| | LRK Home | | Bio Info | | Krash Khronicles | | LAROKE | |
| | BettyLou | | BillyBob's Garage | | Rat Patrol | | Deerslayer | | Elvira | |
| | Land of the Free and Home of the Brave | |
| | Keppylou's Art | | WWI Soldier's Diary | |
BillyBob Work-in-Progress Log
![]()
WHAT'S NEW is a chronological listing of updates to the BillyBob site.
![]()
TRUCK LINKS including vendor sites for old parts, custom parts, and tools as well as sites for classic car and truck organizations
STORE Operating in association with Amazon.com, books, recordings and tools can be purchased.
PLANNING for the restoration including project schedule and cost estimates.
![]()
TRAVELS WITH BILLYBOB With apologies to Steinbeck, this area of BillyBob's Garage will be used to log the trips BillyBob and I make together.
WORK-IN-PROGRESS is the restoration of parts of BillyBob that I can accomplish without a garage.
PRE-RESTORATION includes log entries of minor repairs and adventures between time of purchase and the time when I started restoration, a piece at a time.
JR'S KORNER JR's Korner is the history of BillyBob before I got him authored by my brother, Wm. C. Kephart.
![]()
BILLYBOB MAINTENANCE Ever changing detailing, oil change, lube, etc. maintenance routines specifically developed for BillyBob, including required tools, materials and procedures.
PARTS SHOP The Parts Shop is a repository of How-To articles. Things that I have done over and over enough times to have developed a procedure. This gives me a checklist and saves brain cells.
STEALTH SHOP Urban residence design with large integrated shop and separate living quarters for a relative or renter.
![]()
You will need the Adobe Acrobat browser plugin to view these wiring diagrams which are in the PDF file format. This format allows zooming and panning. If you don't have this plugin, it can be downloaded and installed (free) from the Adobe site. The button below will take you there.
![]()
BILLYBOB WIRING DIAGRAM Here's the wiring diagram updated with BillyBob's current state 'cepting the third-party strap-on turn-signal director.
STRAP-ON TURN-SIGNAL DIRECTOR/BRAKE LIGHT CIRCUIT This turn signal and brake light circuit diagram shows the current state of the third-party turn-signal director wiring, which will remain in place until I figure out the problems with the OEM turn-signal director. It also shows the OEM headlight switch.
38. Chassis Chazzmeteria
April 9th 2005 Yeah, I don't know what that made up word means either. It was coined by one of my co-workers for all the nasty, time-consuming, little adjustments you need to make to CADD drawings to clean them up after a less skillful operator has worked on them. My co-worker is not Jewish but I think he made it up from the Yiddish "Chazzerai" which means pig slop, garbage, any kind of junk. I needed a catchy title an' and all my brainpower is being drained by my tax return so this is the best I could come up with.
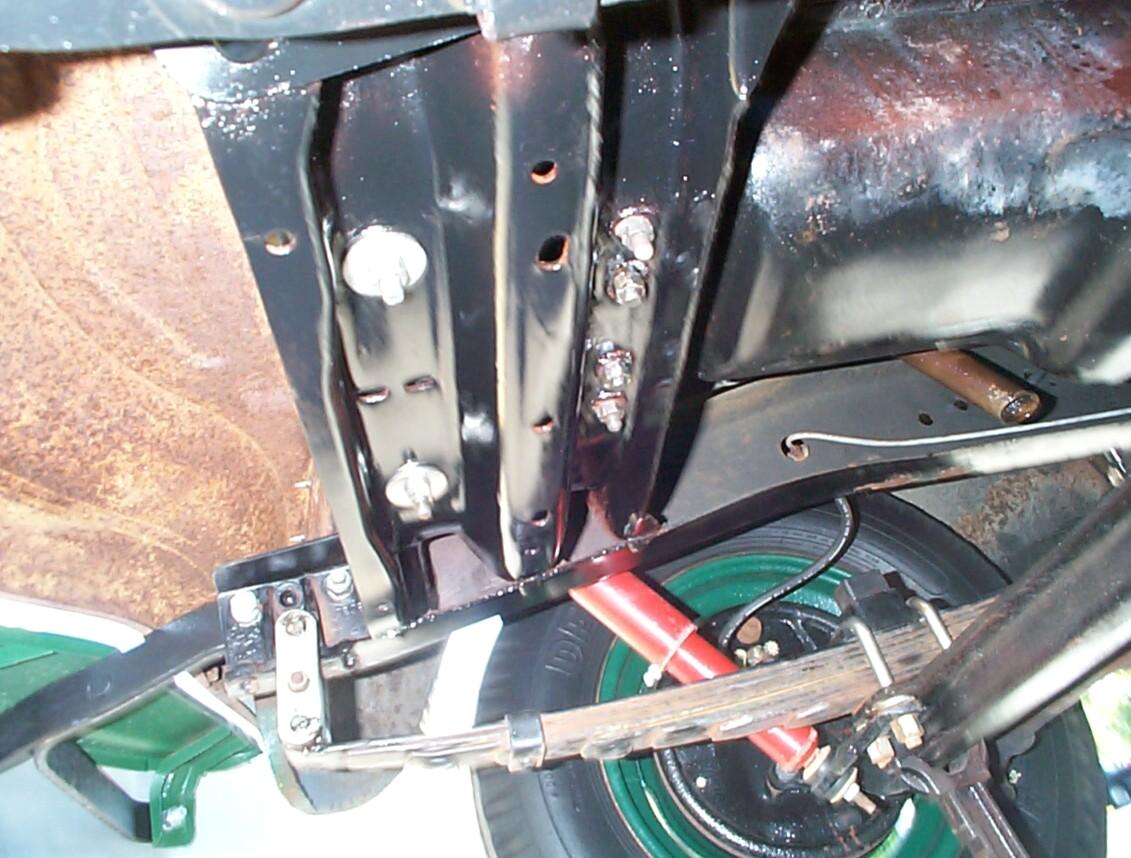
Good weather day. Started out by putting BillyBob's front end up on jackstands and finishing the front crossmember bottom. Recieved stainless steel hex nuts, flat and lock washers during the week for the radiator support. Strength 8 equivalent stainless hex nuts are expensive but this is, I believe, a structural area (the term radiator "support" cued me). Removed the old nuts and washers again and masked the bolts. PRE Paint prepped and finished with Eastwood's rattlecan Chassis Black.
 While
the paint was drying, the gearshift linkage at the transmission was
removed for a tumbler
cleaning. Rooted thru my various boxes of nuts, bolts and
washers for a second backup set. Found that I had new hardware for most
items. After the tumbler session, the hardware I didn't have spares for
was tin-zinc plated and
tossed in the tumbler for a polishing session. Masked off the bottom of
the radiator support and touched up the underhood black paint. Finished
by putting the new stainless steel washers and hex nuts on the radiator
support carriage bolts.
While
the paint was drying, the gearshift linkage at the transmission was
removed for a tumbler
cleaning. Rooted thru my various boxes of nuts, bolts and
washers for a second backup set. Found that I had new hardware for most
items. After the tumbler session, the hardware I didn't have spares for
was tin-zinc plated and
tossed in the tumbler for a polishing session. Masked off the bottom of
the radiator support and touched up the underhood black paint. Finished
by putting the new stainless steel washers and hex nuts on the radiator
support carriage bolts.
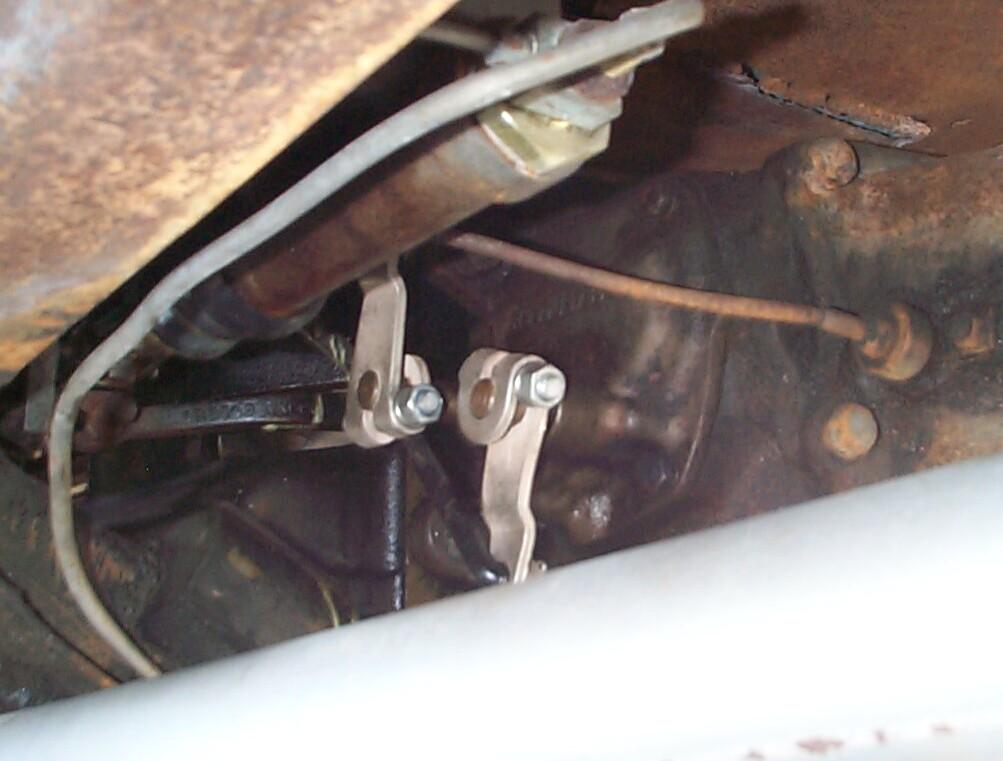 Re-assembled
the transmission shift arms and rods. There's a trick, a sequence to
perform this task and I always forget it. The bottom arm and rod has to
be in place before the top arm is placed on its shaft because of the
tight clearances whereas the natural order of procedure would seem to
be to get both arms on first then both rods. Won't work that way if the
other ends of the rods are already installed in the bellcrank on the
bellhousing.
Re-assembled
the transmission shift arms and rods. There's a trick, a sequence to
perform this task and I always forget it. The bottom arm and rod has to
be in place before the top arm is placed on its shaft because of the
tight clearances whereas the natural order of procedure would seem to
be to get both arms on first then both rods. Won't work that way if the
other ends of the rods are already installed in the bellcrank on the
bellhousing.
April 10th 2005 Blessed with good weather again today. Pulled out the new pressure blaster and went to work on the spare tire carrier again. Only got about thirty minutes in before I ran out of sand. I'm still getting my sea legs with this new blaster and it is going thru sand much faster than I anticipated. More of it is blowing beyond the tarp and is therefore unrecoverable for recycling too. Gonna have to adjust my habits.
While looking fer somethin' else to do, the Panzerwagon was started to charge its battery, something I hadn't done for over a month. Pulled the glove box door out of its ziplock bag next and PRE Paint Prepped the the front for an application of Evercoat Metal-to-Metal filler. Of course, since I haven't done any bodywork for over six months, I've forgotten a lot and, I'm short of some consumables and tools.
April 13th 2005 Earlier in the week, I took the Renegade home to the Krash Pad overnite. The next night when I fired up BillyBob, something was amiss. My sunglasses case and duct tape roll (redneck cup holder) that usually reside on the passenger seat underneath a towel were rolled up tightly in the towel and placed on the driver side like a pillow. There was also a slight unpleasant musty odor to BillyBob's cab. There was a concert that night in the park up the street where the bums hang out. Hummm, think I'll try to fix BillyBob's door locks this weekend.
 April
16th 2005 Cool with 30%
chance of rain forecast for today. Received some goodies during the
week from a couple of EBay auctions. A Ranco valve and control rod for
the deluxe fresh air heater and a pair of parking brake chassis
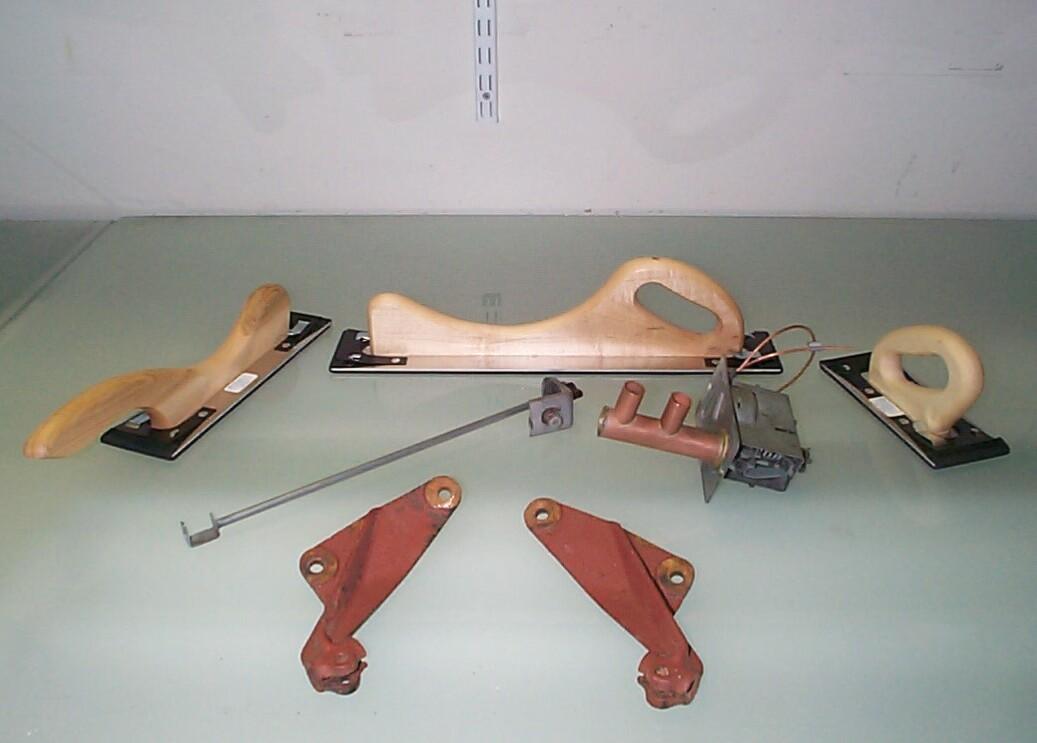
brackets. Also got small, medium and large sanding boards from Eastwood.
April
16th 2005 Cool with 30%
chance of rain forecast for today. Received some goodies during the
week from a couple of EBay auctions. A Ranco valve and control rod for
the deluxe fresh air heater and a pair of parking brake chassis
brackets. Also got small, medium and large sanding boards from Eastwood.
Dragged out the tools and put BillyBob's front end up on jackstands again. A few weeks back when the wheels were detailed, they were swapped, from left to right, for tire rotation purposes. BillyBob has, since then, developed a nasty front end vibration. Everything will be fine until we hit a road bump at a speed between 45 and 50 and then the front end starts an oscillation like to shake your teeth out until the truck slows down considerably. Front end suspension appears to be fine. I noticed that one of the wheel weights I applied when I changed an inner tube sometime back is now missing and the other wheel has no weights at all. Gonna drag the static balancer and weights down from the warehouse next week and balance the front wheels to see if that makes the problem go away.
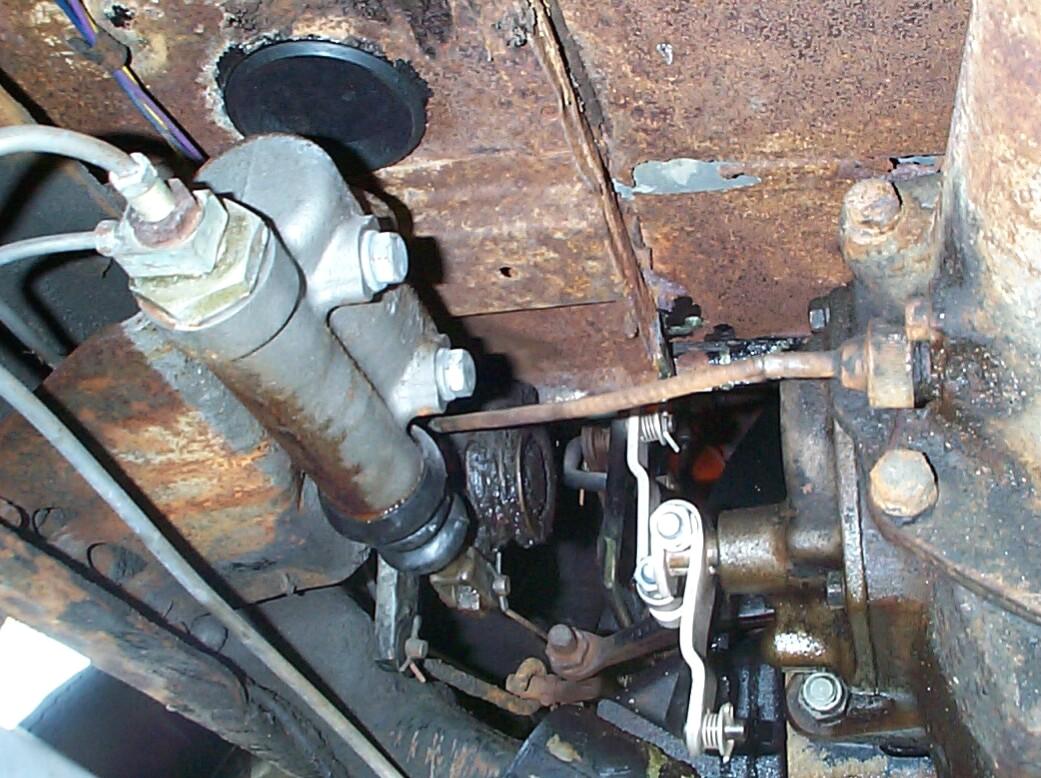 First
order of business today is master
cylinder detailing. It's lookin' a bit ratty. Cleaned,
masked, PRE Paint prepped and touched up with Eastwood's Spray Gray
rattlecan lacquer. While that was drying, the Ranco valve and control
were bagged for storage until I get around to restoring the heater I'd
picked up on another EBay auction. Earlier this week, a fella named
David Smith e-mailed me asking if I had a source for the heater control
rod grommet. Timing is everything. Before I bagged it, I disassembled
the control rod and measured the grommet. It's a simple one-hole
grommet that measures approximately 1" OD, 1/4" ID, 3/8" thick with a
1/16" slot that fits in a 3/4" hole in the underdash bracket. I found
one that is close (all dimensions same 'cept thickness which is 1/4")
at McMaster-Carr. It is number "9307K64". That's the good news. The bad
news is that they sell in packs of 25.
First
order of business today is master
cylinder detailing. It's lookin' a bit ratty. Cleaned,
masked, PRE Paint prepped and touched up with Eastwood's Spray Gray
rattlecan lacquer. While that was drying, the Ranco valve and control
were bagged for storage until I get around to restoring the heater I'd
picked up on another EBay auction. Earlier this week, a fella named
David Smith e-mailed me asking if I had a source for the heater control
rod grommet. Timing is everything. Before I bagged it, I disassembled
the control rod and measured the grommet. It's a simple one-hole
grommet that measures approximately 1" OD, 1/4" ID, 3/8" thick with a
1/16" slot that fits in a 3/4" hole in the underdash bracket. I found
one that is close (all dimensions same 'cept thickness which is 1/4")
at McMaster-Carr. It is number "9307K64". That's the good news. The bad
news is that they sell in packs of 25.
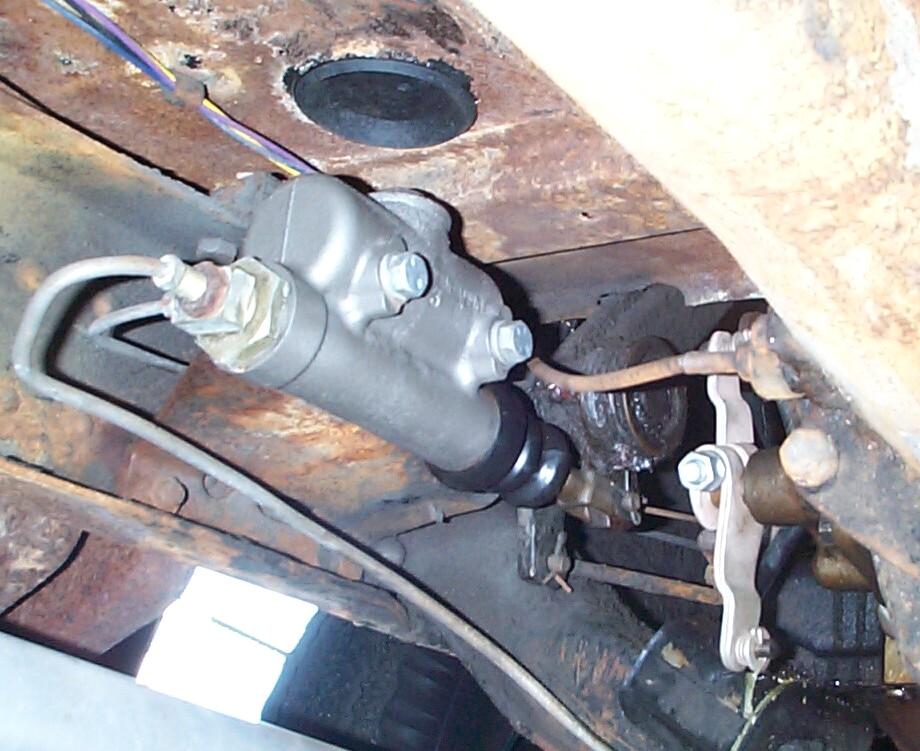 Removed
the masking from around the master cylinder and treated the rubber boot
with protectant. Removed each master cylinder bolt, one at a time, and
replaced it with a clean one using threadlocker blue. These bolts
thread into a plate behind the frame bracket. If you remove them both,
the plate will fall and it will be more difficult to line up again.
Removed
the masking from around the master cylinder and treated the rubber boot
with protectant. Removed each master cylinder bolt, one at a time, and
replaced it with a clean one using threadlocker blue. These bolts
thread into a plate behind the frame bracket. If you remove them both,
the plate will fall and it will be more difficult to line up again.
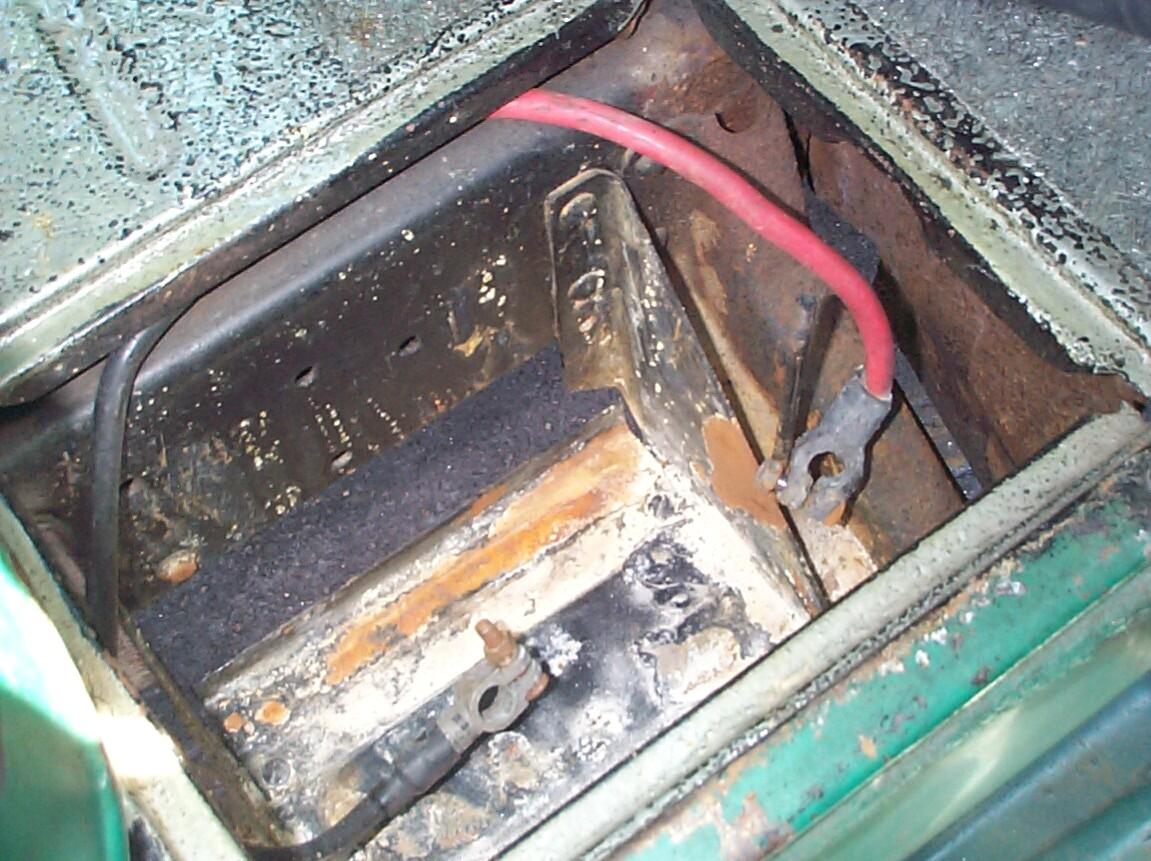 Next,
the battery was removed to spruce up the battery box. It took a beating
when I was fiddling around trying to make the Antique Auto Battery
work. All the acid leaching out of that thing ate the battery box up a
bit. Used CRC Battery Cleaner till that ran out. Washed with water,
dried it, then went after it with wire cup in the electric angle
grinder. After cleanup, it was PRE Paint Prepped and given a rattlecan
coat of Rust Encapsulator. While waiting on the paint again, I turned
my attention to the battery.
Next,
the battery was removed to spruce up the battery box. It took a beating
when I was fiddling around trying to make the Antique Auto Battery
work. All the acid leaching out of that thing ate the battery box up a
bit. Used CRC Battery Cleaner till that ran out. Washed with water,
dried it, then went after it with wire cup in the electric angle
grinder. After cleanup, it was PRE Paint Prepped and given a rattlecan
coat of Rust Encapsulator. While waiting on the paint again, I turned
my attention to the battery.
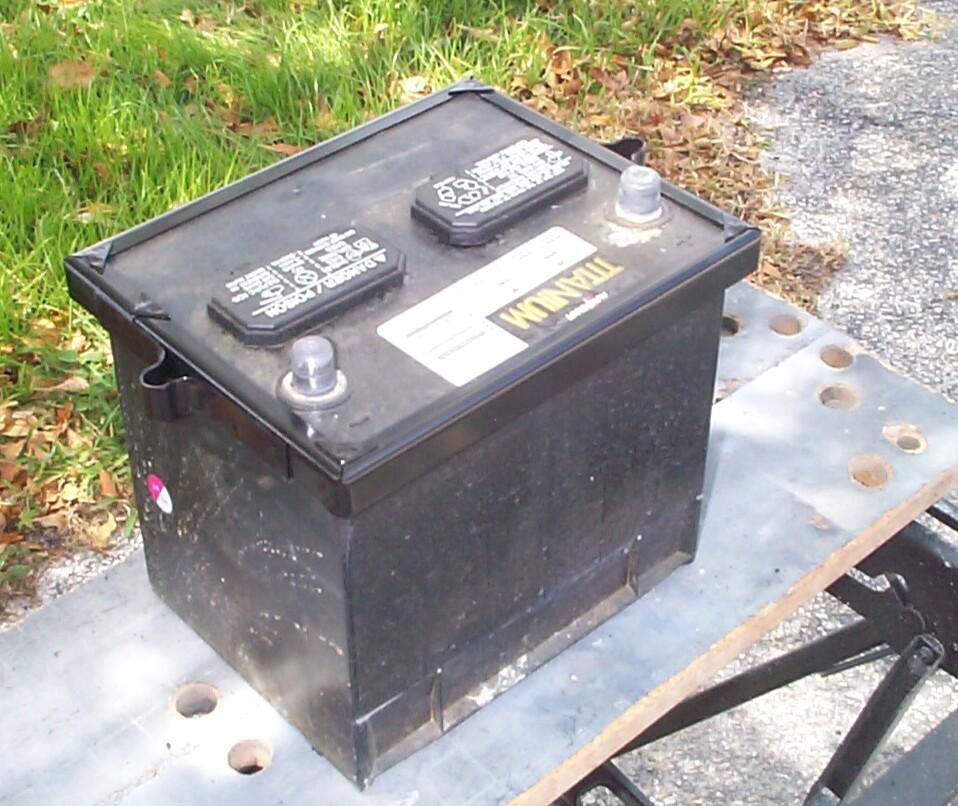 This
AutoCraft battery has been doin' fine since I installed it to replace
the defective Antique Auto Battery. Since I'm pretty shure now I won't
have to cart it back to Discount Auto Parts, I got out the 3"
air-powered cut-off wheel and removed the molded extrusions on the ends
for the built-in carry strap. Now the repop battery retainer will fit
when I put it back in BillyBob tomorrow. Then, the battery was cleaned
and checked with the multi-meter. After two hours had passed, the
battery box was given a coat of Chassis Black and BillyBob was put back
on the ground again.
This
AutoCraft battery has been doin' fine since I installed it to replace
the defective Antique Auto Battery. Since I'm pretty shure now I won't
have to cart it back to Discount Auto Parts, I got out the 3"
air-powered cut-off wheel and removed the molded extrusions on the ends
for the built-in carry strap. Now the repop battery retainer will fit
when I put it back in BillyBob tomorrow. Then, the battery was cleaned
and checked with the multi-meter. After two hours had passed, the
battery box was given a coat of Chassis Black and BillyBob was put back
on the ground again.
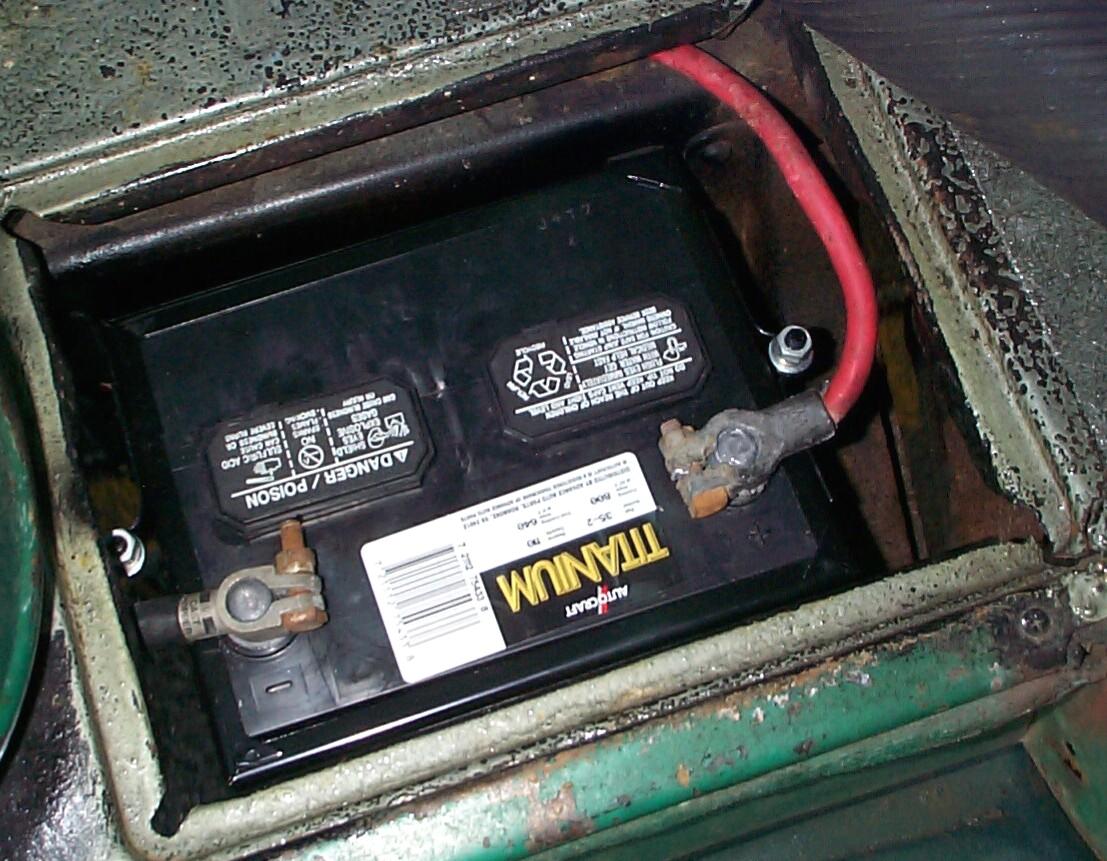 April
17th 2005 Cool today
and a bit windy. Started out by putting the battery back in BillyBob
and bolting on the new retainer. I had been using 5/16"-18 wingnuts but
the FAM (Factory Assembly Manual) shows hex nuts over lock washers,
over flat washers so that's what I used (with threadlocker blue).
Decided to risk the wind and set up the sand blaster. Picked up two
hundred pounds of blasting sand from Home Depot on Friday an' boy, was
that fun! The pallet was on the second tier and every fifty pound bag
was above my head. In addition, somebody had managed to break a bag of
cement over the pallet and the stuff was everywhere. No orange shirts
in sight. I managed the chore on my own.
April
17th 2005 Cool today
and a bit windy. Started out by putting the battery back in BillyBob
and bolting on the new retainer. I had been using 5/16"-18 wingnuts but
the FAM (Factory Assembly Manual) shows hex nuts over lock washers,
over flat washers so that's what I used (with threadlocker blue).
Decided to risk the wind and set up the sand blaster. Picked up two
hundred pounds of blasting sand from Home Depot on Friday an' boy, was
that fun! The pallet was on the second tier and every fifty pound bag
was above my head. In addition, somebody had managed to break a bag of
cement over the pallet and the stuff was everywhere. No orange shirts
in sight. I managed the chore on my own.
Unfolded the tarp this time to double its coverage. This makes the tarp lighter and more subject to wind disturbance, but I need to recover more sand for recycling and avoid turning my Boss's parking lot into a beach. We don't want refugee boats sailing up the alley (unless it's an old chebby truck on floats, that is).
 The
wind wasn't too bad when I started but it got progressively worse. I
had some trouble with the blaster too. It's a 110 lb capacity but I
found when I loaded it up with 100 pounds of sand, It didn't work very
well for me. I reverted to 50 pound cycles again and did much better. I
was determined to get all the tire carrier parts blasted today. By the
time I was done, the wind was picking up the edge of my tarp and
dragging my paver stone anchors almost continously. At the end, I still
had enuf sand in the tank to blast one of the parking brake brackets I
gotten from the EBay auction. PRE Paint Prepped all the blasted items
and hung them up in BillyBob's tree for a coat of Rust Encapsulator.
The wind made that task problematic too.
The
wind wasn't too bad when I started but it got progressively worse. I
had some trouble with the blaster too. It's a 110 lb capacity but I
found when I loaded it up with 100 pounds of sand, It didn't work very
well for me. I reverted to 50 pound cycles again and did much better. I
was determined to get all the tire carrier parts blasted today. By the
time I was done, the wind was picking up the edge of my tarp and
dragging my paver stone anchors almost continously. At the end, I still
had enuf sand in the tank to blast one of the parking brake brackets I
gotten from the EBay auction. PRE Paint Prepped all the blasted items
and hung them up in BillyBob's tree for a coat of Rust Encapsulator.
The wind made that task problematic too.
Some restorers would use filler to smooth out the chassis parts before painting to make them look new. I hate rust but bumps and character lines from a long life of bad roads don't bother me. They remind me of BillyBob's adventures, both the ones I know about like Outraged Citizenry and Six Days on the Road, and the ones I don't know about like his life in the Pennsylvania coal fields. Finished up the weekend by building a McMaster-Carr hardware order on the Internet.
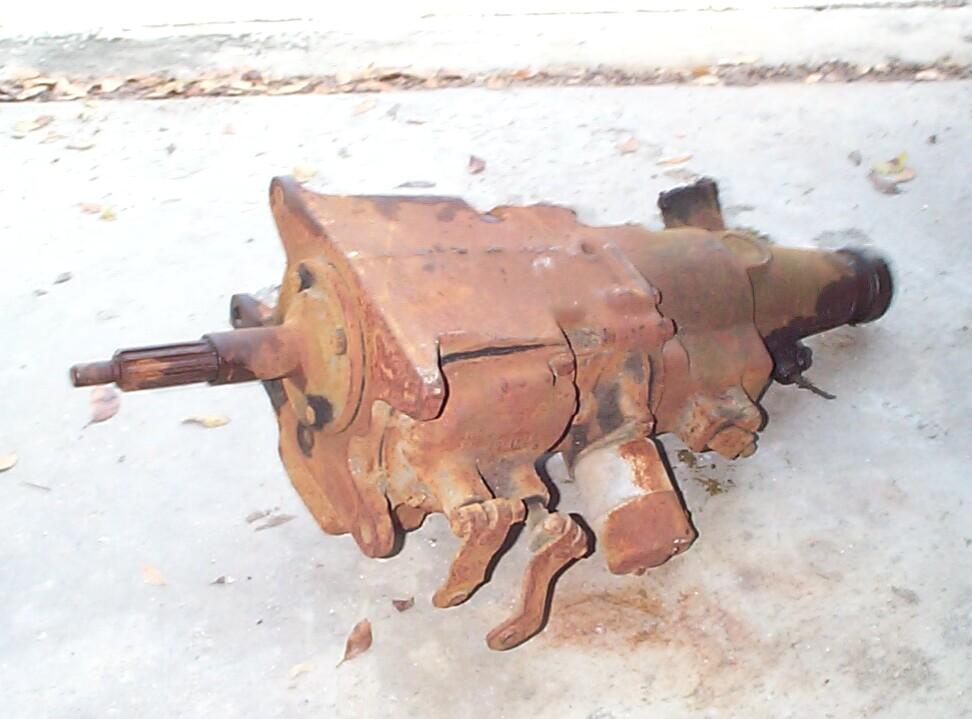 April
22nd 2005 A fellow
stovebolter, Gwyn Reedy, was selling off his collection at the stovebolt.com
swapmeet. I bought a 55-60ish three speed with Borg-Warner overdrive,
complete with solenoid and governor from him. Gwyn lives outside Tampa
and he's a semi driver by profession. Rather than shipping it to Boca
Raton, he offered to haul it around in his truck until he got a South
Florida run if I wasn't in a hurry. I wasn't. Gwyn called me last night
and told me his dispatcher had gotten him a drop-off load in West Palm
Beach and a pickup load in Pompano Beach. I met him this morning at the
Pompano loading docks in BillyBob so I'd be easy to spot. I forgot my
camera so I didn't get a shot of Gwyn. He was glad for that since he's
been on the road awhile and feelin' a bit ragged. He looked fine to me.
It wouldn't have broken the camera. I'll take this thing up to the
warehouse for storage until I find time for a tear-down and inspection.
April
22nd 2005 A fellow
stovebolter, Gwyn Reedy, was selling off his collection at the stovebolt.com
swapmeet. I bought a 55-60ish three speed with Borg-Warner overdrive,
complete with solenoid and governor from him. Gwyn lives outside Tampa
and he's a semi driver by profession. Rather than shipping it to Boca
Raton, he offered to haul it around in his truck until he got a South
Florida run if I wasn't in a hurry. I wasn't. Gwyn called me last night
and told me his dispatcher had gotten him a drop-off load in West Palm
Beach and a pickup load in Pompano Beach. I met him this morning at the
Pompano loading docks in BillyBob so I'd be easy to spot. I forgot my
camera so I didn't get a shot of Gwyn. He was glad for that since he's
been on the road awhile and feelin' a bit ragged. He looked fine to me.
It wouldn't have broken the camera. I'll take this thing up to the
warehouse for storage until I find time for a tear-down and inspection.
April 23rd 2005 Beautiful day. Met 'nother stovebolter, John Ray, at Einstein's Bagles for coffee first thing. John found the BillyBob site at Easter time and e-mailed me. He has his Uncle's '54 Half-ton chebby pickup truck. It has about 71,000 original miles and is in much better shape than BillyBob. We compared the trucks in the parking lot. This time, I remembered to take my camera. The bad news is that once I started working my jaw, I fergot to snap any pictures of the trucks together. Darn! John did e-mail some pics of his truck to me earlier in the week 'tho and here's an example. After we split up, I took the overdrive tranny up to the BillyBob warehouse and picked up the tire balancing equipment to bring back to the Krash Lab with me.
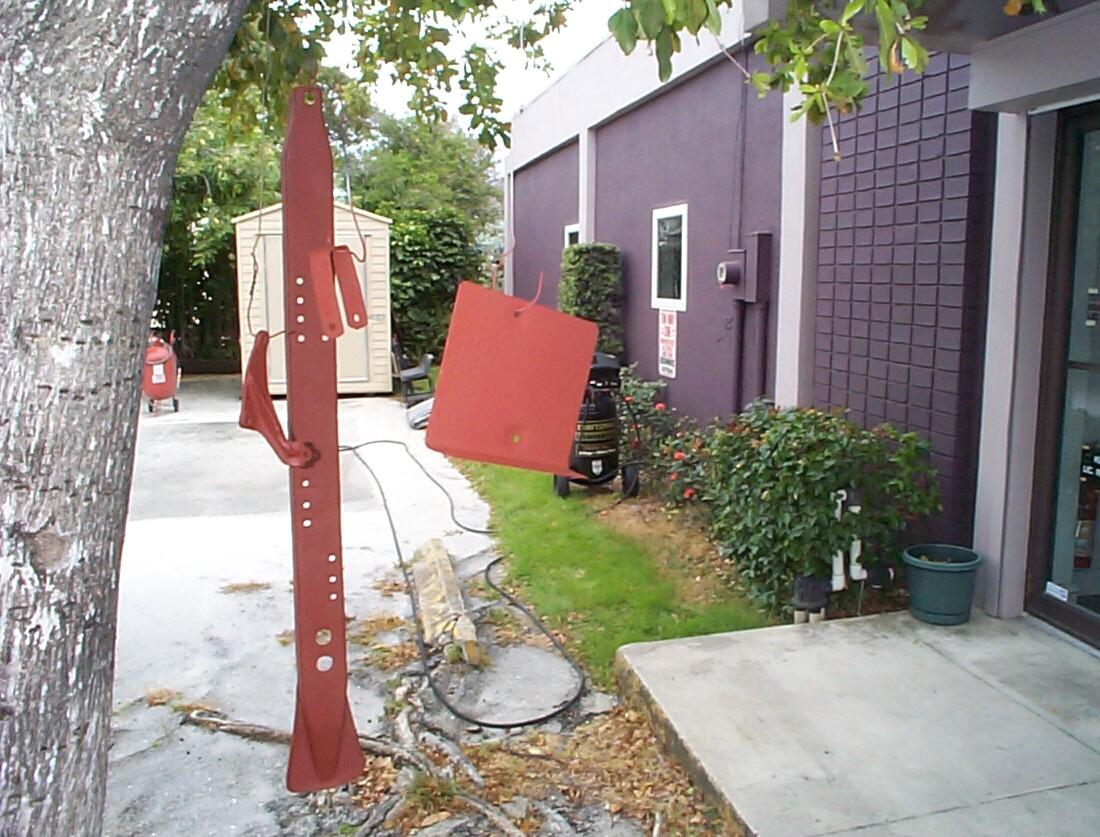
 After
the tools were dragged out, the tire carrier parts and parking brake
bracket were hung up in BillyBob's tree again and PRE Paint Prepped.
Gave the items a rattlecan coat of Chassis Black, then turned my
attention to the exhaust
system detailing. It's beginning to corrode again. Removed
all the clamps and cataloged
the fasteners. Spent a good part of the afternoon cleaning
the clamps with sanding cones, wire wheels and anything else I could
lay my hands on, none of it very satisfactory.
After
the tools were dragged out, the tire carrier parts and parking brake
bracket were hung up in BillyBob's tree again and PRE Paint Prepped.
Gave the items a rattlecan coat of Chassis Black, then turned my
attention to the exhaust
system detailing. It's beginning to corrode again. Removed
all the clamps and cataloged
the fasteners. Spent a good part of the afternoon cleaning
the clamps with sanding cones, wire wheels and anything else I could
lay my hands on, none of it very satisfactory.
April 24th 2005 'Nother good weather day 'cept for some wind under the shadetree. I'm counting my blessings 'cause ole truckers in Michigan are dealing with six inches of white global warming on the ground today. Started out by PRE Paint Prepping the exhaust system clamps and straps and giving the bare spots with Eastwood's Self Etching Primer. Left that to dry and put BillyBob's front end up on jackstands. Removed the front wheels and static balanced them. The driver's side wheel (the bouncing one) took four ounces of weight. I put on two two-ounce weights, one on the inside rim and one on the outside. After I pried off the remaining 1/2 ounce weight from the other wheel, it needed no weights at all. Confusing. I may not have this procedure down pat yet. Put the wheels back on BillyBob. We'll see if the vibration problem goes away now.
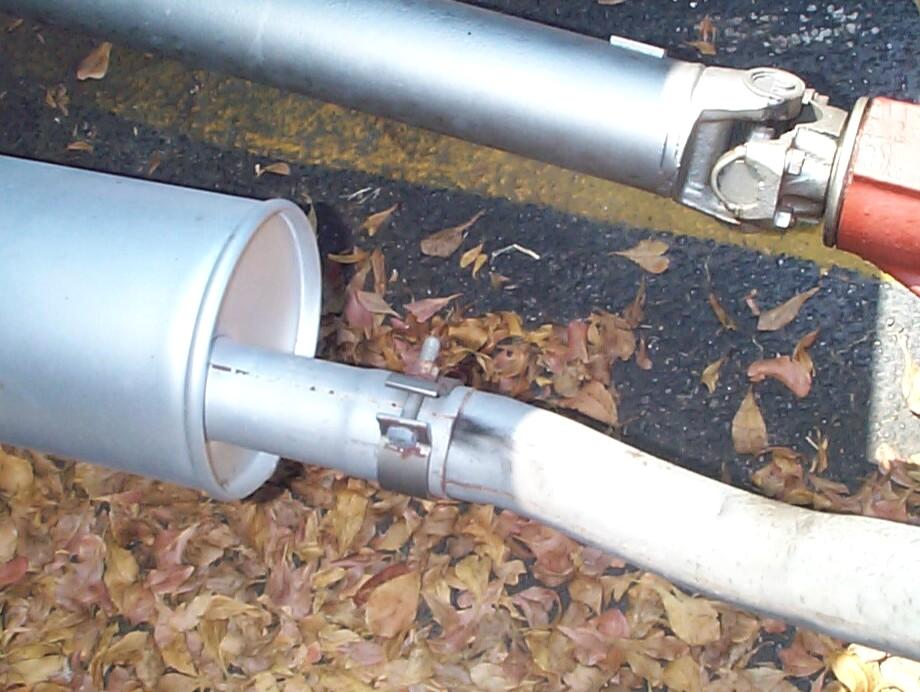
 Cleaned
the exhaust pipe with a 3M Scuff Pad, PRE Paint Prepped it and applied
Eastwood's rattlecan Exhaust Paint. Put BillyBob's front end back on
the ground and moved the jackstands to the rear axle. Took care of the
muffler and tail pipe the same way then came back with a brush and
chassis black to take care of areas that took some exhaust paint
overspray. Then, the two tire carrier pieces were reassembled with
5/16" - 18 x 3/4" cap screws and hex nuts. No lock washers, no
threadlocker. Since these are replacing the original rivets, they are
going to be painted in place and the paint should hold them from moving.
Cleaned
the exhaust pipe with a 3M Scuff Pad, PRE Paint Prepped it and applied
Eastwood's rattlecan Exhaust Paint. Put BillyBob's front end back on
the ground and moved the jackstands to the rear axle. Took care of the
muffler and tail pipe the same way then came back with a brush and
chassis black to take care of areas that took some exhaust paint
overspray. Then, the two tire carrier pieces were reassembled with
5/16" - 18 x 3/4" cap screws and hex nuts. No lock washers, no
threadlocker. Since these are replacing the original rivets, they are
going to be painted in place and the paint should hold them from moving.
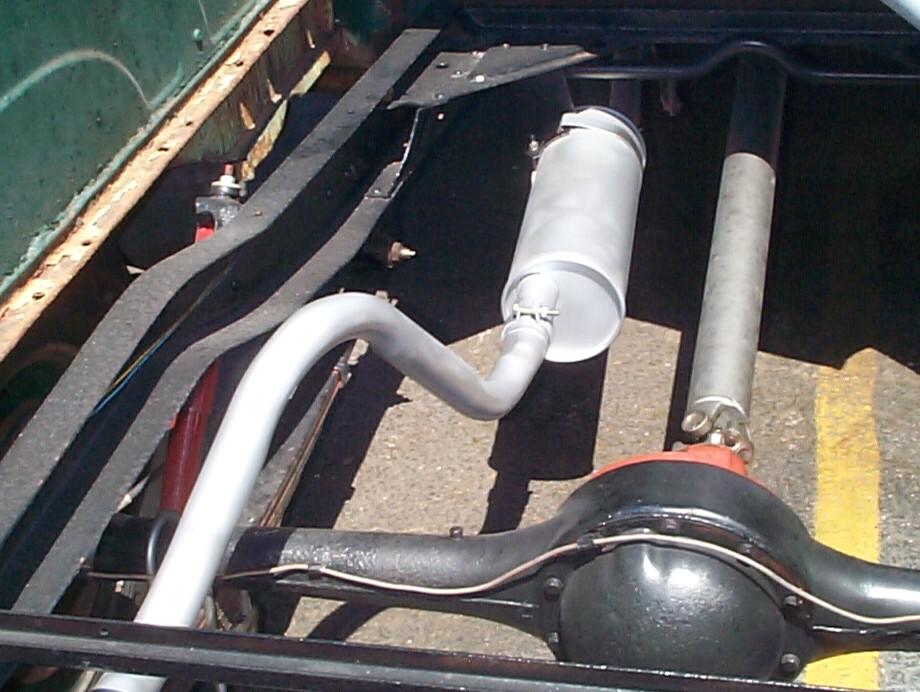 Finished
up the day by re-installing the exhaust pipe muffler clamp, muffler
strap, tail pipe muffler clamp and tail pipe support with new fasteners
and threadlocker blue. That takes care of the exhaust system for this
chassis detailing cycle. The parking brake assembly will be next.
Finished
up the day by re-installing the exhaust pipe muffler clamp, muffler
strap, tail pipe muffler clamp and tail pipe support with new fasteners
and threadlocker blue. That takes care of the exhaust system for this
chassis detailing cycle. The parking brake assembly will be next.
April 30th 2005 The good weather streak continues. After the monthly maintenance routine, I removed the battery and put it on the trickle charger. I've developed charging problems after I "fixed" the alternator wiring a few weeks back. The ammeter needle doesn't jerk around anymore, it just doesn't stay in the middle. If the lights are out, it charges slightly at idle, then the needle goes up in direct proportion to increasing engine RPM. With the lights on, the behavior is the same 'cept the needle is in a slight discharge position at idle and goes up from there. I've been checking battery voltage with my multi-meter every day this week and it's a little lower each day. This morning, it was at 12.07 volts and that's why I'm charging it.
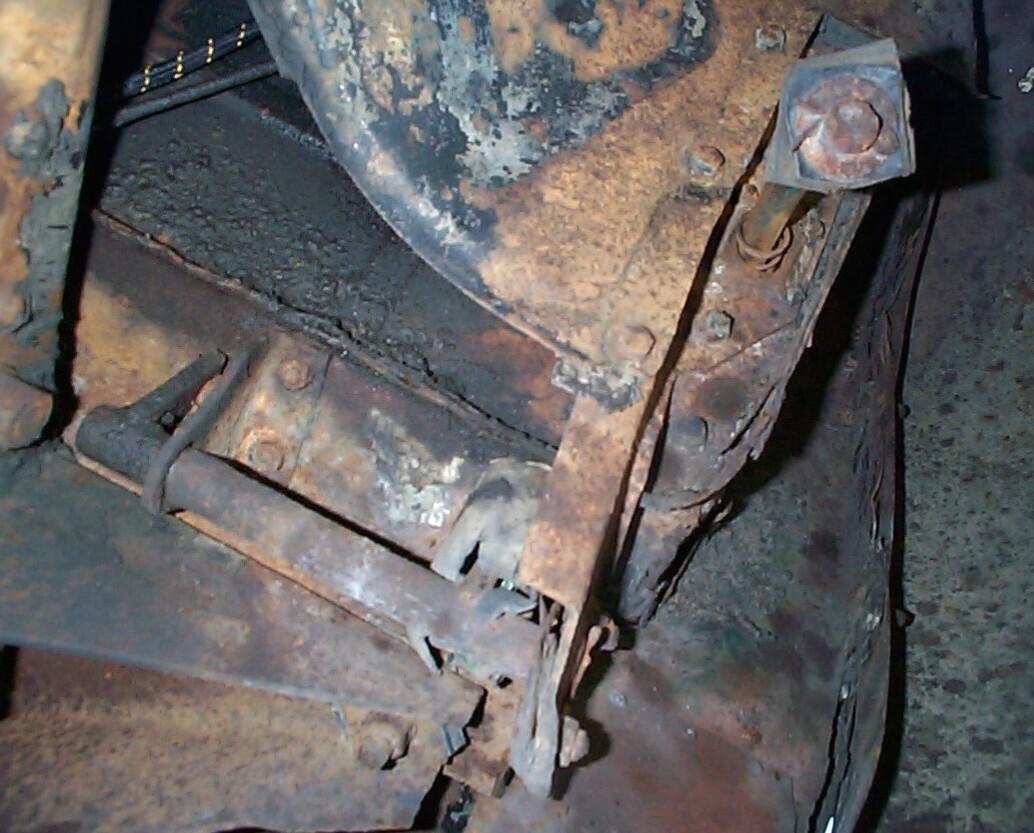
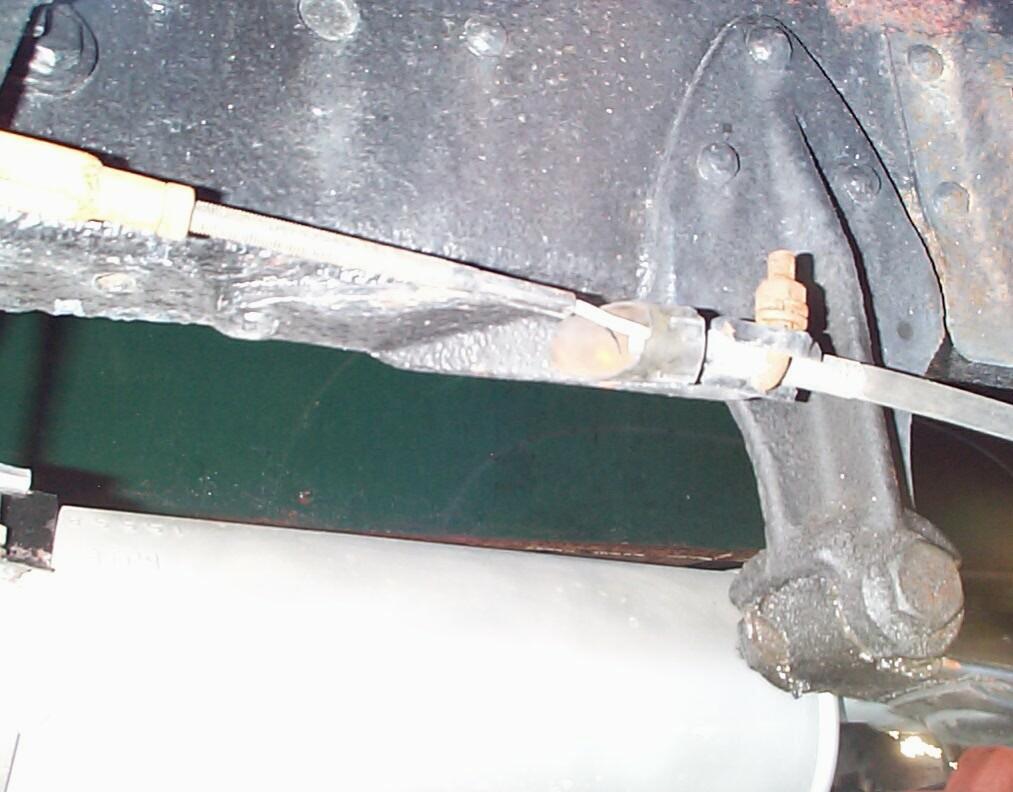 Today,
I start spiffin' up the parking brake assembly.
It's been awhile since it's had any attention and it's showing the
neglect. This is a current shot of the driver side bracket and cable
where JR employed his J-bolt solution to the broken clamp problem first
documented in this log
entry. When I duplicated his efforts, I couldn't get the
J-bolt tight enuf for that warm fuzzy feeling but it's been working
fine despite that. When I saw a pair of these brackets (with intact
clamps) for auction on eBay, I bid and won. Time to replace this
improvised solution.
Today,
I start spiffin' up the parking brake assembly.
It's been awhile since it's had any attention and it's showing the
neglect. This is a current shot of the driver side bracket and cable
where JR employed his J-bolt solution to the broken clamp problem first
documented in this log
entry. When I duplicated his efforts, I couldn't get the
J-bolt tight enuf for that warm fuzzy feeling but it's been working
fine despite that. When I saw a pair of these brackets (with intact
clamps) for auction on eBay, I bid and won. Time to replace this
improvised solution.
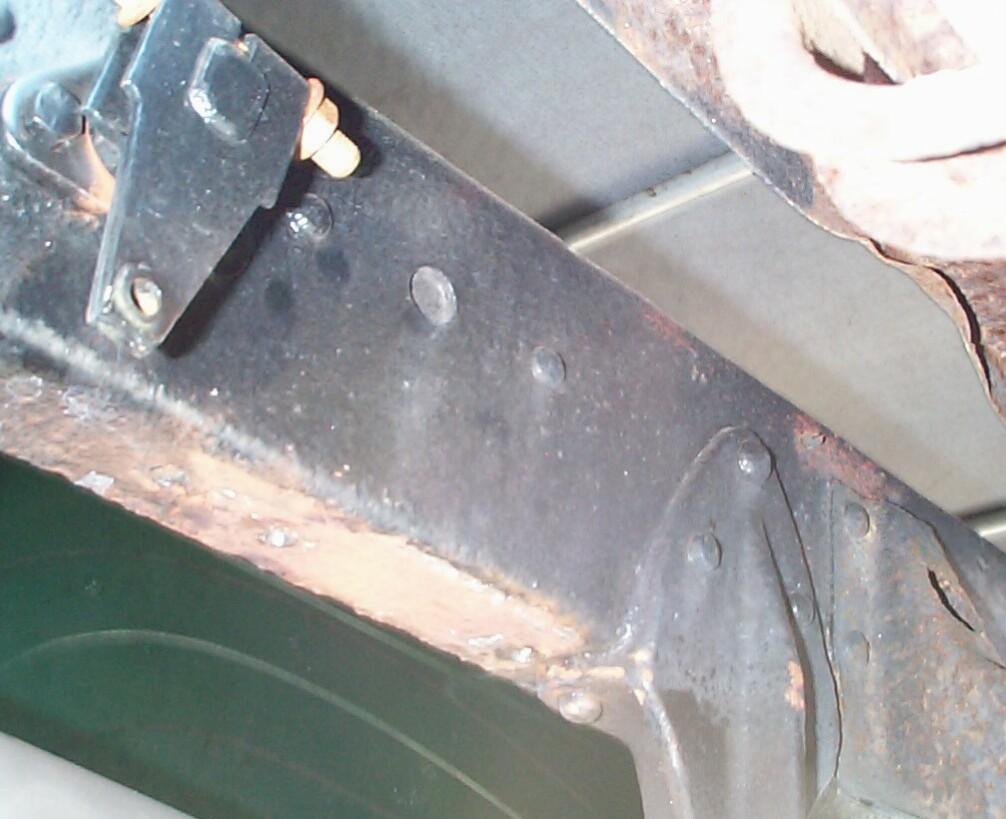 These
brackets were riveted at the factory, so out came the 4" electric angle
grinder. After I got the rivet heads ground off, I hit the bracket for
a few minutes with the four pound sledge but it wasn't going to be that
easy. The MAPP torch was used to heat the bracket bosses around the
rivets and that was enuf to get the bracket off with a few whacks from
the sledge. The rivet nubs were still solidly in the frame, so it was
back to the grinder again. After the nubs were ground off, the rivet
remainders would still not move with punch and hammer work. They go
thru two frame thicknesses as well as the bracket. This is the only
area of the frame that is boxed and the rivets help hold that together
as well. Resorted to drilling them out with 1/4" bit followed by 5/16"
bit. I got the rear drill hole a smidgeon off-center so that hole was
finished with a 3/8" bit.
These
brackets were riveted at the factory, so out came the 4" electric angle
grinder. After I got the rivet heads ground off, I hit the bracket for
a few minutes with the four pound sledge but it wasn't going to be that
easy. The MAPP torch was used to heat the bracket bosses around the
rivets and that was enuf to get the bracket off with a few whacks from
the sledge. The rivet nubs were still solidly in the frame, so it was
back to the grinder again. After the nubs were ground off, the rivet
remainders would still not move with punch and hammer work. They go
thru two frame thicknesses as well as the bracket. This is the only
area of the frame that is boxed and the rivets help hold that together
as well. Resorted to drilling them out with 1/4" bit followed by 5/16"
bit. I got the rear drill hole a smidgeon off-center so that hole was
finished with a 3/8" bit.
The newly exposed frame area was degreased, PRE Paint Prepped and given a coat of Rust Encapsulator followed by Chassis Black after a two hour waiting period. By one in the afternoon, the trickle charger had brought the battery back to 13.21 volts. I put the battery back in BillyBob and will check the voltage again before going home to the Krash Pad to see if it is losing charge by itself.
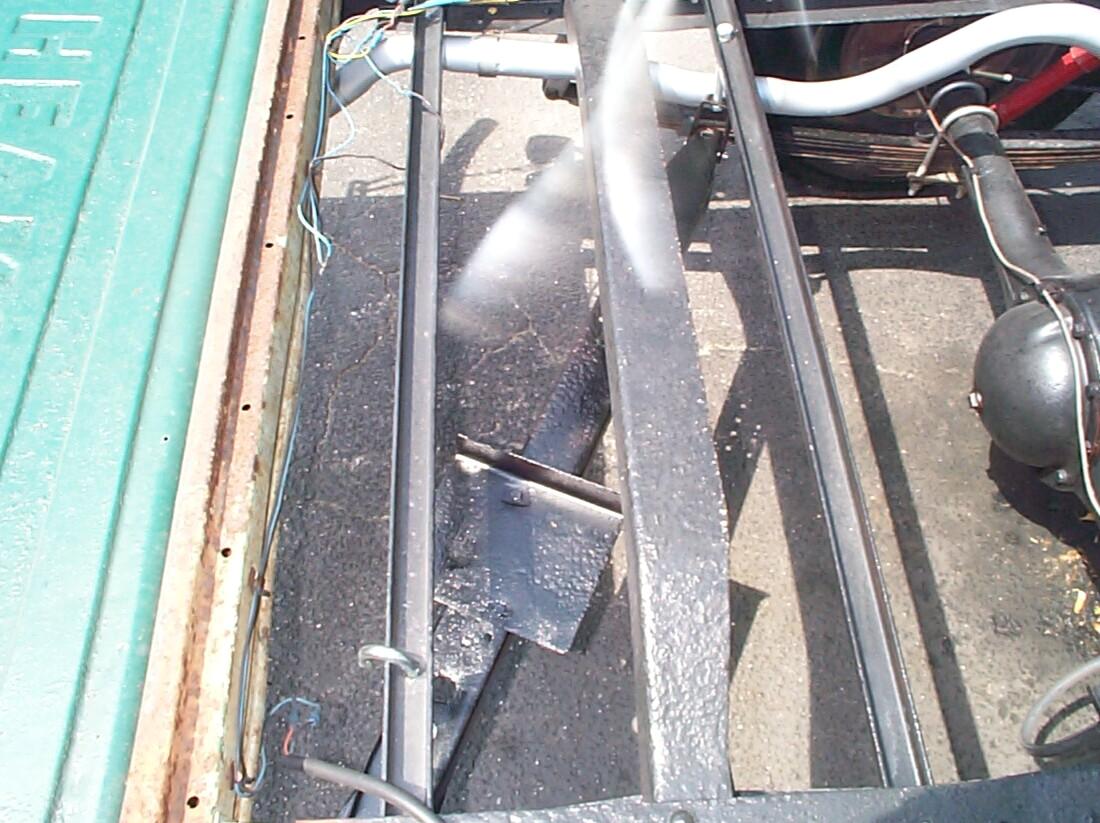
Attached the "new" eBay bracket (that I painted last week) to the frame with 5/16"-18 x 1-1/4" Armorcoat cap screws and hex nuts with flat washers. Sprayed the bolt heads and hex nuts with Chassis Black, then re-connected the parking brake cable for the day. Fastener cleaning will be tomorrow or next week. The cable was clamped in the bracket with a 5/16"-18 x 1-1/4" Armorcoat cap screw and hex nut along with a stainless steel lock washer. Finished up the day installing the spare tire carrier and that didn't work out so well. I'll write about it tomorrow.
May 1st 2005 Eighty percent chance of rain today. A rainy May in Florida leads to statistically fewer Florida hurricanes so I'm not complaining. When I snapped the bed cover back into position yesterday, a section of its edge hem pulled off. The sun has done a number on the stitching. Also, the battery lost voltage. When I connected it to go home, it was down to 12.99 volts. Today, when I measured it after I arrived at the Krash Lab, it was 12.73 volts and I don't know how much of that loss is due to a hard start. The starter chattered quite a bit this morning, during several tries, until it found a tooth to grip on the worn ring gear. ~!@#$%^ Looks like Murphy has me by the short hairs. I'm moving with caution today.
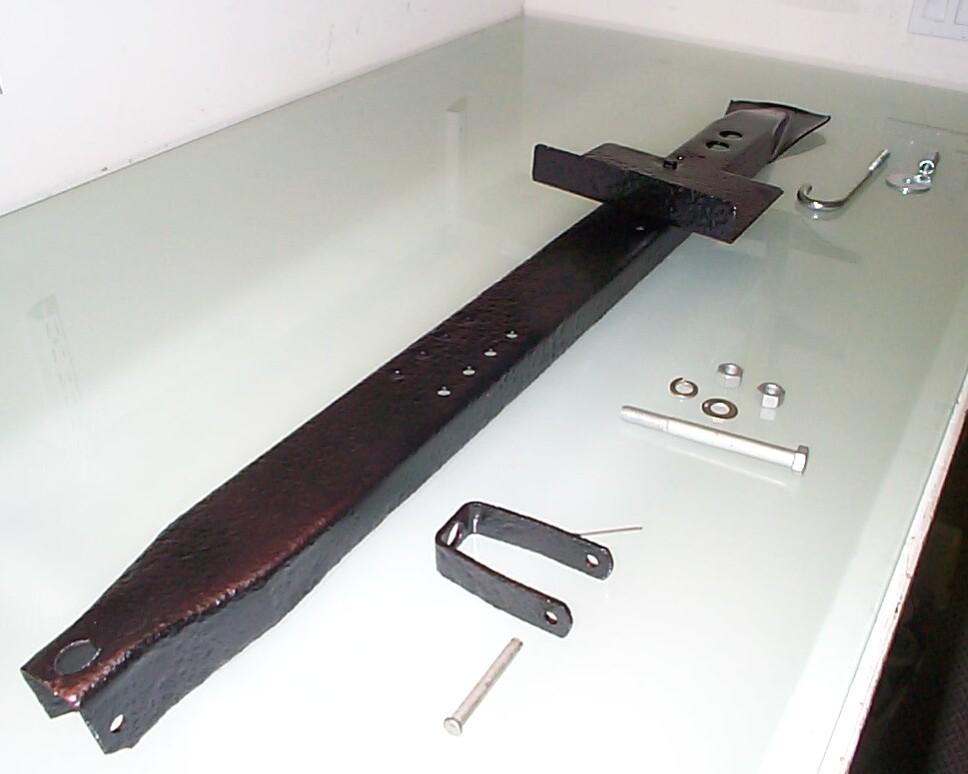 OK,
the wheel carrier. It took me awhile to figure out the hardware needed
but by last week, I had gathered all the fasteners. 1/2"-13 x 5" hex
bolt for the support-to-hinge end along with two hex nuts, flat washer
and lock washer to attach it to the support. 5/16" x 2-1/2" clevis pin
and 3/32" x 1-1/2" cotter pin for the hinge. 1/2"-13 x 8" J-bolt with
1/2"-13 x 1-3/4" hex nut from Chevy Duty for the drop end along with a
17/32" ID 2" OD 1/8" thick fender washer. The fender washer was
necessary because the hole in BillyBob's wheel carrier is much larger
than the one shown in the Factory Assembly Manual. I grunted this thing
into place and adjusted it as shown in the Factory Assembly Manual.
Then I tried to put BillyBob's spare in it. ~!@#$%^!
It's too tight for a 6.50 x 16 in the stock configuration. The FAM
measurement must be for the standard 6.00 x 16 tire. I have to order
longer bolts now!
OK,
the wheel carrier. It took me awhile to figure out the hardware needed
but by last week, I had gathered all the fasteners. 1/2"-13 x 5" hex
bolt for the support-to-hinge end along with two hex nuts, flat washer
and lock washer to attach it to the support. 5/16" x 2-1/2" clevis pin
and 3/32" x 1-1/2" cotter pin for the hinge. 1/2"-13 x 8" J-bolt with
1/2"-13 x 1-3/4" hex nut from Chevy Duty for the drop end along with a
17/32" ID 2" OD 1/8" thick fender washer. The fender washer was
necessary because the hole in BillyBob's wheel carrier is much larger
than the one shown in the Factory Assembly Manual. I grunted this thing
into place and adjusted it as shown in the Factory Assembly Manual.
Then I tried to put BillyBob's spare in it. ~!@#$%^!
It's too tight for a 6.50 x 16 in the stock configuration. The FAM
measurement must be for the standard 6.00 x 16 tire. I have to order
longer bolts now!
 I
can see why these wheel carriers are rare. They are as far from
user-friendly as anything I have ever seen. If I was laying on my back
in the rain wrestling with this thing in the fifties for the first
time, the very first thing I'd do after changing the tire is take this
thing off and throw it in the ditch.
I
can see why these wheel carriers are rare. They are as far from
user-friendly as anything I have ever seen. If I was laying on my back
in the rain wrestling with this thing in the fifties for the first
time, the very first thing I'd do after changing the tire is take this
thing off and throw it in the ditch.
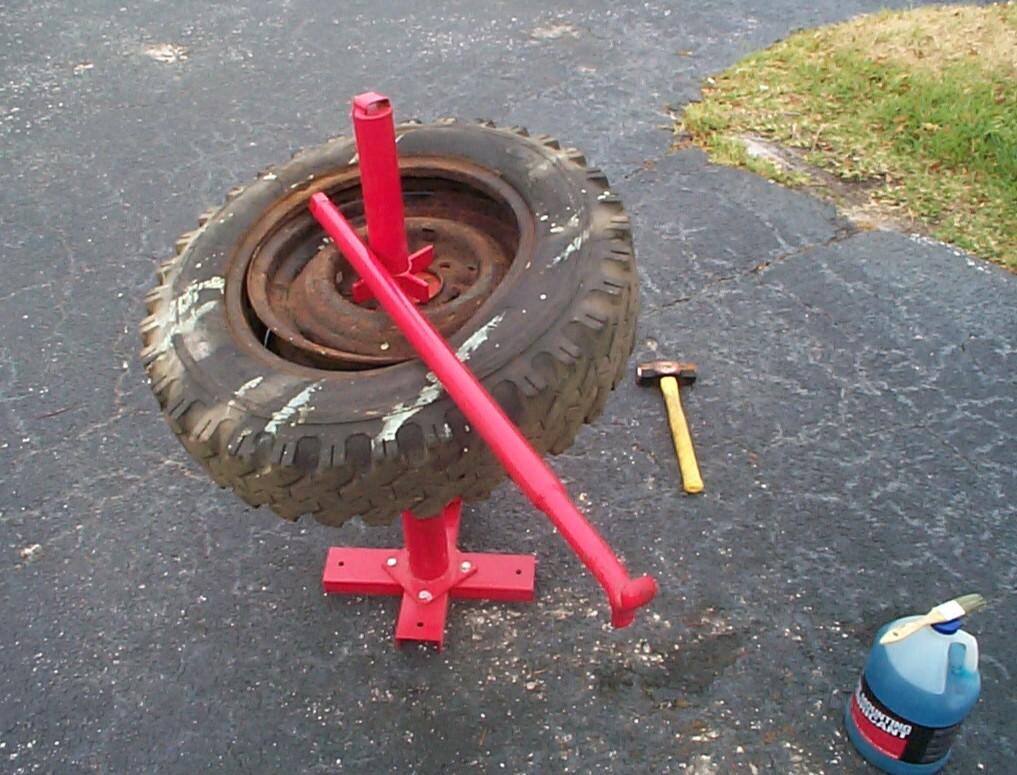 I
kept an eye to the overcast sky and pulled out my Harbor Freight tire
changer and BillyBob's old spare to demount the tire. I'm finally
starting the new tire and wheel restoration gig after talking 'bout it
fer over a year. This tire changer is designed to be bolted down to the
shop floor but I don't have that luxury in the shade tree garage. It is
still doable but you lose a lot of leverage trying to hold the base
with a foot, the centerpost with one hand and the demounting bar with
the other, and cursing for the extra strength that foul language
imparts to the task at hand. When the tire was off, I packed it in for
the day and went home to the Krash Pad to read my electrical
troubleshooting books.
I
kept an eye to the overcast sky and pulled out my Harbor Freight tire
changer and BillyBob's old spare to demount the tire. I'm finally
starting the new tire and wheel restoration gig after talking 'bout it
fer over a year. This tire changer is designed to be bolted down to the
shop floor but I don't have that luxury in the shade tree garage. It is
still doable but you lose a lot of leverage trying to hold the base
with a foot, the centerpost with one hand and the demounting bar with
the other, and cursing for the extra strength that foul language
imparts to the task at hand. When the tire was off, I packed it in for
the day and went home to the Krash Pad to read my electrical
troubleshooting books.
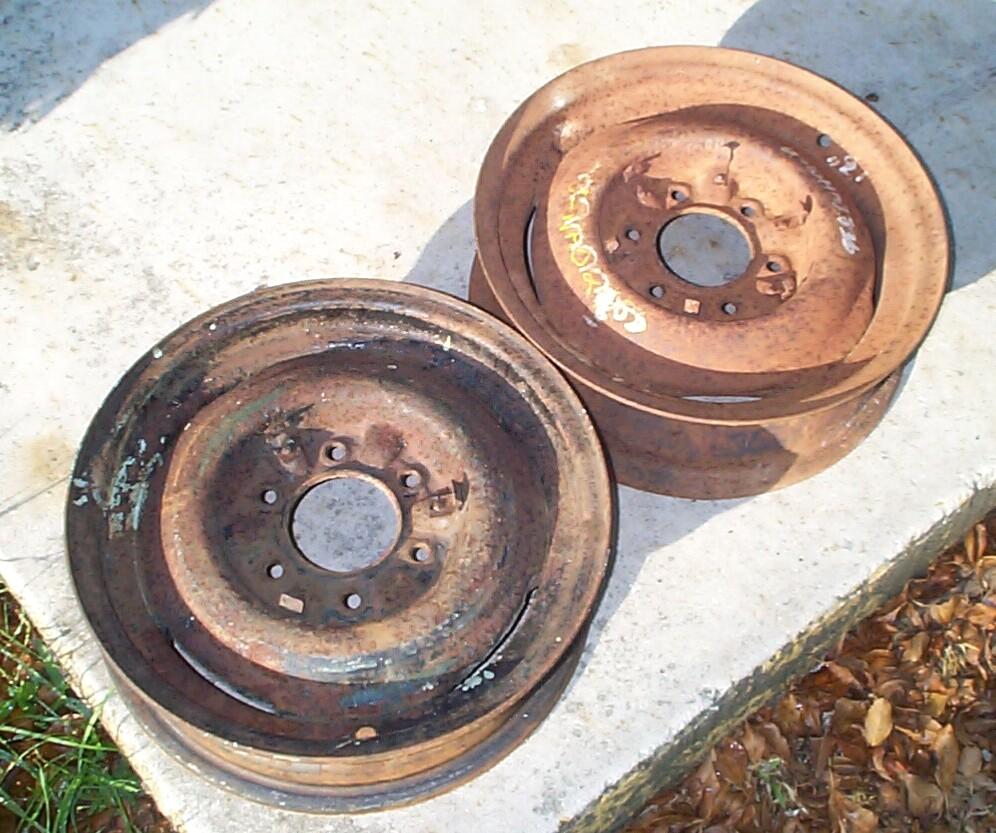 May
7th 2005 It rained hard
most of the week but the good weather is back again today. Now that I
had BillyBob's spare tire off the rim, I could compare the rim to the
used one I got from American
Classic Truck Parts. There were two rim widths to choose from
(1/4" variance) and it looks like I guessed correctly for a change. The
parking brake fasteners were removed next for cleaning and cataloging. The
passenger side brake cable clevis was tight and needed some MAPP torch
heat and penetrating oil persuasion. After all the fasteners were
removed, they were dumped in the tumbler for a cleaning session. The
rubber cable boots are history. I don't know if repop rubber parts are
biodegradable or my efforts with silicone and protectant are destroying
them.
May
7th 2005 It rained hard
most of the week but the good weather is back again today. Now that I
had BillyBob's spare tire off the rim, I could compare the rim to the
used one I got from American
Classic Truck Parts. There were two rim widths to choose from
(1/4" variance) and it looks like I guessed correctly for a change. The
parking brake fasteners were removed next for cleaning and cataloging. The
passenger side brake cable clevis was tight and needed some MAPP torch
heat and penetrating oil persuasion. After all the fasteners were
removed, they were dumped in the tumbler for a cleaning session. The
rubber cable boots are history. I don't know if repop rubber parts are
biodegradable or my efforts with silicone and protectant are destroying
them.
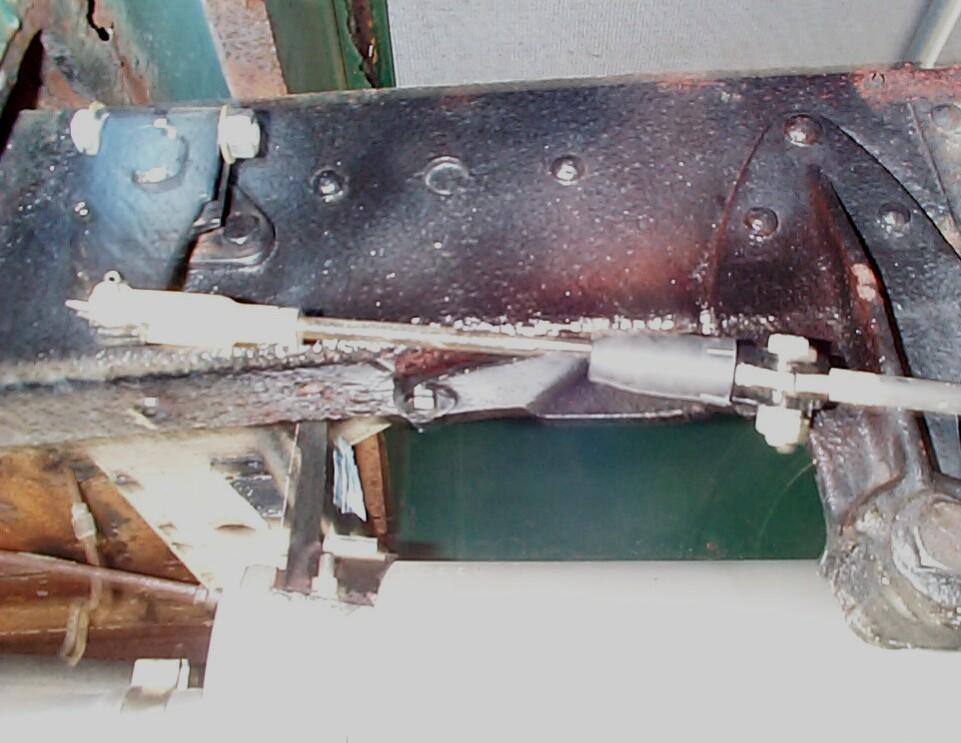
 I've
had a new replacement parking brake rod for a few years now. It
attaches to the pedal assembly at one end and the cross shaft at the
other end and I wanted to try to install it today. When I examined the
pedal assembly at the back of the driver side wheelwell, I changed my
plans. Now I remember why I didn't install the rod when I first got it.
All the parts are so rusted and the working space so confined that I
don't think I can get at the rod/pedal assembly clevis unless I address
the whole assembly. I'll start applying Kroil penetrating oil to this
area on a regular basis and begin to gather all the other replacement
parts I can find in case I break something during disassembly.
I've
had a new replacement parking brake rod for a few years now. It
attaches to the pedal assembly at one end and the cross shaft at the
other end and I wanted to try to install it today. When I examined the
pedal assembly at the back of the driver side wheelwell, I changed my
plans. Now I remember why I didn't install the rod when I first got it.
All the parts are so rusted and the working space so confined that I
don't think I can get at the rod/pedal assembly clevis unless I address
the whole assembly. I'll start applying Kroil penetrating oil to this
area on a regular basis and begin to gather all the other replacement
parts I can find in case I break something during disassembly.
I had new parts on hand for about half the fasteners I needed to reassemble the parking brake assemblies so, the tin-zinc plating kit was set up to re-finish the rest of the fasteners I needed from the cleaning session. The plating process is a bit tejus' so it was performed while watching this weekend's Powerblock segment on Spike TV . . . Well, that didn't work for some reason or another. The plating process just wouldn't initiate. I think the D cell batteries providing the juice were OK. They checked out with the multi-meter. Most likely, the electrolyte solution is shot. I have more but I don't have a container to put the spent stuff handy. I'll just have to bypass plating for today.
 After
Powerblock, the parking brake assembly was bolted back together. I've
mentioned it before but it bears repeating that the way to get the
rubber boots over the threaded cable ends is a lubricant like a drop of
dishwashing soap and the use of bent needle-nose pliers to spread the
small boot opening. External snap-ring pliers work even better if ya
got 'em. OK, that's done fer another cycle. Not quite as purty as I'd
hoped before the plating snafu but good enuf fer govermint work.
After
Powerblock, the parking brake assembly was bolted back together. I've
mentioned it before but it bears repeating that the way to get the
rubber boots over the threaded cable ends is a lubricant like a drop of
dishwashing soap and the use of bent needle-nose pliers to spread the
small boot opening. External snap-ring pliers work even better if ya
got 'em. OK, that's done fer another cycle. Not quite as purty as I'd
hoped before the plating snafu but good enuf fer govermint work.
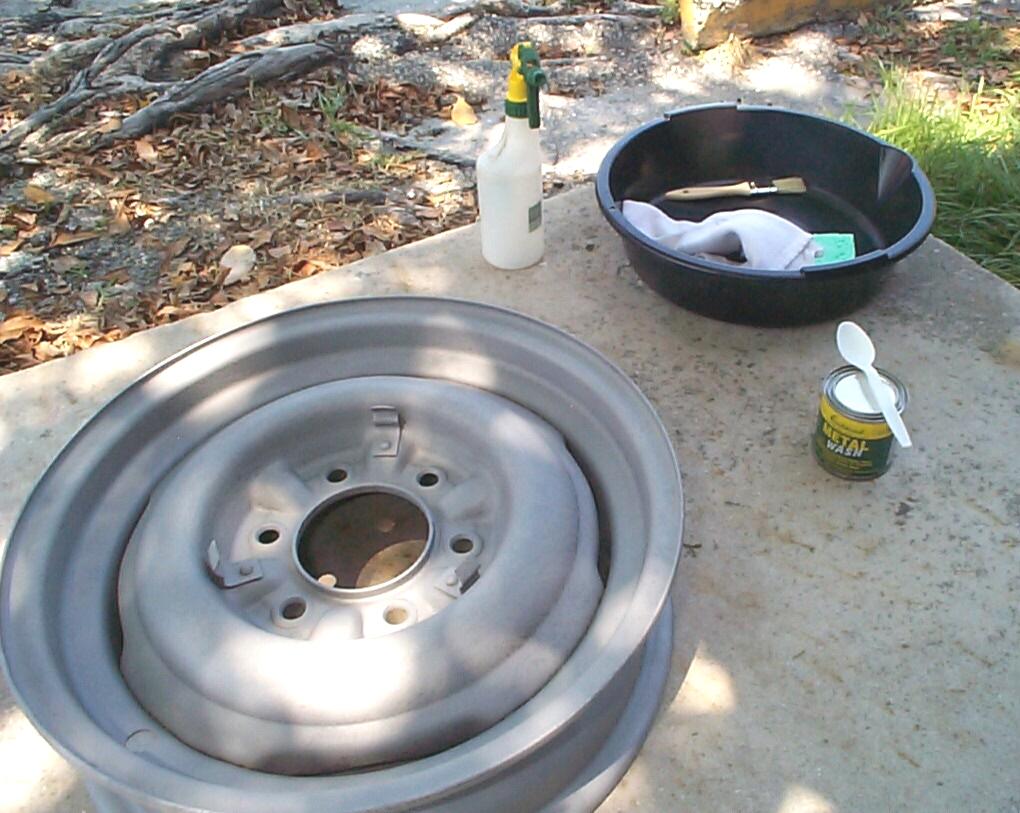 May
8th 2005 The weather
today is perfect for sandblasting or painting or anything else that
doesn't get along with wind or rain. Dragged the pressure blaster out
and started in on BillyBob's badly rusted spare wheel. The blasting was
going so well that I kept at it until I had the wheel done. Five hours
and I'm pretty well wasted now but you don't get Sunday weather like
this all that often and it would have literally taken me a month of
Sundays to get that job done with the siphon blaster. I mixed up a
batch of Eastwood's metal wash and applied it to the wheel to keep the
flash rust away before packing it in. I'm plum tuckered out.
May
8th 2005 The weather
today is perfect for sandblasting or painting or anything else that
doesn't get along with wind or rain. Dragged the pressure blaster out
and started in on BillyBob's badly rusted spare wheel. The blasting was
going so well that I kept at it until I had the wheel done. Five hours
and I'm pretty well wasted now but you don't get Sunday weather like
this all that often and it would have literally taken me a month of
Sundays to get that job done with the siphon blaster. I mixed up a
batch of Eastwood's metal wash and applied it to the wheel to keep the
flash rust away before packing it in. I'm plum tuckered out.
May 13th 2005 Rested up and ordered some parts. I've concluded the chassis detailing for this cycle and that seems a good cutting off point for this log entry. I'm still gonna be crawling around the chassis when I work on the brakes in the coming weeks but that's not part of the detailing task. Will continue to work on that charging system problem and the wheel restoration project. Concerning the detailing cycle, the cab interior is the next stop.
| < Back
to Intro |
You can email me at ![]() webmaster@laroke.com
webmaster@laroke.com
Issued Friday May 13, 2005
Updated Tuesday March 6, 2018
copyright © 1996-2018 Larry Robert Kephart all rights reserved
| | LRK Home | | Bio Info | | Krash Khronicles | | LAROKE | |
| | BettyLou | | BillyBob's Garage | | Rat Patrol | | Deerslayer | | Elvira | |
| | Land of the Free and Home of the Brave | |
| | Keppylou's Art | | WWI Soldier's Diary | |