| | LRK Home | | Bio Info | | Krash Khronicles | | LAROKE | |
| | BettyLou | | BillyBob's Garage | | Rat Patrol | | Deerslayer | | Elvira | |
| | Land of the Free and Home of the Brave | |
| | Keppylou's Art | | WWI Soldier's Diary | |
BillyBob Work-in-Progress Log
![]()
TRUCK LINKS including vendor sites for old parts, custom parts, and tools as well as sites for classic car and truck organizations
STORE Operating in association with Amazon.com, books, recordings and tools can be purchased.
PLANNING for the restoration including project schedule and cost estimates.
![]()
WORK-IN-PROGRESS is the restoration of parts of BillyBob that I can accomplish without a garage.
PRE-RESTORATION includes log entries of minor repairs and and adventures between time of purchase and the time when I started restoration, a piece at a time.
JR'S KORNER JR's Korner is the history of BillyBob before I got him authored by my brother, Wm. C. Kephart.
![]()
BILLYBOB MAINTENANCE Ever changing detailing, oil change, lube, etc. maintenance routines specifically developed for BillyBob, including required tools, materials and procedures.
10. Emergency Stop Mr. Scott!
December 23rd 2000 I'd just finished the Steering Wheel Spifin' up and had decided on some dashboard work for the next interior job when BillyBob experienced startup problems. That took three weeks to solve.
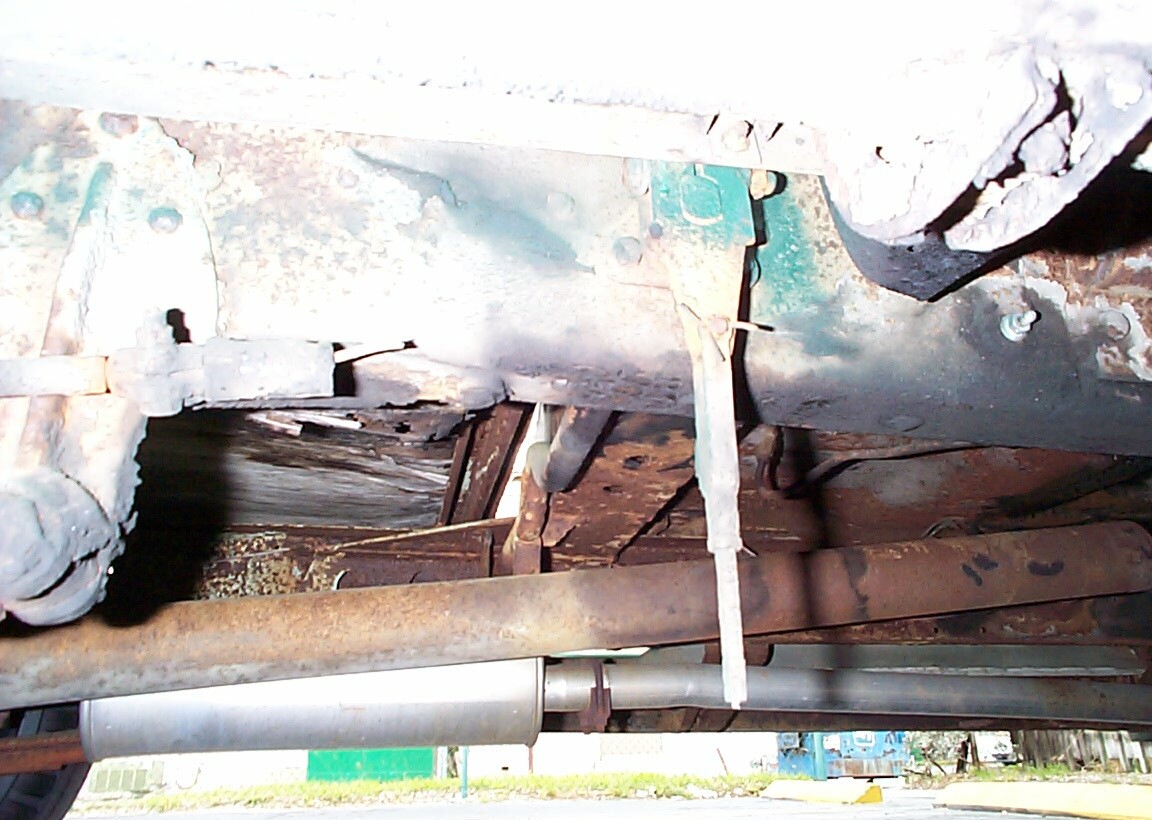 As
I lay under BillyBob this morning installing his new re-built starter,
the corner of my eye caught something out of place. The passenger side
parking brake cable had given up the ghost and was hanging loose from
its moorings. I depend on the parking brake so this will be my next
project. JR had
jerry-rigged the driver side cable at some point to pass Pennsylvania
inspection (fighting the conspiracy) and it was still holding.
As
I lay under BillyBob this morning installing his new re-built starter,
the corner of my eye caught something out of place. The passenger side
parking brake cable had given up the ghost and was hanging loose from
its moorings. I depend on the parking brake so this will be my next
project. JR had
jerry-rigged the driver side cable at some point to pass Pennsylvania
inspection (fighting the conspiracy) and it was still holding.
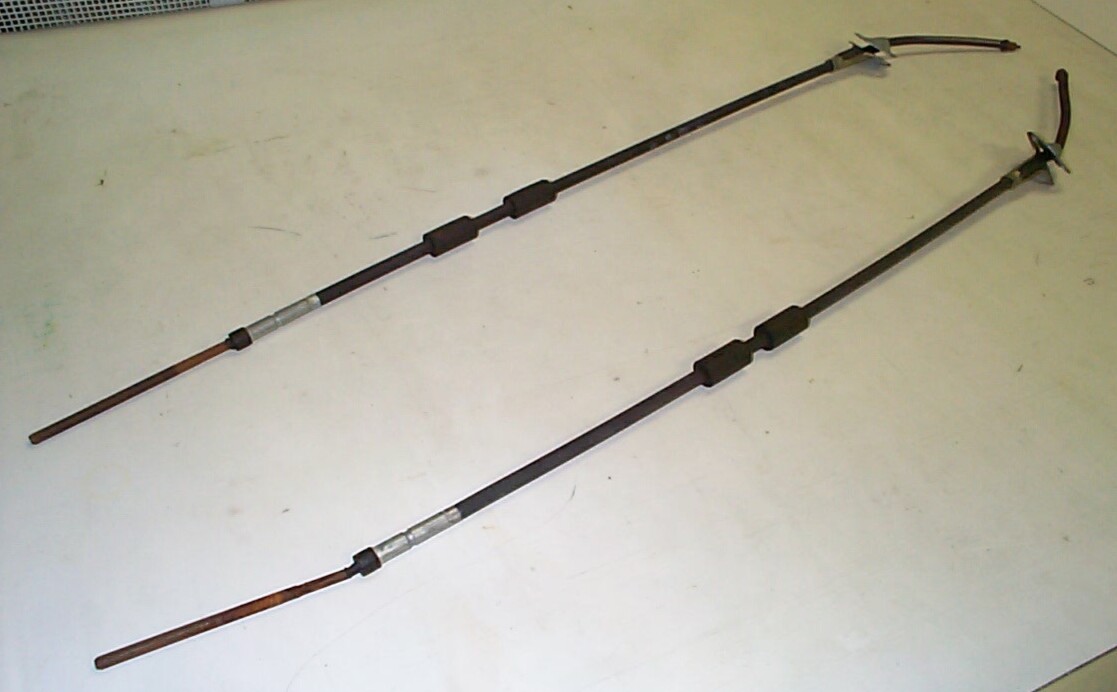 JR
later on obtained the correct Parking Brake Cable assemblies but had
not installed them. He sent them along with BillyBob when he sold the
truck to me. 'Cept for some surface rust they are in good shape. I'm
gonna start ordering all the parking brake parts I can find from the
various vendors and freely apply penetrating oil to all the parking
brake connecting linkages in the mean time.
JR
later on obtained the correct Parking Brake Cable assemblies but had
not installed them. He sent them along with BillyBob when he sold the
truck to me. 'Cept for some surface rust they are in good shape. I'm
gonna start ordering all the parking brake parts I can find from the
various vendors and freely apply penetrating oil to all the parking
brake connecting linkages in the mean time.
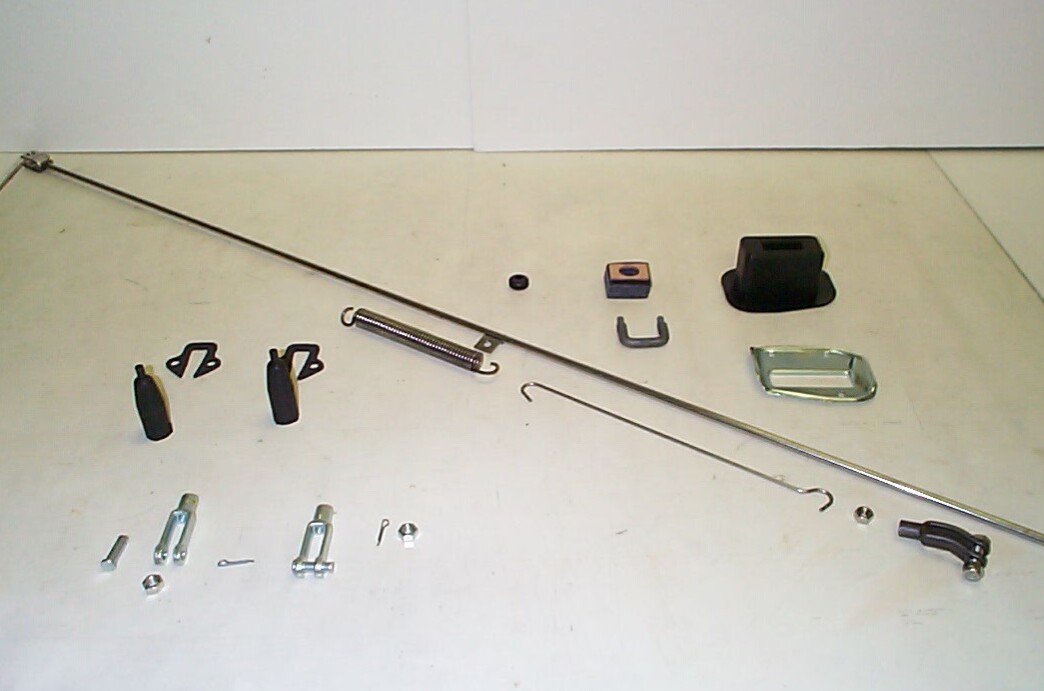 January
11th 2001 Received
bunch of parts from Chevy-Duty last Friday. My only
problem with them is that they continue to ignore my instructions to
ship to the Krash Lab instead of my home address - a minor
inconvenience. The goodies are: (#32-225) Parking Brake Handle Grommet,
(#40-115) Parking Brake Rod Seal and Bumper, (#40-711) Parking Brake
Lever Boot, (#40-725) Parking Brake Boot Retainer, (#40-731) Parking
Brake Boot Retainer Screws, (#40-761) Parking Brake Release Lock Guide
U-bolt, (#71-883) Parking Brake Cable Boots, (#71-888) Parking Brake
Cable to Backing Plate Gaskets, (#71-891) Emergency Brake Control Rod,
and (#71-892) Brake Yoke Ends.
January
11th 2001 Received
bunch of parts from Chevy-Duty last Friday. My only
problem with them is that they continue to ignore my instructions to
ship to the Krash Lab instead of my home address - a minor
inconvenience. The goodies are: (#32-225) Parking Brake Handle Grommet,
(#40-115) Parking Brake Rod Seal and Bumper, (#40-711) Parking Brake
Lever Boot, (#40-725) Parking Brake Boot Retainer, (#40-731) Parking
Brake Boot Retainer Screws, (#40-761) Parking Brake Release Lock Guide
U-bolt, (#71-883) Parking Brake Cable Boots, (#71-888) Parking Brake
Cable to Backing Plate Gaskets, (#71-891) Emergency Brake Control Rod,
and (#71-892) Brake Yoke Ends.
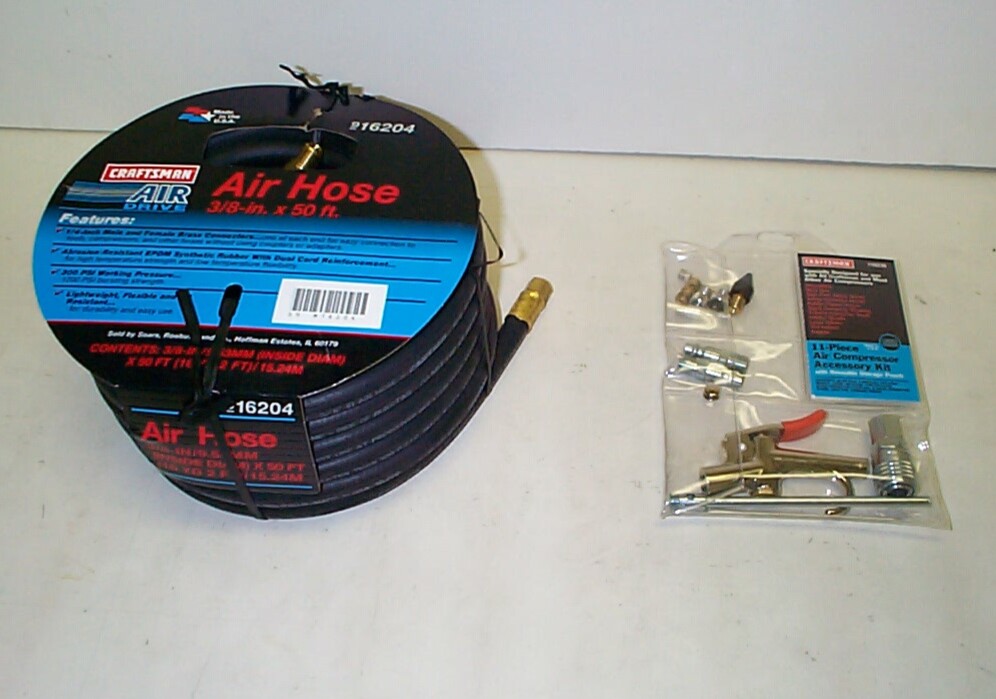 Made
a run to the local Sears on Monday to get started with accessory
purchases for my new Craftsman Air Compressor. I picked up a Craftsman
50 foot, 3/8" Air Hose and Craftsman 11-Piece Air Compressor Accessory
Kit. This will give me some minimal play-around gadgets 'til I get some
really useful air tools.
Made
a run to the local Sears on Monday to get started with accessory
purchases for my new Craftsman Air Compressor. I picked up a Craftsman
50 foot, 3/8" Air Hose and Craftsman 11-Piece Air Compressor Accessory
Kit. This will give me some minimal play-around gadgets 'til I get some
really useful air tools.
 January
27th 2001 I've been
ordering tools at the rate of one a week to spread out the cost and
keep my budget in line. If the spirit of my Dad is watching, this
allows me to "plausibly deny" that I'm procrastinating on this project.
I don't think he's buyin' it . . . He knows I dread the prospect of
wrestling those rear brake drums off. JR doesn't think I'll have much
trouble since he re-did the shoes when he had BillyBob so it's not like
they haven't seen the light of day since the fifties. Even tho' I
ordered these tools over the period of four weeks, they all arrived in
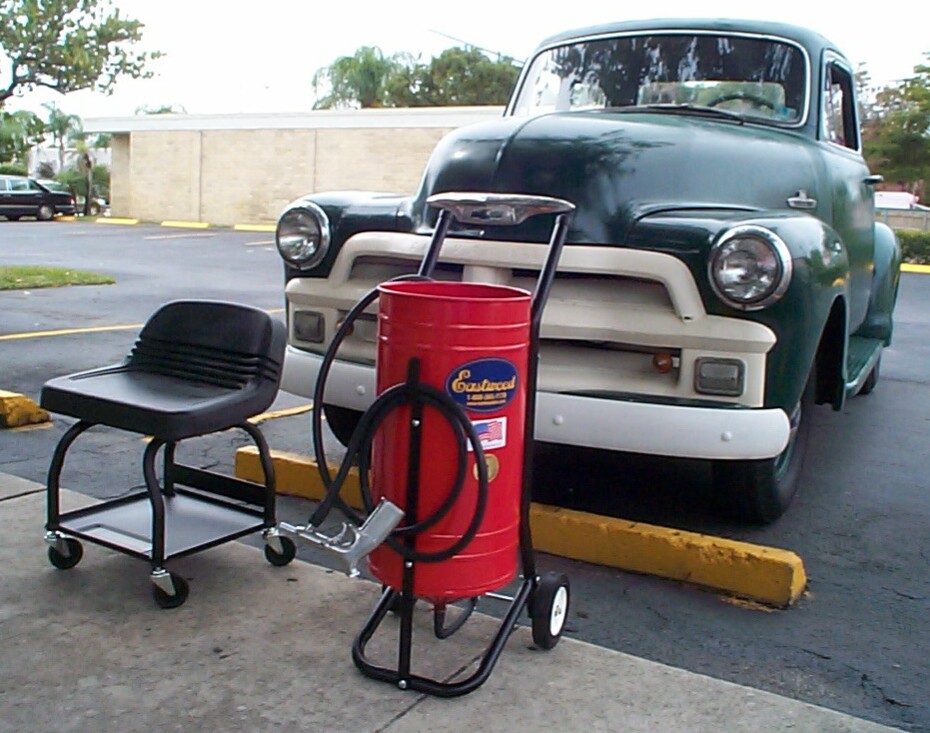
the past few days. First to arrive was the Mechanic's Stool (#33796)
from Northern
Tool and Equipment Company. This mobile butt-to-ground
adapter will save my knees while working in the wheelwells. At the end
of the week, Eastwood's Abrasive Blaster, 90
pound, siphon (#22026) showed up.
January
27th 2001 I've been
ordering tools at the rate of one a week to spread out the cost and
keep my budget in line. If the spirit of my Dad is watching, this
allows me to "plausibly deny" that I'm procrastinating on this project.
I don't think he's buyin' it . . . He knows I dread the prospect of
wrestling those rear brake drums off. JR doesn't think I'll have much
trouble since he re-did the shoes when he had BillyBob so it's not like
they haven't seen the light of day since the fifties. Even tho' I
ordered these tools over the period of four weeks, they all arrived in
the past few days. First to arrive was the Mechanic's Stool (#33796)
from Northern
Tool and Equipment Company. This mobile butt-to-ground
adapter will save my knees while working in the wheelwells. At the end
of the week, Eastwood's Abrasive Blaster, 90
pound, siphon (#22026) showed up.
 Timing
is everything, and I missed this time. Boyoconner shared his new purchase of a
pressure blaster (better than siphon) he purchased from Harbor
Freight on the Stovebolt.com Forum. I didn't try
Harbor Freight 'cause they have a reputation similar to J. C. Whitney .
. . You can get good deals, but if you don't know your tools (and I
don't at this point), you can end up with junk. Had I seen Boyo's
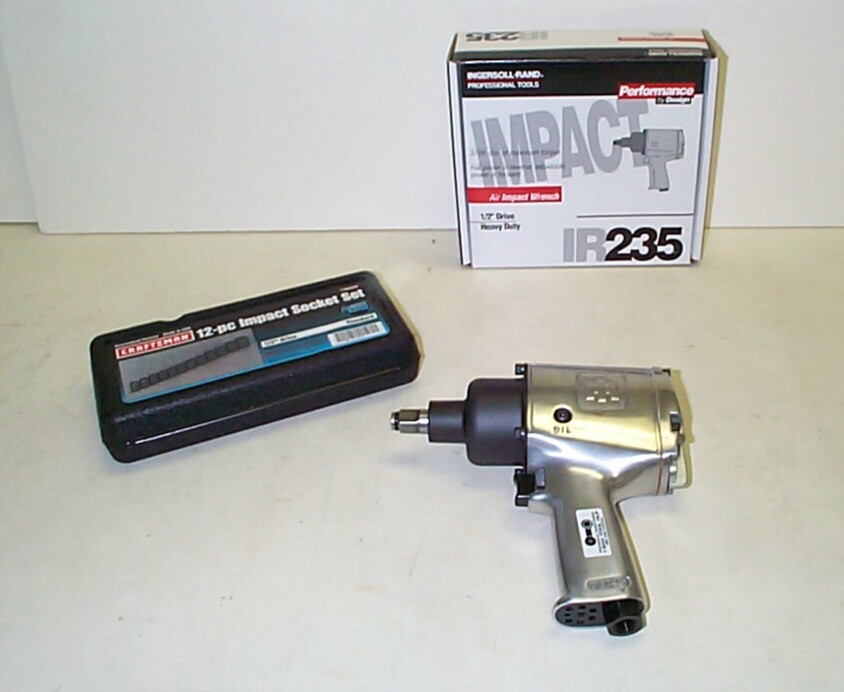
posting before I ordered from Eastwood, I would have ordered the
pressure blaster from Harbor Freight 'cause Eastwood is expensive. An
Ingersoll-Rand IR-235 1/2" Drive Heavy Duty Air Impact Wrench arrived
from Amazon.com. This had been on back order for several weeks, but I
did get a fairly good deal at $79 plus shipping. I also picked up
Craftsman's 12-piece Impact Socket Set, 1/2" Drive, Standard at Sears a
week back.
Timing
is everything, and I missed this time. Boyoconner shared his new purchase of a
pressure blaster (better than siphon) he purchased from Harbor
Freight on the Stovebolt.com Forum. I didn't try
Harbor Freight 'cause they have a reputation similar to J. C. Whitney .
. . You can get good deals, but if you don't know your tools (and I
don't at this point), you can end up with junk. Had I seen Boyo's
posting before I ordered from Eastwood, I would have ordered the
pressure blaster from Harbor Freight 'cause Eastwood is expensive. An
Ingersoll-Rand IR-235 1/2" Drive Heavy Duty Air Impact Wrench arrived
from Amazon.com. This had been on back order for several weeks, but I
did get a fairly good deal at $79 plus shipping. I also picked up
Craftsman's 12-piece Impact Socket Set, 1/2" Drive, Standard at Sears a
week back.
February 3rd 2001 Good news and bad news . . . Bad news: A hard rain hit the Krash Lab just after I got here but before I got the tools out of BillyBob's pickup box and inside under cover. Good news: The rain stopped after a half hour. More good news: A fellow member of the Stovebolt.com Forum, Rick Cavender of Cohutta, Ga. (Rick51) arrived with his family (four generations in two cars!) to visit for awhile. Rick got to meet BillyBob up close, warts 'an all. I didn't think of firing BillyBob up and giving Rick a ride around the block until five minutes after he left . . . about the same time he thought of it. More good news: by the afternoon, the shade tree garage had pretty much dried up. I jacked up the rear end and pulled the rear wheels. The new mechanic's stool and impact wrench works great for this purpose. I still tighten the lugs by hand so they aren't over-torqued. The driver side rear brake drum came off without much coaxing and the linings are good. More bad news: The passenger side drum wouldn't budge, even after backing off the shoe adjuster a lot. The final bad news is that it looks like I have to remove the shoes to get at the parking brake cable connection . . . Drat!
 February
17th 2001 Ordered a
bunch of drum brake tools from Eastwood Company a couple of weeks back
and some of them arrived this week including the Drum Remover (#49007).
I was stopped in my tracks on my taillight re-wiring this morning
(wires too short), so I decided to tackle the stubborn passenger side
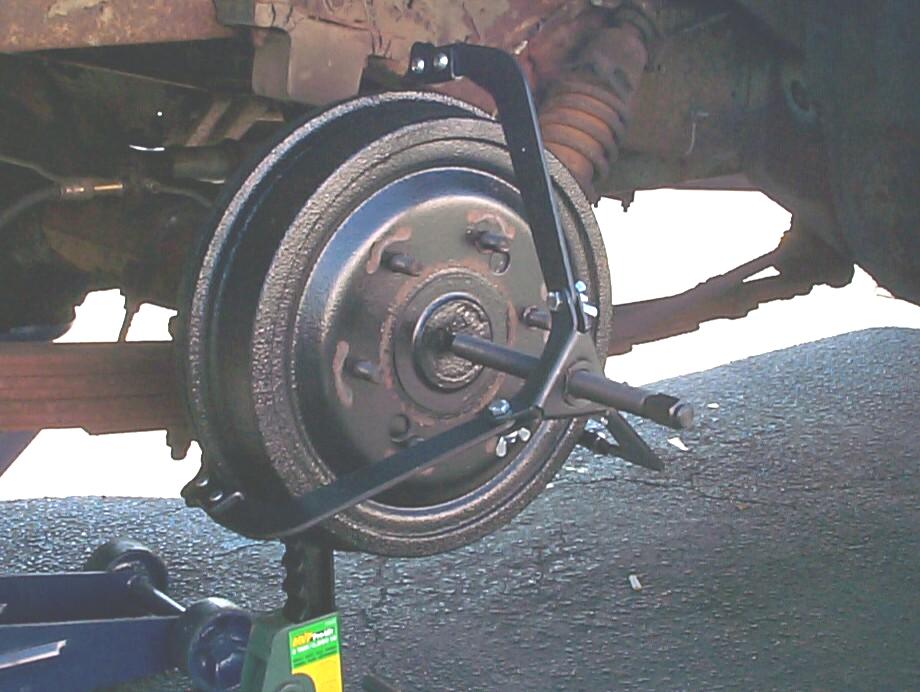
brake drum again. This time, with the help of the remover tool, I was
successful. I might've been hurt but my guardian angel must have been
in the shade tree garage today. This gadget is not a "puller". You
tighten the screw a bit, then tap at each of the legs where they grip
the rim of the drum. I was doing that but at one point when
re-adjusting the screw, the drum popped off with a bang and bounced off
the asphalt in front of me! I hardly ever ask the Lord for help, but I
always offer thanks when I have a close call. While I had the drums
off, I cleaned the brake shoe area with compressed air (after donning
goggles and respirator). Everything was buttoned back up for the day to
await the arrival of the remaining backordered brake tools.
February
17th 2001 Ordered a
bunch of drum brake tools from Eastwood Company a couple of weeks back
and some of them arrived this week including the Drum Remover (#49007).
I was stopped in my tracks on my taillight re-wiring this morning
(wires too short), so I decided to tackle the stubborn passenger side
brake drum again. This time, with the help of the remover tool, I was
successful. I might've been hurt but my guardian angel must have been
in the shade tree garage today. This gadget is not a "puller". You
tighten the screw a bit, then tap at each of the legs where they grip
the rim of the drum. I was doing that but at one point when
re-adjusting the screw, the drum popped off with a bang and bounced off
the asphalt in front of me! I hardly ever ask the Lord for help, but I
always offer thanks when I have a close call. While I had the drums
off, I cleaned the brake shoe area with compressed air (after donning
goggles and respirator). Everything was buttoned back up for the day to
await the arrival of the remaining backordered brake tools.
 February
25th 2001 The
backordered 3 Piece Brake Tool set (#49021) arrived from Eastwood and I
realized I could have gotten along without them. One of the tools was
an Bendix brake adjustment spoon which I had already purchased from
Discount auto parts. Another tool is used to remove the little coil
springs that hold the shoes to the backing plate, but BillyBob has
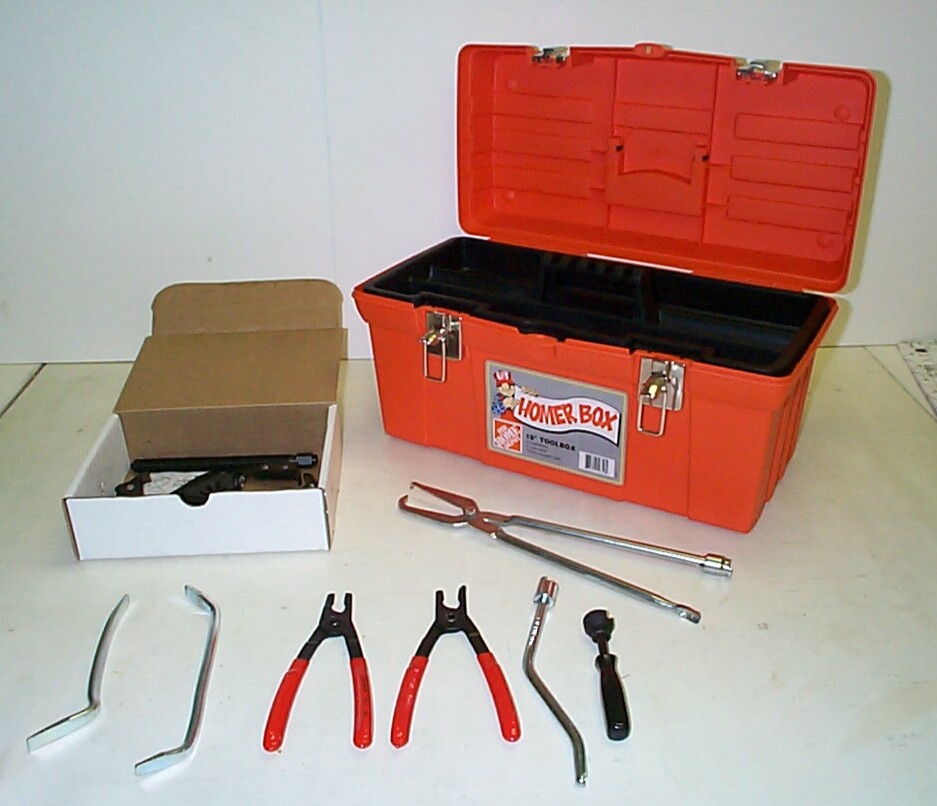
older style U-shaped spring retainers. The third tool from Eastwood
helps to remove/install the springs that attach the shoes to the pivot
at the top of the assembly. This tool duplicates a unverisal
three-in-one tool (looks like tongs) that I purchased over thirty years
ago in Pennsylvania and still have. The C-Ring Plier tools (#49043)
from Eastwood should help me with the parking brake cable connection to
the rear brake shoe. The cardboard box contains the Drum Remover in its
dis-assembled state. I picked up a tool box at Home Depot last week to
consolidate all my present and future brake tools in one place.
February
25th 2001 The
backordered 3 Piece Brake Tool set (#49021) arrived from Eastwood and I
realized I could have gotten along without them. One of the tools was
an Bendix brake adjustment spoon which I had already purchased from
Discount auto parts. Another tool is used to remove the little coil
springs that hold the shoes to the backing plate, but BillyBob has
older style U-shaped spring retainers. The third tool from Eastwood
helps to remove/install the springs that attach the shoes to the pivot
at the top of the assembly. This tool duplicates a unverisal
three-in-one tool (looks like tongs) that I purchased over thirty years
ago in Pennsylvania and still have. The C-Ring Plier tools (#49043)
from Eastwood should help me with the parking brake cable connection to
the rear brake shoe. The cardboard box contains the Drum Remover in its
dis-assembled state. I picked up a tool box at Home Depot last week to
consolidate all my present and future brake tools in one place.
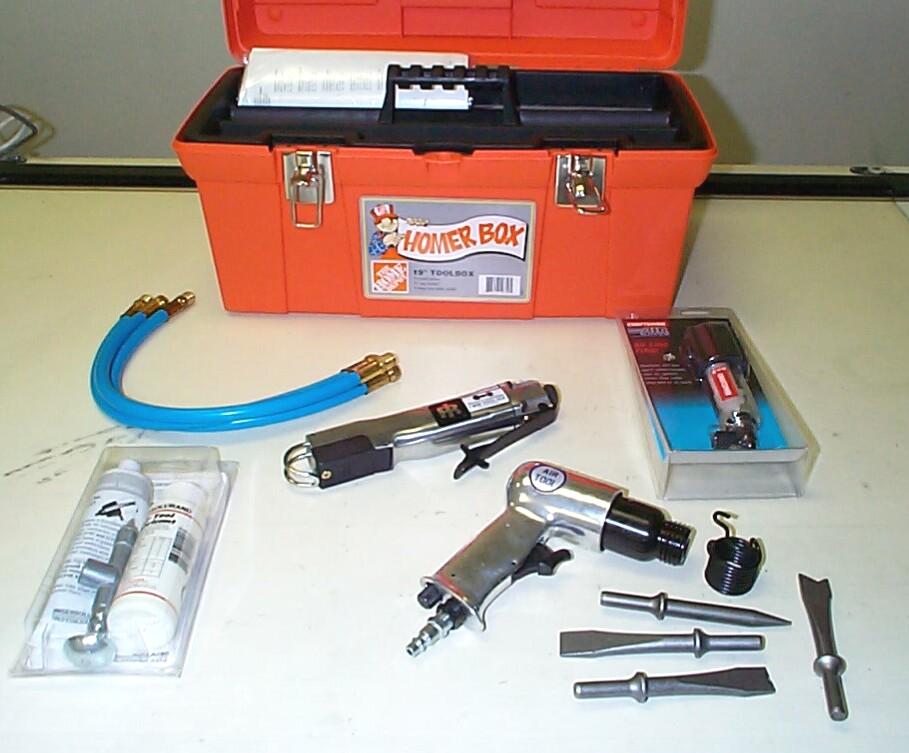 April
24th 2001 Sidetracked
for a couple of months with turn signal re-wiring and gearshift
problems, I'm back to working on the parking brakes. The diversion also
gave me time to gather some more air tools that might make this job a
little easier. Stub hoses from McMaster-Carr. Air tool lube kit
and in-line filter from Sears. No-Name impact hammer with four chisels
from an eBay
auction - The price was right at $20 including shipping. An
Ingersoll-Rand IR-429 Heavy Duty Reciprocating Saw via Amazon.com -
good price but a long wait. Picked up 'nother "Homer Box" at Home Depot
yesterday to tote these new treasures around in.
April
24th 2001 Sidetracked
for a couple of months with turn signal re-wiring and gearshift
problems, I'm back to working on the parking brakes. The diversion also
gave me time to gather some more air tools that might make this job a
little easier. Stub hoses from McMaster-Carr. Air tool lube kit
and in-line filter from Sears. No-Name impact hammer with four chisels
from an eBay
auction - The price was right at $20 including shipping. An
Ingersoll-Rand IR-429 Heavy Duty Reciprocating Saw via Amazon.com -
good price but a long wait. Picked up 'nother "Homer Box" at Home Depot
yesterday to tote these new treasures around in.
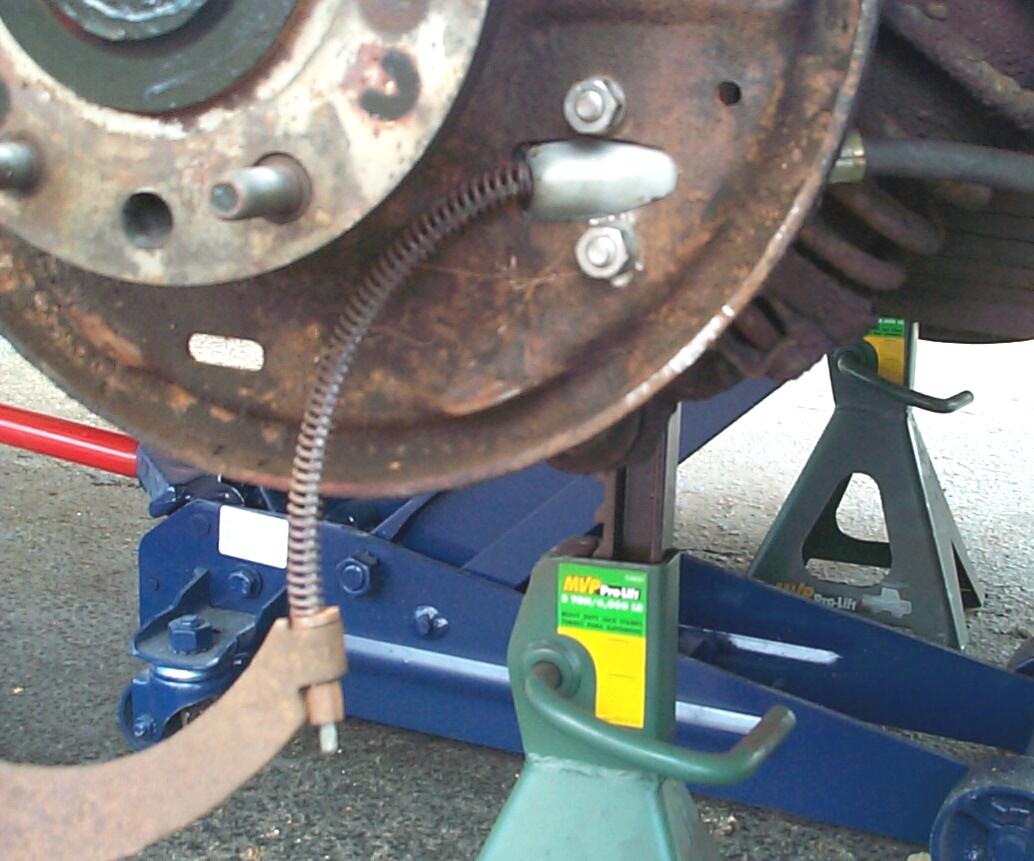
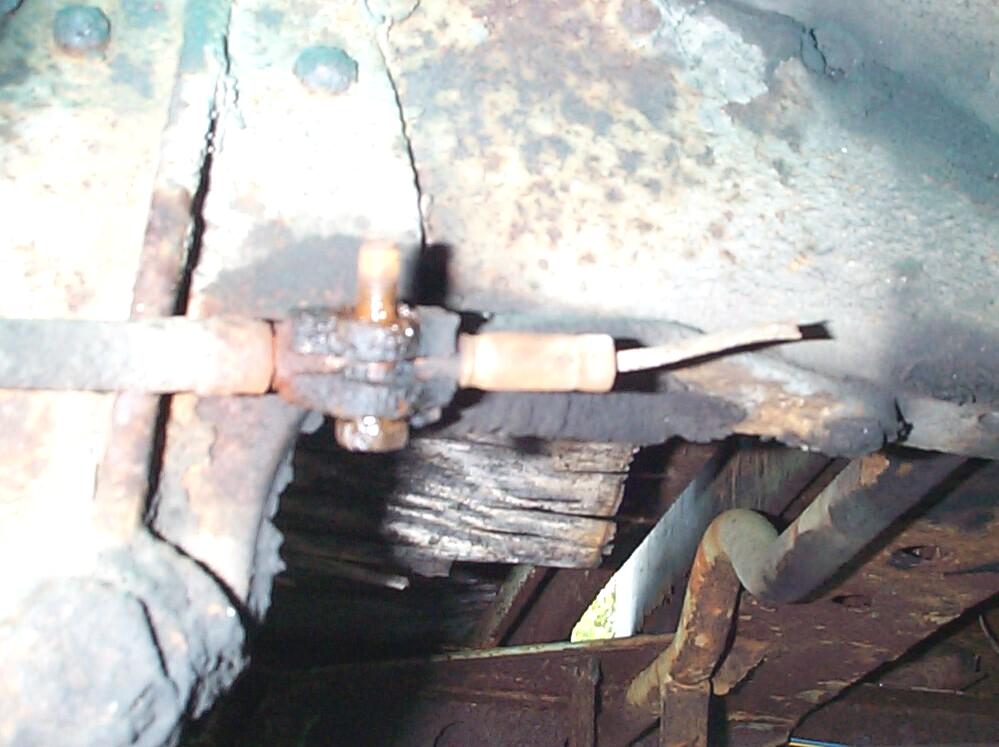 April
28th 2001 Good day
under the shade tree. Not too hot out with a bit of a breeze (I don't
have to do any spray painting today). Decided to start on the brake
cable that broke (passenger side). First task is to get the cable off
the frame bracket support. The clamp bolt came out with a little Kroil
penetrating oil persuasion. Used a pickle fork to spread the clamp enuf
to slip the old cable out. Degreased and cleaned the frame, cable
support bracket and the spring mount next to it with Eastwood's Under
Gone Undercoating/Heavy Residue Remover (#31130Z) and Under Gone
Industrial Cleaner/Degreaser (#31131Z) along with putty knife/gasket
scraper/wire brush technique. Finished with an application of
Eastwood's PRE Painting Prep (#1679Z) and a brush coat of Corroless
Rust Stabilizer (#16011ZP).
April
28th 2001 Good day
under the shade tree. Not too hot out with a bit of a breeze (I don't
have to do any spray painting today). Decided to start on the brake
cable that broke (passenger side). First task is to get the cable off
the frame bracket support. The clamp bolt came out with a little Kroil
penetrating oil persuasion. Used a pickle fork to spread the clamp enuf
to slip the old cable out. Degreased and cleaned the frame, cable
support bracket and the spring mount next to it with Eastwood's Under
Gone Undercoating/Heavy Residue Remover (#31130Z) and Under Gone
Industrial Cleaner/Degreaser (#31131Z) along with putty knife/gasket
scraper/wire brush technique. Finished with an application of
Eastwood's PRE Painting Prep (#1679Z) and a brush coat of Corroless
Rust Stabilizer (#16011ZP).
After the Corroless cured some, a coat of Eastwood's Chassis Black (#1244Z) was applied and left to dry. I'll have to pick up a replacement bolt in the upcoming week for the clamp. It appears to be a 5/16" x 1-1/4" fine thread bolt with only the last 1/2" threaded. While the truck was up in the air, I checked the differential oil level. Seemed a little low but I didn't know how much since the back end of the truck was jacked up and the pumpkin wasn't level. I added gear oil 'til I felt better but not the whole way to the fill hole.
 May
5th 2001 Cool breezy
weather - good for undercarriage work. Started by jacking Billybob up
and pulling the passenger side rear brake drum again. And it was stuck
again so I had to assemble and apply the brake drum remover again. This
time, however, I screwed two of the lug nuts back on part way after
taking the wheel off. The drum broke loose all of a sudden like last
time, but the lug nuts kept it from bouncing off the pavement or my
face. I think God might help us out when we make a mistake sometimes,
but if we keep doing the same stupid things over and over, we're on our
own.
May
5th 2001 Cool breezy
weather - good for undercarriage work. Started by jacking Billybob up
and pulling the passenger side rear brake drum again. And it was stuck
again so I had to assemble and apply the brake drum remover again. This
time, however, I screwed two of the lug nuts back on part way after
taking the wheel off. The drum broke loose all of a sudden like last
time, but the lug nuts kept it from bouncing off the pavement or my
face. I think God might help us out when we make a mistake sometimes,
but if we keep doing the same stupid things over and over, we're on our
own.
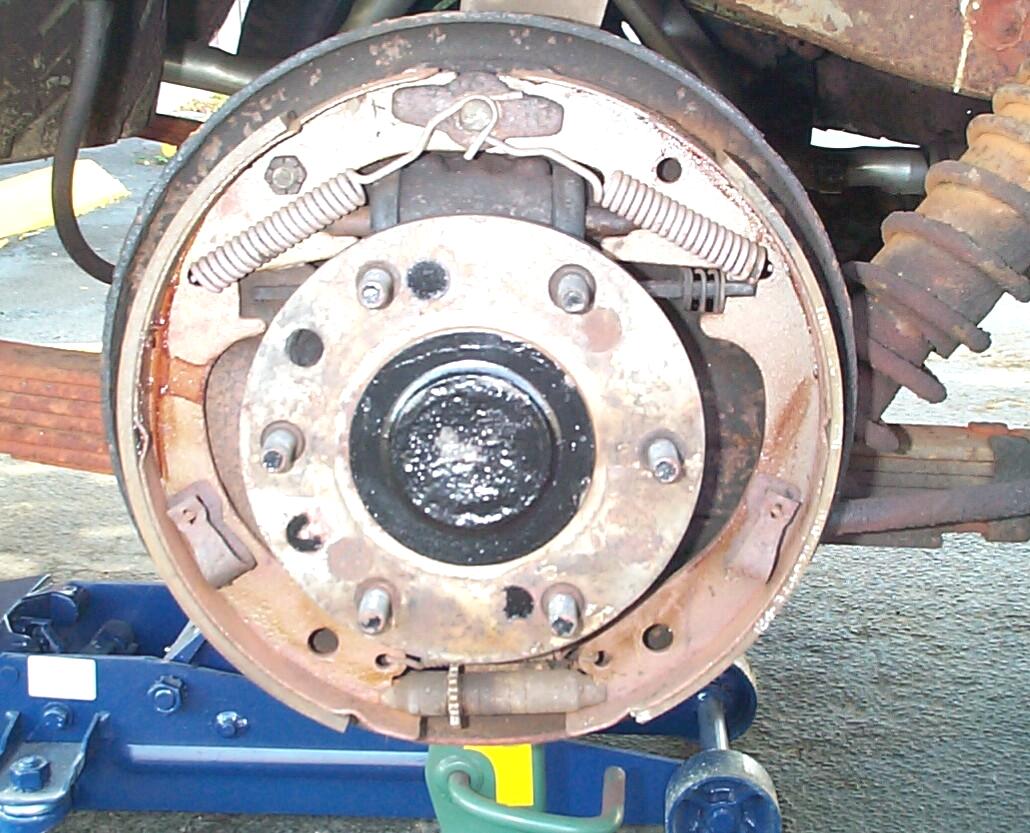
Using the sequence from the Shop Manual, I got the shoes off and parking brake cable disconnected from the parking brake lever on the trailing shoe. This was a simple operation and did not require the specialized C-Ring Pliers. I treated the two bolts holding the cable to the backing plate with Kroil Penetrating oil, then I had a stupid attack . . . I tried to use the impact wrench to remove these hex nuts with a twelve point box wrench on the back side. This had the effect of rounding the bolt head on the back. I stopped before I ruined the other bolt. I managed to get the undamaged, but rusted, bolt off with patience and two box end wrenches. The rounded bolt was another story. Took 'bout forty minutes with reciprocating air saw, air hammer chisel, vice grips, one skinned knuckle and cussin' under my breath.
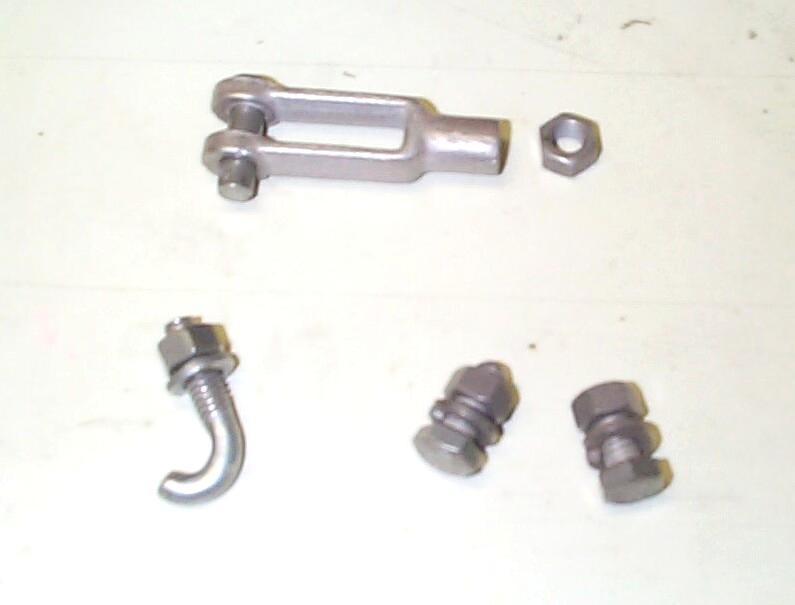
 One
good bit of luck was that I had replacement 5/16"-18 x 3/4" bolts in my
parts inventory for re-assembly with the new cable. Eastwood's Tin-Zinc
Electroplating System (#10049Z) was used to plate these bolts, washers,
hex nuts along with the new clamp bolt I picked up during the week and
one of the new Brake Yoke Ends from Chevy-Duty. After plating, I put
them in Eastwood's "Vibratory Tumbler System" (catalog #43204) with
polishing media to put a satin sheen on the new plating.
One
good bit of luck was that I had replacement 5/16"-18 x 3/4" bolts in my
parts inventory for re-assembly with the new cable. Eastwood's Tin-Zinc
Electroplating System (#10049Z) was used to plate these bolts, washers,
hex nuts along with the new clamp bolt I picked up during the week and
one of the new Brake Yoke Ends from Chevy-Duty. After plating, I put
them in Eastwood's "Vibratory Tumbler System" (catalog #43204) with
polishing media to put a satin sheen on the new plating.
 I
missed plating and polishing the jamb nut that runs up against the yoke
and secures it. I'll do that when I take this apart again for the next
phase of the parking brake rebuild which will be the cross shaft
assembly. It was mid-afternoon and time to try and put this stuff all
back together.
I
missed plating and polishing the jamb nut that runs up against the yoke
and secures it. I'll do that when I take this apart again for the next
phase of the parking brake rebuild which will be the cross shaft
assembly. It was mid-afternoon and time to try and put this stuff all
back together.
 A
couple of minutes of head-scratchin' and I determined that the "Backing
Plate Gasket" is sandwiched between the two "plates" on the end of the
cable assembly and this assembly is then bolted to the backing plate.
After testing this theory, I took the hex nuts back off one-at-a-time
and applied thread-locker compound. I had to try several times to
connect the new cable parking brake lever. I ended up using the C-Ring
Pliers after all to hold the spring on the cable back about 3/4" long
enuf to slip the cable into the lever retainer (needle-nose or any
other "thin" pliers would have worked as well).
A
couple of minutes of head-scratchin' and I determined that the "Backing
Plate Gasket" is sandwiched between the two "plates" on the end of the
cable assembly and this assembly is then bolted to the backing plate.
After testing this theory, I took the hex nuts back off one-at-a-time
and applied thread-locker compound. I had to try several times to
connect the new cable parking brake lever. I ended up using the C-Ring
Pliers after all to hold the spring on the cable back about 3/4" long
enuf to slip the cable into the lever retainer (needle-nose or any
other "thin" pliers would have worked as well).
 The
Shop Manual is a bit cryptic regarding the parking brake adjustment
procedure but I soldiered on and I think I got close to where it should
be. When I was finished, I put the transmission in neutral. Both rear
wheels were spinning freely. Before I started today, engaging the
parking brake pedal would take it the whole way to the floor and the
driver's side brake would engage enough to hold the truck on a slight
grade (like when waiting for a draw bridge here in South Florida). Now
it was time to test today's results. I applied the parking brake and
the pedal only went down one third of its play. Now the passenger side
rear wheel was locked. The driver's side wheel will still spin which is
about what I expected. Success! Next week I start work on the driver's
side cable.
The
Shop Manual is a bit cryptic regarding the parking brake adjustment
procedure but I soldiered on and I think I got close to where it should
be. When I was finished, I put the transmission in neutral. Both rear
wheels were spinning freely. Before I started today, engaging the
parking brake pedal would take it the whole way to the floor and the
driver's side brake would engage enough to hold the truck on a slight
grade (like when waiting for a draw bridge here in South Florida). Now
it was time to test today's results. I applied the parking brake and
the pedal only went down one third of its play. Now the passenger side
rear wheel was locked. The driver's side wheel will still spin which is
about what I expected. Success! Next week I start work on the driver's
side cable.
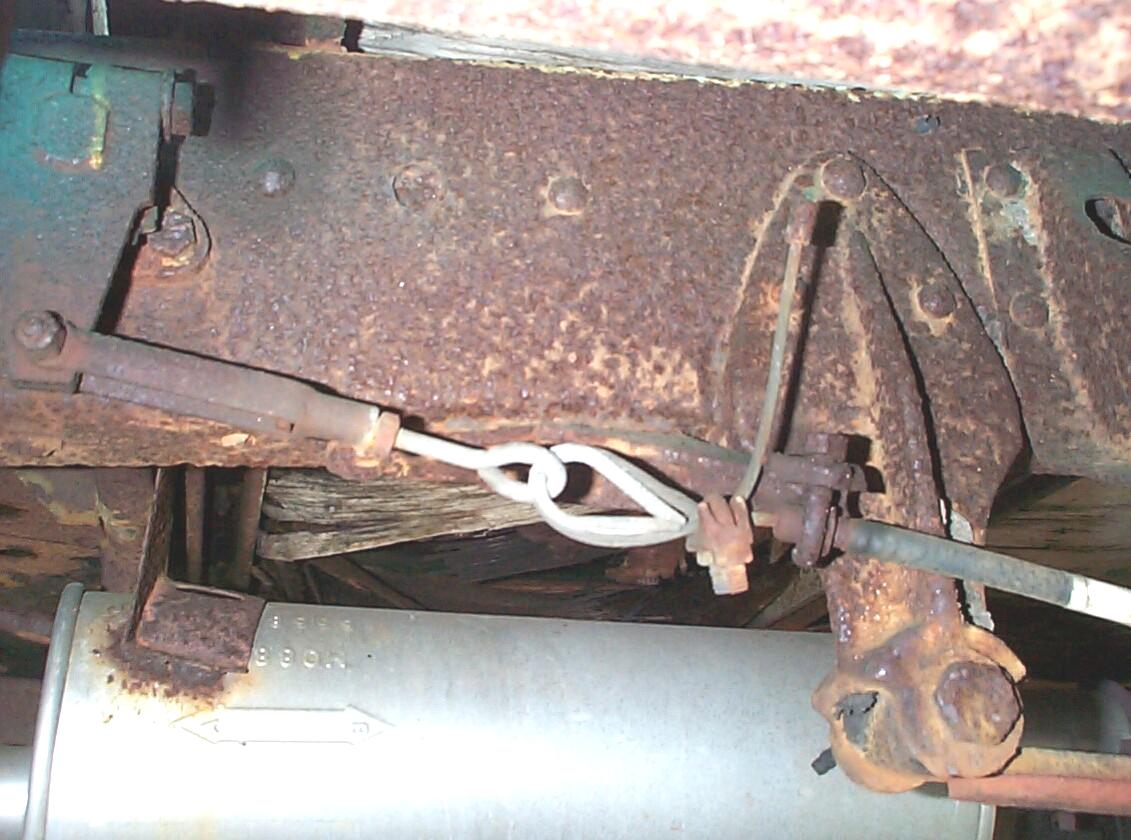 May
12th 2001 Got BillyBob
up on jackstands in the cool of the early morning. The driver's side
brake cable was the one that JR jerry-rigged. As I studied his
solution, it was Deja Vu all over again. This combination of J-bolt,
eye-bolt, cable clamp and cable looks very much like the main brake
system of JR's 1965 Soap Box Derby Racer! Good to see JR was able to
apply that knowledge decades later. The lower clamp portion of the
frame bracket support on this side had broken off in the distant past
and JR's solution was to use a J-bolt to make up for the missing
portion of the clamp . . . a nifty solution I fear would have escaped
me. I went to the local mom and pop hardware store this past week in
search of a 5/16" J-Bolt. The salesman had never heard of a "J-bolt" so
I got a U-bolt to modify. I can't help but wonder if his worldly
knowledge is limited to the items he has in stock.
May
12th 2001 Got BillyBob
up on jackstands in the cool of the early morning. The driver's side
brake cable was the one that JR jerry-rigged. As I studied his
solution, it was Deja Vu all over again. This combination of J-bolt,
eye-bolt, cable clamp and cable looks very much like the main brake
system of JR's 1965 Soap Box Derby Racer! Good to see JR was able to
apply that knowledge decades later. The lower clamp portion of the
frame bracket support on this side had broken off in the distant past
and JR's solution was to use a J-bolt to make up for the missing
portion of the clamp . . . a nifty solution I fear would have escaped
me. I went to the local mom and pop hardware store this past week in
search of a 5/16" J-Bolt. The salesman had never heard of a "J-bolt" so
I got a U-bolt to modify. I can't help but wonder if his worldly
knowledge is limited to the items he has in stock.
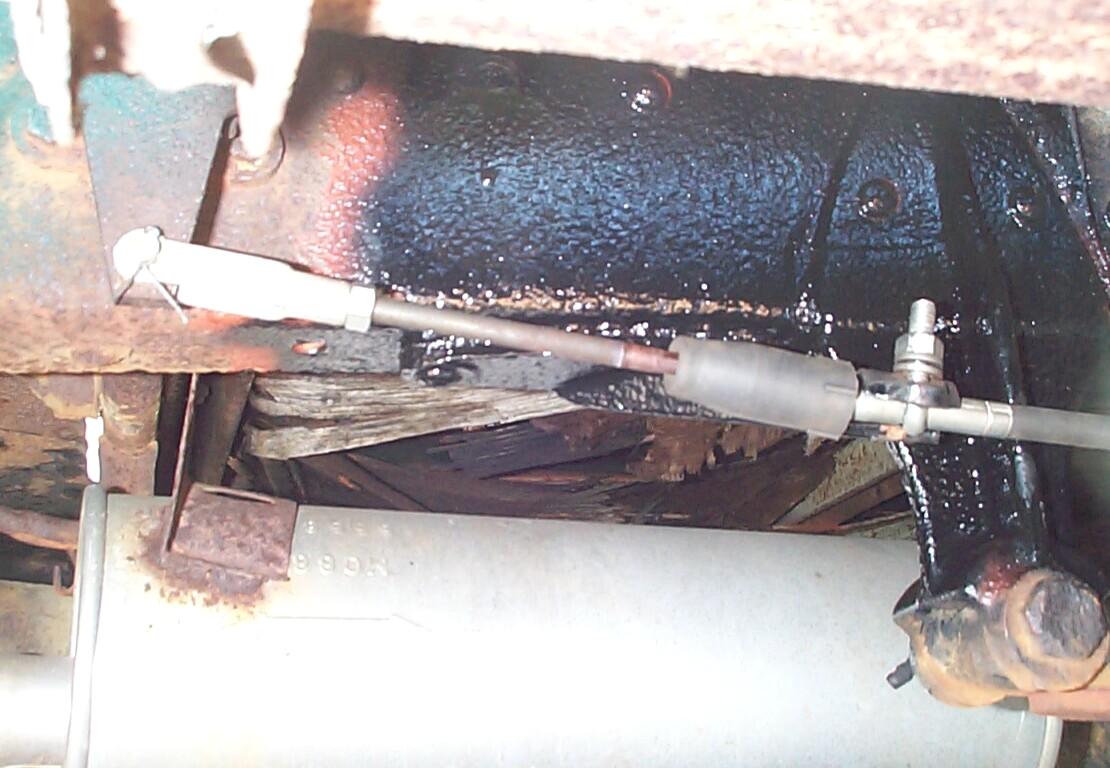
Put some Kroil penetrating oil on JR's rusted-beyond-recognition components and set up the air compressor. Cut one leg off the new U-bolt with the air saw, then cleaned it up with a grinding stone in the Dremel motor-tool. I tried clench wrench and vice-grips on the Kroil soaked connectors without success. There was plenty of room to work here so I cut the rusted connectors off with the air saw. This side didn't have any undercoating or grease buildup, just solid rust, so drill-assisted and hand wire brushing was all the prep necessary before applying the PRE Paint Prep and Corroless Rust Stabilizer.
 May
19th 2001 Hot right out
of the box this morning. Tried to get the "heavy lifting" done before I
lost my shade. Had the brake shoes off the driver side by 9:00 AM. Last
Sunday I plated and polished the bolts and other connectors I would be
using today as well as paint the affected frame area with Chassis
Black. Operations are going well today, so far. I didn't make the same
mistake with the two bolts holding the cable assembly to the backing
plate on this side. I used penetratiog oil and hand tools only and they
both came off intact.
May
19th 2001 Hot right out
of the box this morning. Tried to get the "heavy lifting" done before I
lost my shade. Had the brake shoes off the driver side by 9:00 AM. Last
Sunday I plated and polished the bolts and other connectors I would be
using today as well as paint the affected frame area with Chassis
Black. Operations are going well today, so far. I didn't make the same
mistake with the two bolts holding the cable assembly to the backing
plate on this side. I used penetratiog oil and hand tools only and they
both came off intact.
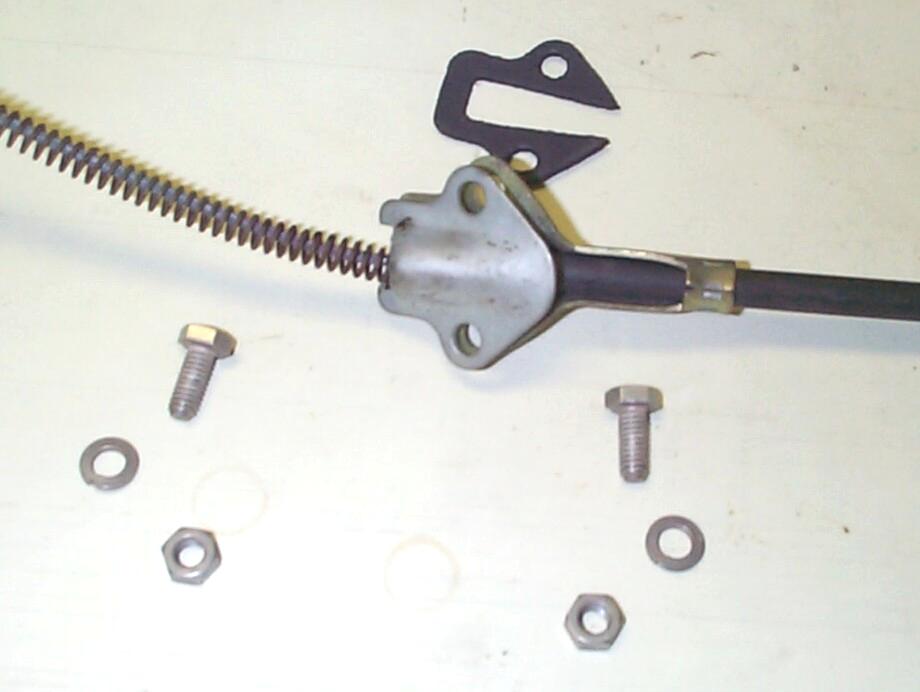
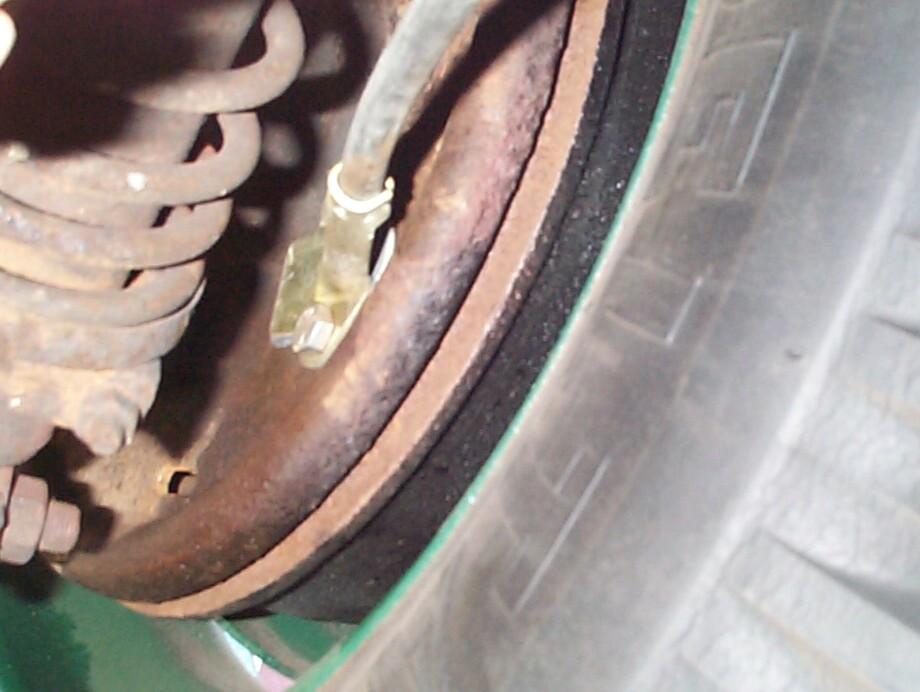 Got
the cable assembly secured to the backing plate without problems and
re-installed the brake shoes with a minimum of difficulties (just the
normal problems, you know - like getting those ~!@#$%^
shoe pull back springs stretched enuf to get 'em back on the pivot
post). Here's a view of the cable assembly entering the backing plate
from the backside this time.
Got
the cable assembly secured to the backing plate without problems and
re-installed the brake shoes with a minimum of difficulties (just the
normal problems, you know - like getting those ~!@#$%^
shoe pull back springs stretched enuf to get 'em back on the pivot
post). Here's a view of the cable assembly entering the backing plate
from the backside this time.
 Then
I hit a snag with the improvised J-bolt. The curved portion of the
J-bolt appeared a little too long for a snug fit. Got the air saw out
again after a bit of cursin' and cut a little more off the J-bolt . . .
probably a little too much. Tried to tighten up the J-bolt again but
the angle thru the hole in the clamp was skewed and the bottom of the
J-bolt wanted to turn off the cable. I realized the nut was running out
of threads and still not tight. Took the J-bolt out again and turned a
few more threads on it with the die set I purchased from Eastwood
months ago. Managed to get the J-bolt on this time tight enuf (with two
lock washers) to secure the cable . . . It works but I'm not entirely
happy and I'll be re-visiting this connection as soon as I come up with
a better solution.
Then
I hit a snag with the improvised J-bolt. The curved portion of the
J-bolt appeared a little too long for a snug fit. Got the air saw out
again after a bit of cursin' and cut a little more off the J-bolt . . .
probably a little too much. Tried to tighten up the J-bolt again but
the angle thru the hole in the clamp was skewed and the bottom of the
J-bolt wanted to turn off the cable. I realized the nut was running out
of threads and still not tight. Took the J-bolt out again and turned a
few more threads on it with the die set I purchased from Eastwood
months ago. Managed to get the J-bolt on this time tight enuf (with two
lock washers) to secure the cable . . . It works but I'm not entirely
happy and I'll be re-visiting this connection as soon as I come up with
a better solution.
The driver's side brake was adjusted following the Shop Manual again and the transmission was placed in neutral so that both rear wheels were spinning freely. Now, when the parking brake pedal was engaged, both rear wheels locked up solid. Well, that's it for the parking brake cables. Next job in this series will be removing, cleaning, re-finishing and re-installing the cross-shaft. I'll probably stall around 'til I get a few more media-blaster accessories before I tear into that. In the meantime, I'll start breaking loose the old cross-shaft assembly bolts and installing new bolts and nuts one at a time.
| < Back to Intro |
You can email me at ![]() webmaster@laroke.com
webmaster@laroke.com
Issued Saturday May 19, 2001
Updated Monday May 15, 2017
copyright © 1996-2017 Larry Robert Kephart all rights reserved
| | LRK Home | | Bio Info | | Krash Khronicles | | LAROKE | |
| | BettyLou | | BillyBob's Garage | | Rat Patrol | | Deerslayer | | Elvira | |
| | Land of the Free and Home of the Brave | |
| | Keppylou's Art | | WWI Soldier's Diary | |