| | LRK Home | | Bio Info | | Krash Khronicles | | LAROKE | |
| | BettyLou | | BillyBob's Garage | | Rat Patrol | | Deerslayer | | Elvira | |
| | Land of the Free and Home of the Brave | |
| | Keppylou's Art | | WWI Soldier's Diary | |
BillyBob Work-in-Progress Log
![]()
WHAT'S NEW is a chronological listing of updates to the BillyBob site.
![]()
TRUCK LINKS including vendor sites for old parts, custom parts, and tools as well as sites for classic car and truck organizations
STORE Operating in association with Amazon.com, books, recordings and tools can be purchased.
PLANNING for the restoration including project schedule and cost estimates.
![]()
TRAVELS WITH BILLYBOB With apologies to Steinbeck, this area of BillyBob's Garage will be used to log the trips BillyBob and I make together.
WORK-IN-PROGRESS is the restoration of parts of BillyBob that I can accomplish without a garage.
PRE-RESTORATION includes log entries of minor repairs and adventures between time of purchase and the time when I started restoration, a piece at a time.
JR'S KORNER JR's Korner is the history of BillyBob before I got him authored by my brother, Wm. C. Kephart.
![]()
BILLYBOB MAINTENANCE Ever changing detailing, oil change, lube, etc. maintenance routines specifically developed for BillyBob, including required tools, materials and procedures.
PARTS SHOP The Parts Shop is a repository of How-To articles. Things that I have done over and over enough times to have developed a procedure. This gives me a checklist and saves brain cells.
STEALTH SHOP Urban residence design with large integrated shop and separate living quarters for a relative or renter.
![]()
You will need the Adobe Acrobat browser plugin to view these wiring diagrams which are in the PDF file format. This format allows zooming and panning. If you don't have this plugin, it can be downloaded and installed (free) from the Adobe site. The button below will take you there.
![]()
BILLYBOB WIRING DIAGRAM Here's the wiring diagram updated with BillyBob's current state 'cepting the third-party strap-on turn-signal director.
STRAP-ON TURN-SIGNAL DIRECTOR/BRAKE LIGHT CIRCUIT This turn signal and brake light circuit diagram shows the current state of the third-party turn-signal director wiring, which will remain in place until I figure out the problems with the OEM turn-signal director. It also shows the OEM headlight switch.
42. The Krash Abides
September 24th 2005 S'posed to be a good weather day. So far, so good. It's time for monthly maintenance again so I performed that first on BillyBob and Renegade. Performed some quarterly maintenance on Renegade too, then went on to more engine bay detailing on BillyBob.
A few weeks ago when some of my co-workers were cleaning and reorganizing one of the rooms at the Krash Lab, they found a air-cleaner decal I'd ordered and lost a long time ago. Decided to do a stage I refurb on the after-market oil bath air cleaner before I lose it again. When I got this thing, it was supposed to be NOS but the lid had a number of dents and spots of surface rust. Looks like it led a hard life on the shelf.
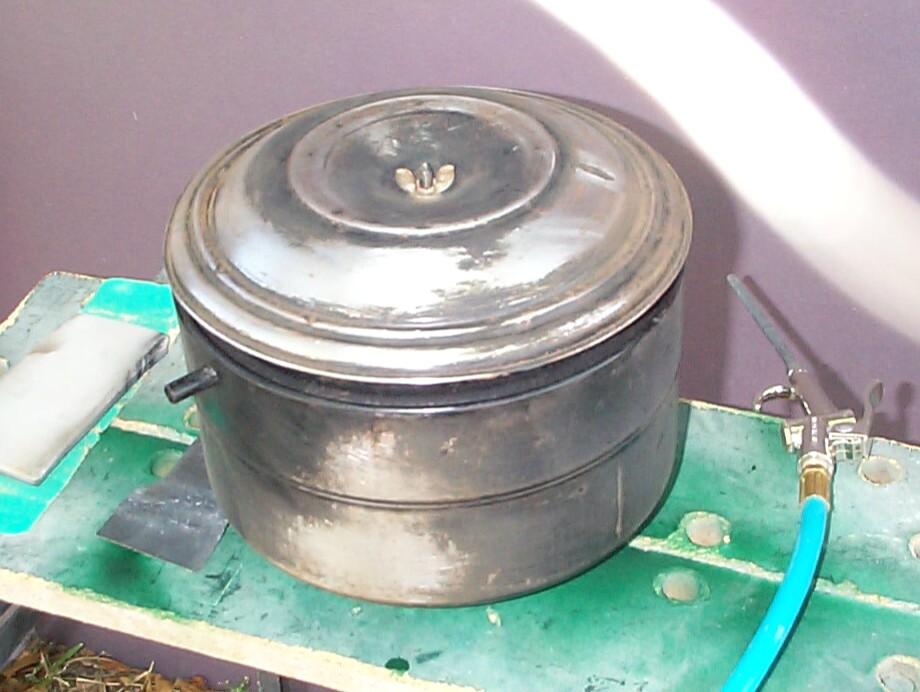 Took
it off the carby and sanded the rough spots down with 80 grit paper
followed by 320 grit. Finally, gave it the once over with the 3M scuff
pad before hanging it in the shade tree, donning the nitrile gloves and
hitting it with the PRE Paint Prep. After that, the air cleaner bare
metal areas got a coat of Eastwood's
rattlecan Self-Etching Primer.
Took
it off the carby and sanded the rough spots down with 80 grit paper
followed by 320 grit. Finally, gave it the once over with the 3M scuff
pad before hanging it in the shade tree, donning the nitrile gloves and
hitting it with the PRE Paint Prep. After that, the air cleaner bare
metal areas got a coat of Eastwood's
rattlecan Self-Etching Primer.
Took the fender brace rods off for cleaning next. The cad plated cap screws and star lock washers at the firewall that I'd installed last time were holding up well. The standard hex nuts on the threaded end at the fenders were rusting. The best way to take the rods off is to remove the nut off the threaded end first, then the cap screws. That way, the rod won't rotate on you while you try to get the nut loose. The black powder coat I put on these rods is holding up well too. Cleaned the rods with spray cleaner and re-installed them, this time with all stainless steel nuts and washers at the threaded rod ends. The hex nuts and lock washers came from the Doc's House of Bolts set I got sometime back. The flat washers from this kit were too small, however, and I had to substitute stainless steel flat washers I had from a McMaster-Carr order. I used the same cap screws and washers at the firewall end since they were showing no sign of corrosion. Threadlocker blue was used on the stainless steel fasteners.
The primer on the air cleaner being cured by this time, three coats of Dupli-Color gloss black acrylic enamel were applied at ten minute intervals. Updated my nuts and bolts inventory with the fender brace fasteners. Then it was time to clean up for the day.
 September
25th 2005 Stopped off
at the warehouse bay first thing to exchange Renegade for BettyLou and
pickup some parts. When I got to the Krash Lab, it had been soaked down
by a passing shower. I want to sandblast this morning. I'll have to
wait now for the parking lot to dry up and drag out the tarp then if
it's not too late in the morning. While waiting, I put the decal on the
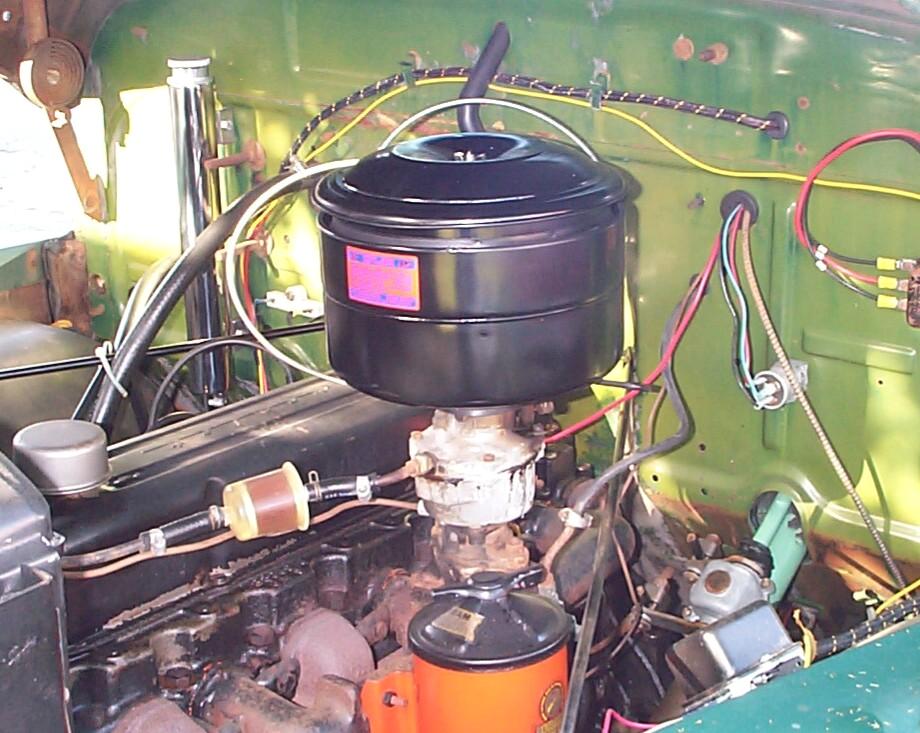
newly painted air cleaner and remounted it on BillyBob. The only air
cleaners I've seen with the decal have it on the lid. This being a
after-market air cleaner, the decal doesn't fit very well on the lid. I
tried for awhile but wasn't happy with the result so I gingerly peeled
it back off and placed it on the front where I could get it positioned
without wrinkles.
September
25th 2005 Stopped off
at the warehouse bay first thing to exchange Renegade for BettyLou and
pickup some parts. When I got to the Krash Lab, it had been soaked down
by a passing shower. I want to sandblast this morning. I'll have to
wait now for the parking lot to dry up and drag out the tarp then if
it's not too late in the morning. While waiting, I put the decal on the
newly painted air cleaner and remounted it on BillyBob. The only air
cleaners I've seen with the decal have it on the lid. This being a
after-market air cleaner, the decal doesn't fit very well on the lid. I
tried for awhile but wasn't happy with the result so I gingerly peeled
it back off and placed it on the front where I could get it positioned
without wrinkles.
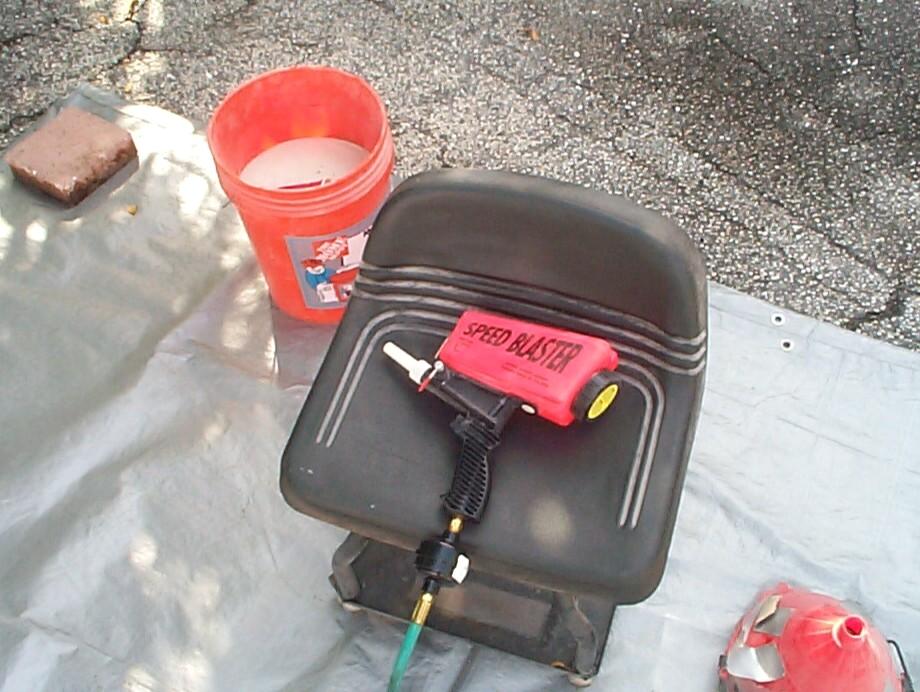 When
it got dry enuf to sandblast, I wasn't in the mood to drag the whole
rig out so I set up the SpeedBlaster gun which I haven't used since I
bought it for sandblasting the channel around the cowl vent. I didn't
put on the coveralls and hood either, just gloves, respirator, goggles
and face shield. Now I've got true grit and will be shedding silica all
day.
When
it got dry enuf to sandblast, I wasn't in the mood to drag the whole
rig out so I set up the SpeedBlaster gun which I haven't used since I
bought it for sandblasting the channel around the cowl vent. I didn't
put on the coveralls and hood either, just gloves, respirator, goggles
and face shield. Now I've got true grit and will be shedding silica all
day.
The SpeedBlaster worked well to clean up the new surface rust on the upper hood latch parts and support. Hung the latch parts up in BillyBob's tree (support rods and cross bar) along with a blasted hose bracket from BettyLou. Got the nitrile gloves on and applied the PRE Paint Prep to all parts, then gave them a couple of coats of Self-Etching primer.
While the primer was curing, I fired up the boss's Panzerwagon to charge up the battery and get its juices flowing. I haven't been doing this often enough an' I'm afraid of the gas going bad on me. Got out the tin-zinc plating set and plated the latch shaft, spring, retainer, washer and hex nut. After that, these parts were put in the tumbler for polishing. The hood latch support cross bar and the BettyLou hose bracket were given a couple of coats of Eastwood's Underhood Black. The support rods were left in primer until next week because I'm gonna use gloss black on them and they won't dry in time for reassembly if I paint them today.
 After
everything was dry, the hood lock assembly was put back together and
put in the truck. Well, I almost got everything accomplished today that
I'd planned on. That's rare so I'm gonna reward myself with a burger
and a cigar.
After
everything was dry, the hood lock assembly was put back together and
put in the truck. Well, I almost got everything accomplished today that
I'd planned on. That's rare so I'm gonna reward myself with a burger
and a cigar.
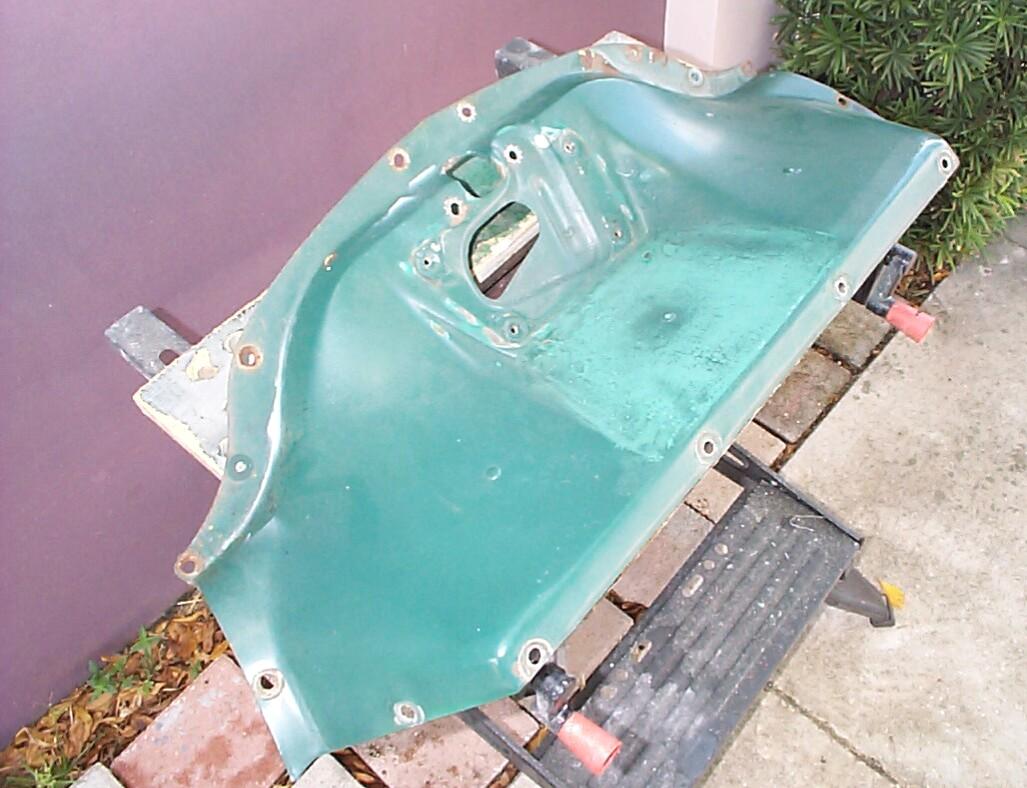
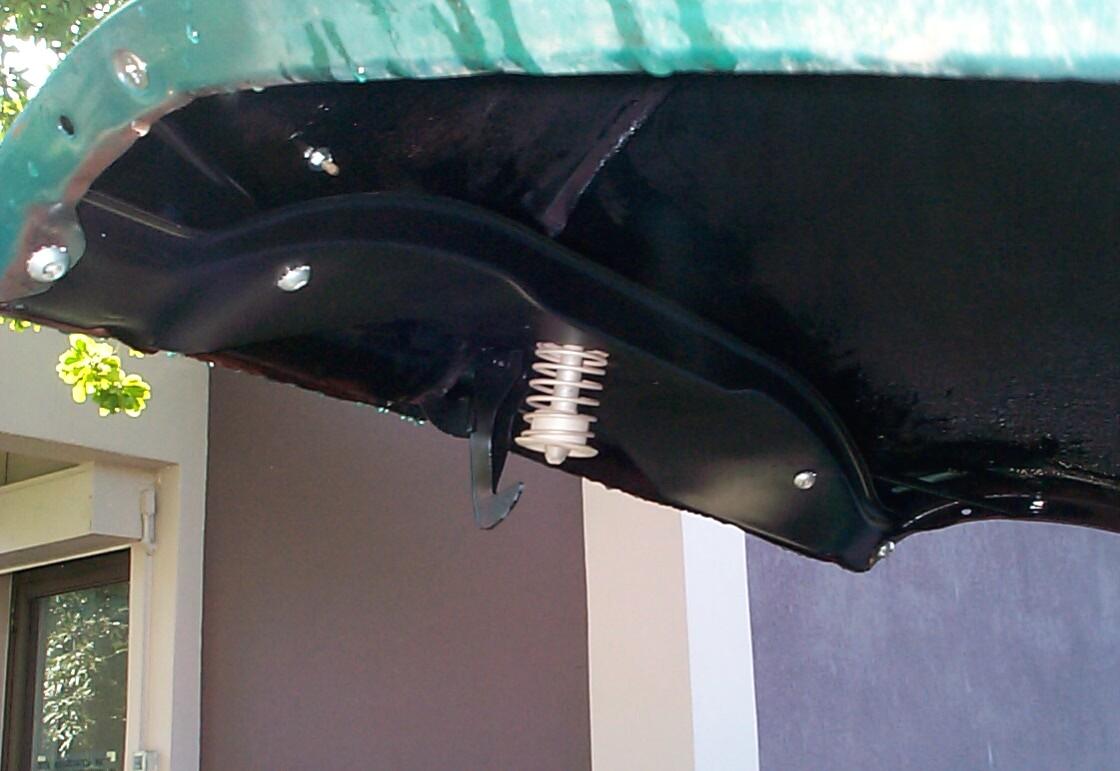
October 1st 2005 October an' we're over the hump with hurricane season. Four months down, two to go. Puddles on the ground and overcast in the shadetree garage today. Had half my tools out of the shed when it started raining on me. Today is hood latch and upper radiator baffle day. After the rain stopped, I removed the hood lock assembly again and the hood emblem. Cleaned up the forward edge of the hood, both front and back, with a wire cup in the electric angle grinder. I couldn't reach all the nooks and cranies so Eastwood's Rust Encapsulator was selected for the primer coat.
 It
will be about four hours before I can topcoat the Rust Encapsulator so
I turned to the latch plate and upper radiator baffle. I haven't found
the way to keep the latch plate rust free yet. I suspect this thing was
painted gloss black along with the radiator baffle originally but I
like the polished metal look better and will deviate from concours in
this area. Since I'm re-finishing the upper radiator baffle this time
around, I gave the latch the wire cup/electric angle grinder treatment
in situ. I wasn't worried about losing some paint on the baffle as I
would normally. Removed the latch plate to finish the wire brushing
operation then, it rained again ~!@#$%^
It
will be about four hours before I can topcoat the Rust Encapsulator so
I turned to the latch plate and upper radiator baffle. I haven't found
the way to keep the latch plate rust free yet. I suspect this thing was
painted gloss black along with the radiator baffle originally but I
like the polished metal look better and will deviate from concours in
this area. Since I'm re-finishing the upper radiator baffle this time
around, I gave the latch the wire cup/electric angle grinder treatment
in situ. I wasn't worried about losing some paint on the baffle as I
would normally. Removed the latch plate to finish the wire brushing
operation then, it rained again ~!@#$%^
 The
hood lock support rods that I primered last week weren't quite fully
covered so they got hung up in BillyBob's tree between passing showers
for another coat of self-etching primer. Went on to remove and sand
down the upper radiator baffle. I originally gave this thing a stage I
treatment back in the fall of 2000. I finished it in Rustoleum Hunter
Green which is holding up OK but is a bit lumpy because I didn't fill
in the pits or fix the other surface imperfections. Gonna refinish it
in a more correct gloss black and smooth it out a little in the
process. We aren't going down to bare metal, just sand and fill it
some. I started out with 80 grit sandpaper on a foam sanding block.
The
hood lock support rods that I primered last week weren't quite fully
covered so they got hung up in BillyBob's tree between passing showers
for another coat of self-etching primer. Went on to remove and sand
down the upper radiator baffle. I originally gave this thing a stage I
treatment back in the fall of 2000. I finished it in Rustoleum Hunter
Green which is holding up OK but is a bit lumpy because I didn't fill
in the pits or fix the other surface imperfections. Gonna refinish it
in a more correct gloss black and smooth it out a little in the
process. We aren't going down to bare metal, just sand and fill it
some. I started out with 80 grit sandpaper on a foam sanding block.
By mid-afternoon, the Rust Encapsulator on the hood was cured. I gave the underside a coat of Eastwood's rattlecan Chassis Black paint along with the hood lock support rods. I don't know what the original finish was when BillyBob left the factory but somewhere along the line he got a coat of some kinda tar-like black undercoating. This stuff is still doing its job and I'm not gonna mess with it 'cept to maybe paint it someday. The outside edges of the hood got Rustoleum Hunter Green to repair the areas damaged by the "torch and quench" bolt loosening methods a few weeks back. I may have to do the Hunter Green over since the sky opened up on me a third time while I was spraying it! The rain is doin' a number on me today.
OK. I'm tired of stompin' thru the puddles like a swamprat. I secured BillyBob's hood with a bungie cord. Then I completed BettyLou's monthly maintenance tasks since I'll be exchanging her for Renegade up at the warehouse in the morning. Put the tools away and headed for the Krash Pad in BettyLou.
October 2nd 2005 Wet when I got to the Krash Lab this morning with occasional wind gusts. If the forecasters are to be believed, I'm in for more of the same weather I had yesterday. Doesn't look like I'm gonna be able to start sandblasting that second wheel today. At the park up the street, city workers are stringing Christmas tree lights in the palm trees. They seem to start earlier every year. Really leaches out all the meaning for me.
 The
hood emblem was re-installed. The upper hood lock assembly was put back
together first and installed, this time with threadlocker on the
fasteners since it won't be coming back out again this detailing cycle.
I was interrupted by a rain storm in the middle of this process. All
fasteners are new and the clutch head flats were replaced with
stainless 1/4" - 20 x 1/2" phillips flat head screws that came with the
Doc's House of Bolts kit since I haven't placed an order to Restoration Specialities
yet for replacement clutch heads.
The
hood emblem was re-installed. The upper hood lock assembly was put back
together first and installed, this time with threadlocker on the
fasteners since it won't be coming back out again this detailing cycle.
I was interrupted by a rain storm in the middle of this process. All
fasteners are new and the clutch head flats were replaced with
stainless 1/4" - 20 x 1/2" phillips flat head screws that came with the
Doc's House of Bolts kit since I haven't placed an order to Restoration Specialities
yet for replacement clutch heads.
Went on to continue sanding the upper radiator baffle from yesterday. Got the front sanded and was running over the back side with a 3M Scuff pad to rough it up for new paint when the second shower of the day chased me inside. Rattzen-Frazzen!
Got the baffle to the point where I could hang it in the tree and PRE Paint Prep it. Then hit the bare metal areas with rattlecan self-etching primer. By the time that cured, it was too late to paint since I was planning on using Eastwood's Chassis Black and that is a slow drying paint. It will have to wait until next week. Started bolting the upper radiator baffle and hood latch plate back on BillyBob with new stainless steel bolts from Doc's House of Bolts. One of them started crooked so I stopped to clean the fouled captured nut by running a tap thru it. Three more passing showers also slowed my progress.
Updated my nuts-n-bolts inventory spreadsheet and waited until the rain was down to a drizzle to hump the tools back to the storage shed. Wuz 'bout half done when I thought I heard someone drivin' down the alley fast thru the puddles . . . Wrong! It was a sheet of rain that drenched me!. That's it! I'm done. I'll cart the rest of the tools to the shed tomorrow. Darn! Weekends like this are worse than the all day soakers.
October 8th 2005 "Rise and shine! Daylight in the swamps!" was one of my Dad's favorite sayings when Mom was out-of-town and he was in charge of JR and I. He would revert to his days as a Staff Sgt. during WWII with the 329th Airdrome Squadron, a Combat Cargo outfit in Burma. I've been thinking of that saying all week as we suffered the daily deluge. It's not too bad today so far, so I started dragging out the tools.
 I
got the first sprinkling of precipitation of the day shortly after I
got set up for more sanding of the upper radiator baffle. I had secured
my electric drill to the Decker WorkMate with bungie cords and attached
my 52" flexible drill shaft with 3M's "2" Grinding/ Sanding/ Finishing
Kit disks at the working end. I didn't get far before it started
raining hard and I had to suspend operations and drag the tools inside.
I
got the first sprinkling of precipitation of the day shortly after I
got set up for more sanding of the upper radiator baffle. I had secured
my electric drill to the Decker WorkMate with bungie cords and attached
my 52" flexible drill shaft with 3M's "2" Grinding/ Sanding/ Finishing
Kit disks at the working end. I didn't get far before it started
raining hard and I had to suspend operations and drag the tools inside.
 The
fins on the front side of BillyBob's radiator are crumbling. I have
this problem with Renegade too. The Krash Lab is a twenty minute walk
from the ocean and the salt air is the only thing I can think of,
off-hand, that might be causing this problem. Curses! I don't know how
to fix this short of keeping yet another new radiator in inventory.
The
fins on the front side of BillyBob's radiator are crumbling. I have
this problem with Renegade too. The Krash Lab is a twenty minute walk
from the ocean and the salt air is the only thing I can think of,
off-hand, that might be causing this problem. Curses! I don't know how
to fix this short of keeping yet another new radiator in inventory.
After the rain went away, I got the upper radiator baffle and upper radiator support bar sanded and hung up in BillyBob's tree, They were PRE Paint Prepped and the bare spots touched up with Rust Encapsulator because there was a small bit of rust here and there. While the Rust Encapsulator was curing, turned my attention to the radiator. Went over the tank with a 3M Scuff Pad and masked it off for paint. PRE Paint Prepped the radiator tank and gave it a coat of Eastwood's Radiator Black paint, including the front fins in the forlorn hope it will slow down the corrosion a little bit. I masked off and touched up Renegade's radiator tank at the same time.
I received mushroom shaped buffs from Eastwood this past week and I chucked one in the electric drill/flexible shaft rig. Cleaned up the hood latch plate again and shined it up with Autosol Metal Polish (also from Eastwood) using the mushroom buff. Now we'll see how well this stuff protects the metal from corrosion. I put the buff in a ziplock bag with the Autosol since it's not good to mix and match polishes and compounds. This particular buff will be dedicated to Autosol use alone.
Had to wait four hours for the Rust Encapsulator on the baffle and support to cure. Then they were given a coat of Eastwood's Chassis Black and hung in the shed. Got a couple of drips but I'll fix those on the next engine bay detailing cycle. Shut down operations for the day and headed to the Krash Pad in Renegade.
October 9th 2005 Good weather is expected this morning. Mother nature is dumping on the Northeast states today. My home state of Pennsylvania has flooding rivers. After exchanging Renegade for BettyLou up at the warehouse, I started setting up for a sandblasting session at the Krash Lab. After I got the blaster set up, I put on the "spacesuit" and ran a couple of tanks of sand over the second wheel in the wheel re-finishing job. I only got the front of the wheel done but the last time when I did the whole wheel in one session I became too dehdrydrated to be much good the rest of the day. I have to keep reminding myself that this is a hobby. Hobbies are fun. Dehydration is not fun.
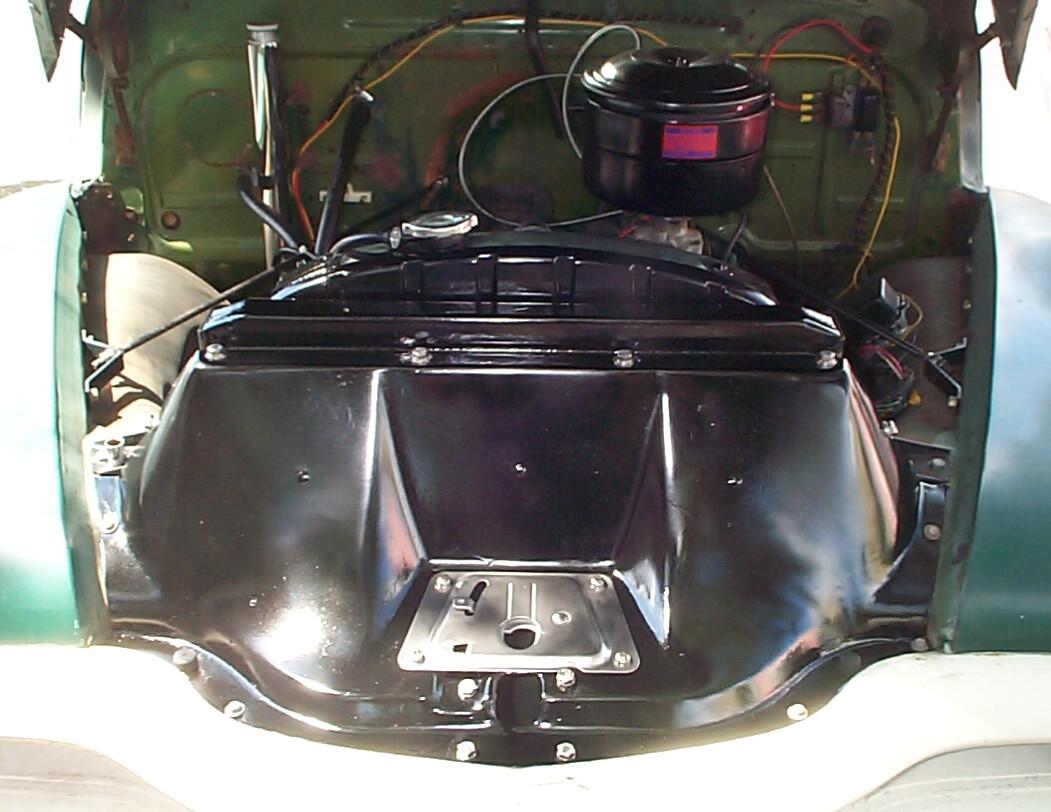 Bolted
the upper radiator baffle and hood latch plate back in with the
stainless steel fasteners from Doc's House of Bolts, this time with
threadlocker since I don't anticipate taking these parts back out again
this detailing cycle. Did some diddlin' around maintenance to BettyLou
and the boss's panzerwagon to finish out the weekend.
Bolted
the upper radiator baffle and hood latch plate back in with the
stainless steel fasteners from Doc's House of Bolts, this time with
threadlocker since I don't anticipate taking these parts back out again
this detailing cycle. Did some diddlin' around maintenance to BettyLou
and the boss's panzerwagon to finish out the weekend.
October 15th 2005 Forecast today is for scattered showers with a 30% chance of rain. So far, it's a steady drizzle with heavy cloud cover, more like a all-day soaker. Finished up the engine bay portion of the detailing cycle last week and I left it in better shape than I found it, cleaner, and with two new parts restored (upper hood lock assembly and air cleaner). Now, it's on to the body detailing portion of the cycle. Washing BillyBob and touching up the Rustoleum Hunter green paint is first on the list.
It was turning out to be "one of those days" when stoicism would be tested. First, the rain, then the cleaning guy appeared to disrupt operations for awhile. I made the mistake of answering the phone which turned out to be a client who wanted to use our conference room for a couple of hours. Now, I would have to ride herd over them too. After the hustle and bustle was over, BillyBob was washed. The weather hadn't cleared up to my satisfaction so Rustoleum touch-ups will have to wait some. In the mean time, I replaced BettyLou's hood struts.
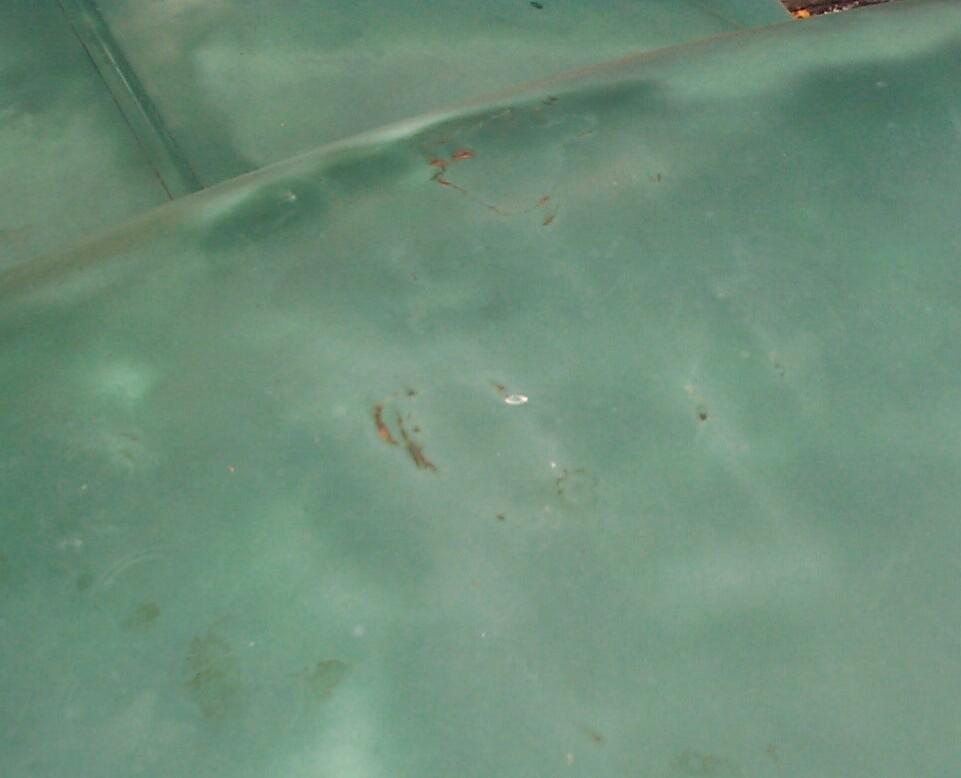 By
mid-afternoon, the sky was still uneasy but I decided to start the body
touch-ups anyway. There were small rust spots starting in a few areas
on the roof so these were hand-sanded with a foam sanding block, PRE
Paint Prepped and primed with rattlecan Rust Encapsulator. I'll top it
off with Rustoleum tomorrow.
By
mid-afternoon, the sky was still uneasy but I decided to start the body
touch-ups anyway. There were small rust spots starting in a few areas
on the roof so these were hand-sanded with a foam sanding block, PRE
Paint Prepped and primed with rattlecan Rust Encapsulator. I'll top it
off with Rustoleum tomorrow.
October 16th 2005 Got cloud cover today but it's not supposed to rain so, after switching BettyLou for Renegade up at the warehouse, I started dragging out the pressure blaster setup to work on the second spare wheel some more. Got the blaster filled with sand when the wind started to pick up. Nutz! Went thru the tedjus process of putting the blaster equipment away again.
Back to body touch-ups. Ran over the roof areas I primed yesterday with a 3M Scuff Pad and PRE Paint Prep. I can spray rattlecan paint as long as the wind is intermittent and not steady. Put down a coat of Rustoleum Dark Hunter Green over most of the roof. That should hold it fer awhile. I figure the cab will be the last to get real honest-to-goodness automotove paint on it sometime down the line.
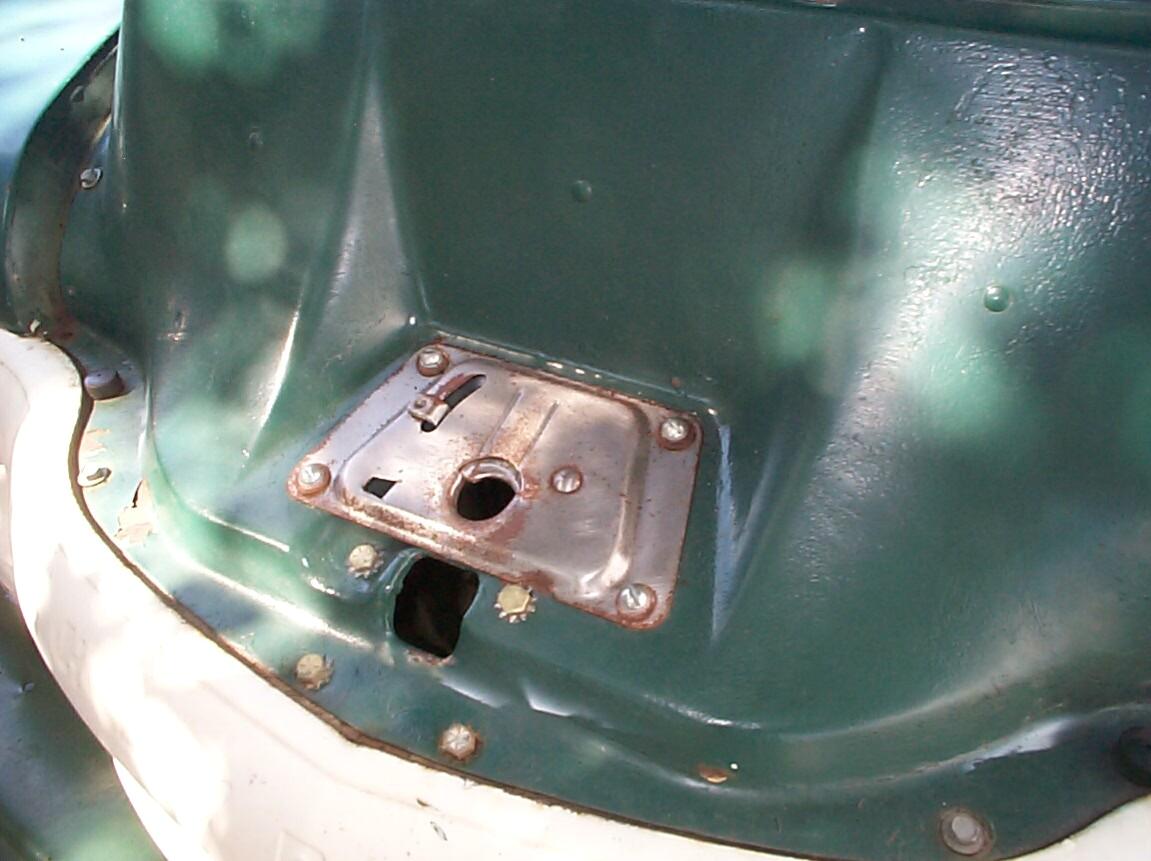
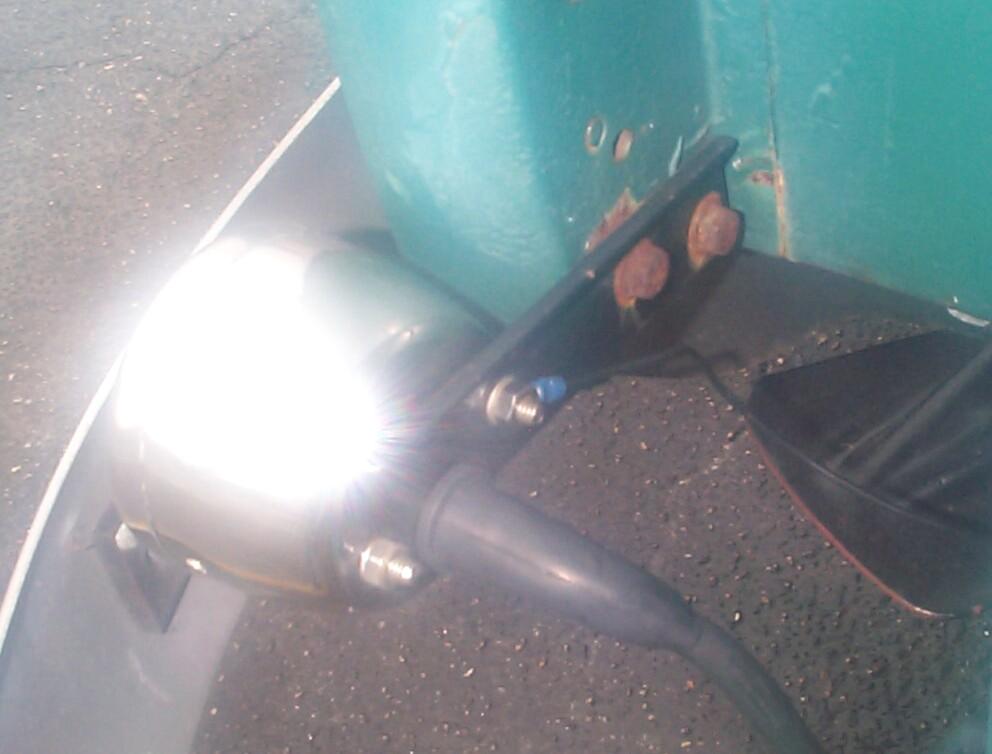
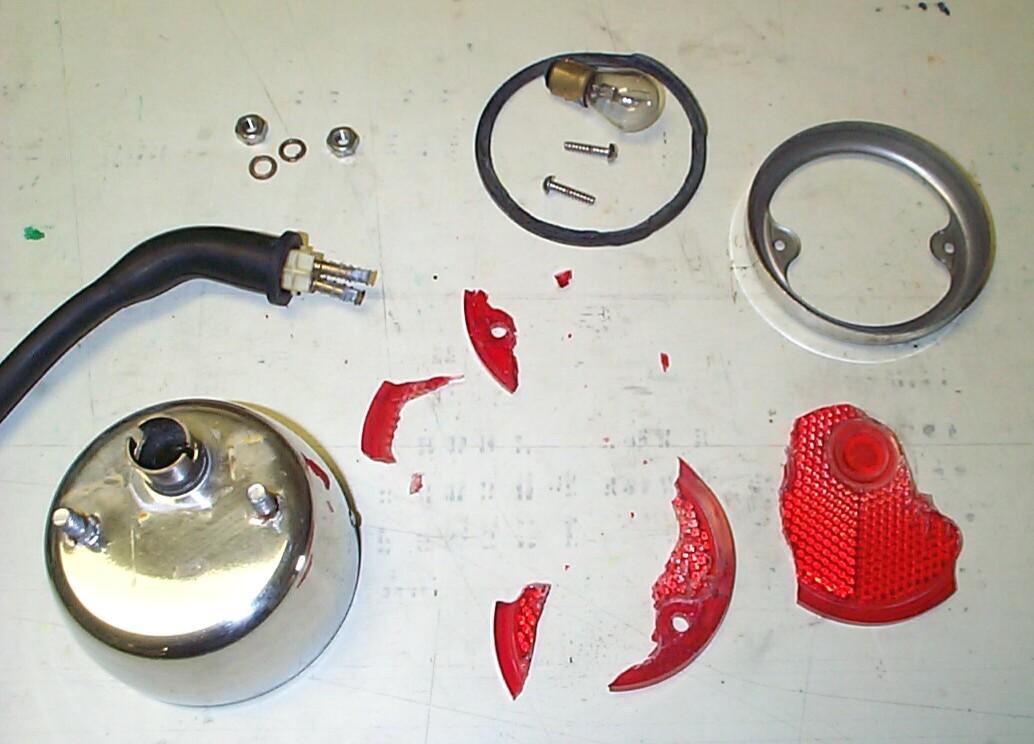 Did
some minor work on Renegade then turned to taillight detailing. The
last time I messed with the taillights, I didn't take them completely
apart because the lenses were fractured. I've got new lenses now and
the old lenses did fall to pieces when I took the lights apart. I
cleaned corrosion and rust off the bulb contacts and stud threads with
the mini radial bristle brush in the Dremel motor tool. Polished the
housings up and re-installed the taillight housings on BillyBob.
Checked to make shure the lights were working before installing the new
lenses.
Did
some minor work on Renegade then turned to taillight detailing. The
last time I messed with the taillights, I didn't take them completely
apart because the lenses were fractured. I've got new lenses now and
the old lenses did fall to pieces when I took the lights apart. I
cleaned corrosion and rust off the bulb contacts and stud threads with
the mini radial bristle brush in the Dremel motor tool. Polished the
housings up and re-installed the taillight housings on BillyBob.
Checked to make shure the lights were working before installing the new
lenses.
 October
19th 2005 Awoke this
morning with Fred Flintstone hollerin' "Willlllma!!"
in my mind. I have the TV programmed to come on at 5 AM tuned to The
Weather Channel. Hurricane Wilma is now the strongest CAT 5 storm on
record with sustained winds of 175 MPH and it's current track is darn
near centered on us. The prospects for sand blasting this weekend under
BillyBob's tree are not good. A gal who blogs under the moniker
"Florida Cracker" sez "Looks like we're not even going to get the
chance to be wiped out by the bird flu."
October
19th 2005 Awoke this
morning with Fred Flintstone hollerin' "Willlllma!!"
in my mind. I have the TV programmed to come on at 5 AM tuned to The
Weather Channel. Hurricane Wilma is now the strongest CAT 5 storm on
record with sustained winds of 175 MPH and it's current track is darn
near centered on us. The prospects for sand blasting this weekend under
BillyBob's tree are not good. A gal who blogs under the moniker
"Florida Cracker" sez "Looks like we're not even going to get the
chance to be wiped out by the bird flu."
October 22nd 2005
Swampy in the shadetree garage this morning. I had scheduled car
washing for Renegade and BettyLou this weekend but that would be a
wasted effort since Hurricane Wilma is expected to plow thru here on Monday
Tuesday Monday so that is postponed
to next weekend when, hopefully, I'll still have two dirty vehicles to
wash. Waiting for the "Sword of Damocles" to fall tends to make one
irritable.
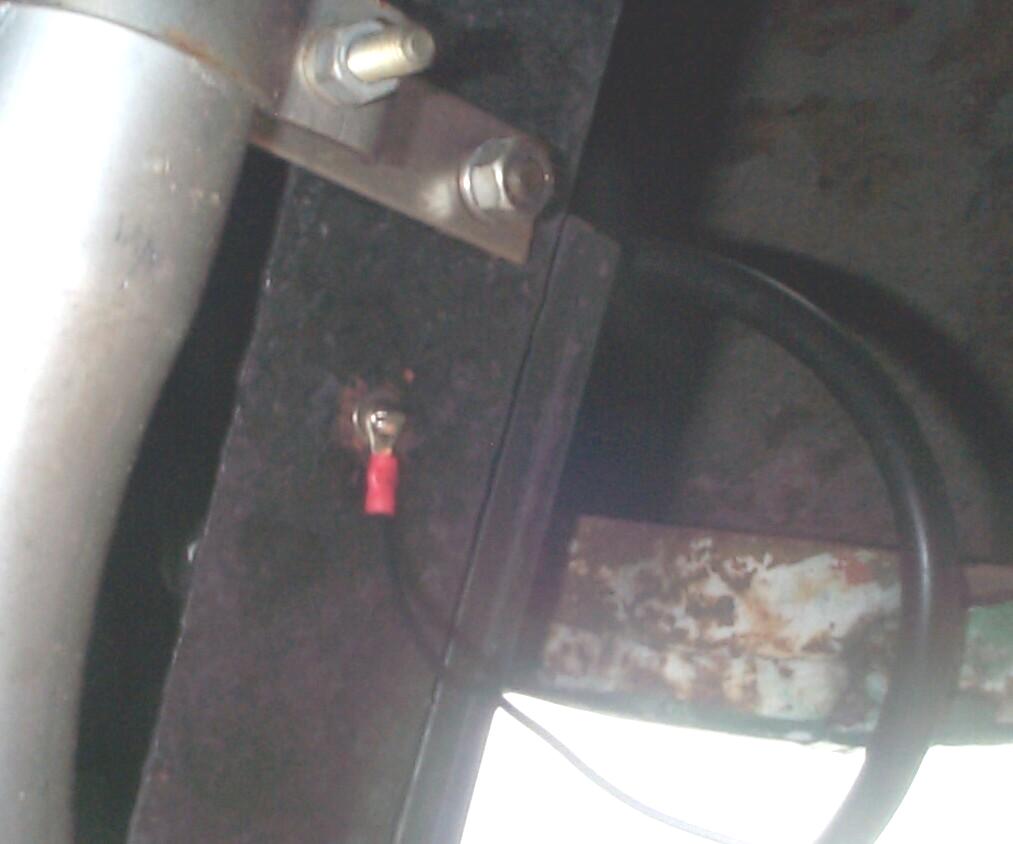 Last
week, the taillights were detailed. The taillight brackets will be
taken care of today but first, ground wires for the taillights will be
installed. I've had trouble getting a good ground in the past and I'm
hoping this is the reason that the factory turn signal director isn't
working properly. Two 7/64" holes were drilled in the bottom of the
frame rail near the taillight assemblies. My first thought was to use
stainless steel self-tapping screws to secure the ground wires to the
frame. This idea didn't work and I ended up using #8-32 x 1/2"
stainless steel machine screws with stainless steel flat washers and
hex nuts in 11/64" holes. Several tries were necessary to get to this
end result. Probably because I was working on my back in the water,
Murphy's law kicked in. If I was standing up in an easily accessible
area, I woulduv' gotten it on the first try.
Last
week, the taillights were detailed. The taillight brackets will be
taken care of today but first, ground wires for the taillights will be
installed. I've had trouble getting a good ground in the past and I'm
hoping this is the reason that the factory turn signal director isn't
working properly. Two 7/64" holes were drilled in the bottom of the
frame rail near the taillight assemblies. My first thought was to use
stainless steel self-tapping screws to secure the ground wires to the
frame. This idea didn't work and I ended up using #8-32 x 1/2"
stainless steel machine screws with stainless steel flat washers and
hex nuts in 11/64" holes. Several tries were necessary to get to this
end result. Probably because I was working on my back in the water,
Murphy's law kicked in. If I was standing up in an easily accessible
area, I woulduv' gotten it on the first try.
 Then
it started raining on me . . . What else is new? While waiting on the
rain, I put away tools I don't anticipate using anymore this weekend
and updated BillyBob's wiring diagram with the taillight ground wires.
When the rain let up, ring connectors were crimped to the black ground
wires and the grounds were connected to the inboard taillight mounting
studs. Now the taillights have a direct ground to the frame where
before the ground was thru the brackets, stake pockets, bedsides and
who knows what else before it finally got to the frame. Lot's of
corrosion and paint barriers to transverse, making for a weak ground.
I'm going to wait for better weather conditions before cleaning the
taillight brackets, touching up the paint and replacing the fasteners.
I may replace the bracket fasteners with stainless steel someday since
the black flanged capscrews don't seem to hold up to the rust very well
but I still have a good supply of these so I'm stickin' with 'em for
the time being.
Then
it started raining on me . . . What else is new? While waiting on the
rain, I put away tools I don't anticipate using anymore this weekend
and updated BillyBob's wiring diagram with the taillight ground wires.
When the rain let up, ring connectors were crimped to the black ground
wires and the grounds were connected to the inboard taillight mounting
studs. Now the taillights have a direct ground to the frame where
before the ground was thru the brackets, stake pockets, bedsides and
who knows what else before it finally got to the frame. Lot's of
corrosion and paint barriers to transverse, making for a weak ground.
I'm going to wait for better weather conditions before cleaning the
taillight brackets, touching up the paint and replacing the fasteners.
I may replace the bracket fasteners with stainless steel someday since
the black flanged capscrews don't seem to hold up to the rust very well
but I still have a good supply of these so I'm stickin' with 'em for
the time being.
October 23rd 2005
Weather is oppressive but not bad otherwise. We are about 24 hrs until
Hurricane Wilma passes thru here. Right now, she is a 100 mph CAT 2
storm. Still don't know where she will hit or how strong she will be.
If she hits the Naples area as a CAT 1, I can safely ride it out at the
Krash Pad (barring tornado activity). If she hits as a CAT 2, I would
be safer at the Krash Lab. If you're reading this, I made
some correct decisions got lucky this time.
BillyBob's battery is down to 12.02 volts so I put it on the charger first thing. After the battery was charged, I took BillyBob up to his warehouse and exchanged him for BettyLou. Positioned BettyLou and the boss's Panzerwagon against our neighbor's building and away from the trees to protect them some from the coming storm. Put away the tools then. Not much fun working while you're awaiting impending doom.
October 30th 2005 "The Dude Abides" and so does the Krash and BillyBob. Hurricane Wilma is gone and things are slowly getting back to normal. I've written up my storm reflections on a separate page, Live from Hurricane Alley.
Weather is clear and cool. BillyBob is still up at the warehouse and today I'm gonna try and wash Hurricane Wilma debris off of BettyLou. Yesterday, I cleaned up Renegade and ran Meguiar's Quik Clay Detailing System over him. Will try to do the same for BettyLou in the upcoming weeks. Am developing procedures with these two vehicles that I hope to use with BillyBob someday when the Rustoleum is replaced with automotive paint. Fer now tho', Paint care for BillyBob consists of a scuff pad and a rattlecan. No sandblasting on the wheel restoration again this weekend. It's a very breezy day.
November 5th 2005 Here it is, November. One month of hurricane season to go. It's a fairly nice indian summer day and I just got back from a cruise with six of the survivors of the USS Abner Read, a Fletcher class destroyer sunk in the Battle of Leyte Gulf. My uncle, Anson Wade Kephart, went down with the ship. BillyBob is still in his warehouse bay so I'm doing monthly maintenance and body detailing on Renegade today.
November 6th 2005 Exchanged Renegade for BillyBob up at the warehouse first thing and performed monthly maintenance tasks on both BillyBob and BettyLou. It's good weather this morning for sandblasting but I just can't build up the motivation to setup the rig and do it.
I don't have time to finish any of the jobs I want to start today so I'll just post this log entry and wait for a clean start next weekend . . . weather permitting. I'll be continuing with body detailing as well as the wheel project. The Tammy Faye paint job is gettin' pretty shabby so there will be more Rattlecan Rustoleum work than usual for this detailing phase. See Y'all down the road.
| < Back
to Intro |
You can email me at ![]() webmaster@laroke.com
webmaster@laroke.com
Issued Sunday November 6, 2005
Updated Monday March 12, 2018
copyright © 1996-2018 Larry Robert Kephart all rights reserved
| | LRK Home | | Bio Info | | Krash Khronicles | | LAROKE | |
| | BettyLou | | BillyBob's Garage | | Rat Patrol | | Deerslayer | | Elvira | |
| | Land of the Free and Home of the Brave | |
| | Keppylou's Art | | WWI Soldier's Diary | |