| | LRK Home | | Bio Info | | Krash Khronicles | | LAROKE | |
| | BettyLou | | BillyBob's Garage | | Rat Patrol | | Deerslayer | | Elvira | |
| | Land of the Free and Home of the Brave | |
| | Keppylou's Art | | WWI Soldier's Diary | |
BillyBob Work-in-Progress Log
![]()
WHAT'S NEW is a chronological listing of updates to the BillyBob site.
![]()
TRUCK LINKS including vendor sites for old parts, custom parts, and tools as well as sites for classic car and truck organizations
STORE Operating in association with Amazon.com, books, recordings and tools can be purchased.
PLANNING for the restoration including project schedule and cost estimates.
![]()
TRAVELS WITH BILLYBOB With apologies to Steinbeck, this area of BillyBob's Garage will be used to log the trips BillyBob and I make together.
WORK-IN-PROGRESS is the restoration of parts of BillyBob that I can accomplish without a garage.
PRE-RESTORATION includes log entries of minor repairs and adventures between time of purchase and the time when I started restoration, a piece at a time.
JR'S KORNER JR's Korner is the history of BillyBob before I got him authored by my brother, Wm. C. Kephart.
![]()
BILLYBOB MAINTENANCE Ever changing detailing, oil change, lube, etc. maintenance routines specifically developed for BillyBob, including required tools, materials and procedures.
PARTS SHOP The Parts Shop is a repository of How-To articles. Things that I have done over and over enough times to have developed a procedure. This gives me a checklist and saves brain cells.
STEALTH SHOP Urban residence design with large integrated shop and separate living quarters for a relative or renter.
![]()
You will need the Adobe Acrobat browser plugin to view these wiring diagrams which are in the PDF file format. This format allows zooming and panning. If you don't have this plugin, it can be downloaded and installed (free) from the Adobe site. The button below will take you there.
![]()
BILLYBOB WIRING DIAGRAM Here's the wiring diagram updated with BillyBob's current state 'cepting the third-party strap-on turn-signal director.
STRAP-ON TURN-SIGNAL DIRECTOR/BRAKE LIGHT CIRCUIT This turn signal and brake light circuit diagram shows the current state of the third-party turn-signal director wiring, which will remain in place until I figure out the problems with the OEM turn-signal director. It also shows the OEM headlight switch.
36. Just tryin' to Maintain
December 7th 2004 Pearl Harbor Day. Remember our honored dead. Got back from 'nother trip to Pennslyvania on Sunday. The Antique Auto Battery was too dead to crank BillyBob. ~!@#$%^ When I arrived home last night, I found my apartment management at the Courtyards of Tivoli were up to their old tricks, or mis-management rather. I personally delivered my rent check in advance before leaving for Pennslyvania but here I was confronted with a three-day eviction notice on my door for non-payment! There's never a dull moment when you live in a development owned and managed by Jim Batmasian and his lovely wife Marta. With events like these it's difficult to maintain my always sunny disposition.
OK! I'm finished pussyfootin' around with this battery. I went to Discount Auto Parts and found a Autocraft Titanium brand battery of dimensions close enuf to fit. With a little bit of trimmin', the battery hold-down will fit. I'm not gonna start badmouthin' the Antique Auto Battery yet until I see how the new battery fares.
12v G22 Delco 9"x6.75"x9" battery - $157.00
6 qts Battery Electrolyte - $25.25
School of Hard Knocks education - Priceless!
December 10th 2004
It must be my week to suffer the wrath of the "rent gods"! Got a letter
in the mail last nite informing me I had been locked out of BillyBob's
warehouse bay for non-payment of December rent. I had executed an
online bill payment from my bank on November 26th, the same day I paid
the apartment rent. It never got there and now I have to deal with the
bank ~!@#$%^ Had to go up to the
warehouse this morning and pay the rent again by credit card including
a late fee
double ~!@#$%^
December 11th 2004 Today's a maintenance day. Cloudy, slightly cool weather. Did the monthly checks then turned my attention to the taillights. Both taillight lenses are cracked which is a new mystery to me. I don't want to worsen the cracks and since the bulbs are OK (I checked the lights earlier), I'm cleaning them this time without disassembly and ordering new lenses. Taillight brackets are beginning to look a bit ratty 'specially where they've been sanded to get a good ground. Think I'm gonna improve BillyBob in the future by adding ground wires so I don't have to scrape off paint to get a good ground.
Continued by sanding, priming and touching up the bare metal areas on the hood with rattlecan Dark Green Rustoleum. Finally, I pulled the seat out and replaced the gas tank filler hose and vent hose. Hopefully, I'll stop getting gas fumes in the cab when I fuel up now. I didn't do much but it was a good day. With the road trips to Pennsylvania, I haven't been able to putz around with BillyBob for three weeks. Tomorrow, I'll try to get some new stuff done.
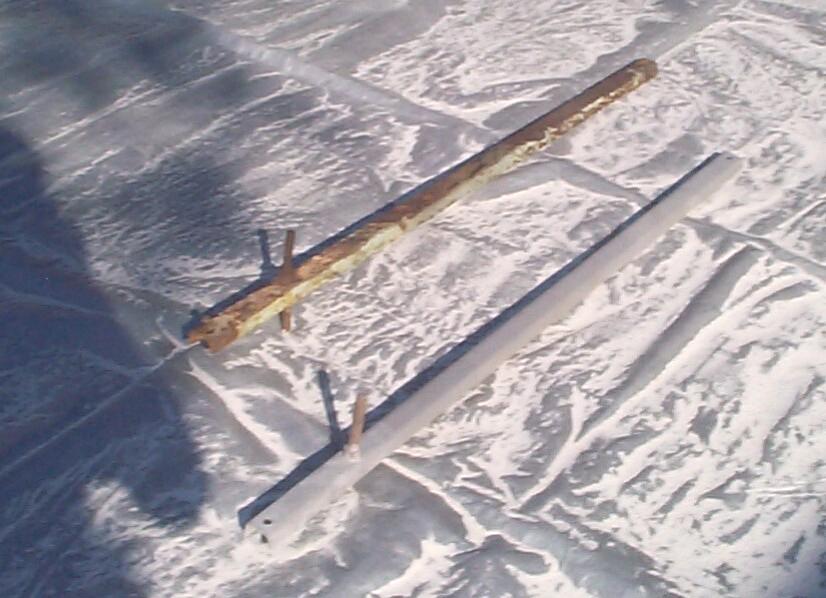 December
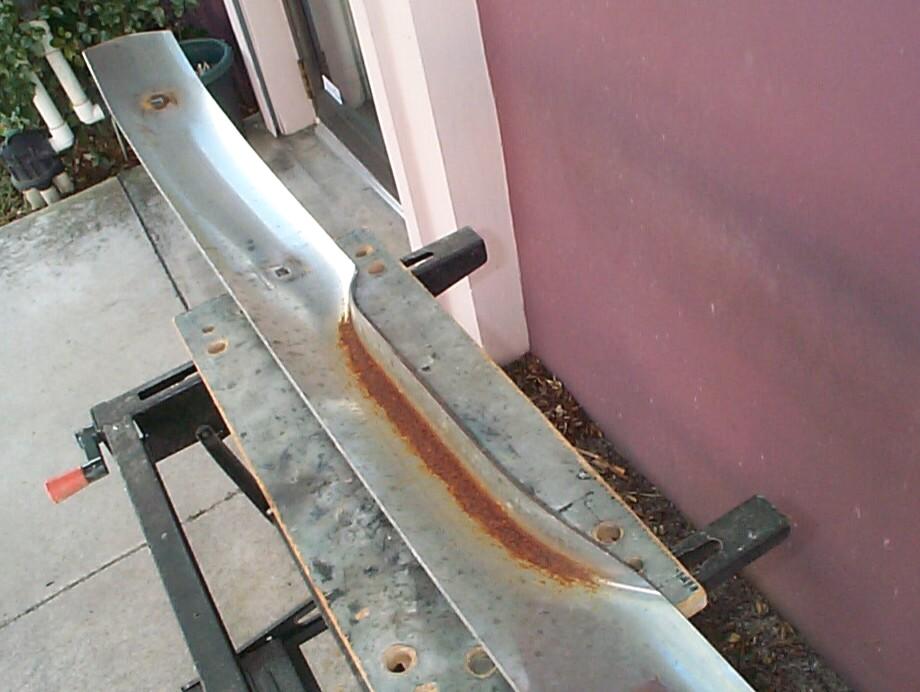
12th 2004 A cold front
is rolling thru. It's chilly and clear. A good day to drag out the
sandblaster and derust the tire carrier parts. By mid-afternoon, I had
finished blasting one of the support channels and that's enuf blaster
fun for one day. Got out the electric 4" angle grinder and cut thru the
bolt still rusted to the cleaned support channel. That worked well so
the rusted bolts still attached to the un-blasted support channel were
removed in the same way.
December
12th 2004 A cold front
is rolling thru. It's chilly and clear. A good day to drag out the
sandblaster and derust the tire carrier parts. By mid-afternoon, I had
finished blasting one of the support channels and that's enuf blaster
fun for one day. Got out the electric 4" angle grinder and cut thru the
bolt still rusted to the cleaned support channel. That worked well so
the rusted bolts still attached to the un-blasted support channel were
removed in the same way.
PRE Paint Prepped the blasted channel and hung it up in BillyBob's tree. Started spraying with Eastwood's Self-Etching Primer but the rattlecan ran out of propellant with plenty of paint still in the can . . . It was my last can, too! Waited awhile and painted the channel with my last rattlecan of Rust Encapsulator instead. When that set up, the support channel was finished off with a coat of Chassis Black.
December 18th 2004 There's another cold front rolling thru so it's good working weather temperature-wise but the rain threat is 50%. The new gas tank hoses solved the fume problems in the cab but I didn't expect to replace them so soon (about three years). I guess the modern gas formulations are hard on old-style rubber. These might last longer since I don't fill the tank completely when I stop fer gas these days.
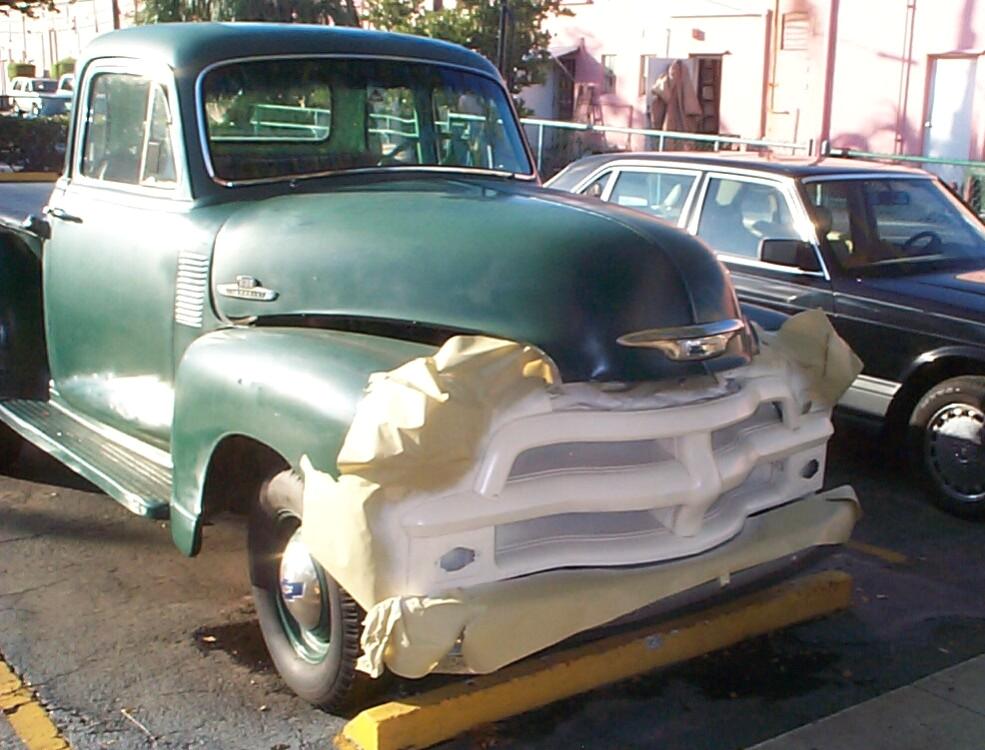 Started
out with quarterly
maintenance. Then went on to detail the parking lights. I
never cease to be amazed by how fast re-pop chrome and rubber
deteriorates. At least the lenses are intact now that I'm using the
original shouldered retaining screws that allow the lenses to move with
the cork gasket. With the parking lights out, I did a quick-n-durty
cleaning and masking on the grille and gave it a barnyard rattlecan,
Rustoleum Shell White, paint coat with the associated runs, drips an'
errors.
Started
out with quarterly
maintenance. Then went on to detail the parking lights. I
never cease to be amazed by how fast re-pop chrome and rubber
deteriorates. At least the lenses are intact now that I'm using the
original shouldered retaining screws that allow the lenses to move with
the cork gasket. With the parking lights out, I did a quick-n-durty
cleaning and masking on the grille and gave it a barnyard rattlecan,
Rustoleum Shell White, paint coat with the associated runs, drips an'
errors.
December 19th 2004 Chilly again today so the sandblaster was set up to clean the other wheel carrier support channel. Some rain water has managed to find its way into the storage shed and, naturally, it pooled around and soaked into my one remaining bag of blasting sand. I kept recycling what dry sand I had and managed to get the support channel blasted but I'll have to make a Home Depot run for more sand before long.
I don't have a new supply of primer or Rust Encapsulator yet, so painting will have to wait. Gave the Boss's Panzerwagon its weekly exercise and finished detailing, re-installing and testing the parking lights.
December 24th 2004 Christmas Eve and a Merry Christmas to all. We have the day off here at the architect's office so I'm back to maintenance on BillyBob. While most of the rest of the nation are suffering a severe winter storm and cold snap, we are scheduled for rain. I'm doin' an oil change so I got up early this morning, laid out the tools and took off on a Fort Lauderdale Port Everglades run to heat up BillyBob's engine before draining the oil.
Got the oil changed by eleven, and the weather was still holding so I pulled out the tire carrier support channel that was sand-blasted last sunday and hung it up in BillyBob's tree. Commsumables (paints) arrived from Eastwood and fasteners from McMaster-Carr during the week to complete this small task. The channel was PRE Paint prepped then coated with one coat each of Rust Encapsulator and Chassis Black.
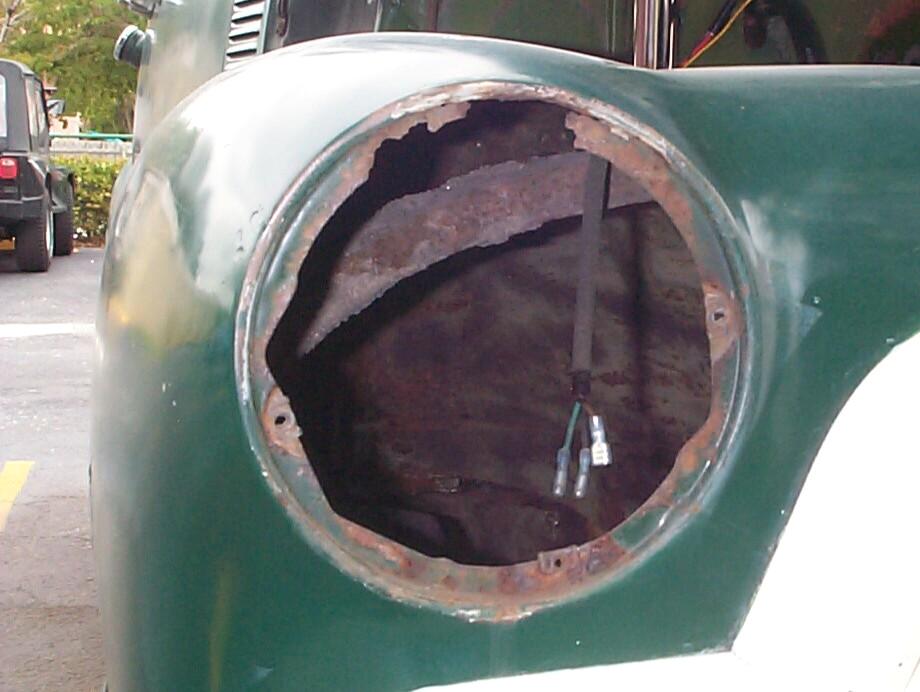 Next,
I took the headlights
out. It is their turn in the detailing rotation. Also took a few
minutes to glue Renegade's rear-view mirror back
onto his windshield. It falls off every few years regular as clockwork.
The last time BillyBob's headlights were detailed, it was a cosmetic
cleaning. Rust has progressed to the point on the fenders and headlight
buckets that this time will be a full scrape and paint detailing.
Next,
I took the headlights
out. It is their turn in the detailing rotation. Also took a few
minutes to glue Renegade's rear-view mirror back
onto his windshield. It falls off every few years regular as clockwork.
The last time BillyBob's headlights were detailed, it was a cosmetic
cleaning. Rust has progressed to the point on the fenders and headlight
buckets that this time will be a full scrape and paint detailing.
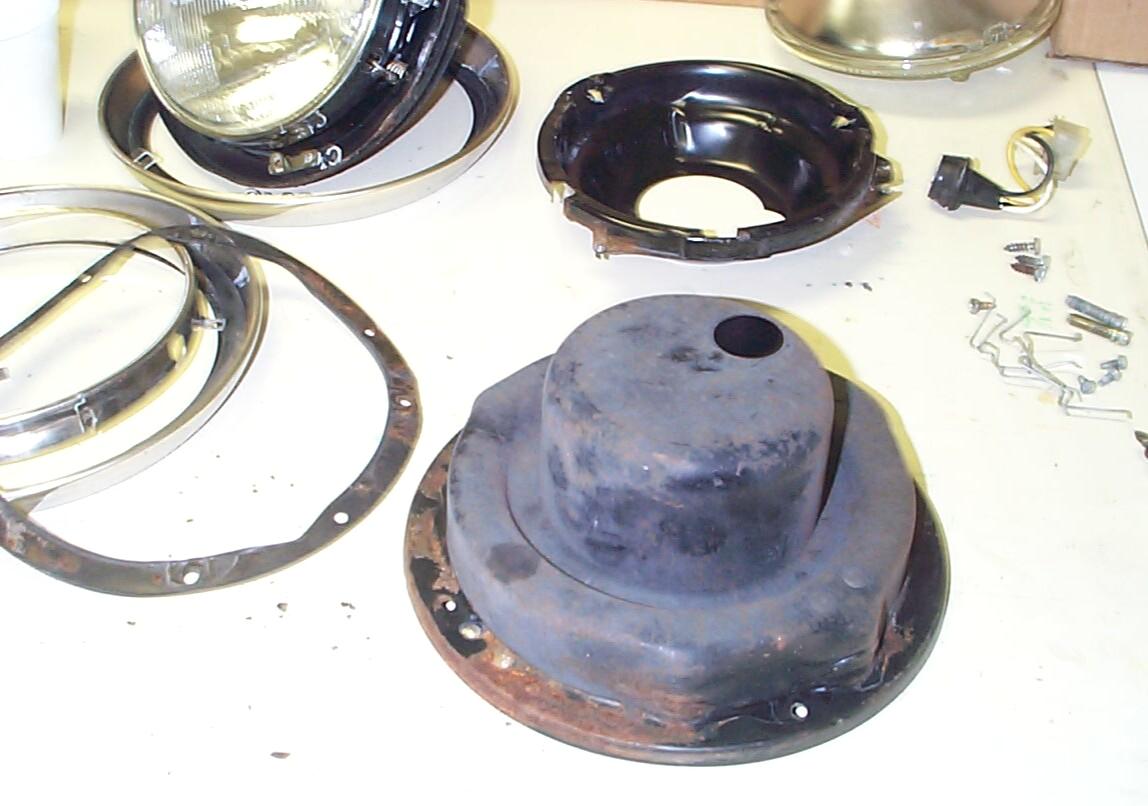 These
headlight buckets are re-pop assemblies manufactured who knows where
and, of course, the level of finish is substandard. They've only been
mounted on BillyBob fer two and a half years and the rust is extensive.
I'm gonna sandblast the worst of it and re-finish them with a more
durable paint. Gonna do it one headlight assembly at a time so the
other assembly can serve as a model when I try to put things back
together. The promised rain rolled in a little after three in the
afternoon. I did manage to get the fender paint touched up before I had
to put the tools away.
These
headlight buckets are re-pop assemblies manufactured who knows where
and, of course, the level of finish is substandard. They've only been
mounted on BillyBob fer two and a half years and the rust is extensive.
I'm gonna sandblast the worst of it and re-finish them with a more
durable paint. Gonna do it one headlight assembly at a time so the
other assembly can serve as a model when I try to put things back
together. The promised rain rolled in a little after three in the
afternoon. I did manage to get the fender paint touched up before I had
to put the tools away.
December 26th 2004 Change of plans. It's too windy for the siphon blaster today. It's too windy fer paintin' too so I put the headlight assemblies back on BillyBob to make him mobile for this week's daily driving. These assemblies are not right-handed or left-handed. They're interchangeable between sides so I have it in my mind to buy one more, re-finish it the way I want to, then install it and re-finish the one I pull out, etc.
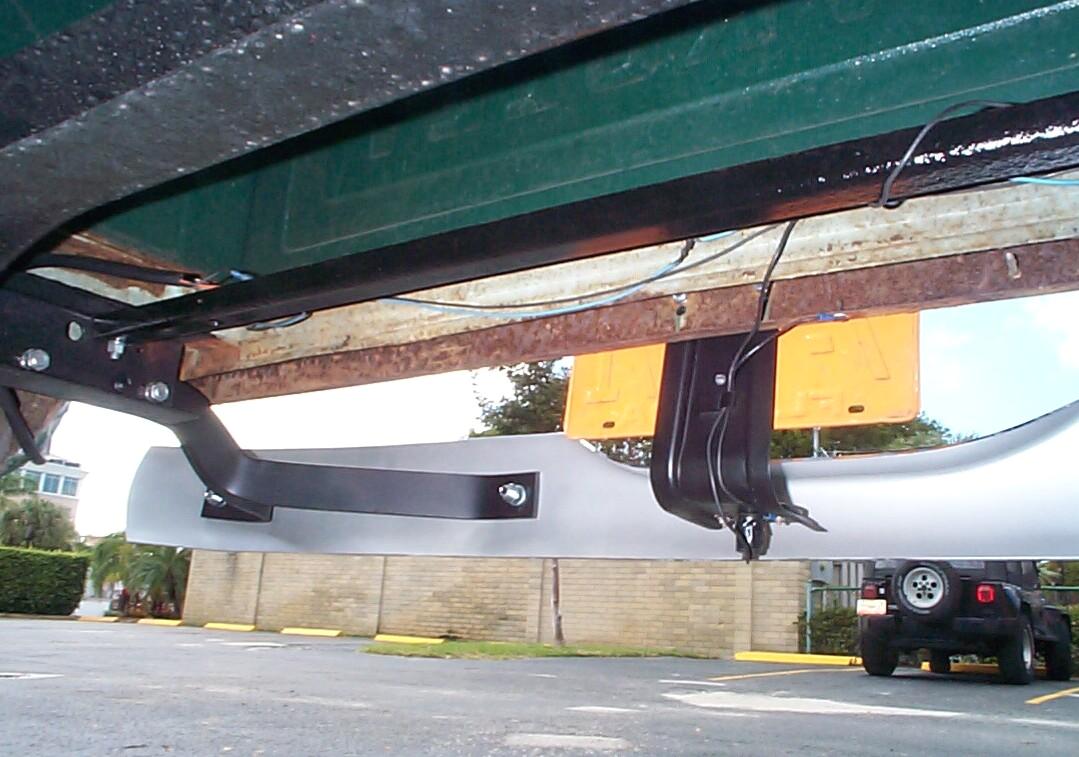
 Managed
to get some new work done by installing the tire carrier support
channels installed on the frame with 3/8"-24 x 1-3/4" Grade 8, Armor
Coat cap screws and hex nuts with lock washers and threadlocker blue. I
called it a day after that. The wind had kicked up to 25 mph with 30-35
mph gusts an' I wuz tired of fightin' it. After I got home, I saw on
the news that some gusts were up to 50 mph.
Managed
to get some new work done by installing the tire carrier support
channels installed on the frame with 3/8"-24 x 1-3/4" Grade 8, Armor
Coat cap screws and hex nuts with lock washers and threadlocker blue. I
called it a day after that. The wind had kicked up to 25 mph with 30-35
mph gusts an' I wuz tired of fightin' it. After I got home, I saw on
the news that some gusts were up to 50 mph.
January 1st 2005 Happy New Year! Spent most of New Year's eve on bumper maintenance and tryin' to loosen up the drain plug on the bottom of the three-speed transmission. Had limited success with the first task and none with the second. The drain plug apparently hasn't moved in years. I tried a open end 1/2" wrench and broke it. Then a pipe wrench and vise-grips and a Sears clench-wrench both before and after Kroil penetrating oil and MAPP gas torch applications were tried. No joy. This morning, I ordered a 8-point 1/2" impact wrench socket from McMaster-Carr. I would have ordered a 4-point socket if it had been available. In the mean time, I'll continue with the Kroil soakings.
 Today
is mostly a paint day. Started with tailgate touchups of Rust
Encapsulator followed by Dark Hunter Green Rustoleum. The frame ends
were hit with a bit of Chassis Black in the bumper bracket area. I
turned my attention to the license plate bracket, another re-pop item
showing signs of rust. It didn't turn out to be as bad as it looks once
I got the wire wheel after it. Finished up with PRE Paint Prep and SEM
Trim Paint.
Today
is mostly a paint day. Started with tailgate touchups of Rust
Encapsulator followed by Dark Hunter Green Rustoleum. The frame ends
were hit with a bit of Chassis Black in the bumper bracket area. I
turned my attention to the license plate bracket, another re-pop item
showing signs of rust. It didn't turn out to be as bad as it looks once
I got the wire wheel after it. Finished up with PRE Paint Prep and SEM
Trim Paint.
 The
rear bumper brackets got the same treatment but they were in pretty
good shape and only needed a few touch-ups with the SEM Trim paint.
Now, we come to the rear bumper. The chrome on the re-pops isn't very
good and the backs are rusting. Nate Hall and others have recommended
painting the bumper backs. Went over the entire back of the bumper with
a wire wheel in the air-powered angle grinder. Cleaned with Pre Paint
Prep and went over it again with a 3M Scuff pad. I would'uv used steel
wool if I had some. Masked the front of the bumper and edges off and
PRE Paint Prepped again. Gave the back of the bumper a couple of coats
of Eastwood's Self-Etching Primer and hung up my paint cans for the
day. The Primer has a two-hour drying time and it will be dark by then.
The
rear bumper brackets got the same treatment but they were in pretty
good shape and only needed a few touch-ups with the SEM Trim paint.
Now, we come to the rear bumper. The chrome on the re-pops isn't very
good and the backs are rusting. Nate Hall and others have recommended
painting the bumper backs. Went over the entire back of the bumper with
a wire wheel in the air-powered angle grinder. Cleaned with Pre Paint
Prep and went over it again with a 3M Scuff pad. I would'uv used steel
wool if I had some. Masked the front of the bumper and edges off and
PRE Paint Prepped again. Gave the back of the bumper a couple of coats
of Eastwood's Self-Etching Primer and hung up my paint cans for the
day. The Primer has a two-hour drying time and it will be dark by then.
 January
2nd 2005 Cool today but
too windy to sandblast. Gave the back of the rear bumper three coats of
Eastwood's Detail Silver Acrylic Lacquer (#1285Z) during wind calms.
I've had good luck with Eastwood's detail paints so far. Maybe this
solution will work better than my previous efforts with chrome polish
and wax. Put the license plate and bracket back together. Re-installed
it and the bumper brackets. Polished and waxed the chrome side of the
rear bumper and intalled it. It'll look good fer a few days untill it
rains again.
January
2nd 2005 Cool today but
too windy to sandblast. Gave the back of the rear bumper three coats of
Eastwood's Detail Silver Acrylic Lacquer (#1285Z) during wind calms.
I've had good luck with Eastwood's detail paints so far. Maybe this
solution will work better than my previous efforts with chrome polish
and wax. Put the license plate and bracket back together. Re-installed
it and the bumper brackets. Polished and waxed the chrome side of the
rear bumper and intalled it. It'll look good fer a few days untill it
rains again.
Went back to the windshield and put a bead of silicone windshield sealant between the glass and gasket on the outside. Then put a bead between the pinchweld and the gasket on the inside at the top and sides. Now, we'll wait and see what the rain does with that. I'm getting better at applying the silicone but not enuf that I can brag about it.
 I've
spent the whole three-day weekend on maintenance and detailing and I
wanted to make some forward progress before hangin' up my hat. I pulled
the Hot Rod Insulation, contact cement and heat tape that came from California Car Cover
out of the shed. The marketing materials that come with the insulation
say that it "Consists of two sheets of 99.5% pure industrial
grade aluminum laminated to 3/8" fiber tech padding". Looks
like aluminum foil on jute to me. I used the front panel of my old
cardboard headliner as a template to cut the first piece of roof
insulation. If you do the same, make the insulation 'bout 3" bigger all
the way around to give you enuf slop factor for trimming. I used
several pieces at the rear and tried to get insulation in behind the
dome light panel too. The heat tape was applied at all seams. It is
very similar to the foil and you have to really look close to see it.
I've
spent the whole three-day weekend on maintenance and detailing and I
wanted to make some forward progress before hangin' up my hat. I pulled
the Hot Rod Insulation, contact cement and heat tape that came from California Car Cover
out of the shed. The marketing materials that come with the insulation
say that it "Consists of two sheets of 99.5% pure industrial
grade aluminum laminated to 3/8" fiber tech padding". Looks
like aluminum foil on jute to me. I used the front panel of my old
cardboard headliner as a template to cut the first piece of roof
insulation. If you do the same, make the insulation 'bout 3" bigger all
the way around to give you enuf slop factor for trimming. I used
several pieces at the rear and tried to get insulation in behind the
dome light panel too. The heat tape was applied at all seams. It is
very similar to the foil and you have to really look close to see it.
January 8th 2005 Beautiful weather today. My impact socket arrived from McMaster-Carr early in the week so the transmission drain plug was the first order of business. The impact wrench in concert with the penetrating oil got the frozen drain plug loose in a matter of seconds. Tomorrow, after a warm-up run, I can change the transmission gear oil.
Then the front bumper, brackets and splash pan came off for the same treatment I gave the rear bumper last week. Got the bumper primed and Hunter green touchups done on the fender bottoms and front splash pan before the shadetree garage was closed for the day.
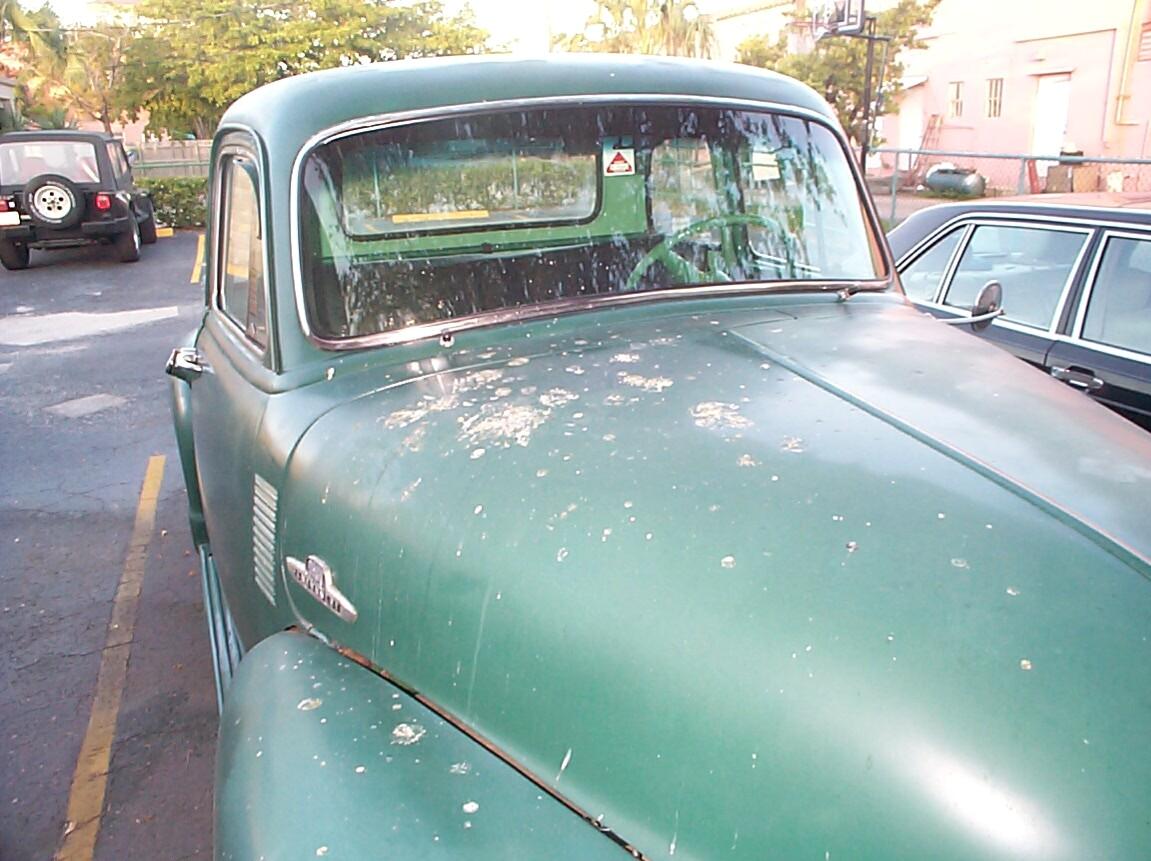 January
9th 2005 'Nother good
day to work. Came out of the Krash Pad at daylight to find that the
local birds had a block party in the tree above BillyBob last nite.
Gassed BillyBob up on the way to the Krash Lab and then washed the hood
and windshield before embarking on a Fort Lauderdale Beach run to warm
up the transmission and rear end. When I logged a beach cruise over
a year ago, I mentioned at the end about having trouble shifting
without double-clutching after the transmission warmed up and that I
wanted to try a heavy weight gear oil for relief from this problem.
Nate Hall wrote and suggested I try Synthetic Gear oil instead. The
transmission seals are good - It never needs filling when I check it
so, I'm gonna give the synthetic oil a try. With that in mind I got
some Valvoline SynPower SAE 75W-140W Synthetic Gear Oil at the FLAPS
along with some standard SAE 85W-140W Gear Oil for the rear end. The
differential leaks a small amount so I don't wanna use the expensive
stuff there yet. After the gear
oil change, I waited for some clouds and rain sprinkles to
pass.
January
9th 2005 'Nother good
day to work. Came out of the Krash Pad at daylight to find that the
local birds had a block party in the tree above BillyBob last nite.
Gassed BillyBob up on the way to the Krash Lab and then washed the hood
and windshield before embarking on a Fort Lauderdale Beach run to warm
up the transmission and rear end. When I logged a beach cruise over
a year ago, I mentioned at the end about having trouble shifting
without double-clutching after the transmission warmed up and that I
wanted to try a heavy weight gear oil for relief from this problem.
Nate Hall wrote and suggested I try Synthetic Gear oil instead. The
transmission seals are good - It never needs filling when I check it
so, I'm gonna give the synthetic oil a try. With that in mind I got
some Valvoline SynPower SAE 75W-140W Synthetic Gear Oil at the FLAPS
along with some standard SAE 85W-140W Gear Oil for the rear end. The
differential leaks a small amount so I don't wanna use the expensive
stuff there yet. After the gear
oil change, I waited for some clouds and rain sprinkles to
pass.
Finished the back of the front bumper with three coats of Detail Silver and cleaned and touched up the front bumper brackets with SEM Trim paint. Got out the Eastwood Grime Blaster Washer wand and cleaned the rear chassis because I might take BillyBib to his first show next weekend. Re-assembled the front bumper and splash apron with new hardware.
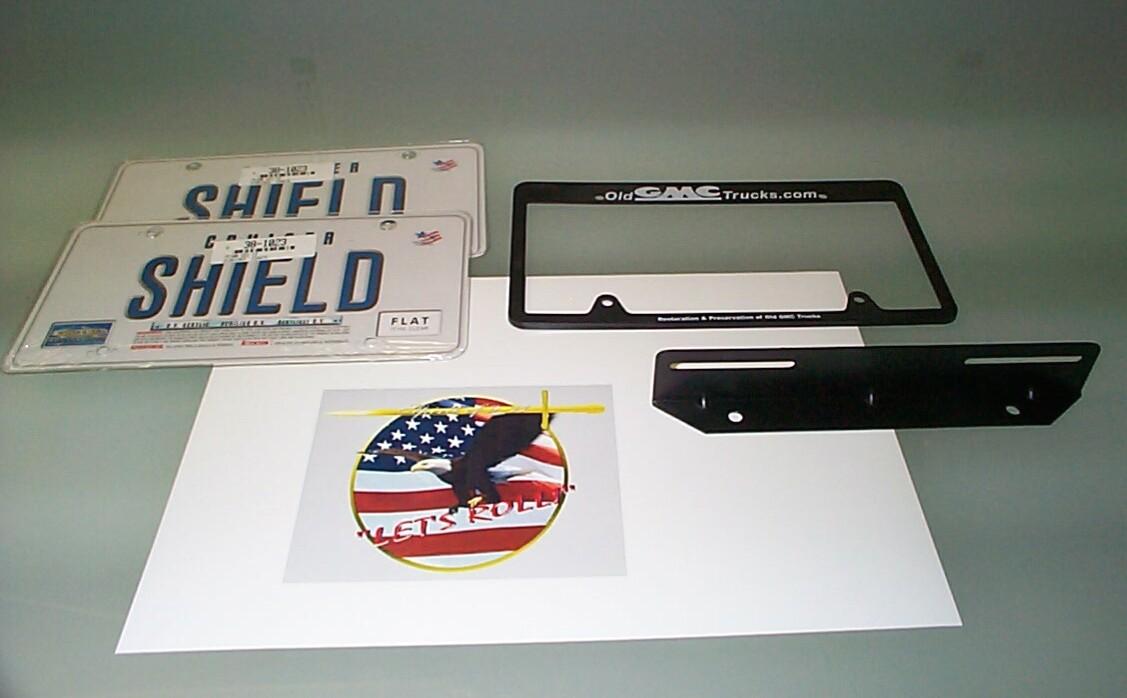 Time
ran out and I didn't get to do any of the new work sandblasting I
wanted to do today. So I could say I did something new, I got out the
stuff I'd been collecting for a front license plate assembly - a graphic from one
of our fighter
squadrons, a license plate frame that I'd "won" by correctly
identifying a rogue's
gallery of old truck conspirators at OldGMCTrucks.com
(Yeah, I know that Rob will use any excuse to send ya one of these
things!), two clear acrylic shields and a front license plate bracket
from LMC Trucks.
Time
ran out and I didn't get to do any of the new work sandblasting I
wanted to do today. So I could say I did something new, I got out the
stuff I'd been collecting for a front license plate assembly - a graphic from one
of our fighter
squadrons, a license plate frame that I'd "won" by correctly
identifying a rogue's
gallery of old truck conspirators at OldGMCTrucks.com
(Yeah, I know that Rob will use any excuse to send ya one of these
things!), two clear acrylic shields and a front license plate bracket
from LMC Trucks.
 I
did some preliminary fiddling with the graphic and printed it on photo
paper here at the architectural office I work for. Trimmed it to
license plate size and sandwiched it between the two acrylic shields
which fit in the OldGMCTrucks frame as if they were made for it. The
license plate assembly was bolted to the bracket and the bracket to the
splash apron with some misc fasteners I had layin' around an' I took
the above pic. Then it was removed again since it won't last long in
the weather this way. I have to photoshop the graphic background and
resize it a bit smaller, then re-print it and have it laminated. I plan
on sealing the edges of the acrylic panels with tape to keep water out
and I think I'll get stainless steel nuts and bolts for fasteners.
I
did some preliminary fiddling with the graphic and printed it on photo
paper here at the architectural office I work for. Trimmed it to
license plate size and sandwiched it between the two acrylic shields
which fit in the OldGMCTrucks frame as if they were made for it. The
license plate assembly was bolted to the bracket and the bracket to the
splash apron with some misc fasteners I had layin' around an' I took
the above pic. Then it was removed again since it won't last long in
the weather this way. I have to photoshop the graphic background and
resize it a bit smaller, then re-print it and have it laminated. I plan
on sealing the edges of the acrylic panels with tape to keep water out
and I think I'll get stainless steel nuts and bolts for fasteners.
January 22nd 2005 The weather was miserable last week and no work was done. Took BillyBob to a car show on Saturday and actually won a third place ribbon. Moving along in my maintenance campaign, monthly maintenance was performed first today. Then, since they were both due, brake maintenance was combined with wheelwell detailing.
January 23rd 2005 Wet and cool today. Too wet to sandblast. Back to wheels, wheelwells and brakes. This is taking me longer than it might because I'm revamping my procedures and since I haven't done this detailing work for over a year, rust has made great headway trying to return BillyBob back to the earth. The shocks are starting to show some rust thru the red paint. The next time I have these things off I'll probably prep and paint them. Need to do some research to see in there is a paint color for the original shocks.
 At
11 AM, the shadetree garage got hit with what I hoped was a passing
shower. It's the leading edge of another cold front. The Weather
Channel issued a "Wind Chill Warning" for tonite. I laughed at that
considering the nasty Nor'easter passing thru New England today.
At
11 AM, the shadetree garage got hit with what I hoped was a passing
shower. It's the leading edge of another cold front. The Weather
Channel issued a "Wind Chill Warning" for tonite. I laughed at that
considering the nasty Nor'easter passing thru New England today.
January 29th 2005 Another weekend, another cold front. Continued with the brake maintenance and wheelwell detailing, working on the rear wheels this time.
January 30th 2005 Weather report is good for today but when I got to the Krash Lab, it was already raining. Concentrated on nuts-n-bolts organization while I waited that out. I got the rear shocks and hardware cleaned and re-installed before it became time to stow the tools for the weekend.
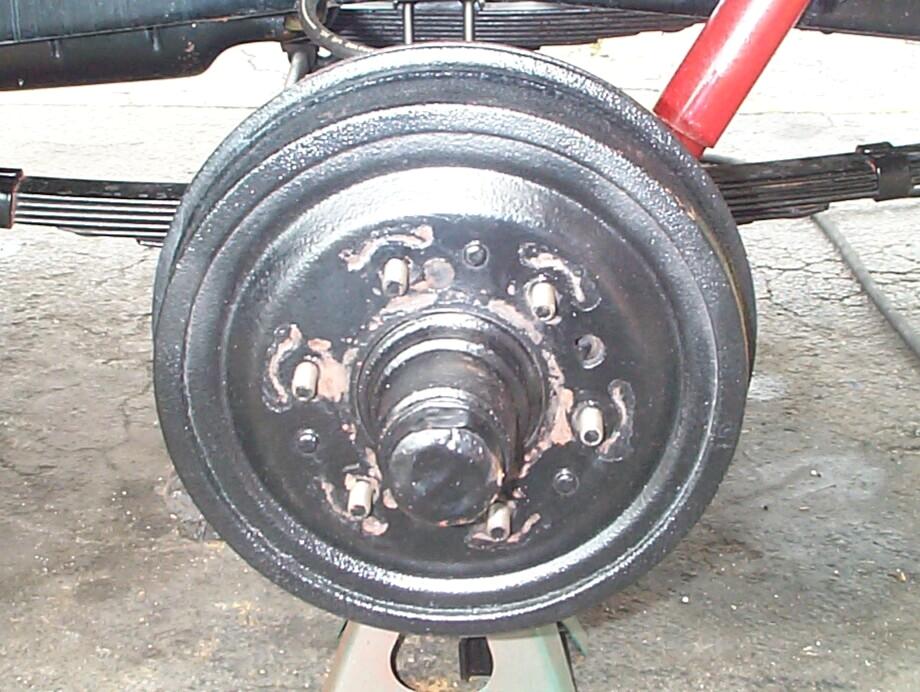 February
5th 2005 It's 51
degrees in South Florida this morning. I'm not much of a gambler but I
don't even think the Las Vegas boys would bet on this many weekend cold
fronts in a row. Still workin' in the wheelwells this morning. Pulled
the front wheels to re-finish the brake drum paint. One of the problems
I have under the shadetree with BillyBob, that a frame-off restorer
doesn't have to deal with, is paint drying times. I can't let the paint
on most things I do fully cure before I put BillyBob back together and
head on down the road. In the past, when I painted the wheels or brake
drums, I'd spray the partially dryed paint with WD-40 before putting
the wheels back on in the forlorn hope that the paint wouldn't transfer
to the opposite surface pressed against it. I would have been presently
surprised if this had worked and, as you can see, it didn't
February
5th 2005 It's 51
degrees in South Florida this morning. I'm not much of a gambler but I
don't even think the Las Vegas boys would bet on this many weekend cold
fronts in a row. Still workin' in the wheelwells this morning. Pulled
the front wheels to re-finish the brake drum paint. One of the problems
I have under the shadetree with BillyBob, that a frame-off restorer
doesn't have to deal with, is paint drying times. I can't let the paint
on most things I do fully cure before I put BillyBob back together and
head on down the road. In the past, when I painted the wheels or brake
drums, I'd spray the partially dryed paint with WD-40 before putting
the wheels back on in the forlorn hope that the paint wouldn't transfer
to the opposite surface pressed against it. I would have been presently
surprised if this had worked and, as you can see, it didn't
This time, I'm going to let the paint dry longer (overnite) and tomorrow, when I put the wheels back on, wax paper is going between the wheel and drum contact surfaces. I also got a care package this week from American Classic Truck Parts that includes new grease caps and lug nuts, among other goodies. The new grease caps were installed and the drum wire-brushed with the 4" angle grinder and brass wire cup. PRE Paint prep came next followed by two coats of Eastwood's Self-Etching Primer.
 While
waiting for the primer to dry, new stainless steel tailgate chains,
also from American Classic, were installed so I could feel I was making
some forward progress, no matter how small. I can sense my Dad's spirit
on my shoulder, scowling a bit at my playing with cosmetic items while
there is stil solid mechanical work to be done. The eyebolt hex nuts
were applied with Permatex Anti-Sieze lubricant to keep them from
spalling. They look pretty good. Now, all I have to do is build a new
bed and tailgate around them.
While
waiting for the primer to dry, new stainless steel tailgate chains,
also from American Classic, were installed so I could feel I was making
some forward progress, no matter how small. I can sense my Dad's spirit
on my shoulder, scowling a bit at my playing with cosmetic items while
there is stil solid mechanical work to be done. The eyebolt hex nuts
were applied with Permatex Anti-Sieze lubricant to keep them from
spalling. They look pretty good. Now, all I have to do is build a new
bed and tailgate around them.
While I was back at the tailgate, I noticed the screws holding the license plate light housing were rusting big time. A few weeks ago when the license plate bracket was detailed, I didn't have time to pay attention to these screws other than clean them. I received another care package earlier in the week, from Harbor Freight this time. Included was an asortment of small stainless steel screws, bolts and hex nuts. The two rusted screws appear to be #6-32 x 1/4" countersunk philips head machine screws. In the harbor freight kit I found #6-32 x 3/8" slotted machine screws that were close enuf to be replacements. And replaced they were, again with anti-seize compound.
After the primer dried, two coats of Eastwood's Chassis Black were applied and the tools were put away for the day. Went into the Krash Lab and started stringing network cabling. The last time I wired our office ten years ago, The computers were strung like a string of pearls along a 10Base-2 coax cable. Eventually, some 10Base-T Hubs were situated along the coax backbone. This is a horribly slow network by today's standards. I saw the writing on the wall a couple of years ago when places like CompUSA stopped giving shelf space to equipment with coax BNC connectors. A couple of weeks ago, we got a new Minolta network color laser copier. It's driver makes humongous print files, typically 32Mb to 48Mb for a 11x17 print! It takes a long time for these things to traverse the network (15 minutes). A direct computer to copier connection takes about a minute for the same file. My boss can live with a minute so I'm pulling temporary 100Base-T CAT 5e cables over the ceiling this weekend to connect to switches that will replace the hubs.
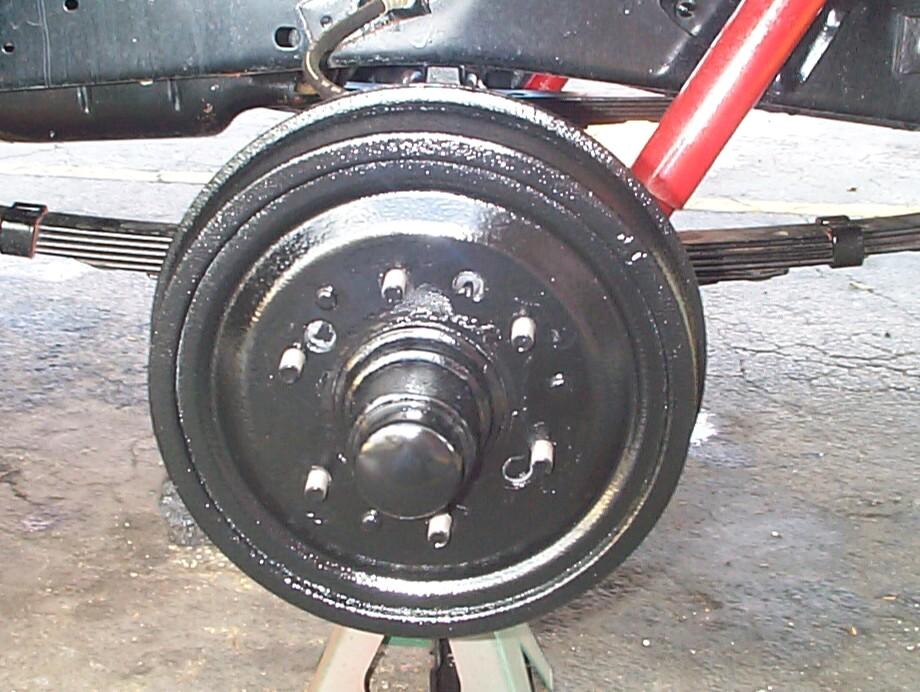 February
6th 2005 Got to the
office early so I could work on the network before anyone else showed
up (I'm not the only one to work on Sundays. The boss is usually here
and one or two others throughout the day and they need network access).
Got all the new switches in by nine and everything appears to be
hunky-dory. Now I can get back to BillyBob. Only 'sposed to be a
"slight chance of a shower" but it's windy and the sky is threatening.
I'm hesitant to drag the sandblasting setup out. The painted front
drums look OK but I'm gonna wait 'til late in the day to put the wheels
back on.
February
6th 2005 Got to the
office early so I could work on the network before anyone else showed
up (I'm not the only one to work on Sundays. The boss is usually here
and one or two others throughout the day and they need network access).
Got all the new switches in by nine and everything appears to be
hunky-dory. Now I can get back to BillyBob. Only 'sposed to be a
"slight chance of a shower" but it's windy and the sky is threatening.
I'm hesitant to drag the sandblasting setup out. The painted front
drums look OK but I'm gonna wait 'til late in the day to put the wheels
back on.
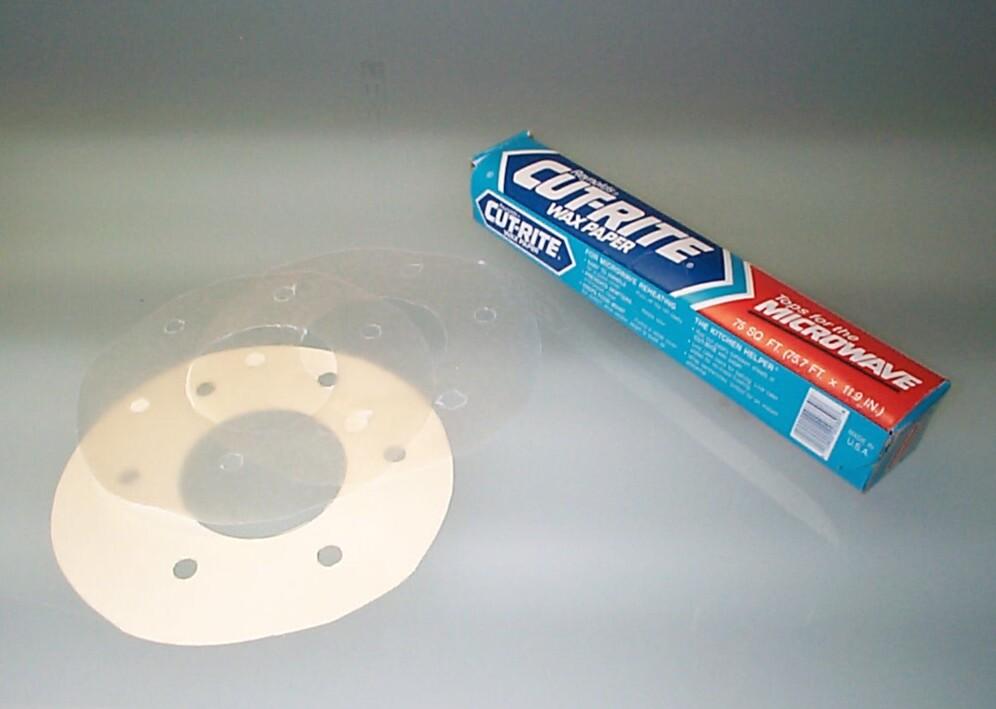 Worked
with my nut and bolt inventory some, then made a card stock template
and used it to make a couple of wax paper "spacers" to fit between the
wheels and newly painted drums. Put the wheels on and backed BillyBob
out from under his tree 'cause there's a lot of birds, doves to robins,
in the tree today and most of them are eating and desposing of some
kinda small black berries. You don't see robins much in South Florida.
They're like snowbirds, you don't see 'em but you know they're here in
the winter. Washed BillyBob's hood, then headed out fer a burger and a
cigar.
Worked
with my nut and bolt inventory some, then made a card stock template
and used it to make a couple of wax paper "spacers" to fit between the
wheels and newly painted drums. Put the wheels on and backed BillyBob
out from under his tree 'cause there's a lot of birds, doves to robins,
in the tree today and most of them are eating and desposing of some
kinda small black berries. You don't see robins much in South Florida.
They're like snowbirds, you don't see 'em but you know they're here in
the winter. Washed BillyBob's hood, then headed out fer a burger and a
cigar.
 February
17th 2005 Just got in
from 'nother Pennsylvania run, one I like to call "Mr. Krash's Wild
Ride". It's the one I've been dreading - rental car from Boca Raton to
Johnstown, Load up last of Mom's household possessions, then return to
Florida in a U-Haul truck with car carrier for Mom's 1993 Chrysler
Concorde, all in the dead of winter. The weather was my biggest worry
(as usual) but I lucked out and threaded my way between storm systems.
The worst weather was near-freezing rain during the load-up of the 14'
Ferd van cab E-350 SuperDuty Triton V10 truck (known for the duration
of our time together as "Henry"). JR was running point for me in the
first leg of the trip on monday nite from Johnstown to his house in
Monroeville, outside Pittsburgh, and when he had to stop suddenly for a
light, I thought I wuz gonna push him thru the intersection. The next
morning, rain was forecast and I got an early start but I got on the
Pennsylvania Turnpike going the wrong way and didn't realize my mistake
until I hit the Ohio border so, I ended up taking the northern scenic
route thru the buckeye state before hitting Columbus and getting back
on my intended route. The rest of the trip was three days of good
driving weather and I am thankful. The only incident was early on
Tuesday when two good ole boys (in a chebby pickup, of course) flagged
me down to let me know that one of the trailer ramps was loose and
dragging. It's good to have that trip behind me. The Concorde only has
18 thousand miles on it and will be the last vehicle in my fleet of
three. She will be called BettyLou
from my Mother's nickname, Betty, and her screenname, KeppyLou.
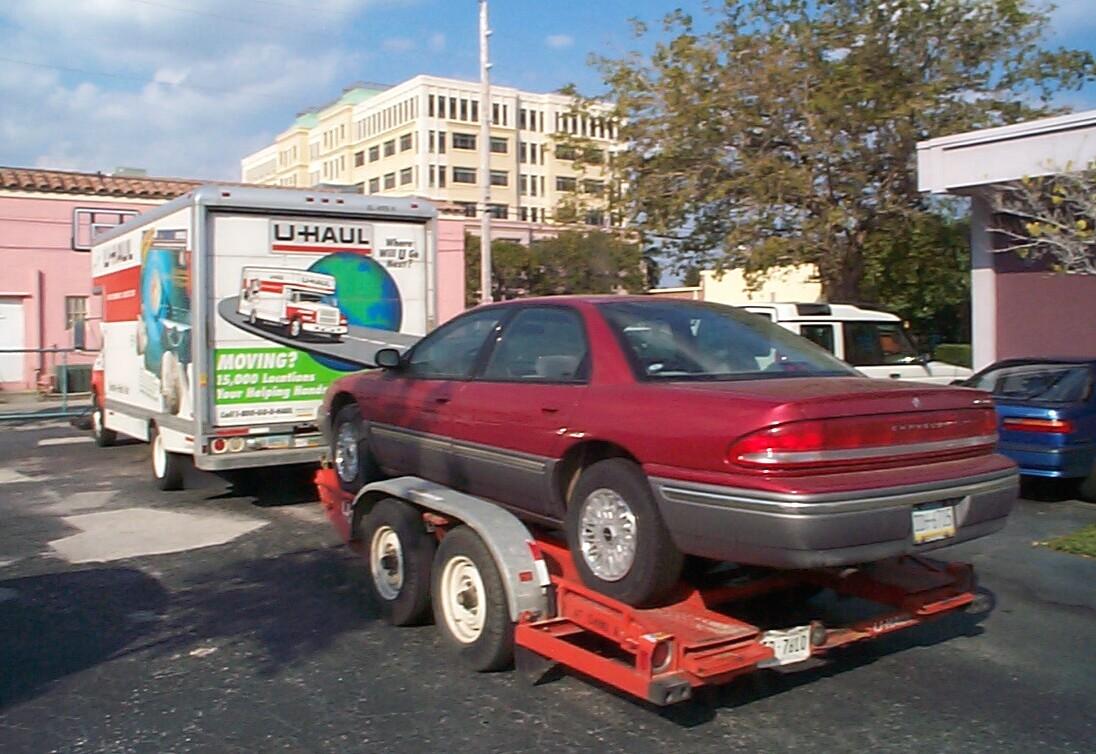
February
17th 2005 Just got in
from 'nother Pennsylvania run, one I like to call "Mr. Krash's Wild
Ride". It's the one I've been dreading - rental car from Boca Raton to
Johnstown, Load up last of Mom's household possessions, then return to
Florida in a U-Haul truck with car carrier for Mom's 1993 Chrysler
Concorde, all in the dead of winter. The weather was my biggest worry
(as usual) but I lucked out and threaded my way between storm systems.
The worst weather was near-freezing rain during the load-up of the 14'
Ferd van cab E-350 SuperDuty Triton V10 truck (known for the duration
of our time together as "Henry"). JR was running point for me in the
first leg of the trip on monday nite from Johnstown to his house in
Monroeville, outside Pittsburgh, and when he had to stop suddenly for a
light, I thought I wuz gonna push him thru the intersection. The next
morning, rain was forecast and I got an early start but I got on the
Pennsylvania Turnpike going the wrong way and didn't realize my mistake
until I hit the Ohio border so, I ended up taking the northern scenic
route thru the buckeye state before hitting Columbus and getting back
on my intended route. The rest of the trip was three days of good
driving weather and I am thankful. The only incident was early on
Tuesday when two good ole boys (in a chebby pickup, of course) flagged
me down to let me know that one of the trailer ramps was loose and
dragging. It's good to have that trip behind me. The Concorde only has
18 thousand miles on it and will be the last vehicle in my fleet of
three. She will be called BettyLou
from my Mother's nickname, Betty, and her screenname, KeppyLou.
Tomorrow, I get back to work on BillyBob. More maintenance is on the task list as well as sandblasting work on the spare wheel carrier and wheels. I've ordered a pressure blaster from Harbor Freight for the heavy blasting work. I'm gonna save the weaker siphon blaster for sheet metal. I just don't have enuf zen to tackle the wheels with the siphon blaster. To close this log entry up, I have to report that the new battery is doing fine and I am writing off the Antique Auto Battery. Also, some good news on the Landlord front - After I found my Mom's cat, Jake, a new home, my apartment management gave me back the one-time pet charge of $300 I paid them when I first brought him to Florida.
| < Back
to Intro |
You can email me at ![]() webmaster@laroke.com
webmaster@laroke.com
Issued Friday February 18, 2005
Updated Friday March 2, 2018
copyright © 1996-2018 Larry Robert Kephart all rights reserved
| | LRK Home | | Bio Info | | Krash Khronicles | | LAROKE | |
| | BettyLou | | BillyBob's Garage | | Rat Patrol | | Deerslayer | | Elvira | |
| | Land of the Free and Home of the Brave | |
| | Keppylou's Art | | WWI Soldier's Diary | |