| | LRK Home | | Bio Info | | Krash Khronicles | | LAROKE | |
| | BettyLou | | BillyBob's Garage | | Rat Patrol | | Deerslayer | | Elvira | |
| | Land of the Free and Home of the Brave | |
| | Keppylou's Art | | WWI Soldier's Diary | |
BillyBob Work-in-Progress Log
![]()
WHAT'S NEW is a chronological listing of updates to the BillyBob site.
![]()
TRUCK LINKS including vendor sites for old parts, custom parts, and tools as well as sites for classic car and truck organizations
STORE Operating in association with Amazon.com, books, recordings and tools can be purchased.
PLANNING for the restoration including project schedule and cost estimates.
![]()
TRAVELS WITH BILLYBOB With apologies to Steinbeck, this area of BillyBob's Garage will be used to log the trips BillyBob and I make together.
WORK-IN-PROGRESS is the restoration of parts of BillyBob that I can accomplish without a garage.
PRE-RESTORATION includes log entries of minor repairs and and adventures between time of purchase and the time when I started restoration, a piece at a time.
JR'S KORNER JR's Korner is the history of BillyBob before I got him authored by my brother, Wm. C. Kephart.
![]()
BILLYBOB MAINTENANCE Ever changing detailing, oil change, lube, etc. maintenance routines specifically developed for BillyBob, including required tools, materials and procedures.
PARTS SHOP The Parts Shop is a repository of How-To articles. Things that I have done over and over enough times to have developed a procedure. This gives me a checklist and saves brain cells.
STEALTH SHOP Urban residence design with large integrated shop and separate living quarters for a relative or renter.
![]()
You will need the Adobe Acrobat browser plugin to view these wiring diagrams which are in the PDF file format. This format allows zooming and panning. If you don't have this plugin, it can be downloaded and installed (free) from the Adobe site. The button below will take you there.
![]()
BILLYBOB WIRING DIAGRAM Here's the wiring diagram updated with BillyBob's current state 'cepting the third-party strap-on turn-signal director.
STRAP-ON TURN-SIGNAL DIRECTOR/BRAKE LIGHT CIRCUIT This turn signal and brake light circuit diagram shows the current state of the third-party turn-signal director wiring, which will remain in place until I figure out the problems with the OEM turn-signal director. It also shows the OEM headlight switch.
35. Aught-three Leftovers
When I started the windshield job way back last year, I had several other log entries in various stages of completion. Instead of finishing them one-by-one, I've decided to merge them all into this log entry to get things up-to-date. At the end, below, the BillyBob work-in-progress logs will be current. In the future, the work-in-progress logs will be in chronological order and I will no longer be separating them into different task categories. I hope to get rid of this feeling that I'm in a Star Trek "temporal anomaly".
 March
24th 2003 Found a
driver side front fender on eBay and won the auction a couple of weeks
ago. It arrived via bus today from New Jersey. It's in excellent shape
with only a little bondo to remove. I now have both front fender spares
to begin work on as soon as I finish the grille (an' learn how to do
bodywork!)
March
24th 2003 Found a
driver side front fender on eBay and won the auction a couple of weeks
ago. It arrived via bus today from New Jersey. It's in excellent shape
with only a little bondo to remove. I now have both front fender spares
to begin work on as soon as I finish the grille (an' learn how to do
bodywork!)
 April
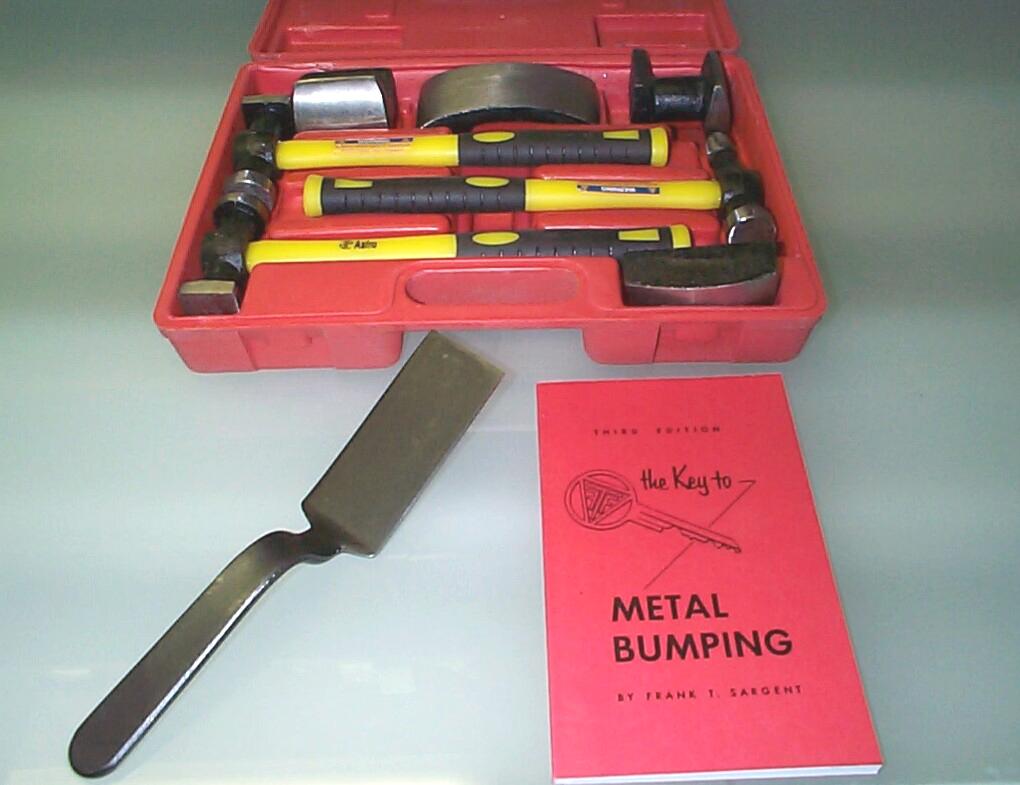
12th 2003 Some bodywork
tools arrived from Eastwood last week. A Light Dinging Spoon, 7pc Body
& Fender Set, and a Key to Metal Bumping Handbook by Frank T.
Sargent which is a reprint of the 1953 third edition. This book is
great! Uses the KISS principle and layman's terms. I can sink my teeth
into it. Eastwood
is the only place I've seen this book. The upper grille bar I've been
sand blasting off and on for almost a year now has two areas of minor
damage that could be fixed with filler alone but I want to use as
little filler as possible so I decided to bump them out. About twenty
minutes with the hammers, dollies and dinging spoon put the damaged
areas much closer to the original contours. I got tons to learn but I'm
happy with my first tenative foray into to art of bodywork.
April
12th 2003 Some bodywork
tools arrived from Eastwood last week. A Light Dinging Spoon, 7pc Body
& Fender Set, and a Key to Metal Bumping Handbook by Frank T.
Sargent which is a reprint of the 1953 third edition. This book is
great! Uses the KISS principle and layman's terms. I can sink my teeth
into it. Eastwood
is the only place I've seen this book. The upper grille bar I've been
sand blasting off and on for almost a year now has two areas of minor
damage that could be fixed with filler alone but I want to use as
little filler as possible so I decided to bump them out. About twenty
minutes with the hammers, dollies and dinging spoon put the damaged
areas much closer to the original contours. I got tons to learn but I'm
happy with my first tenative foray into to art of bodywork.
April 13th 2003 Finally finished sandblasting the upper grille bar today. Then gave the grille bar a treatment of Eastwood's Metal Wash and when that was dry, three light coats of Eastwood's Self-etching Primer.
April 20th 2003 Easter Sunday. Sunshine and gentle breezes. There's a church about a block from here and they are broadcasting the music from their services on outside speakers. It's nice. Roughed up the primer surface on the grille bar and mixed up a small batch of Eastwood's Metal-2-Metal filler. Applied to filler to pitted areas on the grille bar and to the two places I bumped out with the body hammers. Waited thirty minutes and sanded with 36, 80 and 320 grit papers and wet sanded with a foam sanding block. Washed and dried and dry sanded again with 80 grit. Hung the grille bar up in the shadetree and cleaned with PRE Paint Prep. Applied two coats of Plasticote Spot Filler and Primer (red to contrast with the gray etching primer). Both primers are lacquer-based.
May 4th 2003 Yesterday, I discovered one of the front brake shoe linings worn down almost to the rivet head. I had nightmares about that rivet digging into the brake drum any day now. Good weather today so I retreived the front brake shoe replacements from the warehouse. I purchased these shoes from Chevy duty some time ago. It's a shame that only this one shoe is bad 'cause the other front wheel shoes still have plenty of meat on 'em. If ya replace one, you're only asking for trouble if you don't do all four on the same axle.
 Because
it was a sunny day and, 'cause all the other front brake parts are new
and, 'cause I know my way around the brakes now and, 'cause I've got
all the right tools, I had both wheels done and BillyBob back on the
ground inside of two hours. That's record time for me. Took a ride
around the block . . . Adequate, but not great. I'm gonna let them seat
up a bit and re-adjust next week. At least there are no Jurassic Park
screeches coming from the wheel wells.
Because
it was a sunny day and, 'cause all the other front brake parts are new
and, 'cause I know my way around the brakes now and, 'cause I've got
all the right tools, I had both wheels done and BillyBob back on the
ground inside of two hours. That's record time for me. Took a ride
around the block . . . Adequate, but not great. I'm gonna let them seat
up a bit and re-adjust next week. At least there are no Jurassic Park
screeches coming from the wheel wells.
July 29th 2003 After JR read the Red Ducks episode where I was having trouble identifying BillyBob's voltage regulator, he sent me the following e-mail
Krash: If you haven't changed the voltage regulator since I had BillyBob then it's an aftermarket version of a '67-72' Chevrolet 1/2 ton, 6 cylinder regulator. It's the last version regulator GM used before putting current regulation function into the Alternator. I did have a Ford regulator in there for a short time but it didn't hold up. Regards, Bill Kephart Staff Engineer
I kinda figured that was the case but, since "assumption is the mother of all screw-ups", I wanted more info to go on before ordering a voltage regulator replacement/spare. Now I had it.
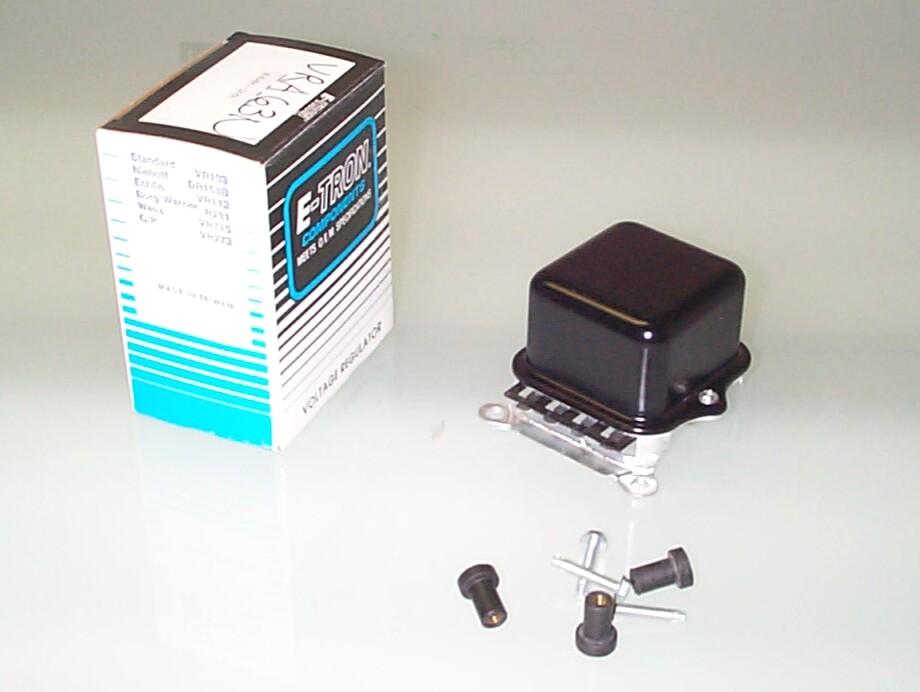 August
8th 2003 Ordered a
voltage regulator and mounting kit from American
Classic Truck parts. Arrived earlier in the week and it looks
correct. Also earlier in the week a co-worker, Luis, informed me
BillyBob had no stop lights after following me into the Krash Lab
parking lot . . . I've been checking the last couple of mornings and
the stop lights either don't work or, work intermittantly. ~!@#$%^
Gonna have to work that out this weekend before BillyBob gets
rear-ended. On the way up to the warehouse at lunch time to pick up
BillyBob's old aftermarket turn signal director, the three-on-the-tree
shift linkage locked up between gears. I had to crawl under the truck
to fix it for the first time since April of 2000. Double~!@#$%^.
These developments put me in an uneasy funk for the rest of the
afternoon. Oh well, some days are good days and some days are character
builders.
August
8th 2003 Ordered a
voltage regulator and mounting kit from American
Classic Truck parts. Arrived earlier in the week and it looks
correct. Also earlier in the week a co-worker, Luis, informed me
BillyBob had no stop lights after following me into the Krash Lab
parking lot . . . I've been checking the last couple of mornings and
the stop lights either don't work or, work intermittantly. ~!@#$%^
Gonna have to work that out this weekend before BillyBob gets
rear-ended. On the way up to the warehouse at lunch time to pick up
BillyBob's old aftermarket turn signal director, the three-on-the-tree
shift linkage locked up between gears. I had to crawl under the truck
to fix it for the first time since April of 2000. Double~!@#$%^.
These developments put me in an uneasy funk for the rest of the
afternoon. Oh well, some days are good days and some days are character
builders.
August 10th 2003 Tried the easy thing first with the turn-signal/brake light problem. Switched to the Flasher that came with the turn-signal kit from Bowtie Bits. No Joy, but I really didn't expect this to work. Removed the handle from the factory turn-signal director and left it in place. Put the aftermarket strap-on unit back on for the time being and re-arranged the wiring connections. That works. Problem must be somewhere in the new unit.
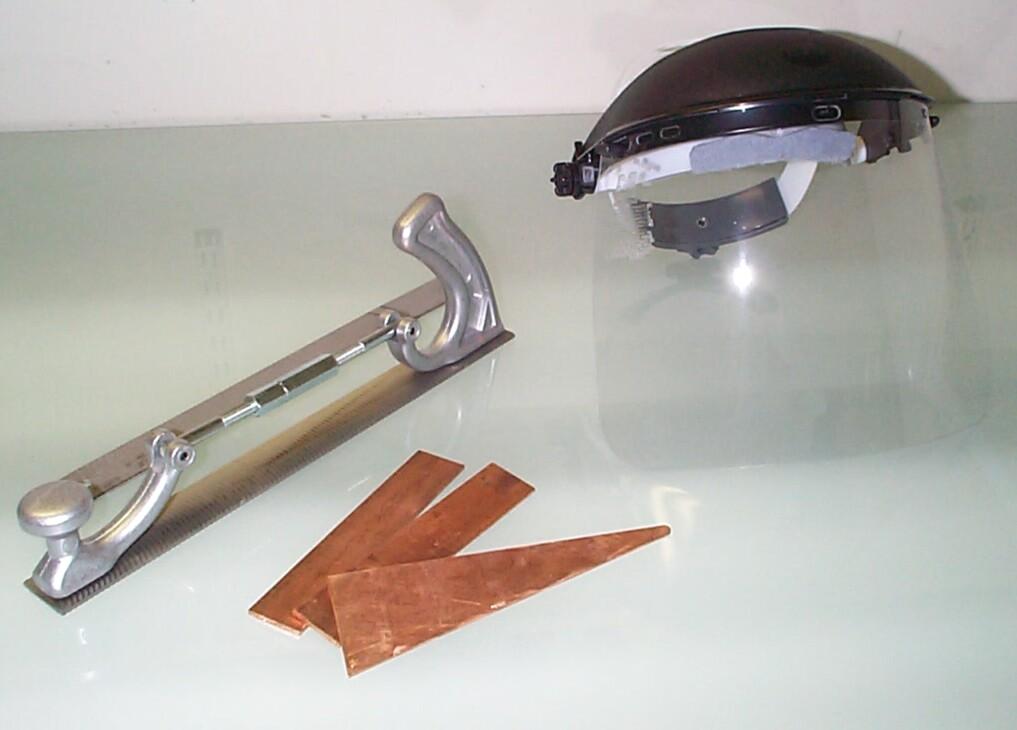 August
16th 2003 Been
gathering more bodywork tools. This week the UPS man arrived with an
Eastwood order consisting of an adjustable body file, copper welding
aids and a face shield for buffing and other light duty tasks. Also got
an assortment of painting rattlecan consumables - Radiator Black, SEM
Trim Black, Chassis Black, PRE Paint Prep and Self-Etching Primer.
August
16th 2003 Been
gathering more bodywork tools. This week the UPS man arrived with an
Eastwood order consisting of an adjustable body file, copper welding
aids and a face shield for buffing and other light duty tasks. Also got
an assortment of painting rattlecan consumables - Radiator Black, SEM
Trim Black, Chassis Black, PRE Paint Prep and Self-Etching Primer.
 August
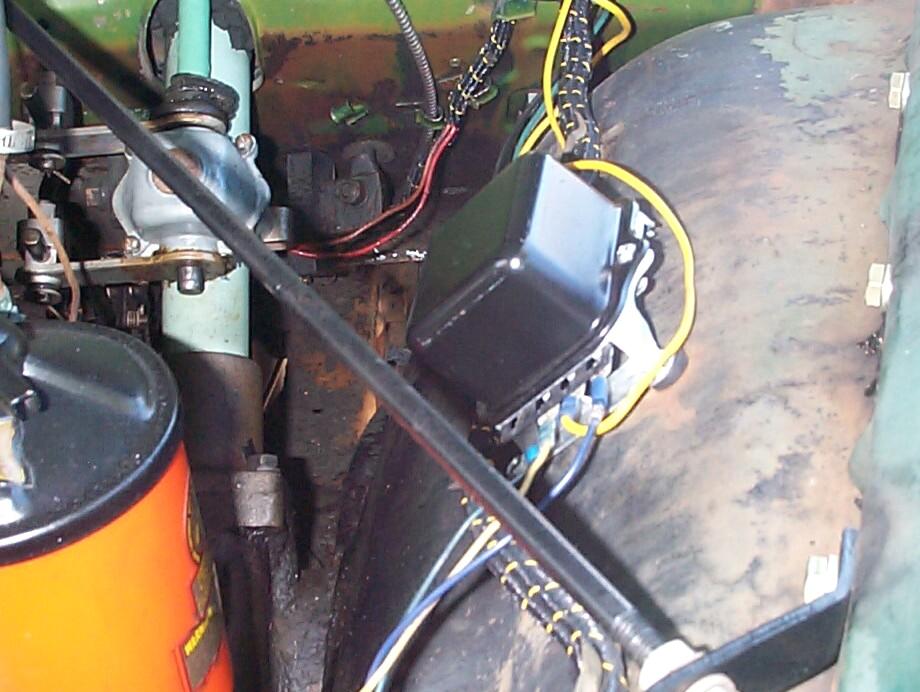
17th 2003 Yesterday,
while BillyBob's front wheels were off for maintenance and I had good
access to both sides of the inner fender, I installed the new voltage
regulator with the new mounting kit. I don't like these connectors
much. They are rubber with a nut molded in the ends and they break down
pretty easily but I managed to make them work. On the way home
yesterday, the ammeter pegged on the charging side, dropping only to
the middle at idle. That can't be good. On the way to the Krash Lab
this morning, in addition to the ammeter being pegged, the alternator
started humming. When I got here, I lifted the hood and checked - the
alternator "felt" hotter than the water pump and the new regulator was
pretty warm too. This makes me uneasy but it's a subjective judgement
an' I don't trust myself.
August
17th 2003 Yesterday,
while BillyBob's front wheels were off for maintenance and I had good
access to both sides of the inner fender, I installed the new voltage
regulator with the new mounting kit. I don't like these connectors
much. They are rubber with a nut molded in the ends and they break down
pretty easily but I managed to make them work. On the way home
yesterday, the ammeter pegged on the charging side, dropping only to
the middle at idle. That can't be good. On the way to the Krash Lab
this morning, in addition to the ammeter being pegged, the alternator
started humming. When I got here, I lifted the hood and checked - the
alternator "felt" hotter than the water pump and the new regulator was
pretty warm too. This makes me uneasy but it's a subjective judgement
an' I don't trust myself.
Removed the new regulator and checked it against the old one. The four terminals are marked (F 2 3 4). Both regulators are marked this way so I believe I had the wires in the correct locations. The old regulator has what looks like a condenser on the side of it. The new one doesn't but does have a terminal for one underneath. I reinstalled the old regulator with the old connectors. Took a ride around the block . . . The ammeter is registering normally again and the alternator hum is reduced. The battery seems to be OK 'cept for dried up overflow indications. Its voltage registers at 12.90v.
Questions: Is my alternator damaged now? my battery? Is the new regulator bad out of the box? Do I need the condenser like device? Does the regulator need to be grounded (the mounting kit insulated it)? Have to start sorting this out. Geezz! Murphy is really raking me over the coals on electrical this month. Or maybe it's electrical anomalies month an' nobody told me. Afterall, the great northeast power grid cascade of 2003 wuz only a few days ago.
 August
22nd 2003 The fun
continues. After doin' some reading, it looks like (so far) that the
voltage regulator should have been grounded to the inner fender. I
probably compounded the error by driving home and back with the
overcharging condition (12 miles round trip). This isn't the first
bonehead mistake of my life. Doing shooters with a retired Navy SEAL at
a beach bar in the eighties comes to mind. Buying the tee-shirt off an
exotic dancer's back for $200 (I ended up with a full wardrobe).
Totaling my '77 Vette by running it off the road and into a tree on
Christmas Eve. And that's just the short list. At least this time there
is a chance I will profit from my error in judgement with newfound
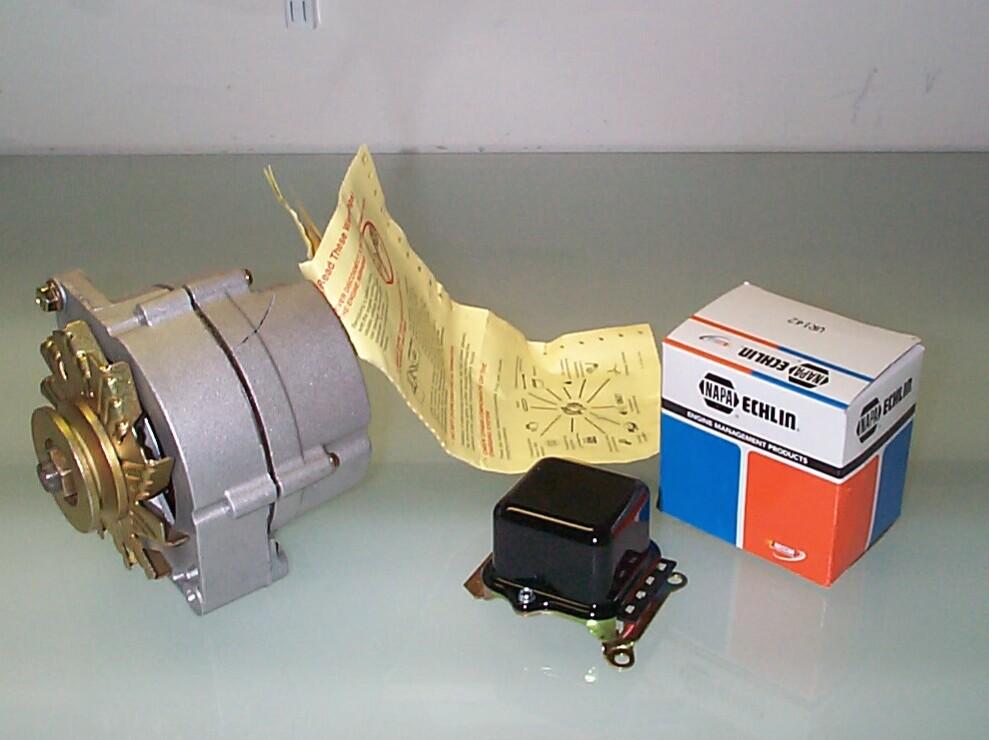
knowledge that can help me in the future. Ordered 'nother voltage
regulator, this time from NAPA Online, and it arrived two
days ago. Also ordered another re-built alternator from Jim
Carter. It arrived this AM and seemed OK until I discovered
the rotor would not turn and that there was a big crack in the case.
Called Jim Carter, got a return authorization, and ordered another
alternator.
August
22nd 2003 The fun
continues. After doin' some reading, it looks like (so far) that the
voltage regulator should have been grounded to the inner fender. I
probably compounded the error by driving home and back with the
overcharging condition (12 miles round trip). This isn't the first
bonehead mistake of my life. Doing shooters with a retired Navy SEAL at
a beach bar in the eighties comes to mind. Buying the tee-shirt off an
exotic dancer's back for $200 (I ended up with a full wardrobe).
Totaling my '77 Vette by running it off the road and into a tree on
Christmas Eve. And that's just the short list. At least this time there
is a chance I will profit from my error in judgement with newfound
knowledge that can help me in the future. Ordered 'nother voltage
regulator, this time from NAPA Online, and it arrived two
days ago. Also ordered another re-built alternator from Jim
Carter. It arrived this AM and seemed OK until I discovered
the rotor would not turn and that there was a big crack in the case.
Called Jim Carter, got a return authorization, and ordered another
alternator.
August 24th 2003 Brought BillyBob down from the warehouse for some monthly maintenance and to troubleshoot the charging system problem. Got the infared thermometer out as soon as I got here and checked the temp of the water pump (168), alternator (142) and regulator (136) - probably OK. Put the new regulator back on, this time without the rubberized connectors, took a test run around the block and it seems fine now that it's grounded. Next, I replaced the new regulator with the other new regulator from NAPA and took another ride around the block - It too works OK with a proper ground. Left the NAPA regulator in place and put the other two in the spares inventory.
September 13th 2003 Waited for a couple of weeks but another alternator did not arrive from Jim Carter, leading me to believe the broken one I had received was the last one on the shelf. I found another source at RockAuto.com. It arrived a few days ago. This one was slightly damaged too (the fan was bent). The guys on the loading dock must play basketball with these things. I have to replace the single pulley with the double pulley from the old alternator on BillyBob anyway so I will use the old fan too. There is a "grd" terminal on these Delcotron alternators that was unused in BillyBob's configuration and maybe this is for an additional wire to go to the regulator to ground it when the insulating mounting connectors are used. I don't know.
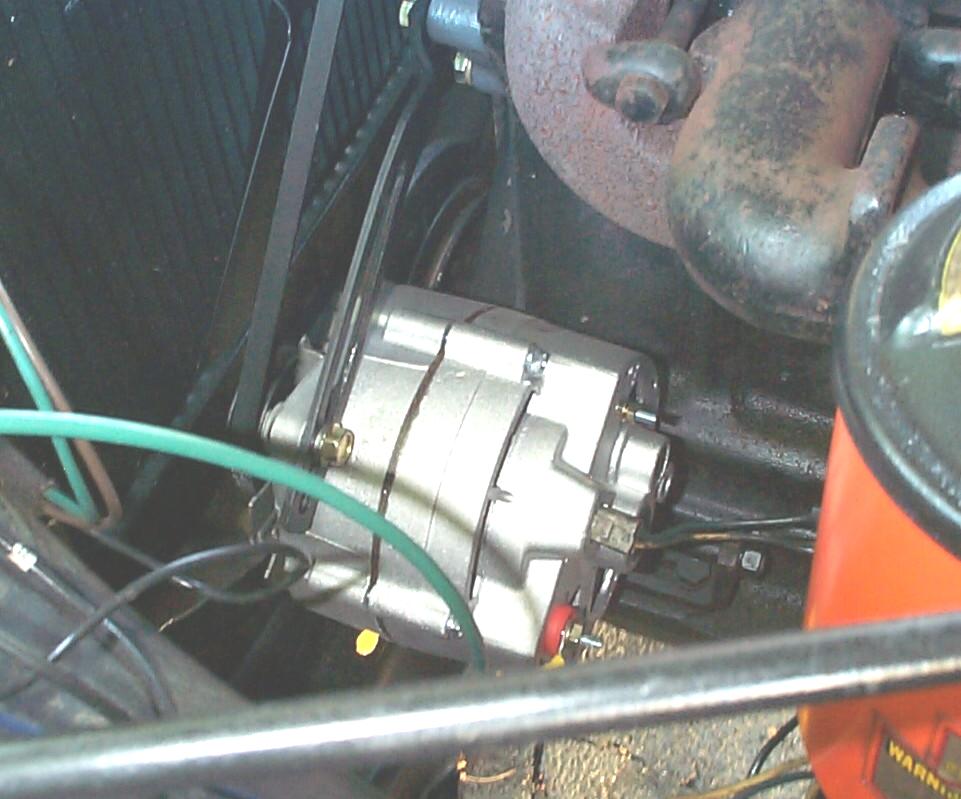 Having
changed alternators a couple of times now, It's getting easier and I
didn't have nearly the trouble with the threaded rod bracket and pulley
nuts that I had the first time I did this. Took about a hour and
everything's hunky dory again. The noise has disappeared and the
ammeter needle is gently floating in the middle of the dial where it
belongs. The only noise from the engine is the comforting clack-clack
of the valve train. I want to replace the wires between the alternator
and the voltage regulator but I need to find a source for a new molded
plastic alternator connector for the wires first.
Having
changed alternators a couple of times now, It's getting easier and I
didn't have nearly the trouble with the threaded rod bracket and pulley
nuts that I had the first time I did this. Took about a hour and
everything's hunky dory again. The noise has disappeared and the
ammeter needle is gently floating in the middle of the dial where it
belongs. The only noise from the engine is the comforting clack-clack
of the valve train. I want to replace the wires between the alternator
and the voltage regulator but I need to find a source for a new molded
plastic alternator connector for the wires first.
 September
20th 2003 Hurricane
Isabele has passed and done her damage. Went right over my cousin's
family in Moorhead City, NC, then passed between my Mom in Johnstown
and JR in Pittsburgh, PA. Everybody is OK. Weather here in the
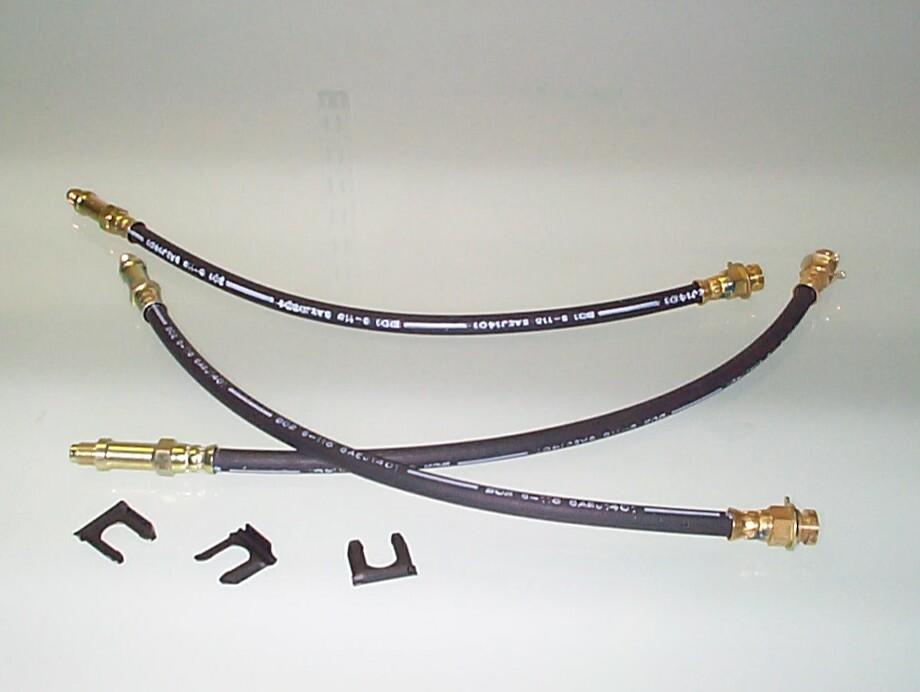
shadetree garage isn't too bad today so far. A few weeks ago, I noticed
that the front brake flex hoses were blistering and the bubbles felt
like they might have migrating brake fluid in them. I had these
replaced in late '97 along with the rear flex hose that still appears
to be good. I ordered new flex hoses and clips from Chevy Duty this
time. Today's the day to install them.
September
20th 2003 Hurricane
Isabele has passed and done her damage. Went right over my cousin's
family in Moorhead City, NC, then passed between my Mom in Johnstown
and JR in Pittsburgh, PA. Everybody is OK. Weather here in the
shadetree garage isn't too bad today so far. A few weeks ago, I noticed
that the front brake flex hoses were blistering and the bubbles felt
like they might have migrating brake fluid in them. I had these
replaced in late '97 along with the rear flex hose that still appears
to be good. I ordered new flex hoses and clips from Chevy Duty this
time. Today's the day to install them.
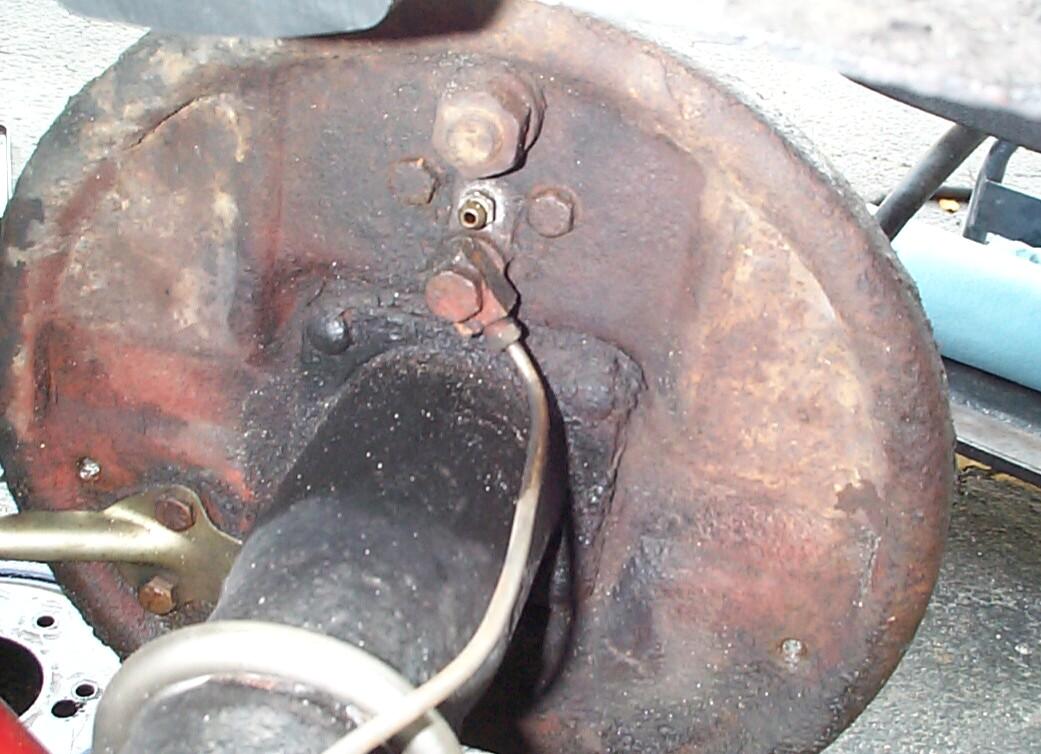
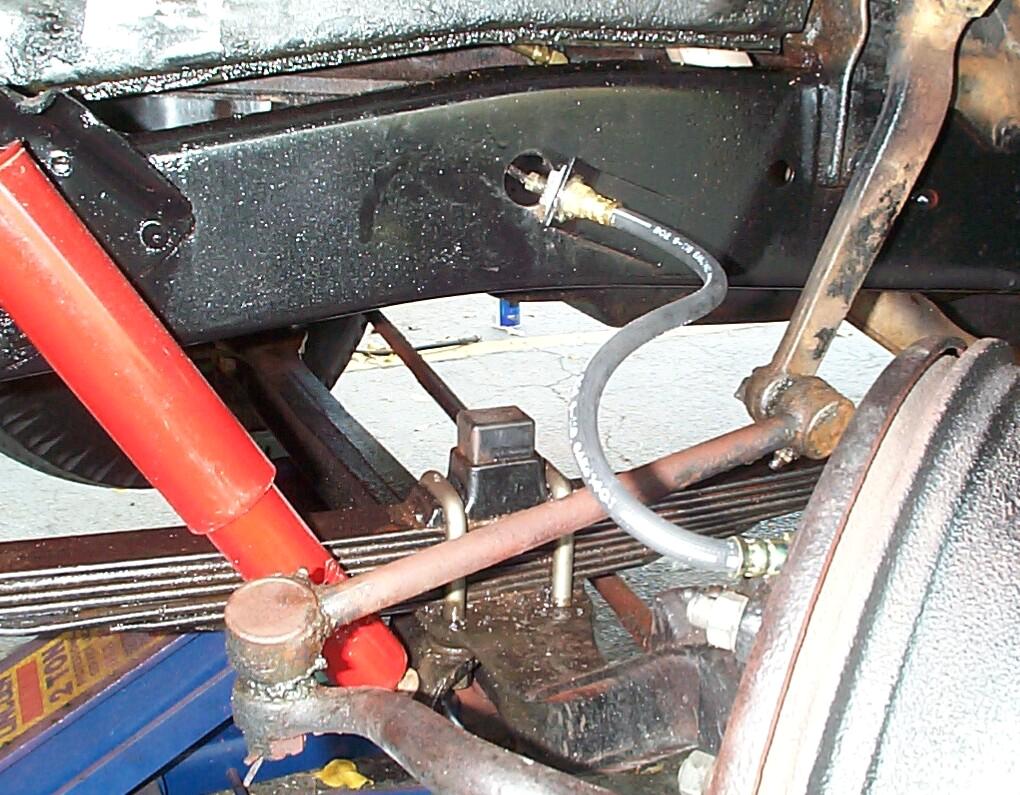 I
anticipated this to be a bigger job than it was. Started on the
passenger side. Didn't know how the flex hose to brake line fitting at
the frame worked so I removed the drum, springs, shoes and wheel
cylinder so the hose wouldn't twist when un-screwed . . . By the time I
got to the frame fitting, I saw this was unnecessary. I did the driver
side wheel without removing the drum or brake guts. Had a heck of a
time bleeding the system. Tried to bleed only the front wheels but
couldn't get a solid pedal so, I bled all four wheels and still no joy.
Put the front end on the ground to level the system out and also
started to screw down the master cylinder fill-up cap everytime I added
brake fluid. Finally got a solid pedal after bleeding all four wheels
again.
I
anticipated this to be a bigger job than it was. Started on the
passenger side. Didn't know how the flex hose to brake line fitting at
the frame worked so I removed the drum, springs, shoes and wheel
cylinder so the hose wouldn't twist when un-screwed . . . By the time I
got to the frame fitting, I saw this was unnecessary. I did the driver
side wheel without removing the drum or brake guts. Had a heck of a
time bleeding the system. Tried to bleed only the front wheels but
couldn't get a solid pedal so, I bled all four wheels and still no joy.
Put the front end on the ground to level the system out and also
started to screw down the master cylinder fill-up cap everytime I added
brake fluid. Finally got a solid pedal after bleeding all four wheels
again.
September 21st 2003 Good weather so far today. I still had to pump the brakes on the way home yesterday so, today after changing the oil and cannister filter, I started into bleeding the brakes again in what was left of the cool of the morning. I wasn't getting much fluid out of any of the bleeder valves 'cept the driver side front with the mitivac vacuum pump alone. I started using my two-by-four block of wood helper to hold the brake pedal down and finally started getting some fluid that way. I think I got a solid pedal again and I've got my fingers crossed for the ride home this afternoon. Cut the blisters on the old flex hoses open with a utility knife before throwing them away and, as suspected, they were full of brake fluid.
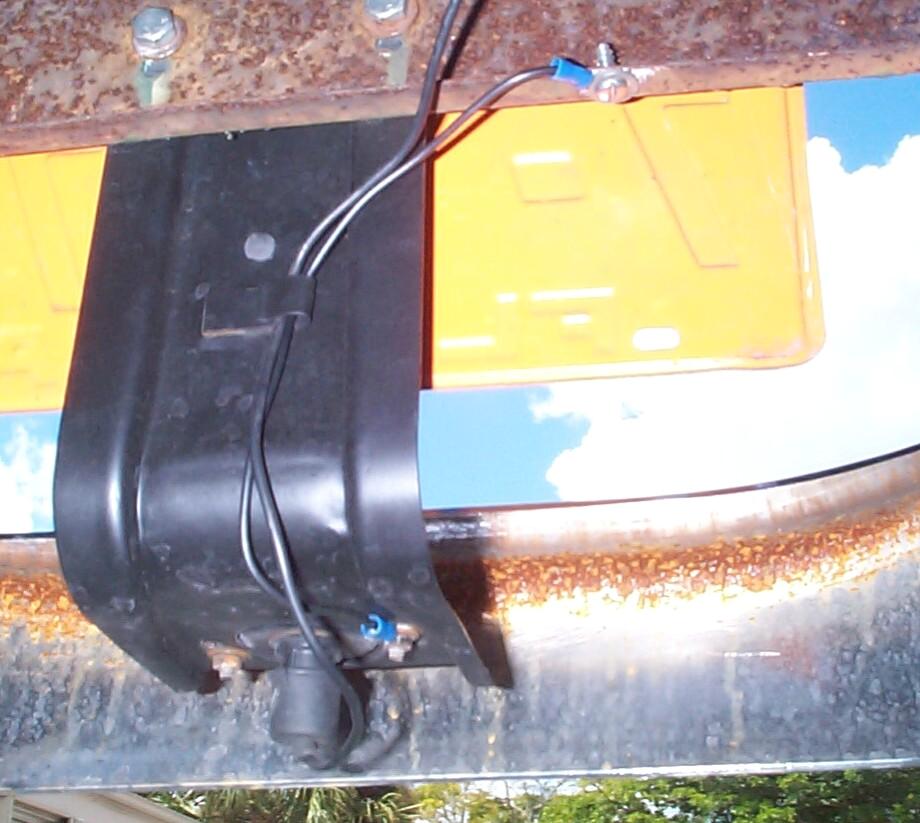 September
27th 2003 During
monthly maintenance, I found out that the license plate light wasn't
working, even after replacing the bad bulb. Got the test light out to
find that, once again, I didn't have a good ground. Took the license
plate assembly apart and sanded mating surfaces at connectors to bare
metal. Problem remained because there is so much rustoleum buildup on
the rear bed crossmember, I couldn't get a good contact. Went another
route at this point and provided a ground wire between the bulb socket
and the bed crossmember . . . Good! Let there be light.
September
27th 2003 During
monthly maintenance, I found out that the license plate light wasn't
working, even after replacing the bad bulb. Got the test light out to
find that, once again, I didn't have a good ground. Took the license
plate assembly apart and sanded mating surfaces at connectors to bare
metal. Problem remained because there is so much rustoleum buildup on
the rear bed crossmember, I couldn't get a good contact. Went another
route at this point and provided a ground wire between the bulb socket
and the bed crossmember . . . Good! Let there be light.
 No
rest for the wicked, I guess. Had good solid brake pedal all week but
that started to change yesterday. This morning while trying to get a
good ground for the license plate light underneath the rear of
BillyBob, I discovered the reason . . . the passenger side rear wheel
brake cylinder had begun to leak. I will have to warehouse BillyBob and
take care of this next weekend. I hope the weather is good like it is
today. Curses! I'm gonna have to repaint the rim.
No
rest for the wicked, I guess. Had good solid brake pedal all week but
that started to change yesterday. This morning while trying to get a
good ground for the license plate light underneath the rear of
BillyBob, I discovered the reason . . . the passenger side rear wheel
brake cylinder had begun to leak. I will have to warehouse BillyBob and
take care of this next weekend. I hope the weather is good like it is
today. Curses! I'm gonna have to repaint the rim.
September 29th 2003 Feel my Dad's spirit looking over my shoulder. Just finished the flawed rebuilding of the passenger side vent window (see Two-Forty A/C Log Entry). I know more work is needed and I'm goin' over easy/hard options. Dad sez "You can go the easy way but I don't want to hear any whinning about it later if it doesn't work!" "Hedgehog" and "OldCarKook" from the Stovebolt.com Forums both gave me ideas to to try. Hedgehog wrote about the vent window gap problem:
I also had a gap between the vent glass and vertical channel when it closed, except I set both the window in the frames at the same time. Only found the 1/4" gap after the fact. After doing some serious thinking, I came up with a simple and (if I may say so myself) rather elegant solution: You know that bladed strip of rubber that goes in a slot at the top of the door panel, which presses against the outside of the window and acts sorta like a squeegie when you roll the window down? If you cut it in half, it's precisely the length of the flat edge of the vent glass. Remove the riveted rubber seal from the vertical post and glue the blade in it's place. No gap, no leak, no wind noise; and I didn't have to pull the vent windows out of the frames and start over. So far, nobody has even noticed that it's not correct, although I have gotten kudos on the tight seal from passengers. Of course, if you're aiming for a perfect resto, you'll probably want to pull the glass and start again. I was more concerned with keeping the rain out of my face.
OldCarKook added his method for setting the hinge rivet:
Larry - those rivets are a pain to set I agree. I ended up just mashing mine over with the smooth part of the vise after driving a punch into it to get the mushroom started. I didn't spring for the tool. Speaking of springs, what's the story on that vent spring? No way to cut the new in half and do both windows with one...lol?
Gonna give both of these ideas some thought.
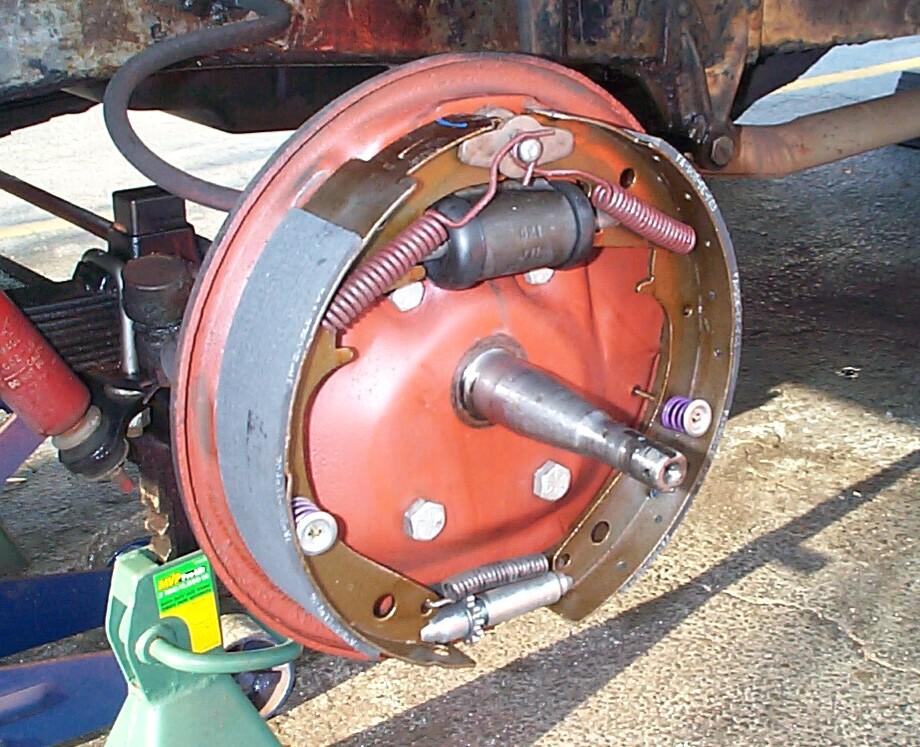
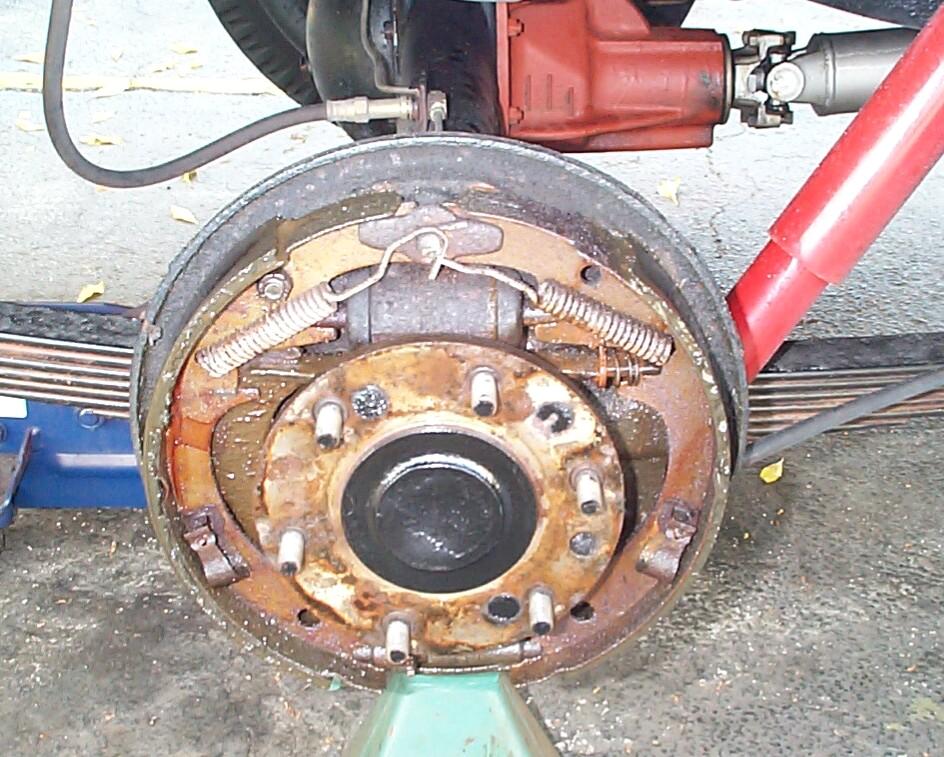 October
4th 2003 Good weather
today, so far, for this job. Got the tools out of the shed and put
BillyBob's rear end up on jackstands. Took off the passenger side wheel
and retracted the brake shoes with the brake adjuster spoon. The drum
came off without having to resort to the drum puller. A good omen.
Removed the springs, shoes, parking brake cable and wheel cylinder next.
October
4th 2003 Good weather
today, so far, for this job. Got the tools out of the shed and put
BillyBob's rear end up on jackstands. Took off the passenger side wheel
and retracted the brake shoes with the brake adjuster spoon. The drum
came off without having to resort to the drum puller. A good omen.
Removed the springs, shoes, parking brake cable and wheel cylinder next.
Back when JR had BillyBob, he had an adventure that required a brake overhaul:
Krash: The rear wheel cylinders as well as the shoes and seals were replaced after my harrowing run away trip down a steep hill while pulling a backhoe. I was standing on the brake pedal with both feet, hands clenched to the steering wheel and ass off the seat and he wasn't stopping! Pretty much overheated everything in both rear wheels. This adventure will be another chapter if I ever get the writing bug again. Point is, my mechanic at the time was pretty resourceful; those rear brake cylinders could be from anything. Regards, Bill
 I
have both '54 and '55 replacement wheel cylinders but neither on them
look like this connection. I'm hoping I can bend the existing brake
line enuf to connect to the new wheel cylinder. I have the tools ready
to make a new line segment, if necessary, but I don't really want to go
that route if I don't have to.
I
have both '54 and '55 replacement wheel cylinders but neither on them
look like this connection. I'm hoping I can bend the existing brake
line enuf to connect to the new wheel cylinder. I have the tools ready
to make a new line segment, if necessary, but I don't really want to go
that route if I don't have to.
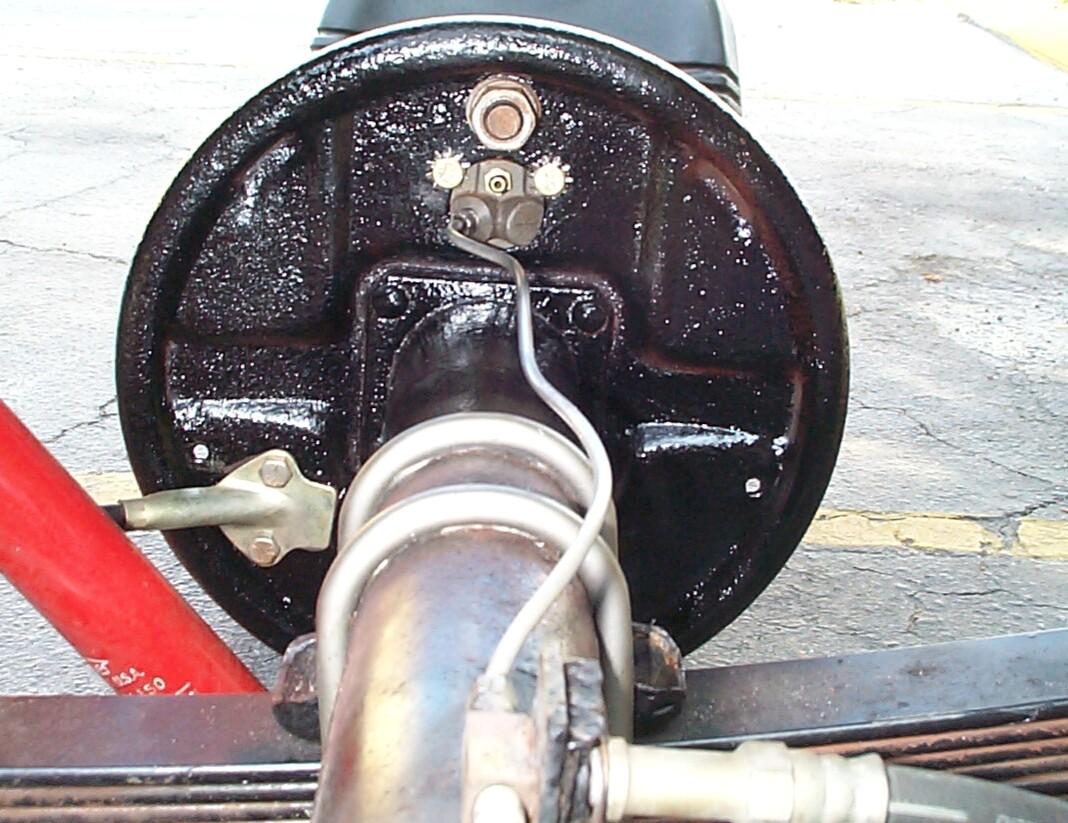
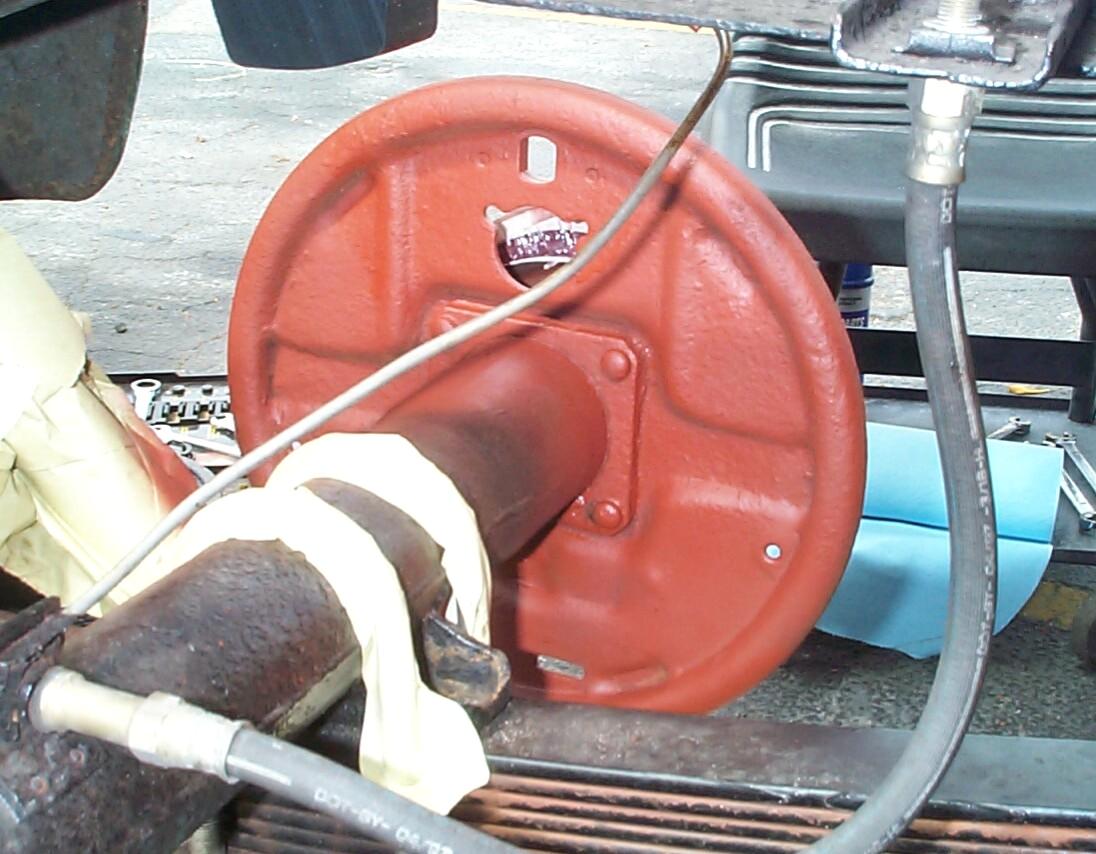 Next
came a couple of hours of degreasing, scraping and wire brushing the
backing plate for painting both sides. Originally, I had played with
the idea of taking off the backing plate for painting like I did for
the front wheels but abandoned it because I didn't want to pull the
axle to get it off. Now, I'm not sure if I could get it off anyway. It
appears to be riveted to the axle tube, not bolted. Applied Eastwood's
PRE Paint Prep and a coat of Eastwood's Red Rust Encapsulator after
masking off items I didn't want paint on. After waiting a hour,
Eastwood's rattlecan Chassis Black was applied to the rear side of the
backing plate. Then the masking tape and paper were removed. Started
cleaning small parts which will be reused with simple green and water.
The brake shoes will be reused until I do the other rear wheel so they
were cleaned with brake cleaner.
Next
came a couple of hours of degreasing, scraping and wire brushing the
backing plate for painting both sides. Originally, I had played with
the idea of taking off the backing plate for painting like I did for
the front wheels but abandoned it because I didn't want to pull the
axle to get it off. Now, I'm not sure if I could get it off anyway. It
appears to be riveted to the axle tube, not bolted. Applied Eastwood's
PRE Paint Prep and a coat of Eastwood's Red Rust Encapsulator after
masking off items I didn't want paint on. After waiting a hour,
Eastwood's rattlecan Chassis Black was applied to the rear side of the
backing plate. Then the masking tape and paper were removed. Started
cleaning small parts which will be reused with simple green and water.
The brake shoes will be reused until I do the other rear wheel so they
were cleaned with brake cleaner.
October 5th 2003 A storm with my name on it ("Larry") is causing problems in Mexico but we've got clear skys here. I thought that this would be more than a one day job so, on Friday, when I bought BillyBob down from the warehouse, I kept Renegade at the Krash Lab for transportation. Put the small parts that had been soaking overnite in the tumbler for a cleaning session. Not gonna do any plating or further painting today, just get the wheel back together and the brakes working. Installed the '55 left side wheel cylinder with new capscrews and star washers after checking to see that it hadn't frozen up sitting on the shelf by checking piston movement. Had trouble getting the capscrews started and had to chase the threads with a tap. On closer inspection, It looks as if the old setup that JR's mechanic used was a '54 wheel cylinder with a angle block fitting to reduce the brake line size down to 3/16" (I think). I later found out that this is called a "banjo" fitting.
 Next,
I set about re-forming the brake line to fit the new cylinder. Had to
loosen the fitting at the "tee" over the axle where the flex hose
connects. I had trouble with both this connector and the wheel cylinder
fitting yesterday. The craftsman tubing wrench alone would not budge
them. I used the Mapp torch both times to loosen them enuf for the
tubing wrench to work without mangling them. I used a tubing bender I
had gotten from Eastwood some time back to reconfigure the brake line.
I got it to work without having the make a new brake line. Another good
omen. Following the advice of friends on the old trucks mailing lists
and stovebolt.com forum, I tightened the fittings without sealants. I'm
not a mechanic, I just play one on the Internet, but some of these guys
are, and good advice is always welcome. Cleaned the parking brake cable
flange with lacquer thinner. Removed and dried the small parts from the
tumbler session. Bolted the parking brake flange to the backing plate,
then the anchor pin assembly.
Next,
I set about re-forming the brake line to fit the new cylinder. Had to
loosen the fitting at the "tee" over the axle where the flex hose
connects. I had trouble with both this connector and the wheel cylinder
fitting yesterday. The craftsman tubing wrench alone would not budge
them. I used the Mapp torch both times to loosen them enuf for the
tubing wrench to work without mangling them. I used a tubing bender I
had gotten from Eastwood some time back to reconfigure the brake line.
I got it to work without having the make a new brake line. Another good
omen. Following the advice of friends on the old trucks mailing lists
and stovebolt.com forum, I tightened the fittings without sealants. I'm
not a mechanic, I just play one on the Internet, but some of these guys
are, and good advice is always welcome. Cleaned the parking brake cable
flange with lacquer thinner. Removed and dried the small parts from the
tumbler session. Bolted the parking brake flange to the backing plate,
then the anchor pin assembly.
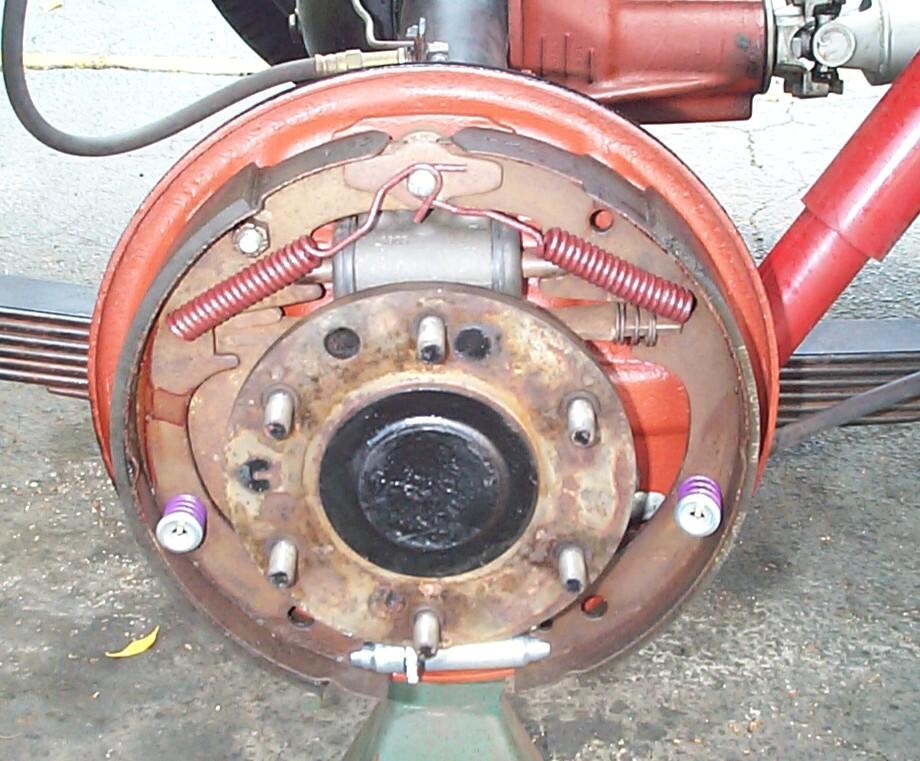 On
the front wheels you have to deal with wheel bearings. On the back
wheels it's parking brake hardware. The rear shoe has a lever bolted on
the back of it which has a connection for the parking brake cable at
the bottom. In addition, there is a flat bar and spring between the
front shoe and parking brake lever that is located just below the wheel
cylinder. The purpose of this, I believe, is to expand both shoes when
the parking brake is engaged. I put all this stuff together and
installed the shoes with new springs and adjuster. The adjuster was
lubed with a little chassis grease before installation.
On
the front wheels you have to deal with wheel bearings. On the back
wheels it's parking brake hardware. The rear shoe has a lever bolted on
the back of it which has a connection for the parking brake cable at
the bottom. In addition, there is a flat bar and spring between the
front shoe and parking brake lever that is located just below the wheel
cylinder. The purpose of this, I believe, is to expand both shoes when
the parking brake is engaged. I put all this stuff together and
installed the shoes with new springs and adjuster. The adjuster was
lubed with a little chassis grease before installation.
Put the drum and wheel on next. Expanded the shoes up against the drum with the adjuster spoon, then backed the adjuster off a few turns to just free the wheel. put the parking brake on to test operation. Looks good. Put BillyBob back on the ground for the ever popular bleeding process. Went at it with my two-by-Four helper and Mitivac vacuum pump technique. Started with the new wheel cylinder first . . . OOPS! Little trickle coming out of the flex hose tee fitting I disturbed to straighten the brake line. Tightened that a little bit more and cleaned the drip up. A little more bleeding and it feels like a solid pedal. Time for a test run around the block. Alright. That works for me . . . for the time being. While looking under BillyBob to see if that leak at the flex hose tee had come back, I saw a potential problem. BillyBob has no bed now so the rear end is light. If the suspension ever bottoms out, however, that relocated brake line will be pinched between the axle and the axle bunper. Looks like I'll be finding out how to make brake line segments afterall.
Actually, I probably screwed up again and put the wrong wheel cylinder on . . . I sometimes get "right" and "left" parts wrong because of my architectural background. The "Left" elevation of a building is the one on the left when you are looking at the front elevation whereas the left side of a car is is taken from the perspective of the person sitting inside the car. Anyway, I put the left rear wheel cylinder on the right rear wheel, I think. The only difference it makes, I believe, is that the brake line fitting seat faces forward instead of rearward and that's why the brake line is in harm's way of the axle bumper. ~!@#$%^ Ratzen-fratzen!
November 12th 2003 Murphy has been tag teaming me first with electrical problems, then with brake problems, then back to electrical again. Last nite on the way home to the Krash Pad, I noticed the ammeter discharging big time at idle and it struggled to get to the middle of the gauge when the engine was up to speed. This morning on the way back to the Krash Lab (lights off), it was acting more like a tach than a ammeter - charging good on acceleration and dropping back to slight discharge at idle. Put the headlights on and almost peg on discharge again. ~!@#$%^ If it was a new vehicle with electronics, maybe I could blame solar flares. Time to dig into the troubleshooting charts again, I guess.
November 15th 2003 Been checking battery voltage every day. It's been staying between 12.6 and 12.8 volts. Today I checked under load which dropped it down to 10.4 volts. Electrolyte has dropped some too but it's about a quarter inch above the plates so I think the battery is OK for the time being. I've been lookin' over my shoulder waiting for the battery to fail due to the overcharging condition caused by the ungrounded regulator back in August. When I got here this morning, I pulled the battery disconnect without turning off the engine and it kept running so the alternator is at least putting out that much juice.
Switched out the NAPA regulator (installed in August) for the oldest regulator I have. That put the ammeter into a slight charging indication with lights on and engine at idle. We'll see how that works overnite. I also noticed in the 1969 Motors Manual that I'm using for the Delcrotron alternator/regulator information and procedures, a diagram showing a ground wire from the Delcrotron grd terminal to a mounting screw on the regulator for ground. I made a ground wire and installed it on BillyBob.
 November
23rd 2003 I'm sitting
in the Wendy's drive-thru yesterday after a good day under the
shadetree when I smell something burning. Using an old truck as a daily
driver tends to put you on the alert to minute changes in your
environment. Different smells, sounds and vibrations must be
investigated in short order. half the time it turns out to be someone
else's out-of-tune vehicle. This time it was BillyBob . . . The lighter
knob was melting off! I caught it too late to save the knob. I had been
working under the dash and maybe I pushed the lighter part way in -
just enuf to make it heat up but not enuf to make it pop out when I
re-connected the battery. Gonna have to order 'nother one now.
November
23rd 2003 I'm sitting
in the Wendy's drive-thru yesterday after a good day under the
shadetree when I smell something burning. Using an old truck as a daily
driver tends to put you on the alert to minute changes in your
environment. Different smells, sounds and vibrations must be
investigated in short order. half the time it turns out to be someone
else's out-of-tune vehicle. This time it was BillyBob . . . The lighter
knob was melting off! I caught it too late to save the knob. I had been
working under the dash and maybe I pushed the lighter part way in -
just enuf to make it heat up but not enuf to make it pop out when I
re-connected the battery. Gonna have to order 'nother one now.
The charging system has been working fine all week, so today I switched out my old voltage regulator and replaced it with the one I got from American Classics again. I will leave that one in and save the old reliable one for backup unless the charging system begins to act up again. Took a test ride around the block - Ammeter stayed in the middle of the gauge.
I had BillyBob's front end up in the air today for chassis lube maintenance so, I went over the remainder of the exhaust pipe forward of the muffler with a 3M Scuff Pad. Masked, PRE Paint prepped and painted the exhaust pipe with Eastwood's Exhaust Paint (#10020Z).
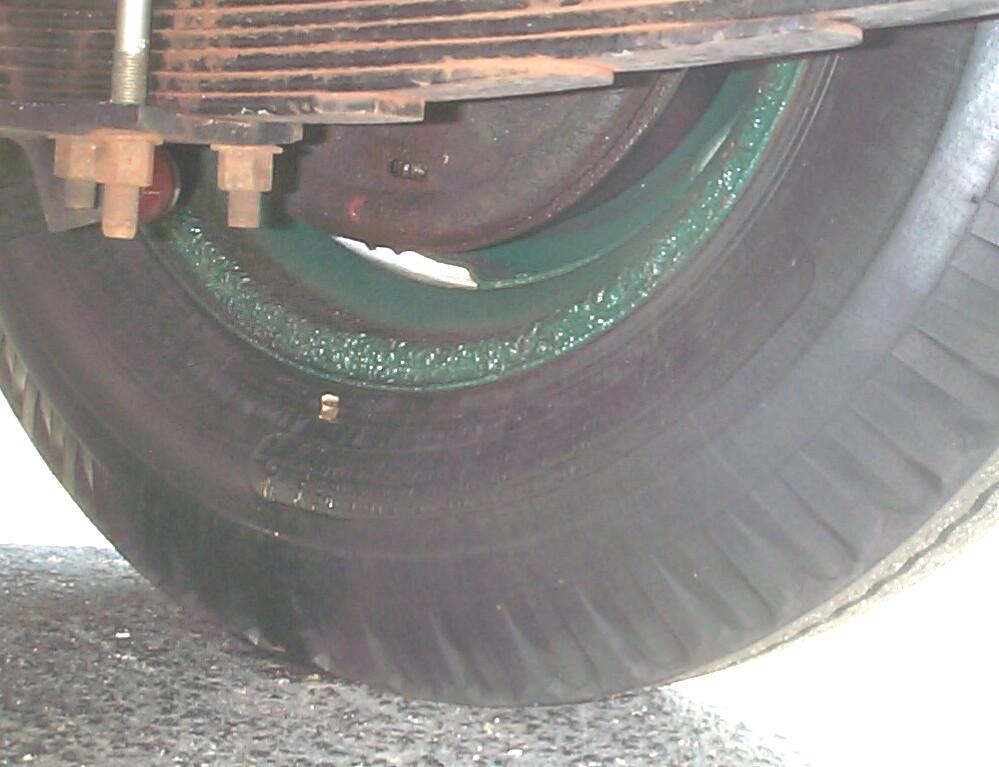
November 26th 2003 The old 6.50x16 LT Delta Hiway bias ply tires and inner tubes on BillyBob were on him long before I got the truck from JR. The sidewalls have been cracked all that time but the hard rubber tread has been holding up well against South Florida's aggressive coral rock aggregate asphalt paving. On the other hand, hard rubber does not make for good stopping power. I've been thinking about replacements for some time and it looks like the decision will be made for me if I don't get off my duff. Noticed that one of the valve stems is ruptured where it enters the wheel and I don't think it will be long before it fails.
 February
29th 2004 Well, it
failed last week. The valve stem ruptured when I moved the truck during
the windshield repair job and it is now a slow leak that is fast enuf
that you can hear it when you fill the tire with air. Hauled the Harbor
Freight Manual Tire Changer down from the warehouse along
with the inner tube I got from Coker the last time I had a tire
problem. Got a tire valve tool from a FLAPS and ordered Tire Mounting
Lubricant from NAPA online.
February
29th 2004 Well, it
failed last week. The valve stem ruptured when I moved the truck during
the windshield repair job and it is now a slow leak that is fast enuf
that you can hear it when you fill the tire with air. Hauled the Harbor
Freight Manual Tire Changer down from the warehouse along
with the inner tube I got from Coker the last time I had a tire
problem. Got a tire valve tool from a FLAPS and ordered Tire Mounting
Lubricant from NAPA online.
Got the air compressor out and filled BillyBob's flat tire again so I could push him back a few feet from the bumper block for the floor jack placement. Put BillyBob's front end up on jackstands and filled the new Coker inner tube with air to make shure it wuz OK. That done, I took the front wheel off the truck. Deflated the tire again and removed the valve core. washed the tire/wheel with a Simple Green and water solution.
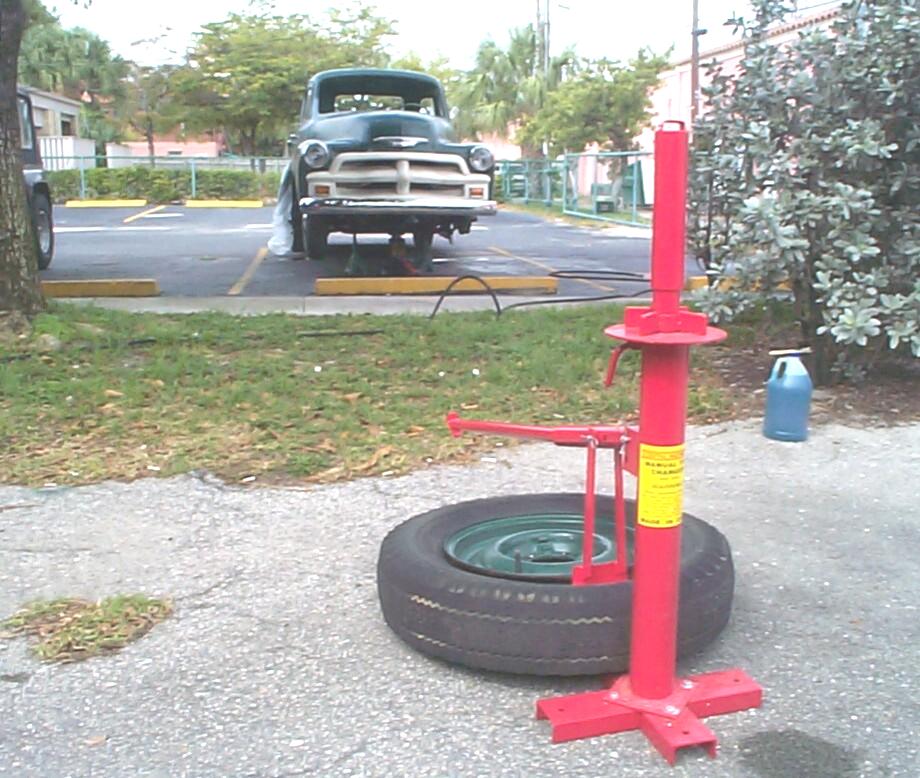 Used
a 1" throw-away paint brush to spread tire lubricant around the bead
area on the front side and used the bead breaking shoe on the tire
changer to pry the bead from the rim. Repeated on the back side. When
the bead separated on the back side, I realized I didn't have it broken
on the front side after all. Turned it over and completed the front
side bead breaking. Then, using the instructions that came with the
tire changer, I got the tire off the rim with a minimum of cussin'.
These instructions are for tubless tires and I managed to wreck the
already bad tube some more with the tire bar.
Used
a 1" throw-away paint brush to spread tire lubricant around the bead
area on the front side and used the bead breaking shoe on the tire
changer to pry the bead from the rim. Repeated on the back side. When
the bead separated on the back side, I realized I didn't have it broken
on the front side after all. Turned it over and completed the front
side bead breaking. Then, using the instructions that came with the
tire changer, I got the tire off the rim with a minimum of cussin'.
These instructions are for tubless tires and I managed to wreck the
already bad tube some more with the tire bar.
The Chevrolet Truck Shop Manual has instructions for mounting the half ton tires but none for demounting. The Operator's Manual flat out states "The drop center wheels used on 1/2 ton models have been so universally used on cars and light trucks for so many years that it can be assumed that all motorists are familar with the procedure for changing tires." Maybe in 1955 but in 2004, this manly art has been lost to many of us. More's the pity.
Started wire-brushing the inside of the rim with wire wheel on air-powered angle grinder . . . Then it started raining on me! I had to stop and cover up BillyBob and drag some tools undercover. No rain was forecast for today, just 15-25 mph winds which are bad enuf. I was starting to run out of time for the day too.
When the wheel was clean, the new inner tube was deflated and placed inside the old tire after blowing out the casing with compressed air. The new inner tube was inflated just enuf for it to begin to take shape then, tire lubricant was spread on both sides of both beads and on the exposed side of the inner tube. It took me about twenty minutes from that point to curse the tire back onto the rim (backside bead first, fish valve stem thru hole, then the front bead). Next, the tire was inflated just enuf to seat the beads. Everything looked good. The tire was completely deflated again (valve core removed) and the beads remained seated. The tire was re-inflated at this point to 26 psi and re-mounted on BillyBob.
It looks like I was successful with my first tire and tube changing wrestling match an' I'm happy with myself despite the ball-busting comment from the operator's manual. Static balancing is next.
 March
20th 2004 Breezy, but
otherwise good weather today. Took some time out from windshield
bodywork for quarterly maintenance. While I had BillyBob up in the air
to lube the zerk fittings, I took the driver side wheel off again to
static balance it. Got a static wheel balancer from Eastwood but Harbor
Freight and other vendors carry this tool too. They all charge about
the same for it. This gadget needs to be on a level floor to work so I
set it up inside the Krash Lab. I found wheel weights at J.C. Whitney,
first time I've purchased anything from them in thirty-odd years. Back
then, I'd ordered a '59 Ferd 3-speed transmission from
them. It arrived completely painted Ferd blue including metal mating
surfaces and splines. When I opened it up, I found rusty gears covered
with graphite. I was not a happy camper! This wheel/tire didn't have
any weights on it before I changed the inner tube and it didn't need
much now - one ounce would do it. I put a half-ounce weight on the
front side of the rim and another across from it on the back side. Done!
March
20th 2004 Breezy, but
otherwise good weather today. Took some time out from windshield
bodywork for quarterly maintenance. While I had BillyBob up in the air
to lube the zerk fittings, I took the driver side wheel off again to
static balance it. Got a static wheel balancer from Eastwood but Harbor
Freight and other vendors carry this tool too. They all charge about
the same for it. This gadget needs to be on a level floor to work so I
set it up inside the Krash Lab. I found wheel weights at J.C. Whitney,
first time I've purchased anything from them in thirty-odd years. Back
then, I'd ordered a '59 Ferd 3-speed transmission from
them. It arrived completely painted Ferd blue including metal mating
surfaces and splines. When I opened it up, I found rusty gears covered
with graphite. I was not a happy camper! This wheel/tire didn't have
any weights on it before I changed the inner tube and it didn't need
much now - one ounce would do it. I put a half-ounce weight on the
front side of the rim and another across from it on the back side. Done!
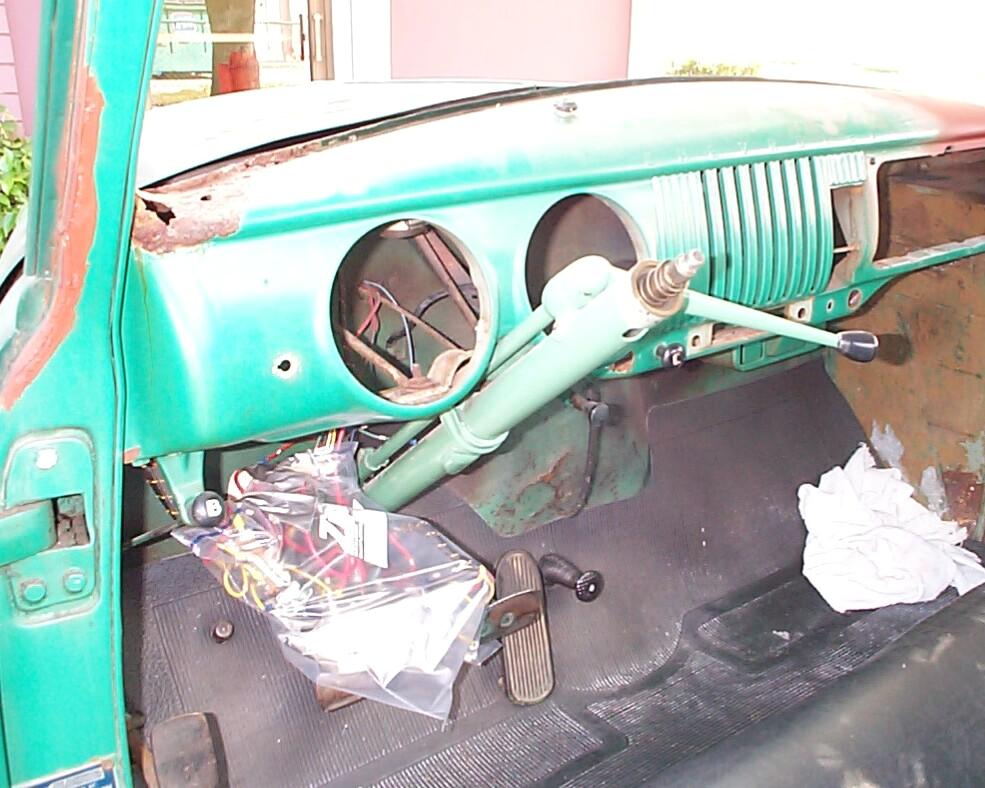 March
27th 2004 Had to remove
the instrument clusters to keep them out of harm's way during the
dashboard metalwork and welding operations. First thing I did was
reverse the ammeter connections that I got wrong during the re-wiring
job two years ago (the ammeter has been reading "D" during charging and
"C" during discharging. Also crimped a ring type connector on one of
the ignition switch wires to replace the original fork type. I'm out of
ring type connectors or I would'uv replaced them all . . . This little
improvement will cut down on my cussin' everytime I have to mess with
this ignition switch from here on out. The speedometer cluster was
completely removed. The main cluster and the switches were placed in a
2 gal zip-lock bag and secured with duct tape. Now I have room to
further protect things with a welding blanket during metalwork and
masking paper during painting operations.
March
27th 2004 Had to remove
the instrument clusters to keep them out of harm's way during the
dashboard metalwork and welding operations. First thing I did was
reverse the ammeter connections that I got wrong during the re-wiring
job two years ago (the ammeter has been reading "D" during charging and
"C" during discharging. Also crimped a ring type connector on one of
the ignition switch wires to replace the original fork type. I'm out of
ring type connectors or I would'uv replaced them all . . . This little
improvement will cut down on my cussin' everytime I have to mess with
this ignition switch from here on out. The speedometer cluster was
completely removed. The main cluster and the switches were placed in a
2 gal zip-lock bag and secured with duct tape. Now I have room to
further protect things with a welding blanket during metalwork and
masking paper during painting operations.
December 21st 2004 That's it. We're pretty much up-to-date to the beginning of December. Since I got BillyBob back on the road, I've mostly been doing maintenance on items that have started to degrade in the year he's been sitting out back of the Krash Lab for the windshield job. Been starting to move ahead on some new stuff too and that will be covered in the next log entry. The two big jobs I hope to accomplish in the new year is wheels and tires, and a new bed floor. Merry Christmas and Happy Holidays to all.
| < Back
to Intro |
You can email me at ![]() webmaster@laroke.com
webmaster@laroke.com
Issued Tuesday December 21, 2004
Updated Thursday March 1, 2018
copyright © 1996-2018 Larry Robert Kephart all rights reserved
| | LRK Home | | Bio Info | | Krash Khronicles | | LAROKE | |
| | BettyLou | | BillyBob's Garage | | Rat Patrol | | Deerslayer | | Elvira | |
| | Land of the Free and Home of the Brave | |
| | Keppylou's Art | | WWI Soldier's Diary | |