| | LRK Home | | Bio Info | | Krash Khronicles | | LAROKE | |
| | BettyLou | | BillyBob's Garage | | Rat Patrol | | Deerslayer | | Elvira | |
| | Land of the Free and Home of the Brave | |
| | Keppylou's Art | | WWI Soldier's Diary | |
BillyBob Work-in-Progress Log
![]()
TRUCK LINKS including vendor sites for old parts, custom parts, and tools as well as sites for classic car and truck organizations
STORE Operating in association with Amazon.com, books, recordings and tools can be purchased.
PLANNING for the restoration including project schedule and cost estimates.
![]()
WORK-IN-PROGRESS is the restoration of parts of BillyBob that I can accomplish without a garage.
PRE-RESTORATION includes log entries of minor repairs and and adventures between time of purchase and the time when I started restoration, a piece at a time.
JR'S KORNER JR's Korner is the history of BillyBob before I got him authored by my brother, Wm. C. Kephart.
5. One thing leads to another Page 1
September 30th 2000 Now that the Stage I gearshift linkage restoration is complete, it's time to get another Stage I project started to run concurrently with the steering wheel and re-wiring projects.
 Still
gathering stuff for the re-wiring project. I decided cleaning and
painting the engine compartment would be a logical move to get done
before the new wires, grommets, etc. are placed. We've got Tropical
Storm Joyce to the East, Keith to the West, and a front pushing down
from the Northwest so the climate in the shadetree garage is not the
best today. The easiest to tackle first appeared to be the "Radiator
Grille Upper Baffle". I hit all the bolts/screws I could see
with a shot of Kroil/AeroKroil Penetrating Oil
from Kano
Laboratories.
Still
gathering stuff for the re-wiring project. I decided cleaning and
painting the engine compartment would be a logical move to get done
before the new wires, grommets, etc. are placed. We've got Tropical
Storm Joyce to the East, Keith to the West, and a front pushing down
from the Northwest so the climate in the shadetree garage is not the
best today. The easiest to tackle first appeared to be the "Radiator
Grille Upper Baffle". I hit all the bolts/screws I could see
with a shot of Kroil/AeroKroil Penetrating Oil
from Kano
Laboratories.
 All
the bolts and screws holding the baffle in place came loose easily. I
placed them in Eastwood's "Vibratory Tumbler
System" (catalog #43204) for a cleaning session, and then went after
the baffle and upper radiator support "Header Bar" with a preliminary
wire brush treatment (cordless drill and by hand). I'm glad I decided
to remove the baffle because it let me see how the headlight, parking
light and horn wires are routed behind the grille. I did some mental
boxing with myself and decided to cleanup the radiator plenum area and
grille as part of this mini-project.
All
the bolts and screws holding the baffle in place came loose easily. I
placed them in Eastwood's "Vibratory Tumbler
System" (catalog #43204) for a cleaning session, and then went after
the baffle and upper radiator support "Header Bar" with a preliminary
wire brush treatment (cordless drill and by hand). I'm glad I decided
to remove the baffle because it let me see how the headlight, parking
light and horn wires are routed behind the grille. I did some mental
boxing with myself and decided to cleanup the radiator plenum area and
grille as part of this mini-project.
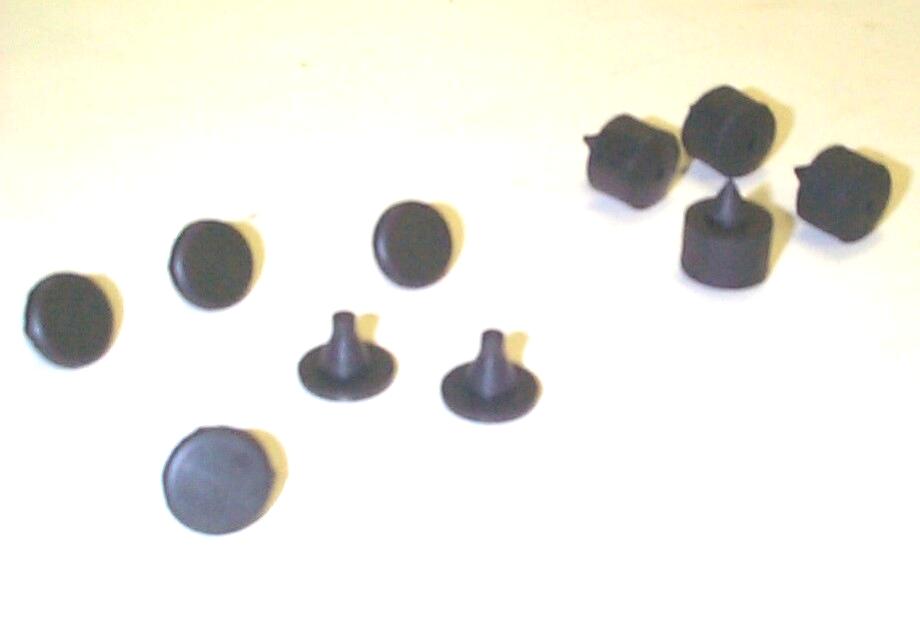 October
7th 2000 Ordered some
stuff from several vendors last week for this project. The first item
to arrive was a "Hood Bumper Set 47-55" (catalog #FP113) from Jim
Carter's yesterday. There are six bumpers for the hood side
edges and two thicker bumpers that mount on the the baffle as far as I
can tell. The package had two extra of the baffle bumpers.
October
7th 2000 Ordered some
stuff from several vendors last week for this project. The first item
to arrive was a "Hood Bumper Set 47-55" (catalog #FP113) from Jim
Carter's yesterday. There are six bumpers for the hood side
edges and two thicker bumpers that mount on the the baffle as far as I
can tell. The package had two extra of the baffle bumpers.
Dug around at the back of BillyBob's warehouse bay for the spare grille and upper baffle assembly that JR picked up at the Carlisle show when he owned the truck. This thing has a bent nose and some previous owner customization imperfections, but the upper grille bar is in pretty good shape and a good replacement for BillyBob's which has rustout on the driver's side. I brought the assembly back to the Krash Lab and treated the connections with Kroil/AeroKroil Penetrating Oil in hopes of getting the upper grille bar separated from the rest of the thing.
Removed the Radiator Grille Upper Baffle again today for more work and this time removed the "Lock Plate Assembly" from the baffle which, in BillyBob's case, is held on with four stovebolts. On the spare assembly from Carlisle it is held in place by the dreaded and much-cursed clutchhead bolts. Removed the spring from the underside of the Lock Plate Assembly and threw it into the tumbler along with the bolts, screws, and washers for a cleaning session. Continued to work on the Baffle and Lock Plate with wire brush and Eastwood's cleaning wheel (#31095). Used Eastwood's OxiSolv rust remover/cleaner (#16026) to treat heavily rusted areas of the baffle and lock plate. After about 45 minutes, the OxiSolv was wiped off and Eastwood's PRE Paint Prep (catalog #10041Z) was applied and wiped off before re-assembling for the ride back to the barn.
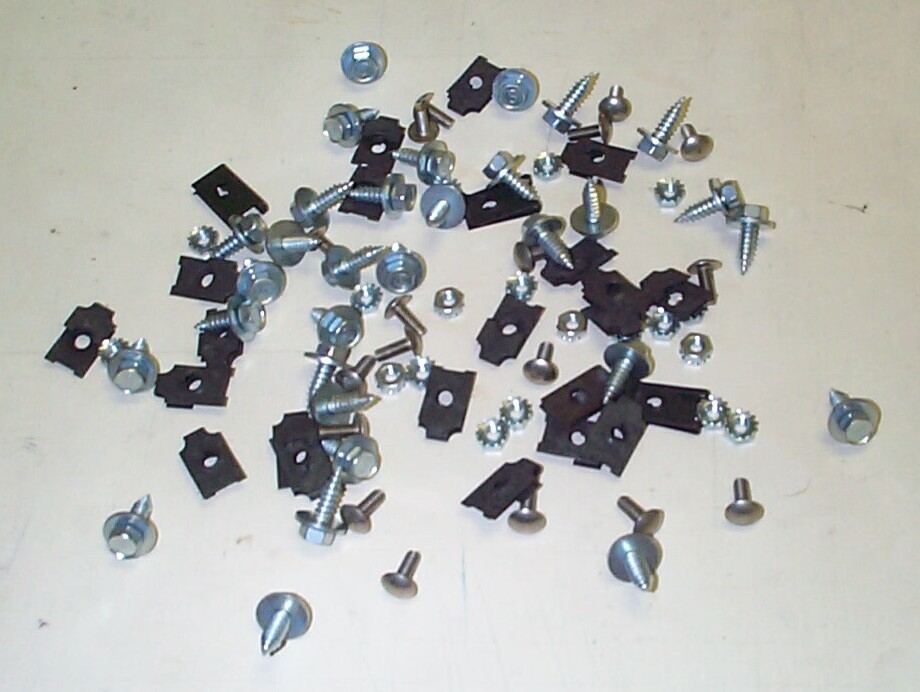 October
11th 2000 More stuff
came today, this time from American Classic Truck Parts. I'd
ordered a "Grille Fastener Kit 54-55 Chevy" (#FA-21) from their
website. This is a hand full of screws, bolts, washers, nuts and clips
and I have no idea of where they all go. There are no diagrams, just
the parts. Some are a match for the baffle fasteners I've already
cleaned. I'll just have to play it by ear when I get there.
October
11th 2000 More stuff
came today, this time from American Classic Truck Parts. I'd
ordered a "Grille Fastener Kit 54-55 Chevy" (#FA-21) from their
website. This is a hand full of screws, bolts, washers, nuts and clips
and I have no idea of where they all go. There are no diagrams, just
the parts. Some are a match for the baffle fasteners I've already
cleaned. I'll just have to play it by ear when I get there.
 October
14th 2000 Left BillyBob
up at his barn today and brought the Baffle back to the Krash Lab for
painting. Removed the Lock Plate Assembly from the Baffle and proceded
to wire brush, sand, rub and curse the Baffle 'til it was reasonably
ready for painting. If I get no other tools next year, an air
compressor, sand blaster, and grinder are a must. These farm-league
techniques just don't hold any thrill for me anymore.
October
14th 2000 Left BillyBob
up at his barn today and brought the Baffle back to the Krash Lab for
painting. Removed the Lock Plate Assembly from the Baffle and proceded
to wire brush, sand, rub and curse the Baffle 'til it was reasonably
ready for painting. If I get no other tools next year, an air
compressor, sand blaster, and grinder are a must. These farm-league
techniques just don't hold any thrill for me anymore.
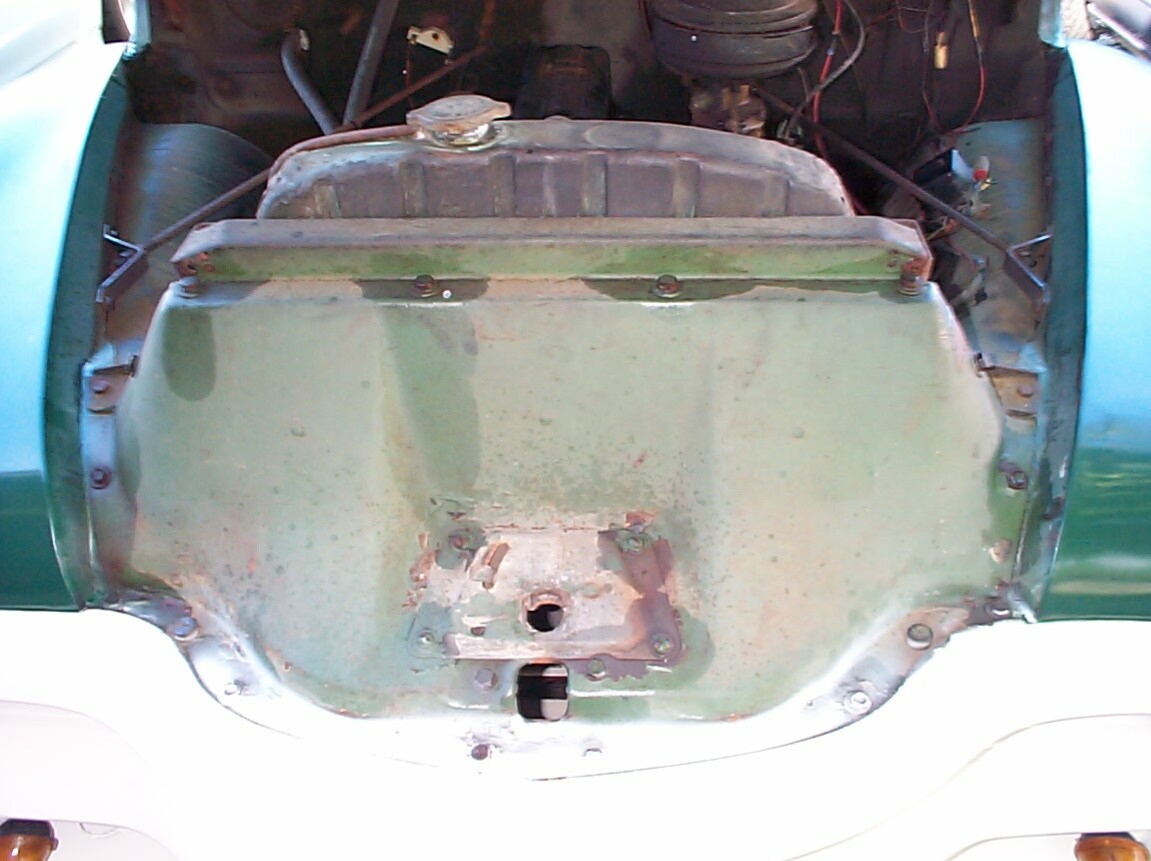
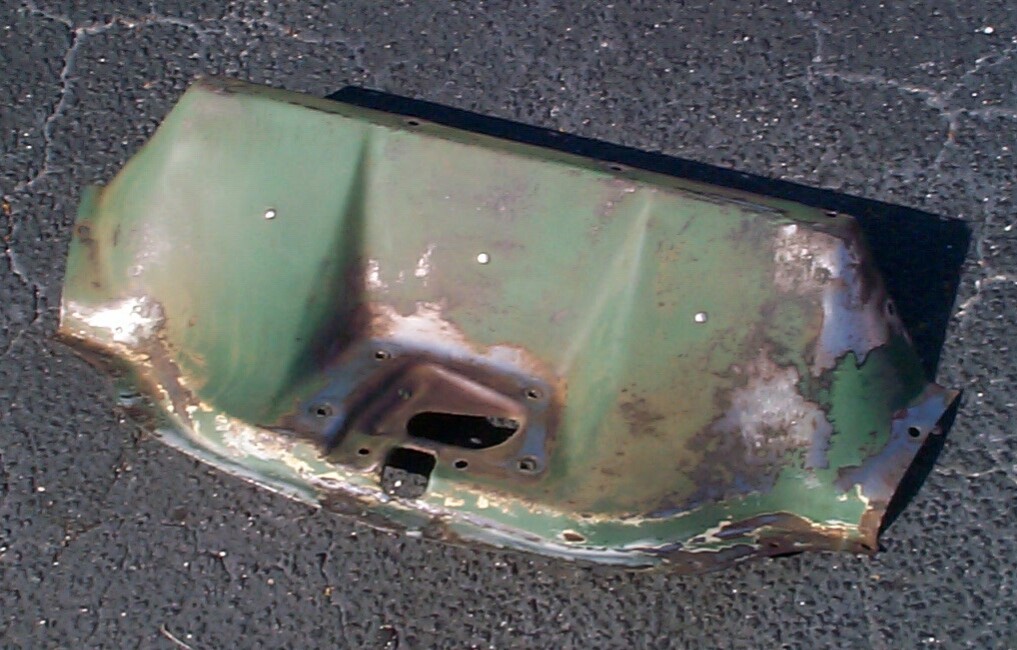
 This
is the back side of the Baffle after being treated with OxiSolv rust
remover/cleaner last week. After I had enuf fun sanding, I cleaned the
Baffle with PRE Paint Prep again and sprayed the Baffle, front and
back, with "Plasti-kote" anti-rust primer and hung it up in my shop
(shade tree) to dry. When the primer was dry on the Baffle, it was
painted, two coats, front and back, with Rustoleum "Hunter Green".
This
is the back side of the Baffle after being treated with OxiSolv rust
remover/cleaner last week. After I had enuf fun sanding, I cleaned the
Baffle with PRE Paint Prep again and sprayed the Baffle, front and
back, with "Plasti-kote" anti-rust primer and hung it up in my shop
(shade tree) to dry. When the primer was dry on the Baffle, it was
painted, two coats, front and back, with Rustoleum "Hunter Green".
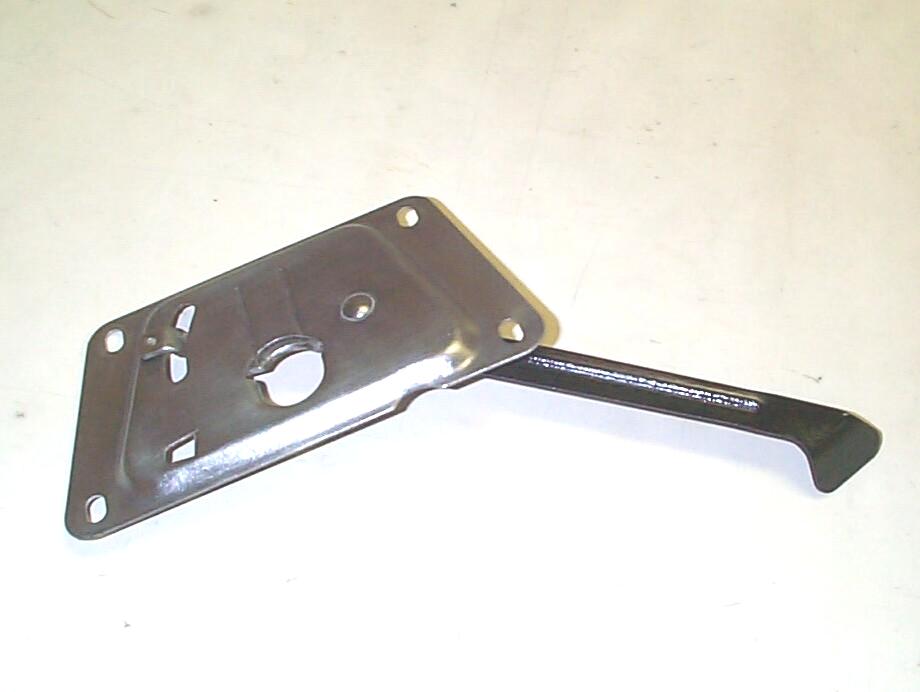 Turned
to the Lock Plate assembly and, after removing the spring from the
underside again, gave it the same wire brush and sanding routine. This
is a nice dull gray metal that, when slightly polished, will look
better with a clearcoat than paint. After cleanup with PRE, I masked
off the assembly to isolate it from the hood latch handle attached to
it and sprayed the handle with Eastwood's "Chassis Black" (#10025Z).
After the latch handle dried enuf, the spring was put back on the Lock
Plate Assembly and the whole thing was treated to two coats of
Eastwood's "Diamond Clear Gloss Finish for Bare Metal" aerosol
(#10200Z).
Turned
to the Lock Plate assembly and, after removing the spring from the
underside again, gave it the same wire brush and sanding routine. This
is a nice dull gray metal that, when slightly polished, will look
better with a clearcoat than paint. After cleanup with PRE, I masked
off the assembly to isolate it from the hood latch handle attached to
it and sprayed the handle with Eastwood's "Chassis Black" (#10025Z).
After the latch handle dried enuf, the spring was put back on the Lock
Plate Assembly and the whole thing was treated to two coats of
Eastwood's "Diamond Clear Gloss Finish for Bare Metal" aerosol
(#10200Z).
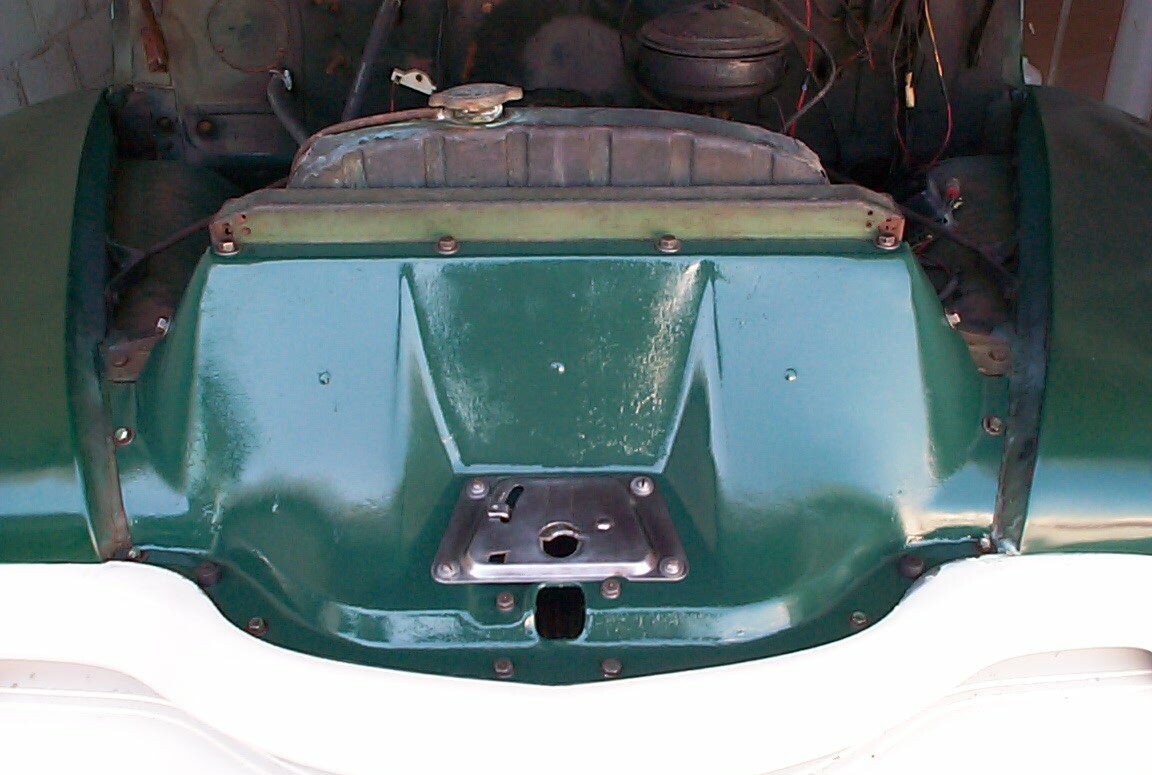 October
17th 2000 Couldn't wait
until Saturday to re-install the Lock Plate Assembly and Baffle on
BillyBob. I picked up some replacement 1/4" lock washers at Discount
Auto Parts yesterday for the Lock Plate Assembly stovebolts and put the
Lock Plate back on the Baffle last night. I also installed the two new
rubber hood bumpers from Jim Carter. Today at lunch time I went up to
the warehouse and bolted the Baffle back in place. It's a good start.
October
17th 2000 Couldn't wait
until Saturday to re-install the Lock Plate Assembly and Baffle on
BillyBob. I picked up some replacement 1/4" lock washers at Discount
Auto Parts yesterday for the Lock Plate Assembly stovebolts and put the
Lock Plate back on the Baffle last night. I also installed the two new
rubber hood bumpers from Jim Carter. Today at lunch time I went up to
the warehouse and bolted the Baffle back in place. It's a good start.
October 21st 2000 Stopped in Pep Boys yesterday and, while there to check out aftermarket turn signals, picked up a pack each of 5/16" lock washers and flat washers for the Upper Baffle bolts. Today the upper radiator support "Header Bar" was removed, wire brushed and sanded before getting a treatment of the OxiSolv rust remover/cleaner on the back side which had a lot of surface rust.
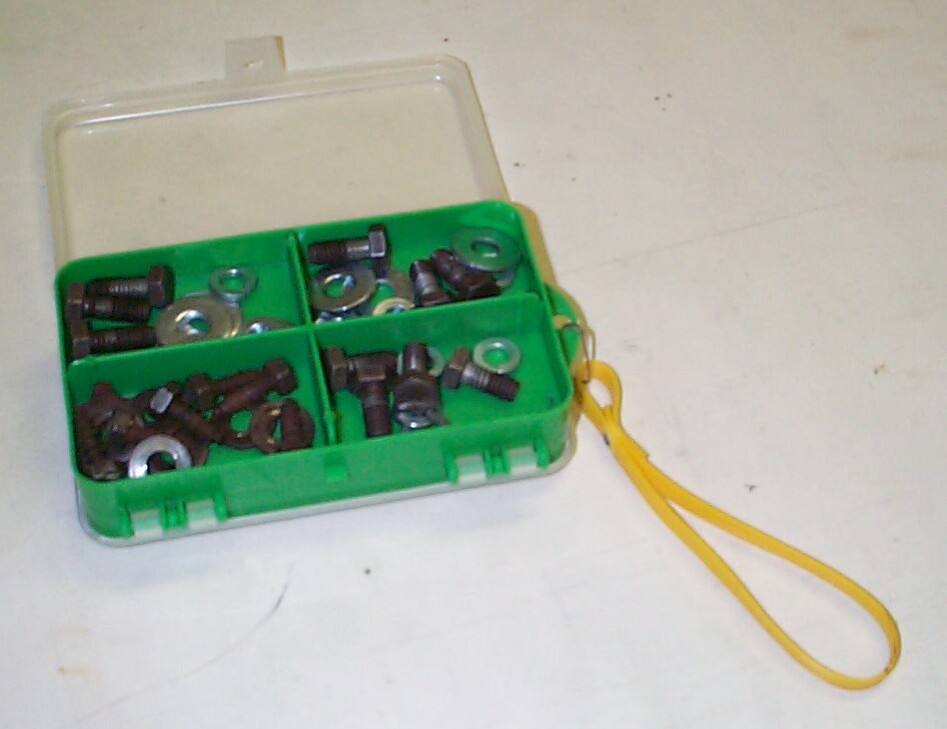 When
I was in Pennslyvania for vacation in September, My six-year-old
nephew, Sam,
and five-year-old neice, Brooke gave me an
eight-compartment plastic box with wrist-strap they had seen somewhere
and decided their uncle Larry should have. Much to my surprise, I've
found out they were absolutely right! I've been using it to keep
different kinds of connectors separated and handy during disassembly
and re-assembly of various BillyBob subsystems. Here it is with the
Upper Baffle bolts and washers.
When
I was in Pennslyvania for vacation in September, My six-year-old
nephew, Sam,
and five-year-old neice, Brooke gave me an
eight-compartment plastic box with wrist-strap they had seen somewhere
and decided their uncle Larry should have. Much to my surprise, I've
found out they were absolutely right! I've been using it to keep
different kinds of connectors separated and handy during disassembly
and re-assembly of various BillyBob subsystems. Here it is with the
Upper Baffle bolts and washers.
 October
27th 2000 I had planned
earlier in the year to use the upcoming Thanksgiving Day weekend to
re-wire BillyBob. Those plans have changed . . . I don't have all the
parts, or the stones, yet to tackle this job. I don't want to lose the
long weekend tho' where I can work on BillyBob for four days without
moving him. It's near the end of hurricane season and I can probably
safely leave him outside at the Krash Lab. I've decided to try and
cleanup/paint the radiator and its support. I started ordering parts
for this job a couple of weeks ago. This week a shipment arrived from
Jim Carter's including Radiator Support Mount Pads (#ME195), 4 lb
Radiator Cap (#ME196), Upper Hose Clamps (#ME1981), Lower Hose Clamps
(#ME499), Radiator Hose Upper (#ME199) and Radiator Petcock (#ME740).
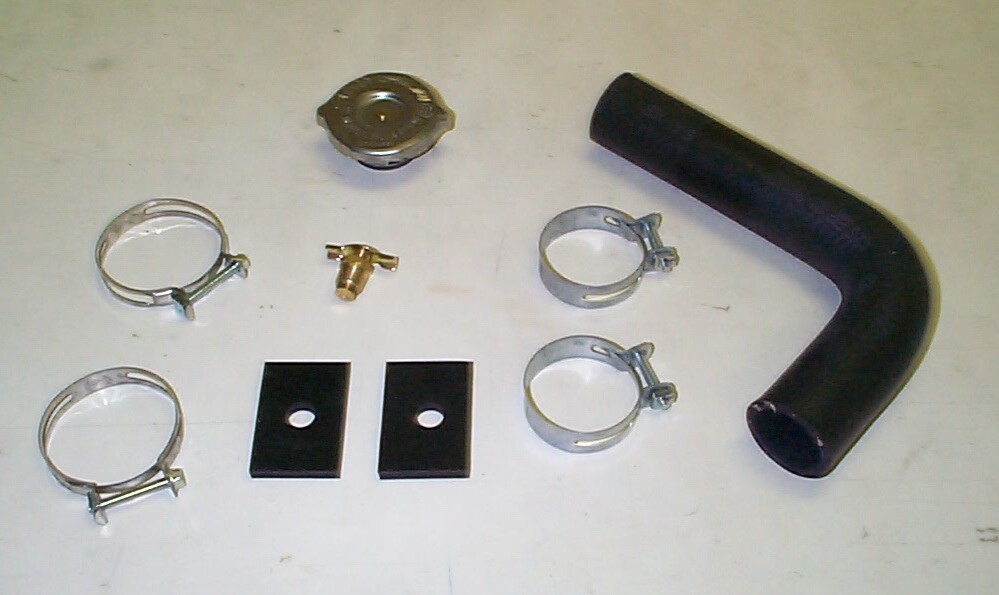
October
27th 2000 I had planned
earlier in the year to use the upcoming Thanksgiving Day weekend to
re-wire BillyBob. Those plans have changed . . . I don't have all the
parts, or the stones, yet to tackle this job. I don't want to lose the
long weekend tho' where I can work on BillyBob for four days without
moving him. It's near the end of hurricane season and I can probably
safely leave him outside at the Krash Lab. I've decided to try and
cleanup/paint the radiator and its support. I started ordering parts
for this job a couple of weeks ago. This week a shipment arrived from
Jim Carter's including Radiator Support Mount Pads (#ME195), 4 lb
Radiator Cap (#ME196), Upper Hose Clamps (#ME1981), Lower Hose Clamps
(#ME499), Radiator Hose Upper (#ME199) and Radiator Petcock (#ME740).
October 28th 2000 Started today by treating the upper radiator support "Header Bar" with another application of PRE cleaner, masking off bolt threads and giving it a coat of rattle-can Corroless. I got the Corroless a little too heavy and will have to sand some drips before spraying with the "Hunter Green" Rustoleum later today.
November 4th 2000 We're over the hump and probably safe for this hurricane season and the weather couldn't be much nicer. Started to work on the Radiator Support bolts to get prepared for the long Thanksgiving day weekend. I gave every bolt I could see a good soaking of Kroil/AeroKroil Penetrating Oil to start loosening them up. I intend to take them out a few at a time and clean/lubricate them so this part of the job will not give me any Murphy surprises on the big weekend. Had to jack BillyBob up and remove the front wheels to get access to most of the bolts (as well as remove the radiator Upper Baffle and Header Bar again).
The Kroil did the job 'cause I got all the bolts out without breaking anything on BillyBob or myself. There are four bolts each side thru the inner fender well into "captured" nuts on the Radiator Support (undercoating had to be putty-knifed away from a couple of these). There are three cap-screw bolts on each side of the radiator connecting it to captured nuts on the support. There are two bolts holding each horn support to the Radiator Support, again thru captured nuts. Finally, there are two thru-bolts at the top on each side of the Radiator Support down thru the inner fender to nuts and washers inside the fender well. These gave me the only difficulty because my hands could not reach wrenches topside and in the fender well at the same time. I finally solved it with a combination of curses and wedged vise-grip technique. If I were still a drinkin' man, I would give this a "one-budweiser" degree-of-difficulty.
A 1/2" wrench was used for all the bolts. The only connectors I didn't tackle were the two carriage bolts that attach the Radiator Support to the front frame cross-member. That's going to require more putty-knife work on my back and another day to do it in. When I picked up BillyBob at the warehouse today, he had white paint flakes all over the front. I noticed then that the storage facility had pressure-washed the roll-up doors sometime during the week and they were probably going to paint the doors soon. When I took BillyBob back to the warehouse, I dragged the California Car Cover out of the corner to protect BillyBob from the anticipated painting operations. The car cover had been in that corner for over a year and I had to battle palmetto bugs for control of it. For my Northern friends, palmetto bugs are gawdawful big cockroaches with somewhat limited flight abilities. Their danger is mostly psychological. The real menace I had an eye peeled for were scorpions but I didn't see any of those thankfully.
November 11th 2000 Veteran's Day. Used to be Armistice Day to mark the ending of the Great War - the 11th hour of the 11th day of the 11th month, 1918. I'm remembering my maternal grandfather, Bill Livergood, who was in the Meuse-Argon battle at the time. I'm remembering my Dad, Bob Kephart, who served in the China-India-Burma theatre in WWII and his brother, "Dutch" who died in the Battle of Leyte Gulf. I'm thinking of my Uncle Glaydon Lucore slogging it out in Korea and my Uncle Dan Kephart (eighteen months older than me) on a firebase in Vietnam and my Brother, JR, a tin-can sailor and too many other relatives to mention. I'm wondering about citizen-soldier ancestors I don't even know about, since both sides of my family have been here since before the Revolution. I'm sorry to get off on a tangent but we owe everything to those who have served. If you enjoy your liberties, thank a Vet! Whenever I run into people collecting for disabled vets these days, I give them the biggest bill I have in my wallet. In my book it's not charity, it's small payback for a great debt.
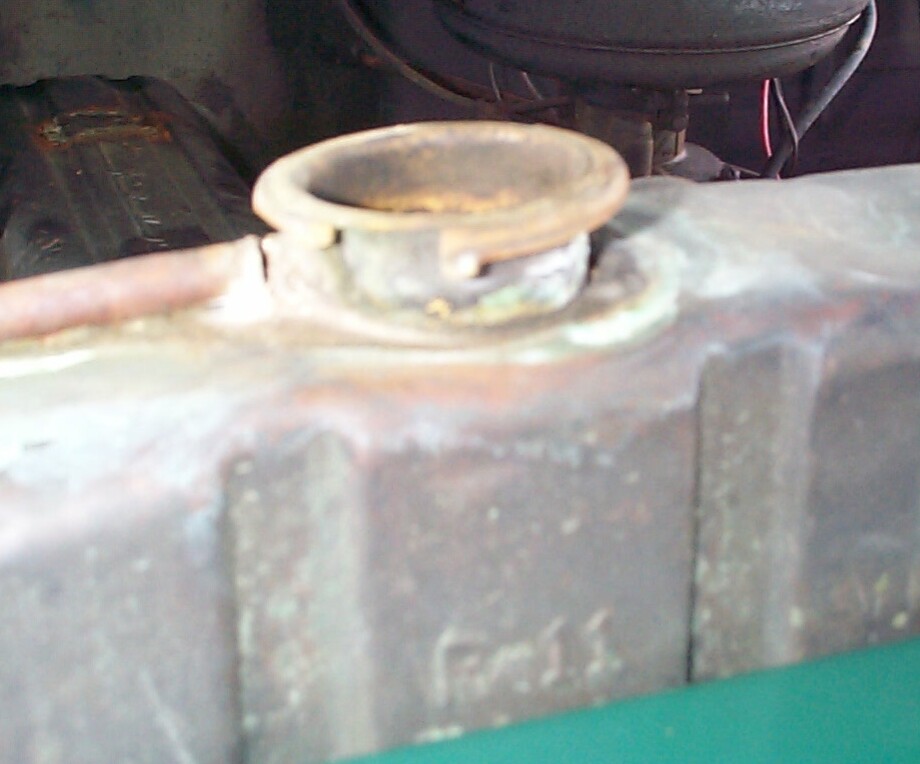 Back
to BillyBob. I'm puzzling over a radiator overflow tube rupture at the
filler neck - how to repair it, that is. I'm guessing some kind of
brazing/soldering operation but this is virgin territory to me, and I'm
not quite sure where to start. I left a message at the Stovebolter's forum
a little while ago and hopefully I'll get some help there. This can be
fixed after the long weekend when I paint the radiator, but has to be
fixed before I install the reproduction overflow tank I have on order
from The
Filling Station.
Back
to BillyBob. I'm puzzling over a radiator overflow tube rupture at the
filler neck - how to repair it, that is. I'm guessing some kind of
brazing/soldering operation but this is virgin territory to me, and I'm
not quite sure where to start. I left a message at the Stovebolter's forum
a little while ago and hopefully I'll get some help there. This can be
fixed after the long weekend when I paint the radiator, but has to be
fixed before I install the reproduction overflow tank I have on order
from The
Filling Station.
During the past week, I went in search of bolt replacements for the ones I loosened up last week. The local Discount Auto Parts and Bennett Auto Supply stores have a limited assortment of Grade 5 bolts whereas the local hardware stores have a greater variety but it's Grade 2. At least I got some of what I needed and an appreciation for the sizes required. I also picked up some Loctite Threadlocker Blue 242 for final assembly down the road. I picked up some Permatex Hi-temp Metal Repair Compound hoping this was the answer to my radiator overflow tube rupture problem. I don't wear glasses yet at fifty-one but that doesn't mean I can see. I can't read the fine-print of insurance policies, microwave food directions, or the back of this package. Alas, when I took a magnifying glass to the directions, I found in the gnat-high print that it's "NOT RECOMMENDED FOR COOLING SYSTEM CRACKS IN ENGINES OR RADIATORS". Might still be worth a try, though, since BillyBob is a low-pressure system.
Most of the bolts are 5/16"-18 hex-head cap screws 3/4" and 7/8" in length. The radiator to Radiator Support bolts are 5/16" flanged hex-head cap screws. I went to the McMaster-Carr website and ordered 100 each Grade 5 Fully Threaded Hex Head Cap Screws Zinc-Plated Steel, 5/16"-18 in the 3/4" and 7/8" length. I have a gut feeling I will see more of these connectors as I dig deeper into BillyBob's rusted anatomy. I also ordered 50 Grade 8 Hex Flange Cap Screws 5/16"-18 Thread, 3/4" Length, Fully Threaded - these come in a black finish. I'll get the assorted nuts, flat and lock washers locally.
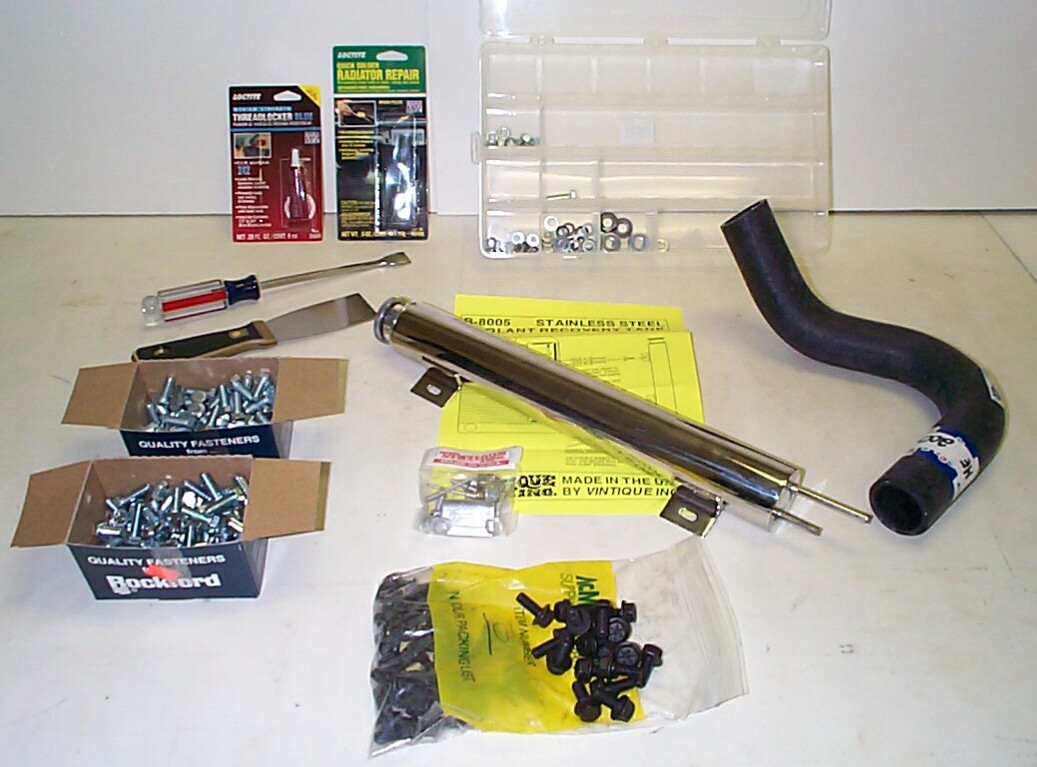 November
14th 2000 Got care
packages via UPS today. All the cap screws I ordered on Saturday
arrived from McMaster-Carr, and the "Reproduction" Coolant Recovery
Tank arrived from The Filling Station. I don't know what the original
overflow tank looked like for those rare trucks to have the option, but
the stainless steel "reproduction" is a handsome item (It will be the
shiniest thing in BillyBob's engine bay for some time to come). Last
week, a backordered lower radiator hose arrived from Jim Carter's and I
picked up a putty knife and gasket scraper from Sears. I also went to
the local Discount Auto Parts this morning for more lock washers and
5/16" nuts. While there I found a Loctite product, "Quick Solder
Radiator Repair", that may be the answer to my overflow tube rupture
problem.
November
14th 2000 Got care
packages via UPS today. All the cap screws I ordered on Saturday
arrived from McMaster-Carr, and the "Reproduction" Coolant Recovery
Tank arrived from The Filling Station. I don't know what the original
overflow tank looked like for those rare trucks to have the option, but
the stainless steel "reproduction" is a handsome item (It will be the
shiniest thing in BillyBob's engine bay for some time to come). Last
week, a backordered lower radiator hose arrived from Jim Carter's and I
picked up a putty knife and gasket scraper from Sears. I also went to
the local Discount Auto Parts this morning for more lock washers and
5/16" nuts. While there I found a Loctite product, "Quick Solder
Radiator Repair", that may be the answer to my overflow tube rupture
problem.
November 18th 2000 Lawyers to the left, lawyers to the right, lawyers and rabblerousers to the North and South battle to steal a presidental election or to preserve the process. Most of you ole truckers know who the good guy is, but here's a clue: It ain't the guy who wants to ban internal combustion engines and abolish the 2nd Amendment. Meanwhile, I'll work on BillyBob 'til things shake out.
While it was still the cool of the morning and the tree I work under was still actually providing some shade (no, it's not a palm tree), I jacked BillyBob up and, after scraping some gunk away, tried to loosen the two carriage bolts that connect the Radiator Support to the front crossmember. One was loose in it's mounting (the nut was only half-way up the threaded portion of the bolt). Both nuts turned without much effort. I'll have my Jeep Renegade for a parts-chaser next week, so I'll wait 'til then to remove these bolts and see if they need replacement. Kroil/AeroKroil Penetrating Oil was sprayed on the rusty radiator petcock and BillyBob was lowered to the ground again.
The upper radiator baffle and header bar were removed again and the remaining existing fasteners replaced with new bolts I received from McMaster-Carr earlier in the week. Only a few more last minute items to pick up and I'll be ready for the Thanksgiving Day weekend.
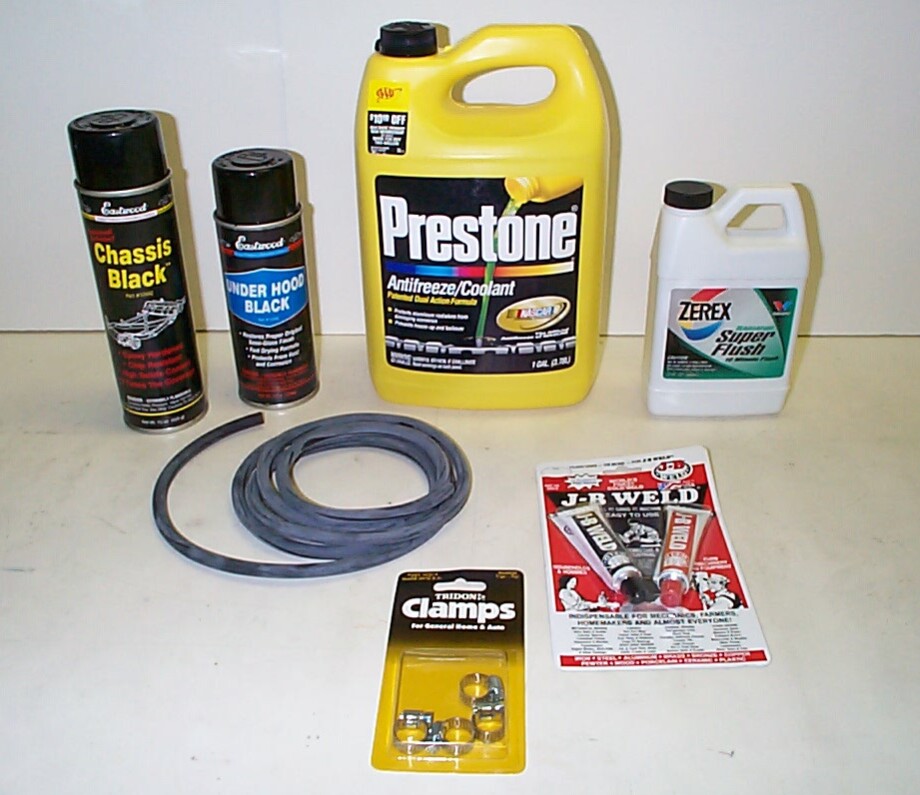 November
21st 2000 Received
rattle cans of "Chassis Black" (#1244Z) and "Under Hood Black" (#1240Z)
paint from Eastwood on Monday and picked up 6' of 7/32" vacuum hose,
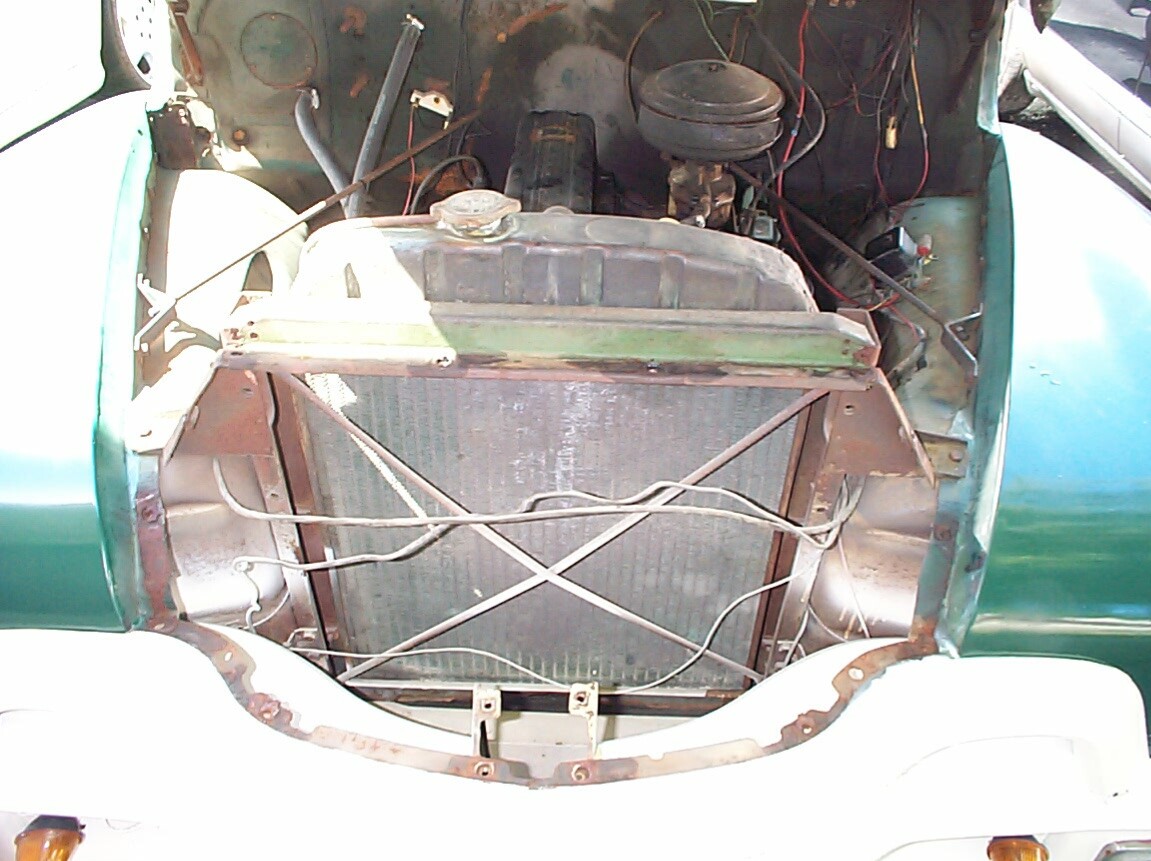
clamps, radiator flush, radiator coolant and JB Weld at Discount Auto
Parts today. The "X" brace across the front of the Radiator Support is
broken in two of the four places it connects to the support. I don't
have the tools (or skill) yet to mig weld it so I'm gonna give the JB
Weld a try.
November
21st 2000 Received
rattle cans of "Chassis Black" (#1244Z) and "Under Hood Black" (#1240Z)
paint from Eastwood on Monday and picked up 6' of 7/32" vacuum hose,
clamps, radiator flush, radiator coolant and JB Weld at Discount Auto
Parts today. The "X" brace across the front of the Radiator Support is
broken in two of the four places it connects to the support. I don't
have the tools (or skill) yet to mig weld it so I'm gonna give the JB
Weld a try.
| < Back to Intro |
You can email me at ![]() webmaster@laroke.com
webmaster@laroke.com
Issued Sunday January 7, 2001
Updated Friday April 28, 2017
copyright © 1996-2017 Larry Robert Kephart all rights reserved
| | LRK Home | | Bio Info | | Krash Khronicles | | LAROKE | |
| | BettyLou | | BillyBob's Garage | | Rat Patrol | | Deerslayer | | Elvira | |
| | Land of the Free and Home of the Brave | |
| | Keppylou's Art | | WWI Soldier's Diary | |