| | LRK Home | | Bio Info | | Krash Khronicles | | LAROKE | |
| | BettyLou | | BillyBob's Garage | | Rat Patrol | | Deerslayer | | Elvira | |
| | Land of the Free and Home of the Brave | |
| | Keppylou's Art | | WWI Soldier's Diary | |
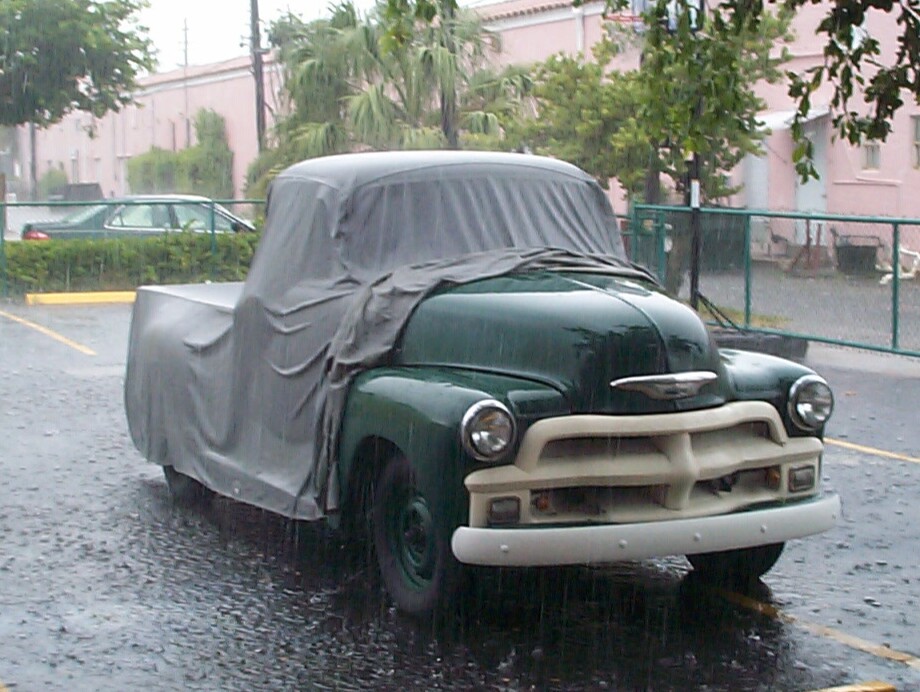
BillyBob Work-in-Progress Log
![]()
TRUCK LINKS including vendor sites for old parts, custom parts, and tools as well as sites for classic car and truck organizations
STORE Operating in association with Amazon.com, books, recordings and tools can be purchased.
PLANNING for the restoration including project schedule and cost estimates.
![]()
WORK-IN-PROGRESS is the restoration of parts of BillyBob that I can accomplish without a garage.
PRE-RESTORATION includes log entries of minor repairs and and adventures between time of purchase and the time when I started restoration, a piece at a time.
JR'S KORNER JR's Korner is the history of BillyBob before I got him authored by my brother, Wm. C. Kephart.
5. One thing leads to another Page 2
 November
23rd 2000 It's turkey
day and I'm starting out by installing the Zerox Flush Kit and flushing
BillyBob's cooling system prior to removing the radiator. I often get
visitors when working on BillyBob under the shade tree, but I didn't
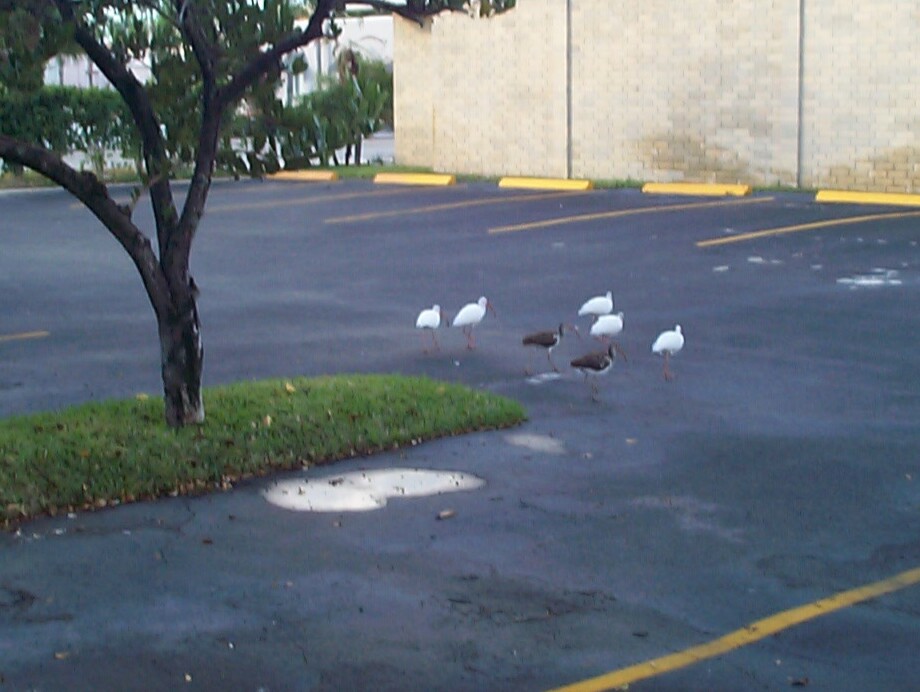
think Florida waterfowl were old truck fans. This group of Ibis walked
right up to BillyBob and me (within twenty feet anyway) before scouring
that landscape island for food, then sauntering off.
November
23rd 2000 It's turkey
day and I'm starting out by installing the Zerox Flush Kit and flushing
BillyBob's cooling system prior to removing the radiator. I often get
visitors when working on BillyBob under the shade tree, but I didn't
think Florida waterfowl were old truck fans. This group of Ibis walked
right up to BillyBob and me (within twenty feet anyway) before scouring
that landscape island for food, then sauntering off.
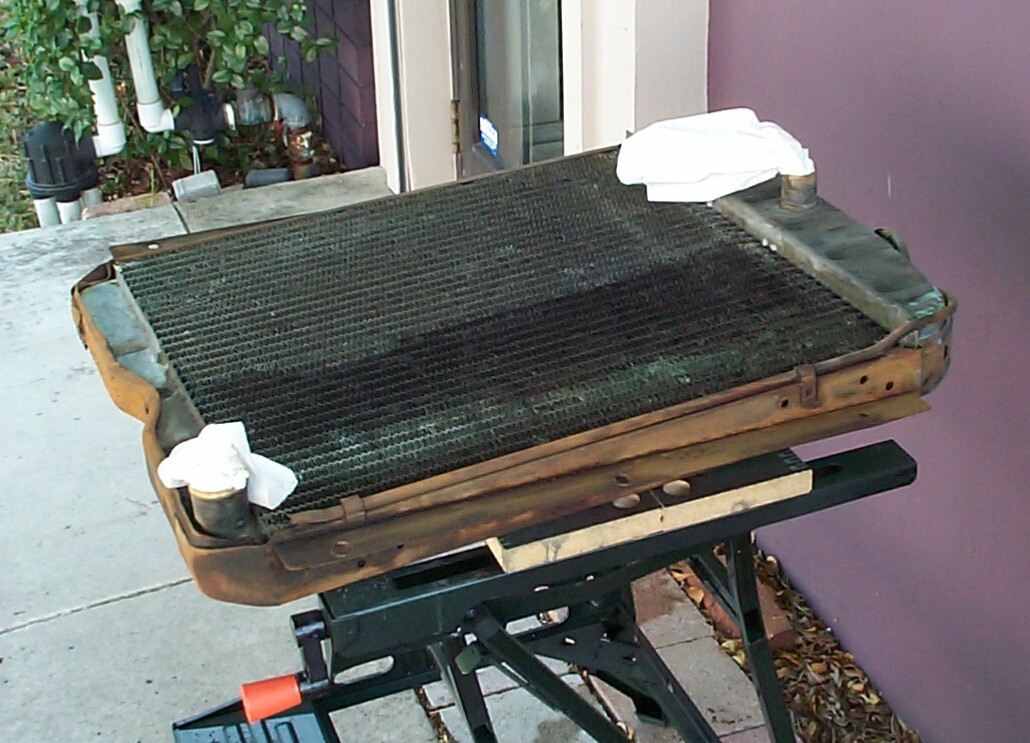 After
flushing/backflushing the cooling system, BillyBob's radiator was
removed and prepped. Removing the radiator only took a few minutes
thanx to the previous weeks' bolt replacement exercise. The radiator
frame and tank were wire-brushed and given the once-over with
Eastwood's cleaning wheel (#31095). I cleaned up the ruptured areas
(there's two of 'em) of the overflow tube with wire-brush attachments
for the Dremel moto-tool. I cut off 'bout a half inch of the Loctite
Quick Solder Radiator Repair stick and started to knead it to mix the
two parts of this chemical miracle. The instructions say to continue
this operation until a uniform "brass" color is achieved. The color is
actually more of a kaki green. I tore the resulting lump in half and
proceeded to mold it into place around the first rupture. This stuff
sets up fast once you stop working it. When I went to finish the other
rupture, the remaining half-lump of compound was hard enuf that it
sounded like a bolt when I threw it in the dumpster.
After
flushing/backflushing the cooling system, BillyBob's radiator was
removed and prepped. Removing the radiator only took a few minutes
thanx to the previous weeks' bolt replacement exercise. The radiator
frame and tank were wire-brushed and given the once-over with
Eastwood's cleaning wheel (#31095). I cleaned up the ruptured areas
(there's two of 'em) of the overflow tube with wire-brush attachments
for the Dremel moto-tool. I cut off 'bout a half inch of the Loctite
Quick Solder Radiator Repair stick and started to knead it to mix the
two parts of this chemical miracle. The instructions say to continue
this operation until a uniform "brass" color is achieved. The color is
actually more of a kaki green. I tore the resulting lump in half and
proceeded to mold it into place around the first rupture. This stuff
sets up fast once you stop working it. When I went to finish the other
rupture, the remaining half-lump of compound was hard enuf that it
sounded like a bolt when I threw it in the dumpster.
Cut another quarter inch of the repair stick and started over for the second rupture. This was the one at the radiator cap and I folded up a coffee stirrer and put it inside the overflow tube from inside the filling neck opening to block too much of the repair compound from going inside the overflow tube and possibly clogging it up. The compound was applied and the coffee stirrer removed. The radiator cap was screwed on and off a couple of times to trim off any of the compound blocking its path before the stuff set up. Only time will tell if I did this right and the leaks are fixed.
 Treated
the radiator frame with Eastwood's PRE Paint Prep and then the rusted
frame got a coat of brush-on Corroless Rust Stabilizer I still had left
from the Tammy Faye paint job.
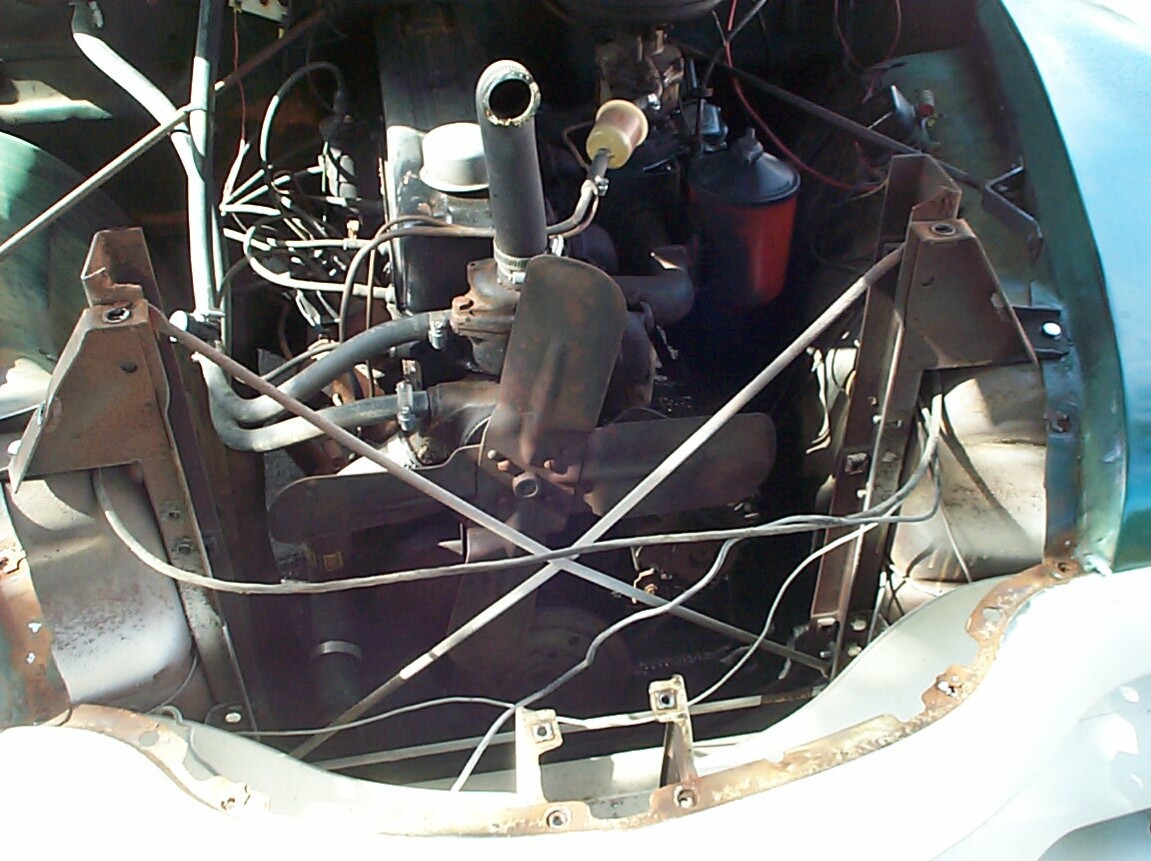
The radiator was put in the storage shed and I started thinking about
whether to remove the Radiator Support today or wait 'til tommorrow.
Wot the heck! Let's go for it! The weather might not be this nice
tomorrow. It's cool enuf to work in the middle of the day and the rest
of the week a warming trend is the forecast. I dragged the floor jack,
and stands out, and took BillyBob's front wheels off so I could get at
all the bolts. The dis-assembly went smoothly and the fenders didn't
settle much when all the capscrews were out. I should not have much
trouble getting things back together after the painting is done. Well,
It's 4:30 PM and time to clean up for today.
Treated
the radiator frame with Eastwood's PRE Paint Prep and then the rusted
frame got a coat of brush-on Corroless Rust Stabilizer I still had left
from the Tammy Faye paint job.
The radiator was put in the storage shed and I started thinking about
whether to remove the Radiator Support today or wait 'til tommorrow.
Wot the heck! Let's go for it! The weather might not be this nice
tomorrow. It's cool enuf to work in the middle of the day and the rest
of the week a warming trend is the forecast. I dragged the floor jack,
and stands out, and took BillyBob's front wheels off so I could get at
all the bolts. The dis-assembly went smoothly and the fenders didn't
settle much when all the capscrews were out. I should not have much
trouble getting things back together after the painting is done. Well,
It's 4:30 PM and time to clean up for today.
 November
24th 2000 Spread a
9x12, .7 mil plastic painter's drop cloth half under BillyBob and half
in front of BillyBob and secured at the corners with sample
architectural pavers laying around at the Krash Lab. This will catch
the dirt scraped off the Radiator Support and the front cross-member it
sits on. There is a couple of inches of gunk in the deepest recesses of
the front cross-member and it's satisfying to dig this stuff out (at
least at first 'til the job gets difficult). There are embedded
springs, bolts, and probably a few Roman artifacts. Heck, BillyBob's
gas mileage might improve with this much weight gone.
November
24th 2000 Spread a
9x12, .7 mil plastic painter's drop cloth half under BillyBob and half
in front of BillyBob and secured at the corners with sample
architectural pavers laying around at the Krash Lab. This will catch
the dirt scraped off the Radiator Support and the front cross-member it
sits on. There is a couple of inches of gunk in the deepest recesses of
the front cross-member and it's satisfying to dig this stuff out (at
least at first 'til the job gets difficult). There are embedded
springs, bolts, and probably a few Roman artifacts. Heck, BillyBob's
gas mileage might improve with this much weight gone.
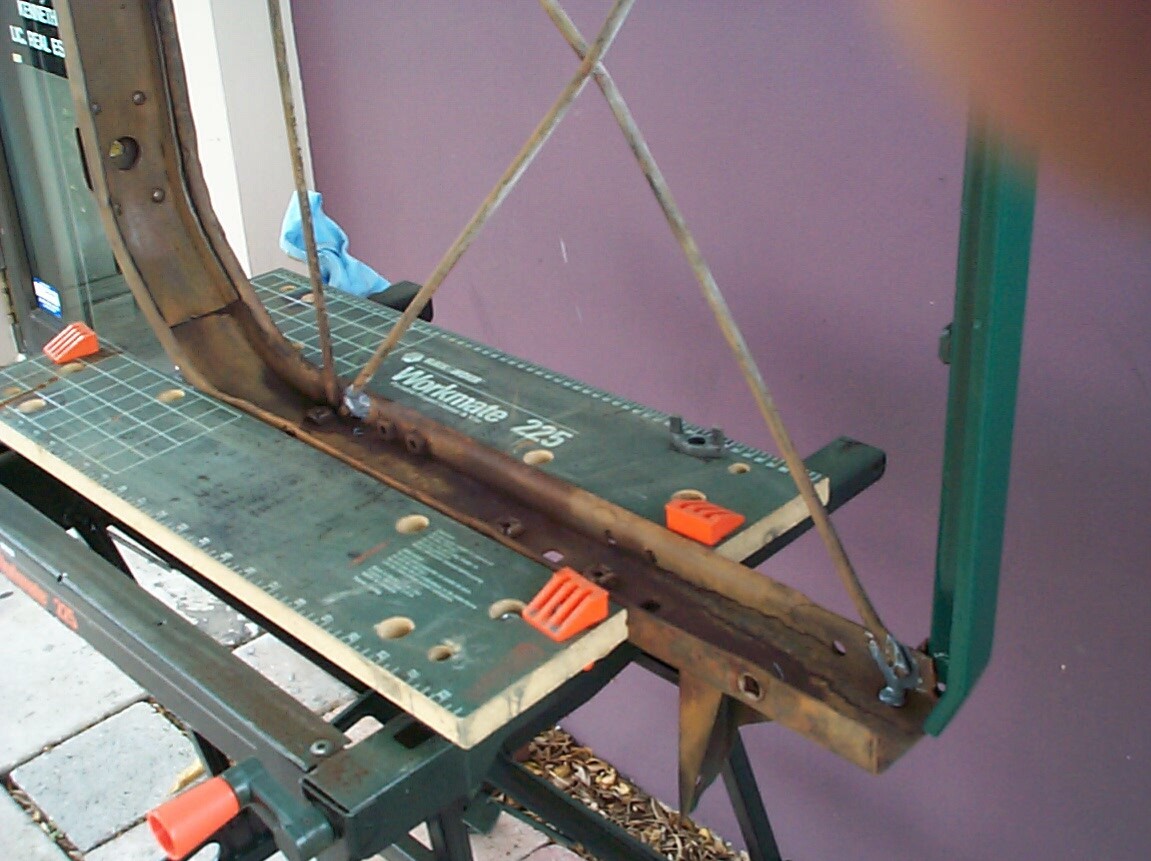 The
gunk on the bottom of the Radiator Support was putty-knifed and
wire-brushed off as much as possible, then treated with a couple of
doses of Eastwood's Under Gone Industrial Cleaner/Degreaser (#31131Z).
This stuff is new and more environmental-friendly than the traditional
degreasers. The upper radiator support Header Bar was bolted onto the
top of the U-shaped Radiator Support temporarily to keep it square for
the next operation. The two broken X-brace connections on the Radiator
Support were cleaned to bare-metal with the Dremel moto-tool coarse
sanding drum, then a batch of JB Weld was mixed up and applied.
The
gunk on the bottom of the Radiator Support was putty-knifed and
wire-brushed off as much as possible, then treated with a couple of
doses of Eastwood's Under Gone Industrial Cleaner/Degreaser (#31131Z).
This stuff is new and more environmental-friendly than the traditional
degreasers. The upper radiator support Header Bar was bolted onto the
top of the U-shaped Radiator Support temporarily to keep it square for
the next operation. The two broken X-brace connections on the Radiator
Support were cleaned to bare-metal with the Dremel moto-tool coarse
sanding drum, then a batch of JB Weld was mixed up and applied.
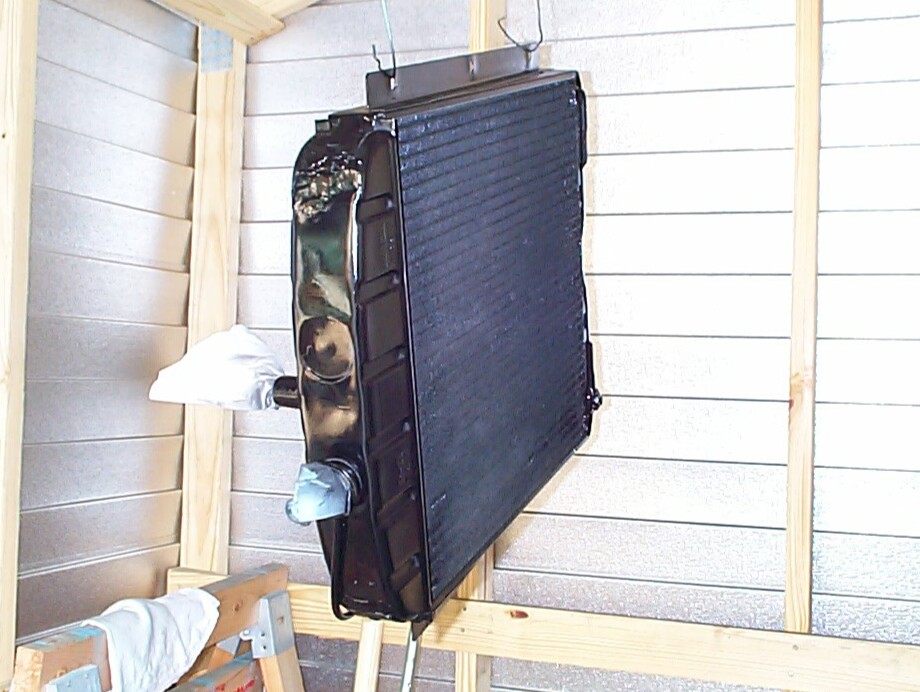 Gave
the Radiator an application of PRE Paint Prep, hung it up in the "Paint
Booth" storage shed, donned respirator and goggles, and gave it the
first coat of Eastwood's Radiator Black paint (#1617Z). This stuff is
fast-drying. Maybe that's why the respirator doesn't seem to be as
effective. I'm giving it several quick, light coats, holding my breath
during my time in the storage shed. It's too windy to spray under the
shade tree today. In the meantime, between paint coats on the Radiator
and waiting for the JB Weld on the Radiator Support to cure, I put the
Radiator Support mounting carriage bolts, washers, spacers and nuts
into the Vibratory Tumbler for a cleaning session and worked on
cleaning the front cross-member. I went thru several rounds of
putty-knifing, shop-vacuuming and degreasing to get to the paint prep
stage.
Gave
the Radiator an application of PRE Paint Prep, hung it up in the "Paint
Booth" storage shed, donned respirator and goggles, and gave it the
first coat of Eastwood's Radiator Black paint (#1617Z). This stuff is
fast-drying. Maybe that's why the respirator doesn't seem to be as
effective. I'm giving it several quick, light coats, holding my breath
during my time in the storage shed. It's too windy to spray under the
shade tree today. In the meantime, between paint coats on the Radiator
and waiting for the JB Weld on the Radiator Support to cure, I put the
Radiator Support mounting carriage bolts, washers, spacers and nuts
into the Vibratory Tumbler for a cleaning session and worked on
cleaning the front cross-member. I went thru several rounds of
putty-knifing, shop-vacuuming and degreasing to get to the paint prep
stage.
 Finally,
I'm close enuf on the front cross-member to apply the PRE Paint Prep
and paint it with Eastwood's Chassis Black paint. Next, the Header Bar
was removed from the Radiator Support again and the frame was given the
PRE Paint Prep treatment. The old capscrews I stiil have laying around
were screwed into the Radiator Support's captured nuts to protect the
threads from paint. The Radiator Support was hung up in the storage
shed and given two coats of rattle-can Corroless Rust Stabilizer.
Finally, the carriage bolts were removed from the tumbler, rinsed with
water and dried with a hair dryer. The sun is gettin' low in the West
and the sky is threatening light rain, so I shut down operations for
the day.
Finally,
I'm close enuf on the front cross-member to apply the PRE Paint Prep
and paint it with Eastwood's Chassis Black paint. Next, the Header Bar
was removed from the Radiator Support again and the frame was given the
PRE Paint Prep treatment. The old capscrews I stiil have laying around
were screwed into the Radiator Support's captured nuts to protect the
threads from paint. The Radiator Support was hung up in the storage
shed and given two coats of rattle-can Corroless Rust Stabilizer.
Finally, the carriage bolts were removed from the tumbler, rinsed with
water and dried with a hair dryer. The sun is gettin' low in the West
and the sky is threatening light rain, so I shut down operations for
the day.
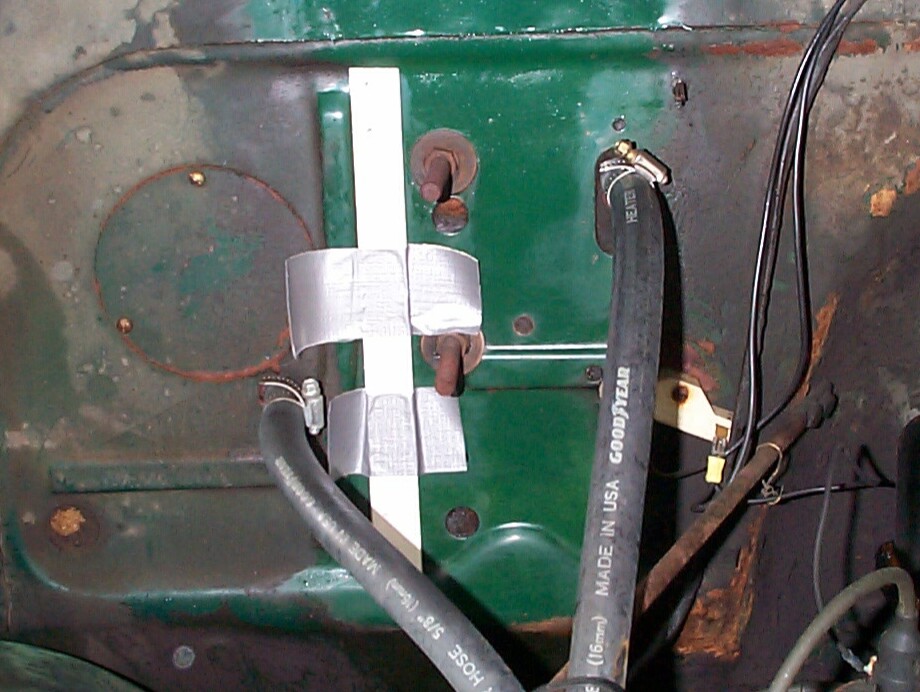 November
25th 2000 A change in
the weather has put a kink in my operations. It's rainin' now and while
I wait, I can't help but ruminate on the irony that Algore and the
global warming crowd place their faith in some of the same jokers who
can't get a four-day weather forecast on the money. Between rain
fronts, which aren't lasting more than five minutes at a stretch so
far, I'm trying to install the coolant recovery tank I got from The
Filling Station. There isn't clearance for it beside the radiator so
it's going on the firewall. I made a foamcore (an art material abundant
in architectural offices and useful for many purposes) template for the
3/16" bracket holes that have to be drilled in the firewall and
duct-taped it into position. A plumb bob not being handy, I used my
mobile phone battery-charging transformer dangling on the end of its
cord to point the way to gravity.
November
25th 2000 A change in
the weather has put a kink in my operations. It's rainin' now and while
I wait, I can't help but ruminate on the irony that Algore and the
global warming crowd place their faith in some of the same jokers who
can't get a four-day weather forecast on the money. Between rain
fronts, which aren't lasting more than five minutes at a stretch so
far, I'm trying to install the coolant recovery tank I got from The
Filling Station. There isn't clearance for it beside the radiator so
it's going on the firewall. I made a foamcore (an art material abundant
in architectural offices and useful for many purposes) template for the
3/16" bracket holes that have to be drilled in the firewall and
duct-taped it into position. A plumb bob not being handy, I used my
mobile phone battery-charging transformer dangling on the end of its
cord to point the way to gravity.
 ~!@#$%^
rain! Took a run to a local hardware store to pickup carriage bolt
replacements and a 3/16" bit for drilling the coolant tank bracket
holes. My old drill bit wouldn't make a dent in the firewall (or maybe
I had the drill goin' the wrong direction?? . . . NAW!).
I needed the carriage bolts 'cause when I cleaned the originals
yesterday I discovered why the one had been loose in its mounting - the
threads were fouled half-way up.
~!@#$%^
rain! Took a run to a local hardware store to pickup carriage bolt
replacements and a 3/16" bit for drilling the coolant tank bracket
holes. My old drill bit wouldn't make a dent in the firewall (or maybe
I had the drill goin' the wrong direction?? . . . NAW!).
I needed the carriage bolts 'cause when I cleaned the originals
yesterday I discovered why the one had been loose in its mounting - the
threads were fouled half-way up.
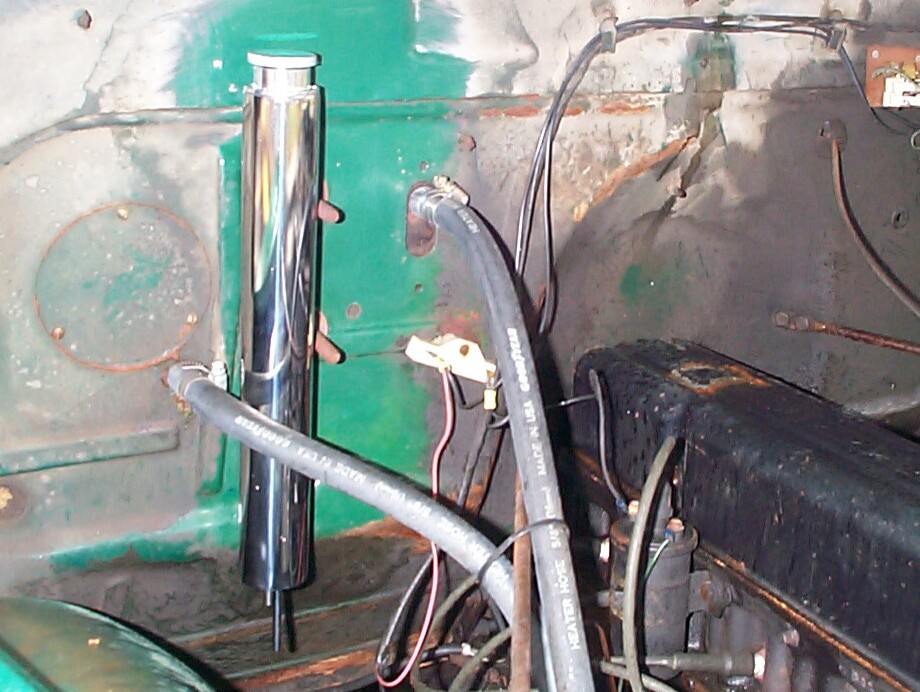 I
got the holes drilled for the brackets, gasket compound on the mating
surfaces, and the brackets pop-riveted in place before the next wave of
rain rolled thru. The coolant tank ships with pop-rivets to attach the
brackets with, then the tank is mounted to the brackets with bolts. A
pop-rivet tool was one of the few tools I had in my tool box from the
distant past. When I was putting paneling in my '71
half-ton Chevy Van (back in the early seventies) to make it
into a weekend hippie abode, I thought the pop-rivet was the best
invention since sliced bread. In the next gap in the weather, I got the
coolant tank mounted, including Threadlocker on the bolts . . . then it
rained. This is going to be a long day.
I
got the holes drilled for the brackets, gasket compound on the mating
surfaces, and the brackets pop-riveted in place before the next wave of
rain rolled thru. The coolant tank ships with pop-rivets to attach the
brackets with, then the tank is mounted to the brackets with bolts. A
pop-rivet tool was one of the few tools I had in my tool box from the
distant past. When I was putting paneling in my '71
half-ton Chevy Van (back in the early seventies) to make it
into a weekend hippie abode, I thought the pop-rivet was the best
invention since sliced bread. In the next gap in the weather, I got the
coolant tank mounted, including Threadlocker on the bolts . . . then it
rained. This is going to be a long day.
 As
late as this morning, I hadn't decided on whether to paint the Radiator
Support with Eastwood's Chassis Black or Under Hood Black. The climatic
conditions made my decision for me. The Under Hood Black is a
quick-drying formula so it got the nod. The only problen is that I got
a defective rattle-can and I ended up with paint all over my hand and
half-way up my arm from the first coat (I shook the can during painting
and that's how I discovered it was leaking!). I'll wear gloves for the
next coat. Why is it that you can scrub your hands with industrial soap
and not get rid of all the paint, but as soon as you touch something
after the scrubbing that doesn't need paint (like a computer keyboard),
the paint will transfer to that item like magic? Another one of life's
little mysteries, I guess.
As
late as this morning, I hadn't decided on whether to paint the Radiator
Support with Eastwood's Chassis Black or Under Hood Black. The climatic
conditions made my decision for me. The Under Hood Black is a
quick-drying formula so it got the nod. The only problen is that I got
a defective rattle-can and I ended up with paint all over my hand and
half-way up my arm from the first coat (I shook the can during painting
and that's how I discovered it was leaking!). I'll wear gloves for the
next coat. Why is it that you can scrub your hands with industrial soap
and not get rid of all the paint, but as soon as you touch something
after the scrubbing that doesn't need paint (like a computer keyboard),
the paint will transfer to that item like magic? Another one of life's
little mysteries, I guess.
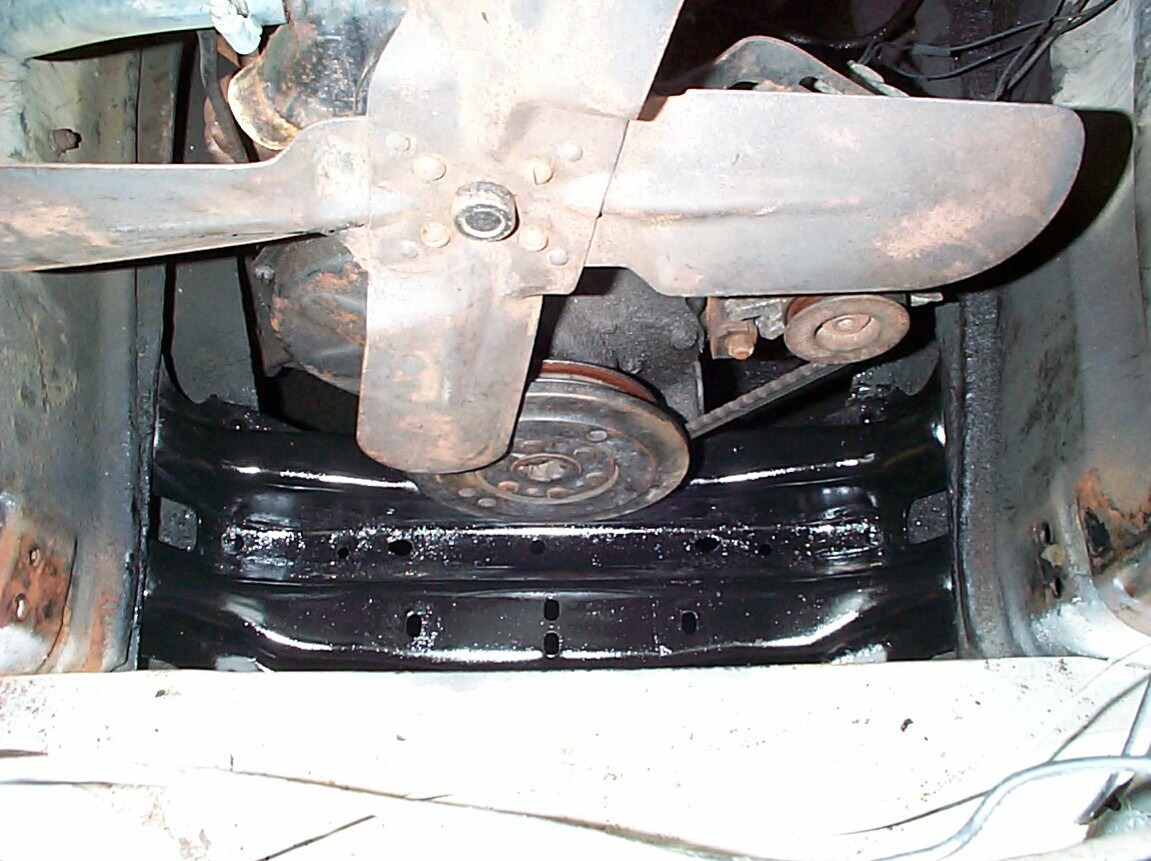
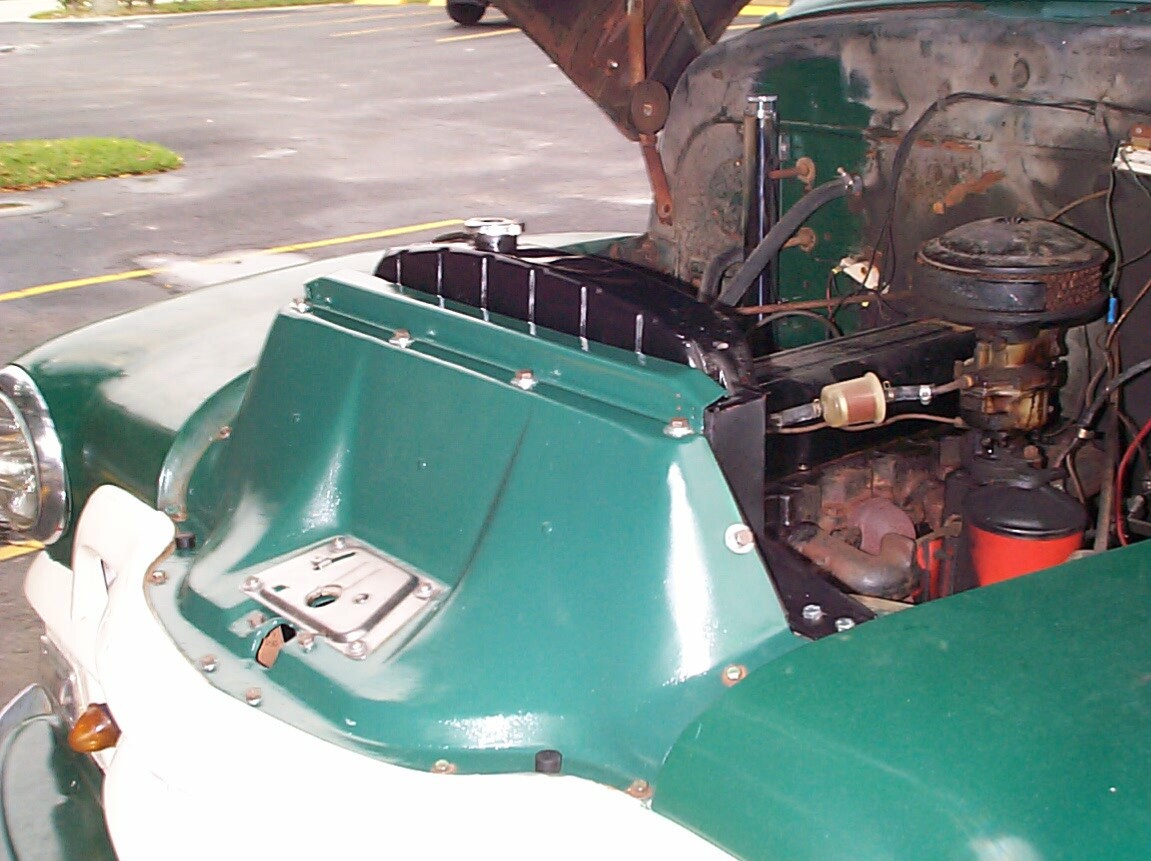
Between paint coats, the existing radiator hoses were cleaned with Westley's Bleche-Wite tire cleaner followed by a treatment of Armor All Protectant and placed back on the engine . . . OOPs! the new original equipment type hose clamps from Jim Carter's are too big for the hoses so I went back to the existing clamps. The six feet of vacuum hose was clamped onto the end of the radiator overflow tube because it's an awkward location and a tight fit to get the hose on the larger tube. I'd rather do it in a comfortable position now than lay on my back and curse at it tomorrow when I'm more pressed for time. The new drainage petcock was also installed. Time to shutdown and and go home.
November 26th 2000 "Doors Sunday" on VH1 and BillyBob and I are still "Riders on the Storm". It's wet and foggy at the Krash Lab today but not as bad as yesterday and I'm pretty sure I can finish this job up as originally planned.
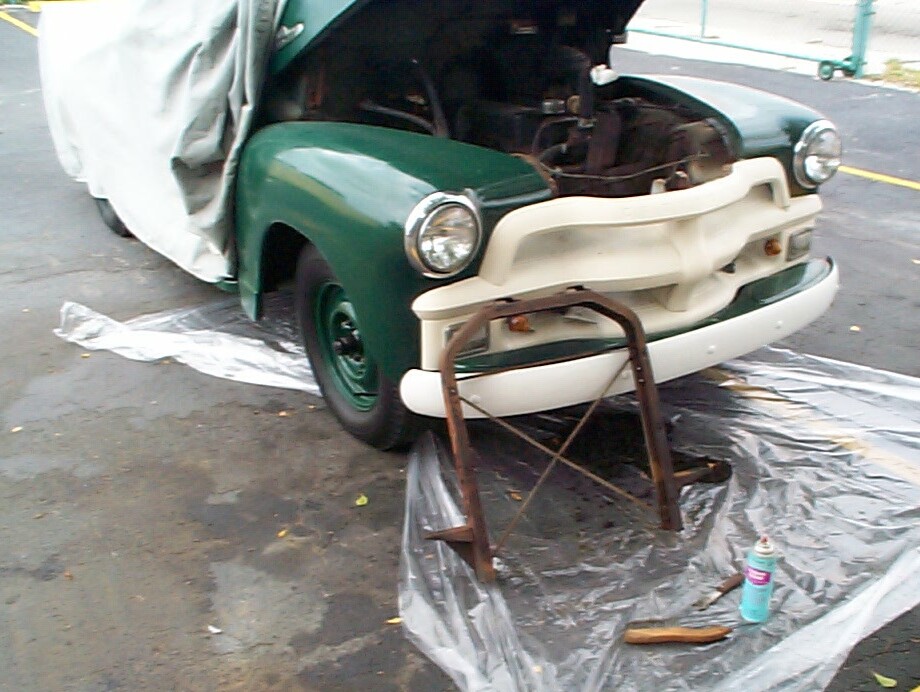
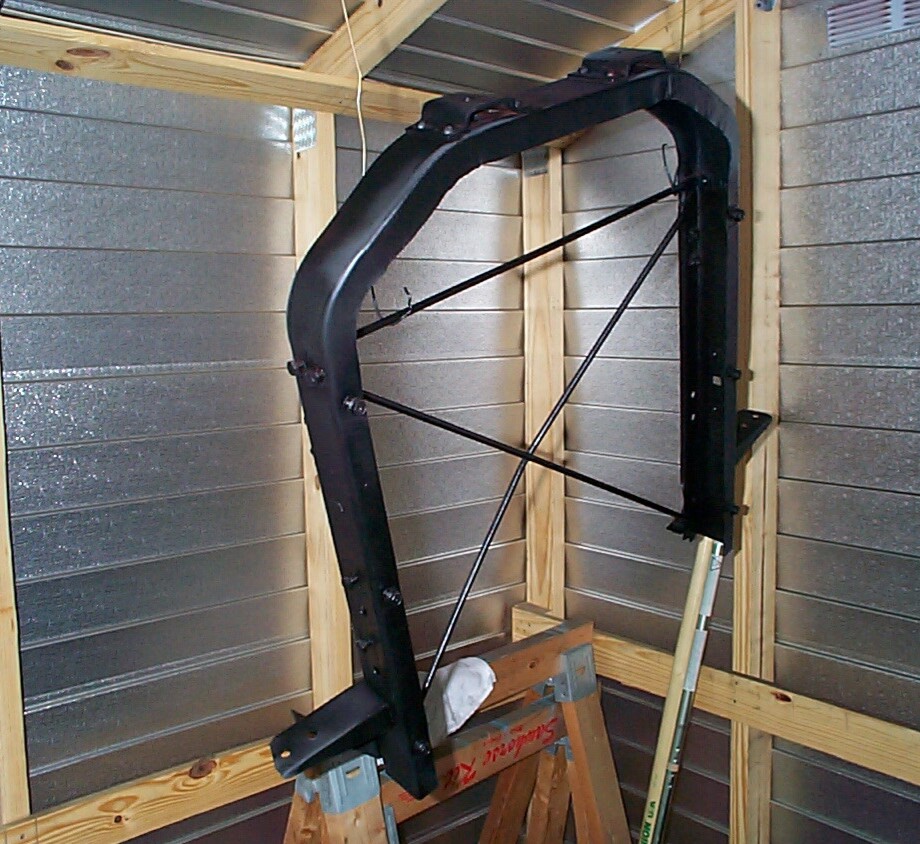
 I
knew the first task would be the hardest but it turned out to be more
perplexing than I thought. The Radiator Support needed to go in first.
The problem was that the front end bodywork had settled a bit (which
I'd anticipated). The new Radiator Support Mount Pads aggravated the
situation by making the support sit higher than before (this I hadn't
thought about). I spent 2-1/2 hours grunting sweating and cursing the
Radiator Support and fenders back into alignment. I didn't curse much
tho'. I believe cursing is an art, and I didn't have the time to
compose the kind of pithy statements I thought the occasion deserved. I
got everything together eventually except for two capscrews on the
passenger side and one on the driver's side. I think I damaged the
captured nuts with the punch I was using for alignment or
cross-threaded them or both. Fixing them will have to wait for another
day.
I
knew the first task would be the hardest but it turned out to be more
perplexing than I thought. The Radiator Support needed to go in first.
The problem was that the front end bodywork had settled a bit (which
I'd anticipated). The new Radiator Support Mount Pads aggravated the
situation by making the support sit higher than before (this I hadn't
thought about). I spent 2-1/2 hours grunting sweating and cursing the
Radiator Support and fenders back into alignment. I didn't curse much
tho'. I believe cursing is an art, and I didn't have the time to
compose the kind of pithy statements I thought the occasion deserved. I
got everything together eventually except for two capscrews on the
passenger side and one on the driver's side. I think I damaged the
captured nuts with the punch I was using for alignment or
cross-threaded them or both. Fixing them will have to wait for another
day.
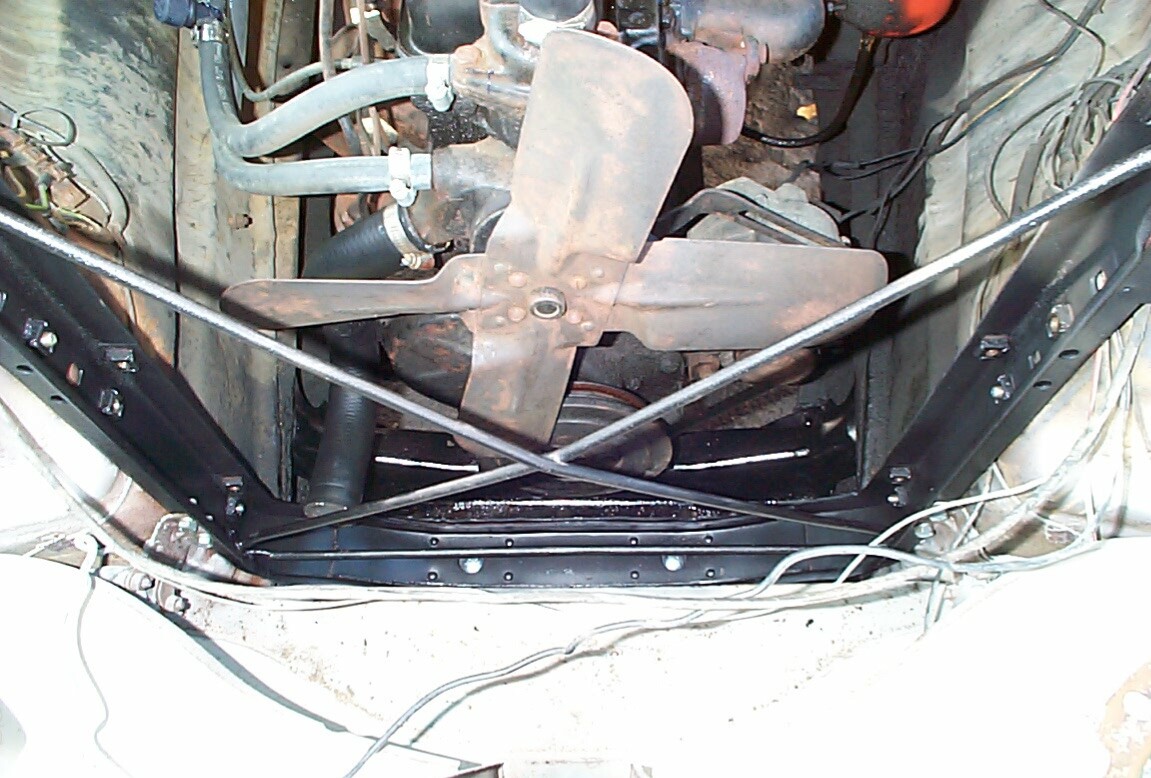
 The
fog had burned off early and it didn't rain again. This is turning into
a hot, sunny day . . . gotta get the heavy stuff done before the sun
cooks me. Next, the Radiator went back in place without much
difficulty, 'cept I screwed up another captured nut low on the driver's
side. The hoses were connected including the coolant tank hoses.
The
fog had burned off early and it didn't rain again. This is turning into
a hot, sunny day . . . gotta get the heavy stuff done before the sun
cooks me. Next, the Radiator went back in place without much
difficulty, 'cept I screwed up another captured nut low on the driver's
side. The hoses were connected including the coolant tank hoses.
 Went
thru the flushing and backflushing exercises one more time and then
filled the system with coolant (25%) and water (75%) and ran the
engine. Noticed a few leaks so I ran off to the Discount Auto Parts
store and grabbed another gallon of coolant and a bottle of Bar's Stop
Leak. After putting in the Stop Leak and topping off with water,
BillyBob's engine was run for thirty minutes . . . all the leaks
stopped. I'm not ahead or too far behind at this point so I decided to
close up shop for the day while I was almost even.
Went
thru the flushing and backflushing exercises one more time and then
filled the system with coolant (25%) and water (75%) and ran the
engine. Noticed a few leaks so I ran off to the Discount Auto Parts
store and grabbed another gallon of coolant and a bottle of Bar's Stop
Leak. After putting in the Stop Leak and topping off with water,
BillyBob's engine was run for thirty minutes . . . all the leaks
stopped. I'm not ahead or too far behind at this point so I decided to
close up shop for the day while I was almost even.
 December
2nd 2000 Removed the
Upper Baffle and Header Bar again today to get at the Horns. Took both
the horns off and wire-brushed. Gave the ferrous metal portions for the
horns an application of PRE, then a coat of Corroless. Did not bother
using the Corroless Rust Stabilizer on the "pot metal" parts. Using
card board as a shield, portions of the Radiator Support that were
marred during installation last week were touched up with Underhood
Black.
December
2nd 2000 Removed the
Upper Baffle and Header Bar again today to get at the Horns. Took both
the horns off and wire-brushed. Gave the ferrous metal portions for the
horns an application of PRE, then a coat of Corroless. Did not bother
using the Corroless Rust Stabilizer on the "pot metal" parts. Using
card board as a shield, portions of the Radiator Support that were
marred during installation last week were touched up with Underhood
Black.
I also topped off the Radiator with coolant - getting closer to the 70% water, 30% coolant proportion I'd like to maintain. Also managed to get my head up under the hood at the firewall to observe if there was any water/coolant in the new Coolant Recovery Tank . . . Good, it was 'bout half full. There is still one small leak to attend to - the first rupture I tried to fix with the Loctite Quick Solder Radiator Repair stick is seeping. If the Bar's Stop Leak doesn't take care of it by next week, I'll grind down the area a bit and try JB Weld.
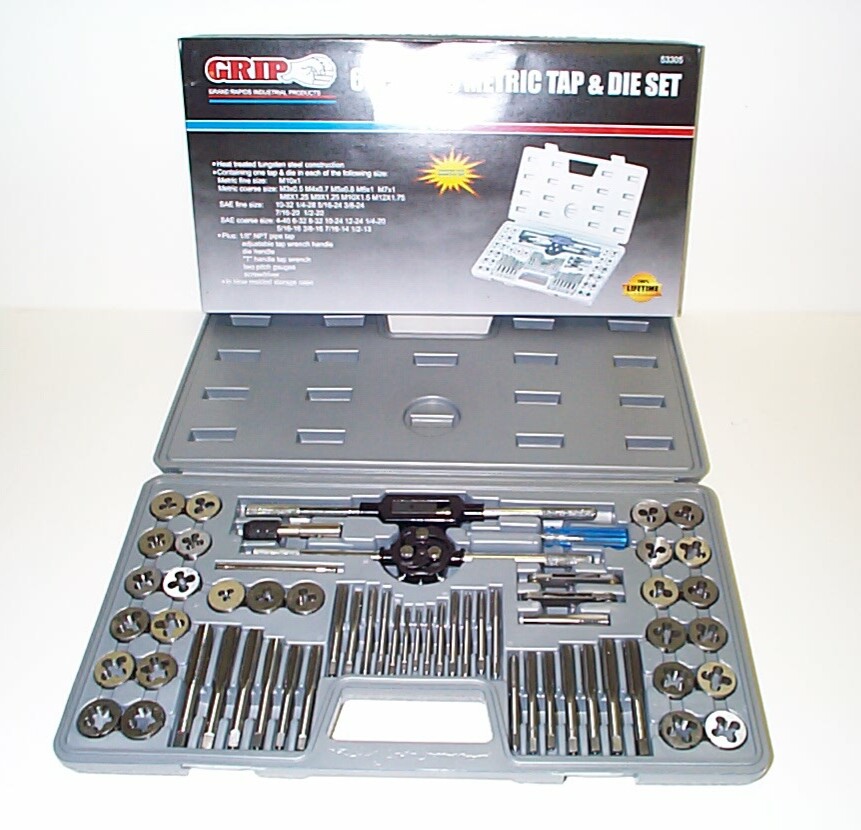 December
5th 2000 Last week, I
received a new Eastwood catalog and inside the front cover was a new
item - a 60-Piece SAE/Metric Tap and Die Set (#43257). I went online
and made an "impulse purchase" because of the captured nuts on the
Radiator Support I messed up. I don't need the Metric sizes for
BillyBob, but they might be useful for work on Renegade, my Jeep - I
don't know fer shure. The tap and die set arrived yesterday, courtesy
UPS and we'll find out Saturday if I can clean up the captured nuts or
if more extensive repair is necessary.
December
5th 2000 Last week, I
received a new Eastwood catalog and inside the front cover was a new
item - a 60-Piece SAE/Metric Tap and Die Set (#43257). I went online
and made an "impulse purchase" because of the captured nuts on the
Radiator Support I messed up. I don't need the Metric sizes for
BillyBob, but they might be useful for work on Renegade, my Jeep - I
don't know fer shure. The tap and die set arrived yesterday, courtesy
UPS and we'll find out Saturday if I can clean up the captured nuts or
if more extensive repair is necessary.
December 23rd 2000 This project went into a holding pattern for a few weeks while I determined why BillyBob's starter wouldn't crank the engine. Finally got BillyBob out of the warehouse bay again today but the weather is overcast and blustery so I'm not doin' much. The Radiator overflow tube is still leaking in one location so I roughened the area up with a sandpaper cone on the cordless drill. Prepped the area with Eastwood's PRE Paint Prep and then applied a small batch of JB Weld.
 December
30th 2000 Chilly today
for South Florida but I'm not complainin' since the folks north of me
are being clobbered by two storm systems, collectively called "The
Bomb" by the media, and Arkansas, Missouri and Texas are trying to
crawl out from under last week's devastating ice storm . . . Global
warming my A!@#$$. I ordered a Craftsman
Air Compressor a week back and it arrived yesterday (minus one wheel,
so I'll be making a trip to Sears soon). My specs required portability
and 120v power source 'cause that's all we got here at the Krash Lab
and my boss is tolerant but I can't keep filling up his back room with
power tools. This is a two-stage model and beefy enuf for most of my
applications. Now I have to get ramps so I can pull it up into
BillyBob's pickup box after I get the wheels mounted.
December
30th 2000 Chilly today
for South Florida but I'm not complainin' since the folks north of me
are being clobbered by two storm systems, collectively called "The
Bomb" by the media, and Arkansas, Missouri and Texas are trying to
crawl out from under last week's devastating ice storm . . . Global
warming my A!@#$$. I ordered a Craftsman
Air Compressor a week back and it arrived yesterday (minus one wheel,
so I'll be making a trip to Sears soon). My specs required portability
and 120v power source 'cause that's all we got here at the Krash Lab
and my boss is tolerant but I can't keep filling up his back room with
power tools. This is a two-stage model and beefy enuf for most of my
applications. Now I have to get ramps so I can pull it up into
BillyBob's pickup box after I get the wheels mounted.
January 3rd 2001 Some days are better than others. This is also one time when my natural proclivity for procrastination turned out to be a plus. In the afternoon, the truck driver who delivered the air compressor last week arrived, out of the blue, with the missing wheel so it was good fortune, I hadn't called Sears yet. I also had to upgrade my opinion of this fella for makin' the extra trip rather than just throwing the wheel in a dumpster somewhere.
January 6th 2001 Finally warm enuf to work under the shade tree in shirt sleeves again. The last batch of JB Weld almost stopped the small leak on the overflow tube so I gave it another application today from the other side of the troublesome area. I got a late start today so I'm gonna hold off on pulling the wheels to get at the threads I messed up in the Radiator Support bolts. Since I have to pull the rear brake drums soon to replace the parking brake cables, I'm gonna try to get one of those "Creeper Stools" this week to work in the wheelwell area and save my knees. This episode is getting long in the tooth so I'm cutting it off here. The next log entry in this series will pick up with the grille and front bumper. Other Stage one projects I've got going are the re-wiring job, parking brake re-build and some dashboard work. Keep on truckin' til then.
| < Back to Intro |
You can email me at ![]() webmaster@laroke.com
webmaster@laroke.com
Issued Sunday January 7, 2001
Updated Monday May 1, 2017
copyright © 1996-2017 Larry Robert Kephart all rights reserved
| | LRK Home | | Bio Info | | Krash Khronicles | | LAROKE | |
| | BettyLou | | BillyBob's Garage | | Rat Patrol | | Deerslayer | | Elvira | |
| | Land of the Free and Home of the Brave | |
| | Keppylou's Art | | WWI Soldier's Diary | |