| | LRK Home | | Bio Info | | Krash Khronicles | | LAROKE | |
| | BettyLou | | BillyBob's Garage | | Rat Patrol | | Deerslayer | | Elvira | |
| | Land of the Free and Home of the Brave | |
| | Keppylou's Art | | WWI Soldier's Diary | |
BillyBob Work-in-Progress Log
![]()
WHAT'S NEW is a chronological listing of updates to the BillyBob site.
![]()
TRUCK LINKS including vendor sites for old parts, custom parts, and tools as well as sites for classic car and truck organizations
STORE Operating in association with Amazon.com, books, recordings and tools can be purchased.
PLANNING for the restoration including project schedule and cost estimates.
![]()
TRAVELS WITH BILLYBOB With apologies to Steinbeck, this area of BillyBob's Garage will be used to log the trips BillyBob and I make together.
WORK-IN-PROGRESS is the restoration of parts of BillyBob that I can accomplish without a garage.
PRE-RESTORATION includes log entries of minor repairs and adventures between time of purchase and the time when I started restoration, a piece at a time.
JR'S KORNER JR's Korner is the history of BillyBob before I got him authored by my brother, Wm. C. Kephart.
![]()
BILLYBOB MAINTENANCE Ever changing detailing, oil change, lube, etc. maintenance routines specifically developed for BillyBob, including required tools, materials and procedures.
PARTS SHOP The Parts Shop is a repository of How-To articles. Things that I have done over and over enough times to have developed a procedure. This gives me a checklist and saves brain cells.
STEALTH SHOP Urban residence design with large integrated shop and separate living quarters for a relative or renter.
![]()
You will need the Adobe Acrobat browser plugin to view these wiring diagrams which are in the PDF file format. This format allows zooming and panning. If you don't have this plugin, it can be downloaded and installed (free) from the Adobe site. The button below will take you there.
![]()
BILLYBOB WIRING DIAGRAM Here's the wiring diagram updated with BillyBob's current state 'cepting the third-party strap-on turn-signal director.
STRAP-ON TURN-SIGNAL DIRECTOR/BRAKE LIGHT CIRCUIT This turn signal and brake light circuit diagram shows the current state of the third-party turn-signal director wiring, which will remain in place until I figure out the problems with the OEM turn-signal director. It also shows the OEM headlight switch.
47. Them's the Brakes
June 4th 2006 Had a fire last night in the Krash Pad neighorhood. Heard the sirens as I wuz driftin' off. When I came out this morning, there was a strong smoke odor in the air and BillyBob was covered with fine ash. I tried to find the fire location on my way to the Krash Lab but didn't see any hint of it along my route. First order of business today is to wash BillyBob. I haven't seen my nemesis, the blackbird, for over a week now and at least I don't have to clean droppings off of BillyBob on a daily basis any longer. Found out later that it was an Everglades fire started by lightning on friday night. Rain slowed it down some sunday late afternoon but I had ashes on the truck again monday morning.
June 11th 2006 Hot, muggy, overcast and misting when I left the Krash Pad this morning. The first tropical depression of the season (Alberto) is forming in the vicinity of western Cuba and heading in our direction. Did monthly maintenance on BillyBob as soon as I got to the Krash Lab and got done just as the first wave of rain arrived. Got the bubble chair out and sat on the rear stoop with my cigar and coffee while I waited out the rain.
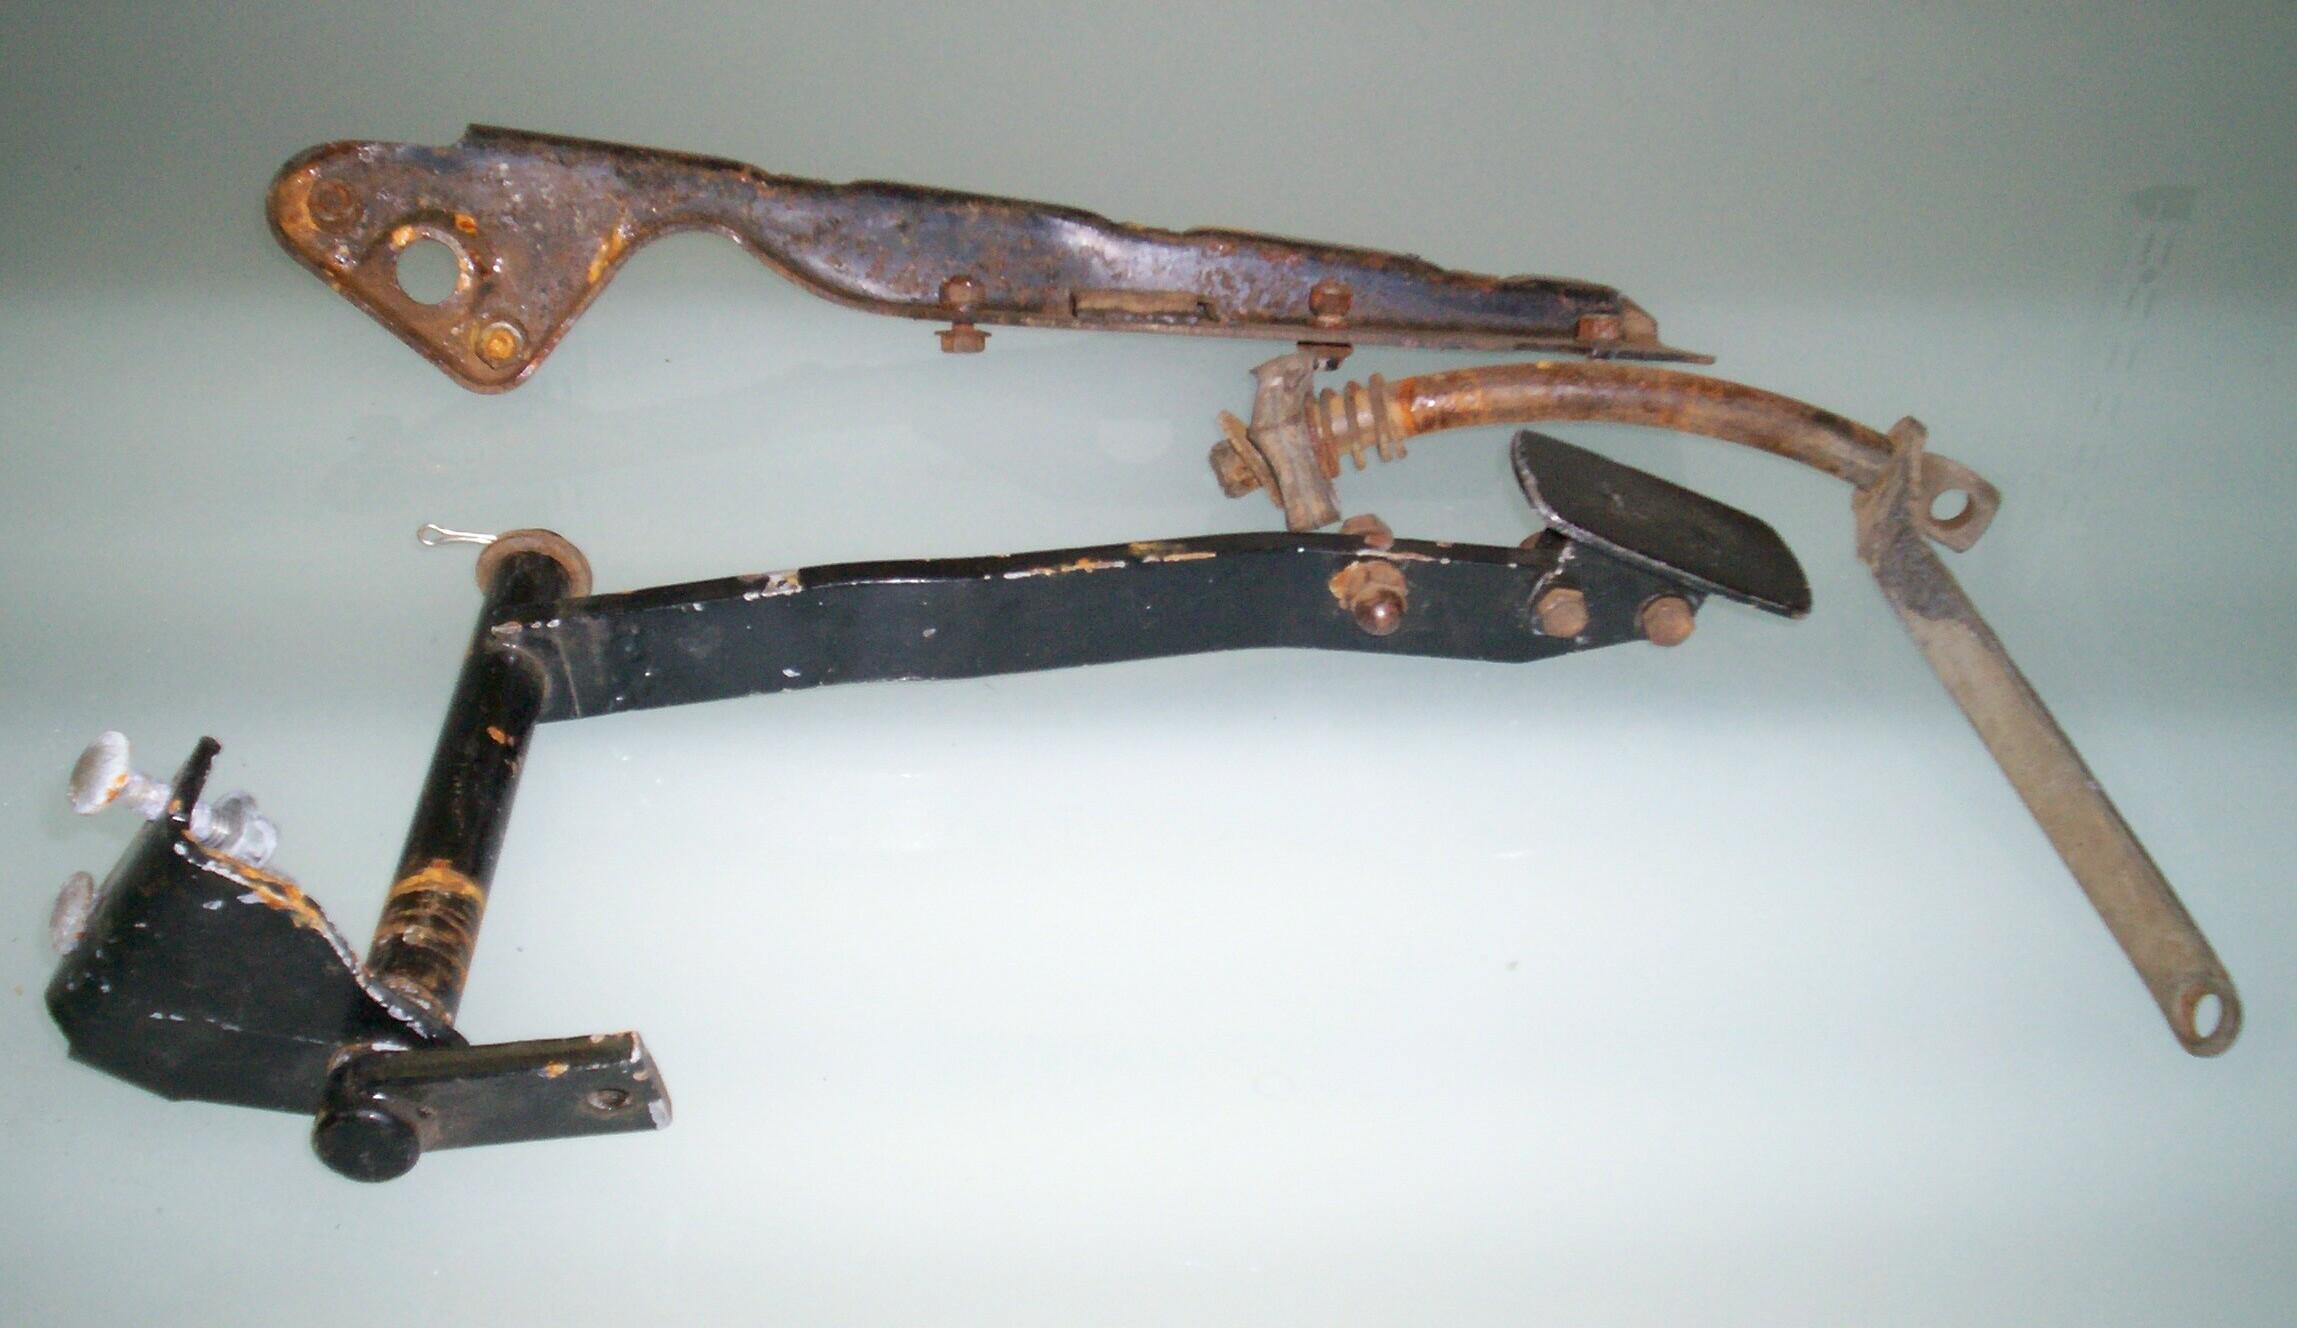 Three
showers passed over before it started drying up a bit. I wanted to
start cleaning up the fine emergency brake parts that fellow ole
trucker Robert French from Perryville, Arkansas sent me last year. He
sent me all his emergency brake assembly parts but these are the ones I
want to install during the wheelwell phase of this detailing cycle.
Sandblasting would be the best way to get these parts ready for a new
finish but since Renegade is up on
jackstands in the middle of my sandblasting area, I went to the wire
wheel in the electric angle grinder method instead. By the time
PowerBlock was over on Spike TV, it was still sprinkling under the
shadetree almost continually and it didn't look like I'd be able to
prime any parts today so I packed it in and had a few beers.
Three
showers passed over before it started drying up a bit. I wanted to
start cleaning up the fine emergency brake parts that fellow ole
trucker Robert French from Perryville, Arkansas sent me last year. He
sent me all his emergency brake assembly parts but these are the ones I
want to install during the wheelwell phase of this detailing cycle.
Sandblasting would be the best way to get these parts ready for a new
finish but since Renegade is up on
jackstands in the middle of my sandblasting area, I went to the wire
wheel in the electric angle grinder method instead. By the time
PowerBlock was over on Spike TV, it was still sprinkling under the
shadetree almost continually and it didn't look like I'd be able to
prime any parts today so I packed it in and had a few beers.
 June
18th 2006 Happy
Father's Day, Dad. You're always with me when I'm workin' on BillyBob.
Just pokin' around the shadetree garage today, re-finishing emergency
brake parts. Cleaned and wire-brushed (wire cup in electric angle
grinder) the pedal assembly and its supporting brackets. They were then
PRE Paint Prepped and given a rattlecan coat of Eastwood's Rust
Encapsulator. Rain started sprinkling then and lasted just long enuf
for me to get tools and parts under cover.
June
18th 2006 Happy
Father's Day, Dad. You're always with me when I'm workin' on BillyBob.
Just pokin' around the shadetree garage today, re-finishing emergency
brake parts. Cleaned and wire-brushed (wire cup in electric angle
grinder) the pedal assembly and its supporting brackets. They were then
PRE Paint Prepped and given a rattlecan coat of Eastwood's Rust
Encapsulator. Rain started sprinkling then and lasted just long enuf
for me to get tools and parts under cover.
Continued to get hit by passing showers while I waited for the Rust Encapsulator to dry. I purchased repop parking brake parts way back and now I don't remember where they are so I spent some time in the Krash Lab going thru boxes to find them . . . I now know some of the places they aren't.
Just before curing time was up, we got a gully-washer and it turned BillyBob's garage into a swamp. As soon as the rain let up, I dragged the parts out of the shed between raindrops and gave them a coat of Chassis Black. Then back into the shed with the parts and home to the Krash Pad.
June 25th 2006 When I was leaving the FLAPS on friday after picking up consumables for the weekend work, I set the parking brake to start up BillyBob as I wuz on a slope. BANG-TWANG from under the truck and the pedal dropped two inches. Back at the Krash Lab, I looked underneath to find that the passenger side cable had not retracted into its sheath when released. I suspected a cable break. Yesterday, after working on Renegade's tranny, I pulled BillyBob's passenger side rear drum. I wanted to be certain that no loose items were rolling around in there to imbed themselves in the drum and ruin it. There weren't and it seems the cable broke in the middle - a rare kind of part failure, I think. I'll send for new cables this week.
Once again, I'm laboring under the threat of rain. Got the parking brake parts I painted last week out of the shed and gave them another coat of Chassis Black before I went to searching my inventory again for additional parking brake parts. I was more successful this time - I actually found some.
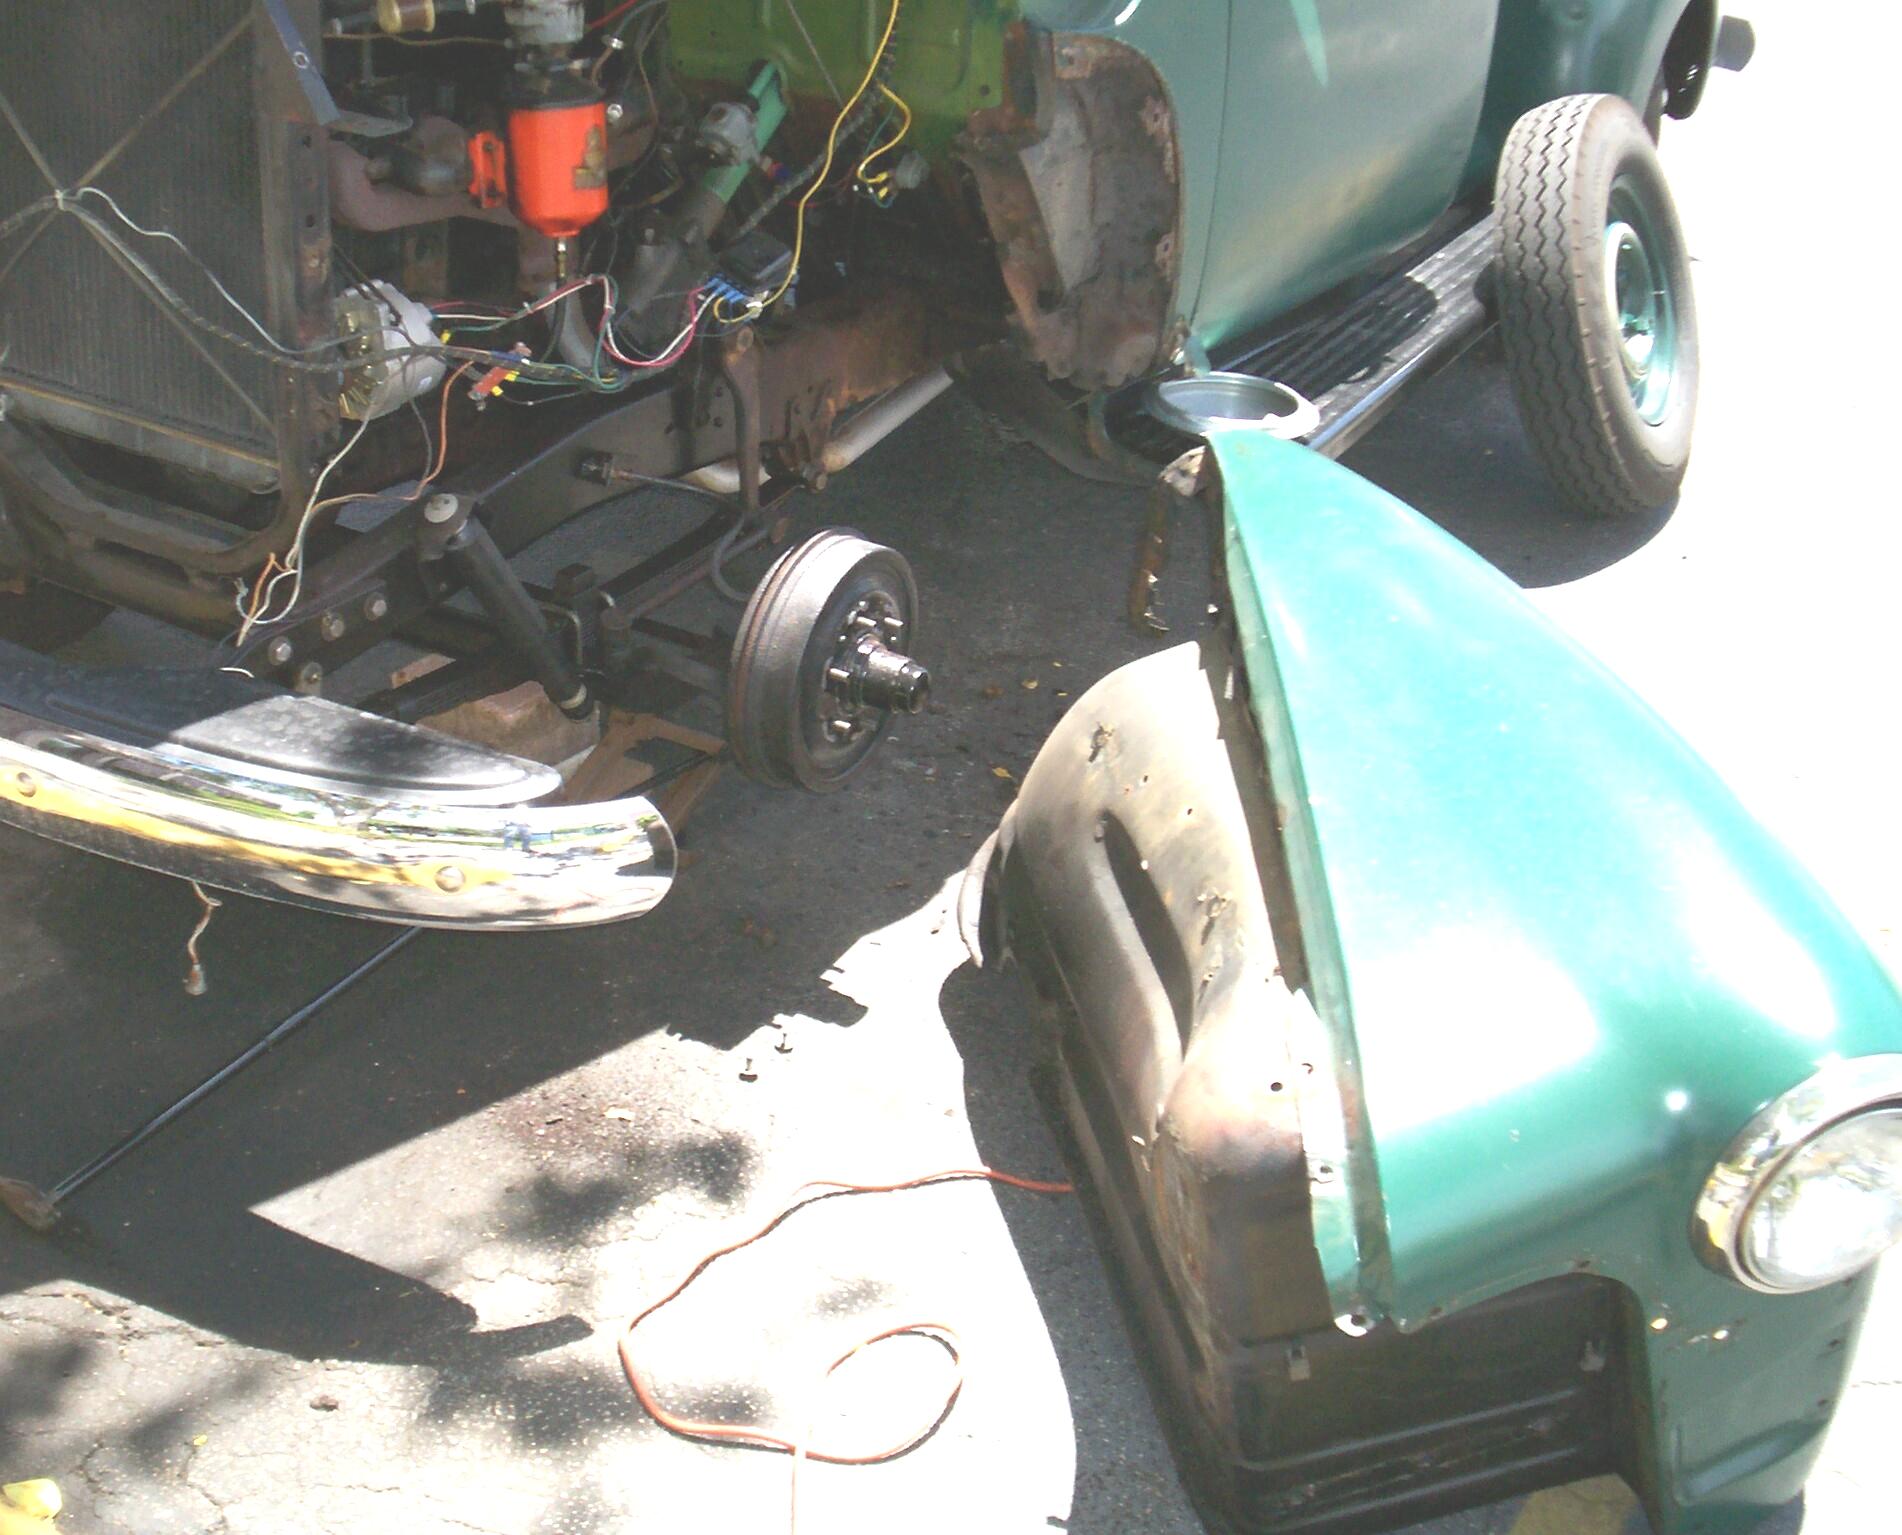
July 1st 2006 Forty percent chance of rain today, the forecasters say. For the parking brake work I want to do, the driver's side front fender has to come off. This is where my method of refurbishing parts from the outside to the inside comes into play. The bumper, splash apron, bumper brackets, grille, and upper radiator baffle have already been off and on many times. They have new fasteners and I know the routine so that part of the work will go fast, even for one who works at my slow pace. New territory (and old rusty nuts) won't slow me down until I reach the back of the fender.
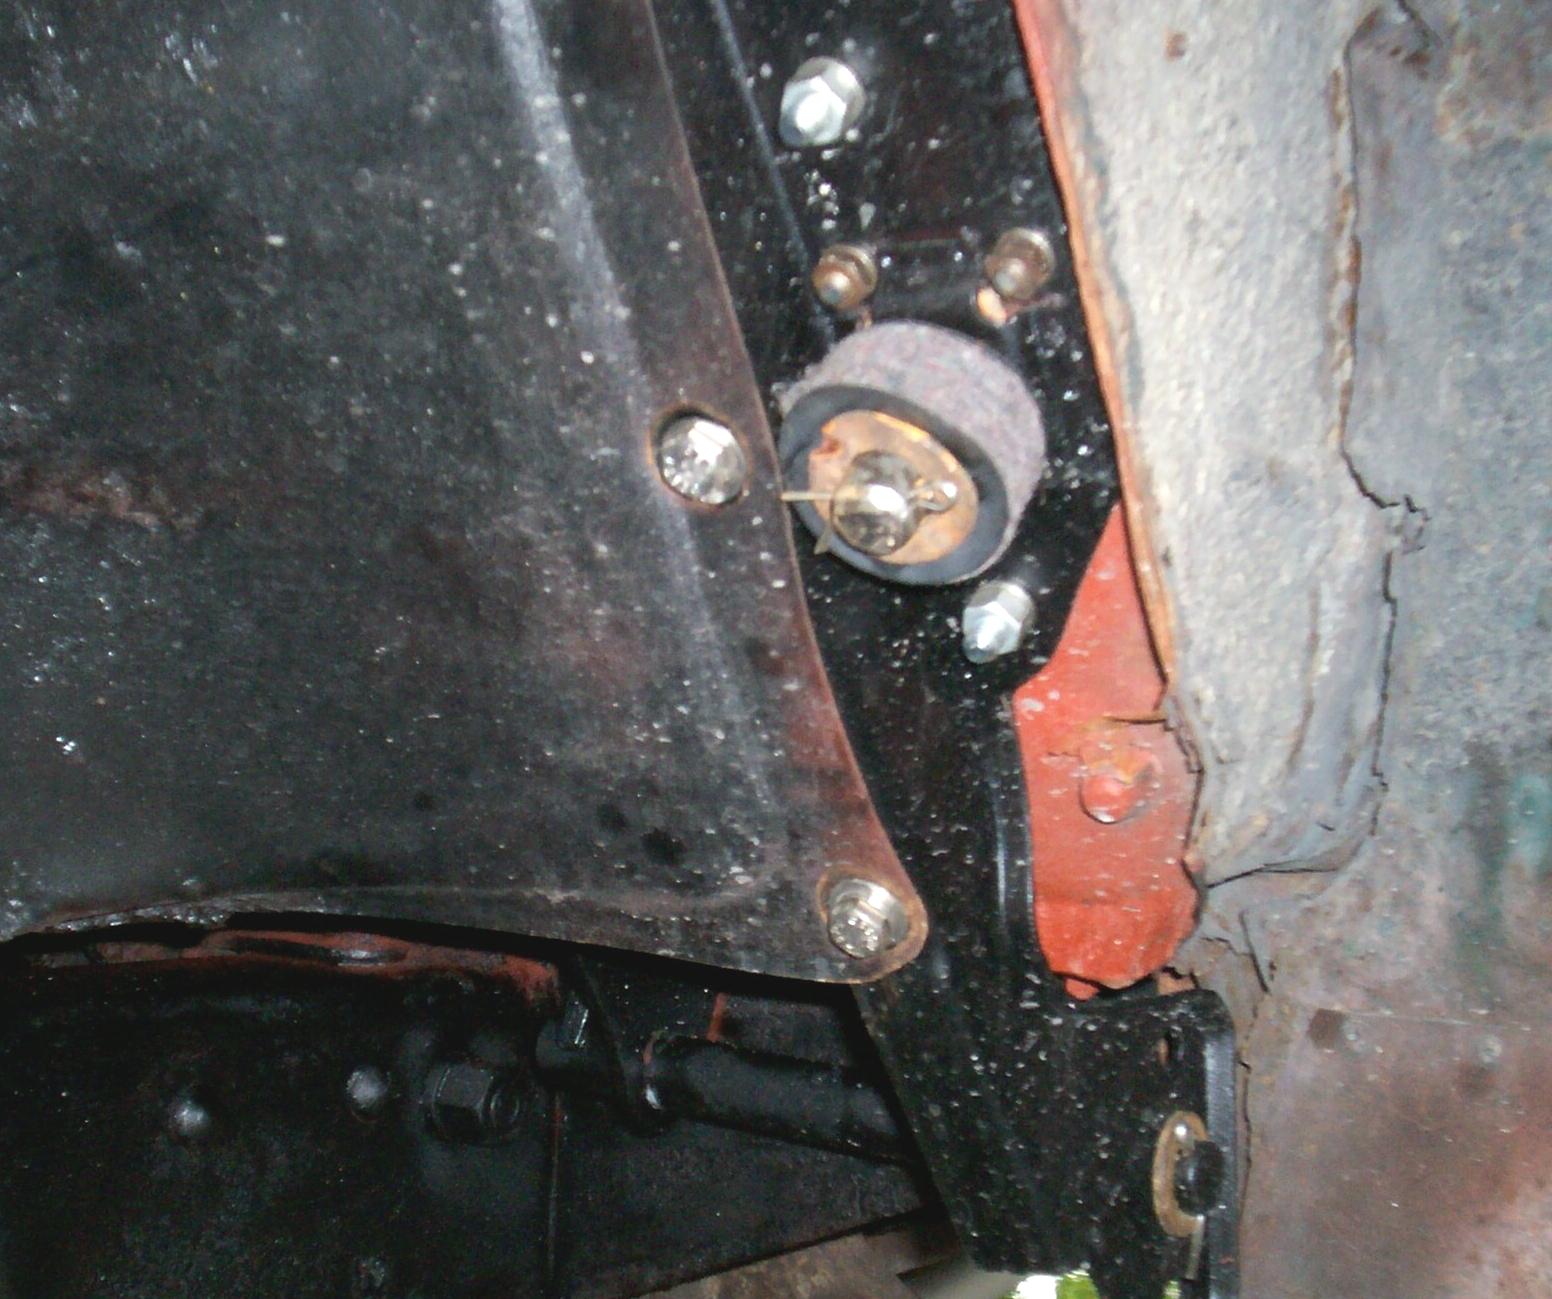
First, I determined that I can probably get the grille off without taking the bumper and splash apron off so we started with the front license plate bracket, then the parking lights, then the upper radiator baffle, then the grille. Removed the horn on that side next then stopped long enuf to put the driver side axle end up on blocks and remove the wheel.
Dividing my attention between the Factory Assembly Manual and the actual wheelwell in question, I determined that the most difficult fasteners in my path were four at the back of the wheelwell where both the capscrews and the hexnuts were inside the wheelwell. These were rusted nubs from years of wheelspray. I gave them each a MAPP gas torch session followed by a Kroil penetrating oil quenching. This wuz enuf to get the next bolt from the bottom out. I tried the top bolt next and rounded it off immediately! It was a tight fit but I was able to get the electric angle grinder in there and grind it down flush so I could screw the remainder off from the backside of the flange. Two more to go.
I gave them another torch and penetrating oil application for good measure. The next to the top fastener unscrewed after that. I realized then that the bottom bolt had rusted out the flange to the body and would not have to be removed. Undid the inner fender to fender capscrews next. I had replaced these some time ago and they came out easily. Undid the front fender support bolts at the radiator support and the three front fender to inner fender sheet metal capscrews. Undid the headlight terminals at the terminal block and pulled the wires thru the grommet in the inner fender.
 I
wanted to take the fender off and then work on the inner fender but it
wouldn't work for me because the fender support was still attached at
the wheelwell lip with a pair of well-rusted bolts. Instead, I unbolted
the terminal block and the voltage regulator from the inner fender.
Then the two remaining bolts holding the inner fender to the radiator
support were removed. Finally, the three capscrews attaching the inner
fender to the parking brake bracket were removed. I had good luck with
these and they unscrewed easily. So here we are a two in the afternoon
on a hot, humid south Florida day.
I
wanted to take the fender off and then work on the inner fender but it
wouldn't work for me because the fender support was still attached at
the wheelwell lip with a pair of well-rusted bolts. Instead, I unbolted
the terminal block and the voltage regulator from the inner fender.
Then the two remaining bolts holding the inner fender to the radiator
support were removed. Finally, the three capscrews attaching the inner
fender to the parking brake bracket were removed. I had good luck with
these and they unscrewed easily. So here we are a two in the afternoon
on a hot, humid south Florida day.
With the fender upside down in the grass under the tree, I had better access to the fender support capscrews and they came out with a few minutes worth of the now familiar torch and oil quench technique. I now had the fender separated from the inner fender. The paint is scratched up some in several places and blistered where the torch got too close but that's the beauty of a stage I Rustoleum paint job - easy repairs. It's mid-afternoon in the broiling sun now. Siesta time which for me is a few Becks and a cigar while I wait out the hottest part of the day. Having a global warming debate with Donnie, the lawn guy, caused me to imbib more Becks than I might have had otherwise (He's an Algore fan and I'm not).
. . . And then, it started raining. OK! The rain stopped. In the fading light of a waning sun, I managed to get the bolts off the smaller parking brake bracket (two short stovebolts and one long thru-bolt). This allowed me to slide it over for access to the cotter key in the clevis for the rod that goes to the back of the truck. Small victories. I live for 'em. OK. It's seven PM and I'm tired. I'll put BillyBob's front wheel back on and button things up fer the nite. Start again tomorrow before father sun starts beating the crap outa me again.
 July
2nd 2006 Arrived at the
Krash Lab in BettyLou during the
first shower of the day. The irrigation sprinklers are on too so the
shadetree garage is swampy again. By the time I had my first cuppa joe
and cigar, Things had dried up enuf to get to work. I spent the time
watching the new residents of BillyBob's tree. About ten grackles had
taken the place of my nemesis, the blackbird. I clapped my hands at
their scoldings and they booked. Alas, they were back in five minutes
and the hand-clapping only worked once. Damn!
July
2nd 2006 Arrived at the
Krash Lab in BettyLou during the
first shower of the day. The irrigation sprinklers are on too so the
shadetree garage is swampy again. By the time I had my first cuppa joe
and cigar, Things had dried up enuf to get to work. I spent the time
watching the new residents of BillyBob's tree. About ten grackles had
taken the place of my nemesis, the blackbird. I clapped my hands at
their scoldings and they booked. Alas, they were back in five minutes
and the hand-clapping only worked once. Damn!
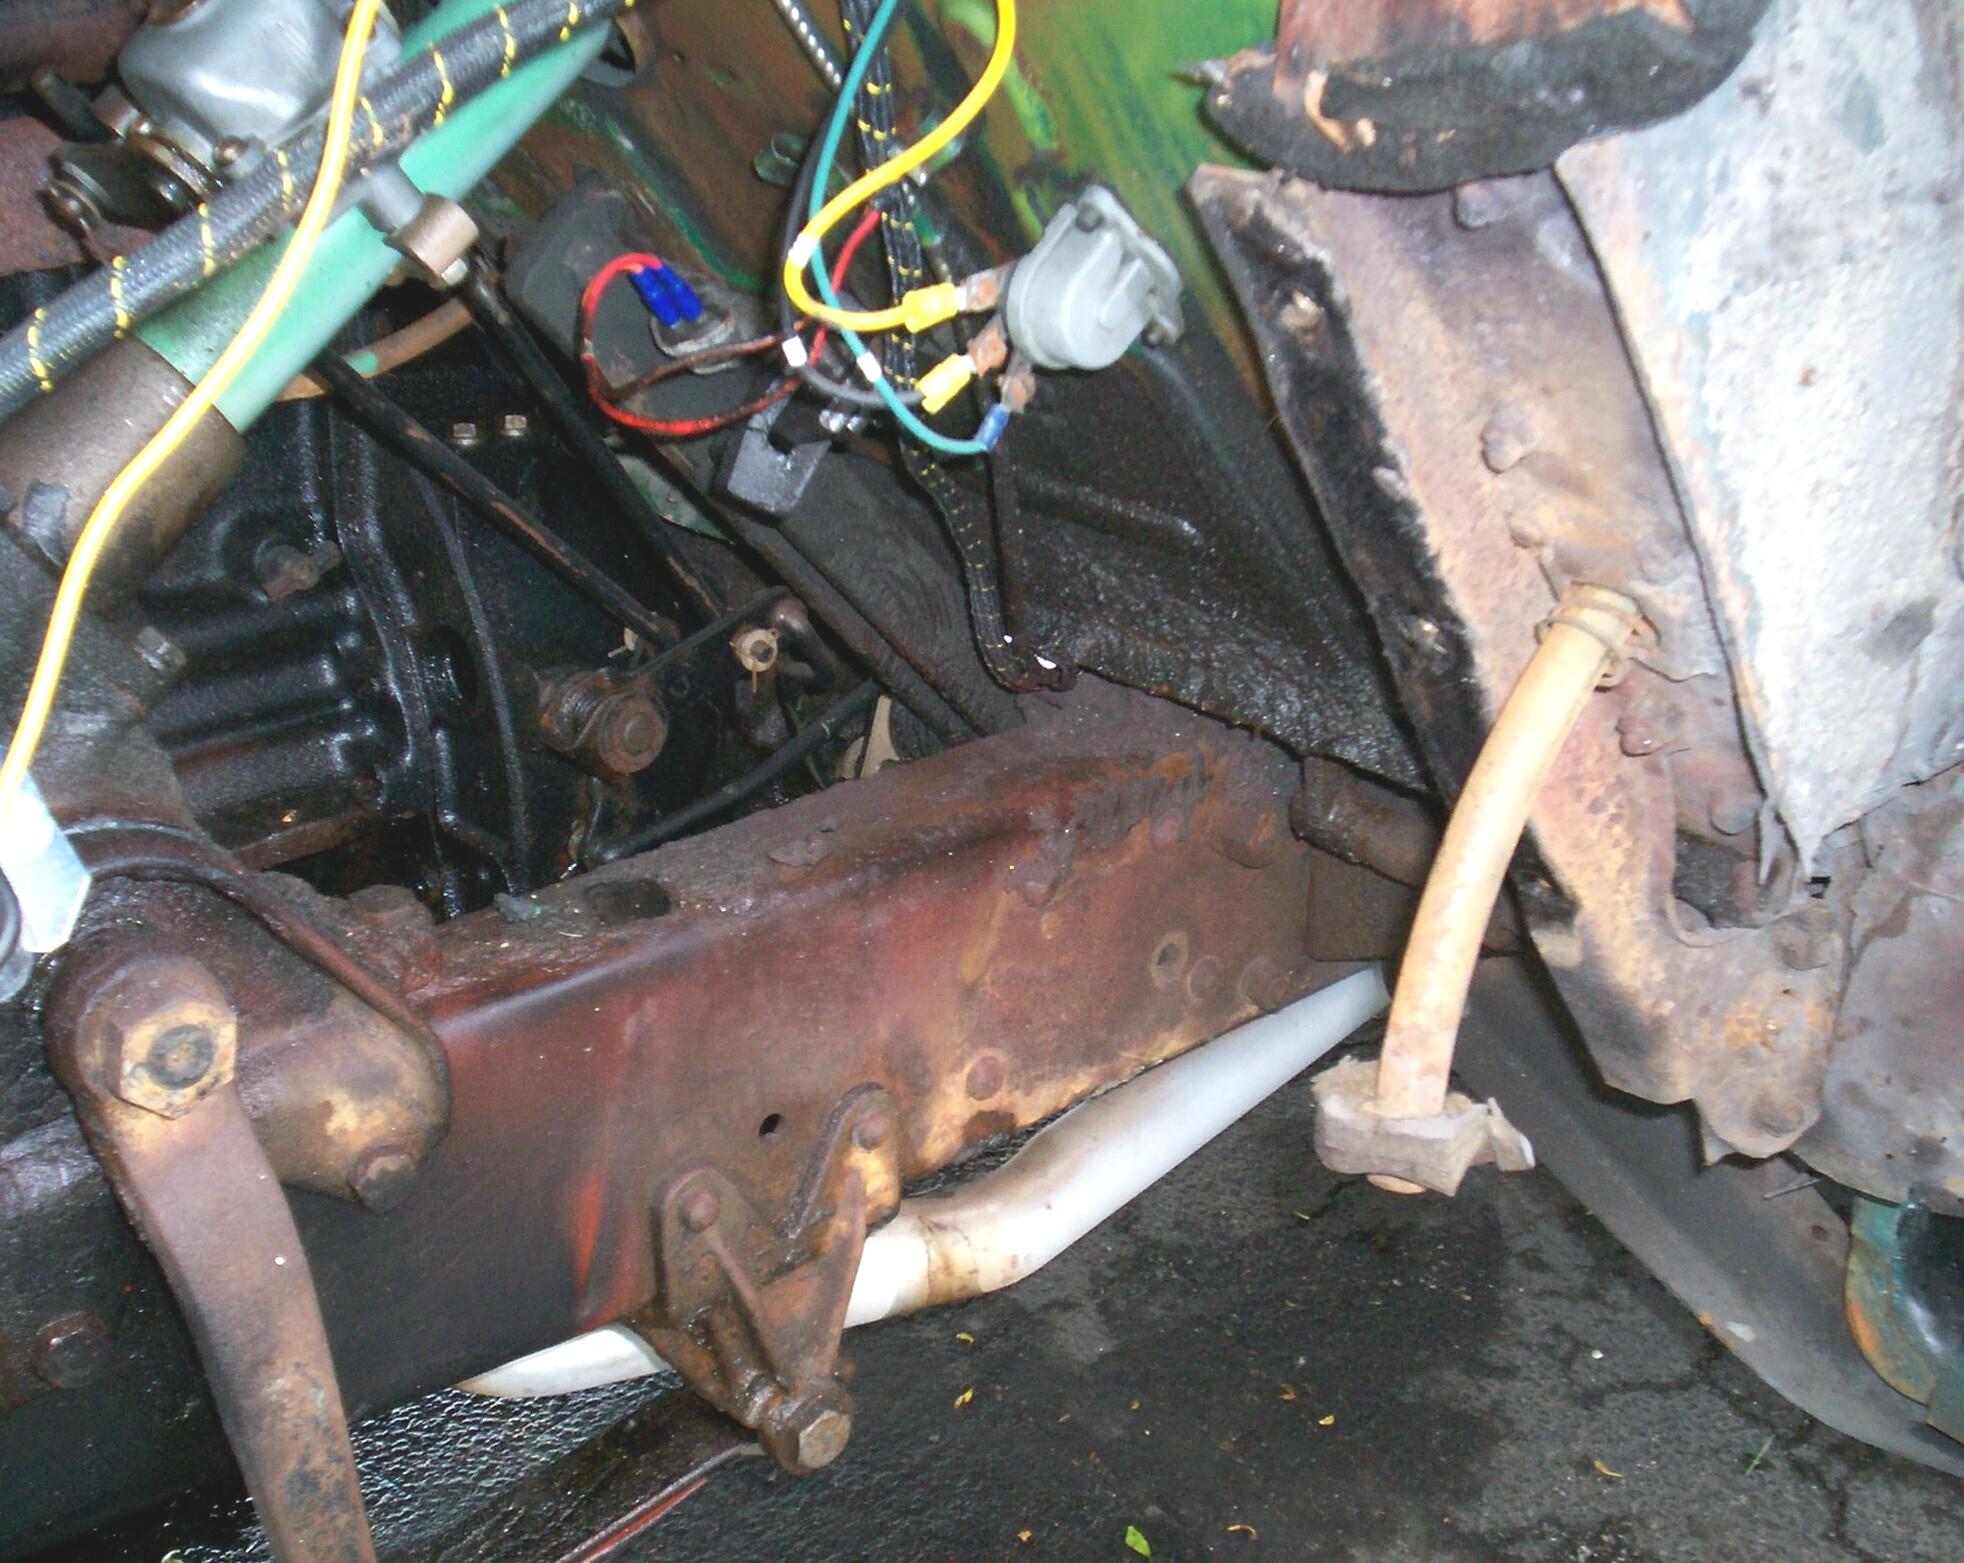
 An
hour or so of torch and oil, wire brushing and grinding, twisted off
fasteners and screwed off nuts, cussin' and a little bleeding and I
finally had the parking brake hardware off the firewall. I had to cut
off the brake rod to the back of the truck because the clevis pin was
rusted in solid. The only remaining piece to come off was the extrusion
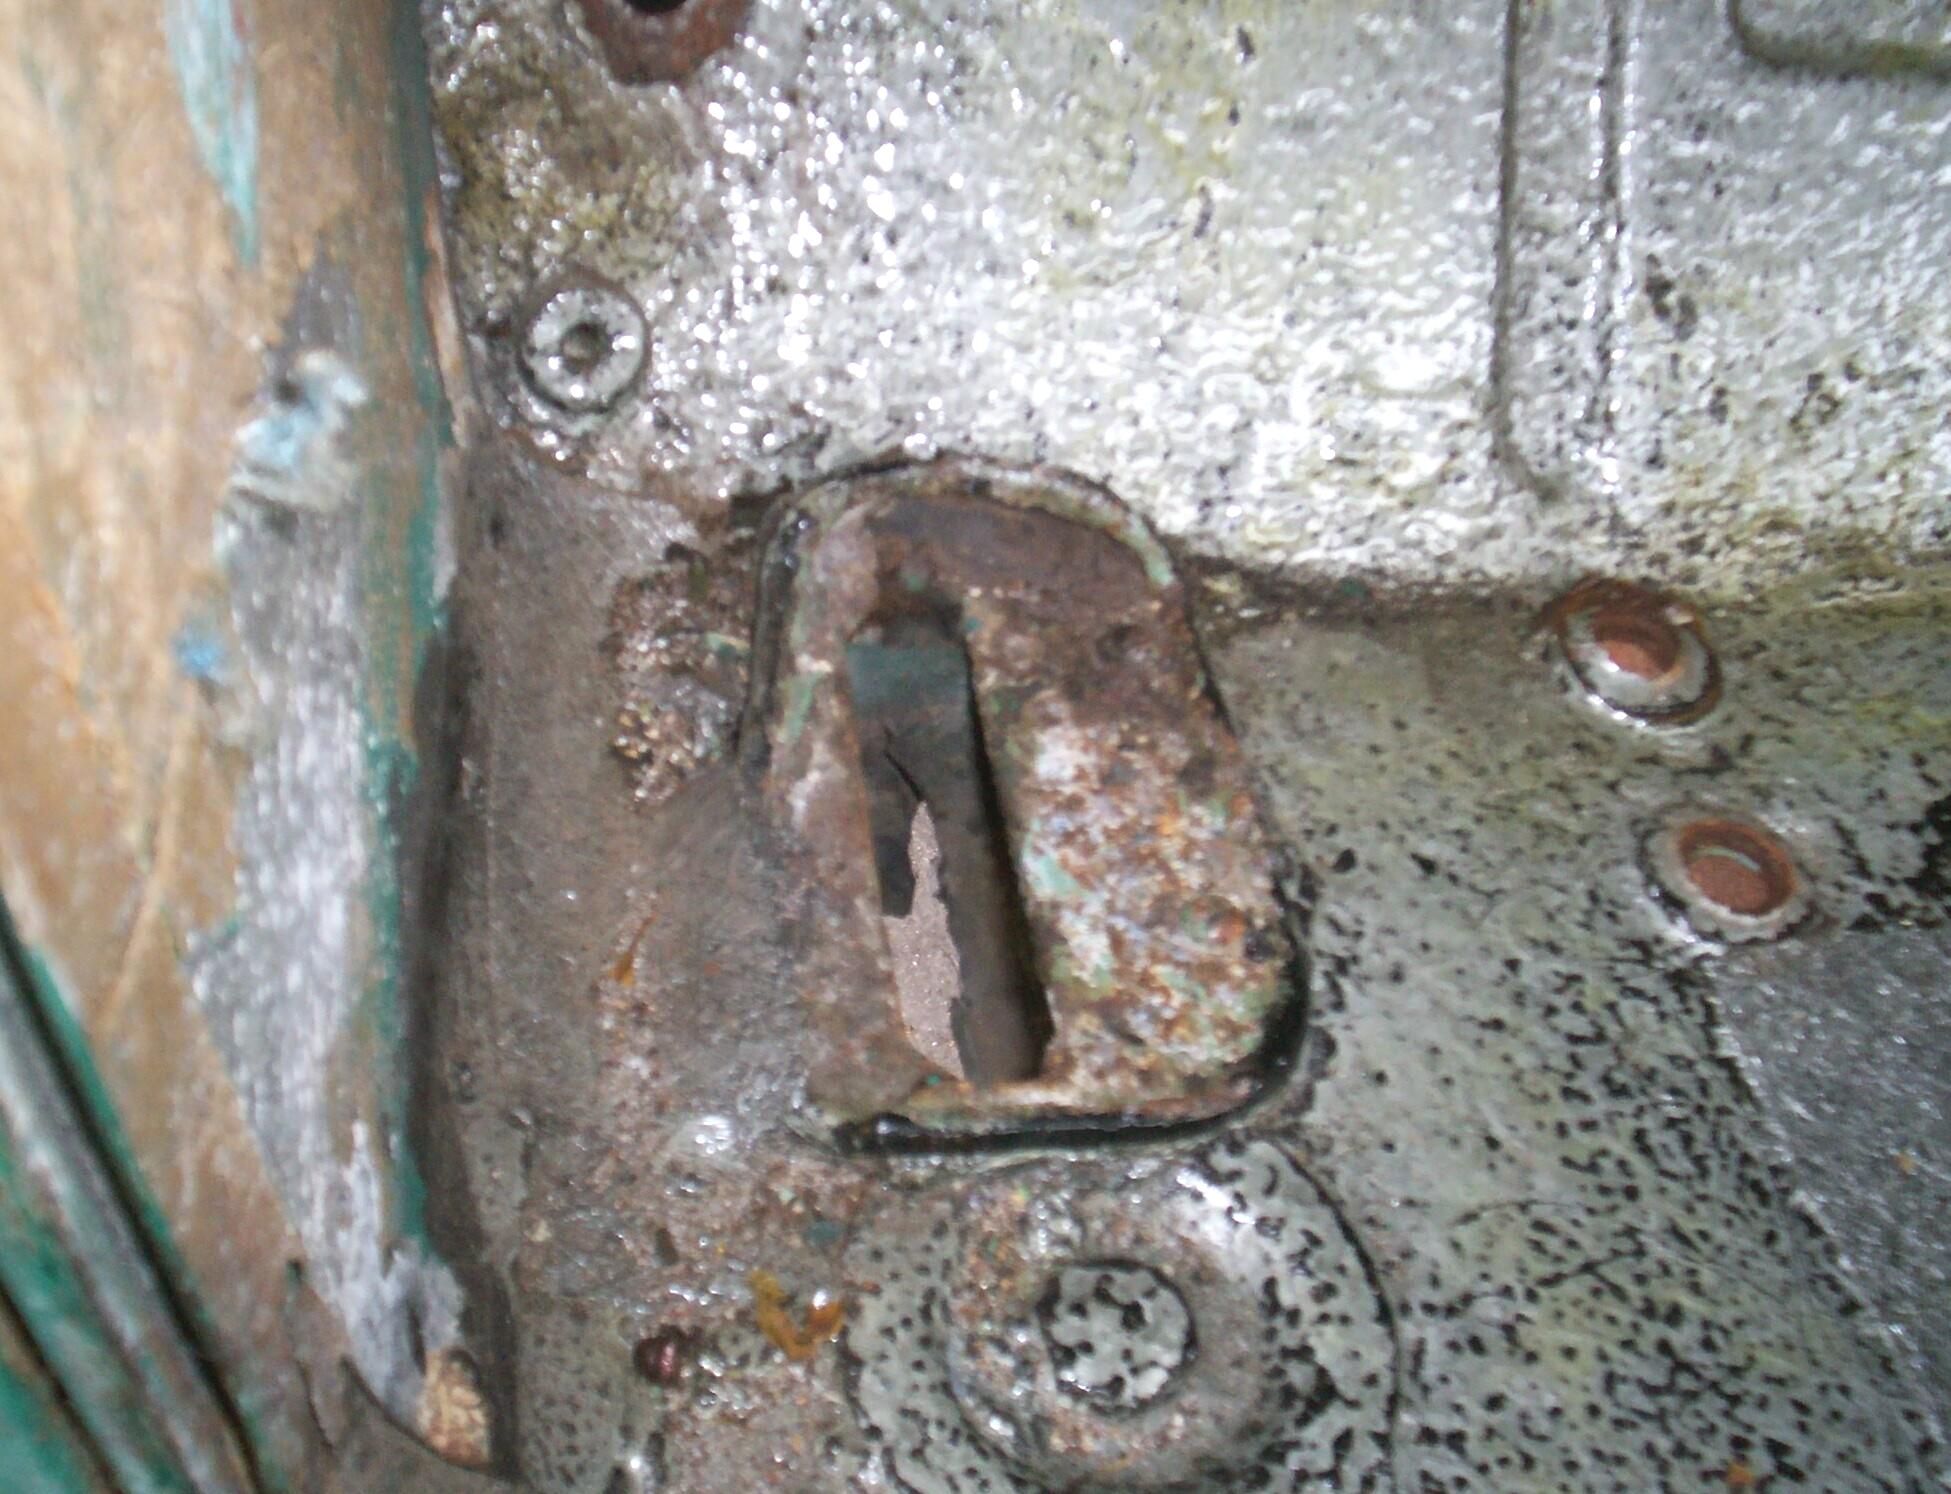
plate and rubber boot where the pedal shaft goes thru the floorboard.
This thing was in bad shape and the three screws that hold it were
nubs. I wouldn't even have known they were screws if I didn't have a
new plate, boot and screws to go by. I didn't mess around with it. Used
the grinder to take the screw heads off, chisled off the old plate and
rubber, ground the remainder of the screws down to the floorboard and
punched them out.
An
hour or so of torch and oil, wire brushing and grinding, twisted off
fasteners and screwed off nuts, cussin' and a little bleeding and I
finally had the parking brake hardware off the firewall. I had to cut
off the brake rod to the back of the truck because the clevis pin was
rusted in solid. The only remaining piece to come off was the extrusion
plate and rubber boot where the pedal shaft goes thru the floorboard.
This thing was in bad shape and the three screws that hold it were
nubs. I wouldn't even have known they were screws if I didn't have a
new plate, boot and screws to go by. I didn't mess around with it. Used
the grinder to take the screw heads off, chisled off the old plate and
rubber, ground the remainder of the screws down to the floorboard and
punched them out.
 Got
out the Grimeblaster pressure washer and did a degreasing session of
the parking brake assembly area and frame rail. Did the same for the
inner fender. It was too late for any painting and the sky didn't look
too good for it either. Put the wheel back on and cleaned up.
Independence Day is when everything goes back together. That's tuesday
this year so I've got one normal work day between now and then.
Got
out the Grimeblaster pressure washer and did a degreasing session of
the parking brake assembly area and frame rail. Did the same for the
inner fender. It was too late for any painting and the sky didn't look
too good for it either. Put the wheel back on and cleaned up.
Independence Day is when everything goes back together. That's tuesday
this year so I've got one normal work day between now and then.
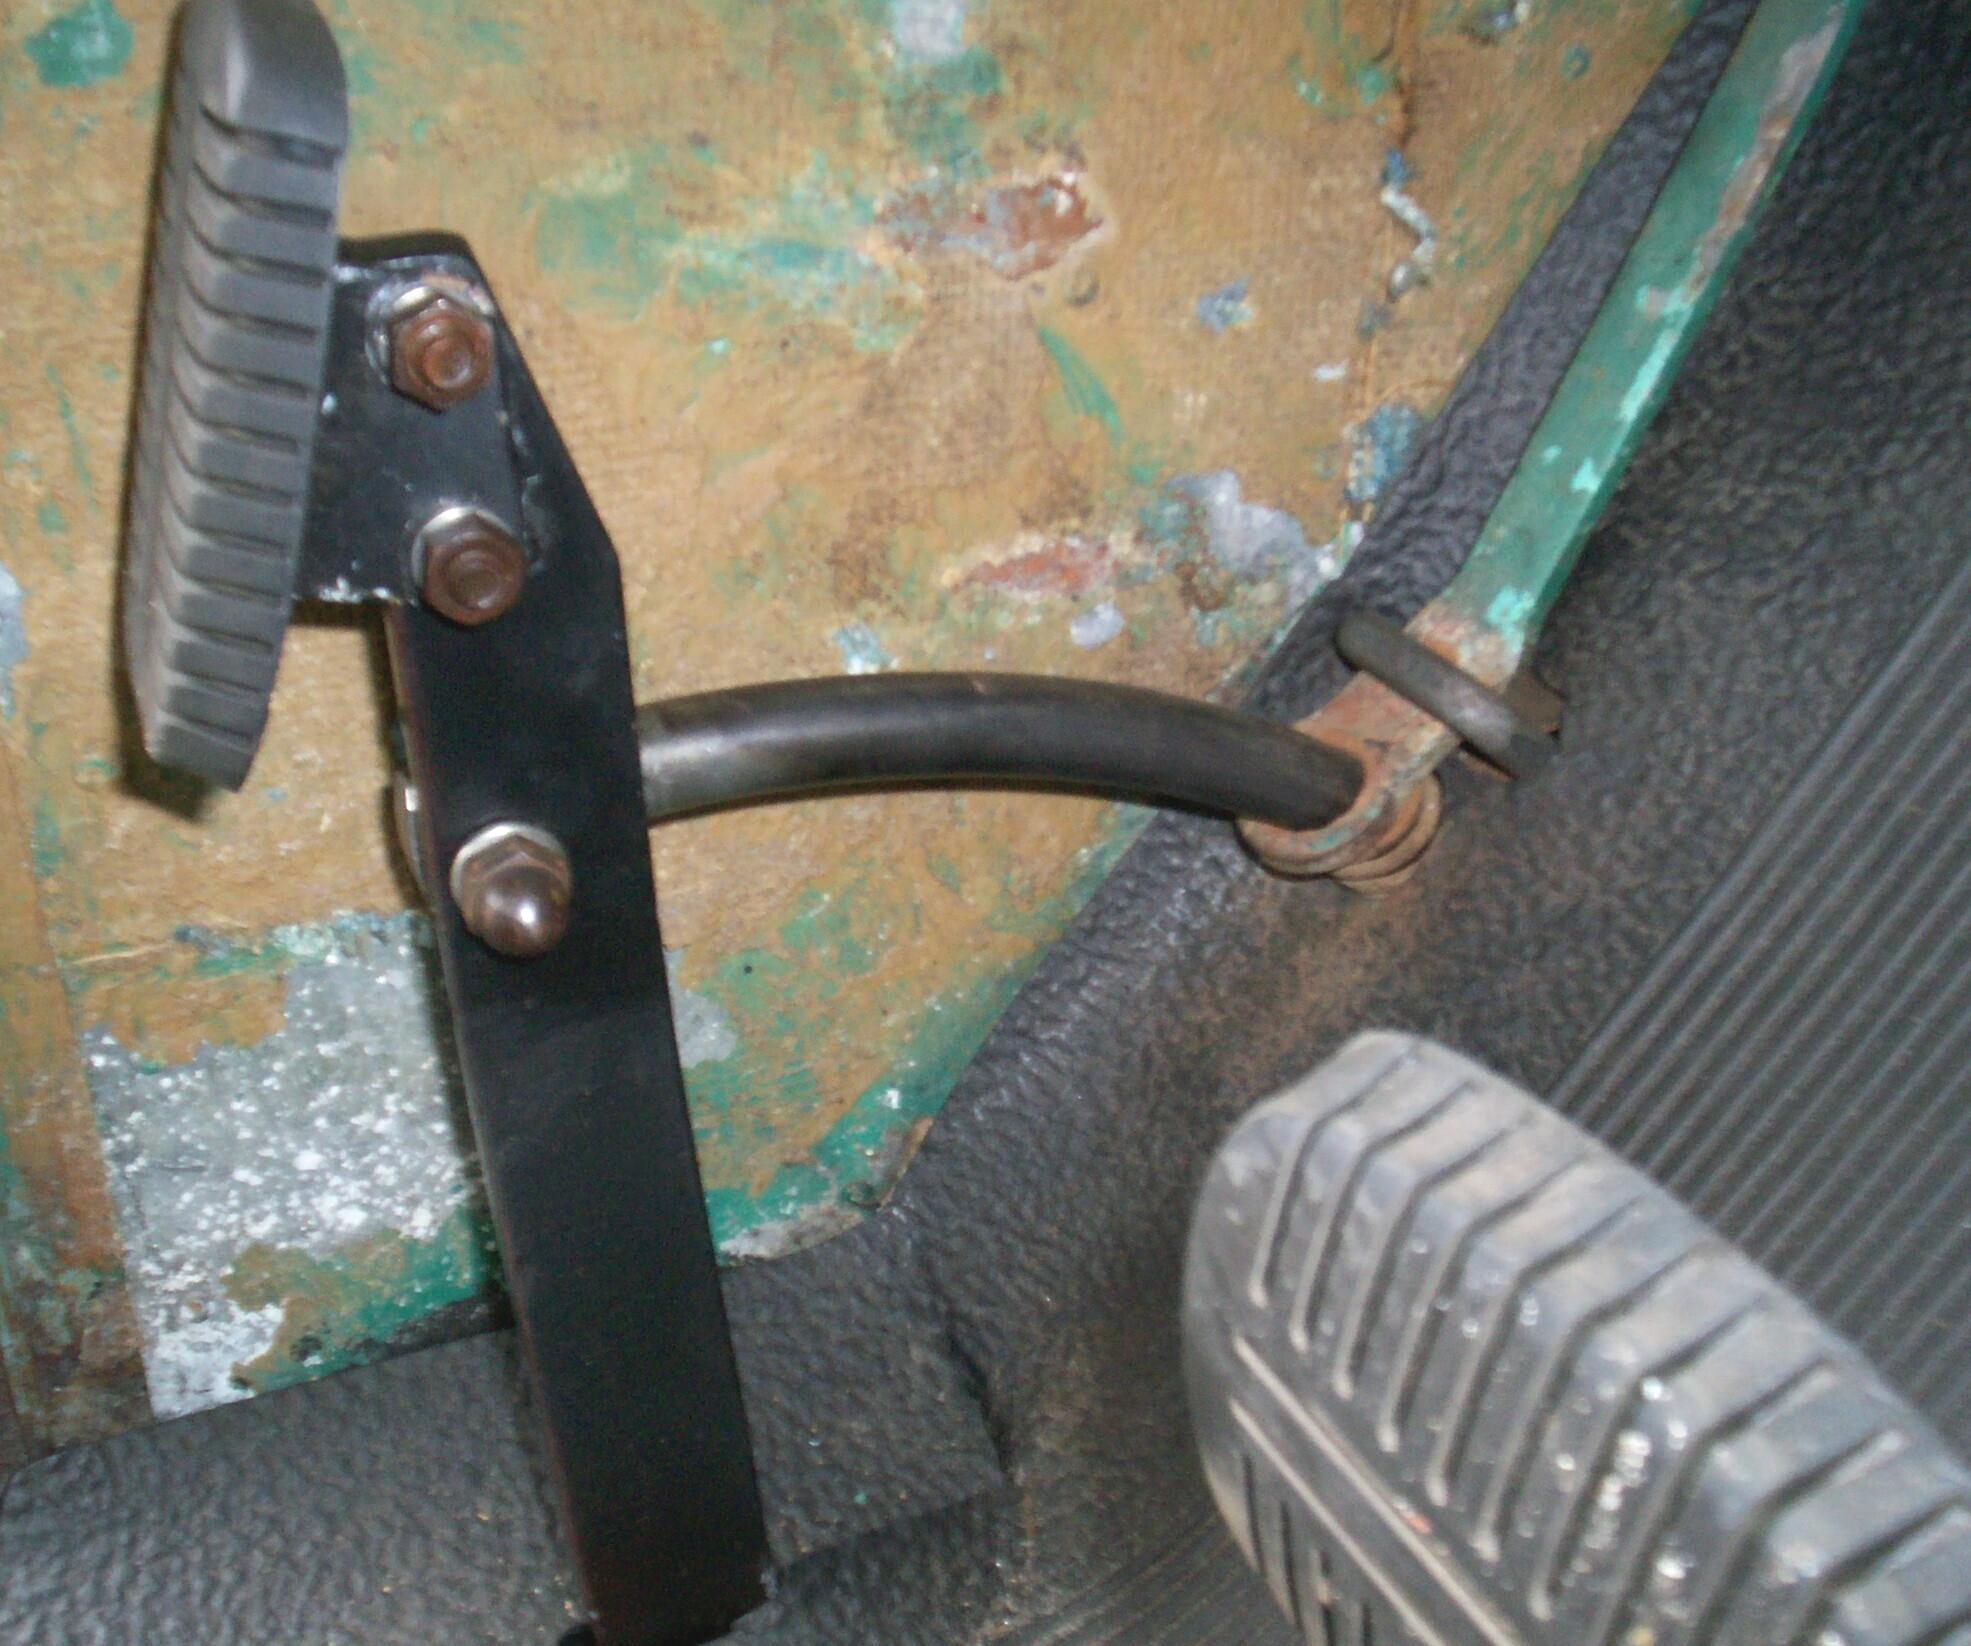
July 4th 2006 Independence Day. The American Experiment is 230 years old and, boy oh boy, am I glad that my family has been part of it from the beginning. Got to the Krash Lab about eight in the morning and took the front wheel off straight away. Masked and PRE Paint Prepped the frame area that I wanted to give some paint to in the course of this op. Pulled remainder of the old parking brake control rod out and threaded the new stainless steel rod thru the chassis openings to replace it. Then I turned my attention to the refurbished pedal assembly.
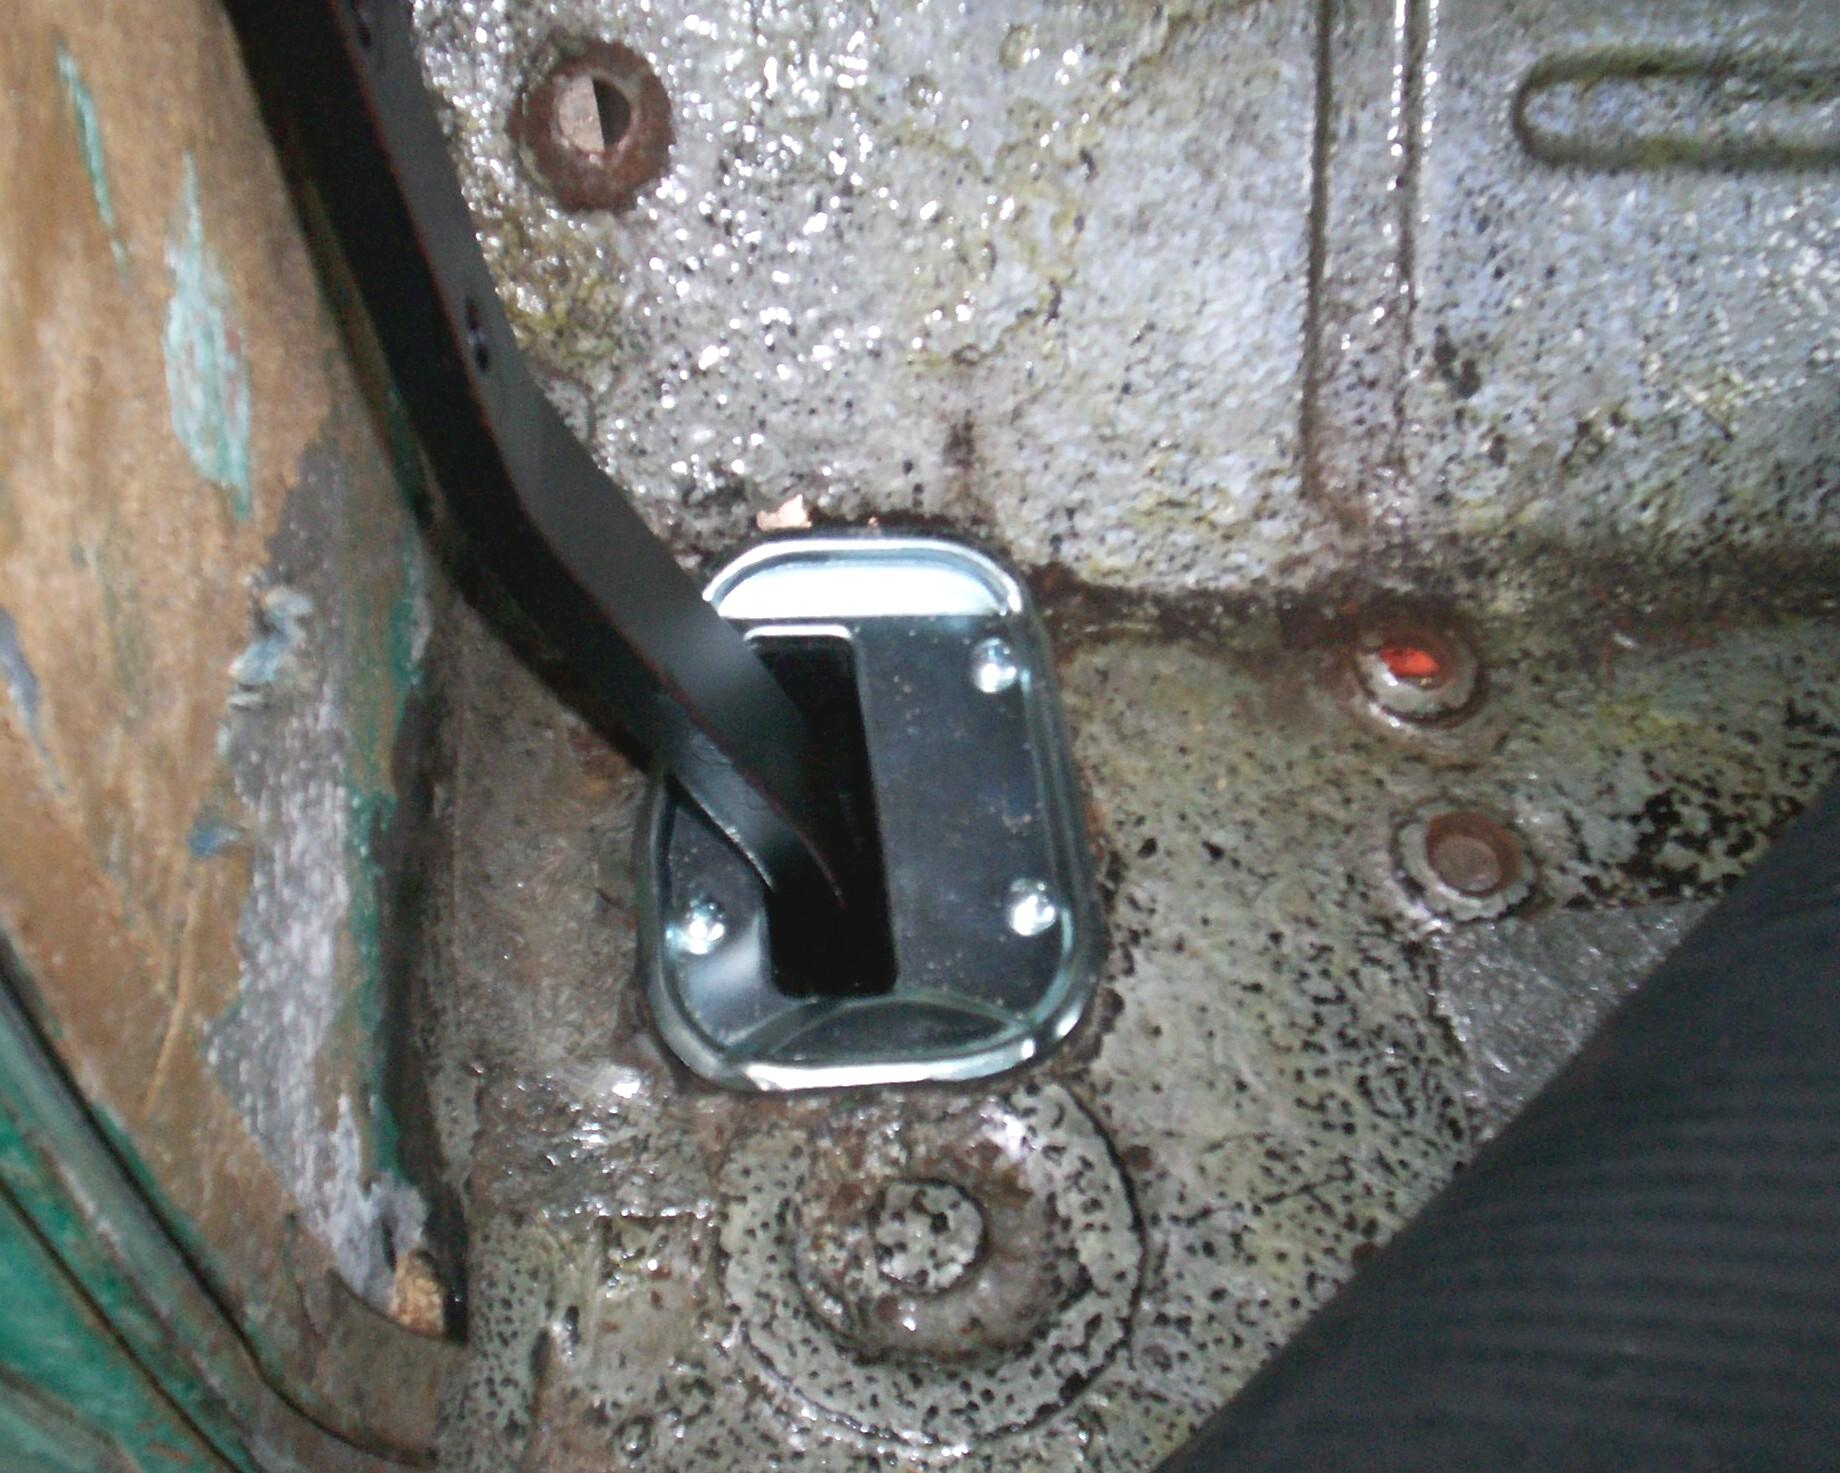 The
new pedal shaft boot and floor plate were installed first with three
new sheet metal screws. The pedal shaft was guided thru the boot from
the bottom and the short arm on the cross shaft was connected to the
stainless steel control rod with a new clevis pin and cotter pin. The
smaller pedal assembly bracket was connected next with a 5/16"-24 x 3"
long hex bolt with hex nut and 2 flat washers and threadlocker blue.
The bolt was just a bit too short to accomodate the flat washers so I
will replace it with a longer one down the line. The other two bolts
for this bracket are 5/6"-18 x 3/4" carrige bolts and hex nuts. The
larger bracket was secured with three 5/16"-18 x 7/8" capscrews, flat
washers, lock washers and hexnuts. The cross-shaft was secured in the
big bracket end with flat washer and 1/8" x 1-1/2" stainless steel
cotter pin. The lock guide u-bolt was threaded for 1/4"-28 hex nuts and
lock washers.
The
new pedal shaft boot and floor plate were installed first with three
new sheet metal screws. The pedal shaft was guided thru the boot from
the bottom and the short arm on the cross shaft was connected to the
stainless steel control rod with a new clevis pin and cotter pin. The
smaller pedal assembly bracket was connected next with a 5/16"-24 x 3"
long hex bolt with hex nut and 2 flat washers and threadlocker blue.
The bolt was just a bit too short to accomodate the flat washers so I
will replace it with a longer one down the line. The other two bolts
for this bracket are 5/6"-18 x 3/4" carrige bolts and hex nuts. The
larger bracket was secured with three 5/16"-18 x 7/8" capscrews, flat
washers, lock washers and hexnuts. The cross-shaft was secured in the
big bracket end with flat washer and 1/8" x 1-1/2" stainless steel
cotter pin. The lock guide u-bolt was threaded for 1/4"-28 hex nuts and
lock washers.
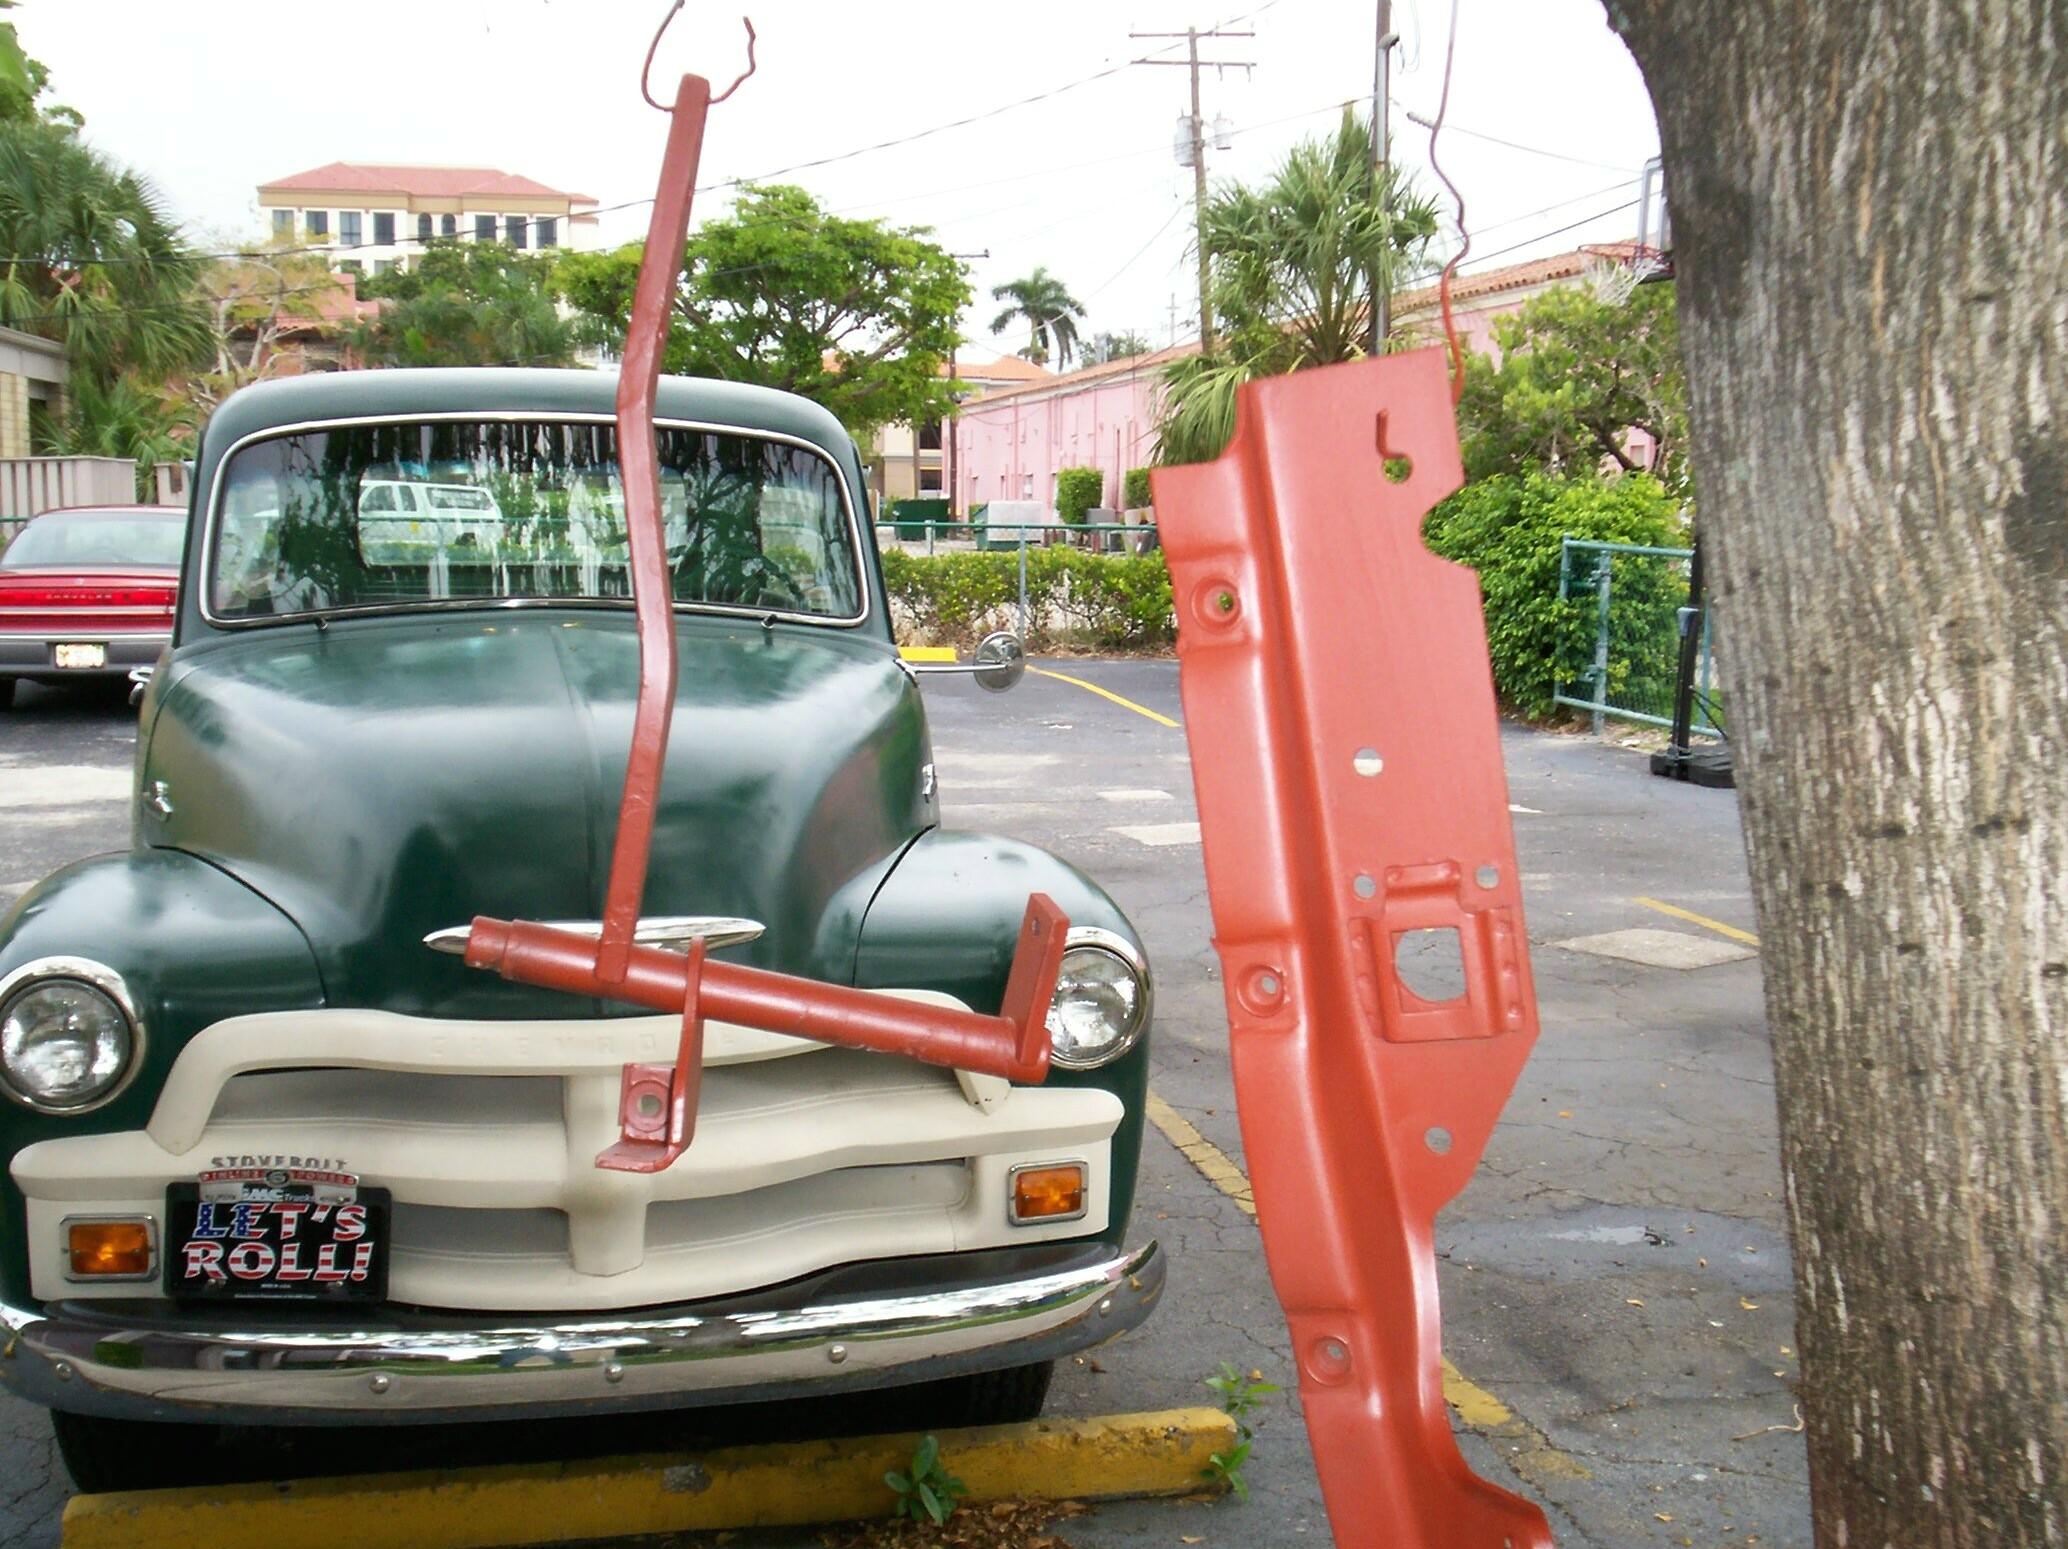
 Next,
the curved release bar was installed. It connects to the pedal arm with
a custom bolt that has a shoulder on the bar side to support the bar
and an acorn nut on the opposite side. Thanks to Bob French I now have
a spare. Where the bar goes thru the toeboard, there is a retainer for
a leather seal. I lubed the seal with petroleum jelly to hold it in
place and to keep the bar from squeaking. On the firewall side, the bar
has a bumper, washer and cotter pin installed in the Factory Assembly
Manual. The manual does not show a spring on the end of the bar but one
was on both BillyBob's old assembly and the one I received from Robert
French so I reinstalled a spring too.
Next,
the curved release bar was installed. It connects to the pedal arm with
a custom bolt that has a shoulder on the bar side to support the bar
and an acorn nut on the opposite side. Thanks to Bob French I now have
a spare. Where the bar goes thru the toeboard, there is a retainer for
a leather seal. I lubed the seal with petroleum jelly to hold it in
place and to keep the bar from squeaking. On the firewall side, the bar
has a bumper, washer and cotter pin installed in the Factory Assembly
Manual. The manual does not show a spring on the end of the bar but one
was on both BillyBob's old assembly and the one I received from Robert
French so I reinstalled a spring too.
 Then
I struggled with the control rod for awhile. It took several
adjustments of the control rod threaded clevis and the remaining good
brake cable clevis to get a working parking brake (driver's side cable
only working). The problem I still have to work out (along with
replacing the cables) is that the brake pedal will not remain down
until the release knob is pulled. It is working like a regular brake
pedal. The lock mechanism cannot get a grip on the release bar. A
combination of my improvements is probably conspiring against me. The
rusty bar was wire brushed to a polished finish. That, combined with
the lubricant from the leather seal and a new return spring on the
control rod below (where none existed before), is most likely
responsible for this problem. I'll figure it out sooner or later.
Then
I struggled with the control rod for awhile. It took several
adjustments of the control rod threaded clevis and the remaining good
brake cable clevis to get a working parking brake (driver's side cable
only working). The problem I still have to work out (along with
replacing the cables) is that the brake pedal will not remain down
until the release knob is pulled. It is working like a regular brake
pedal. The lock mechanism cannot get a grip on the release bar. A
combination of my improvements is probably conspiring against me. The
rusty bar was wire brushed to a polished finish. That, combined with
the lubricant from the leather seal and a new return spring on the
control rod below (where none existed before), is most likely
responsible for this problem. I'll figure it out sooner or later.
 It
was early afternoon by that time and I had to pick up the pace if I
wanted to drive BillyBob home to the Krash Pad by day's end. I quit
cataloging fasteners and recording this log step-by-step which is my
normal practice. The rest of the day was spent wrestling the fender and
grille, etc. back into place. A few
years ago when I took the radiator support out for the first time
the whole front end "doghouse" had sagged and I buggered some of the
radiator support captured nuts trying to get the bolts back in on both
sides. I ended up not putting those bolts back in. Today, I fixed that
on this side. Ran a tap thru the damaged nuts and, with the help of my
hydraulic ram tool to position the fender, I was able to get all the
fasteners in. All the new fasteners were installed from the Doc's House of Bolts
kit.
It
was early afternoon by that time and I had to pick up the pace if I
wanted to drive BillyBob home to the Krash Pad by day's end. I quit
cataloging fasteners and recording this log step-by-step which is my
normal practice. The rest of the day was spent wrestling the fender and
grille, etc. back into place. A few
years ago when I took the radiator support out for the first time
the whole front end "doghouse" had sagged and I buggered some of the
radiator support captured nuts trying to get the bolts back in on both
sides. I ended up not putting those bolts back in. Today, I fixed that
on this side. Ran a tap thru the damaged nuts and, with the help of my
hydraulic ram tool to position the fender, I was able to get all the
fasteners in. All the new fasteners were installed from the Doc's House of Bolts
kit.
When installing body parts, all bolts should be installed loosely until all parts line up. All my new fasteners for the fender and inner fender are stainless steel and need either anti-seize or threadlocker to keep them from spalling. This gets messy so my method is to completely install the part and tighten every bolt. Then the fasteners are removed one-at-a-time, treated with threadlocker and reinstalled. I ran out of time and will have to do that this weekend even tho' I don't relish the thought of cramping myself up in that wheelwell again so soon.
By sunset, I was finished. I had my first brew of the day while cleaning four days of grackle guano off of BillyBob and, in my bone tired state, rarely has a beer tasted so good. "Life is good" I whispered to the spirits of my parents sitting on my shoulders and lit my cigar to watch the soon-to-start fireworks.
 July
8th 2006 OK. I had the
spring on the release bar in the wrong place. A link by Atomarc over at
Stovebolt.com illustrated
to me the error of my ways. I setup in the Krash Lab after meeting John
Ray and his '54 chebby, Sherwood, for coffee. I decided to put the
spring in the correct location first. BillyBob's left front end was put
up on a jackstand and the wheel removed. Unbolted the release bar and
rearranged the "shishkabob" to line up (top-to-bottom) lock bar,
spring, floorboard, leather seal, bumper, flat washer, and cotter pin.
That works much better. It still lets loose on its own sometimes but
that action will fade, I think, when the release bar gets more gritty.
July
8th 2006 OK. I had the
spring on the release bar in the wrong place. A link by Atomarc over at
Stovebolt.com illustrated
to me the error of my ways. I setup in the Krash Lab after meeting John
Ray and his '54 chebby, Sherwood, for coffee. I decided to put the
spring in the correct location first. BillyBob's left front end was put
up on a jackstand and the wheel removed. Unbolted the release bar and
rearranged the "shishkabob" to line up (top-to-bottom) lock bar,
spring, floorboard, leather seal, bumper, flat washer, and cotter pin.
That works much better. It still lets loose on its own sometimes but
that action will fade, I think, when the release bar gets more gritty.
 I
still have some fasteners and parts of the parking brake assembly to
clean and catalog but that will have to wait for another day. It's hot,
muggy and rainy today. Tomorrow is 'sposed to be hot, muggy and less
rain. I have to remove the stainless steel bolts I placed on tuesday
and apply threadlocker blue to them to protect them from spalling. I
also have to move and configure a couple of computers inside the Krash
Lab this weekend.
I
still have some fasteners and parts of the parking brake assembly to
clean and catalog but that will have to wait for another day. It's hot,
muggy and rainy today. Tomorrow is 'sposed to be hot, muggy and less
rain. I have to remove the stainless steel bolts I placed on tuesday
and apply threadlocker blue to them to protect them from spalling. I
also have to move and configure a couple of computers inside the Krash
Lab this weekend.
I did the threadlocker thing and, as I put BillyBob back on the ground and snapped the hubcap on, I had a nagging at the edge of my mind. I realized after a few minutes that I had gotten threadlocker on all the new fender bolts 'cept the three holding the inner fender to the parking brake bracket. Geez! OK. I'll get them next week when I detail the wheels.
July 15th 2006 Good working weather forecast for this weekend. Stopped at the warehouse on the way up to the Krash Lab and picked up the wheel paint masking rings for the wheel detailing I plan today. When I got to the Krash Lab and pulled the tools out of the shed, the first order of business was to get thredlocker blue on those three fasteners I missed last weekend. I must'uv missed them for a subconscious reason 'cause I couldn't get the bottom one back in. The inner fender alignment hole was off just enuf to block a bolt from going in straight. I messed with it for 'bout a hour then put it aside with a curse.
By day's end, got three of the wheels detailed. Veered away from the procedure for the one wheel that has auto paint on it (the only one I've restored so far, then gouged the heck out of trying to get it in the spare tire carrier). That wheel I used car wash soap on and didn't touchup with paint afterwards.
July 16th 2006 Another good working day. Performed BillyBob's monthly maintenance first when I arrived at the Krash Lab. Then I worked on the Renegade Tranny/transfer case package fer awhile, getting it ready for re-insertion in the Jeep next weekend if things go according to plan. Finished up the other wheel detailing left over from yesterday. Debated with myself over detailing the spare. Lazy Larry won the debate. Gonna hold the spare for the chassis detailing phase so I only have to wrestle with the spare and the tire carrier one time.
Well, that's it for the wheelwell detailing phase for this cycle. We move into the chassis phase next where I will continue work on the parking brake and the hydraulic brakes as well. Next week I gotta try to get Renegade's transmission/tranny back in and I suspect I'll be pretty tuckered out after that exertion, successful or not, to get much done on BillyBob so Here's as good a place as any to post this log entry. Time for beers, burger and cigars.
| < Back
to Intro |
You can email me at ![]() webmaster@laroke.com
webmaster@laroke.com
Issued Sunday July 16, 2006
Updated Wednesday March 21, 2018
copyright © 1996-2018 Larry Robert Kephart all rights reserved
| | LRK Home | | Bio Info | | Krash Khronicles | | LAROKE | |
| | BettyLou | | BillyBob's Garage | | Rat Patrol | | Deerslayer | | Elvira | |
| | Land of the Free and Home of the Brave | |
| | Keppylou's Art | | WWI Soldier's Diary | |