| | LRK Home | | Bio Info | | Krash Khronicles | | LAROKE | |
| | BettyLou | | BillyBob's Garage | | Rat Patrol | | Deerslayer | | Elvira | |
| | Land of the Free and Home of the Brave | |
| | Keppylou's Art | | WWI Soldier's Diary | |
BillyBob Work-in-Progress Log
![]()
TRUCK LINKS including vendor sites for old parts, custom parts, and tools as well as sites for classic car and truck organizations
STORE Operating in association with Amazon.com, books, recordings and tools can be purchased.
PLANNING for the restoration including project schedule and cost estimates.
![]()
TRAVELS WITH BILLYBOB With apologies to Steinbeck, this area of BillyBob's Garage will be used to log the trips BillyBob and I make together.
WORK-IN-PROGRESS is the restoration of parts of BillyBob that I can accomplish without a garage.
PRE-RESTORATION includes log entries of minor repairs and and adventures between time of purchase and the time when I started restoration, a piece at a time.
JR'S KORNER JR's Korner is the history of BillyBob before I got him authored by my brother, Wm. C. Kephart.
![]()
BILLYBOB MAINTENANCE Ever changing detailing, oil change, lube, etc. maintenance routines specifically developed for BillyBob, including required tools, materials and procedures.
STEALTH SHOP Urban residence design with large integrated shop and separate living quarters for a relative or renter.
29. Windshield Saga - The Bad
August 14th 2003 Starting to get ready for this Thanksgiving weekend planned task - replacing BillyBob's leaking, foggy bottom windshield. As usual, I'm gathering many more tools and parts than I'll probably need to cover every continguency and to ward off Murphy.
 Started
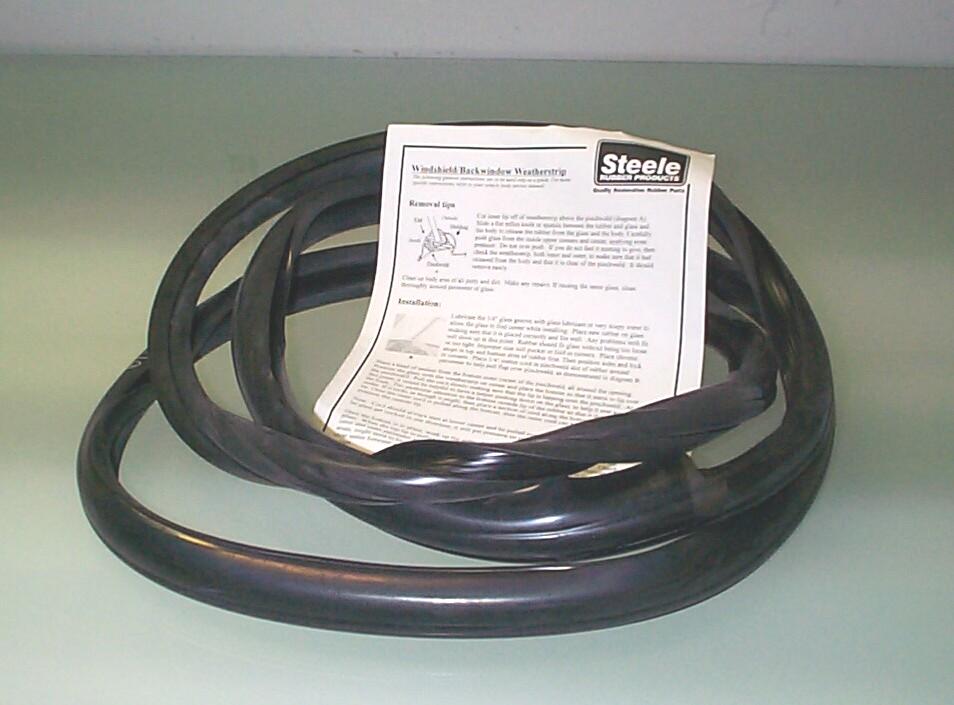
by ordering the Windshield Gasket from Steele
Rubber Products online. Steele has the best reputation for an
accurate fit and I'll be working against time so I'm going for all the
breaks I can get. BillyBob has the Deluxe stainless steel windshield
trim so that's the gasket I ordered. It arrived this week.
Started
by ordering the Windshield Gasket from Steele
Rubber Products online. Steele has the best reputation for an
accurate fit and I'll be working against time so I'm going for all the
breaks I can get. BillyBob has the Deluxe stainless steel windshield
trim so that's the gasket I ordered. It arrived this week.
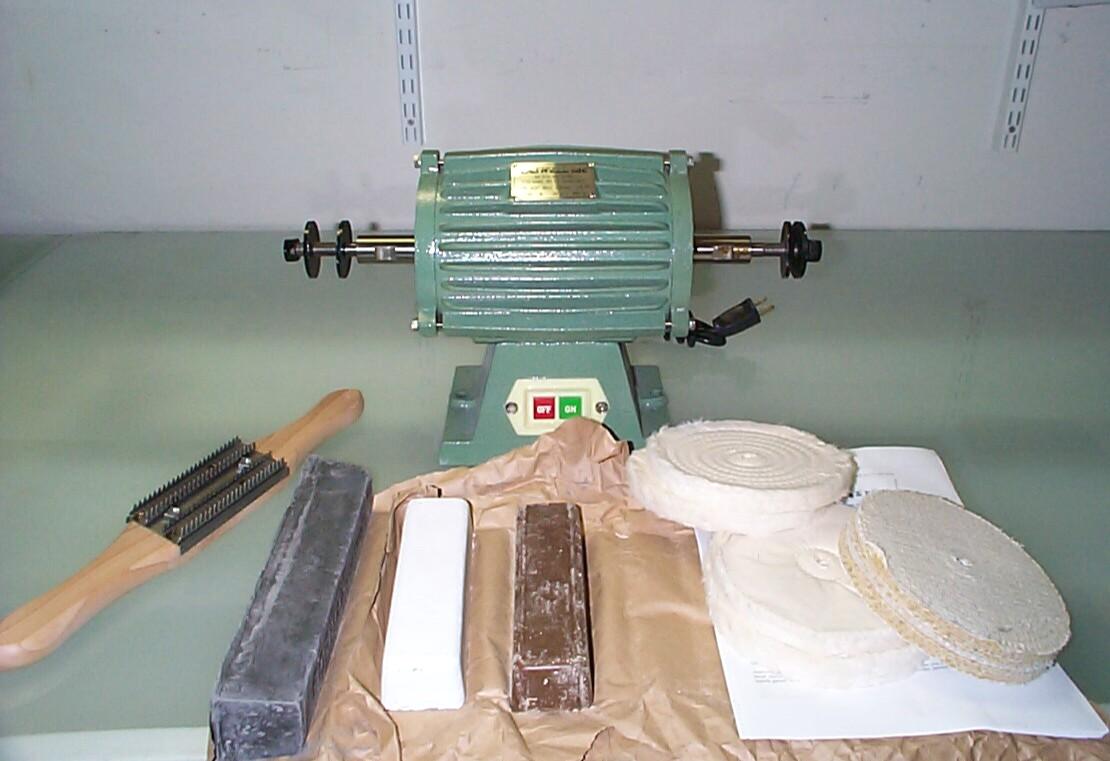 I
want to restore that stainless steel trim while the windshield is out
so I got a 1/3 HP buffer from Caswell,
Inc. They have a package deal with a starter kit for about a
c-note with 6 wheels, 3 compounds and a cleaning rake which I thought
was a pretty good deal. Gotta still pickup a stainless steel finishing
compound, then I'll have everything I need 'cept the necessary skills.
I
want to restore that stainless steel trim while the windshield is out
so I got a 1/3 HP buffer from Caswell,
Inc. They have a package deal with a starter kit for about a
c-note with 6 wheels, 3 compounds and a cleaning rake which I thought
was a pretty good deal. Gotta still pickup a stainless steel finishing
compound, then I'll have everything I need 'cept the necessary skills.
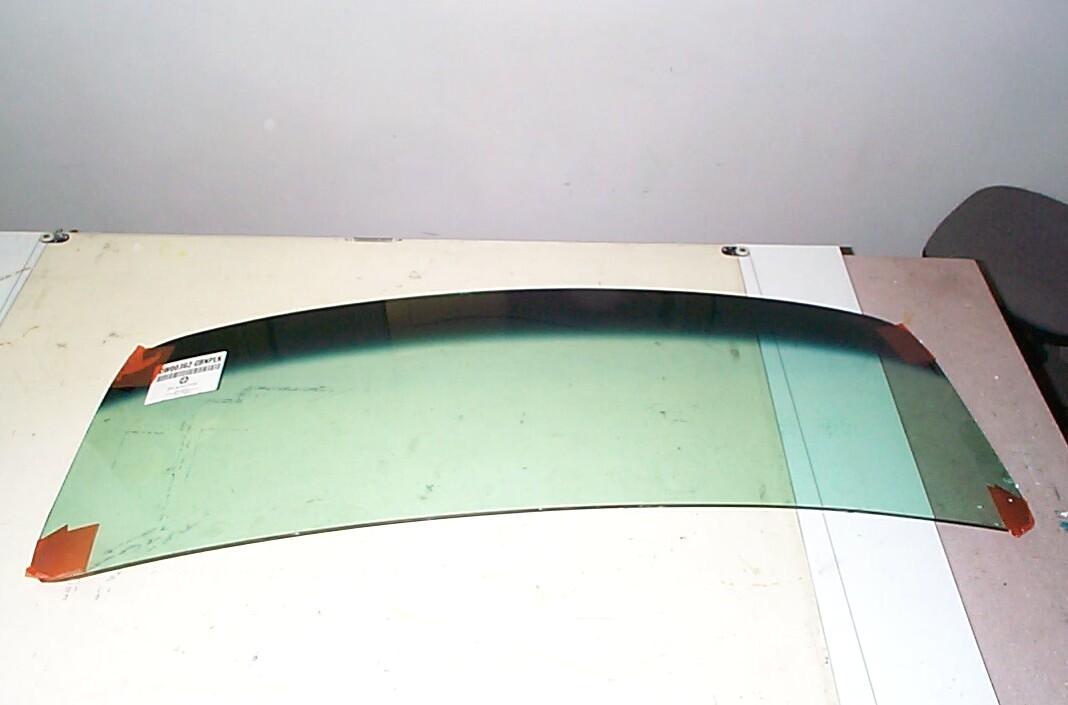 August
21st 2003 New 54-55
Windshield arrived from Chevy Duty via Yellow Freight
today. I'd ordered this a few weeks ago and got an e-mail notice that
it was backordered. Don't need it until Thanksgiving but, just to be on
the safe side, I ordered one from Jim
Carter. The worst that could happen is that I'd end up with a
spare windshield in inventory. Chevy Duty only offers a tinted
windshield (top 3 inches blue). Jim Carter also lists a clear
windshield which is what I prefer. Middle of last week Carrie, a Chevy
Duty rep, calls to find out about shipping and for me to be sure I
check for damage before accepting the windshield when it arrived. Later
the same day, a Jim Carter rep calls to tell me the clear windshield
has been discontinued. The timing worked to my advantage this time. I
canceled that order. I'd been anxious about the windshield arriving at
the Krash Lab when I wasn't here to inspect it so I irritated my
co-workers by repeatedly telling them not to accept this shipment if I
wasn't here. But now it was here. Went out to the truck with my trusty
Stanley box cutter to check the package . . . Windshield is good. It
was a little hard to find in about 25 cubic feet of styrofoam peanuts
but I'm not complaining.
August
21st 2003 New 54-55
Windshield arrived from Chevy Duty via Yellow Freight
today. I'd ordered this a few weeks ago and got an e-mail notice that
it was backordered. Don't need it until Thanksgiving but, just to be on
the safe side, I ordered one from Jim
Carter. The worst that could happen is that I'd end up with a
spare windshield in inventory. Chevy Duty only offers a tinted
windshield (top 3 inches blue). Jim Carter also lists a clear
windshield which is what I prefer. Middle of last week Carrie, a Chevy
Duty rep, calls to find out about shipping and for me to be sure I
check for damage before accepting the windshield when it arrived. Later
the same day, a Jim Carter rep calls to tell me the clear windshield
has been discontinued. The timing worked to my advantage this time. I
canceled that order. I'd been anxious about the windshield arriving at
the Krash Lab when I wasn't here to inspect it so I irritated my
co-workers by repeatedly telling them not to accept this shipment if I
wasn't here. But now it was here. Went out to the truck with my trusty
Stanley box cutter to check the package . . . Windshield is good. It
was a little hard to find in about 25 cubic feet of styrofoam peanuts
but I'm not complaining.
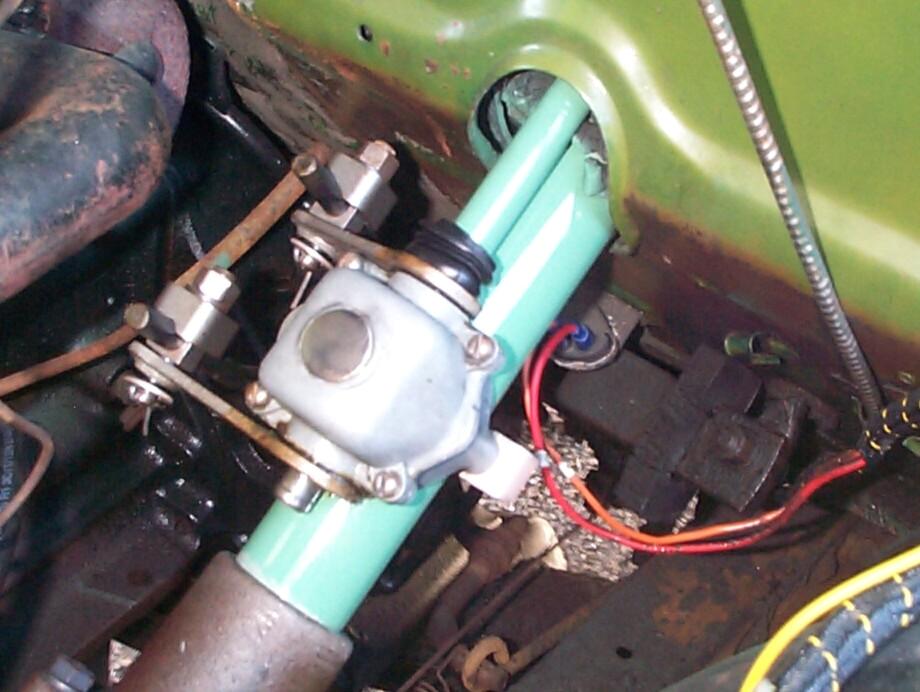
November 27th 2003 T-Day is here. I'm getting a slow start. I'm always a bit hesitant about jumpin' into the deep end of the pool. Parked BillyBob on the backside of the shadetree where he will sit until this job is done. Removed the steering wheel, third party turn-signal director and original turn-signal director which isn't working quite right (Don't ask. I'll report on that when I know what's wrong). Removed the shift linkage lever assembly and took a short detour from the main task to clean up the lower steering column and shift box in the engine compartment. Marked the shift box location on the steering column and removed it. Cleaned and masked off the lower steering column. Applied a 3M Scuff Pad and Eastwood's PRE Paint Prep. Finished off with a couple of coats of Rustoleum Grass Green gloss enamel. The shift box was masked and the same paint treatment given to the shift box shaft that extends into the cab. Shift box and steering column fittings were placed in the tumbler for a cleaning session.
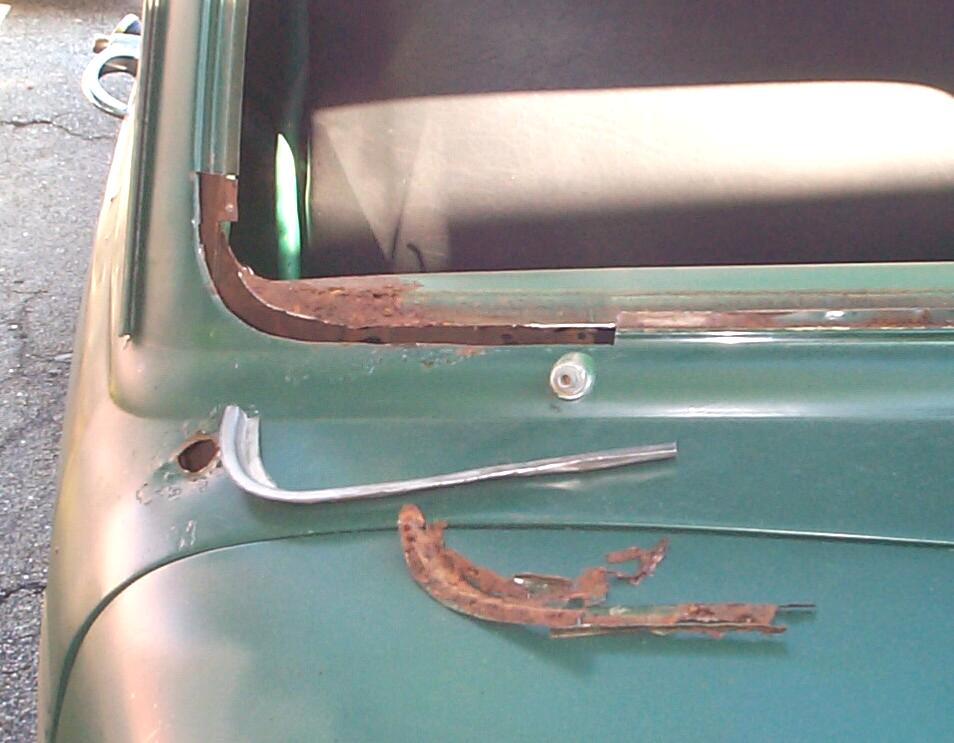
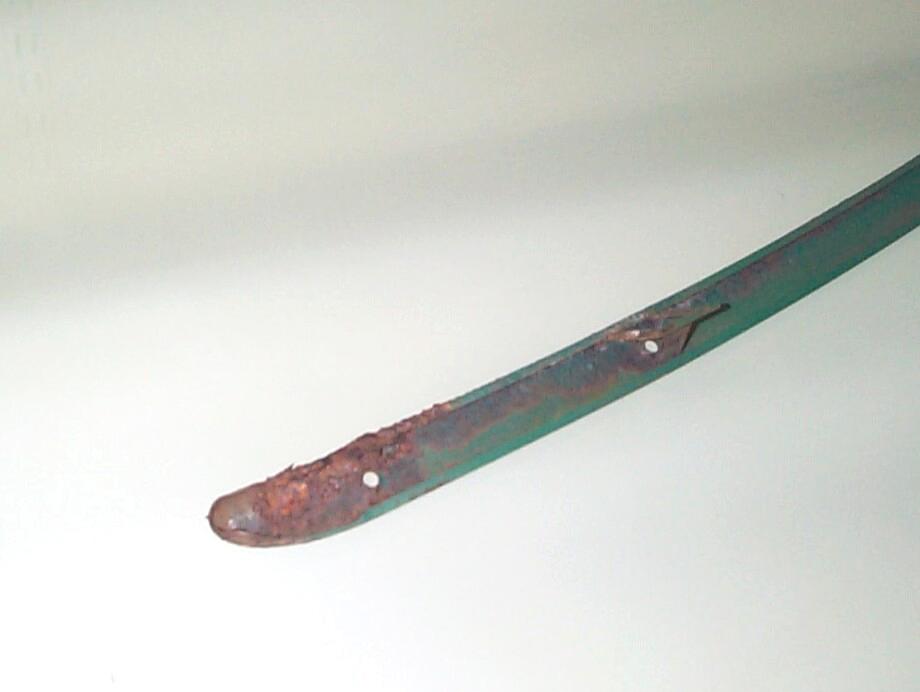 Back
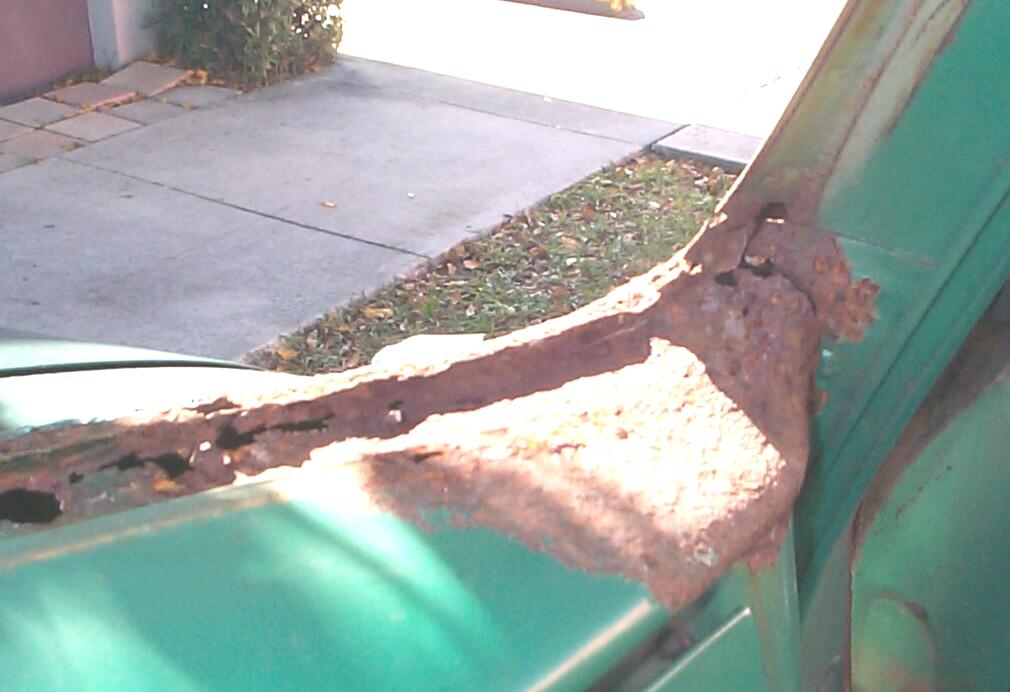
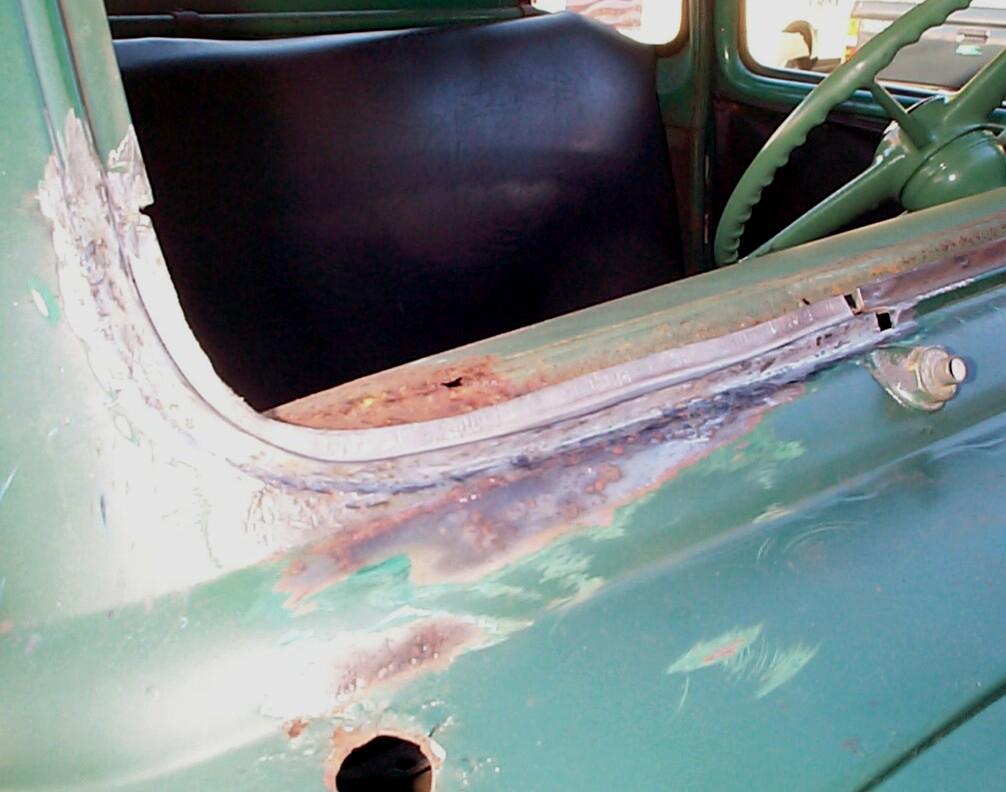
to the windshield. Removed the cowl trim at the top of the dashboard.
Both ends are rust damaged but the drivers side is the worst. The end
bracket and philips screw are gone. Have to get the shop vac out and
clean the loose rust out of this area before continuing on. Took out
the mirror and headliner next. The retro blue carpet between the
headliner and roof was turning brown and falling apart. I tore it out.
Underneath was peeling tarpaper which might have been original from the
factory. Scraped the worst of that off too. What a mess. Start that
shop vac up again.
Back
to the windshield. Removed the cowl trim at the top of the dashboard.
Both ends are rust damaged but the drivers side is the worst. The end
bracket and philips screw are gone. Have to get the shop vac out and
clean the loose rust out of this area before continuing on. Took out
the mirror and headliner next. The retro blue carpet between the
headliner and roof was turning brown and falling apart. I tore it out.
Underneath was peeling tarpaper which might have been original from the
factory. Scraped the worst of that off too. What a mess. Start that
shop vac up again.
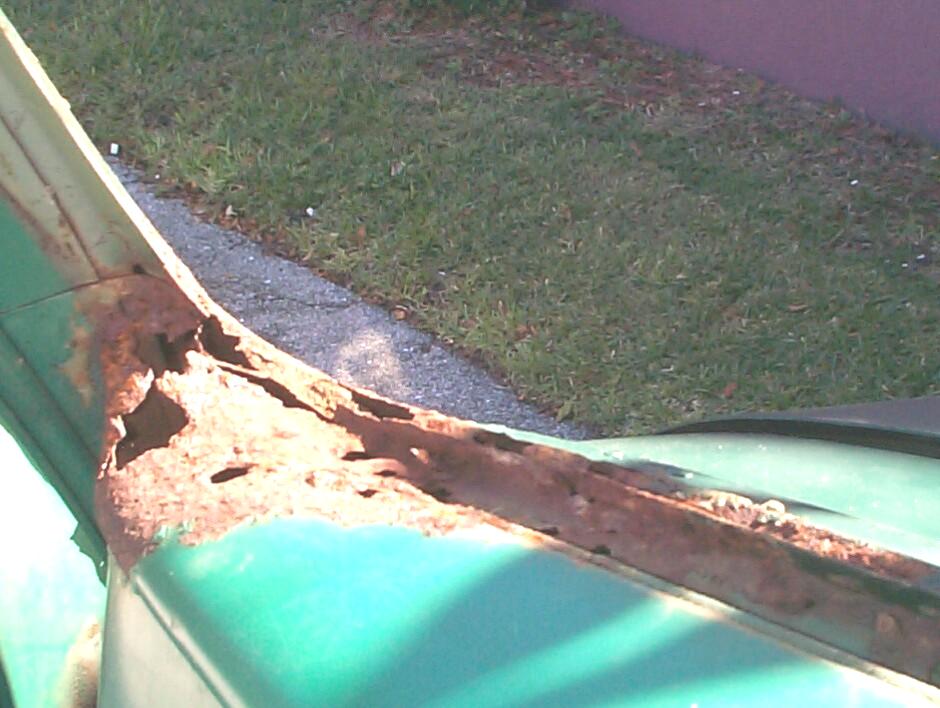 Can't
put it off any longer. Time to cut the old windshield out. I want to do
it gently as possible so I have it for a backup if the new windshield
doesn't fit. The Installation
Instructions (PDF format) that came with the windshield
gasket from Steele Rubber Products (and is also provided on their
website) sez to "cut the inner lip of weatherstrip above the
pinchweld". The old weatherstrip cut easily with my box
cutter and the old windshield popped out . . . The rust damage to the
pinchweld, dashboard and windshield frame was so extensive, I had to
sit down and ponder awhile. One thing's fer shure, this is gonna take a
lot longer than four days!
Can't
put it off any longer. Time to cut the old windshield out. I want to do
it gently as possible so I have it for a backup if the new windshield
doesn't fit. The Installation
Instructions (PDF format) that came with the windshield
gasket from Steele Rubber Products (and is also provided on their
website) sez to "cut the inner lip of weatherstrip above the
pinchweld". The old weatherstrip cut easily with my box
cutter and the old windshield popped out . . . The rust damage to the
pinchweld, dashboard and windshield frame was so extensive, I had to
sit down and ponder awhile. One thing's fer shure, this is gonna take a
lot longer than four days!
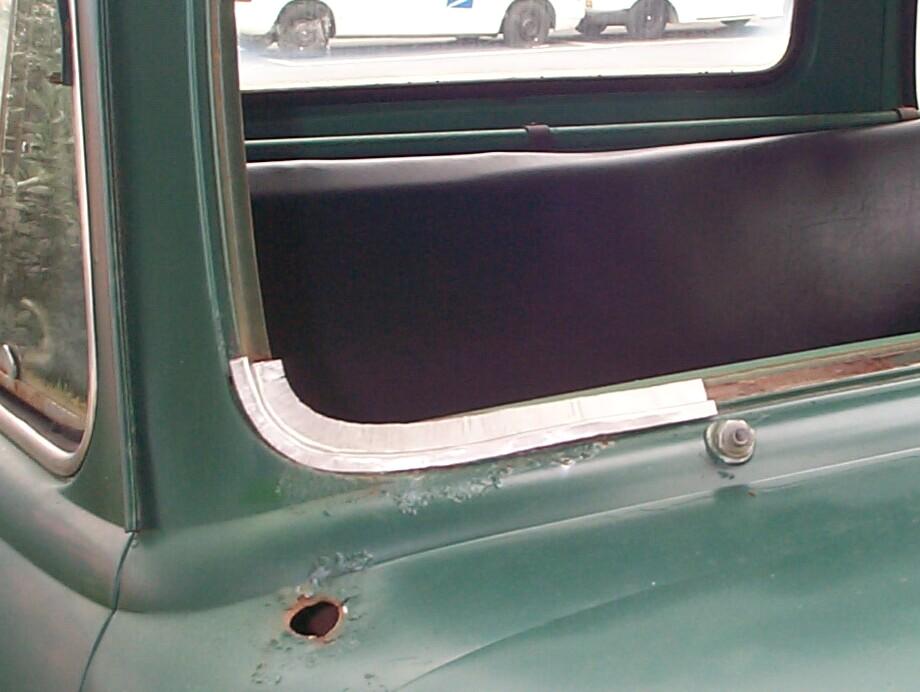
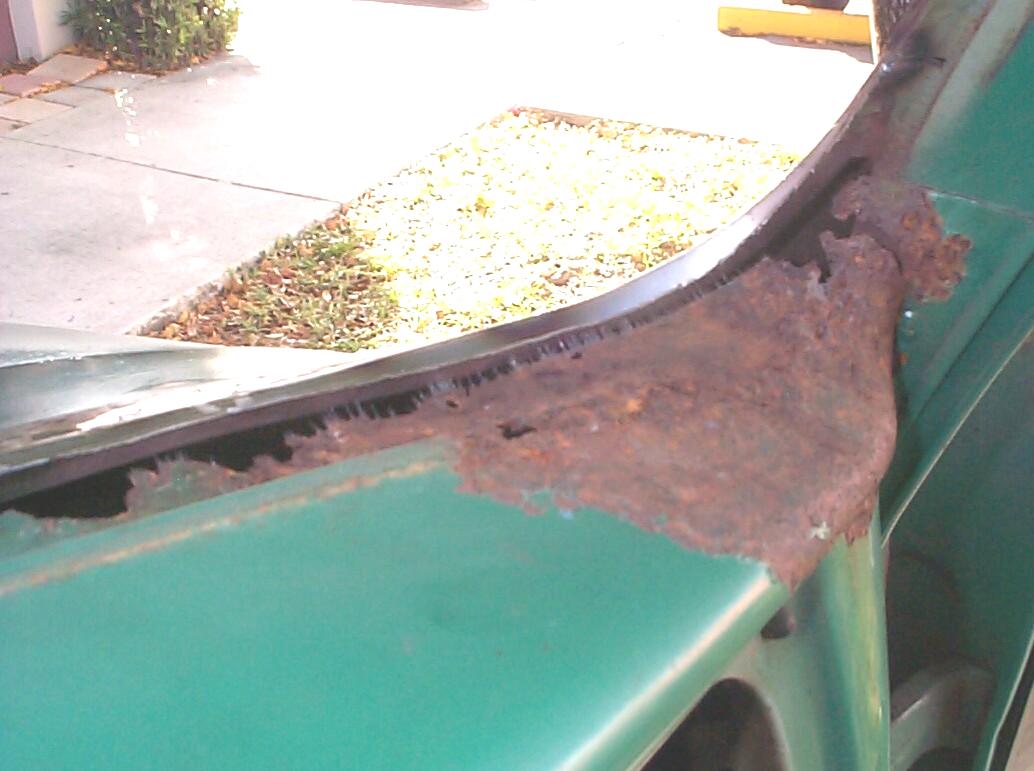
 The
passenger side isn't much better. I can't think of another place on the
truck where the curves are more complex. They are all small and go in
many different directions. In the pinchweld area, I have to be dead
nuts on if the new weatherstrip is going to fit correctly. Quite a bit
for an apprentice "metal bumper" to chew on. While wondering about how
to start, I removed the stainless steel windshield trim and clips from
the old weatherstrip and labeled them "top", "bottom", "left" and
"right". Also removed the glove box door. Masked off the top of the
steering column and gave it a new coat of Grass Green Rustoleum.
The
passenger side isn't much better. I can't think of another place on the
truck where the curves are more complex. They are all small and go in
many different directions. In the pinchweld area, I have to be dead
nuts on if the new weatherstrip is going to fit correctly. Quite a bit
for an apprentice "metal bumper" to chew on. While wondering about how
to start, I removed the stainless steel windshield trim and clips from
the old weatherstrip and labeled them "top", "bottom", "left" and
"right". Also removed the glove box door. Masked off the top of the
steering column and gave it a new coat of Grass Green Rustoleum.
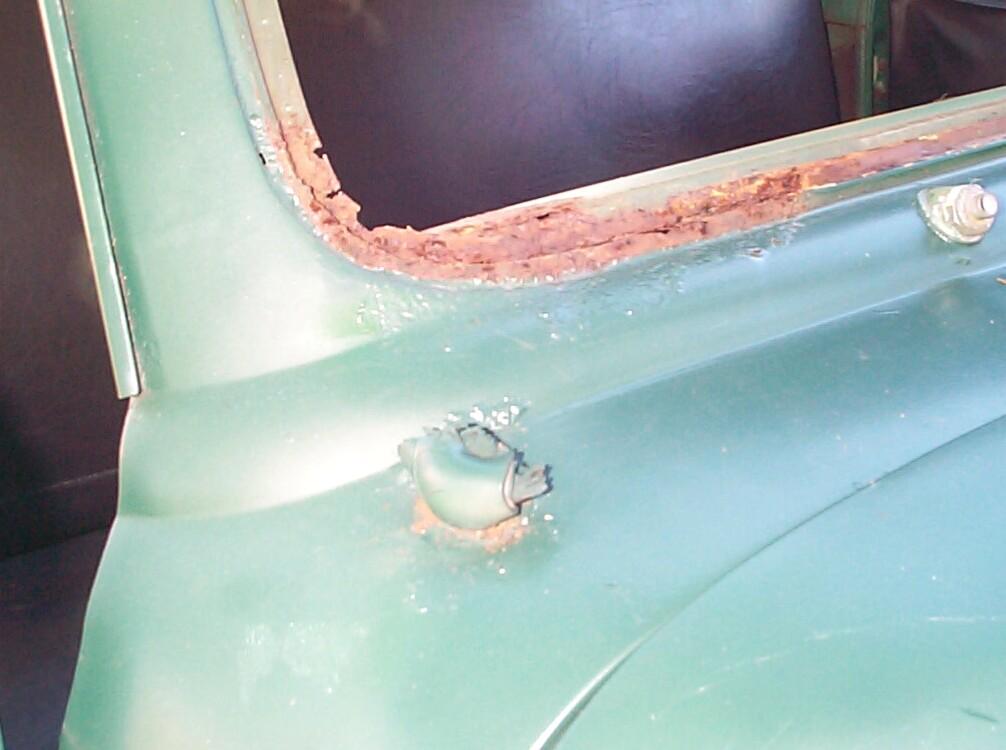 About
all I've decided so far is that I'll tackle the passenger side first
including a dent and a 1" hole that has had a piece of rubber stuffed
in it since before I became BillyBob's proud owner. There's more room
underneath the dash to work too. When I get to the driver side, I'll
have to get gauges, wires and switches out of the way. I'm also
thinking along the lines of building up a single replacement patch
consisting of several smaller patch pieces. I can start over if I screw
up too badly without damaging the truck any more. I think there's gonna
be a lotta sittin' and headscratchin' on this job so I'm bringing some
cigars with me tomorrow. Sun's getting low in the West. Spread a
plastic painters drop cloth over BillyBob's cab and taped it down. Put
BillyBob's California Car Cover on top of that 'an I'm hoping this is
enuf to keep rainwater out of the cab while the windshield job is in
progress.
About
all I've decided so far is that I'll tackle the passenger side first
including a dent and a 1" hole that has had a piece of rubber stuffed
in it since before I became BillyBob's proud owner. There's more room
underneath the dash to work too. When I get to the driver side, I'll
have to get gauges, wires and switches out of the way. I'm also
thinking along the lines of building up a single replacement patch
consisting of several smaller patch pieces. I can start over if I screw
up too badly without damaging the truck any more. I think there's gonna
be a lotta sittin' and headscratchin' on this job so I'm bringing some
cigars with me tomorrow. Sun's getting low in the West. Spread a
plastic painters drop cloth over BillyBob's cab and taped it down. Put
BillyBob's California Car Cover on top of that 'an I'm hoping this is
enuf to keep rainwater out of the cab while the windshield job is in
progress.
 November
28th 2003 Starting slow
today. Still vegetating over my approach to the dashboard ends metal
repair. Smoked a cigar and pondered it some more. Finished the shift
box cleaning/painting I started yesterday and bolted it back into place.
November
28th 2003 Starting slow
today. Still vegetating over my approach to the dashboard ends metal
repair. Smoked a cigar and pondered it some more. Finished the shift
box cleaning/painting I started yesterday and bolted it back into place.
OK! let's strike out into new territory. I made a cardboard template (file folder) of the pinchweld curve that has to be replaced for the windshield right side. I turned it over and checked it against the left side and it fit well so I think I'm on the right track.
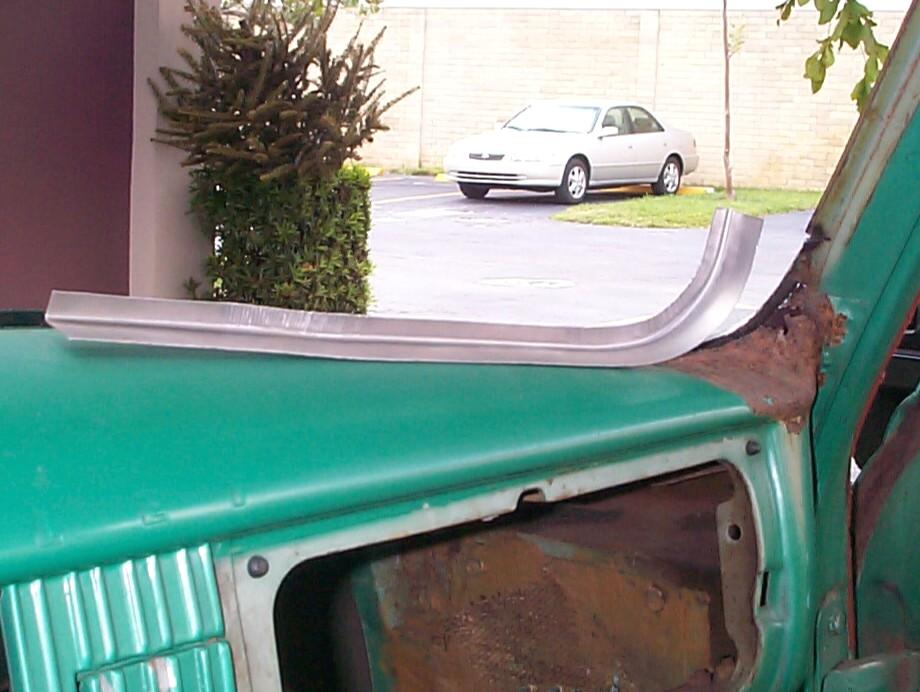
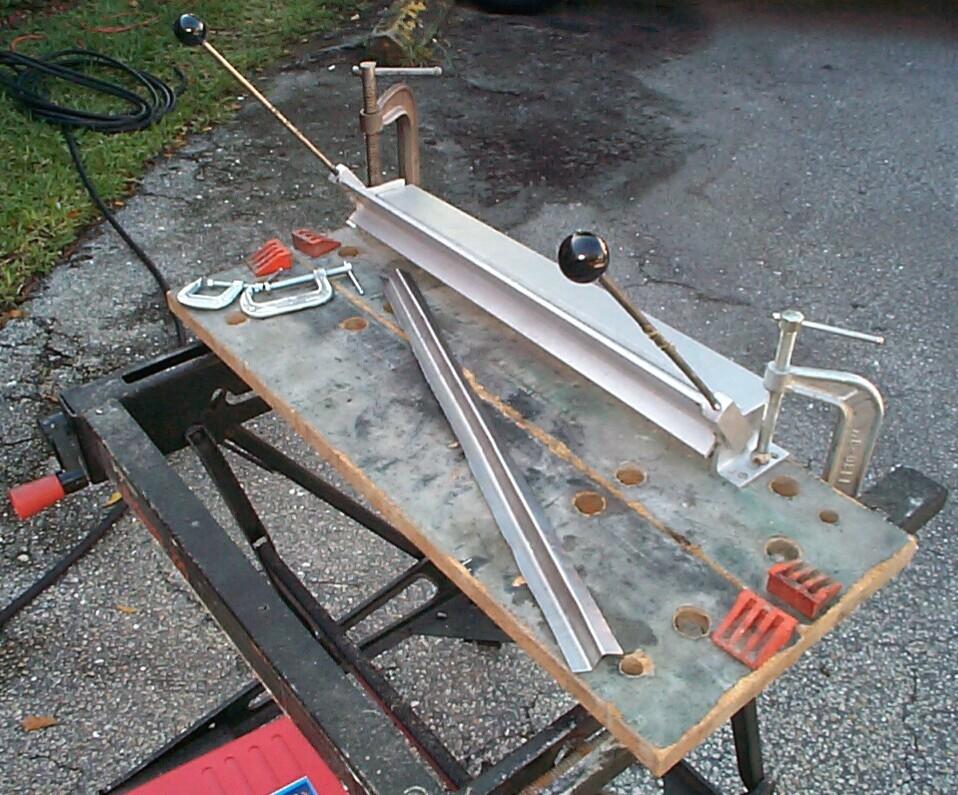 Wanted
to try to form the outside portion of the pinchweld replacement first.
With this in mind, I measured a piece of sheet steel 18" by 1.5" with a
combination square and scribed it with a prick punch. In addition, I
scribed lengthwise marks at 0.5" and 1" to divide it into thirds. Cut
it out with aviation snips. I got this sheet metal from McMaster-Carr
some time ago and it is somewhere between 19 and 20 gauge, I think.
Hammered it roughly straight from the curl it got from the aviation
snips. Setup the 18" "Mighty Mini-Bender" bending brake I got from Eastwood
awhile ago and used it to bend a ninety degree leg at one of the third
point scribe marks. I wanted a "Z" shape and the other ninety degree
leg had to be bent the other way. I couldn't use the brake for the
second bend so, the piece was C-clamped to the edge of the brake and
the othe leg was hammered into shape. The hardest thing for me to get
used to as a beginner at metalwork is how deformed and lumpy the work
is in the early stages.
Wanted
to try to form the outside portion of the pinchweld replacement first.
With this in mind, I measured a piece of sheet steel 18" by 1.5" with a
combination square and scribed it with a prick punch. In addition, I
scribed lengthwise marks at 0.5" and 1" to divide it into thirds. Cut
it out with aviation snips. I got this sheet metal from McMaster-Carr
some time ago and it is somewhere between 19 and 20 gauge, I think.
Hammered it roughly straight from the curl it got from the aviation
snips. Setup the 18" "Mighty Mini-Bender" bending brake I got from Eastwood
awhile ago and used it to bend a ninety degree leg at one of the third
point scribe marks. I wanted a "Z" shape and the other ninety degree
leg had to be bent the other way. I couldn't use the brake for the
second bend so, the piece was C-clamped to the edge of the brake and
the othe leg was hammered into shape. The hardest thing for me to get
used to as a beginner at metalwork is how deformed and lumpy the work
is in the early stages.
 November
29th 2003 Chilly today
(for South Florida) so I worked inside the Krash Lab while I waited for
it to warm up some under the shade tree. Pulled out Eastwood's
sheetmetal Stretcher and Shrinker tools that I got some time back.
Recently, I also ordered a mounting plate for these two tools. Spent an
hour or so shaping the straight "Z" shape piece I made yesterday into
the curve required to fit the windshield on the passenger side. Not
having an eye for this work yet, I spent a lot of time at it but I
finally came up with a fairly close shape to the template. I think
these two tools are great! I haven't had this much fun with a simple
tool since I discovered pop rivets as a teenager.
November
29th 2003 Chilly today
(for South Florida) so I worked inside the Krash Lab while I waited for
it to warm up some under the shade tree. Pulled out Eastwood's
sheetmetal Stretcher and Shrinker tools that I got some time back.
Recently, I also ordered a mounting plate for these two tools. Spent an
hour or so shaping the straight "Z" shape piece I made yesterday into
the curve required to fit the windshield on the passenger side. Not
having an eye for this work yet, I spent a lot of time at it but I
finally came up with a fairly close shape to the template. I think
these two tools are great! I haven't had this much fun with a simple
tool since I discovered pop rivets as a teenager.
 November
30th 2003 It's warmer
today but I just puttered around mostly. I trimmed and refined the
curved "Z" shape some. I fitted it on BillyBob with C-clamps and it's
darn close but this ain't horseshoes. The center section of the "Z" is
just a sixteenth inch or so too wide and I've convinced myself to
fabricate another one.
November
30th 2003 It's warmer
today but I just puttered around mostly. I trimmed and refined the
curved "Z" shape some. I fitted it on BillyBob with C-clamps and it's
darn close but this ain't horseshoes. The center section of the "Z" is
just a sixteenth inch or so too wide and I've convinced myself to
fabricate another one.
December 6th 2003 Cold front rolling thru and it's cool and windy again today but not as uncomfortabe as last saturday. Dragged the tools out and started cutting out another piece of steel sheet for a new "Z" shape. Measured and marked the middle band to be 7/16" in lieu of 1/2" this time. Used the "Mini Nibbler" (#28012) I got from Eastwood some time back to cut the piece out this time instead of the aviation snips. It made a cleaner edge without deformations (ruffles). Setup the bending brake and repeated last week's exercise to get the basic "Z" shape. Worked with the shrinker, stretcher, aviation snips, hammers and dollies until I got a pretty good curved "Z" shape piece. It's noon and the temperature is starting to go down again ('sposed to hit the forties tonight - this ain't what I moved to South Florida for!).
 December
7th 2003 Cold again
this morning but a nor'easter is tearing up my friends in the new
england states so I'm gonna quit whinning 'bout it. I've given up the
complicated built-up patch panel idea in favor of a "one piece at a
time" approach. Setup the air compressor and cut out the damaged area
that the new curved "Z" shape is to replace with 3" cutoff wheel and
air powered saber saw. Now I need to do a bit more shaping of the new
piece before spot welding it into place.
December
7th 2003 Cold again
this morning but a nor'easter is tearing up my friends in the new
england states so I'm gonna quit whinning 'bout it. I've given up the
complicated built-up patch panel idea in favor of a "one piece at a
time" approach. Setup the air compressor and cut out the damaged area
that the new curved "Z" shape is to replace with 3" cutoff wheel and
air powered saber saw. Now I need to do a bit more shaping of the new
piece before spot welding it into place.
 December
13th 2003 'Sposed to
rain tomorrow but it's good weather under the shadetree today. Dragged
out the tools including the MIG welder. Cleaned up the areas to be
welded with a wire wheel on the air-powered angle grinder and
vise-gripped the curved "Z" shape in place. Began with spot welds 'bout
an inch apart to keep heat warpage down, then began to fill in between
the spot welds with other spots. Burnt a couple of holes an' it's
gawdawful ugly but, all-in-all, I think I'm making progress. The
alignment of the new metal is good. When I started this morning, I had
less than thirty minutes of welding experience. Now I have about thirty
minutes more.
December
13th 2003 'Sposed to
rain tomorrow but it's good weather under the shadetree today. Dragged
out the tools including the MIG welder. Cleaned up the areas to be
welded with a wire wheel on the air-powered angle grinder and
vise-gripped the curved "Z" shape in place. Began with spot welds 'bout
an inch apart to keep heat warpage down, then began to fill in between
the spot welds with other spots. Burnt a couple of holes an' it's
gawdawful ugly but, all-in-all, I think I'm making progress. The
alignment of the new metal is good. When I started this morning, I had
less than thirty minutes of welding experience. Now I have about thirty
minutes more.
Used the four inch electric grinder to smooth the welds. Turned down the setting on the welder a notch and began to build up the holes with weld material. Weld and grind, weld and grind.
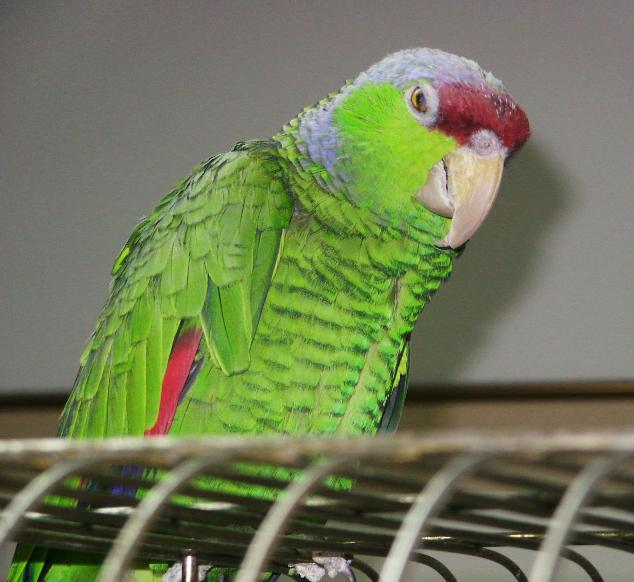
December 20th 2003 Forty-three degrees this morning in sunny Boca Raton. global warming, my hindquarters! This is the third day of a "forecasted" four day cold snap. The Krash Lab is not heated and moving the tools in from the shed requires different logistics in cold weather to keep the heat from escaping the building. Otherwise, Wingnut the parrot is in danger of freezing his giblets off.
 Back
to where I left off last week. Weld and grind, weld and grind. I keep
burning holes due to my lack of skill and unseen rust pockets. Then I
have to weld and grind those. One hole that opened up in the cowl last
week was almost a quarter inch across. I used a Roper Whitney No. 5
Junior Hand Punch I got from (you guessed it - Eastwood) about a year
ago to punch out a little sheetmetal disk to roughly fit the hole. Used
a piece of heat resistant tape (from my powder coating tools) to hold
it in place long enuf to get a spot weld on it. Weld and grind some
more. Looked good enough by late afternoon. Still a few pinholes that I
could see by looking up under the dash and I will attend to those
tomorrow.
Back
to where I left off last week. Weld and grind, weld and grind. I keep
burning holes due to my lack of skill and unseen rust pockets. Then I
have to weld and grind those. One hole that opened up in the cowl last
week was almost a quarter inch across. I used a Roper Whitney No. 5
Junior Hand Punch I got from (you guessed it - Eastwood) about a year
ago to punch out a little sheetmetal disk to roughly fit the hole. Used
a piece of heat resistant tape (from my powder coating tools) to hold
it in place long enuf to get a spot weld on it. Weld and grind some
more. Looked good enough by late afternoon. Still a few pinholes that I
could see by looking up under the dash and I will attend to those
tomorrow.
January 3rd 2004 OK, I got lazy and didn't pull the car cover off BillyBob to work during the long Christmas weekend and New Year's day. Those were good weather days too, and I'm sure Murphy will punish me down the road for not makin' hay while the sun shines. Made a new year's resolution to git back with it 'an here I am.
 Decided
to take care of the old (antenna?) hole in the cowl today. The metal
around the old 1" hole is a bit nasty but I'm gonna try to just weld a
new sheet metal disk in the hole and retain as much of the old metal as
possible. Started by removing old paint, rust and debris from around
the hole with a wire wheel on an air-powered angle grinder and a 3M
stripping wheel in the electric drill. The area around the hole is
dented in in two places. I used hammer and dolly (off dolly method) to
bring back the original cowl contour. Gettin' a little bit better at
metal bumpin'.
Decided
to take care of the old (antenna?) hole in the cowl today. The metal
around the old 1" hole is a bit nasty but I'm gonna try to just weld a
new sheet metal disk in the hole and retain as much of the old metal as
possible. Started by removing old paint, rust and debris from around
the hole with a wire wheel on an air-powered angle grinder and a 3M
stripping wheel in the electric drill. The area around the hole is
dented in in two places. I used hammer and dolly (off dolly method) to
bring back the original cowl contour. Gettin' a little bit better at
metal bumpin'.
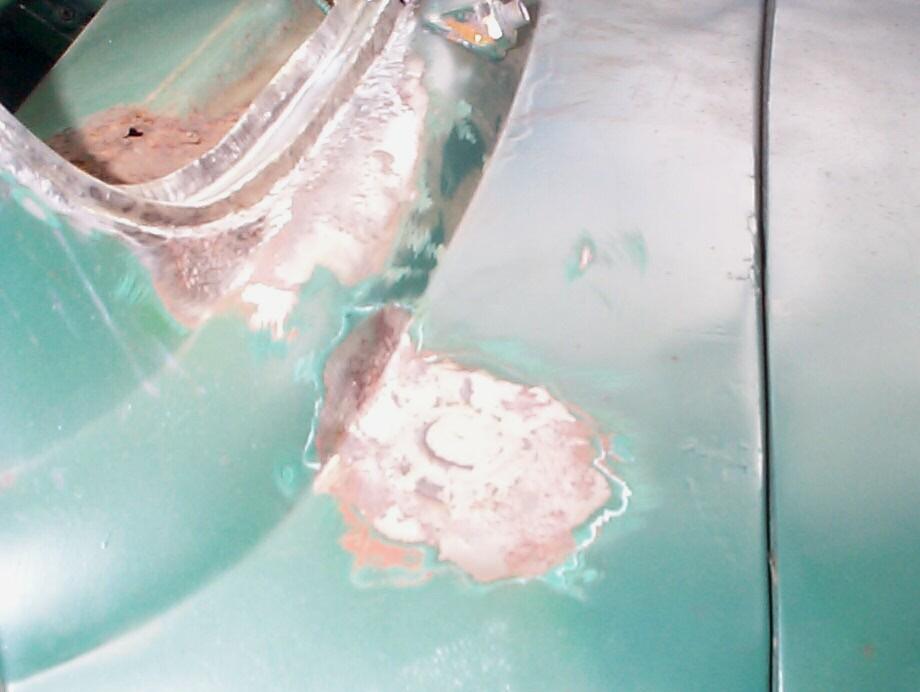 Put
a small piece of file folder cardboard behind the hole and traced the
opening with a marker. Glued the cardboard template to a scrap of sheet
metal with artists spray adhesive and cut out the disk with aviation
snips. Removed the cardboard pattern and trimmed the disk until it fit
the hole snugly. Fixed it in place with a welder's magnet and proceded
to spot weld the disk in place. The existing metal here is better and
the disk was welded and ground down in short order. Went back to
finishing up filling the pinholes between the new windshield curved
piece and body . . . and back to poor welds and burn holes. I just
don't have enuf skill yet for this marginal metal condition. It's like
trying to weld steel wool or a boiler under pressure. I'm gonna get it
to ninety percent perfect (by my reckoning, of course) and move on.
Put
a small piece of file folder cardboard behind the hole and traced the
opening with a marker. Glued the cardboard template to a scrap of sheet
metal with artists spray adhesive and cut out the disk with aviation
snips. Removed the cardboard pattern and trimmed the disk until it fit
the hole snugly. Fixed it in place with a welder's magnet and proceded
to spot weld the disk in place. The existing metal here is better and
the disk was welded and ground down in short order. Went back to
finishing up filling the pinholes between the new windshield curved
piece and body . . . and back to poor welds and burn holes. I just
don't have enuf skill yet for this marginal metal condition. It's like
trying to weld steel wool or a boiler under pressure. I'm gonna get it
to ninety percent perfect (by my reckoning, of course) and move on.
 OK.
Ninety percent. Maybe I'll come back to this later when I'm in a
"conquer the world" mood. Next piece to form is the interior side of
the pinch weld and the defroster vent channel portion of the dashboard.
Another multi-curved piece that I might have to make a couple of times
before I get a useable one. Think I'll go home to the Krash Pad to
ponder my approach. Get a fresh start tomorrow. I'll fall asleep on my
sofa. That way I can't get up on the "wrong side of the bed".
OK.
Ninety percent. Maybe I'll come back to this later when I'm in a
"conquer the world" mood. Next piece to form is the interior side of
the pinch weld and the defroster vent channel portion of the dashboard.
Another multi-curved piece that I might have to make a couple of times
before I get a useable one. Think I'll go home to the Krash Pad to
ponder my approach. Get a fresh start tomorrow. I'll fall asleep on my
sofa. That way I can't get up on the "wrong side of the bed".
January 4th 2004 Good weather continues. Started out with some maintence on BillyBob and Renegade. Ran BillyBob's engine for an hour to charge the battery and circulate the fluids. BillyBob ran hotter than usual near the end of the session but didn't lose any coolant . . . I'll have to watch that condition fer awhile to see if anything alarming develops.
 Back
to the next patch panel. Started by scribing off and cutting out
another 18" x 1-1/2" strip of sheet metal with the hand nibbler. Used
the mini brake bender to make a 1" x 1/2" x 18" "L" shape out of it.
I'm not overly happy with the mini bender. It doesn't seem robust enuf
for automotive gauge sheet metal. The handles and the bending plane
itself bends almost as much as the sheet metal. The job has to be
finished with a hammer. Next, the shrinker tool was used to put the
windshield radius curve on the new piece. Now I gotta start judiciously
trimming the new piece down to fit. At some point I'll have to cut away
some more dashboard material but I'm not there yet.
Back
to the next patch panel. Started by scribing off and cutting out
another 18" x 1-1/2" strip of sheet metal with the hand nibbler. Used
the mini brake bender to make a 1" x 1/2" x 18" "L" shape out of it.
I'm not overly happy with the mini bender. It doesn't seem robust enuf
for automotive gauge sheet metal. The handles and the bending plane
itself bends almost as much as the sheet metal. The job has to be
finished with a hammer. Next, the shrinker tool was used to put the
windshield radius curve on the new piece. Now I gotta start judiciously
trimming the new piece down to fit. At some point I'll have to cut away
some more dashboard material but I'm not there yet.
 January
7th 2004 Last night,
another '55 1st Series Stovebolter, Dave Shirlin, who hails from
Hendersonville, North Carolina, was in Fort Lauderdale on business and
he came by the shadetree garage to see BillyBob in the rough and talk
old trucks for a few hours. My boss, Derek, came out back to join us
an' we all enjoyed the opportunity to tell our tales to someone new.
Dave has restored his truck, christened Clarabel by his children, to the
point I hope to be with BillyBob five years from now and she can be
seen at the stovebolt.com gallery. Dave's image is a bit fuzzy around
the edges 'cause the camera caught him in mid time-warp transition
between the present and 1955 which happens to people when they get
close to BillyBob.
January
7th 2004 Last night,
another '55 1st Series Stovebolter, Dave Shirlin, who hails from
Hendersonville, North Carolina, was in Fort Lauderdale on business and
he came by the shadetree garage to see BillyBob in the rough and talk
old trucks for a few hours. My boss, Derek, came out back to join us
an' we all enjoyed the opportunity to tell our tales to someone new.
Dave has restored his truck, christened Clarabel by his children, to the
point I hope to be with BillyBob five years from now and she can be
seen at the stovebolt.com gallery. Dave's image is a bit fuzzy around
the edges 'cause the camera caught him in mid time-warp transition
between the present and 1955 which happens to people when they get
close to BillyBob.
January 10th 2004 No rain showing on the doppler radar but it's overcast and misty out so I'll post this log entry while I wait for conditions to improve a bit. The windshield has turned out to be a major undertaking and, I'm estimating, two more log entries to complete. They will be the next log entries in the series 'cause I can't run BillyBob without a windshield an' I got the "jones" to drive him again on a daily basis. The other tasks in progress will have to be put on the back burner until BillyBob is back on the road again.
| < Back
to Intro |
You can email me at ![]() webmaster@laroke.com
webmaster@laroke.com
Issued Saturday January 10, 2004
Updated Wednesday February 21, 2018
copyright © 1996-2018 Larry Robert Kephart all rights reserved
| | LRK Home | | Bio Info | | Krash Khronicles | | LAROKE | |
| | BettyLou | | BillyBob's Garage | | Rat Patrol | | Deerslayer | | Elvira | |
| | Land of the Free and Home of the Brave | |
| | Keppylou's Art | | WWI Soldier's Diary | |