| | LRK Home | | Bio Info | | Krash Khronicles | | LAROKE | |
| | BettyLou | | BillyBob's Garage | | Rat Patrol | | Deerslayer | | Elvira | |
| | Land of the Free and Home of the Brave | |
| | Keppylou's Art | | WWI Soldier's Diary | |
BillyBob Work-in-Progress Log
![]()
TRUCK LINKS including vendor sites for old parts, custom parts, and tools as well as sites for classic car and truck organizations
STORE Operating in association with Amazon.com, books, recordings and tools can be purchased.
PLANNING for the restoration including project schedule and cost estimates.
![]()
TRAVELS WITH BILLYBOB With apologies to Steinbeck, this area of BillyBob's Garage will be used to log the trips BillyBob and I make together.
WORK-IN-PROGRESS is the restoration of parts of BillyBob that I can accomplish without a garage.
PRE-RESTORATION includes log entries of minor repairs and and adventures between time of purchase and the time when I started restoration, a piece at a time.
JR'S KORNER JR's Korner is the history of BillyBob before I got him authored by my brother, Wm. C. Kephart.
![]()
BILLYBOB MAINTENANCE Ever changing detailing, oil change, lube, etc. maintenance routines specifically developed for BillyBob, including required tools, materials and procedures.
STEALTH SHOP Urban residence design with large integrated shop and separate living quarters for a relative or renter.
28. Cab Comfort Continued
 February
8th 2003 Received a
deluxe heater obtained through an eBay auction last week. This will
eventually replace the third-party box heater now residing in BillyBob
after I rebuild it and get the remaining parts I need for the deluxe
fresh air heater installation.
February
8th 2003 Received a
deluxe heater obtained through an eBay auction last week. This will
eventually replace the third-party box heater now residing in BillyBob
after I rebuild it and get the remaining parts I need for the deluxe
fresh air heater installation.
 February
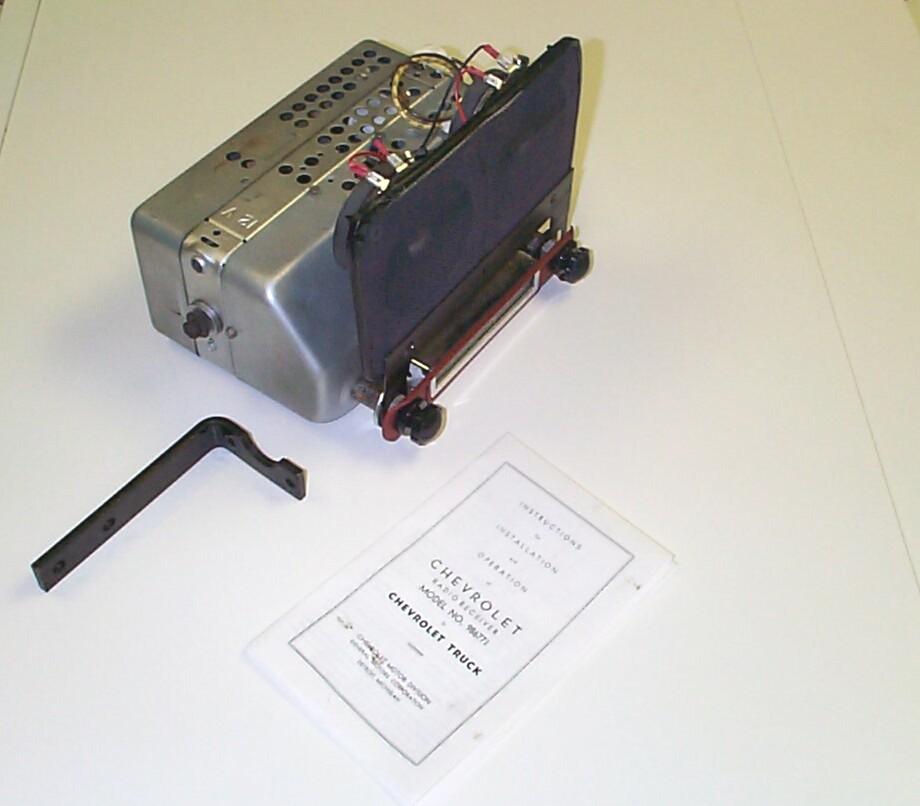
15th 2003 Got a radio
from Bob's
Chevy Parts when he put it up for sale on eBay. This is a
pretty rare item for 54-55 1st Series Chevy and GMC trucks since these
radios were made for only about twenty months and most worktrucks
didn't have the option. Even the broken ones are expensive. My first
plan was to find a broken one if I could and then send it to Antique
Car Radio to have modern guts put in the old shell. I didn't
want to butcher a working 6v radio for BillyBob's 12v system. When Bob
offered this radio on eBay for $595, I made some mental calculations
an' figured it as a fair price. It was already refurbished and
converted to 12v. Granted, it still uses tubes and is only AM but that
makes it more in keeping with billyBob's 95% "spiritual stock rebuild".
February
15th 2003 Got a radio
from Bob's
Chevy Parts when he put it up for sale on eBay. This is a
pretty rare item for 54-55 1st Series Chevy and GMC trucks since these
radios were made for only about twenty months and most worktrucks
didn't have the option. Even the broken ones are expensive. My first
plan was to find a broken one if I could and then send it to Antique
Car Radio to have modern guts put in the old shell. I didn't
want to butcher a working 6v radio for BillyBob's 12v system. When Bob
offered this radio on eBay for $595, I made some mental calculations
an' figured it as a fair price. It was already refurbished and
converted to 12v. Granted, it still uses tubes and is only AM but that
makes it more in keeping with billyBob's 95% "spiritual stock rebuild".
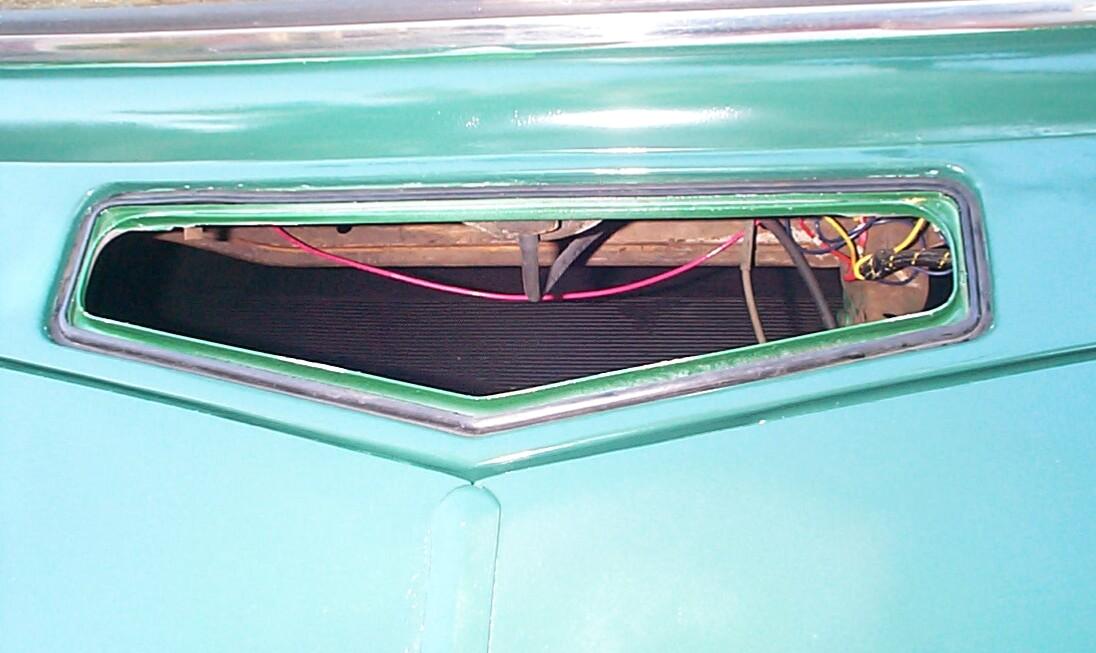
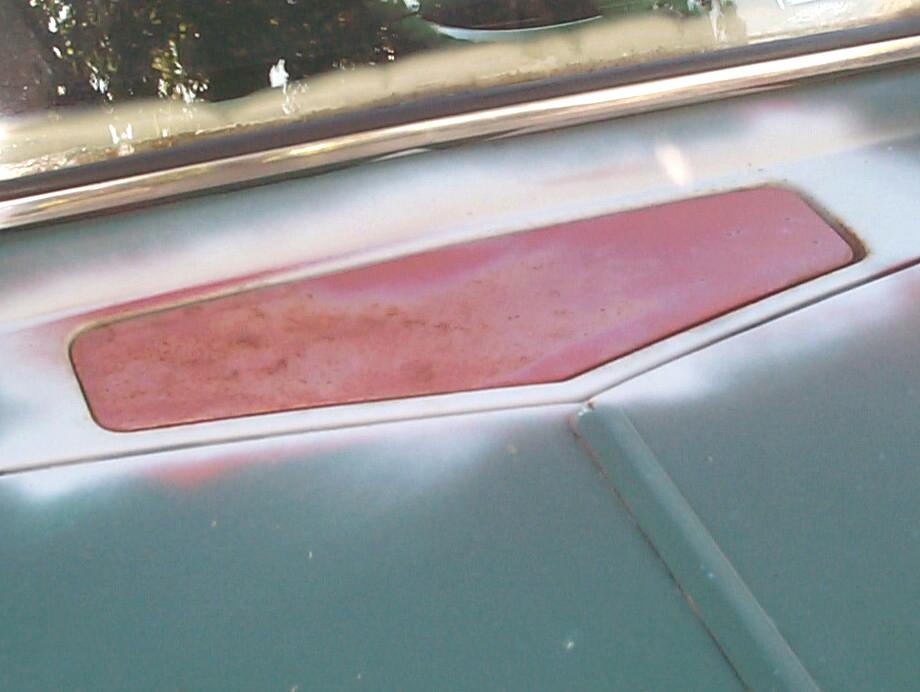 March
29th 2003 Back to the
cowl vent today. Wonderful weather in the shadetree garage. There's
been some corrosion thru the Rust Encapsulator (#16040Z) since I last
visited this task. The area around the vent frame that was painted with
primer fared better. I'll clean up and paint that first. Removed the
vent assembly and vacuumed the rain gutter/gasket area. Hunted up my
foamboard plug to mask the opening and keep debris from the dashboard
area. Not too good at bodywork yet and not too shure wot to do next.
Gonna plunge ahead and play with the Norton Speed Lock Sanding System,
Painter's Small Variety Sandpaper Kit I recently purchased from AutoBodyStore.
March
29th 2003 Back to the
cowl vent today. Wonderful weather in the shadetree garage. There's
been some corrosion thru the Rust Encapsulator (#16040Z) since I last
visited this task. The area around the vent frame that was painted with
primer fared better. I'll clean up and paint that first. Removed the
vent assembly and vacuumed the rain gutter/gasket area. Hunted up my
foamboard plug to mask the opening and keep debris from the dashboard
area. Not too good at bodywork yet and not too shure wot to do next.
Gonna plunge ahead and play with the Norton Speed Lock Sanding System,
Painter's Small Variety Sandpaper Kit I recently purchased from AutoBodyStore.
Sanded with Norton System, 3M Wheel and tight spot sandpaper cones in the portable drill. Vacuumed again and applied PRE Paint Prep (#10041Z). Mixed up my first batch of Eastwood's Metal-2-Metal Filler (#10021ZP) and applied to a badly pitted area. There's no time to dilly-dally around with this stuff - it gets hard within five or six minutes! Hand sanded with 36, 80 and 320 grit papers, blew off with compressed air, masked off the windshield and PRE Paint Prepped the sanded area again. I keep my rattlecan nozzles in a jar of lacquer thinner between uses these days and when I pulled one out to put on the Plasticote Anti-rust Primer can, I got the wrong one. Dumped a load of primer on the cowl area! Had to wipe off with lacquer thinner and try again with a different nozzle.
The fun never stops. BillyBob still has his Rustoleum Hunter Green paint job, starting to fade in some places too. Sometime back, Rustoleum changed the formulation to Hunter Green and Hunter Green Dark. This wouldn't have caused problems if they left the old Hunter Green alone and called the new formulation Hunter Green Light but they didn't and, as a result, the Hunter Green rattlecans I have in stock are too light but they are all I've got right now. The shadetree over BillyBob is a dirty tree and small bits of pollen are getting in the paint too. Gonna try to get some Hunter Green Dark and finish this off better next time I get back to this task.
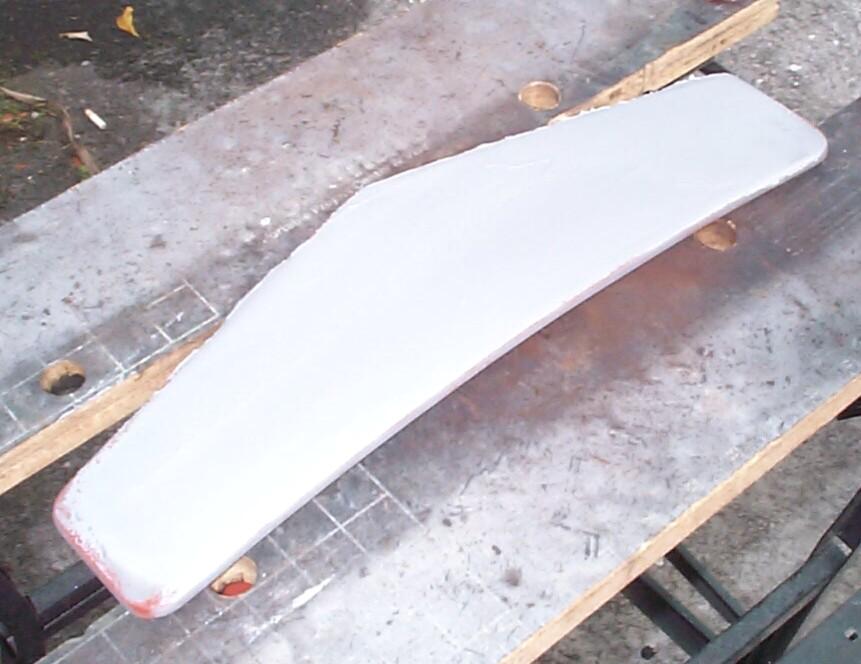 March
30th 2003 'Sposed to
rain later today so I got started early. Pulled the cowl vent again and
lightly sandblasted the surface rust starting to creep thru the Rust
Encapsulator. I had sandblasted this piece to bare metal and given it
one coat of Encapsulator back in October. Rust Encapsulator does better
when it actually has rust to work with. When applied to bare metal it
isn't as good. PRE Paint Prepped the cowl vent after blasting and mixed
up another batch of Metal-2-Metal Filler.
March
30th 2003 'Sposed to
rain later today so I got started early. Pulled the cowl vent again and
lightly sandblasted the surface rust starting to creep thru the Rust
Encapsulator. I had sandblasted this piece to bare metal and given it
one coat of Encapsulator back in October. Rust Encapsulator does better
when it actually has rust to work with. When applied to bare metal it
isn't as good. PRE Paint Prepped the cowl vent after blasting and mixed
up another batch of Metal-2-Metal Filler.
Hand sanded with 36, 80 and 320 grit papers, blew off with compressed air, PRE Paint Prepped and applied a couple of light coats of Plasticote Anti-Rust Primer. Applied a coat of the Hunter Green Rustoleum but it's a windy day and I'm getting more debris from the dirty shadetree so It's definitely a Stage I paint job.
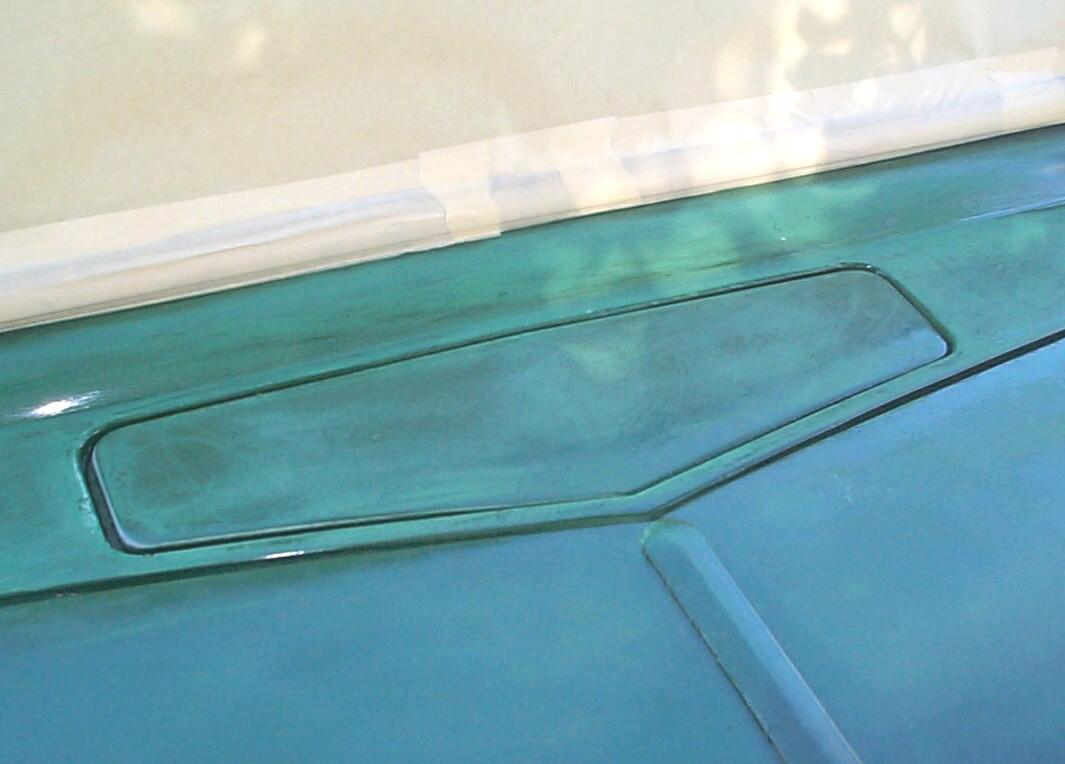 April
12th 2003 Cold front
rolled thru last nite and today is a nice day to work, cool and
sunshiny. Started out with monthly maintenance chores then turned back
to the cowl vent. I picked up a couple of rattlecans of Rustoleum
Hunter Green Dark this past week at Home Depot to repaint the topside
of the cowl vent area. Sanded off the worst of the imperfections from
when I painted two weeks ago with 320 grit paper and masked off the
windshield again. Moved BillyBob to the other side of the parking lot
to get him away from the dirty shadetree and sprayed the Dark Hunter
Green. The wind is fairly calm for good effect. Two weeks ago, it was
strong enuf to put whitecaps on the paint surface.
April
12th 2003 Cold front
rolled thru last nite and today is a nice day to work, cool and
sunshiny. Started out with monthly maintenance chores then turned back
to the cowl vent. I picked up a couple of rattlecans of Rustoleum
Hunter Green Dark this past week at Home Depot to repaint the topside
of the cowl vent area. Sanded off the worst of the imperfections from
when I painted two weeks ago with 320 grit paper and masked off the
windshield again. Moved BillyBob to the other side of the parking lot
to get him away from the dirty shadetree and sprayed the Dark Hunter
Green. The wind is fairly calm for good effect. Two weeks ago, it was
strong enuf to put whitecaps on the paint surface.
 April
13th 2003 Removed the
cowl vent again to place the new rubber gasket. Cleaned the cowl vent
gasket and gasket channel with lacquer thinner. Laid down a bead of
Permatex Clear RTV Silicone 66B sealant in the gasket channel and
bedded the gasket. Replaced the cowl vent to hold the gasket in place.
April
13th 2003 Removed the
cowl vent again to place the new rubber gasket. Cleaned the cowl vent
gasket and gasket channel with lacquer thinner. Laid down a bead of
Permatex Clear RTV Silicone 66B sealant in the gasket channel and
bedded the gasket. Replaced the cowl vent to hold the gasket in place.
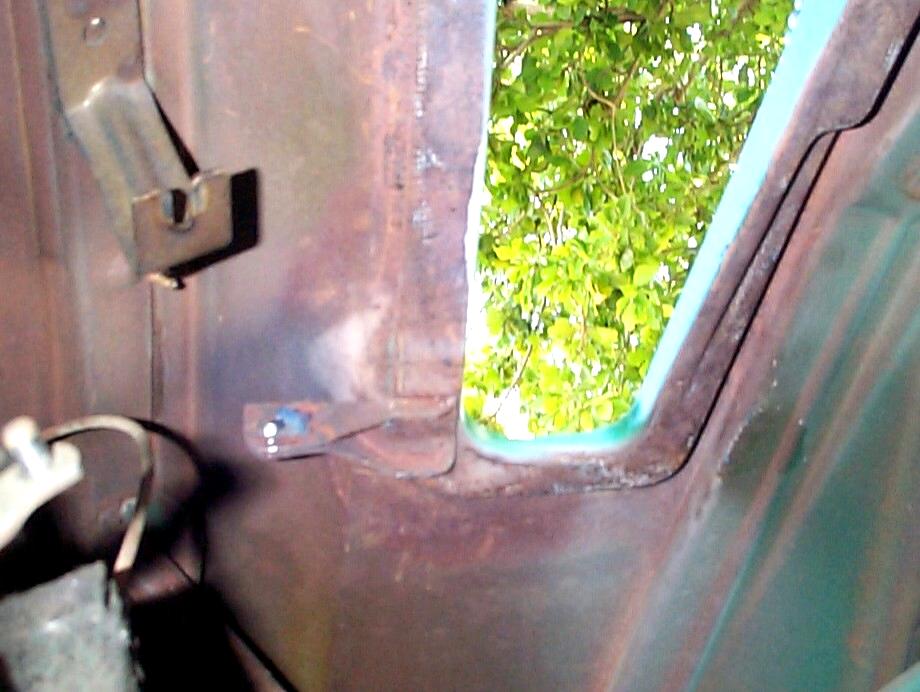
April 19th 2003 Wuz gonna take my first crack at MIG welding this weekend but when I found the closest welding supply company yesterday to pick up shielding gas, they were closed for Good Friday. This was a nasty looking place with concertina wire and probably an out-of-sight junkyard dog. I decided to come back another day. So, I'm back to the cowl vent and not making much progress. The reason the cowl vent assembly quit working is that one of the two hinge rivets failed and, in accord with Murphy, it was the least accessible one on the driver side. The rivet sheared in half. First thing I did was grind down the remainder of the rivet in the (now free) bracket arm that bolts to the cowl vent assembly and punch it out. This left a 17/64" hole for a new rivet.
 Next
came the hard part. Getting the remainder of the old rivet out of the
other half of the hinge which was spot-welded to the cab. Hard to get
at and hard to see. Tried grinding it out with the Dremel motor tool
but the only results I got was a broken grinding stone and a broken
carbide grinding bit and a few superficial scars on the bracket and
rivet. Disconnected and moved the wiper motor out of the way next. Then
went after the rivet with the Dremel again, this time with a 1/8" drill
bit. Limited progress - got a 1/8" hole drilled thru the rivet. Started
working on the hole with a cheap Harbor
Freight punch . . . ~!@#$%^
Chinese punch breaks off in the hole! Progress lost. Tried to heat up
the the rivet / punch / bracket with the MAPP torch . . . Big
Mistake! Windshield rubber and last week's new paint
started smokin' and bubblin'. Now I'm goin' backwards an' it's time to
regroup. Oh yeah, 'sposed to be clear skies today and I've gotten
rained on twice so far. The score: Murphy 6, Home Team 2. Then, the
battery charger for the Black & Decker portable drill gave up
the ghost and so am I for the day. I've had enuf fun.
Next
came the hard part. Getting the remainder of the old rivet out of the
other half of the hinge which was spot-welded to the cab. Hard to get
at and hard to see. Tried grinding it out with the Dremel motor tool
but the only results I got was a broken grinding stone and a broken
carbide grinding bit and a few superficial scars on the bracket and
rivet. Disconnected and moved the wiper motor out of the way next. Then
went after the rivet with the Dremel again, this time with a 1/8" drill
bit. Limited progress - got a 1/8" hole drilled thru the rivet. Started
working on the hole with a cheap Harbor
Freight punch . . . ~!@#$%^
Chinese punch breaks off in the hole! Progress lost. Tried to heat up
the the rivet / punch / bracket with the MAPP torch . . . Big
Mistake! Windshield rubber and last week's new paint
started smokin' and bubblin'. Now I'm goin' backwards an' it's time to
regroup. Oh yeah, 'sposed to be clear skies today and I've gotten
rained on twice so far. The score: Murphy 6, Home Team 2. Then, the
battery charger for the Black & Decker portable drill gave up
the ghost and so am I for the day. I've had enuf fun.
June 5th 2003 Been strategizing on how to fix the cowl vent assembly hinge and gathering parts and tools. Got some drill guides and rivets from McMaster-Carr. I really don't want to use a rivet as a hinge pin and will save that option as a last resort. What I really want to try first is a "sex bolt" or "binding screw" solution. I knew of these fasteners but I didn't know what they were called until fellow stovebolter Nick Griswell mentioned them in the Oletrucks maillist yesterday.
What is it with the sexual nature of hardware nomenclature? My mother, when she was a teenager in the forties, worked for a short time in a five and dime store. She got upset and called the manager when some guy asked her for a "bastard file". Later, as a young wife, when my Dad was installing indoor plumbing in the first house they owned, he sent Mom to the hardware store to get a couple of 3/4" "plumbing nipples". Mom couldn't remember and asked the clerk for two 3/4" plumbing tits . . . He drew a blank stare then said "Do you mean nipples?" Mom turned red, then turned on heel, and fled. She told Dad to go get his own plumbing tits! During her long career as a telephone operator she really got an education in foul language and even a drunken sailor wouldn't make her blink now.
November 15th 2003 Eventually gathered together a drill guide (#8491A275 - Steel Headless Press-Fit Drill Bushing/Liner 17/64" (0.2656") ID, 1/2" OD, 1/2" Length), binding screw barrel (#90277A190 - Binding Head Slotted Machine Screw Zinc-Plated Steel, 8-32 Thread, 1/4" Length) and screw (#90277A190 - Binding Head Slotted Machine Screw Zinc-Plated Steel, 8-32 Thread, 1/4" Length) from McMaster-Carr. The idea was to spot weld the drill guide to a piece of flat bar stock and clamp it to the bracket to keep the 17/64" drill in place for the next attempt to clear the sheared rivet from the bracket hole.
 Before
I got the chance to weld up the drill guide, another idea occurred to
me. Simply bolt the other bracket half back onto the cowl vent and use
that as the drill guide. I set the cowl vent up that way and another
problem arose. Not enough room up under the dash for the drill to drill
straight thru the bracket holes. the 17/64" bit is too big to fit in
the Dremel so I'm stuck again until I can get a flexible drill shaft or
think of some other solution.
Before
I got the chance to weld up the drill guide, another idea occurred to
me. Simply bolt the other bracket half back onto the cowl vent and use
that as the drill guide. I set the cowl vent up that way and another
problem arose. Not enough room up under the dash for the drill to drill
straight thru the bracket holes. the 17/64" bit is too big to fit in
the Dremel so I'm stuck again until I can get a flexible drill shaft or
think of some other solution.
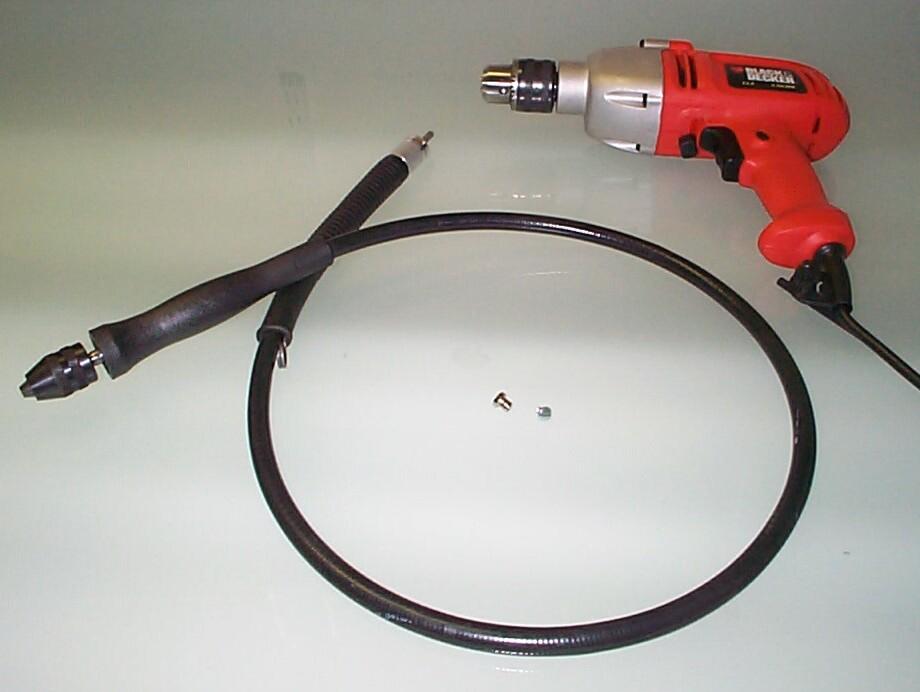 November
22nd 2003 Forty years
today since the coup in Dallas. Perfect working weather under the
shadetree today. Ordered a Flexible Drill Shaft Medium 52" Long
(#13009) from Eastwood last weekend and it arrived by mid-week. The
binding screw is also shown in the pic. Made a safety BOO-BOO
early on. Laying on my back under the dashboard with the drill on the
floor behind me with the switch locked on . . . DUH!
Everything went ok until the drill bit got caught in the hole. The
drill started whipping around the cab. By the time I got it turned off,
the flex shaft and drill cord were wrapped around me like a python and
a nice chunk of my ponytail wuz in the drill chuck. I was very lucky as
I only lost a few strands of hair. God gives ya a mulligan sometimes
and this was one of 'em. I won't have a stupid attack like that again
anytime soon.
November
22nd 2003 Forty years
today since the coup in Dallas. Perfect working weather under the
shadetree today. Ordered a Flexible Drill Shaft Medium 52" Long
(#13009) from Eastwood last weekend and it arrived by mid-week. The
binding screw is also shown in the pic. Made a safety BOO-BOO
early on. Laying on my back under the dashboard with the drill on the
floor behind me with the switch locked on . . . DUH!
Everything went ok until the drill bit got caught in the hole. The
drill started whipping around the cab. By the time I got it turned off,
the flex shaft and drill cord were wrapped around me like a python and
a nice chunk of my ponytail wuz in the drill chuck. I was very lucky as
I only lost a few strands of hair. God gives ya a mulligan sometimes
and this was one of 'em. I won't have a stupid attack like that again
anytime soon.
 Got
the remainder of the sheared rivet cleared out finally and cleaned up
the bracket a bit with a flat file. Wire brushed, PRE Paint prepped the
underside of the cowl vent area and hand brushed some rust encapsulator
on after removing the old petrified drainage hose. It broke off in
several hard pieces. Dug around in my spare parts for awhile 'til I
found the replacement drain hose (#34-205) I bought from Chevy
Duty way back. Put some Permatex #9 Tack and Seal inside the
hose end and pressed it unto the drain and ran the other end thru the
firewall opening. This hose discharges above the engine and I skewed it
a bit to the driver's side so it would not drain on the valve cover.
Got
the remainder of the sheared rivet cleared out finally and cleaned up
the bracket a bit with a flat file. Wire brushed, PRE Paint prepped the
underside of the cowl vent area and hand brushed some rust encapsulator
on after removing the old petrified drainage hose. It broke off in
several hard pieces. Dug around in my spare parts for awhile 'til I
found the replacement drain hose (#34-205) I bought from Chevy
Duty way back. Put some Permatex #9 Tack and Seal inside the
hose end and pressed it unto the drain and ran the other end thru the
firewall opening. This hose discharges above the engine and I skewed it
a bit to the driver's side so it would not drain on the valve cover.
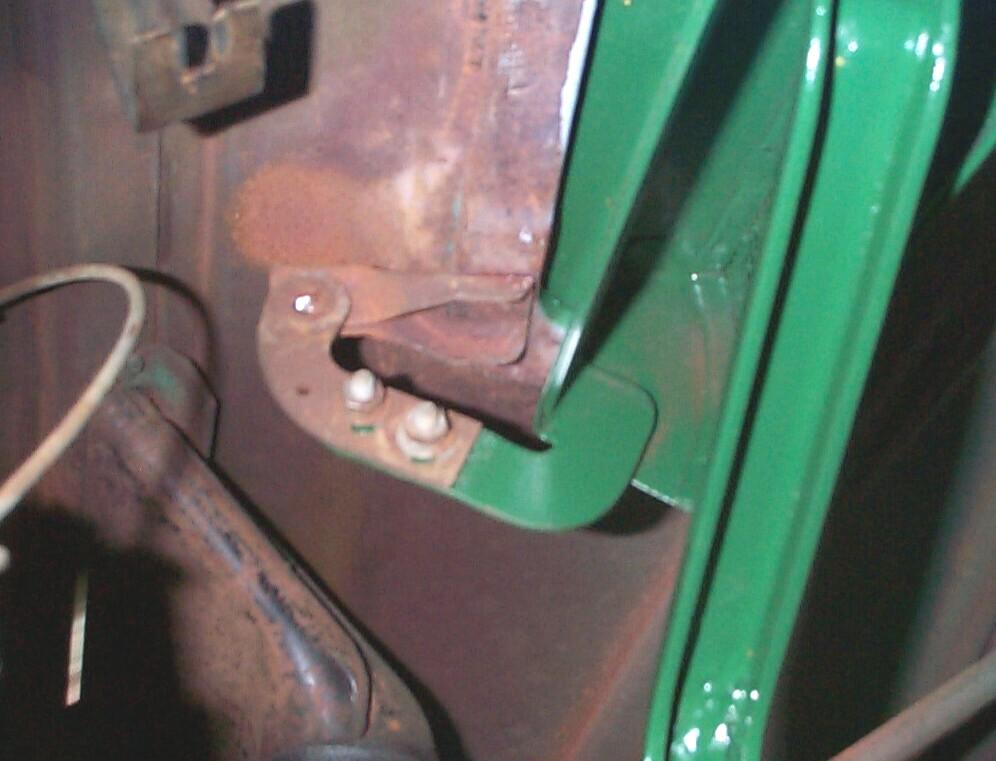
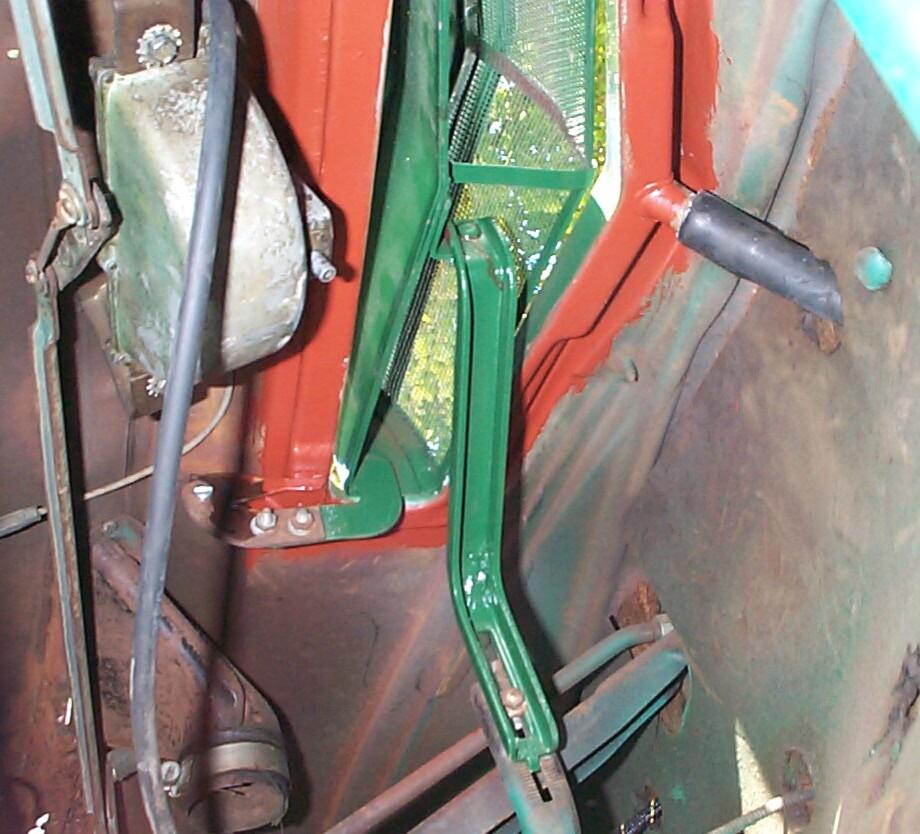 Bolted
the cowl vent back in place and oiled all the pivot points. The binding
screw solution worked. The screw tightens up in the barrel enuf to hold
it in place while still leaving clearance for the hinge to work freely.
I have a working cowl vent again! Does it still leak? I don't know. I
will have to watch and see. I'm not finished under here but I have made
some progress today. Finished up by removing the driver side windshield
wiper arm. I've been tuggin' on this thing, off and on, for a couple of
years now. Today I added some Kroil penetrating oil to the equation and
finally got it off. The wipers haven't worked for a long time - praise
the Lord for Rain-X! I wanted the wiper arm out of the way for the
windshield replacement project this thursday (Thanksgiving). Later on,
when the wiper system is rebuilt, these pivot areas will be re-sealed.
Right now, they are another source of leaks inside the cab.
Bolted
the cowl vent back in place and oiled all the pivot points. The binding
screw solution worked. The screw tightens up in the barrel enuf to hold
it in place while still leaving clearance for the hinge to work freely.
I have a working cowl vent again! Does it still leak? I don't know. I
will have to watch and see. I'm not finished under here but I have made
some progress today. Finished up by removing the driver side windshield
wiper arm. I've been tuggin' on this thing, off and on, for a couple of
years now. Today I added some Kroil penetrating oil to the equation and
finally got it off. The wipers haven't worked for a long time - praise
the Lord for Rain-X! I wanted the wiper arm out of the way for the
windshield replacement project this thursday (Thanksgiving). Later on,
when the wiper system is rebuilt, these pivot areas will be re-sealed.
Right now, they are another source of leaks inside the cab.
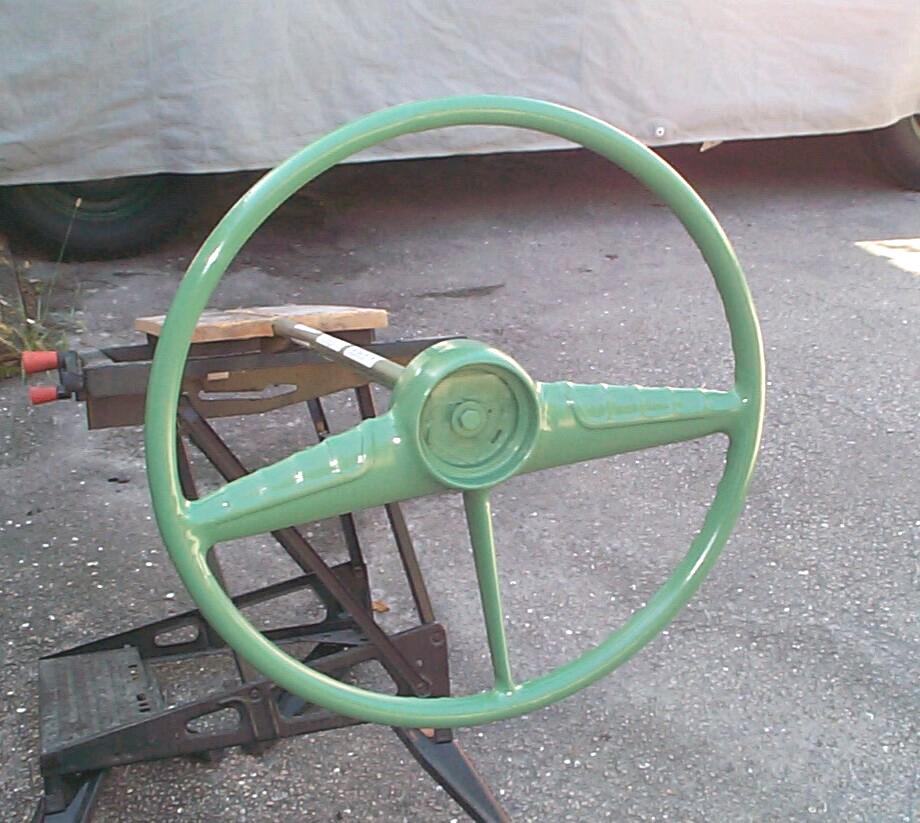 November
29th 2003 Cold front
rolled thru last night and it's chilly and windy today. I've been
working inside mostly on patch panels for the windshield replacement
project. I have the steering wheel, turn-signal director and shift
linkage off for that job and since this also is a scheduled time for
interior detailing, I am cleaning and touch-up painting the steering
column, shift lever and steering wheel. The steering wheel restoration
was a stage one job back in December 2000 and there are bumps and pits
in the finish here and there. I hand sanded these where I found them
and tho' I didn't do a perfect job, the steering wheel is a bit
smoother now. Went over the rest of the wheel with a 3M Scuff Pad and
setup my old steering wheel painting rig. PRE Paint Prepped it and
sprayed on one coat of Grass Green Rustoleum during wind calms.
November
29th 2003 Cold front
rolled thru last night and it's chilly and windy today. I've been
working inside mostly on patch panels for the windshield replacement
project. I have the steering wheel, turn-signal director and shift
linkage off for that job and since this also is a scheduled time for
interior detailing, I am cleaning and touch-up painting the steering
column, shift lever and steering wheel. The steering wheel restoration
was a stage one job back in December 2000 and there are bumps and pits
in the finish here and there. I hand sanded these where I found them
and tho' I didn't do a perfect job, the steering wheel is a bit
smoother now. Went over the rest of the wheel with a 3M Scuff Pad and
setup my old steering wheel painting rig. PRE Paint Prepped it and
sprayed on one coat of Grass Green Rustoleum during wind calms.
 December
7th 2003 Been doing
some monthly maintenance, some tune-up maintenance and working on the
windshield replacement project today. Also wanted to finish up the
steering column painting work I started last week. I wanted to repaint
the sheetmetal cover that goes on the steering column where the horn
wire exits and paint the original turn signal director to match the
rest of the column. I am on my last can of Rustoleum Grass Green and
all the local Rustoleum outlets have stopped stocking this color. I
want everything to match before I run out of paint. Took the horn wire
cover down to bare metal some time back so I PRE Paint Prepped it and
gave it a coat of Eastwood's Self-Etching Primer. While that was
curing, I masked the turn signal director, roughened the black paint it
came in with a 3M scuff pad, PRE Paint Prepped it and painted it with
Grass Green. Finally, gave the horn wire cover its coat of Grass Green
too.
December
7th 2003 Been doing
some monthly maintenance, some tune-up maintenance and working on the
windshield replacement project today. Also wanted to finish up the
steering column painting work I started last week. I wanted to repaint
the sheetmetal cover that goes on the steering column where the horn
wire exits and paint the original turn signal director to match the
rest of the column. I am on my last can of Rustoleum Grass Green and
all the local Rustoleum outlets have stopped stocking this color. I
want everything to match before I run out of paint. Took the horn wire
cover down to bare metal some time back so I PRE Paint Prepped it and
gave it a coat of Eastwood's Self-Etching Primer. While that was
curing, I masked the turn signal director, roughened the black paint it
came in with a 3M scuff pad, PRE Paint Prepped it and painted it with
Grass Green. Finally, gave the horn wire cover its coat of Grass Green
too.
That's gonna close the book on this log entry. I've got my hands full with the windshield replacement job and there are several other unfinished log entries to get to including bodywork, electrical, brakes, chassis and other jobs I have in various stages of completion. It's Sunday, December 7th - Pearl Harbor Day. Remember the Arizona and hug a WWII Vet (If'n he'll let ya).
| < Back
to Intro |
You can email me at ![]() webmaster@laroke.com
webmaster@laroke.com
Issued Sunday December 7, 2003
Updated Tuesday February 20, 2018
copyright © 1996-2018 Larry Robert Kephart all rights reserved
| | LRK Home | | Bio Info | | Krash Khronicles | | LAROKE | |
| | BettyLou | | BillyBob's Garage | | Rat Patrol | | Deerslayer | | Elvira | |
| | Land of the Free and Home of the Brave | |
| | Keppylou's Art | | WWI Soldier's Diary | |