| | LRK Home | | Bio Info | | Krash Khronicles | | LAROKE | |
| | BettyLou | | BillyBob's Garage | | Rat Patrol | | Deerslayer | | Elvira | |
| | Land of the Free and Home of the Brave | |
| | Keppylou's Art | | WWI Soldier's Diary | |
BillyBob Work-in-Progress Log
![]()
TRUCK LINKS including vendor sites for old parts, custom parts, and tools as well as sites for classic car and truck organizations
STORE Operating in association with Amazon.com, books, recordings and tools can be purchased.
PLANNING for the restoration including project schedule and cost estimates.
![]()
WORK-IN-PROGRESS is the restoration of parts of BillyBob that I can accomplish without a garage.
PRE-RESTORATION includes log entries of minor repairs and and adventures between time of purchase and the time when I started restoration, a piece at a time.
JR'S KORNER JR's Korner is the history of BillyBob before I got him authored by my brother, Wm. C. Kephart.
![]()
BILLYBOB MAINTENANCE Ever changing detailing, oil change, lube, etc. maintenance routines specifically developed for BillyBob, including required tools, materials and procedures.
21. Southern Cab Comfort
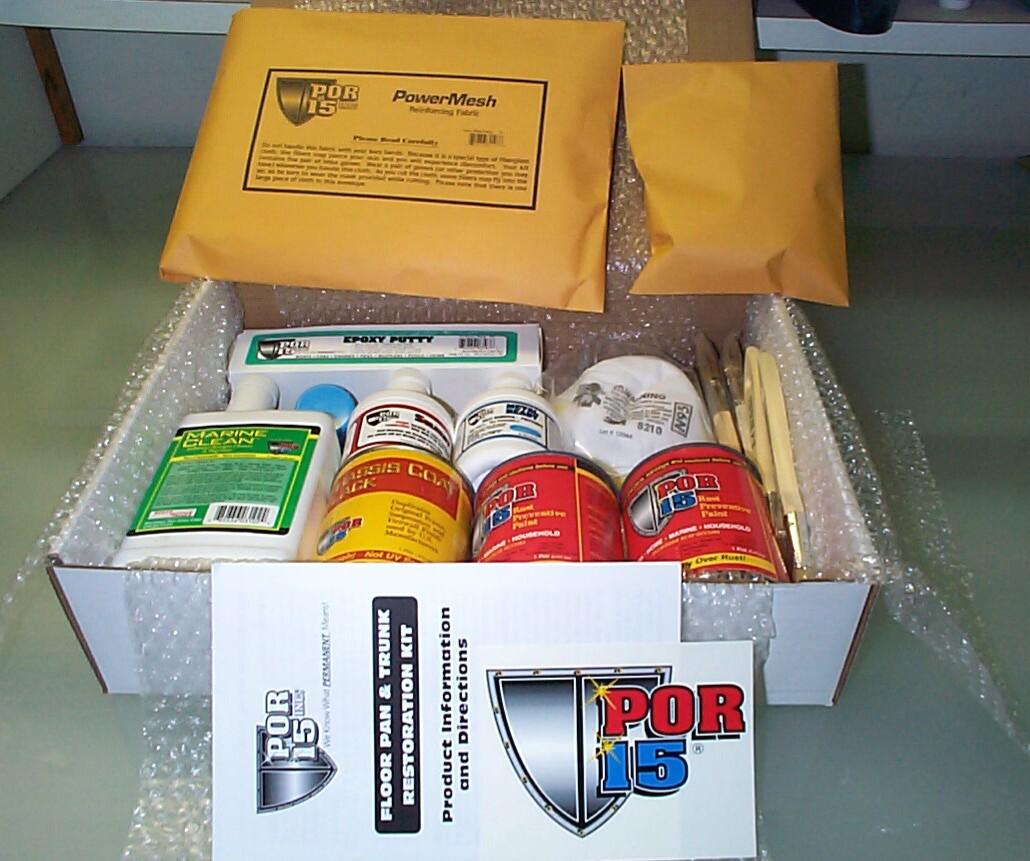
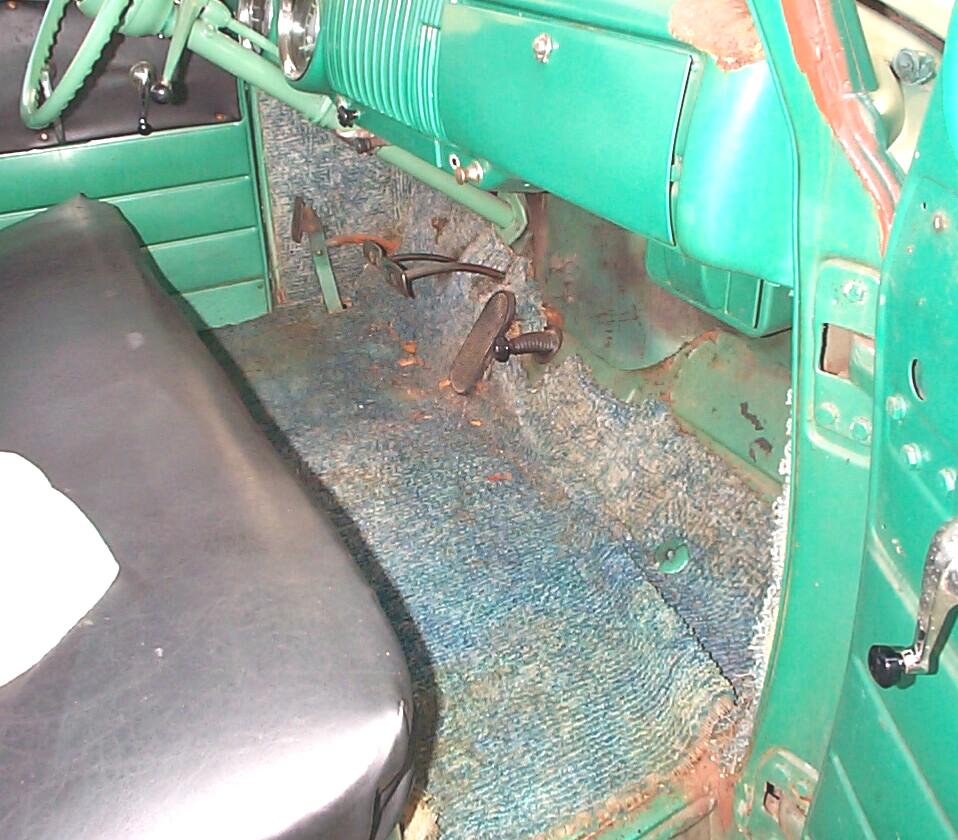
July 18th 2002 Altho' BillyBob is now a daily driver, most trips are short, fifteen minutes or so. On Independence Day, I took a joyride down A-1-A (the beach road) to Port Everglades in Fort Lauderdale and back. Forty miles in 'bout an hour. That long in BillyBob is sauna country, especially without the cowl or wing vents open (all three are busted). And when it rains, it's like a peat bog inside the truck. I want to get the interior in more comfortable shape for those regional and cross-country adventures I have planned for BillyBob 'an yours truly down the road.
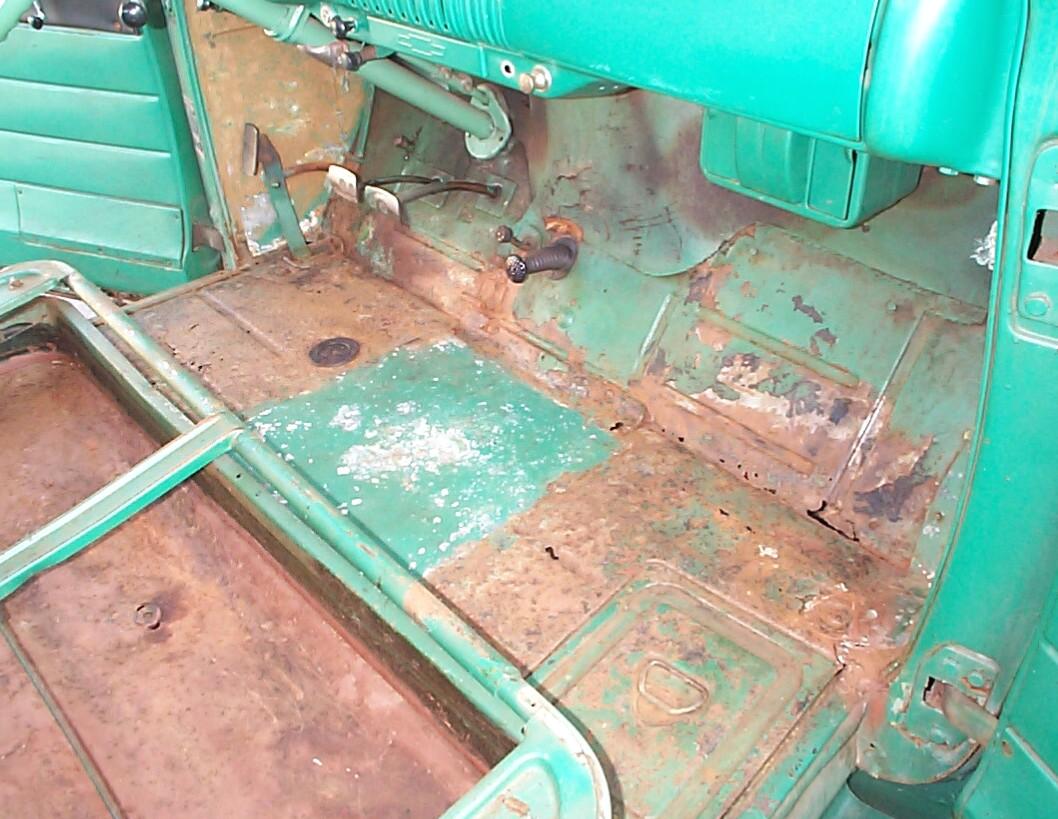
 I've
been carefully watching the deterioration of the rusty floorboards
under the ratty, retro, blue-green carpet. The carpet alone looks like
Legionnaires Disease waiting to happen. I don't think the floorboards
are gonna last long enuf for me to learn how to mig weld the new ones
in place. Also, I want to fix the windshield and other leaks before
welding in a new floor. This situation is going to require a Stage I
stopgap solution 'til I'm ready for the professional solution. With
that in mind, I ordered the POR-15 Floorpan and Trunk Restoration Kit
from Kanter
Auto Products a couple of weeks back and it arrived today.
I've
been carefully watching the deterioration of the rusty floorboards
under the ratty, retro, blue-green carpet. The carpet alone looks like
Legionnaires Disease waiting to happen. I don't think the floorboards
are gonna last long enuf for me to learn how to mig weld the new ones
in place. Also, I want to fix the windshield and other leaks before
welding in a new floor. This situation is going to require a Stage I
stopgap solution 'til I'm ready for the professional solution. With
that in mind, I ordered the POR-15 Floorpan and Trunk Restoration Kit
from Kanter
Auto Products a couple of weeks back and it arrived today.
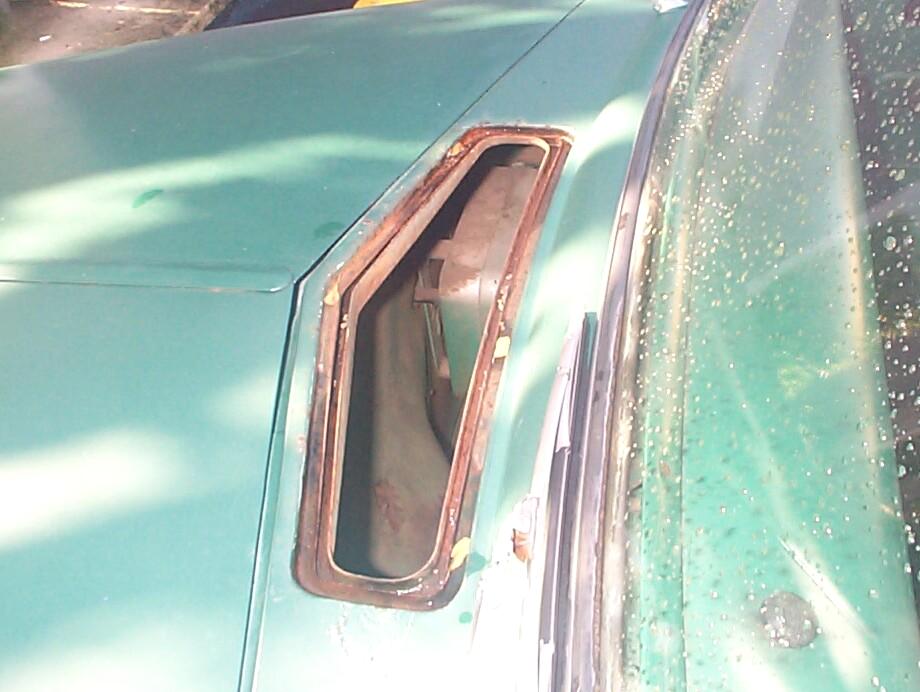 August
17th 2002 Back to the
leaking cowl vent today. Been havin' some trouble trying to figure a
way to clean the gutter and gasket recess area of the cowl for
painting. I wanted to get as much rust as possible out before treating
with Eastwood's
OxySolve and/or Rust Stabilizer and I haven't been having much luck.
August
17th 2002 Back to the
leaking cowl vent today. Been havin' some trouble trying to figure a
way to clean the gutter and gasket recess area of the cowl for
painting. I wanted to get as much rust as possible out before treating
with Eastwood's
OxySolve and/or Rust Stabilizer and I haven't been having much luck.
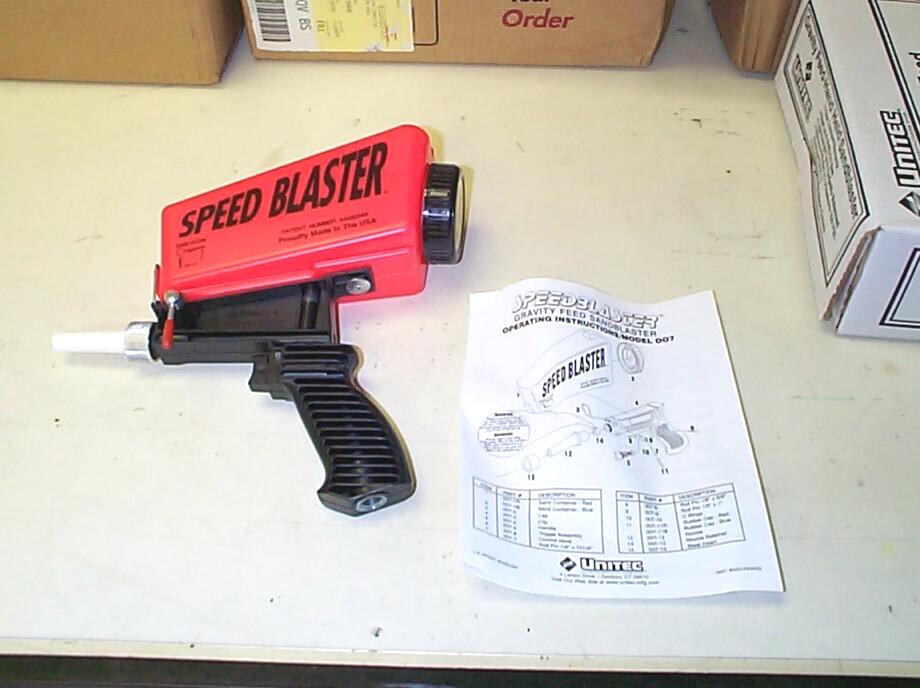 When
I get stuck, it's a good excuse to get a new special purpose tool so,
this time I ordered the "Speed Blaster" from Eastwood. It's a simple
little siphon blaster for small jobs. Fashioned a plug for the vent
opening out of art board and duct tape to keep sand out of the interior
and protected the windshield with masking paper and tape and went at it
with respirator, hood and gloves on. Ended up being a lotta sand
everywhere but the Speed Blaster did a good job and I got the worst of
the rust out of the gutter and gasket recess.
When
I get stuck, it's a good excuse to get a new special purpose tool so,
this time I ordered the "Speed Blaster" from Eastwood. It's a simple
little siphon blaster for small jobs. Fashioned a plug for the vent
opening out of art board and duct tape to keep sand out of the interior
and protected the windshield with masking paper and tape and went at it
with respirator, hood and gloves on. Ended up being a lotta sand
everywhere but the Speed Blaster did a good job and I got the worst of
the rust out of the gutter and gasket recess.
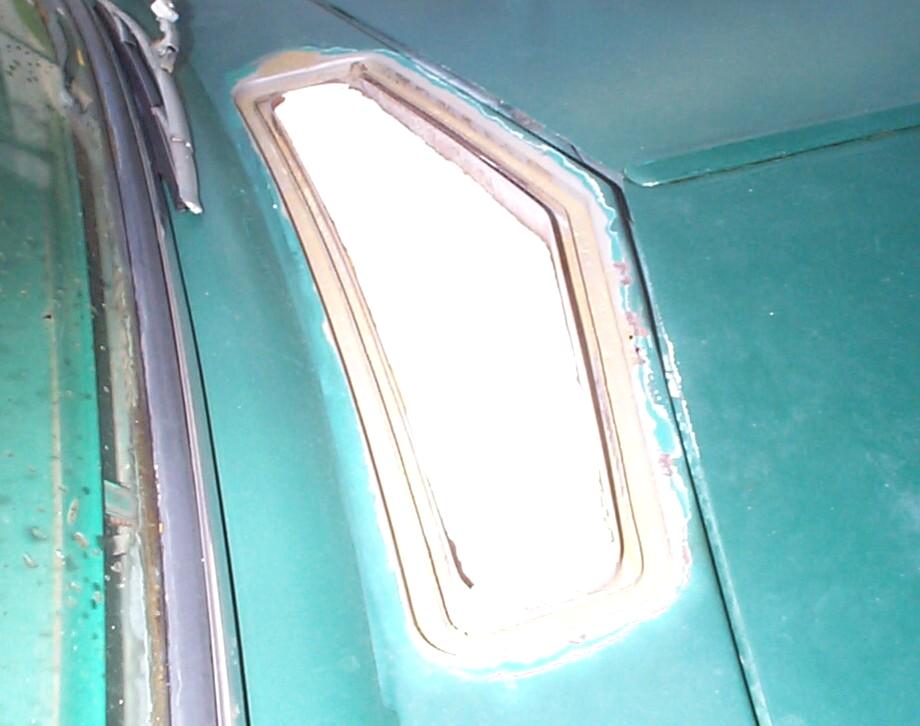 Opened
up a couple of holes, unfortunately. Couple of small pinholes on top of
the narrow ridge between the cowl opening and the hood and a bigger
hole in the outside edge of the gasket recess. Cleaned these areas with
PRE Paint Prep, then worked up a little batch of JB Weld Epoxy to fill
the holes. I'll have to wait until tomorrow to work the epoxy smooth.
Opened
up a couple of holes, unfortunately. Couple of small pinholes on top of
the narrow ridge between the cowl opening and the hood and a bigger
hole in the outside edge of the gasket recess. Cleaned these areas with
PRE Paint Prep, then worked up a little batch of JB Weld Epoxy to fill
the holes. I'll have to wait until tomorrow to work the epoxy smooth.
August 18th 2002 Yesterday's good weather did not carry thru today. Every time I turned around it was raining. Just enuf to keep the shadetree garage miserable. Banged my knee on the frame when I was lubing zerk fittings too. Why is it your knees get so sensitive as you get older? I shure didn't bang it hard but I was limpin' around the rest of the day. Between the raindrops I managed to get the cowl vent area sanded and painted with a coat of rattlecan Rust Encapsulator. Got more sanding and paint work to do in this area but decided to lay the new rubber gasket in place without gluing it down until the next time I work on the cowl vent.
 August
25th 2002 Ordered a new
rubber floor mat (#39-011) from Chevy Duty last week. I don't
wanna look at that retro shag carpet anymore. I read somewhere that
Oscar Wilde's last words on his deathbed were "Either that
wall paper goes or I do!" That's the way I feel
about that carpet.
August
25th 2002 Ordered a new
rubber floor mat (#39-011) from Chevy Duty last week. I don't
wanna look at that retro shag carpet anymore. I read somewhere that
Oscar Wilde's last words on his deathbed were "Either that
wall paper goes or I do!" That's the way I feel
about that carpet.
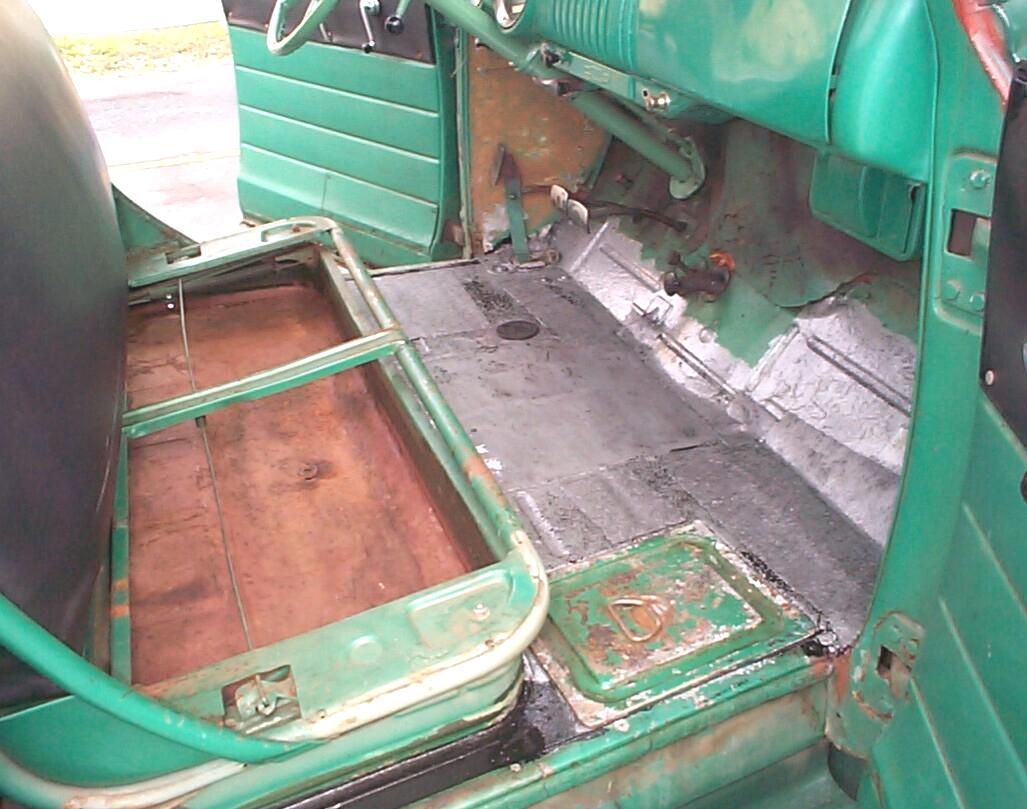
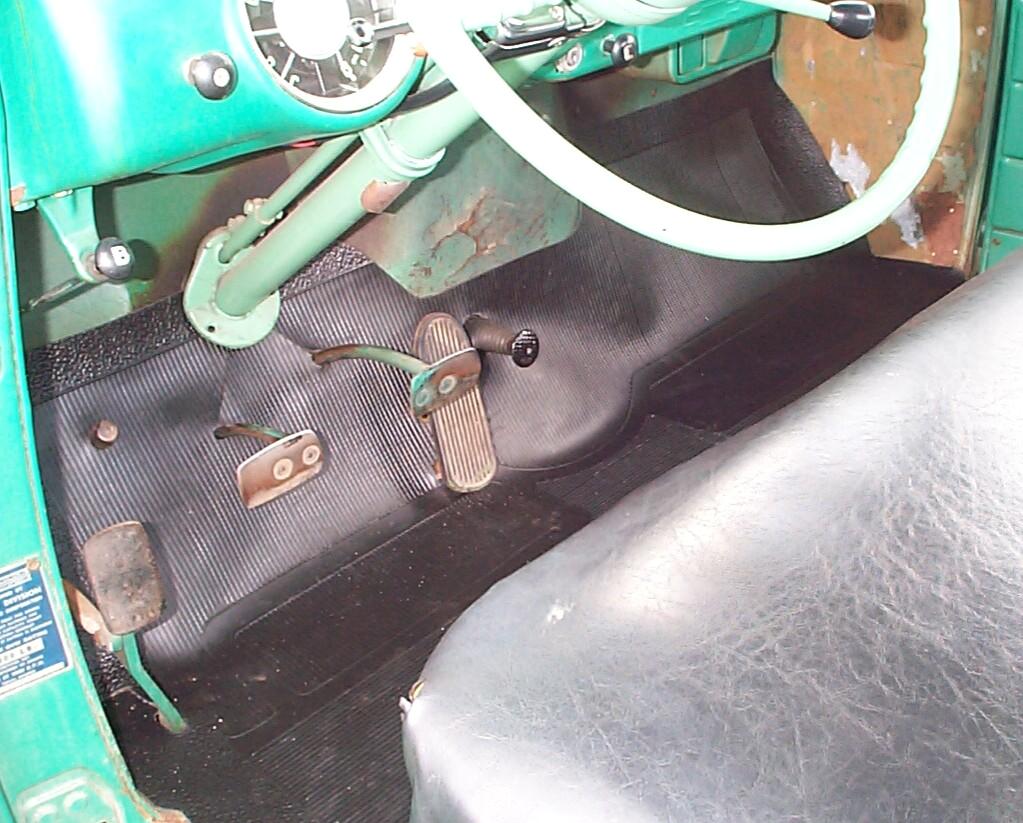 The
new mat is a generic 47-54 mat with punchouts indicated for the various
holes. Since BillyBob is a three-on-the-tree, I cut out all the
openings except the ones for the granny four speed transmission shifter
and the hand type parking brake lever right beside it. Oddly enough,
there was one punchout missing - the foot starter button. I took the
starter button off and used the floorboard hole for a template. That's
better. The rubber mat is a better choice than carpet in the tropics
and it doesn't soak up the water that gets into to cab so it's easier
on the rusting floorboards.
The
new mat is a generic 47-54 mat with punchouts indicated for the various
holes. Since BillyBob is a three-on-the-tree, I cut out all the
openings except the ones for the granny four speed transmission shifter
and the hand type parking brake lever right beside it. Oddly enough,
there was one punchout missing - the foot starter button. I took the
starter button off and used the floorboard hole for a template. That's
better. The rubber mat is a better choice than carpet in the tropics
and it doesn't soak up the water that gets into to cab so it's easier
on the rusting floorboards.
October 12th 2002 Sometimes tropical storm, sometimes hurricane Kyle has been meandering like a drunken sailor out in the Atlantic for almost three weeks. He came inland a couple of days ago in Georgia and the Carolinas for awhile and today we have OK weather. Pulled the cowl vent and gasket out to sand the area around the vent. I have a five inch air sander but, sadly, no disks to fit it yet. I settle for using some 3M products I do have - 2" Grinding/Sanding finishing Kit and some five inch adhesive disks that I can use in the Black & Decker drill. Also do a little wet sanding with a 3M foam sanding block. The sheet metal is pitted enuf in a couple of places to require a skim coat of filler which I don't have today so, the area is PRE prepped, masked and given a coat of Plasti-coat Anti-rust primer.
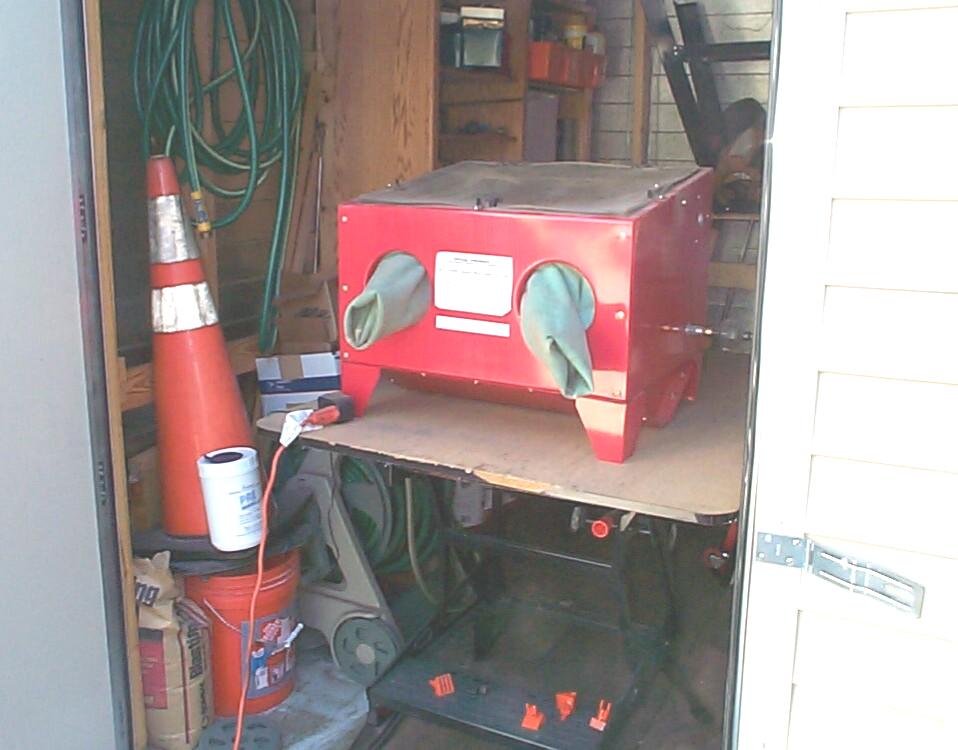 Set
up the cheap Harbor Freight blast cabinet and
proceeded to blast the cowl vent assembly with aluminum oxide media.
With the glare from the morning sun, I couldn't see inside the blast
cabinet, even with the built-in light on. This ain't workin' so I
stopped and moved the blast cabinet inside the storage shed . . .
That's marginally better. Ran low on aluminum oxide 'bout two-thirds of
the way done. Got a ten-pound tub of the stuff, but it's up at the
warehouse. I'm finished for today with blasting.
Set
up the cheap Harbor Freight blast cabinet and
proceeded to blast the cowl vent assembly with aluminum oxide media.
With the glare from the morning sun, I couldn't see inside the blast
cabinet, even with the built-in light on. This ain't workin' so I
stopped and moved the blast cabinet inside the storage shed . . .
That's marginally better. Ran low on aluminum oxide 'bout two-thirds of
the way done. Got a ten-pound tub of the stuff, but it's up at the
warehouse. I'm finished for today with blasting.
October 13th 2002 Got to the Krash Lab early and dragged the siphon blaster and tarp out of the shed. Removed the cowl vent assembly from BillyBob again with the idea in mind of finishing up the cowl vent and priming it. Mother nature intervened and hit me with a light shower before I was finished. Ratzen-fratzen~!@#$%
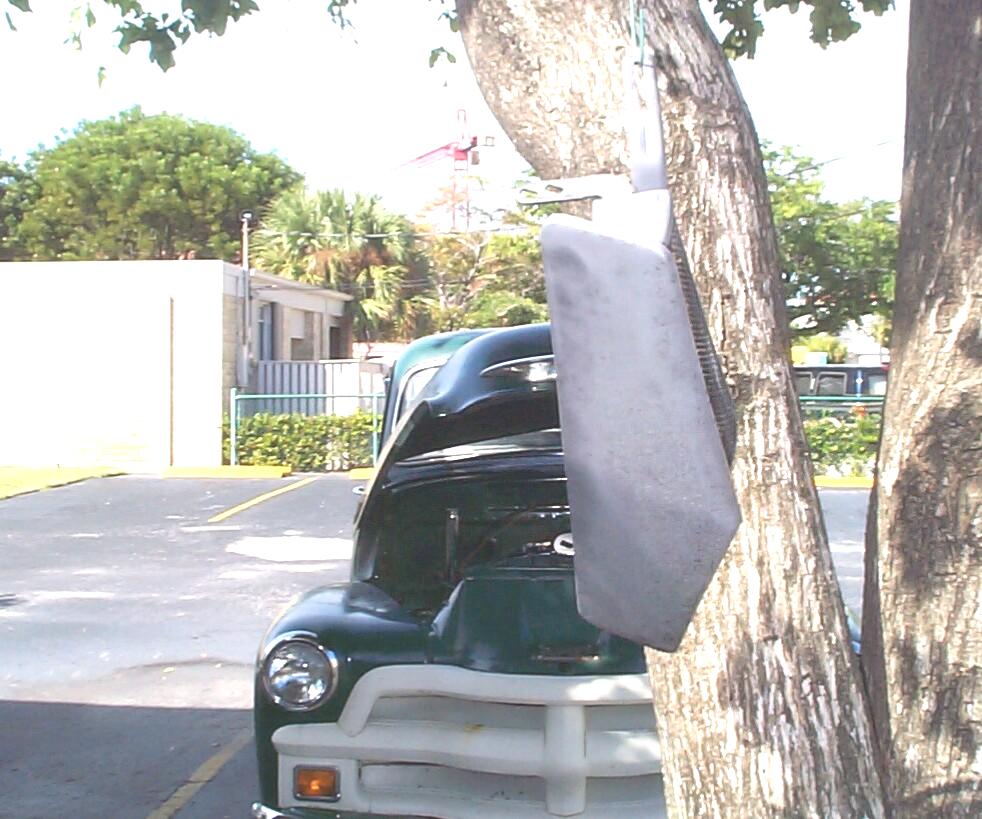 October
20th 2002 Weather looks
pretty good today, what they call an indian summer day up north. Maybe
I can get some sandblasting done. Got the cowl vent assembly blasting
finished without further weather problems. Hung the assembly up in the
shadetree and gave it an application of PRE followed by a thirty minute
soaking with OxiSolve. The cowl was now a uniform gray and ready for
priming. Wuz gonna use Plasticote Anti-Rust Primer 'til I read that it
isn't a sandable primer . . . I've been using it for sometime now 'an I
finally read the can! OK, switch gears and use Eastwood's Rust
Encapsulator. I'm gettin' to the point in BillyBob's progress where I
need to learn a whole lot more about paint systems . . . Time to hit
those books and videos I've been accumulating I guess.
October
20th 2002 Weather looks
pretty good today, what they call an indian summer day up north. Maybe
I can get some sandblasting done. Got the cowl vent assembly blasting
finished without further weather problems. Hung the assembly up in the
shadetree and gave it an application of PRE followed by a thirty minute
soaking with OxiSolve. The cowl was now a uniform gray and ready for
priming. Wuz gonna use Plasticote Anti-Rust Primer 'til I read that it
isn't a sandable primer . . . I've been using it for sometime now 'an I
finally read the can! OK, switch gears and use Eastwood's Rust
Encapsulator. I'm gettin' to the point in BillyBob's progress where I
need to learn a whole lot more about paint systems . . . Time to hit
those books and videos I've been accumulating I guess.
October 21st 2002 UPS guy showed up at the Krash Lab today with a quart of Eastwood's "Metal-2-Metal" body filler (#10021ZA). Need to pick up some filler spreaders at the FLAPS and try this stuff the next time I have the cowl vent assembly out. I'm not powder coating the vent assembly but this particular filler is reported to be good for powder coating applications since it can take the heat.
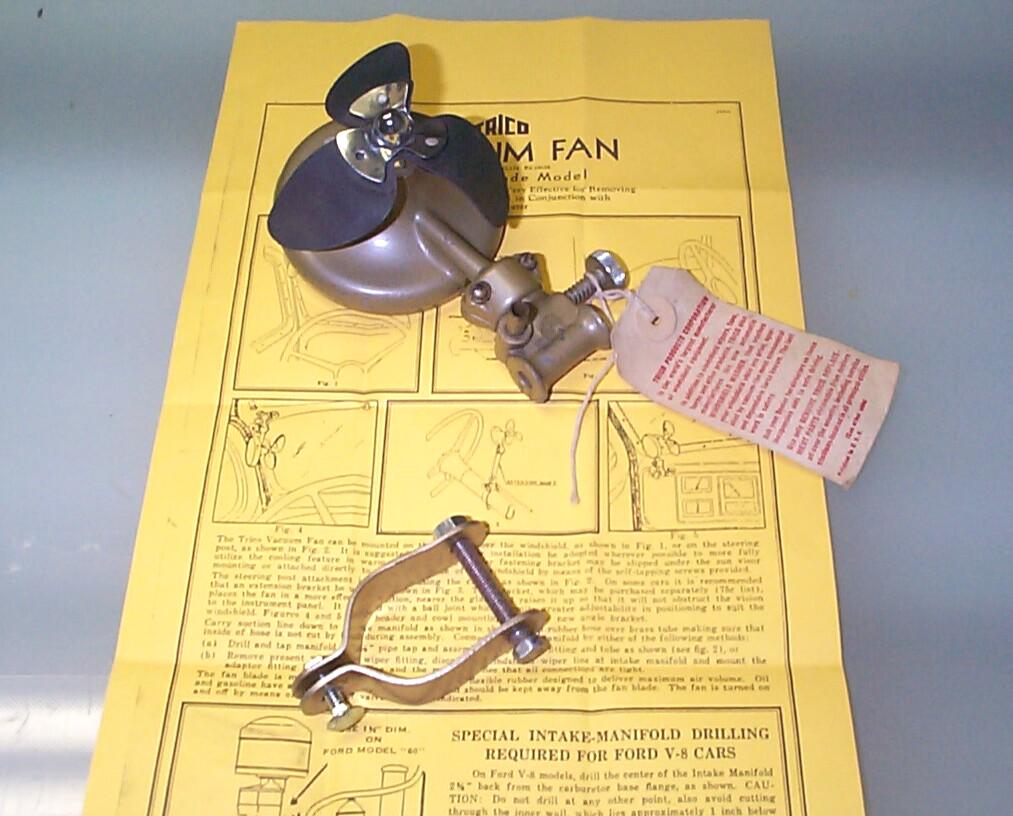 October
24th 2002 I've been
trying to get a Trico rubber-bladed vacuum fan for a few months now.
Was finally successful on my fifth eBay auction and the fan arrived
today. The brackets that support the rubber fan blades need rivets (or
small screws) and the steering column bracket is made for a smaller
diameter steering column so, some work needs to be done to get this
thing operational. ran out to BillyBob at lunch time and hooked up the
windshield wiper vacuum line to the fan and it works . . . Spins fine
but doesn't push much air. I suspect that once new rivets are in place
to put some curvature and stiffness in the rubber blades, I'll get some
air flow out of it. We'll see.
October
24th 2002 I've been
trying to get a Trico rubber-bladed vacuum fan for a few months now.
Was finally successful on my fifth eBay auction and the fan arrived
today. The brackets that support the rubber fan blades need rivets (or
small screws) and the steering column bracket is made for a smaller
diameter steering column so, some work needs to be done to get this
thing operational. ran out to BillyBob at lunch time and hooked up the
windshield wiper vacuum line to the fan and it works . . . Spins fine
but doesn't push much air. I suspect that once new rivets are in place
to put some curvature and stiffness in the rubber blades, I'll get some
air flow out of it. We'll see.
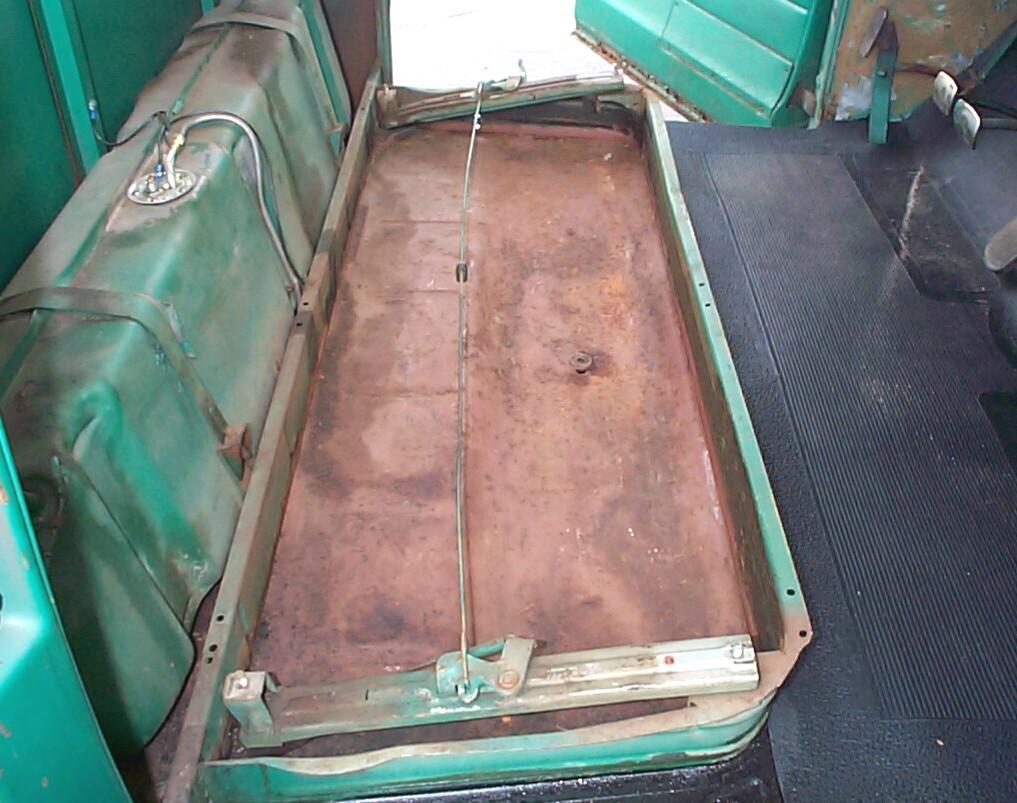
November 28th 2002 Thanksgiving Day and I'm thankful for good weather. I've got four days, uninterrupted, to work on BillyBob and the big jobs scheduled for this year are the Stage I floor replacement and leaf spring replacement. The springs are covered in a previously posted log entry. OK. First step in the POR-15 Floor Pan and Trunk Restoration Kit manual is "Remove all loose material with wire brush and vacuum thoroughly." I plan to cover the area in front of the seat base and extending four or five inches up the angled toe board . . . Just enuf to hold things until I'm ready to replace the floor panels a few years down the road.
 It
didn't take long for Murphy to show up. Was 'bout seventy percent
finished with the wire brushing when the Central Pneumatic air angle
die grinder from Harbor Freight broke down somewhere internally . . .
will worry about fixin' that later. Stopped long enuf to remove the
seat cushion and base skirts. Put the wire cup in the portable drill
and soldiered on at a slower pace 'til the batteries ran down, then it
was hand-to-hand combat with the loose rust. Wire brush, vacuum, blow
out with compressed air for several cycles.
It
didn't take long for Murphy to show up. Was 'bout seventy percent
finished with the wire brushing when the Central Pneumatic air angle
die grinder from Harbor Freight broke down somewhere internally . . .
will worry about fixin' that later. Stopped long enuf to remove the
seat cushion and base skirts. Put the wire cup in the portable drill
and soldiered on at a slower pace 'til the batteries ran down, then it
was hand-to-hand combat with the loose rust. Wire brush, vacuum, blow
out with compressed air for several cycles.
Step two is "Wash area with Engine Clean (POR-15 Marine Clean) mixed with hot water (1:4 ratio), then rinse thoroughly." I slopped the mixture on with a bucket, then agitated it into suds with a paint brush . . . two times. Rinsed with a garden hose and now I have a pretty soggy work area to contend with. On to step three - "Spray area to be restored with Metal-Ready and keep wet for 20-30 minutes. Heavy rust removal will take longer." This stuff is similar in function to Eastwood's OxiSolve. Did that for about 45 minutes with a spray bottle until I ran out of Metal-Ready. Step three continues "Rinse thoroughly with water and dry. It is very important that the metal is completely dry before applying POR-15 Rust Preventive Paint. Use a hair dryer to speed up dry time, then wait overnight to make sure no moisture remains in the pores of the metal." Drat! I put the garden hose away too soon. Got the hose back out and got everything wet again. Blew the excess water out of the cab with compressed air. Too late to start with the springs today so, I buttoned BillyBob up and put his car cover on. 'Sposed to be chilly in the morning tomorrow so I'll probably start with the springs and continue with the floor pan after it warms up a bit.
November 29th 2002 It was late by the time I got back to the floor pan. Installing the new front springs took almost all day. Step four sez "With a sissors, cut pieces of Steel reinforcing Fabric to sizes desired. Please note: if holes in floor exceed 1" in diameter, cover them from the underside with duct tape to avoid temporary sag. Duct tape can be easily removed afterward." The reinforcing fabric that came with the kit was a fiberglas mat, not steel. I cut pieces of this as required as I moved along.
 Step
five "Apply a thin but covering coat of POR-15 Silver to a
floor pan and place the pre-cut corresponding piece of Steel
Reinforcing Fabric directly into the wet surface. Now apply more paint
until the fabric is fully impregnated, but not puddled; too much paint
at this time will result in bubbling, which is undesirable and
counter-productive. Let dry 4-5 hours or overnight."
Well, there are two cans of apparently equal POR-15 paint. I looked the
labels up and down but couldn't find a color designation. Flip a coin.
Pick one and open it up or try to. Really butchered the top getting it
off. POR-15 doesn't keep well after opening so I wasn't too concerned.
I had picked the black ~!@#$%^ Can't stop
now. I put on the gloves in the kit 'cause even tho' this was my first
experience with POR-15, I knew from the postings on the ole trucks
lists that this stuff takes about a month to wear off if you get any on
you. The sun was getting low in the West by the time I was finished.
After cleaning up, I put my specs on and examined the one remaining
can. I finally found the word "silver" on the lid next to the bar code.
It was in six point print! The POR-15 people are savin' a buck by
putting the same main label on everything and only varying the lid
labels ~!@#$%^
Step
five "Apply a thin but covering coat of POR-15 Silver to a
floor pan and place the pre-cut corresponding piece of Steel
Reinforcing Fabric directly into the wet surface. Now apply more paint
until the fabric is fully impregnated, but not puddled; too much paint
at this time will result in bubbling, which is undesirable and
counter-productive. Let dry 4-5 hours or overnight."
Well, there are two cans of apparently equal POR-15 paint. I looked the
labels up and down but couldn't find a color designation. Flip a coin.
Pick one and open it up or try to. Really butchered the top getting it
off. POR-15 doesn't keep well after opening so I wasn't too concerned.
I had picked the black ~!@#$%^ Can't stop
now. I put on the gloves in the kit 'cause even tho' this was my first
experience with POR-15, I knew from the postings on the ole trucks
lists that this stuff takes about a month to wear off if you get any on
you. The sun was getting low in the West by the time I was finished.
After cleaning up, I put my specs on and examined the one remaining
can. I finally found the word "silver" on the lid next to the bar code.
It was in six point print! The POR-15 people are savin' a buck by
putting the same main label on everything and only varying the lid
labels ~!@#$%^
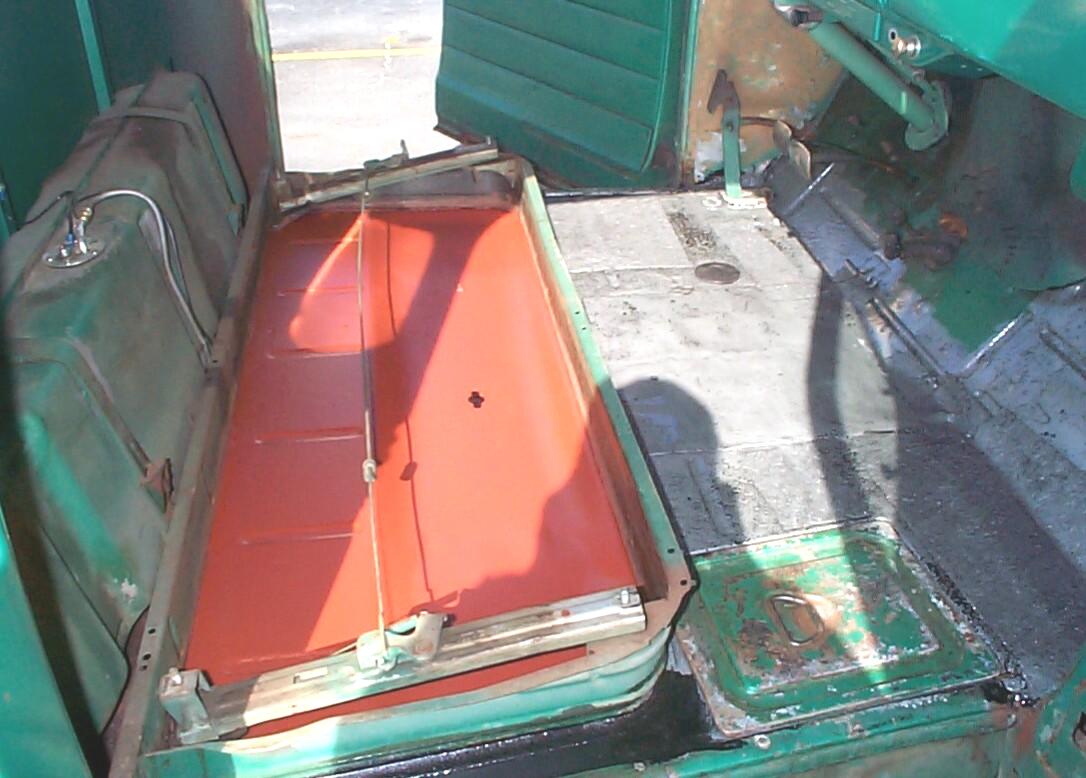
November 30th 2002 Well, because I failed the "Where's Waldo" contest with the paint color labeling, I'm gonna have a bass-ackwards paint combo with silver on top of black instead of black on top of silver. Step six is "Use Epoxy Putty as needed to fill in low areas, welds, etc. Drying time for putty will vary according to ambient temperature (surrounding area). Best time to apply putty is when POR-15 coating is dry to the touch but with a slight finger-drag remaining." I skipped this step. This is a temporary fix, after all.
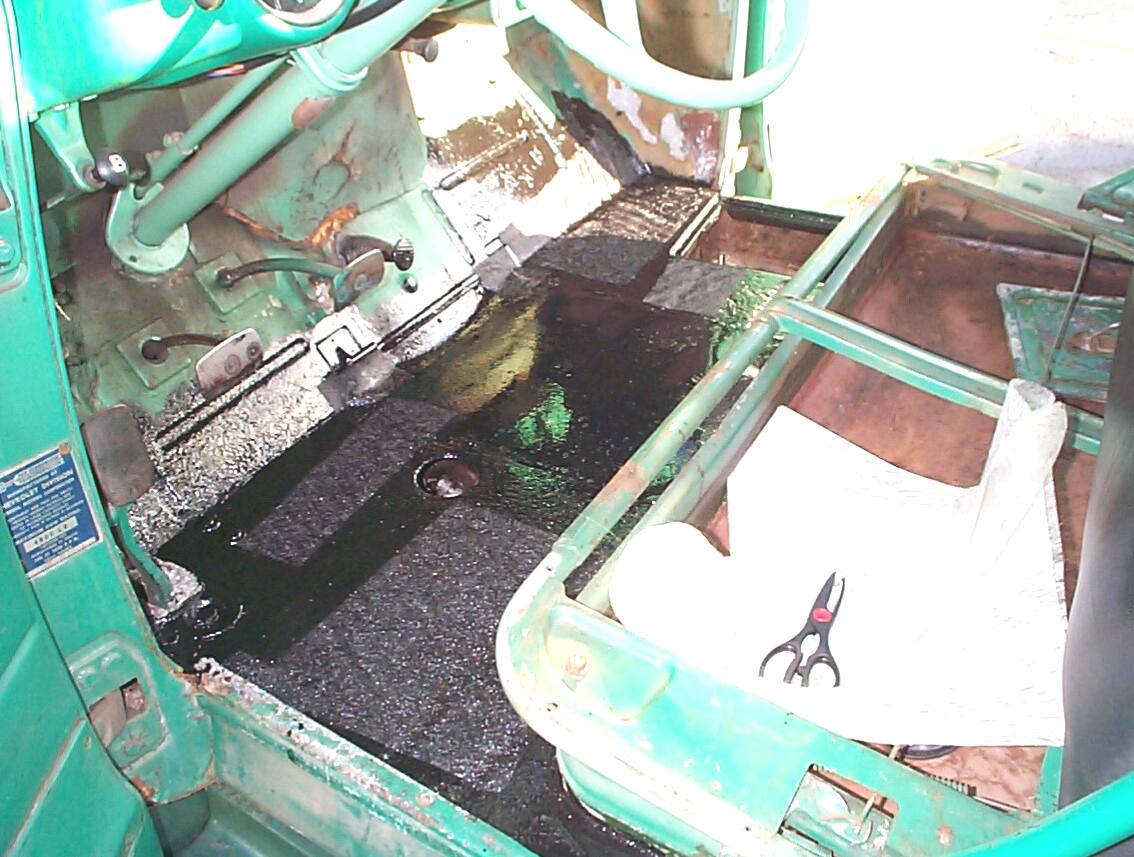
 Step
seven "Topcoat with one coat of ChassisCoat Black. Remove
duct tape from underside of floor pan and apply two coats of POR-15
Rust Perventive Paint." OK, This is where I
applied the silver and it looks pretty bad . . . Even the old shag
carpeting looks better. Oh well, That's what floor mats are for. I
skipped painting the underside. I'll take care of that later, if at
all. I've accomplished what I wanted too. The floor pan is much
stronger, it's just not purty.
Step
seven "Topcoat with one coat of ChassisCoat Black. Remove
duct tape from underside of floor pan and apply two coats of POR-15
Rust Perventive Paint." OK, This is where I
applied the silver and it looks pretty bad . . . Even the old shag
carpeting looks better. Oh well, That's what floor mats are for. I
skipped painting the underside. I'll take care of that later, if at
all. I've accomplished what I wanted too. The floor pan is much
stronger, it's just not purty.
 December
28th 2002 Today was to
have been a wheel rebuild on the passenger side front wheel but when I
realized the replacement wheel cylinder was nowhere to be found in the
Krash Lab, I double-clutched the mental gears and switched to another
task. Decided to refinish the bottom of the seat base area of the floor
pan while I had the seat off for cleaning maintenance. Wanted to remove
and clean the seat tracks too but that will be quite the contortion
move with the gas tank in place. I'll leave those for another day.
December
28th 2002 Today was to
have been a wheel rebuild on the passenger side front wheel but when I
realized the replacement wheel cylinder was nowhere to be found in the
Krash Lab, I double-clutched the mental gears and switched to another
task. Decided to refinish the bottom of the seat base area of the floor
pan while I had the seat off for cleaning maintenance. Wanted to remove
and clean the seat tracks too but that will be quite the contortion
move with the gas tank in place. I'll leave those for another day.
 Went
thru several scraping, wire brushing, vacuuming, degreasing cycles on
the floor pan inside the seat base area. Then PRE Paint Prepped it and
brush painted a coat of Rust Encapsulator on it to simulate the "red
lead paint" look. Well, got a lot of stuff started in this log entry
and darn little finished. What else is new? Got a new year beginning
and a lot planned. Next episode in the interior log entries will
continue with the cowl vent and Trico fan. More seat work too, I think.
Am working up my courage to tackle a windshield replacement later in
the year. That will include repairing the dashboard sheetmetal that has
rusted away at the corners. Right now it's the tenative project for
next Thanksgiving. I've started gathering sheetmetal tools and I've got
a mig welder on order. Chassis, brake, and under hood tasks are
crawling along too. Time to get this posted and start my list of new
year resolutions.
Went
thru several scraping, wire brushing, vacuuming, degreasing cycles on
the floor pan inside the seat base area. Then PRE Paint Prepped it and
brush painted a coat of Rust Encapsulator on it to simulate the "red
lead paint" look. Well, got a lot of stuff started in this log entry
and darn little finished. What else is new? Got a new year beginning
and a lot planned. Next episode in the interior log entries will
continue with the cowl vent and Trico fan. More seat work too, I think.
Am working up my courage to tackle a windshield replacement later in
the year. That will include repairing the dashboard sheetmetal that has
rusted away at the corners. Right now it's the tenative project for
next Thanksgiving. I've started gathering sheetmetal tools and I've got
a mig welder on order. Chassis, brake, and under hood tasks are
crawling along too. Time to get this posted and start my list of new
year resolutions.
| < Back
to Intro |
You can email me at ![]() webmaster@laroke.com
webmaster@laroke.com
Issued Wednesday January 1, 2003
Updated Friday February 9, 2018
copyright © 1996-2018 Larry Robert Kephart all rights reserved
| | LRK Home | | Bio Info | | Krash Khronicles | | LAROKE | |
| | BettyLou | | BillyBob's Garage | | Rat Patrol | | Deerslayer | | Elvira | |
| | Land of the Free and Home of the Brave | |
| | Keppylou's Art | | WWI Soldier's Diary | |