| | LRK Home | | Bio Info | | Krash Khronicles | | LAROKE | |
| | BettyLou | | BillyBob's Garage | | Rat Patrol | | Deerslayer | | Elvira | |
| | Land of the Free and Home of the Brave | |
| | Keppylou's Art | | WWI Soldier's Diary | |
BillyBob Work-in-Progress Log
![]()
TRUCK LINKS including vendor sites for old parts, custom parts, and tools as well as sites for classic car and truck organizations
STORE Operating in association with Amazon.com, books, recordings and tools can be purchased.
PLANNING for the restoration including project schedule and cost estimates.
![]()
WORK-IN-PROGRESS is the restoration of parts of BillyBob that I can accomplish without a garage.
PRE-RESTORATION includes log entries of minor repairs and and adventures between time of purchase and the time when I started restoration, a piece at a time.
JR'S KORNER JR's Korner is the history of BillyBob before I got him authored by my brother, Wm. C. Kephart.
7. Nervous breakdown: Taillights,
Parking Lights, Turn Signals
Page 1
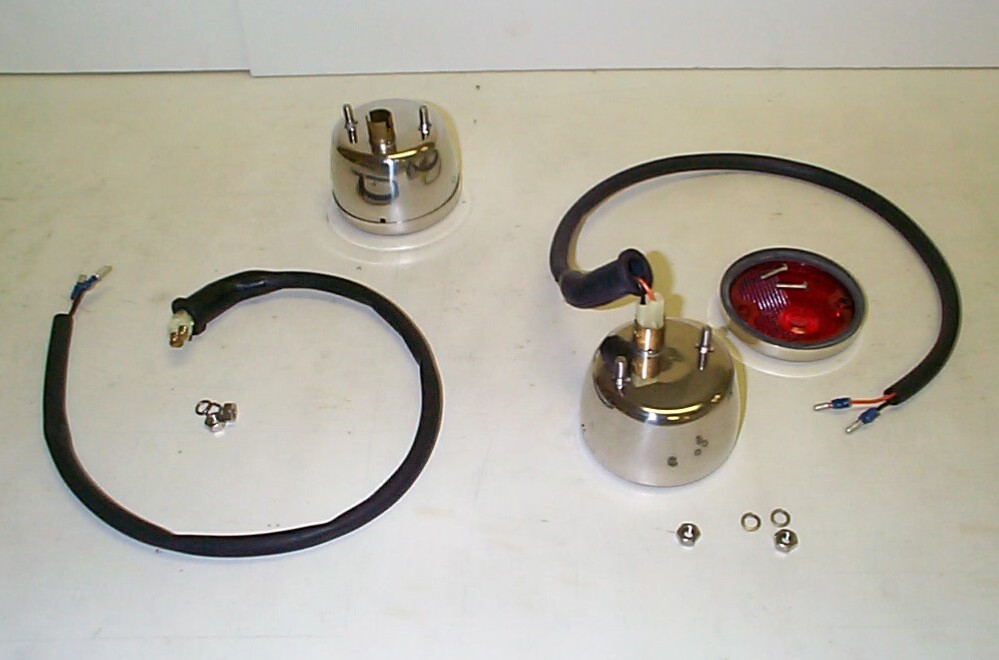
February 10th 2001 Beautiful day. Decided to tackle the taillights. The driver's side light hasn't worked for some time. I intend to replace the wiring from the cab on back and replace the existing after-market lights with 54'-55' replicas with 12v turn-signal double filament bulbs.
But first, some cleanup from the last Nervous Breakdown log entry. I had mentioned that I didn't know why the existing battery cables were of different gauges, so I replaced the cables with new cables of the same differing gauges. I got an e-mail from Bill Hanlon of the Oletrucks maillist to shed some light on this issue:
Your question "Why the difference in cable gauges??" when referring to "a 32 inch 2 gauge red Battery Cable for positive to starter connection, a 38 inch 6 gauge black Battery Cable" for negative to ground connection" is a good one. The same amount of current has to flow in each cable. The current flow will not be more than the smaller of the two cables can handle. When it comes to battery cables bigger is better or at least smaller is worse. And 6 volt cables are bigger than 12 volt cables. Actually, there is no such thing as a 6 volt (or 12 volt) cable. It is just that it will require more amps to turn over the same engine with a 6 volt system than a 12 volt system. More amps need bigger wire. So the safe way is to use the larger cables that were stock on the 6 volt system.
Thanx Bill, I had suspected as much upon reading Randy Rundel's excellent book after I wrote the log entry. Your e-mail solidified the knowledge in my hard head. I will replace the negative 6 ga cable with a 2 ga cable to match the 2 ga positive cable somewhere down the line.
 The existing lights are of the same type so this process shouldn't
present too many difficulties. The wiring harness from Jim
Carter's Antique Truck Parts does not document the wire
gauges, so I'll have to guess at the connectors. The Calterm connectors
I got from Discount Auto Parts to match those on the wiring harness are
blue and designated as for 16-14 gauge wires.
The existing lights are of the same type so this process shouldn't
present too many difficulties. The wiring harness from Jim
Carter's Antique Truck Parts does not document the wire
gauges, so I'll have to guess at the connectors. The Calterm connectors
I got from Discount Auto Parts to match those on the wiring harness are
blue and designated as for 16-14 gauge wires.
 I'm
gonna leave the existing license plate light in place for the
time-being until I figure out how to mount the replica license plate
bracket and light assembly I purchased from the American
Classic Truck Parts website. Started out by twisting,
cursing, dremeling, and chisling existing bolts, stovebolts and nuts
off/out. Wirebrushed the area and treated with a coat of Eastwood's
PRE Paint Prep, followed by a brush-on coat of Corroless Rust
Stabilizer to the disturbed areas of the bed support.
I'm
gonna leave the existing license plate light in place for the
time-being until I figure out how to mount the replica license plate
bracket and light assembly I purchased from the American
Classic Truck Parts website. Started out by twisting,
cursing, dremeling, and chisling existing bolts, stovebolts and nuts
off/out. Wirebrushed the area and treated with a coat of Eastwood's
PRE Paint Prep, followed by a brush-on coat of Corroless Rust
Stabilizer to the disturbed areas of the bed support.
 Waiting
for the Corroless to dry, I threaded the taillight wires thru their
rubber boots with the assistance of a coat hanger wire as a snake.
Next, bullet connectors were crimped to the ends of the taillight
wires. The old tailights were cut from their wires and bullet connector
receptacles crimped to the old wires as a temporary measure. The
disturbed areas of the supports were given a coat of Rustoleum Hunter
Green after the Corroless dried.
Waiting
for the Corroless to dry, I threaded the taillight wires thru their
rubber boots with the assistance of a coat hanger wire as a snake.
Next, bullet connectors were crimped to the ends of the taillight
wires. The old tailights were cut from their wires and bullet connector
receptacles crimped to the old wires as a temporary measure. The
disturbed areas of the supports were given a coat of Rustoleum Hunter
Green after the Corroless dried.
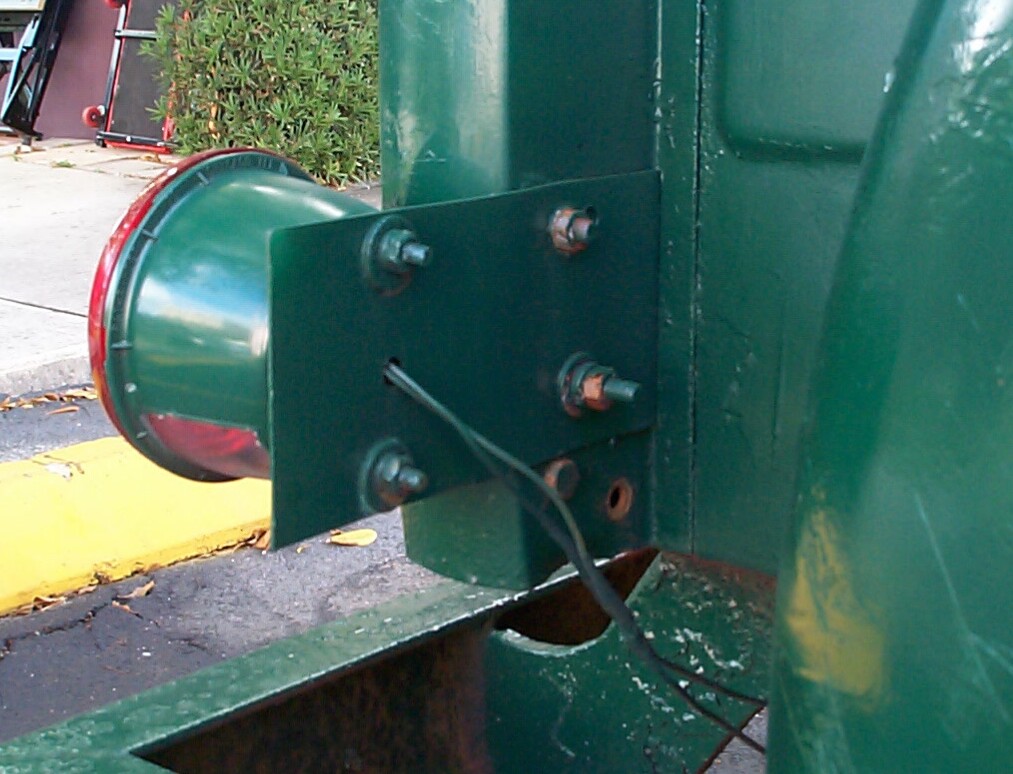
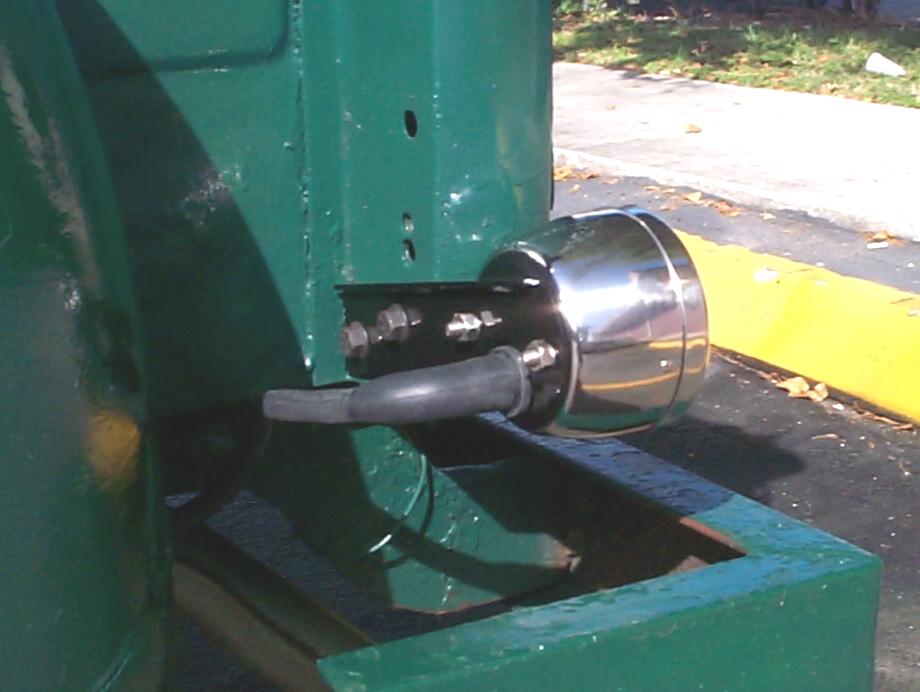
 The
new taillight brackets which come finished in gloss black were attached
to the bed support with 5/16"-18 x 3/4" flanged cap screws that I got
from McMaster-Carr
when working on the radiator support a few months back. These cap
screws have a black finish too. Large diameter flat washers were placed
between the brackets and supports to keep the brackets away from the
fresh paint and secured from inside the support with lock washers and
hex nuts.
The
new taillight brackets which come finished in gloss black were attached
to the bed support with 5/16"-18 x 3/4" flanged cap screws that I got
from McMaster-Carr
when working on the radiator support a few months back. These cap
screws have a black finish too. Large diameter flat washers were placed
between the brackets and supports to keep the brackets away from the
fresh paint and secured from inside the support with lock washers and
hex nuts.
 Installed
the light housings without the lenses and fooled around until I got the
bright filament of each bulb working with the turn signals/brake light
circuits. That's the reason for using the bullet connectors - If I get
it wrong, it's easy to switch wires.
Installed
the light housings without the lenses and fooled around until I got the
bright filament of each bulb working with the turn signals/brake light
circuits. That's the reason for using the bullet connectors - If I get
it wrong, it's easy to switch wires.
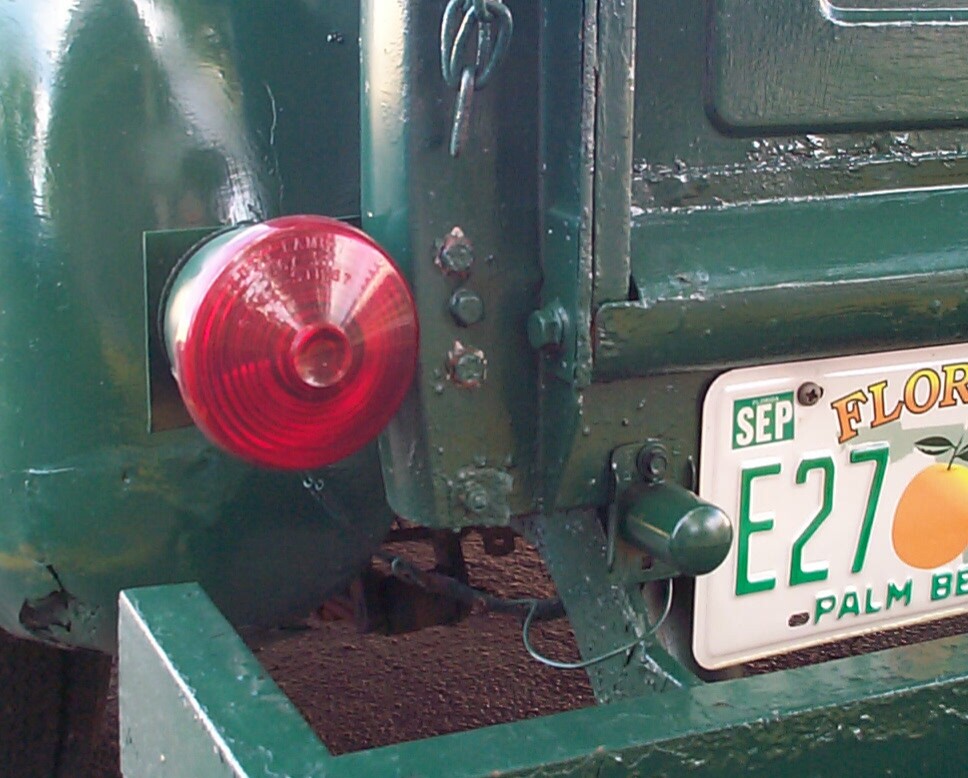
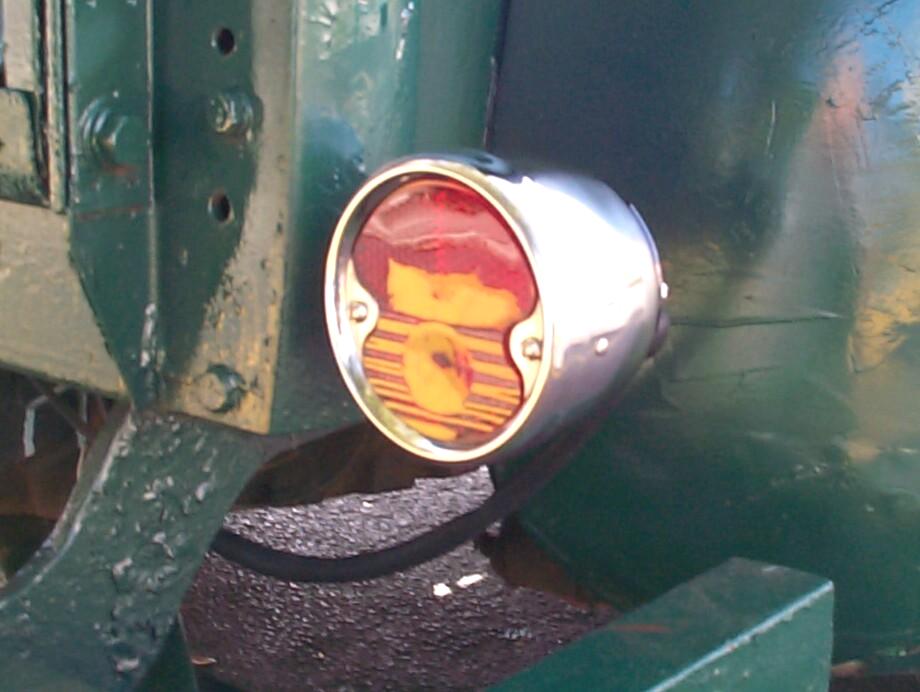 After
I got the lights working, the wire boots were snugged on the back, all
nuts tightened and lenses installed. The wiring was temporarily secured
beneath the bed with wire ties. Everything is working and I only
pinched my thumb once - A good omen and I'm quiting while I'm ahead for
a change.
After
I got the lights working, the wire boots were snugged on the back, all
nuts tightened and lenses installed. The wiring was temporarily secured
beneath the bed with wire ties. Everything is working and I only
pinched my thumb once - A good omen and I'm quiting while I'm ahead for
a change.
February 11th 2001 The brake lights were only working intermittently. When I got to the Krash Lab, I backed BillyBob up to the front doors (glass) and watched the reflection in the rear view mirror as I applied the brakes and turn signals. The brake lights didn't work when pumping the pedal. If the brakes are applied, then first one turn signal turned on and off, then the other, the brake lights would work . . . ARRRUUUGH!! OK! looks like I'll have to install the new aftermarket turn signals soon instead of waiting for the Jim Carter wiring harness installation. In the meantime, I'll move my defensive driving practices to DEFCON 4. I picked up some 5/16"-18 wing nuts at Discount Auto Parts to secure the new battey top retainer I got from Chevy-Duty to the two threaded rods on the battery box. The top retainer will require some surgery to fit the new battery tho' because it is slightly longer than the original six-volt battery this retainer was designed for.
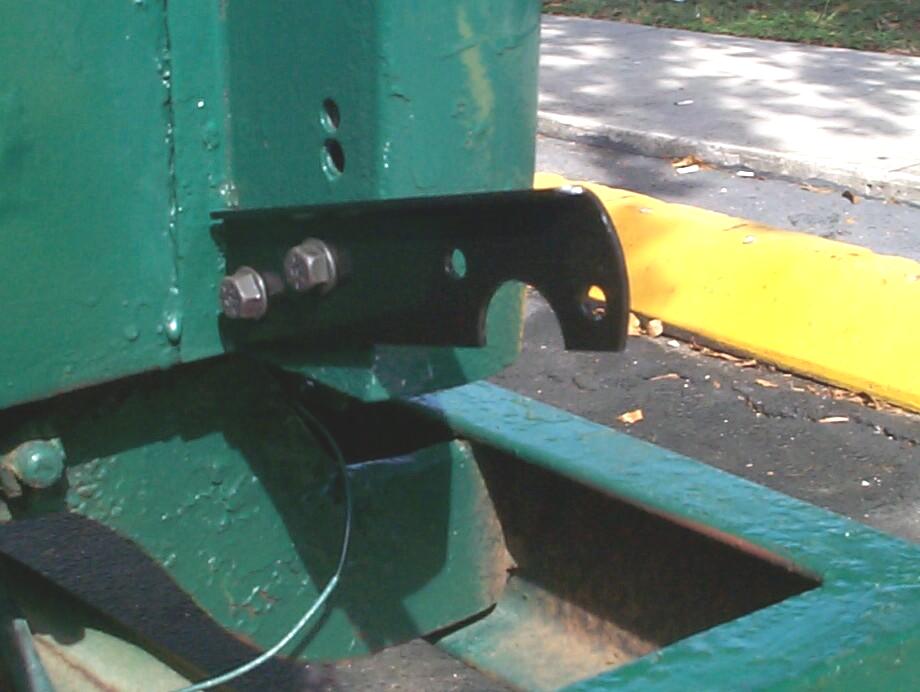
February 17th 2001 Jacked up the rear of BillyBob and placed jack stands. Checked placement of new replica license plate bracket and light assembly . . . looks like it goes at the middle of the back just under the tailgate (there are matching holes in this location). Problem is, it doesn't really fit well behind the home-built channel iron bumper some previous owner installed. I'll have to start researching an original equipment bumper and bumper brackets.
I placed both kinds of Wiring Harness Clips I got from Chevy-Duty on the frame for the new taillight, license plate light and turn signal wiring. These things did not fit well, probably due to the corroded nature of the frame, and when I threaded the wires from the Jim Carter wiring harness, they turned out to be too short to reach the passenger side taillight. Humbug! Time to retrench and rethink. I'll stop and purchase 14 ga wire in the lengths and colors needed and substitute a current style clip for this stage one wiring job.
 February
24th 2001
Received/picked up wire and other electrical accessories during the
week . . . too much, in fact. Last saturday, I ordered 14 ga stranded
wire from McMaster-Carr, 50 feet each of yellow, black, and blue
(wanted purple to match the Jim Carter wiring harness, but blue was as
close as I could get). The wire arrived mid-week and the conductors
looked like aluminum to me and I wanted copper, so I went to Home Depot
where I picked up two fifty foot spools (red and white). I went back to
the McMaster-Carr website and searched for "copper wire" which brought
me to the same product I'd ordered earlier???? Upon closer examination,
the wire that I assumed was aluminum appears to be tinned or silvered
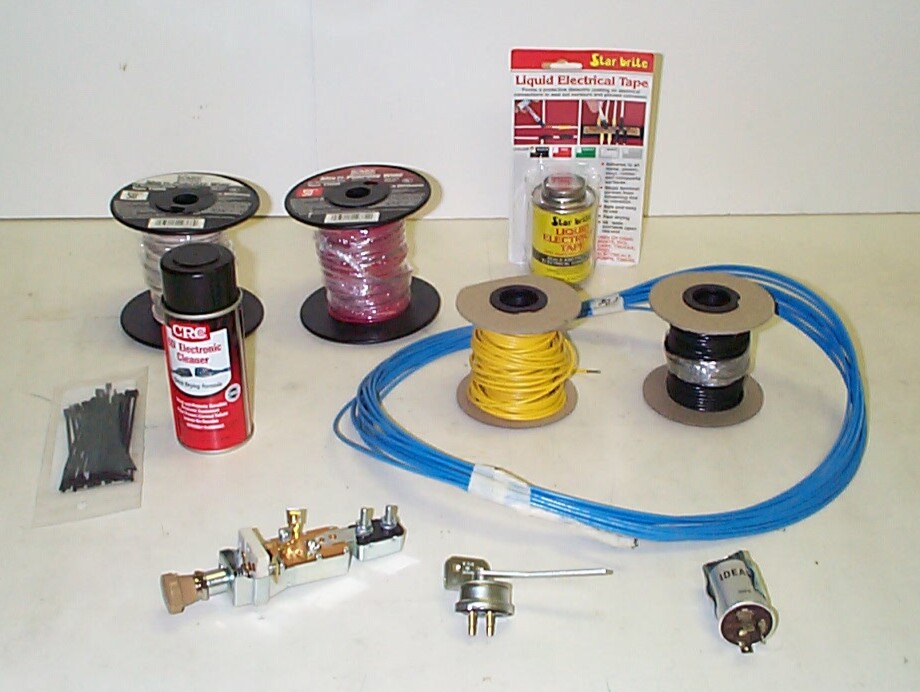
copper. I also picked up a three-prong heavy-duty 12v flasher, black
wire ties, Star Brite Liquid Electrical Tape and CRC QD Electronic
Cleaner from Discount Auto Parts. A Stoplamp Switch (#53-011) and 12v
Replacement Headlamp Switch (#53-156) arrived from Chevy-Duty. The
headlight switch is too different in appearance from the original for
my liking, so it will go in the emergency parts inventory.
February
24th 2001
Received/picked up wire and other electrical accessories during the
week . . . too much, in fact. Last saturday, I ordered 14 ga stranded
wire from McMaster-Carr, 50 feet each of yellow, black, and blue
(wanted purple to match the Jim Carter wiring harness, but blue was as
close as I could get). The wire arrived mid-week and the conductors
looked like aluminum to me and I wanted copper, so I went to Home Depot
where I picked up two fifty foot spools (red and white). I went back to
the McMaster-Carr website and searched for "copper wire" which brought
me to the same product I'd ordered earlier???? Upon closer examination,
the wire that I assumed was aluminum appears to be tinned or silvered
copper. I also picked up a three-prong heavy-duty 12v flasher, black
wire ties, Star Brite Liquid Electrical Tape and CRC QD Electronic
Cleaner from Discount Auto Parts. A Stoplamp Switch (#53-011) and 12v
Replacement Headlamp Switch (#53-156) arrived from Chevy-Duty. The
headlight switch is too different in appearance from the original for
my liking, so it will go in the emergency parts inventory.
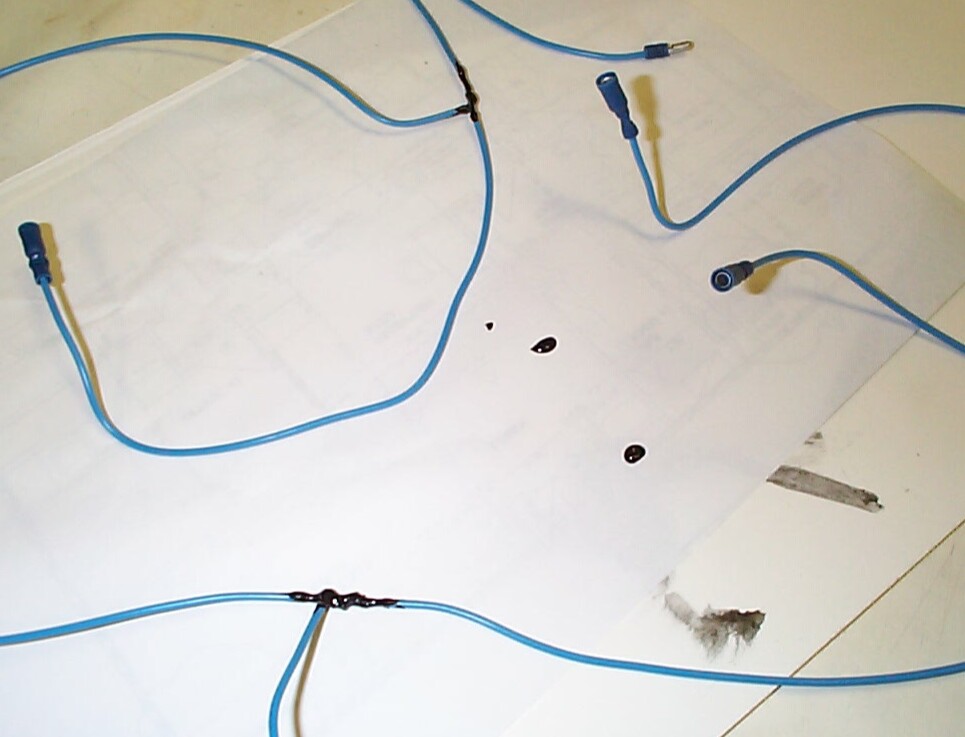 I
removed all the metal frame wiring clips that weren't working and
replaced them with the sheet metal wiring clips which fit snugly in the
frame holes - these are the wrong clips for the application but they
work (Or are they? By the time I was finished, I was unsure of which
clips are for the frame and which are for sheet metal). I pulled the
new blue (purple) tailight wire thru the frame and cut it into three
lengths: 1) back of cab to driver side taillight, 2) driver side
taillight to passenger side taillight, and 3) a short length of wire
for the license plate light that will reach both the present location
and the future location. The wires were removed again and taken back
into the Krash Lab for soldering two tee connections and crimping
connectors on the ends. Several coats of the liquid electrical tape
were applied to the soldered tee connections. This stuff is messy to
work with.
I
removed all the metal frame wiring clips that weren't working and
replaced them with the sheet metal wiring clips which fit snugly in the
frame holes - these are the wrong clips for the application but they
work (Or are they? By the time I was finished, I was unsure of which
clips are for the frame and which are for sheet metal). I pulled the
new blue (purple) tailight wire thru the frame and cut it into three
lengths: 1) back of cab to driver side taillight, 2) driver side
taillight to passenger side taillight, and 3) a short length of wire
for the license plate light that will reach both the present location
and the future location. The wires were removed again and taken back
into the Krash Lab for soldering two tee connections and crimping
connectors on the ends. Several coats of the liquid electrical tape
were applied to the soldered tee connections. This stuff is messy to
work with.
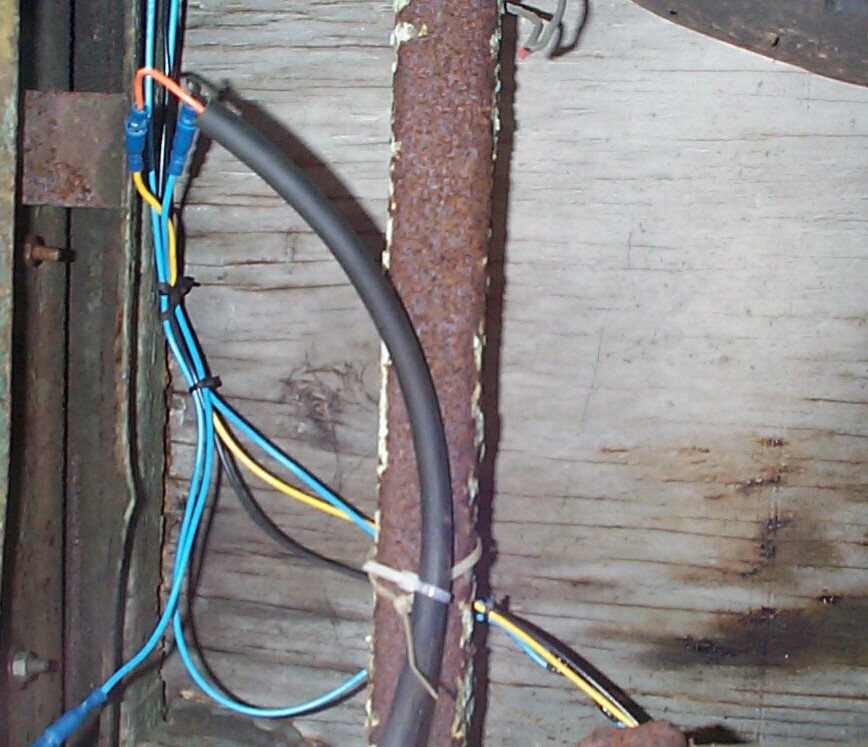 The
new taillight "harness" was re-threaded to Billybob's frame and new 14
ga wires were pulled for the driver side and passenger side
turn-signal/brake lights (yellow and black, respectively). The wiring
clips are open at the top and made out of spring metal, so pinching
them closed to keep the wires in doesn't work all that well. Instead, I
secured the wires to the clips with the small black wire ties. This pic
is under the bed behind the license plate on the driver side of
BillyBob with the new wiring in place.
The
new taillight "harness" was re-threaded to Billybob's frame and new 14
ga wires were pulled for the driver side and passenger side
turn-signal/brake lights (yellow and black, respectively). The wiring
clips are open at the top and made out of spring metal, so pinching
them closed to keep the wires in doesn't work all that well. Instead, I
secured the wires to the clips with the small black wire ties. This pic
is under the bed behind the license plate on the driver side of
BillyBob with the new wiring in place.
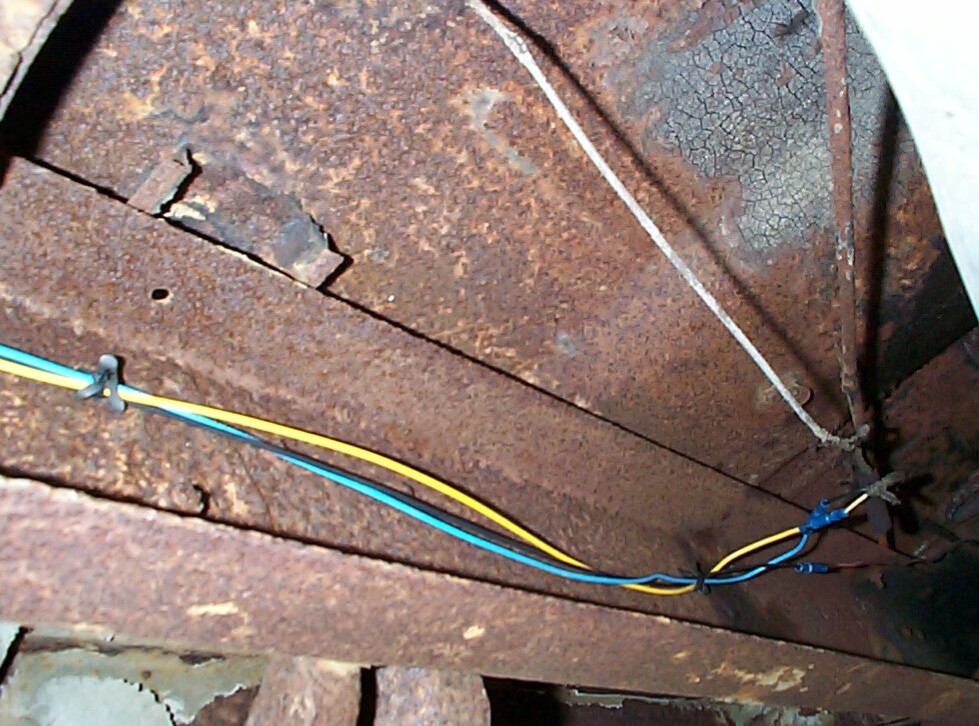 After
taking out the slack, removing the old wires, and securing the new
wires to the clips, connectors were crimped to the old wires where they
were cut off under the cab and they were connected to the new wires
going to the back. It was a good thing I used bullet connectors 'cause
I guessed wrong on which old wire was which the first time around. This
pic shows that area under the cab once I made the correct connections.
It's also a good view of one of the wire-tied clips (to the left side
in the pic). To finish up for the day, I fired up AutoCAD and
documented the tailight and rear turn signal area of the growing wiring
diagram.
After
taking out the slack, removing the old wires, and securing the new
wires to the clips, connectors were crimped to the old wires where they
were cut off under the cab and they were connected to the new wires
going to the back. It was a good thing I used bullet connectors 'cause
I guessed wrong on which old wire was which the first time around. This
pic shows that area under the cab once I made the correct connections.
It's also a good view of one of the wire-tied clips (to the left side
in the pic). To finish up for the day, I fired up AutoCAD and
documented the tailight and rear turn signal area of the growing wiring
diagram.
 March
3rd 2001 Not gettin'
much done today. There's a downtown Boca Raton festival in progress an'
the boss's daughter is selling parking spaces, including BillyBob's.
During the week, she managed to schedule my weekend for a heavier
workload (relocating four computers) in the hope that I'd be too busy
to work on BillyBob . . . Doesn't understand that some of us live for
these old trucks. Well, I got a space on the other side of the shade
tree and she's got the main lot. Neither of us are entirely happy, so
it's probably a good compromise. I cleaned off a portion of the
firewall and mounted the new three-prong flasher next to the old one
using an aluminum pop rivet to mount the flasher bracket.
March
3rd 2001 Not gettin'
much done today. There's a downtown Boca Raton festival in progress an'
the boss's daughter is selling parking spaces, including BillyBob's.
During the week, she managed to schedule my weekend for a heavier
workload (relocating four computers) in the hope that I'd be too busy
to work on BillyBob . . . Doesn't understand that some of us live for
these old trucks. Well, I got a space on the other side of the shade
tree and she's got the main lot. Neither of us are entirely happy, so
it's probably a good compromise. I cleaned off a portion of the
firewall and mounted the new three-prong flasher next to the old one
using an aluminum pop rivet to mount the flasher bracket.
| < Back
to Intro |
You can email me at ![]() webmaster@laroke.com
webmaster@laroke.com
Issued Sunday March 18, 2001
Updated Monday May 8, 2017
copyright © 1996-2017 Larry Robert Kephart all rights reserved
| | LRK Home | | Bio Info | | Krash Khronicles | | LAROKE | |
| | BettyLou | | BillyBob's Garage | | Rat Patrol | | Deerslayer | | Elvira | |
| | Land of the Free and Home of the Brave | |
| | Keppylou's Art | | WWI Soldier's Diary | |