| | LRK Home | | Bio Info | | Krash Khronicles | | LAROKE | |
| | BettyLou | | BillyBob's Garage | | Rat Patrol | | Deerslayer | | Elvira | |
| | Land of the Free and Home of the Brave | |
| | Keppylou's Art | | WWI Soldier's Diary | |
BillyBob Work-in-Progress Log
![]()
TRUCK LINKS including vendor sites for old parts, custom parts, and tools as well as sites for classic car and truck organizations
STORE Operating in association with Amazon.com, books, recordings and tools can be purchased.
PLANNING for the restoration including project schedule and cost estimates.
![]()
WORK-IN-PROGRESS is the restoration of parts of BillyBob that I can accomplish without a garage.
PRE-RESTORATION includes log entries of minor repairs and and adventures between time of purchase and the time when I started restoration, a piece at a time.
JR'S KORNER JR's Korner is the history of BillyBob before I got him authored by my brother, Wm. C. Kephart.
6. Nervous Breakdown: Research,
Battery, Starter
Page 2
 December
9th 2000 Planned
preliminary work on BillyBob's dashboard today along with refinishing
the horns and tapping out some threads I messed up on the Radiator
Support but those plans were thwarted by a problem out of left field .
. . BillyBob wouldn't start. It appears to be a starter problem. I
don't mind bad luck when it's tempered with a bit of good luck. The bit
of good luck is that this happened in BillyBob's warehouse bay where I
can troubleshoot it at a gentlemanly leisure pace instead of out on the
road on a dark and stormy night. It's been almost four years since I've
had problems with BillyBob's
starter. Now it looks like the starter circuit will be first
on my list of electrical learning experiences. I went back to the Krash
Lab to begin my research.
December
9th 2000 Planned
preliminary work on BillyBob's dashboard today along with refinishing
the horns and tapping out some threads I messed up on the Radiator
Support but those plans were thwarted by a problem out of left field .
. . BillyBob wouldn't start. It appears to be a starter problem. I
don't mind bad luck when it's tempered with a bit of good luck. The bit
of good luck is that this happened in BillyBob's warehouse bay where I
can troubleshoot it at a gentlemanly leisure pace instead of out on the
road on a dark and stormy night. It's been almost four years since I've
had problems with BillyBob's
starter. Now it looks like the starter circuit will be first
on my list of electrical learning experiences. I went back to the Krash
Lab to begin my research.
 Trashed
the Krash Lab 'til I found BillyBob's "Shop Manual" and went to Section
12 - The Electrical System. It recommended checking the battery
specific gravity first, then ground cable, then battery terminals. I
had turned BillyBob's headlamps on up at the warehouse and they worked,
so I don't think that's the problem, but first things first. Headed
back up to the warehouse, picking up a Thorsen Battery Hydrometer at
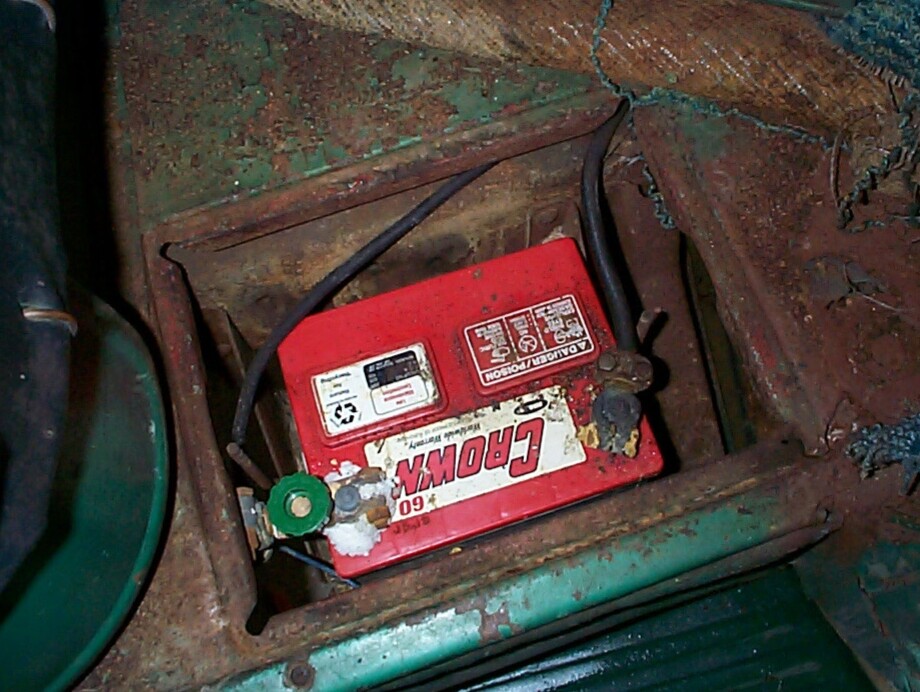
Discount Auto Parts on my way. I've been neglecting the battery for
some time now and corrosion at the terminals had become terminal . . .
couldn't get the connectors off, but managed to unclamp the positive
cable from its connector and separate the cut-off switch into two
component parts at the negative terminal. This allowed me to get the
battery out for more precise surgery back at the Krash Lab. Removed the
battery cables also at starter and ground so I could measure their
lengths for replacement.
Trashed
the Krash Lab 'til I found BillyBob's "Shop Manual" and went to Section
12 - The Electrical System. It recommended checking the battery
specific gravity first, then ground cable, then battery terminals. I
had turned BillyBob's headlamps on up at the warehouse and they worked,
so I don't think that's the problem, but first things first. Headed
back up to the warehouse, picking up a Thorsen Battery Hydrometer at
Discount Auto Parts on my way. I've been neglecting the battery for
some time now and corrosion at the terminals had become terminal . . .
couldn't get the connectors off, but managed to unclamp the positive
cable from its connector and separate the cut-off switch into two
component parts at the negative terminal. This allowed me to get the
battery out for more precise surgery back at the Krash Lab. Removed the
battery cables also at starter and ground so I could measure their
lengths for replacement.
 Cleaned
the battery twice with CRC Battery Cleaner, rinse and dry, then
attempted to remove the postive terminal connector and the cut-off
switch connector by giving both terminals and connector bolts a good
shot of Kroil/AeroKroil Penetrating Oil
from Kano
Laboratories. Finally got the connectors off the terminals
and gave the battery one more CRC cleaning.
Cleaned
the battery twice with CRC Battery Cleaner, rinse and dry, then
attempted to remove the postive terminal connector and the cut-off
switch connector by giving both terminals and connector bolts a good
shot of Kroil/AeroKroil Penetrating Oil
from Kano
Laboratories. Finally got the connectors off the terminals
and gave the battery one more CRC cleaning.
Time to try the hydrometer. It's close to thirty-five years since I was in high school and I haven't brushed up against the term "specific gravity" since then. The Shop Manual" has one small illustration of a hydrometer and that was enuf to allow me to take apart the one I just purchased, remove the packing material, and re-assemble it into a working instrument. There were no instructions at all with this thing 'cept for a couple of short CYA blurbs intended entirely for Thorsen's legal department - statement's like "Don't use this as a turkey baster after checking your battery." I understand the concept - This is a "Man's" tool and Real Men don't need no stinkin' instructions for a tool this simple.
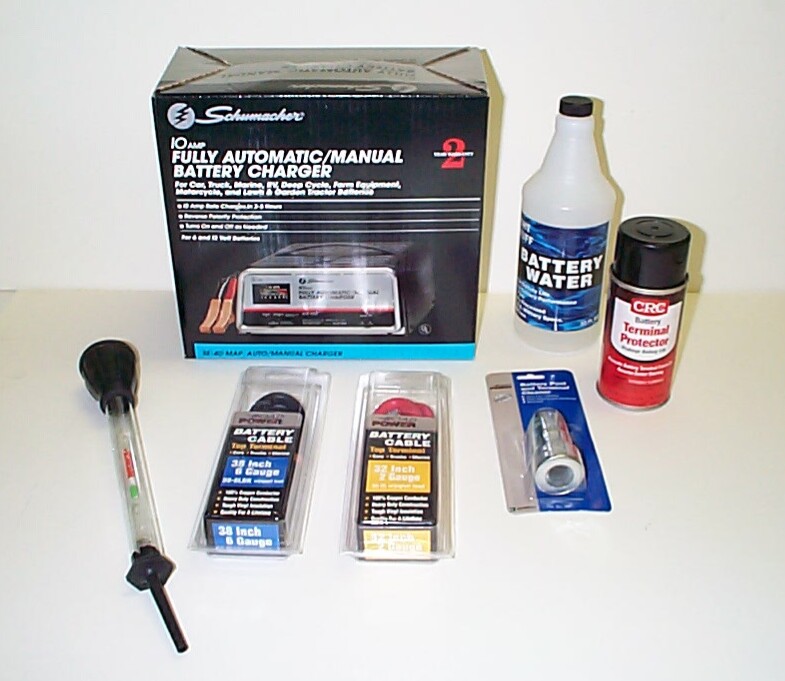 One
cell was "in the green" and the rest were neutral. The battery could
stand to be topped off with water and recharged. I saddled up Renegade
again and stopped off at an ATM machine on my way back to Discount Auto
Parts. I grabbed a bottle of "Right Stuff Battery Water", a can of "CRC
Battery Terminal Protector", a "Road Power Battery Post and Terminal
Cleaner", a "32 inch 2 gauge red Battery Cable" for positive to starter
connection, a "38 inch 6 gauge black Battery Cable" for negative to
ground connection, and a "Schumacher 10 amp Fully Automatic/Manual
Battery Charger". My arms were full and I waddled up to the checkout. I
never use carts in a place like this. I only buy what I can carry in my
two arms . . . kind of limits my spending and helps keep me within
budget a little since I don't have a SWMBO
to perform that function.
One
cell was "in the green" and the rest were neutral. The battery could
stand to be topped off with water and recharged. I saddled up Renegade
again and stopped off at an ATM machine on my way back to Discount Auto
Parts. I grabbed a bottle of "Right Stuff Battery Water", a can of "CRC
Battery Terminal Protector", a "Road Power Battery Post and Terminal
Cleaner", a "32 inch 2 gauge red Battery Cable" for positive to starter
connection, a "38 inch 6 gauge black Battery Cable" for negative to
ground connection, and a "Schumacher 10 amp Fully Automatic/Manual
Battery Charger". My arms were full and I waddled up to the checkout. I
never use carts in a place like this. I only buy what I can carry in my
two arms . . . kind of limits my spending and helps keep me within
budget a little since I don't have a SWMBO
to perform that function.
I topped off the battery with water using the Hydrometer like a big eyedropper to eliminate splashing and clean the Hydrometer at the same time. Why the difference in cable gauges?? I don't know but that's what BillyBob's existing setup is and I'm a primitive before the electron gods. Until I know more, I'll do everything I can to appease them including monkey-see-monkey-do stuff. If Dad's spirit is riding with me today, he's probably laughin' in his beer right now.
December 10th 2000 Got off to a slow start and heading in the wrong direction. I had filled the battery too full yesterday so I dropped the level of the electrolyte a quarter-inch in each cell before connecting the battery charger. I used a long, heavy-duty extension cord to connect the charger to a power source inside the Krash Lab. The ammeter on the front of the charger didn't move off it's peg but the charger was humming. A few hours of this and a few hydrometer readings (all in the red) convinced me something was amiss. I finally removed the extension cord and plugged the charger directly into an outdoor power outlet. The ammeter now shows charging, go figure.
It wasn't long before the charger was back to it's old pegged reading (zero), but the hydrometer readings were still in the red. Pulled out the RadioShack Digital Multimeter which indicated a 12.80 voltage reading. Don't know if I need a new battery or not.
 December
11th 2000 Reinstalled
the battery and sprayed terminals with CRC Battery Terminal Protector.
Lights work but starter still won't turn. Gave the starter a few light
whacks with a ball-peen hammer, hoping maybe a "dead spot" was the
problem . . . no joy. Next thing in the trouble-shooting tree is to
take-off and examine the Starter Switch. This is held onto the top of
BillyBob's starter with two slotted screws. The back one is hard to
reach and mangled a little from previous repairs, so I'll have to
remove the whole starter to get at it.
December
11th 2000 Reinstalled
the battery and sprayed terminals with CRC Battery Terminal Protector.
Lights work but starter still won't turn. Gave the starter a few light
whacks with a ball-peen hammer, hoping maybe a "dead spot" was the
problem . . . no joy. Next thing in the trouble-shooting tree is to
take-off and examine the Starter Switch. This is held onto the top of
BillyBob's starter with two slotted screws. The back one is hard to
reach and mangled a little from previous repairs, so I'll have to
remove the whole starter to get at it.
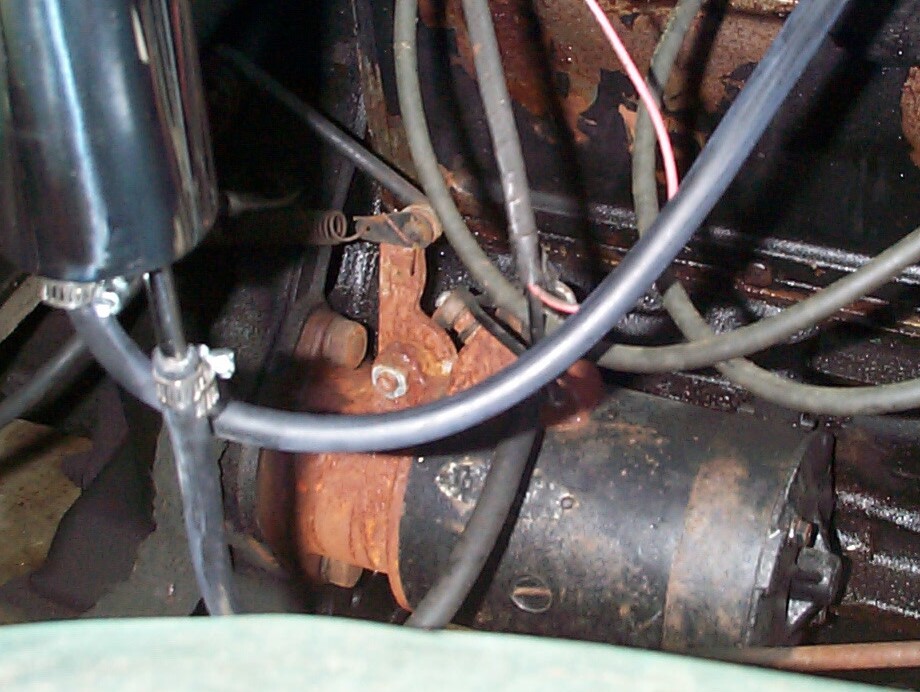
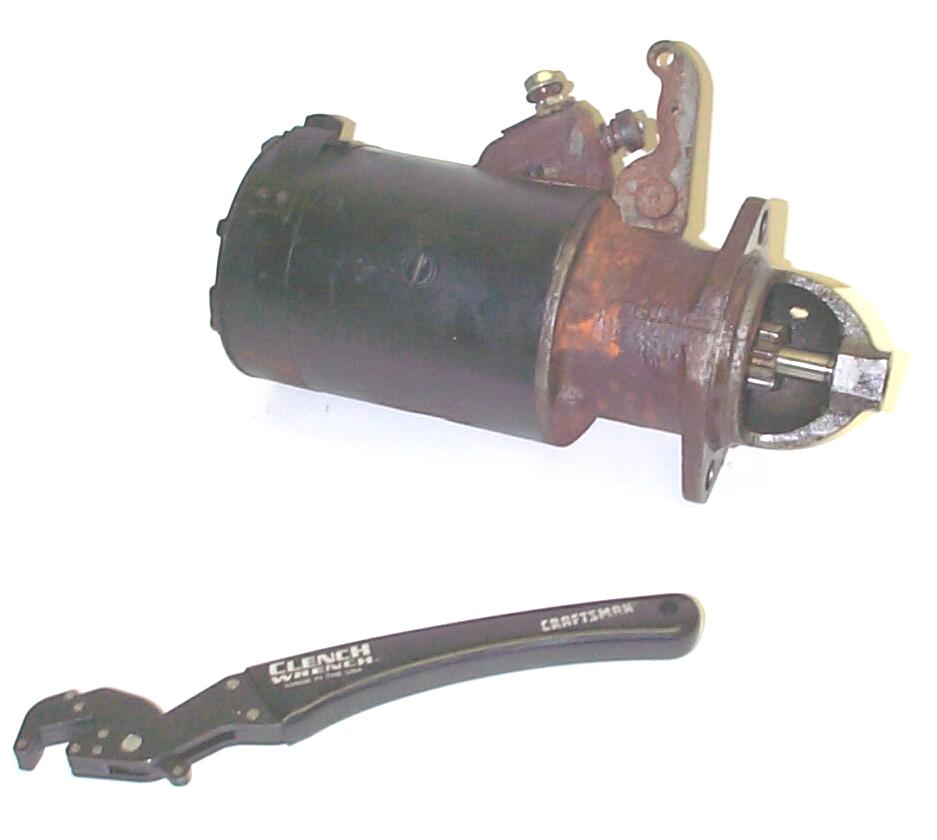
December 12th 2000 Ordered a rebuilt 1938-55 1st 6 volt with foot switch on top starter (#REME425) and a spare 1955 1st-62 Starter Switch (#EL112) from Kelly at Jim Carter's. I'm hopin' I can repair BillyBob's starter but this is the backup plan and I've begun stocking spare parts that I don't think I can get locally to eliminate as much downtime as possible for BillyBob in the future.
 December
16th 2000 Well, Murphy
whacked me a good'un right upside the head first thing this morning to
let me know who was boss. Went up to the warehouse bay to remove
BillyBob's starter . . . WRONG! The
starter is held in place by a 3/4" bolt on the bottom and a 3/4" nut on
a threaded stud at the top (wrench size), rusted in BillyBob's case. No
room for a socket or a box end wrench and the only thing I had that
would fit is a short open end wrench. That didn't cut the mustard.
Couldn't budge it, even tho' I had soaked these with Kroil/AeroKroil
Penetrating Oil earlier in the week. Went back to the Krash Lab to
regroup. Made a Sears run to check out Craftsman's line of speciality
wrenches. Decided to take a chance with their 10" Clench Wrench. Back
at the warehouse that did the trick. The slightly longer, and friendly
to the hand, Clench Wrench loosened the starter nut and bolt enuf to
finish with the open end wrench.
December
16th 2000 Well, Murphy
whacked me a good'un right upside the head first thing this morning to
let me know who was boss. Went up to the warehouse bay to remove
BillyBob's starter . . . WRONG! The
starter is held in place by a 3/4" bolt on the bottom and a 3/4" nut on
a threaded stud at the top (wrench size), rusted in BillyBob's case. No
room for a socket or a box end wrench and the only thing I had that
would fit is a short open end wrench. That didn't cut the mustard.
Couldn't budge it, even tho' I had soaked these with Kroil/AeroKroil
Penetrating Oil earlier in the week. Went back to the Krash Lab to
regroup. Made a Sears run to check out Craftsman's line of speciality
wrenches. Decided to take a chance with their 10" Clench Wrench. Back
at the warehouse that did the trick. The slightly longer, and friendly
to the hand, Clench Wrench loosened the starter nut and bolt enuf to
finish with the open end wrench.
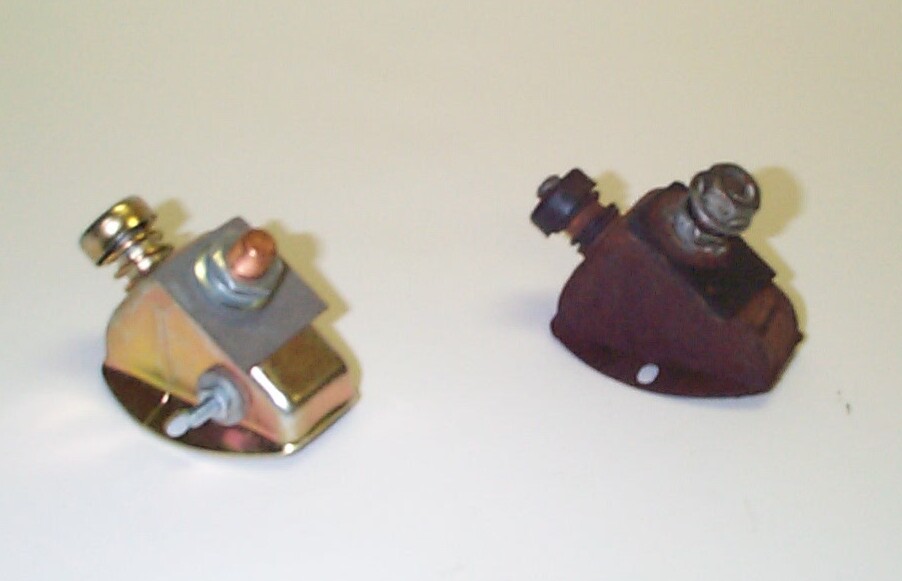 December
18th 2000 The new
starter switch arrived from Jim Carter's today, but the re-built
starter is on backorder. The new switch has a small side terminal that
the old switch is missing which I'm going to ignore for the time being.
I will clean up the contact on top BillyBob's old starter and install
the new switch on it . . . If I'm lucky, I'll get BillyBob back on the
road this weekend.
December
18th 2000 The new
starter switch arrived from Jim Carter's today, but the re-built
starter is on backorder. The new switch has a small side terminal that
the old switch is missing which I'm going to ignore for the time being.
I will clean up the contact on top BillyBob's old starter and install
the new switch on it . . . If I'm lucky, I'll get BillyBob back on the
road this weekend.
December 19th 2000 "Timing is everything" or "Ask and you shall receive" are sayings that come to mind. No sooner had I written the above observation about the side terminal on the new starter switch when I recieved a message regarding the same from the ole trucks e-mail list by John Dorsey. He states that it can be used to provide full voltage to the coil during startup.
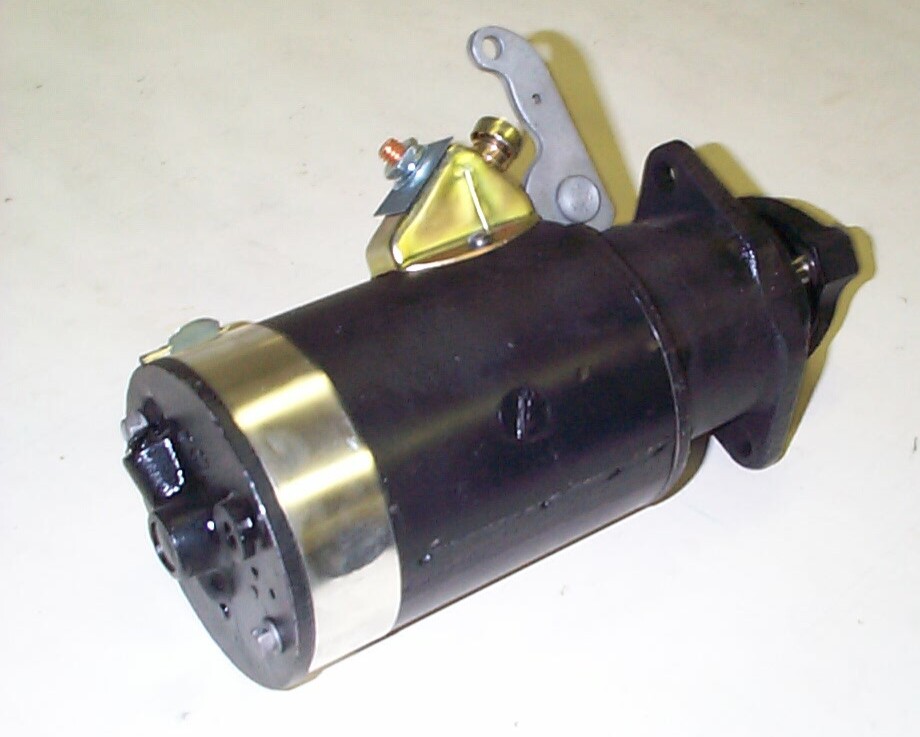 December
20th 2000 BillyBob got
his Christmas present today - The re-built starter arrived from Jim
Carter's and it is "more purdy than a new-born calf!"
This changes my plans for Saturday a bit. I will install the new
starter and bring BillyBob to the Krash Lab before messin' around with
his old starter to see if I can get it to work with the new switch. One
small difference I see with the new starter is that it has an oil cup
for lubrication on the end that BillyBob's old starter is missing.
Uuuhhmmm, the shop manual says the starter motor has an "oiless
bearing" and does not need lubrication, but since this is not a 1954
starter motor but a re-built 1938-1955 1st series motor, the manual may
be wrong for BillyBob's new configuration.
December
20th 2000 BillyBob got
his Christmas present today - The re-built starter arrived from Jim
Carter's and it is "more purdy than a new-born calf!"
This changes my plans for Saturday a bit. I will install the new
starter and bring BillyBob to the Krash Lab before messin' around with
his old starter to see if I can get it to work with the new switch. One
small difference I see with the new starter is that it has an oil cup
for lubrication on the end that BillyBob's old starter is missing.
Uuuhhmmm, the shop manual says the starter motor has an "oiless
bearing" and does not need lubrication, but since this is not a 1954
starter motor but a re-built 1938-1955 1st series motor, the manual may
be wrong for BillyBob's new configuration.
 December
23rd 2000 Bad day at
Blackrock. Sky is overcast, rain threatening and yesterday a gust of
wind ripped the front of my Jeep Renegade's soft top away from the
frame. I should have been ready for more disappointment when I arrived
at BillyBob's warehouse, but I wasn't. Installed the new starter and
still the engine would not crank!! Crestfallen, I retreated back to the
Krash Lab with my tail between my legs to lick my mental wounds.
December
23rd 2000 Bad day at
Blackrock. Sky is overcast, rain threatening and yesterday a gust of
wind ripped the front of my Jeep Renegade's soft top away from the
frame. I should have been ready for more disappointment when I arrived
at BillyBob's warehouse, but I wasn't. Installed the new starter and
still the engine would not crank!! Crestfallen, I retreated back to the
Krash Lab with my tail between my legs to lick my mental wounds.
 For
some inexplicable reason I seem to think better in the Krash Lab than
up at the warehouse. It's possible that the new starter is DOA but I
don't want to comtemplate that just yet. This is the simplest circuit
in the electrical system - battery, switch, starter period! If I can't
figure this one out, I'm in deep doo-doo! I'm still not comfortable
with the state of the battery, the hydrometer readings not being up to
snuff even tho' the lights work and the voltage across the terminals
reads OK. Later, JR told me that I should have checked the voltage
across the terminals when trying to crank the engine, not just in a
static state without a load. DUH!
For
some inexplicable reason I seem to think better in the Krash Lab than
up at the warehouse. It's possible that the new starter is DOA but I
don't want to comtemplate that just yet. This is the simplest circuit
in the electrical system - battery, switch, starter period! If I can't
figure this one out, I'm in deep doo-doo! I'm still not comfortable
with the state of the battery, the hydrometer readings not being up to
snuff even tho' the lights work and the voltage across the terminals
reads OK. Later, JR told me that I should have checked the voltage
across the terminals when trying to crank the engine, not just in a
static state without a load. DUH!
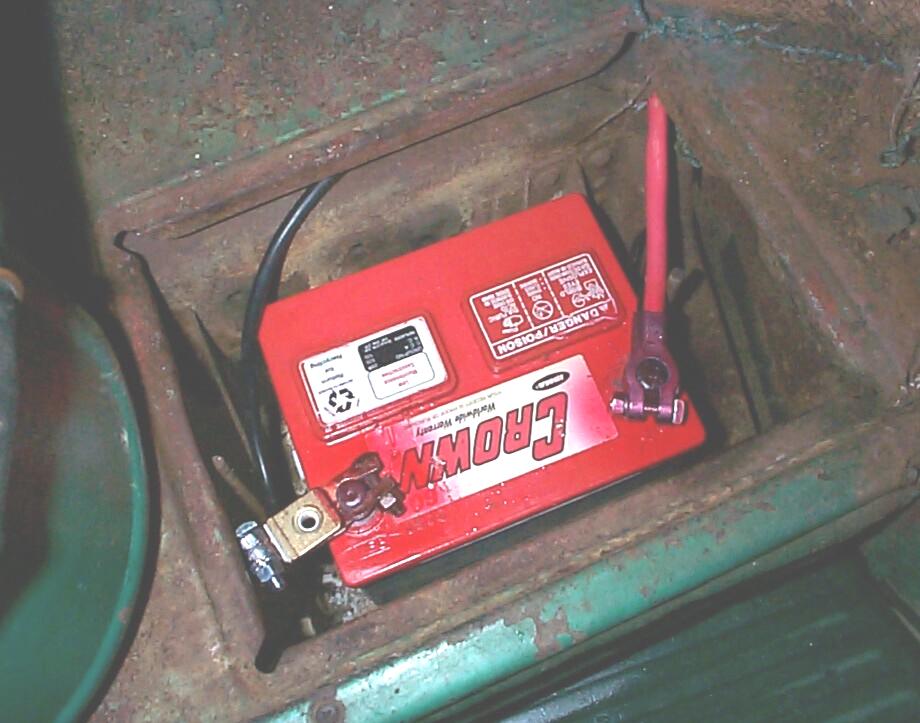
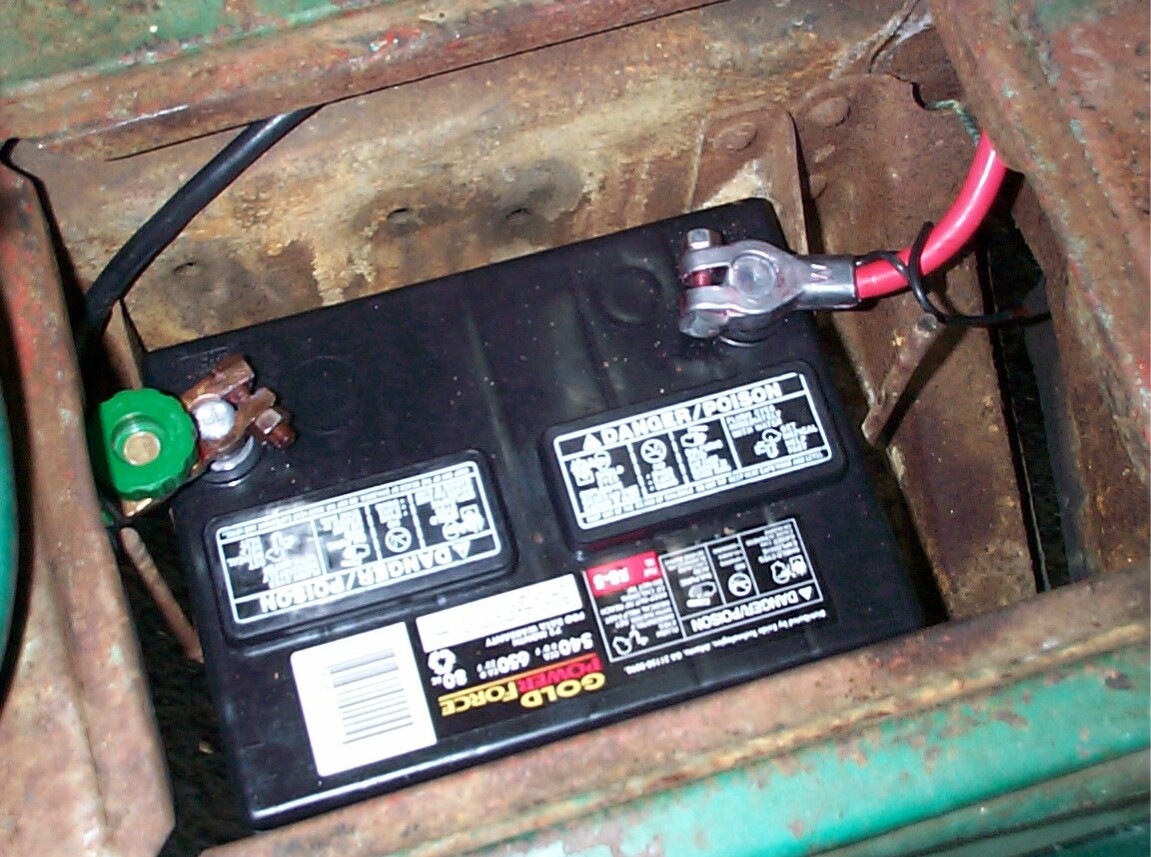
I went back up to the warehouse and connected Renegade's battery to the starter and to ground with jumper cables, something I should have tried way back, if only I'd thought of it. That worked!! Battery Bad, Starter and Switch good. Back to Discount Auto Parts for a replacement battery. With the new battery I had strong cranking and BillyBob is back on the road.
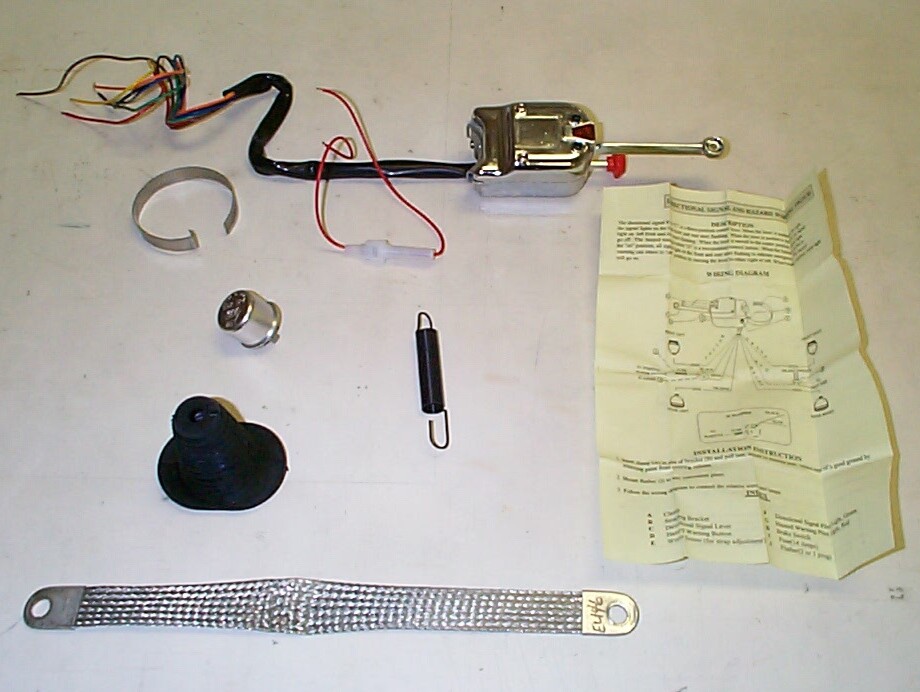 December
26th 2000 Package of
electrical related stuff arrived from American Classic Truck Parts this
morning: Turn Signal Lever Assembly (#EL133), 12v Turn Signal Flasher
(#TFS), Starter Boot (#FL117), Starter Return Spring (#FL825), and 12"
Braided Ground Strap (#EL146).
December
26th 2000 Package of
electrical related stuff arrived from American Classic Truck Parts this
morning: Turn Signal Lever Assembly (#EL133), 12v Turn Signal Flasher
(#TFS), Starter Boot (#FL117), Starter Return Spring (#FL825), and 12"
Braided Ground Strap (#EL146).
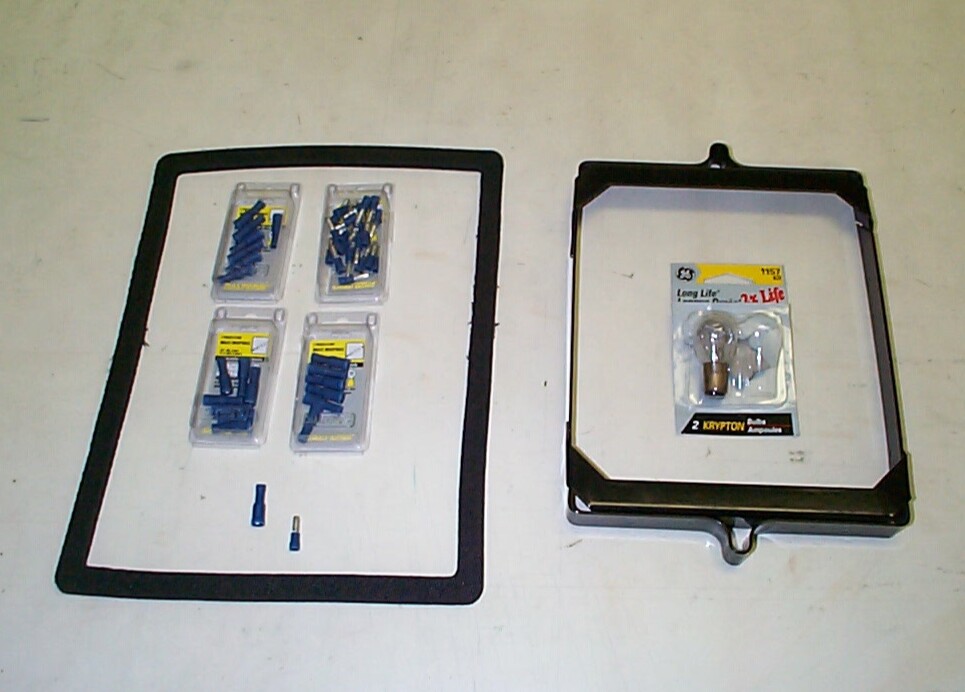 January
11th 2001 Got parts
from Chevy-Duty last Saturday including (#43-311) Battery Hole Cover
Gasket and (#43-015) Battery Top Retainer. Also picked up GE double
filament 12v tail light lamps #1157 and Calterm bullet type wiring
connectors (to match those that shipped with the Jim Carter Wiring
Harness) at Discount Auto Parts.
January
11th 2001 Got parts
from Chevy-Duty last Saturday including (#43-311) Battery Hole Cover
Gasket and (#43-015) Battery Top Retainer. Also picked up GE double
filament 12v tail light lamps #1157 and Calterm bullet type wiring
connectors (to match those that shipped with the Jim Carter Wiring
Harness) at Discount Auto Parts.
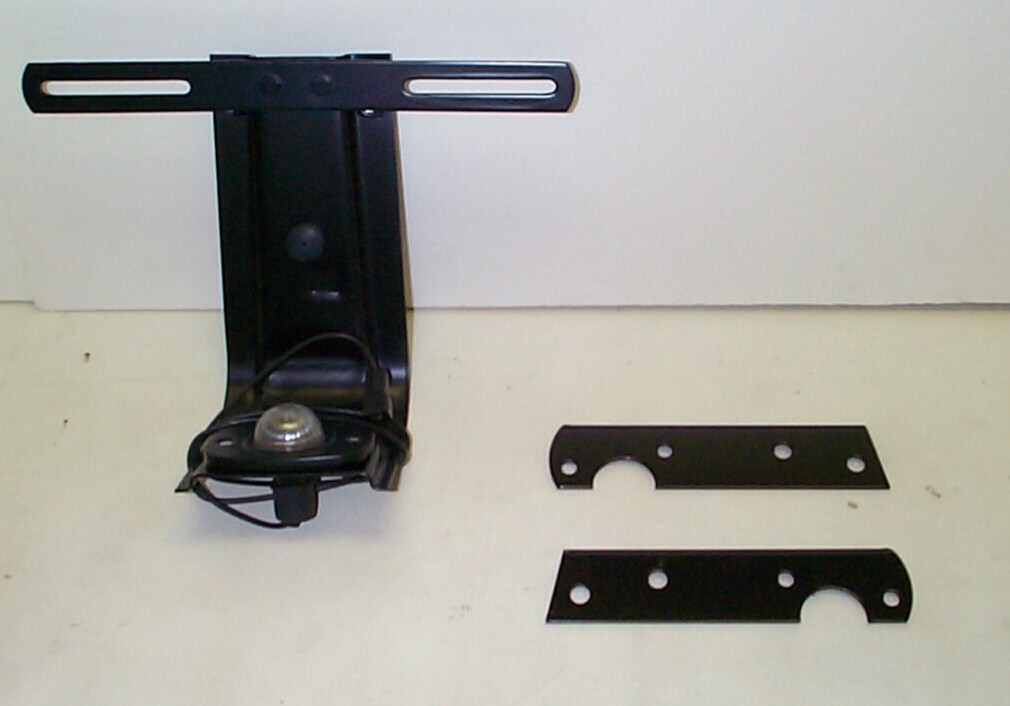 Earlier
this week a shipment from American Classic Truck Parts also arrived. It
included (#LG149) 54-55 Left Taillight Bracket, (#LG163) 54-55 Right
Taillight Bracket and (#LG823) 54-59 Rear License Bracket Assembly,
Stepside, with Lamp. I must admit that I don't see how the License
Bracket mounts - the drawings in the Factory Assembly Manual don't look
much like this do-dad.
Earlier
this week a shipment from American Classic Truck Parts also arrived. It
included (#LG149) 54-55 Left Taillight Bracket, (#LG163) 54-55 Right
Taillight Bracket and (#LG823) 54-59 Rear License Bracket Assembly,
Stepside, with Lamp. I must admit that I don't see how the License
Bracket mounts - the drawings in the Factory Assembly Manual don't look
much like this do-dad.
January 13th 2001 Another chilly Saturday so I'm doin' what I can inside before venturing outside to work on BillyBob. I've dusted off my long dis-used and limited AutoCad skills to draw what will become BillyBob's new wiring diagram. The first circuit I've drawn is the Starter Circuit. A frequent contributer to the Stovebolt.com forums, Chief, is working on a beautiful wiring diagram that puts mine to shame. It is designed for the layman not the electrician. Instead of arcane symbols, devices are depicted as highly detailed three-dimensional objects. It's worth your while to give Chief's diagram a gander.
After it warmed up a bit, I masked the ends of the new 12" Braided Ground Strap and sprayed the strap with Eastwood's "Diamond Clear Gloss Finish for Bare Metal" aerosol (#10200Z). Took the old ground strap off and put the connecting bolts and washers in Eastwood's "Vibratory Tumbler System" (catalog #43204) for a cleaning session.
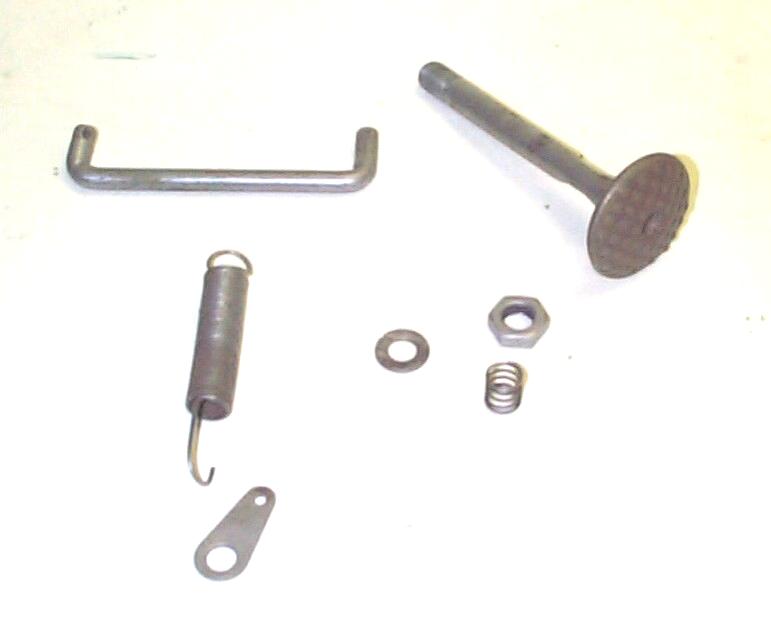
Removed as many elements of the "Starter Control" assembly as I could to toss in the tumbler for cleaning. These parts included the Button (597505), Rod (3685128), Spring (598073), Link (597792) and assorted washers, nuts and bolts. The number designations are from the "Starter Control Instruction" page of the Factory Assembly Manual. I don't have enuf room to get at all the bolts holding the Pedal Shaft Assembly (3685136) in place without removing the shift box on the steering column and/or getting some more specialized wrenches so I satisfied myself with applying some penetrating oil to the bolts for the time being. After the tumbler session, all the parts were re-assembled and the new ground strap was installed.
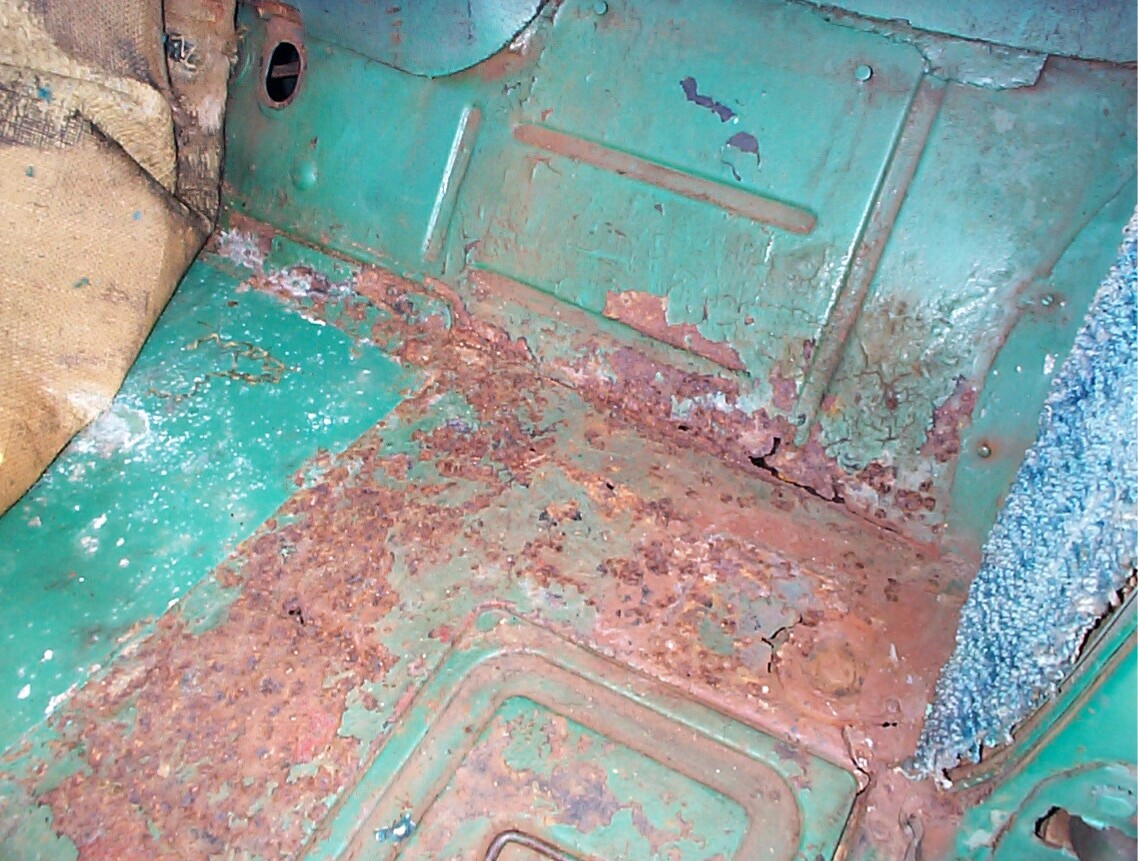 January
14th 2001 Removed same
parts as yesterday for another tumbler session. Ran the shop vac over
BillyBob's interior, above and under the retro shag carpet . . . Hoo-Boy!!
I'm gonna have to lose some weight or replace the floor boards soon.
Half the floor material disappeared up the shop vac nozzle. If ya shine
a spotlight from underneath, I think you'd get a good approximation of
the Milky Way on a clear cold night. I'm hopin' It can wait 'til next
year. I'm buying and learning how to use air tools this year, mig
welding is scheduled for 2002.
January
14th 2001 Removed same
parts as yesterday for another tumbler session. Ran the shop vac over
BillyBob's interior, above and under the retro shag carpet . . . Hoo-Boy!!
I'm gonna have to lose some weight or replace the floor boards soon.
Half the floor material disappeared up the shop vac nozzle. If ya shine
a spotlight from underneath, I think you'd get a good approximation of
the Milky Way on a clear cold night. I'm hopin' It can wait 'til next
year. I'm buying and learning how to use air tools this year, mig
welding is scheduled for 2002.
 The
second tumbler session got the parts ready for re-finishing. I will
replace the big spring (with the one I got from American Classic Truck
Parts) and washer, electro-plate the rod nut, small spring, replacement
washer and clip and paint the rod, link and button . . . next week, I
hope.
The
second tumbler session got the parts ready for re-finishing. I will
replace the big spring (with the one I got from American Classic Truck
Parts) and washer, electro-plate the rod nut, small spring, replacement
washer and clip and paint the rod, link and button . . . next week, I
hope.
January 20th 2001 I hope Dubya is having as good a day as I am on this Inauguration Day. Everything is going well here at the Krash Lab. I removed the same parts as last week and threw them in the tumbler again with the exception of the rod, link and button which, after being cleaned with PRE, were hung up in the shed for a primer coat. I also removed the two shiftbox levers-to-shift-rods swivel assemblies and placed them in the tumbler too. When these parts last received attention several months ago, they were cleaned only and now they're showing beginning signs of surface rust.
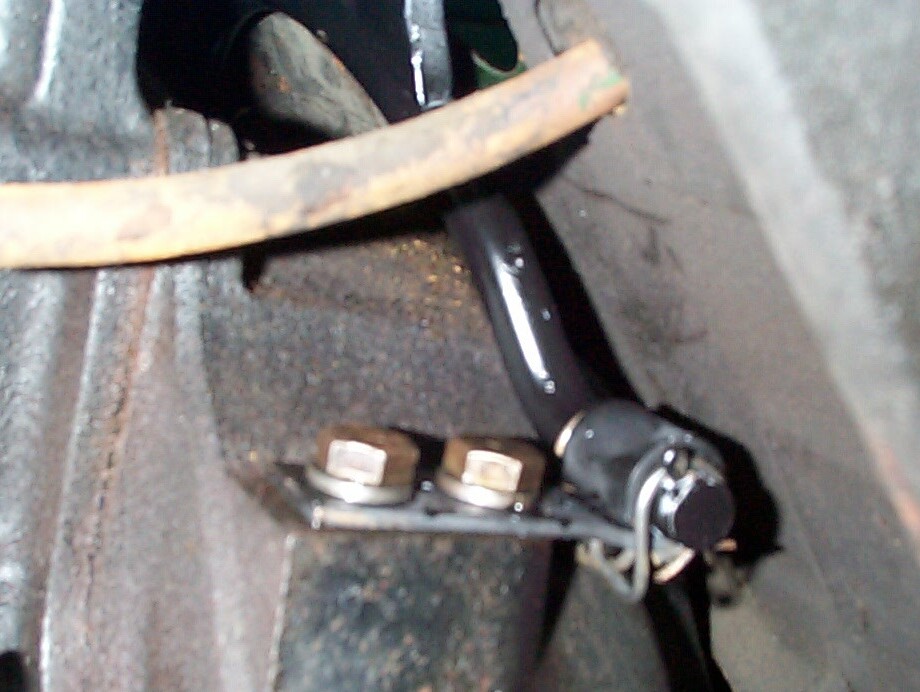
Removing these swivels and moving the shift rods out of the way allowed enuf access to the Pedal Shaft Assembly bolts to loosen and remove them. There's also enough room between the bellhousing and firewall to get the Pedal Shaft Assembly out. All the parts I could get off the assembly including mounting bolts and washers joined the other parts in the tumbler. The remaining assembly shaft and passenger side mounting bracket were treated to a drill-assisted wire brushing, Eastwood's PRE Paint Prep (catalog #10041Z), OxiSolv rust remover/cleaner (#16026), and another PRE treatment. It then joined the other parts in the shed for priming.
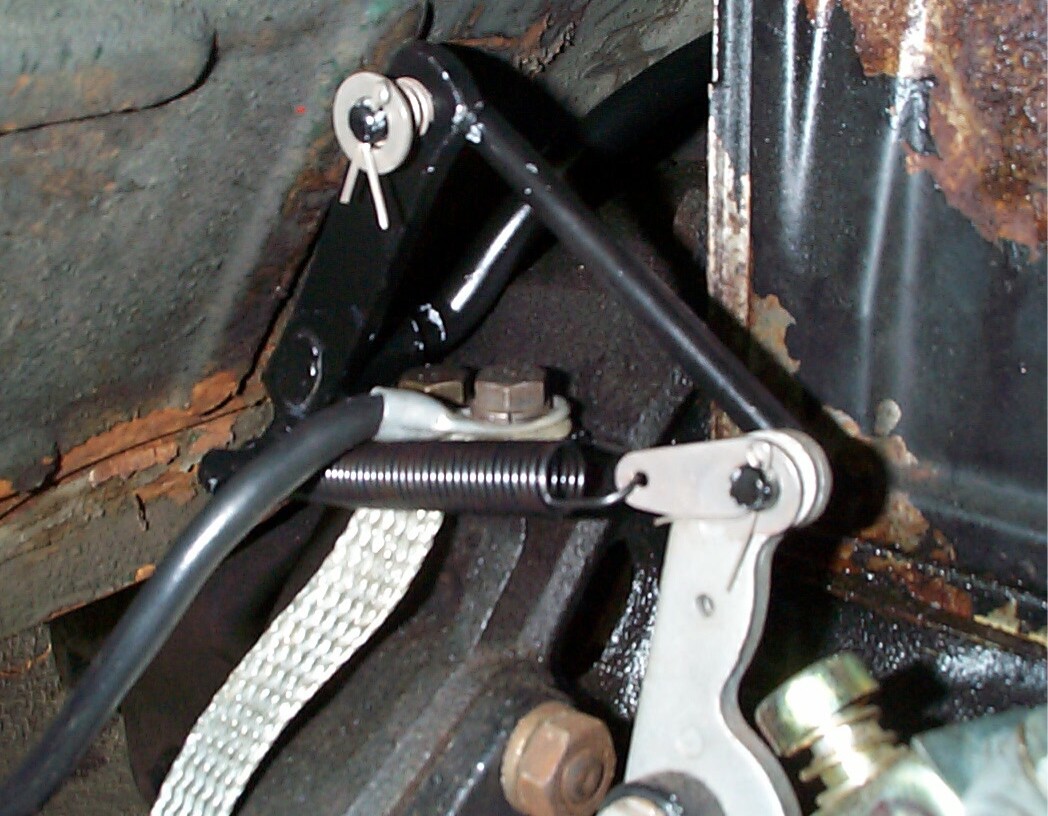
 After
the primer, the Rod and Button got a couple of coats of Chassis Black
while the Link and Pedal Shaft got coats of Under Hood Black . . . Then
I got supprised by a gully-washer rain
front passing thru on its way out to sea. I hunkered down inside to
watch the new President's speech while the storm passed. Timing is
everything, and the storm passed in time for me to treat and primer the
other Pedal Shaft bracket while Clinton gave yet one more farewell
speech at Andrews Air Force Base. The primer was followed up with one
coat of Under Hood Black. Then a light rain started and gave no signs
of letup. Gave up and put things back together in the rain at this
point. The pic is of the Pedal Shaft Assembly on the driver's side
(View "A" detail in the Factory Assembly Manual drawing).
After
the primer, the Rod and Button got a couple of coats of Chassis Black
while the Link and Pedal Shaft got coats of Under Hood Black . . . Then
I got supprised by a gully-washer rain
front passing thru on its way out to sea. I hunkered down inside to
watch the new President's speech while the storm passed. Timing is
everything, and the storm passed in time for me to treat and primer the
other Pedal Shaft bracket while Clinton gave yet one more farewell
speech at Andrews Air Force Base. The primer was followed up with one
coat of Under Hood Black. Then a light rain started and gave no signs
of letup. Gave up and put things back together in the rain at this
point. The pic is of the Pedal Shaft Assembly on the driver's side
(View "A" detail in the Factory Assembly Manual drawing).
 January
27th 2001 Started today
off by removing the Button (597505), Rod (3685128), Spring (598073),
Link (597792), cotter pins, flat washer, small spring and rod nut from
the Starter Control assembly. The parts I didn't paint last week were
plated with Eastwood's Tin-Zinc Electroplating System (#10049Z), then
tossed in the tumbler for a polishing session. After the tumbler put a
satin sheen on the plated parts, they were re-assembled.
January
27th 2001 Started today
off by removing the Button (597505), Rod (3685128), Spring (598073),
Link (597792), cotter pins, flat washer, small spring and rod nut from
the Starter Control assembly. The parts I didn't paint last week were
plated with Eastwood's Tin-Zinc Electroplating System (#10049Z), then
tossed in the tumbler for a polishing session. After the tumbler put a
satin sheen on the plated parts, they were re-assembled.
 Finally,
the new starter button boot was treated with Armorall Protectant and
placed on the rod and button. The rod, button and boot were manhandled
into place with a few minutes worth of curses. I've been cutting down
on my cussin' since profanity has become so commonplace, and I like to
view myself as a rugged individualist (whether true or not). The
starting process isn't as smooth as it was (before I "fixed" it).
Sometimes the starter will spin without engaging the flywheel. I've
learned to lightly touch the starter button 'til it engages instead of
mashin' it as was my practice in the past. This new ritual seems
successful so far. Snappy-Dog, a member in the Stovebolt.com Electrical
Forum has some insight into this problem in a message
thread started by 356sc.
Finally,
the new starter button boot was treated with Armorall Protectant and
placed on the rod and button. The rod, button and boot were manhandled
into place with a few minutes worth of curses. I've been cutting down
on my cussin' since profanity has become so commonplace, and I like to
view myself as a rugged individualist (whether true or not). The
starting process isn't as smooth as it was (before I "fixed" it).
Sometimes the starter will spin without engaging the flywheel. I've
learned to lightly touch the starter button 'til it engages instead of
mashin' it as was my practice in the past. This new ritual seems
successful so far. Snappy-Dog, a member in the Stovebolt.com Electrical
Forum has some insight into this problem in a message
thread started by 356sc.
Well that's enuf for my first timid foray into BillyBob's electrical system. What started out as a re-wiring job has mushroomed into a refurb of all the electrical components encountered along the way. The next log entry in this series will continue with cleanup of the battery box area and replacing the taillights, among other things. See ya then.
| < Back to Intro |
You can email me at ![]() webmaster@laroke.com
webmaster@laroke.com
Issued Tuesday February 6, 2001
Updated Thursday May 4, 2017
copyright © 1996-2017 Larry Robert Kephart all rights reserved
| | LRK Home | | Bio Info | | Krash Khronicles | | LAROKE | |
| | BettyLou | | BillyBob's Garage | | Rat Patrol | | Deerslayer | | Elvira | |
| | Land of the Free and Home of the Brave | |
| | Keppylou's Art | | WWI Soldier's Diary | |