| | LRK Home | | Bio Info | | Krash Khronicles | | LAROKE | |
| | BettyLou | | BillyBob's Garage | | Rat Patrol | | Deerslayer | | Elvira | |
| | Land of the Free and Home of the Brave | |
| | Keppylou's Art | | WWI Soldier's Diary | |
BillyBob Work-in-Progress Log
![]()
TRUCK LINKS including vendor sites for old parts, custom parts, and tools as well as sites for classic car and truck organizations
STORE Operating in association with Amazon.com, books, recordings and tools can be purchased.
PLANNING for the restoration including project schedule and cost estimates.
![]()
WORK-IN-PROGRESS is the restoration of parts of BillyBob that I can accomplish without a garage.
PRE-RESTORATION includes log entries of minor repairs and and adventures between time of purchase and the time when I started restoration, a piece at a time.
JR'S KORNER JR's Korner is the history of BillyBob before I got him authored by my brother, Wm. C. Kephart.
![]()
BILLYBOB MAINTENANCE Ever changing detailing, oil change, lube, etc. maintenance routines specifically developed for BillyBob, including required tools, materials and procedures.
![]()
You will need the Adobe Acrobat browser plugin to view these wiring diagrams which are in the PDF file format. This format allows zooming and panning. If you don't have this plugin, it can be downloaded and installed (free) from the Adobe site. The button below will take you there.
![]()
CHARGING/IGNITION CIRCUIT The updated charging and ignition circuit includes the new 12v coil and distributor wiring.
GAS GAUGE CIRCUIT The updated gas gauge circuit now shows the new sender unit.
BILLYBOB WIRING DIAGRAM Here's the whole updated spaghetti bowl. The present state of BillyBob's wiring diagram including the above sub-diagrams and the new headlight switch with its jumper wire.
18. Nervous Breakdown: Gas Sender, Alternator, Headlights, Light Switch and Coil
December 1st 2001 At the end of the re-wiring job, I still didn't have a working gas gauge. I ordered one from Chevy Duty Online and it arrived yesterday. Two of my fellow ole truck enthusiasts, Nadine Kohn and Bill Hanlon e-mailed me regarding the gas sender. Both suspected a bad ground. Bill included a good list of troubleshooting instructions:
Before you spend the money on the sender for the gas tank make sure that is what you need. Remove the wire from the sender at the tank and connect it to a good ground. If the gauge still reads FULL you have a wiring problem back towards the gauge. If it now reads EMPTY, re-connect the wire to the sender and then make sure the sending unit is grounded. The best way is to remove one of the screws holding the sending unit to the tank, clean up to bare metal under the screw and run a wire from beneath the screw to a good ground. Try the gauge again. If it reads FULL go ahead and replace the sending unit. If not, you just had a bad ground to the tank.
Another reason I ordered a new gas sender was that the gas line that goes down the center of the unit had broken loose and would have to be re-soldered or re-brazed. I may try to fix it later as a spare.
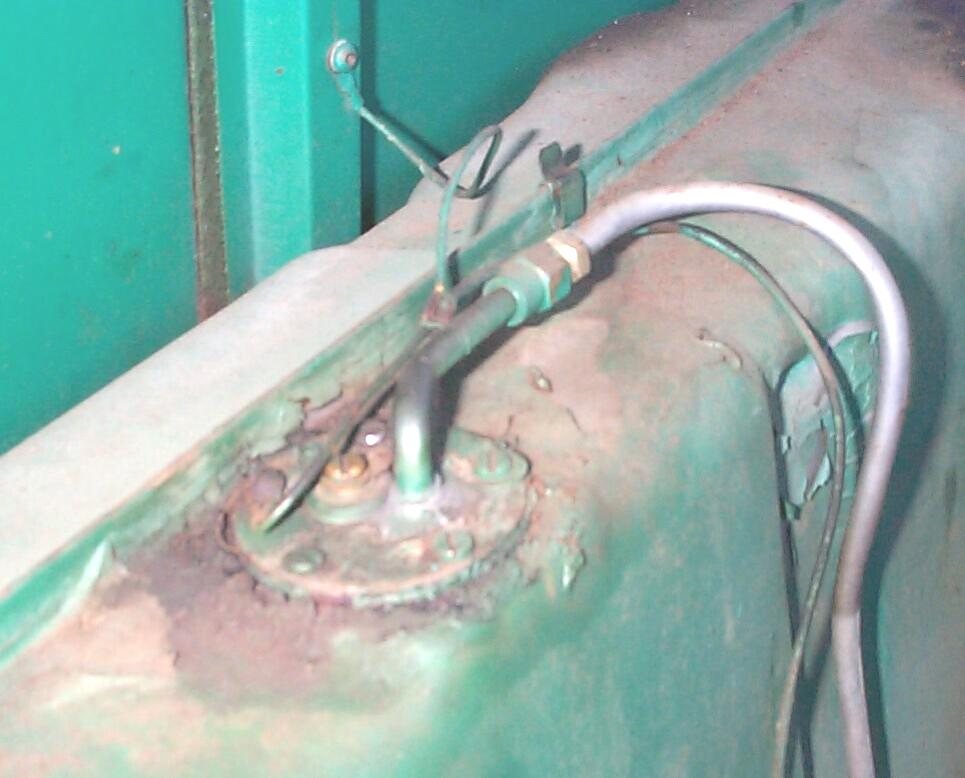 Disconnected
the battery. Removed the seat again (it's easier the second time
around). The sender area of the gas tank looked pretty grotty, so it
was wire brushed lightly and sprayed with compressed air from a
rattlecan. The wire from the gauge and the ground wire were removed.
Got to use my clutch head screwdrivers for the first time as the ground
connection to the cab was a 5/32" clutch head screw.
Disconnected
the battery. Removed the seat again (it's easier the second time
around). The sender area of the gas tank looked pretty grotty, so it
was wire brushed lightly and sprayed with compressed air from a
rattlecan. The wire from the gauge and the ground wire were removed.
Got to use my clutch head screwdrivers for the first time as the ground
connection to the cab was a 5/32" clutch head screw.
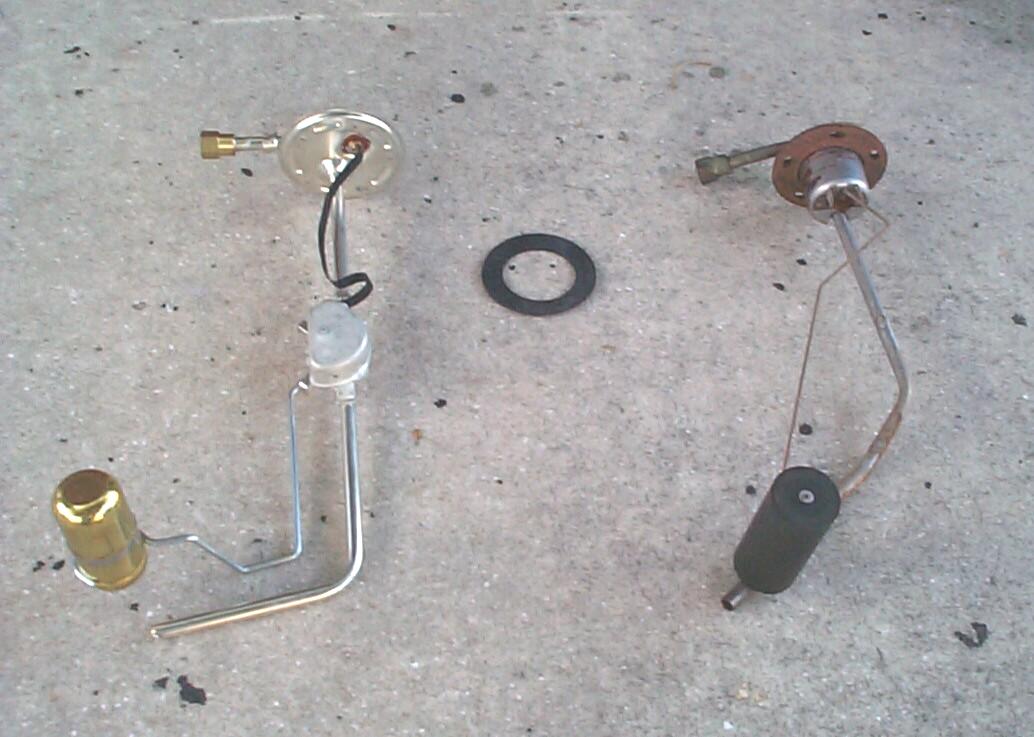 The
old sender and the new sender look substantially different from each
other. The gas tank in the sender area was carefully cleaned (trying to
keep dirt out of the gas) and the new sender was installed without
conflict. The gas line was reconnected with a little threadlocker blue
on the threads.
The
old sender and the new sender look substantially different from each
other. The gas tank in the sender area was carefully cleaned (trying to
keep dirt out of the gas) and the new sender was installed without
conflict. The gas line was reconnected with a little threadlocker blue
on the threads.
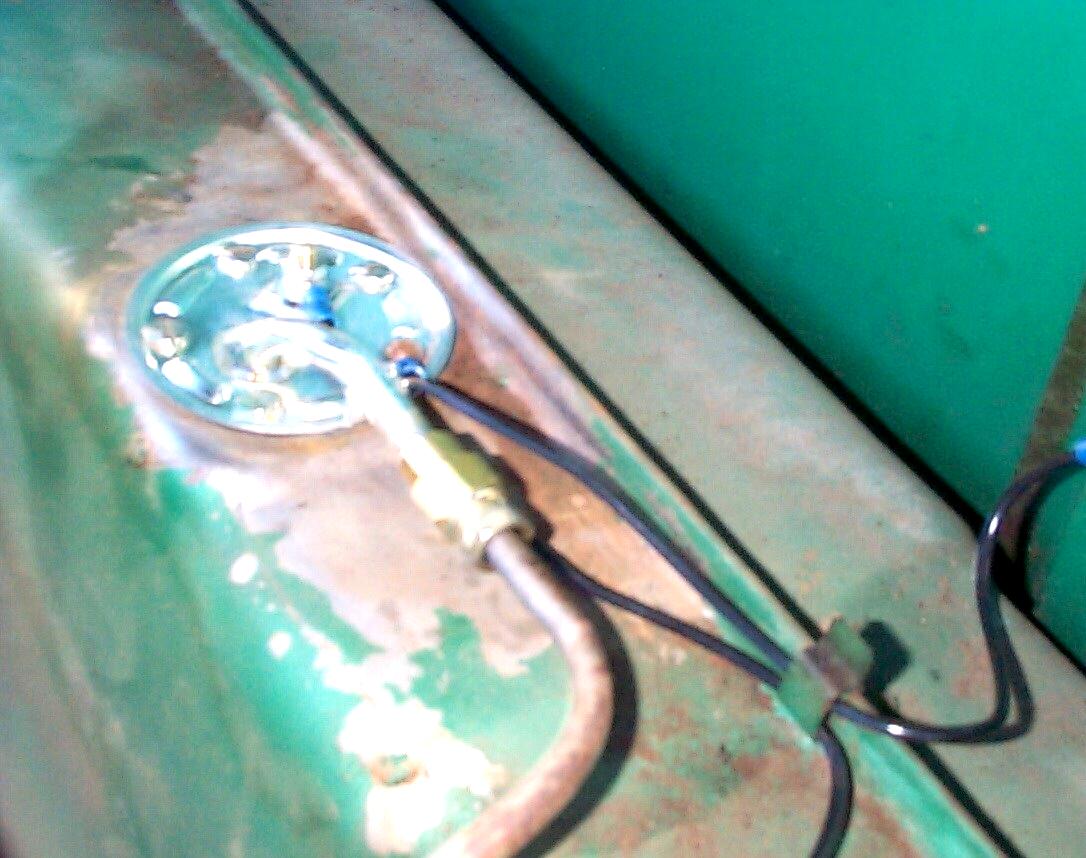 Crawled
under BillyBob and cut out the existing gas sender wire grommet from
the cab floor. The wire from the wiring harness to the sender is navy
blue but I thought it was black so I ran a length of new black wire
from the sender to the bullet connector under the cab. I used the old
wire as a "snake" to pull the new wire. A new grommet was placed and a
bullet connector crimped on the new wire. Topside, new ring connectors
were crimped on the sender wire and a new ground wire (also black).
After reconnecting all the wires, the battery was reconnected and the
ignition turned on . . . Success! The new gas gauge now reads about 7/8
of a tank full which is about right.
Crawled
under BillyBob and cut out the existing gas sender wire grommet from
the cab floor. The wire from the wiring harness to the sender is navy
blue but I thought it was black so I ran a length of new black wire
from the sender to the bullet connector under the cab. I used the old
wire as a "snake" to pull the new wire. A new grommet was placed and a
bullet connector crimped on the new wire. Topside, new ring connectors
were crimped on the sender wire and a new ground wire (also black).
After reconnecting all the wires, the battery was reconnected and the
ignition turned on . . . Success! The new gas gauge now reads about 7/8
of a tank full which is about right.
January 1st 2002 A new year starts and I spent some of the day detailing BillyBob's parking lights and taillights. The plastic parking light lenses which are fairly new are brittle around the mounting screw bosses and cracking ~!@#$%^ I also noticed that altho' the turn signal circuit was working fine, the parking light circuit was not . . . Time for some investigative work. I know it was working before the Thanksgiving re-wiring.
January 2nd 2002 Hmm, foolin' around by working the headlight switch caused the parking lights to come on this morning. Probably indicates the wiring is OK. I'm also getting more instances of chatter from the old starter when cranking. I'm beginning to convince myself that a tired old ring gear is the cause and I'm not lookin' forward to that operation anytime soon.
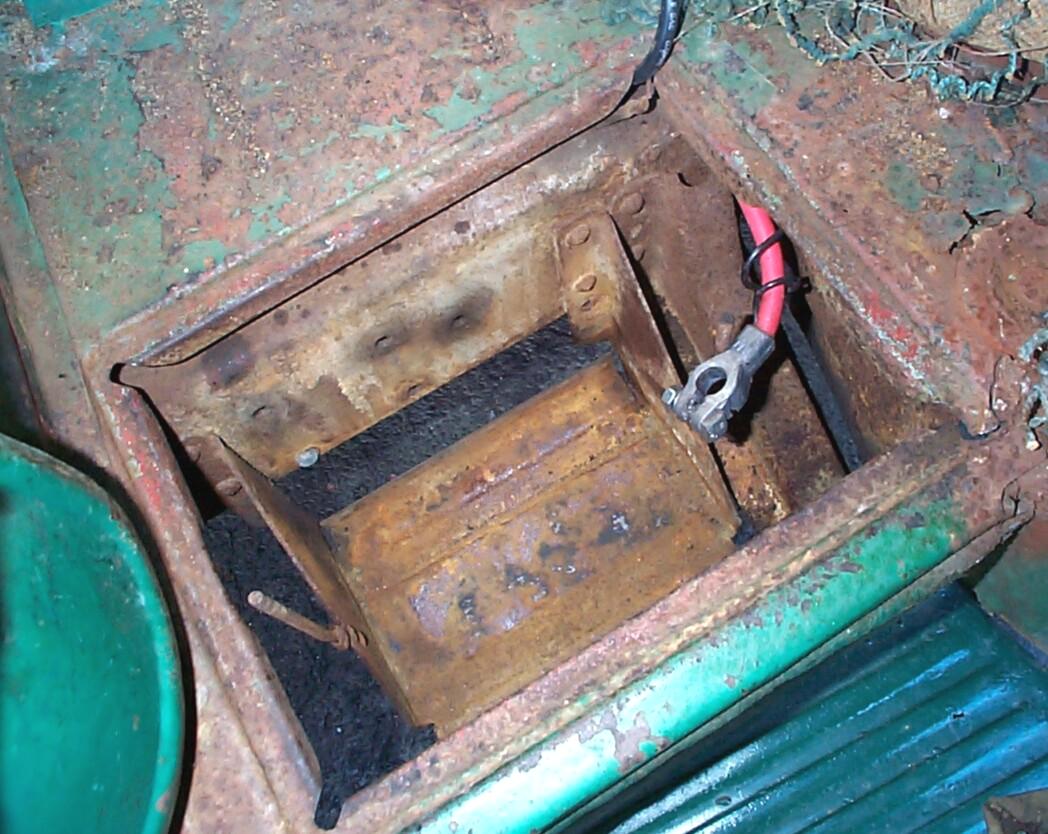 February
3rd 2002 Back to the
battery. Yesterday, the battery was removed and the accessible areas of
the battery box degreased, scrapped and wire brushed. The front running
board bracket is right up against the side of the battery box and it's
difficult to do a thorough job where the bracket is.
February
3rd 2002 Back to the
battery. Yesterday, the battery was removed and the accessible areas of
the battery box degreased, scrapped and wire brushed. The front running
board bracket is right up against the side of the battery box and it's
difficult to do a thorough job where the bracket is.
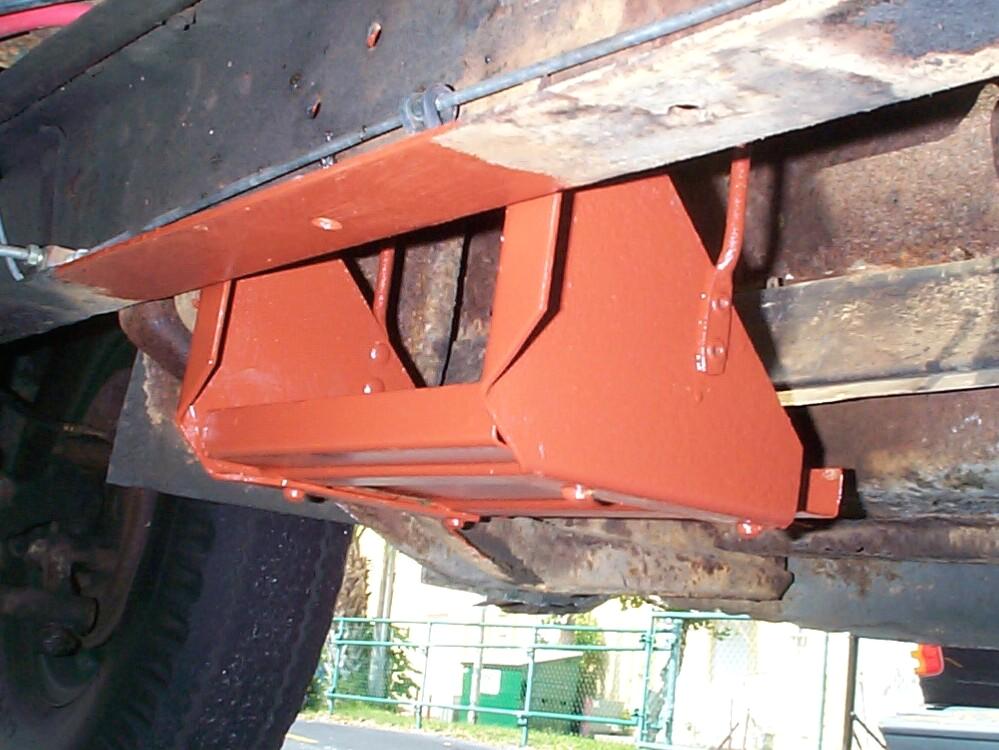 Finished
up with a brush coat of Eastwood's Corroless. Replaced the
battery and went home. Removed the battery again first thing this foggy
morning and followed up the Corroless with a spray coat of Eastwood
Chassis Black after prepping with Eastwood's PRE Paint Prep. Some time
back, I butchered a battery top retainer trying to make it fit
BillyBob's current battery. I ordered another one from Chevy Duty and
intended some more intelligent butchering today. I discovered that the
current battery's case is just a smideon too big no matter how much of
the retainer is cut away so, I abandoned that idea and put the new
retainer away until sometime in the (hopefully distant) future when I
get a smaller battery.
Finished
up with a brush coat of Eastwood's Corroless. Replaced the
battery and went home. Removed the battery again first thing this foggy
morning and followed up the Corroless with a spray coat of Eastwood
Chassis Black after prepping with Eastwood's PRE Paint Prep. Some time
back, I butchered a battery top retainer trying to make it fit
BillyBob's current battery. I ordered another one from Chevy Duty and
intended some more intelligent butchering today. I discovered that the
current battery's case is just a smideon too big no matter how much of
the retainer is cut away so, I abandoned that idea and put the new
retainer away until sometime in the (hopefully distant) future when I
get a smaller battery.
March 11th 2002 The plastic parking light lens on the driver's side fell off today. I know when it happened cause I was on the road and I ran over it. I remember thinking I ran over a plastic bottle and how could I miss seeing it. The screws and gasket were intact so the plastic just disinergrated around the screw bosses til it fell apart. I don't know where these things are made but I'd be willing to bet on mainland China. When I first noticed this problem, I ordered 'nother set (amber this time) from Chevy Duty. We'll see if they're any better than the clear ones. I still have the originals somewhere. I think I'll find 'em and clean 'em up.
March 30th 2002 A couple of weeks ago, BillyBob developed a whirring sound that was loud enuf to drown out the clack-clack sound of the solid lifters. I was mildly alarmed. I was pretty sure it was coming from the alternator but my hearing has never been acute and I can't count a stethescope among my tools yet. I purchased a spare throw-out bearing and short-shaft water pump for good measure just in case it wasn't the alternator. I don't know much about my existing alternator 'cept that it does not have an internal voltage regulator and that it came from a sixties era GM brand vehicle of some kind.
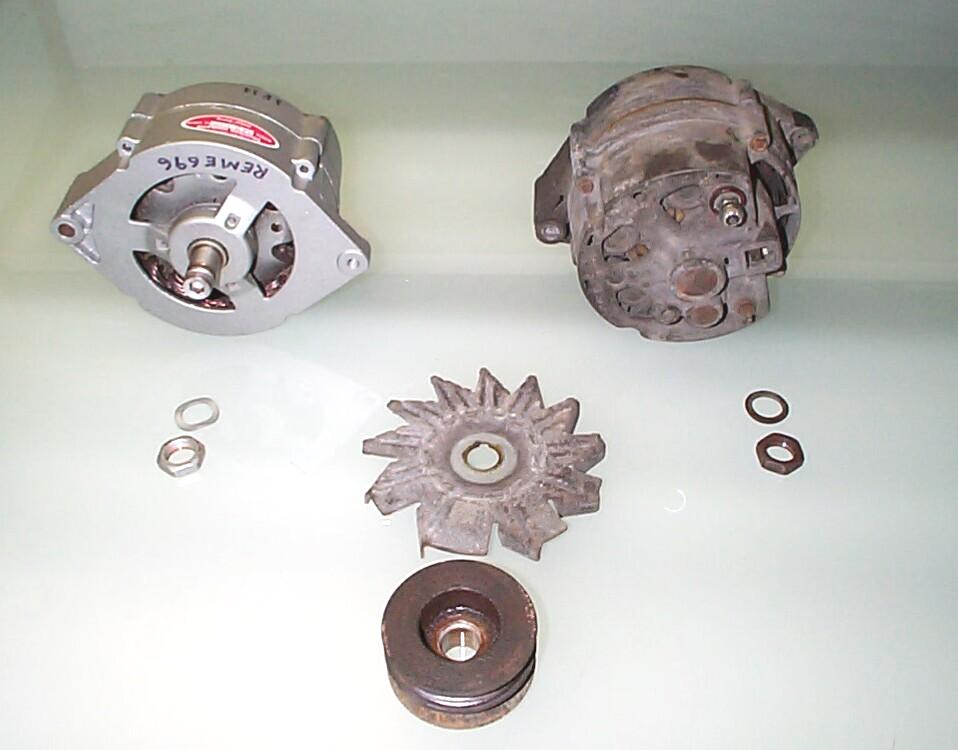 I
found an alternator in the Jim Carter online catalog that
looked close (Fits 1963-72. For original trucks having external voltage
regulators. Rebuilt, ready to install.) so, I took a chance and ordered
it. It arrived this week and is marked as a Delcotron 54 D, 12 volt, 61
amp alternator. I couldn't believe my good luck . . . Physically, this
thing looks exactly like my existing one! I'll gladly accept this good
fortune but it won't keep me from lookin' over my shoulder for Murphy.
Took awhile to get the old alternator off . . . The old familiar rusted
bolts problem. The jerry-rigged alternator mounting appears to use the
old 6 volt generator bracket. The alternator pivots at the bottom on a
long threaded rod thru the bracket holes. Two tube spacers are mounted
on this rod behind the alternator to keep the alternator from sliding
back and forth along the threaded rod. There is a hex nut at each end
of the threaded rod. After, getting this connection apart, I had to
remove the pulley and cooling impeller from the old alternator. Rusted
again, and I wasn't making any progress with hand tools, so I clamped
the pulley in the Black and Decker Workmate and went to work on the
pulley nut with the impact wrench . . . That worked.
I
found an alternator in the Jim Carter online catalog that
looked close (Fits 1963-72. For original trucks having external voltage
regulators. Rebuilt, ready to install.) so, I took a chance and ordered
it. It arrived this week and is marked as a Delcotron 54 D, 12 volt, 61
amp alternator. I couldn't believe my good luck . . . Physically, this
thing looks exactly like my existing one! I'll gladly accept this good
fortune but it won't keep me from lookin' over my shoulder for Murphy.
Took awhile to get the old alternator off . . . The old familiar rusted
bolts problem. The jerry-rigged alternator mounting appears to use the
old 6 volt generator bracket. The alternator pivots at the bottom on a
long threaded rod thru the bracket holes. Two tube spacers are mounted
on this rod behind the alternator to keep the alternator from sliding
back and forth along the threaded rod. There is a hex nut at each end
of the threaded rod. After, getting this connection apart, I had to
remove the pulley and cooling impeller from the old alternator. Rusted
again, and I wasn't making any progress with hand tools, so I clamped
the pulley in the Black and Decker Workmate and went to work on the
pulley nut with the impact wrench . . . That worked.
Later on, these bracket parts, pulley and cooling impeller will be cleaned and refinished, but for today, I just want to get the new alternator installed to see if it solves my problem. Getting the threaded rod back thru the bracket holes, alternator and tube spacers was a real bear. If the engine was out of the truck, this would be easy, but in situ, it involves a lot of cussin'. You can't get a hammer in line with the rod. I eventually got things back together. Time to test. Hook up the battery and start the engine with fingers crossed . . . Hooray! I can hear the clattering of the valve train again and the ammeter needle is ticking back 'an forth slightly in the middle of the gauge where it belongs.
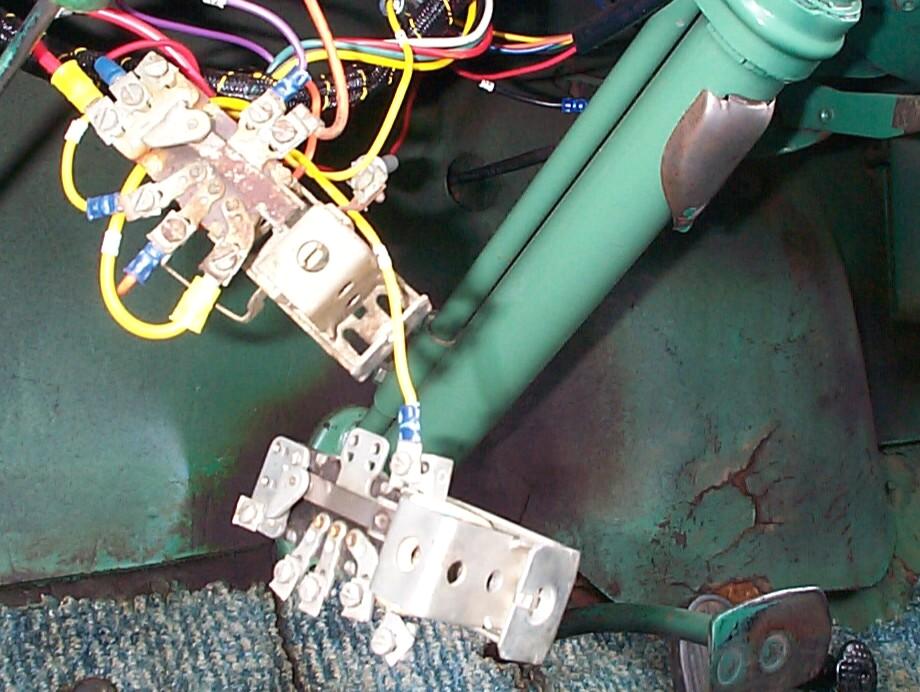 May
12th 2002 Last week a
NOS headlight switch arrived from Vintage Auto Parts, Inc. It's in
very good shape and they aren't making these anymore! My opinion of
Vintage Auto Parts has improved since my first order. My old switch is
rusted and corroded and sometimes, I have trouble turning the lights
off. This switch is for 1948-54, car and 47-54, trucks. I noticed one
slight difference between it and BillyBob's original switch. The new
switch has a second terminal on the rheostat (dash light dimmer) where
the original switch has a metal conductor running to the taillight
terminal. I ignored the difference initally, and installed the new
switch, then tested it. The parking lights and taillights would not
come on. Took the switch out again and fashioned a jumper wire from the
second rheostat terminal to the taillight terminal. Now everything was
hunky-dory. That's nice. The switch action is much smoother. It may be
my imagination but, the original switch looks a little more rusty to me
than when BillyBob was re-wired in November. I've got to fix the
windshield leaks, if only temporarily.
May
12th 2002 Last week a
NOS headlight switch arrived from Vintage Auto Parts, Inc. It's in
very good shape and they aren't making these anymore! My opinion of
Vintage Auto Parts has improved since my first order. My old switch is
rusted and corroded and sometimes, I have trouble turning the lights
off. This switch is for 1948-54, car and 47-54, trucks. I noticed one
slight difference between it and BillyBob's original switch. The new
switch has a second terminal on the rheostat (dash light dimmer) where
the original switch has a metal conductor running to the taillight
terminal. I ignored the difference initally, and installed the new
switch, then tested it. The parking lights and taillights would not
come on. Took the switch out again and fashioned a jumper wire from the
second rheostat terminal to the taillight terminal. Now everything was
hunky-dory. That's nice. The switch action is much smoother. It may be
my imagination but, the original switch looks a little more rusty to me
than when BillyBob was re-wired in November. I've got to fix the
windshield leaks, if only temporarily.
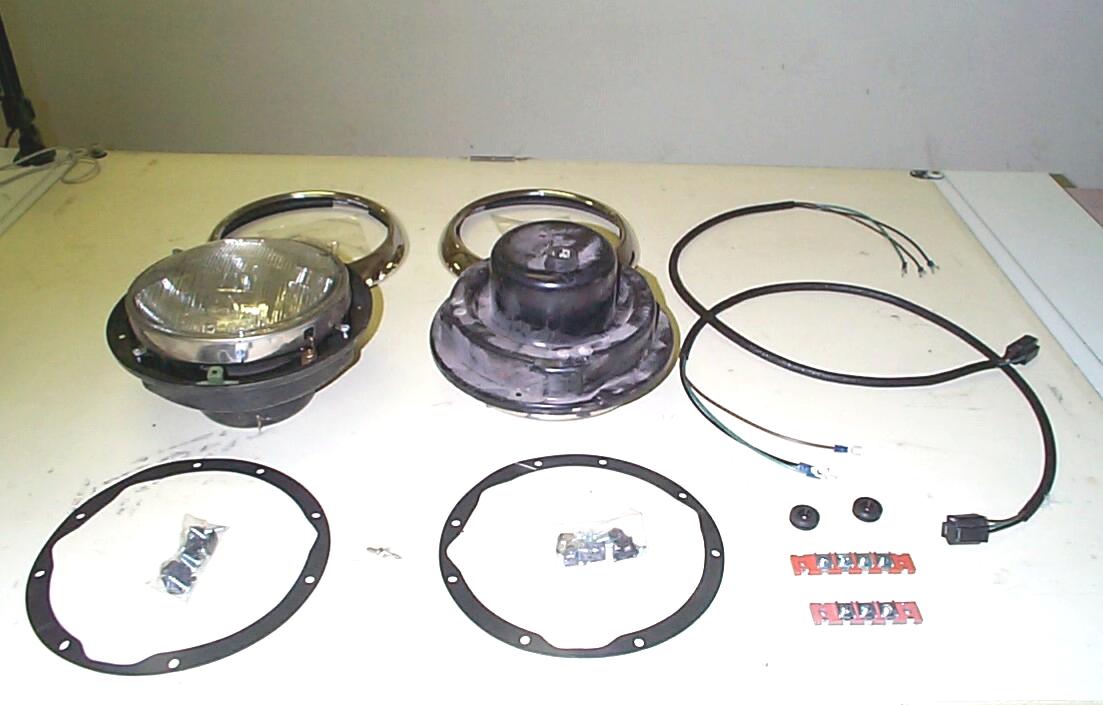 June
29th 2002 Got hit with
a flu bug in the middle of the week and am now just starting to recover
a bit. No heavy lifting today. A few weeks back, I ordered 2 Headlight
Rims (#48-012), Headlight Rim Screws Pr (#48-207), Headlight Bucket
Fender Gaskets Pr (#48-515), 2 Headlight Bucket to Fender Screw sets
(#48-556) and 2 Headlight Buckets, including Lamps (#48-625). Way back,
I purchased the inner fender terminal blocks and grommets. I also had
the headlight wiring sub-harness stubs left from the Jim Carter wiring
harness. Now I've got all the parts to replace the headlights. The
first task is to clean up the new buckets (they arrived dirty and
dusty), and figure out how everything goes together.
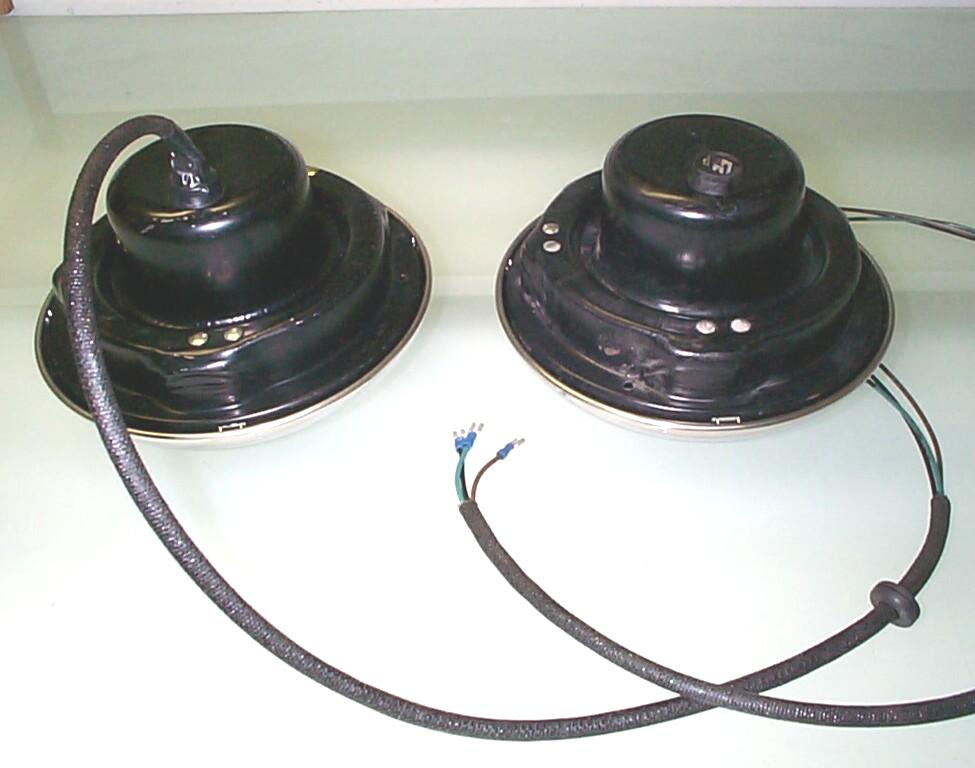
June
29th 2002 Got hit with
a flu bug in the middle of the week and am now just starting to recover
a bit. No heavy lifting today. A few weeks back, I ordered 2 Headlight
Rims (#48-012), Headlight Rim Screws Pr (#48-207), Headlight Bucket
Fender Gaskets Pr (#48-515), 2 Headlight Bucket to Fender Screw sets
(#48-556) and 2 Headlight Buckets, including Lamps (#48-625). Way back,
I purchased the inner fender terminal blocks and grommets. I also had
the headlight wiring sub-harness stubs left from the Jim Carter wiring
harness. Now I've got all the parts to replace the headlights. The
first task is to clean up the new buckets (they arrived dirty and
dusty), and figure out how everything goes together.
Took apart one of the headlamp buckets and washed the lamp housing and sub-body with simple green and water. Dried with hair dryer and reassembled. Then . . . "Houston, We have a problem!" The female socket connector on the wiring stub harness is too big to fit the male socket connector on the back of the headlamp bucket. Aw Fudge! I'm gonna have to change one or the other before these units can be installed. Don't even know where to get these parts at the moment.
 Mounted
the new inner fender terminal blocks. Original terminal blocks have a
tee-shaped spring steel clip type connector to mount to the fender
with. The new terminal blocks just have a hole with a press-metal
stand-off to keep the terminal block from grounding on the fender. Made
a quick trip to a couple of FLAPS for 1/4" - 28 x 1" cap screws and
lock nuts to mount the new terminal blocks. 3/4" long cap screws would
have been more suitable but selection was limited today. Hoped I might
find workable headlight socket connectors too but was out of luck on
that score. Not much accomplished today but limited progress is better
than no progress.
Mounted
the new inner fender terminal blocks. Original terminal blocks have a
tee-shaped spring steel clip type connector to mount to the fender
with. The new terminal blocks just have a hole with a press-metal
stand-off to keep the terminal block from grounding on the fender. Made
a quick trip to a couple of FLAPS for 1/4" - 28 x 1" cap screws and
lock nuts to mount the new terminal blocks. 3/4" long cap screws would
have been more suitable but selection was limited today. Hoped I might
find workable headlight socket connectors too but was out of luck on
that score. Not much accomplished today but limited progress is better
than no progress.
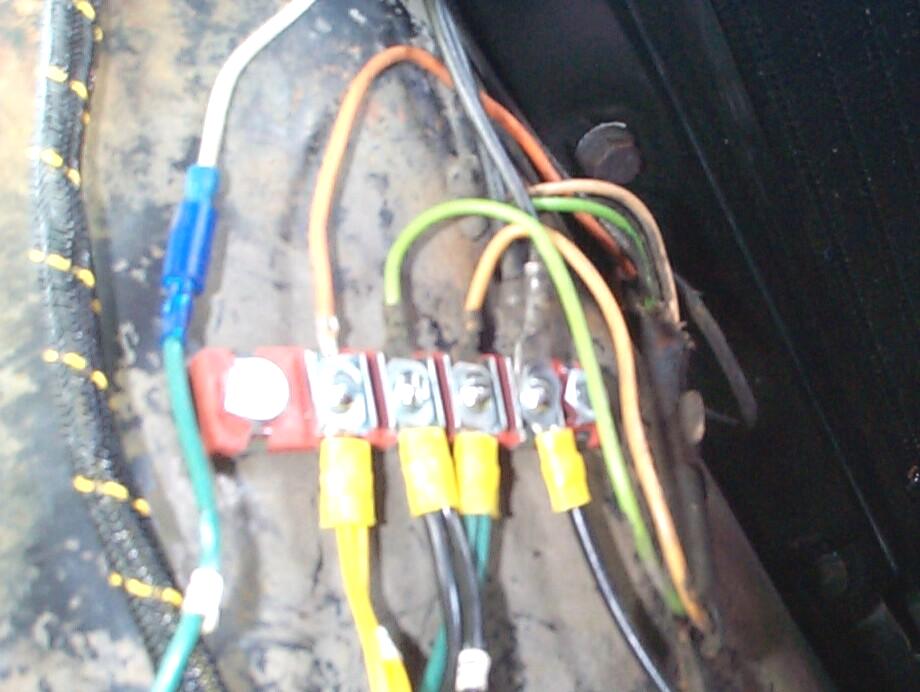
 June
30th 2002 Thought more
about the mis-matched headlight connectors overnite. Decided to abandon
the search for a matching connector. Instead, the wiring stub harness
female connector was cut off and replaced by three female blade
connectors. The main disadvantage with this solution is that I now have
to remember and document which wire connects to which terminal
(brown-top, black-left, green-right). The connection was finished up
with an electrical tape wrapping and the inner fender grommet was
placed on the stub harness using the needle-nose pliers trick to spread
the grommet opening enuf to get the wires thru.
June
30th 2002 Thought more
about the mis-matched headlight connectors overnite. Decided to abandon
the search for a matching connector. Instead, the wiring stub harness
female connector was cut off and replaced by three female blade
connectors. The main disadvantage with this solution is that I now have
to remember and document which wire connects to which terminal
(brown-top, black-left, green-right). The connection was finished up
with an electrical tape wrapping and the inner fender grommet was
placed on the stub harness using the needle-nose pliers trick to spread
the grommet opening enuf to get the wires thru.
Waited for a break in the morning rains and installed the new headlights. Old driver's side bucket was falling apart and wouldn't have lasted much longer. There are four sheet metal screws and clips for each bucket. All came loose 'cept one. I didn't have time to pussyfoot around with it so the 4" grinder came out of the shed. Cleaned up the fender openings a bit and installed the new buckets. Only needed one of the fender to bucket screw kits but it's always good to have a spare. The only old parts I salvaged were the headlamps. Connected the battery, turned on the lights and looked for smoke. Everything seems to be okey-dokey.
August 24th 2002 Planned to replace BillyBob's 6v ignition coil today with a 12v coil ordered from Chevy Duty a couple of months ago (#83-270). I took a close look at it yesterday in preparation for today's work. Box sez "47-59 Ignition Coil 12 Volt". On the coil itself is the warning "use with primary resistance wire or external resistor" . . . Curses! I wanted to git rid of the ballast resistor. I did a search of the stovebolt.com archives and found a NAPA part #IC64 provided by Paul Schmehl (Baldeagle) for a 12v internal resistor coil. I ordered one from NAPA Online but will work with the Chevy Duty unit and existing ballast resistor for the time being. Lugged the blast cabinet down from the warehouse earlier in the week too to the clean the coil bracket for refinishing.
Set up the blast cabinet and air compressor. Removed the old coil and bracket . . . Guess what? It is already a 12v coil just like the one I'm replacing it with. Oh well, sometimes ya gotta lap the track twice to get where ya wanna go. I'll have plenty of spares. Threw the bracket and bolts in the tumbler for a cleaning session. The bracket bolts are 5/16" - 18 x 3/4" cap screws and I just happened to have some new grade 5 replacements and lock washers in one of my parts boxes. Three years into this project now and I'm gettin' to the point that I don't have to run to the FLAPS or hardware store every time I need a bolt. Just once in a while I already have it.
After the tumbler session, I went after the bracket with wire brush wheels in the air powered angle grinder. Then it was short work to finish up with the aluminium oxide media in the blast cabinet. There's somethin' about bare metal when you've managed a good cleaning. I understand gold lust a bit better now. That stuff never corrodes. Next was a coat of Plasti-coat anti-rust primer. Finished up with a coat of Eastwood's Detail Gray (#1246Z) acrylic lacquer.
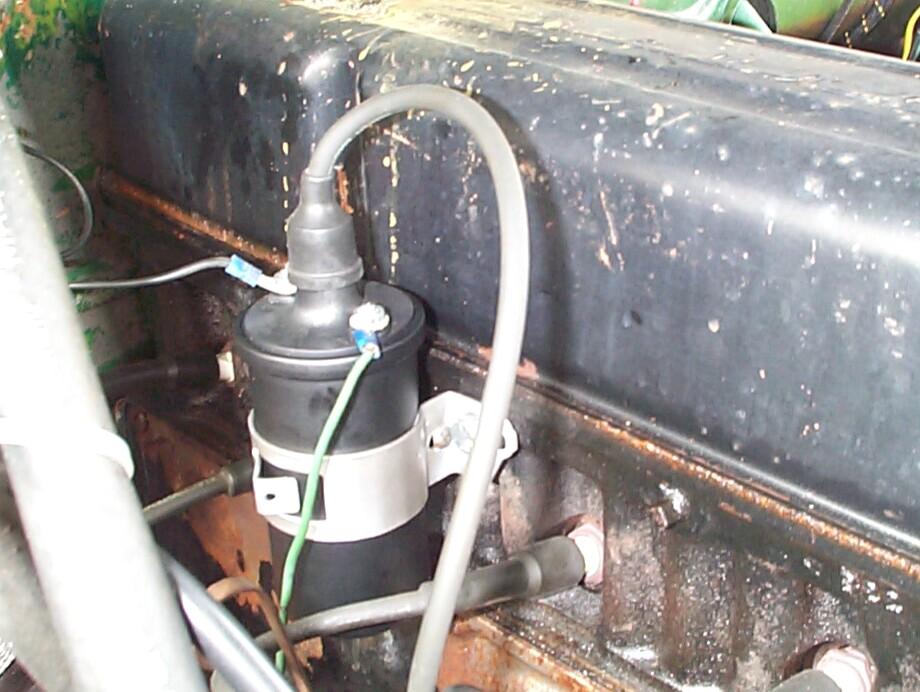 Gave
the paint a couple of hours to dry then reassembled with the new coil.
Used threadlocker blue on the bracket bolts and dielectric grease on
the coil to distributor wire socket. Connected the wires and fired it
up . . . A-OK. Well that's about it for this log entry. We're a little
farther along in the rebuild and I know more than I did at the
beginning. More to do down the road in the electrical department as
well as more frame work, brakes, doors and interior. It never ends,
thank goodness. Oh yeah, I almost forgot. The wiring diagrams were
updated too. You'll find the updates in the gray panel to the left on
this page.
Gave
the paint a couple of hours to dry then reassembled with the new coil.
Used threadlocker blue on the bracket bolts and dielectric grease on
the coil to distributor wire socket. Connected the wires and fired it
up . . . A-OK. Well that's about it for this log entry. We're a little
farther along in the rebuild and I know more than I did at the
beginning. More to do down the road in the electrical department as
well as more frame work, brakes, doors and interior. It never ends,
thank goodness. Oh yeah, I almost forgot. The wiring diagrams were
updated too. You'll find the updates in the gray panel to the left on
this page.
| < Back
to Intro |
You can email me at ![]() webmaster@laroke.com
webmaster@laroke.com
Issued Saturday August 25, 2002
Updated Thursday June 1, 2017
copyright © 1996-2017 Larry Robert Kephart all rights reserved
| | LRK Home | | Bio Info | | Krash Khronicles | | LAROKE | |
| | BettyLou | | BillyBob's Garage | | Rat Patrol | | Deerslayer | | Elvira | |
| | Land of the Free and Home of the Brave | |
| | Keppylou's Art | | WWI Soldier's Diary | |