| | LRK Home | | Bio Info | | Krash Khronicles | | LAROKE | |
| | BettyLou | | BillyBob's Garage | | Rat Patrol | | Deerslayer | | Elvira | |
| | Land of the Free and Home of the Brave | |
| | Keppylou's Art | | WWI Soldier's Diary | |
BillyBob Work-in-Progress Log
![]()
TRUCK LINKS including vendor sites for old parts, custom parts, and tools as well as sites for classic car and truck organizations
STORE Operating in association with Amazon.com, books, recordings and tools can be purchased.
PLANNING for the restoration including project schedule and cost estimates.
![]()
WORK-IN-PROGRESS is the restoration of parts of BillyBob that I can accomplish without a garage.
PRE-RESTORATION includes log entries of minor repairs and and adventures between time of purchase and the time when I started restoration, a piece at a time.
JR'S KORNER JR's Korner is the history of BillyBob before I got him authored by my brother, Wm. C. Kephart.
![]()
BILLYBOB MAINTENANCE Ever changing detailing, oil change, lube, etc. maintenance routines specifically developed for BillyBob, including required tools, materials and procedures.
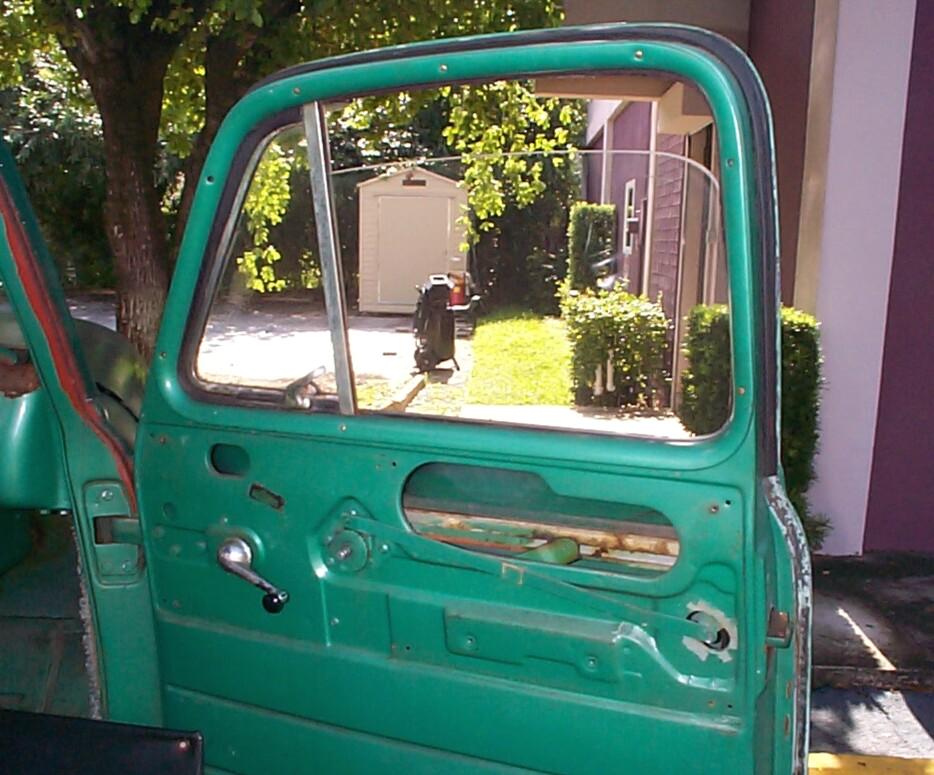
19. Door of Perception
June 8th 2002 (Apologies to Aldous Huxley) Last nite when I got home and slammed the driver's door, there was the loud noise of metal objects/glass falling down inside the door. The window was down at the time and I feared the window regulator had let loose. My guardian angel was watching over me tho', and it turned out to be the interior door handle/latch assembly. The window still worked and I could open and close the door using the outside handle. Today, on the way to the Krash Lab, I realized that BillyBob had lost about half his usual rattles and creakings! It was hard to believe how much noise had been coming from that door. I guess it's time to pay a little attention to the doors. They need everything 'cept maybe hinge work.
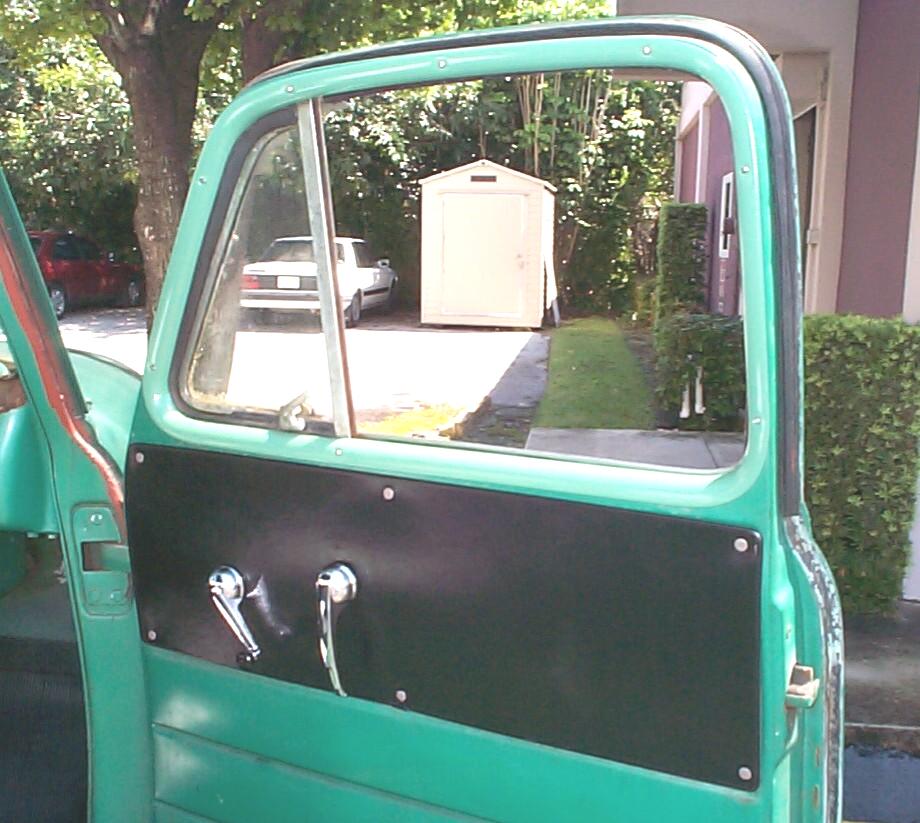
 July
14th 2002 Struck out on
my sandblasting efforts today so I decided to start my initial door
repair investigations. I've decided to rebuild one door at a time
starting with the passenger side door. Took off the inside door handle
and window crank and removed the upholstery panel. The door handle
shaft was pretty well butchered and all the splines were gone. I need
to start ordering parts.
July
14th 2002 Struck out on
my sandblasting efforts today so I decided to start my initial door
repair investigations. I've decided to rebuild one door at a time
starting with the passenger side door. Took off the inside door handle
and window crank and removed the upholstery panel. The door handle
shaft was pretty well butchered and all the splines were gone. I need
to start ordering parts.
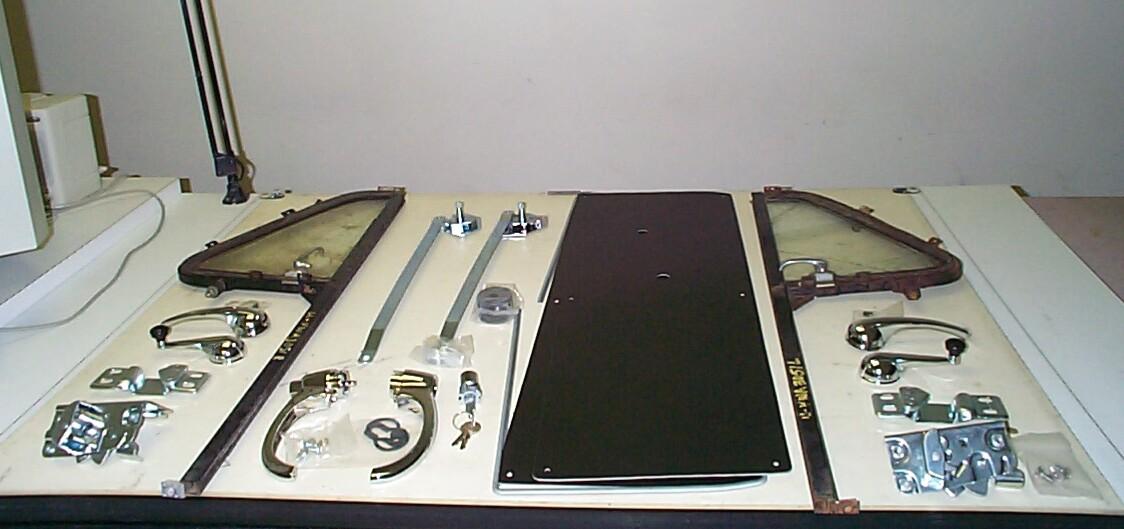
August 3rd 2002 No work last week. I was in Pennsylvania for my thirty-fifth high school class reunion. A chance to see the girl of my dreams again which was my main reason for going. The rest was a bonus. A bittersweet time. Door parts arrived while I was away.
 I
was outbid on a pristine vent window assembly on ebay. I went to American
Classic Truck Parts and ordered used vent window assemblies
for both doors. Ordered outside door handles (#18-107), inside door
handles (#18-005), inside window handles (#18-015), inside handle
gasket set (#18-043), outside door lock w/key (#18-148), left door
latch (#18-523), right door latch (#18-524), left door striker
(#18-629), right door striker (#18-630), left door control (#18-825),
right door control (#18-826), deluxe black door panels (#19-061) and
door panel frames (#19-321) from Chevy Duty.
I
was outbid on a pristine vent window assembly on ebay. I went to American
Classic Truck Parts and ordered used vent window assemblies
for both doors. Ordered outside door handles (#18-107), inside door
handles (#18-005), inside window handles (#18-015), inside handle
gasket set (#18-043), outside door lock w/key (#18-148), left door
latch (#18-523), right door latch (#18-524), left door striker
(#18-629), right door striker (#18-630), left door control (#18-825),
right door control (#18-826), deluxe black door panels (#19-061) and
door panel frames (#19-321) from Chevy Duty.
Using a 1/4" clutchhead screwdriver, loosened clutchhead screws holding the door control, latch assembly and outside door handle. Made a tenative try at getting these three items out. The latch assembly will have to wait as the rear window channel is in the way so I tightened its screws back up. Removed the garnish moulding from around the window opening to get an idea of how the rear window channel fits in. Also reviewed the Factory Assembly Manual and Shop Manual . . . Decided to get some more replacement parts before tackling the window channels. Cleaned up the garnish moulding with Simple Green and water. I will take this thing off and paint it during a week when BillyBob is in the warehouse 'cause the window is not stable without it in place.
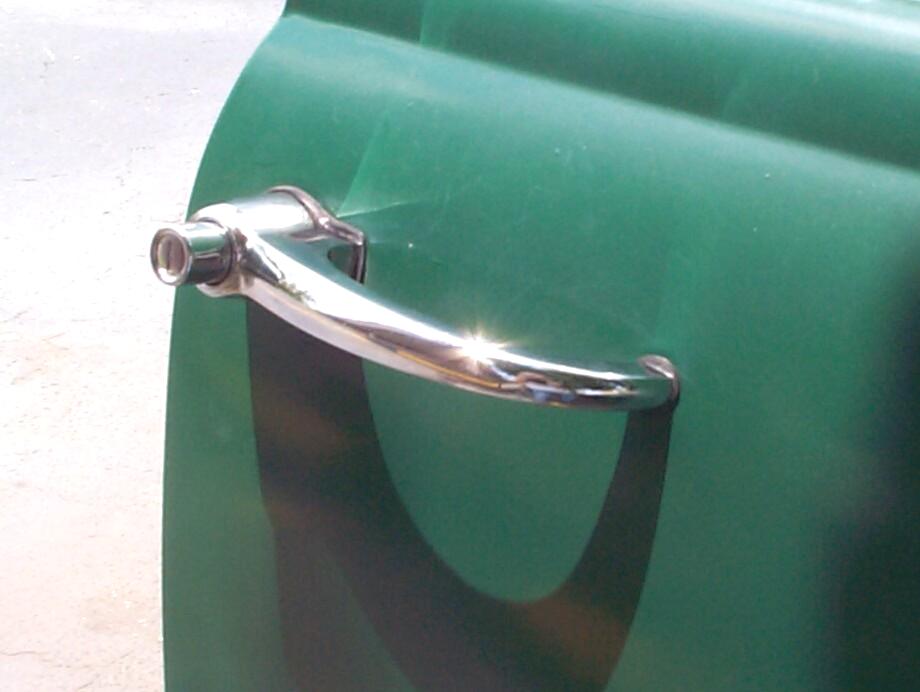 For
want of a horse shoe nail, the kingdom was lost! Started to assemble
the lock cylinder/push button assembly for the passenger side door. An
internal snap ring holds the whole thing together. I had internal snap
ring pliers once that I used for working on the transmission of my
first car, a '59 Ferd sedan. They must still be in Pennslyvania 'cause
I couldn't find them. Closed up the Krash Lab and ran over to NAPA.
Got pliers with interchangable points and rushed back. Points are held
in place with clamps and small allen head screws. The screws are so
tight, the allen wrench begins to strip the allen heads ~!@#$%^
Used penetrating oil and MAPP torch on the damn pliers. Finally twisted
the darn screws out from the back with regular pliers. I wonder if this
is a common problem because two extra screws were provided with the
interchangeable points to replace the two I ruined. After all that, I
finally got the snap ring in place and the new handle mounted on
BillyBob's door. I now have a locking passenger door for the first time
since I've had BillyBob.
For
want of a horse shoe nail, the kingdom was lost! Started to assemble
the lock cylinder/push button assembly for the passenger side door. An
internal snap ring holds the whole thing together. I had internal snap
ring pliers once that I used for working on the transmission of my
first car, a '59 Ferd sedan. They must still be in Pennslyvania 'cause
I couldn't find them. Closed up the Krash Lab and ran over to NAPA.
Got pliers with interchangable points and rushed back. Points are held
in place with clamps and small allen head screws. The screws are so
tight, the allen wrench begins to strip the allen heads ~!@#$%^
Used penetrating oil and MAPP torch on the damn pliers. Finally twisted
the darn screws out from the back with regular pliers. I wonder if this
is a common problem because two extra screws were provided with the
interchangeable points to replace the two I ruined. After all that, I
finally got the snap ring in place and the new handle mounted on
BillyBob's door. I now have a locking passenger door for the first time
since I've had BillyBob.
 Next,
the new door control and interior door handle was installed without
incident. The door can now be opened and locked using the inside door
handle again. Locking the door this way is independent from locking the
door with a key from the outside. The key only locks the button so it
can't be pressed in. The inside door handle locks the latch. If the
door is locked using the inside handle, it cannot be opened by the
outside button even if you have a key. Still, it is difficult to lock
yourself out because you cannot lock the door with the inside handle
until the door is closed (the handle will not move to the lock position
if the door is not latched). I have seen postings from old trucks
maillist members, however, whose ingenious children have overcome this
safeguard!
Next,
the new door control and interior door handle was installed without
incident. The door can now be opened and locked using the inside door
handle again. Locking the door this way is independent from locking the
door with a key from the outside. The key only locks the button so it
can't be pressed in. The inside door handle locks the latch. If the
door is locked using the inside handle, it cannot be opened by the
outside button even if you have a key. Still, it is difficult to lock
yourself out because you cannot lock the door with the inside handle
until the door is closed (the handle will not move to the lock position
if the door is not latched). I have seen postings from old trucks
maillist members, however, whose ingenious children have overcome this
safeguard!
I gave up for the day when, passing my tool boxes, the old snap ring pliers that I couldn't find earlier practically jumped out and tripped me! Jeez! I went thru that tool box three times without finding them and now I see them from over ten feet away. ~!@#$durn Murphy!
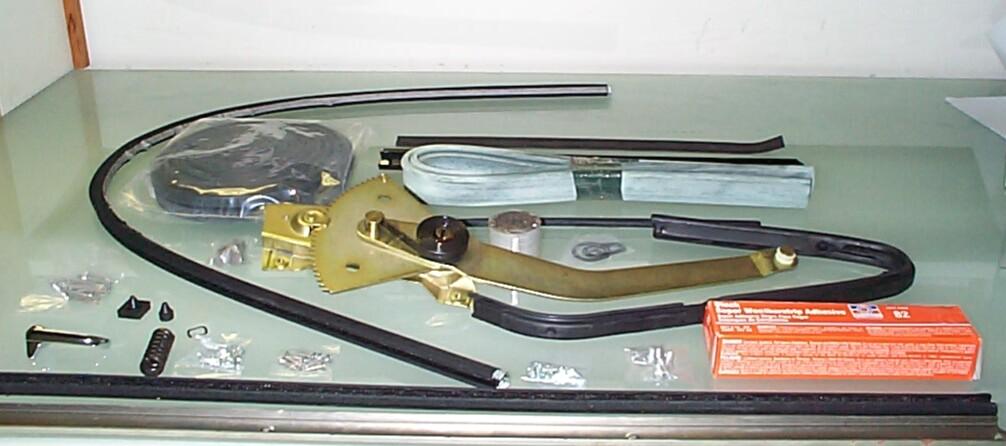 September
21st 2002 Hurricane
Isidore is starting to churn up the gulf but the weather here in the
shadetree garage is good. Got some chassis degreasing out of the way in
the cool of the morning before turning to the door work. A box of
plunder arrived from Chevy Duty since the last time I worked on the
doors including Door Rubber Seal (#03-011), Door Seal Retainer Screws
(#03-091), Lower Cab Windlace Rubber-Green (#03-159), Lower Windlace
Retainer-Steel (#03-257), Lower Windlace Screws (#03-282), Super
Weatherstrip Adhesive (#03-299), Door Felt Kit-Std (#03-612), Door
Glass Channels-Pair (#03-312), Division Bar Relining Channels
(#03-405), Beaded Window Seals-pr, (#03-513), Outer Rubber Window
Seal-pr (#03-712), Vent Window Weatherstrip (#03-803), Vent Assembly
Rivets (#03-825), Vent Pivot Rivets-pr (#03-831), Vent Rivet Setting
Tool (#03-835), Door Glass Channel Guide-L (#03-917), Door Glass
Channel Guide-R (#03-918), Outside Handle Gasket Set (#18-166), Vent
Handle-Left (#18-201), Vent Handle-Right (#18-202), Vent Handle Spring
Washers (#18-231), Vent Handle Roll Pins (#18-251), Vent Window Lower
Pivot Springs (#18-271), Door Bumpers (#18-311), Window Stop Bumpers
(#18-355), Lower Dr Hinge Panel Screws (#18-446), Window Regulator-Left
(#18-723), Window Regulator-Right (#18-724), Door Panel Fasteners
(#19-422), Door Molding Fastener Set (#19-551), Glass Setting Tape-Door
(#70-716), and Glass Setting Tape-Vent (#70-751). Whew! It's hard to
believe that I haven't yet ordered everything for the doors.
September
21st 2002 Hurricane
Isidore is starting to churn up the gulf but the weather here in the
shadetree garage is good. Got some chassis degreasing out of the way in
the cool of the morning before turning to the door work. A box of
plunder arrived from Chevy Duty since the last time I worked on the
doors including Door Rubber Seal (#03-011), Door Seal Retainer Screws
(#03-091), Lower Cab Windlace Rubber-Green (#03-159), Lower Windlace
Retainer-Steel (#03-257), Lower Windlace Screws (#03-282), Super
Weatherstrip Adhesive (#03-299), Door Felt Kit-Std (#03-612), Door
Glass Channels-Pair (#03-312), Division Bar Relining Channels
(#03-405), Beaded Window Seals-pr, (#03-513), Outer Rubber Window
Seal-pr (#03-712), Vent Window Weatherstrip (#03-803), Vent Assembly
Rivets (#03-825), Vent Pivot Rivets-pr (#03-831), Vent Rivet Setting
Tool (#03-835), Door Glass Channel Guide-L (#03-917), Door Glass
Channel Guide-R (#03-918), Outside Handle Gasket Set (#18-166), Vent
Handle-Left (#18-201), Vent Handle-Right (#18-202), Vent Handle Spring
Washers (#18-231), Vent Handle Roll Pins (#18-251), Vent Window Lower
Pivot Springs (#18-271), Door Bumpers (#18-311), Window Stop Bumpers
(#18-355), Lower Dr Hinge Panel Screws (#18-446), Window Regulator-Left
(#18-723), Window Regulator-Right (#18-724), Door Panel Fasteners
(#19-422), Door Molding Fastener Set (#19-551), Glass Setting Tape-Door
(#70-716), and Glass Setting Tape-Vent (#70-751). Whew! It's hard to
believe that I haven't yet ordered everything for the doors.
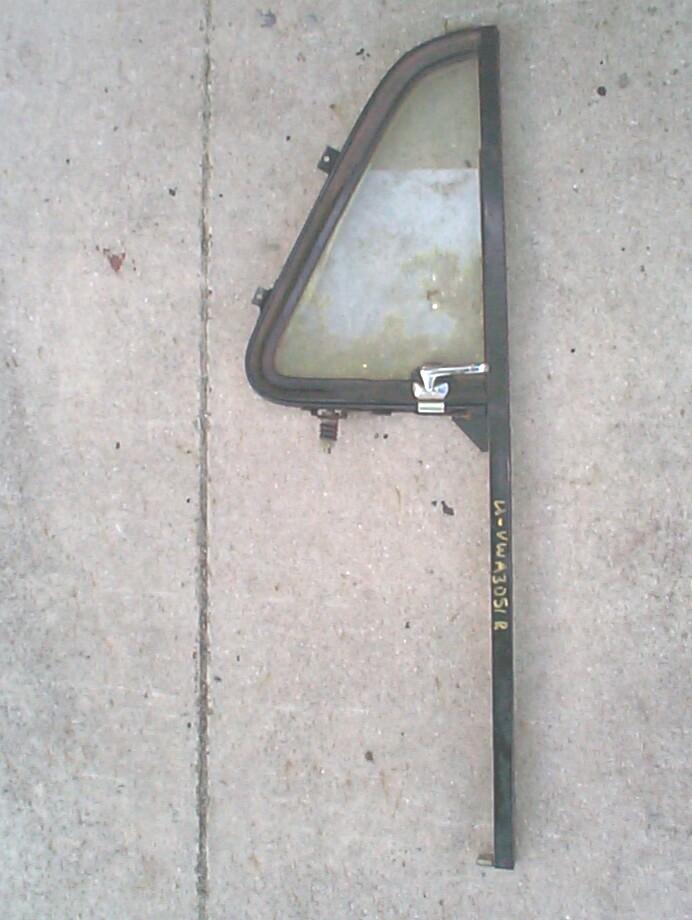 Gonna
start with the used vent window assembly I got from American Classic
for the passenger side. This is the better of the two assemblies. It is
pretty clean and rust free. Gotta figure out how to get it apart so I
went to the Shop Manual which says to drill out the pivot hinge rivet
first with a 1/8" bit. I don't have one . . . Visited the McMaster-Carr
website and ordered a drill bit set. Besides replacing the glass and
weatherstripping, I want to refinish these vent assemblies. They are
the standard black finish and BillyBob's are the Deluxe stainless
steel, badly corroded now. I am going to attempt to powdercoat the
assemblies with a "chrome" powder finish.
Gonna
start with the used vent window assembly I got from American Classic
for the passenger side. This is the better of the two assemblies. It is
pretty clean and rust free. Gotta figure out how to get it apart so I
went to the Shop Manual which says to drill out the pivot hinge rivet
first with a 1/8" bit. I don't have one . . . Visited the McMaster-Carr
website and ordered a drill bit set. Besides replacing the glass and
weatherstripping, I want to refinish these vent assemblies. They are
the standard black finish and BillyBob's are the Deluxe stainless
steel, badly corroded now. I am going to attempt to powdercoat the
assemblies with a "chrome" powder finish.
September 22nd 2002 Took BillyBob up to his warehouse bay for a week so I could exercise Renegade. Removed the passenger door garnish molding for refinishing back at the shadetree garage. Removed the inner seal felt strip, which is secured with staples, from the garnish molding. Did some cleanup of the garnish molding with wire brush, wet sanding block and 3M Automotive Paint & Body Scuff Pad before applying the PRE Paint Prep. Finished up with a coat of Rustoleum Grass Green enamel.
PRE Paint Prepped the passenger side upholstery door panel frame and clip, then sprayed with rattlecan self-etching primer. Finished up with a few coats of Eastwood's Original Trim Black (#39143). Turned out to be an expensive day. Three major rattlecan malfunctions that could not be fixed with new nozzles. After throwing the trim black can in the dumpster, I discovered I didn't have full coverage in a visible area. It's !@#$%damn demoralizing sometimes!
 September
28th 2002 Started today
by installing the garnish molding with the new stainless steel screws
from Chevy-Duty. Any tinkerer knows that an old part that installs
easily will not install without troubles after it's been refinished.
You will have problems until you mar the new finish somewhere and
satisfy Murphy. This happened to me but the scratch I made was small
and hard to notice. There are seven long screws and one short one for
each molding. Next, new foam washers were placed on the window
regulator and door handle shafts. The trim panel frame was fitted to
the new cardboard trim panel and the assembly was installed using the
new spring wire panel fasteners. Fibre/cardboard washers were placed on
the handle shafts and the new window regulator and door handles were
installed. For some obscure reason, unknown to me, Chevrolet used a
normal blade set screw for the window regulator and an allen head set
screw for the door handle. The door is starting to look better already!
September
28th 2002 Started today
by installing the garnish molding with the new stainless steel screws
from Chevy-Duty. Any tinkerer knows that an old part that installs
easily will not install without troubles after it's been refinished.
You will have problems until you mar the new finish somewhere and
satisfy Murphy. This happened to me but the scratch I made was small
and hard to notice. There are seven long screws and one short one for
each molding. Next, new foam washers were placed on the window
regulator and door handle shafts. The trim panel frame was fitted to
the new cardboard trim panel and the assembly was installed using the
new spring wire panel fasteners. Fibre/cardboard washers were placed on
the handle shafts and the new window regulator and door handles were
installed. For some obscure reason, unknown to me, Chevrolet used a
normal blade set screw for the window regulator and an allen head set
screw for the door handle. The door is starting to look better already!
 October
2nd 2002 'Nother
shipment arrived from Chevy Duty yesterday. This time it was two "Door
Glass Clear" (#70-117) and two "Vent Glass Clear" (#70-201). When JR replaced the passenger side glass
with a local cut piece sometime back, he had trouble with installation
'cause it was too thick. I only discovered recently that the original
AD glass was thinner than today's safety glass. I ordered from Chevy
Duty hoping that their replacements meet original specs. I have my
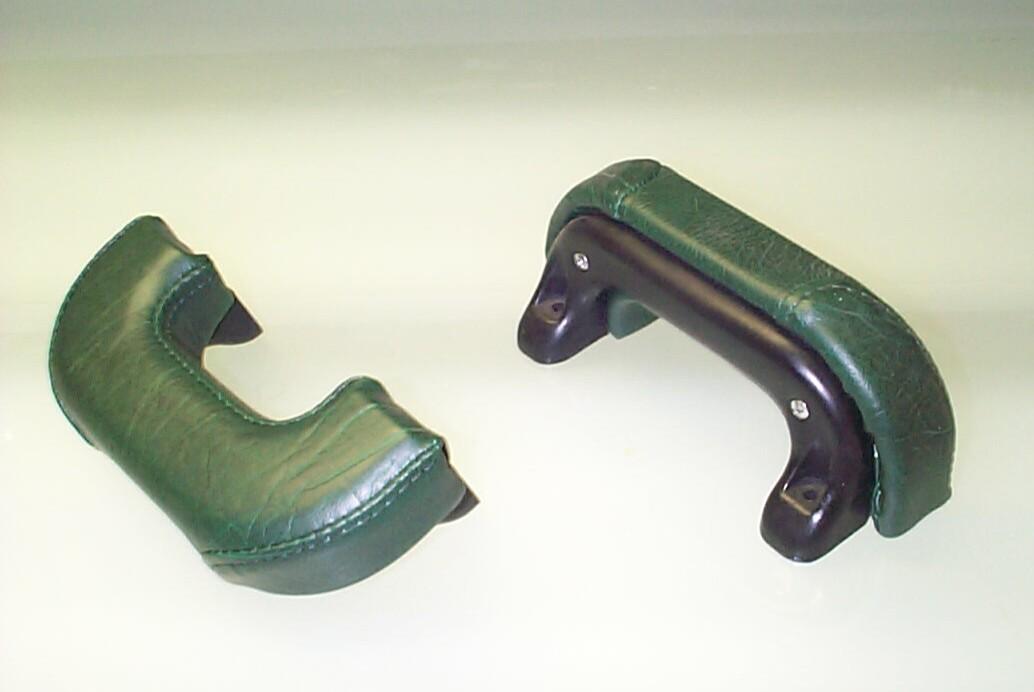
fingers crossed. Today, a backorder consisting of Lower Door Seal
Retainers (#03-061) and Arm Rests Green (#19-626) arrived. At fifty
bucks each, the arm rests are a bit on the high side. They appear to be
real leather tho' and for all I know, were formed on the thighs of
virgins before being hand-sewn in-country. I was a little put off by
the plastic brackets. I don't know what the originals were made of but
cast or stamped metal would be my guess. No mounting hardware either.
October
2nd 2002 'Nother
shipment arrived from Chevy Duty yesterday. This time it was two "Door
Glass Clear" (#70-117) and two "Vent Glass Clear" (#70-201). When JR replaced the passenger side glass
with a local cut piece sometime back, he had trouble with installation
'cause it was too thick. I only discovered recently that the original
AD glass was thinner than today's safety glass. I ordered from Chevy
Duty hoping that their replacements meet original specs. I have my
fingers crossed. Today, a backorder consisting of Lower Door Seal
Retainers (#03-061) and Arm Rests Green (#19-626) arrived. At fifty
bucks each, the arm rests are a bit on the high side. They appear to be
real leather tho' and for all I know, were formed on the thighs of
virgins before being hand-sewn in-country. I was a little put off by
the plastic brackets. I don't know what the originals were made of but
cast or stamped metal would be my guess. No mounting hardware either.
 October
22nd 2002 Got some more
goodies from Eastwood yesterday. A Door Skin Installer (#31059), Door
Skin Removal Tool (#31017) and a Patch Panel Video (#31113). The door
skin tools are steep at $140 separately or $125 as a kit but, the
interior bottoms of both BillyBob's doors will have to be replaced and,
as of this date, the door skins themselves are in pretty good shape. Deve
Krehbiel has tackled this task on his 1950 frame up
restoration and documented it on his website. He had problems with the
door skin crimp. I hope to avoid those problems with these tools but
that remains to be seen.
October
22nd 2002 Got some more
goodies from Eastwood yesterday. A Door Skin Installer (#31059), Door
Skin Removal Tool (#31017) and a Patch Panel Video (#31113). The door
skin tools are steep at $140 separately or $125 as a kit but, the
interior bottoms of both BillyBob's doors will have to be replaced and,
as of this date, the door skins themselves are in pretty good shape. Deve
Krehbiel has tackled this task on his 1950 frame up
restoration and documented it on his website. He had problems with the
door skin crimp. I hope to avoid those problems with these tools but
that remains to be seen.
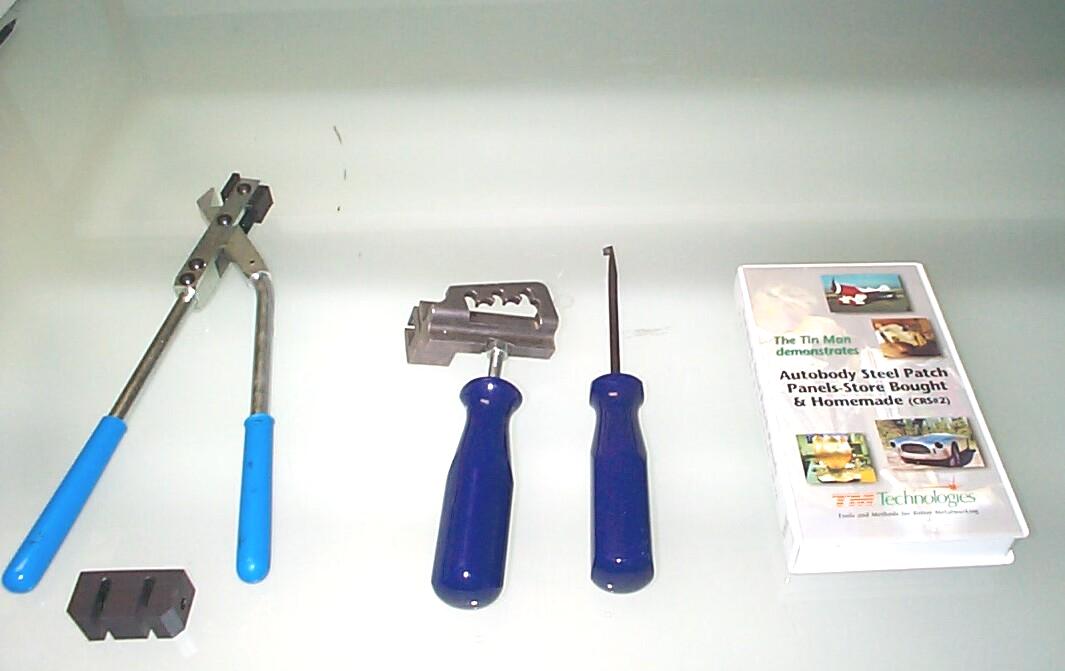
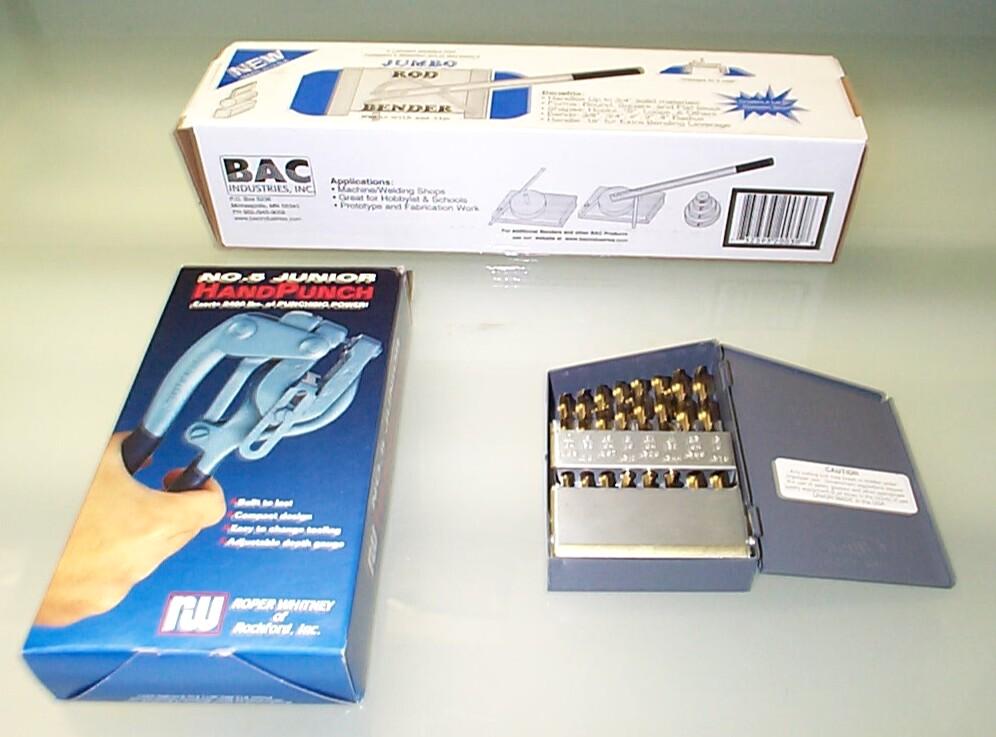 November
9th 2002 And more
tools. The drill bit set from McMaster-Carr (Made in the USA). Jumbo
Rod Bender from BAC Industries, Inc. (#28100) and No. 5 Junior Hand
Punch from Roper Whitney of Rockford, Inc. (#28041) The latter two
metal tools came from Eastwood Company. I plan on using the hand punch
to make sheet metal plugs to weld shut the holes in the doors left from
after market "west coast" mirrors that have been removed. I want to try
to use the rod bender to adjust the door panel frames (#19-321) from
Chevy Duty. The frames are flat in the plane of the panels they enclose
but the door surface they ride against is curved and this is causing
problems with the one panel I've installed so far. It's pulling out of
the frame.
November
9th 2002 And more
tools. The drill bit set from McMaster-Carr (Made in the USA). Jumbo
Rod Bender from BAC Industries, Inc. (#28100) and No. 5 Junior Hand
Punch from Roper Whitney of Rockford, Inc. (#28041) The latter two
metal tools came from Eastwood Company. I plan on using the hand punch
to make sheet metal plugs to weld shut the holes in the doors left from
after market "west coast" mirrors that have been removed. I want to try
to use the rod bender to adjust the door panel frames (#19-321) from
Chevy Duty. The frames are flat in the plane of the panels they enclose
but the door surface they ride against is curved and this is causing
problems with the one panel I've installed so far. It's pulling out of
the frame.
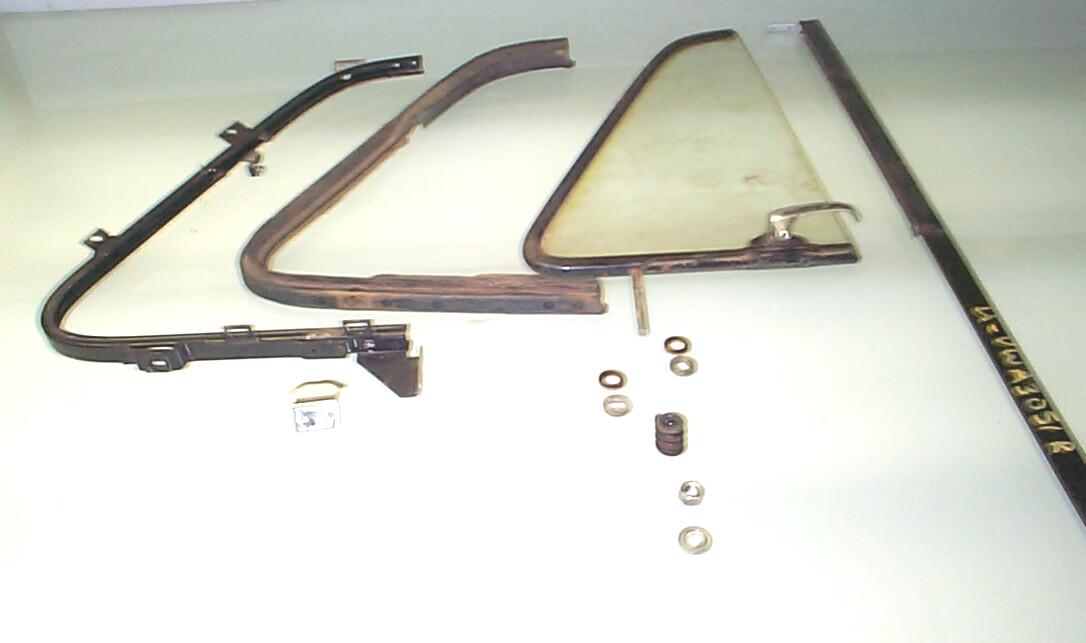 November
10th 2002 Tackled the
disassembly of the vent window assembly. It's too nice outside to work
on this today but I'm fighting a lazy mood an' this is the best I can
muster at the moment. I don't have a drill press and the 1/8" drill bit
wanted to wander all over the pivot hinge rivet head, of course. Hunted
up the Dremel Motor Tool and used it to grind the rivet down flat and
to grind a dimple in the middle of the rivet to guide the drill . . .
That's better. OK, now I've gotten the vent separated and unbolted from
the frame. Now I'm stuck again and it's back to research. The Shop
Manual sez "Drill out the lower rivet, attaching the
ventilator glass rear weatherstrip assembly to the division channel"
. . . This takes re-reading and study 'cause there are two
rivets, not one. After a bit I started drilling out rivets everywhere
'an didn't quit 'til the drill's batteries ran low 'cause it was so
much fun.
November
10th 2002 Tackled the
disassembly of the vent window assembly. It's too nice outside to work
on this today but I'm fighting a lazy mood an' this is the best I can
muster at the moment. I don't have a drill press and the 1/8" drill bit
wanted to wander all over the pivot hinge rivet head, of course. Hunted
up the Dremel Motor Tool and used it to grind the rivet down flat and
to grind a dimple in the middle of the rivet to guide the drill . . .
That's better. OK, now I've gotten the vent separated and unbolted from
the frame. Now I'm stuck again and it's back to research. The Shop
Manual sez "Drill out the lower rivet, attaching the
ventilator glass rear weatherstrip assembly to the division channel"
. . . This takes re-reading and study 'cause there are two
rivets, not one. After a bit I started drilling out rivets everywhere
'an didn't quit 'til the drill's batteries ran low 'cause it was so
much fun.
I haven't posted a log entry since August so I think I'll stop here while I'm at a head-scratchin' stage and upload this episode to the BillyBob website. The four day Thanksgiving weekend is coming up and I've got a lot of work planned for then. Still got plenty of engine compartment, brake, frame, cab work and electrical odds 'n ends in progress to report on down the road. Monday is Armistice Day (11th hour of the 11th day of the 11th month 1918). Remember our Veterans.
| < Back
to Intro |
You can email me at ![]() webmaster@laroke.com
webmaster@laroke.com
Issued Sunday November 10, 2002
Updated Friday June 2, 2017
copyright © 1996-2017 Larry Robert Kephart all rights reserved
| | LRK Home | | Bio Info | | Krash Khronicles | | LAROKE | |
| | BettyLou | | BillyBob's Garage | | Rat Patrol | | Deerslayer | | Elvira | |
| | Land of the Free and Home of the Brave | |
| | Keppylou's Art | | WWI Soldier's Diary | |