| | LRK Home | | Bio Info | | Krash Khronicles | | LAROKE | |
| | BettyLou | | BillyBob's Garage | | Rat Patrol | | Deerslayer | | Elvira | |
| | Land of the Free and Home of the Brave | |
| | Keppylou's Art | | WWI Soldier's Diary | |
BillyBob Work-in-Progress Log
![]()
TRUCK LINKS including vendor sites for old parts, custom parts, and tools as well as sites for classic car and truck organizations
STORE Operating in association with Amazon.com, books, recordings and tools can be purchased.
PLANNING for the restoration including project schedule and cost estimates.
![]()
WORK-IN-PROGRESS is the restoration of parts of BillyBob that I can accomplish without a garage.
PRE-RESTORATION includes log entries of minor repairs and and adventures between time of purchase and the time when I started restoration, a piece at a time.
JR'S KORNER JR's Korner is the history of BillyBob before I got him authored by my brother, Wm. C. Kephart.
3. Shifty Behavior Page 4
August 12th 2000 Overcast . . . Both the sky and my luck this week. Therefore, I'm being somewhat cautious today. To remove the upper shift rods between the bellcrank assembly and the shift box, it is necessary to remove the shift box. I put the transmission linkage in the neutral position and took measurements - how far the end of each shift rod projected beyond its swivel block connection to the shift box lever and the distance the shift box itself was mounted up the steering column from the steering box. Billybob is shifting fairly reliably now and I don't want to get him out-of-kilter. I used a low-tech method of cutting off plastic coffee stirrers to record these three critical measurements. They make perfect shade-tree mechanic alignment gauges for re-assembly.
With the shift box out of the way, I had enuf clearance to get at the cotter pin connections on the bellcrank ends of these upper shift rods. Heck, I even had enuf room to use my handy-dandy cotter pin pliers I got from Eastwood a couple of months back on one of them. I examined the rods at this point to note their differences so I'd stand a better chance of getting things back together correctly. The 2nd/3rd shift rod had a short "zig-zag" in it and the bellcrank end pointed away from the bellhousing, whereas the 1st/reverse shift rod had a longer, gentler zig-zag and its bellcrank end pointed towards the bellhousing.
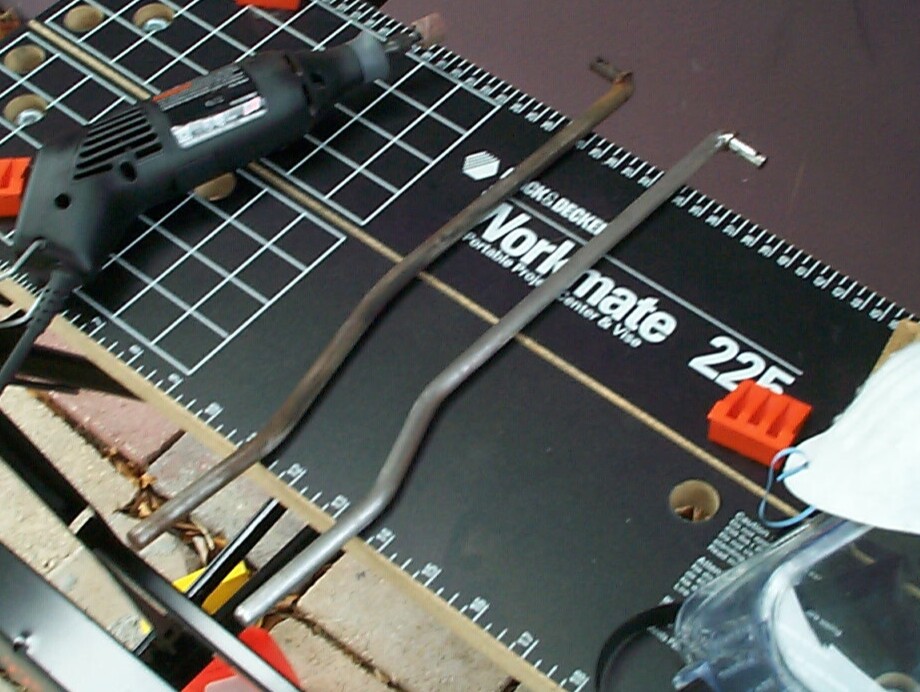 I
started cleaning the rods up for the metal blackening session by
initial hand sanding with 60 grit paper, followed by finer sanding with
the Dremel tool at the 10,000 RPM speed setting. In the pic, the 1st/Reverse
shift rod has been hand-sanded and the 2nd/3rd
rod has been Dremel-sanded in addition to the hand-sanding.
I
started cleaning the rods up for the metal blackening session by
initial hand sanding with 60 grit paper, followed by finer sanding with
the Dremel tool at the 10,000 RPM speed setting. In the pic, the 1st/Reverse
shift rod has been hand-sanded and the 2nd/3rd
rod has been Dremel-sanded in addition to the hand-sanding.
I tried to follow the Metal Blackening System instructions closer this time, but it was obvious afterwards that I have not mastered this process yet. The blackening left a fairly uneven finish. After the sealant had dried for an hour, I finished both rods with Chassis Black paint. Last week's electroplating process was then repeated for two newly cut lengths of compression spring, two flat washers and two cotter pins. The springs, washers and cotter pins were then thrown in the tumbler for a polishing session.
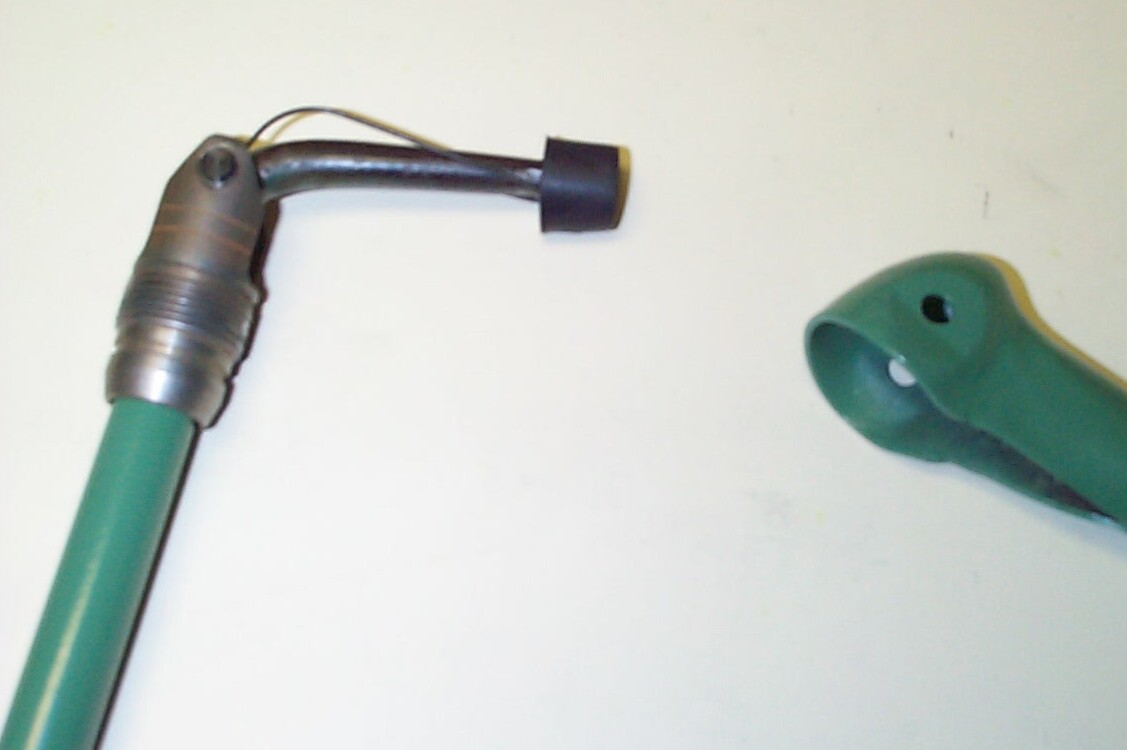
 Looks
like I tried to do too much today. The paint on the shift rods wasn't
dry enuf yet when I had to start re-assembly. I got some smudges. I'm
gonna try to use black touch-up paint next week. I don't want to remove
these things again at this point. This is a shot of the bellcrank
assembly that I can't figure how to get apart. I had to jockey the
camera around blind and take several pics to get one that didn't show
the bone-head smudges I'd made.
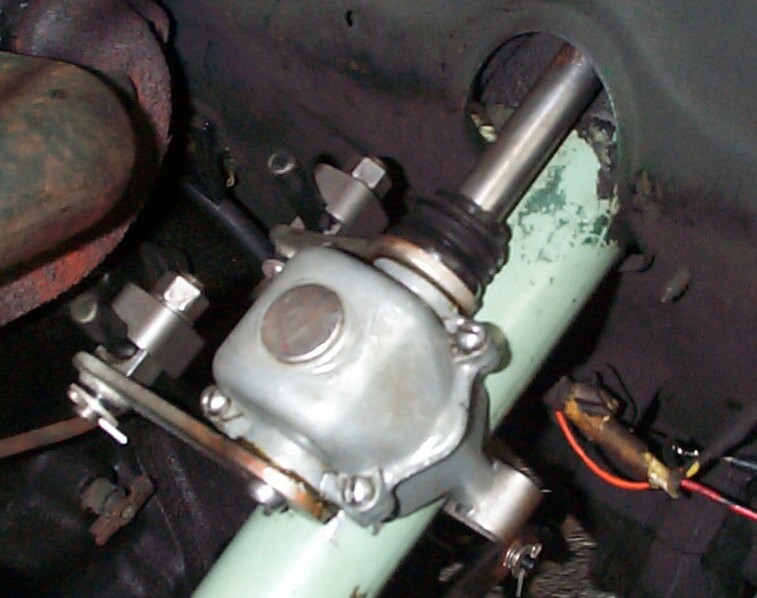
Looks
like I tried to do too much today. The paint on the shift rods wasn't
dry enuf yet when I had to start re-assembly. I got some smudges. I'm
gonna try to use black touch-up paint next week. I don't want to remove
these things again at this point. This is a shot of the bellcrank
assembly that I can't figure how to get apart. I had to jockey the
camera around blind and take several pics to get one that didn't show
the bone-head smudges I'd made.
August 19th 2000 Took a little detour today. I'm going on vacation and the next time I take BillyBob out of his warehouse bay will be three weeks from now. I'll continue with clear-coating the shift box when I get back.
 When
I got back to the warehouse last week, I lifted BillyBob's hood to
notice (what seemed to me) a lot of vapor rising from the oil filler
cap. This might be normal but it gave me pause for concern. I decided
to check the state of the valve train oiling this week. I brought a
gawdawful big blade screwdriver with me from Pennslyvania many years
ago but can't seem to find it now. I stopped at the Discount Auto Parts
store and picked up a cheap 8-piece screwdriver set that had a big
blade screwdriver in it for eight dollars. For as cheap as these things
are, at least some of them are magnetized, and have hex-shaped shanks
at the top for putting a wrench on. It remains to be seen if they break
the first time major force is used. I needed a big blade screwdriver
because the valve cover on BillyBob's 235 CI inline six is held on with
four "stovebolts", not hex-heads.
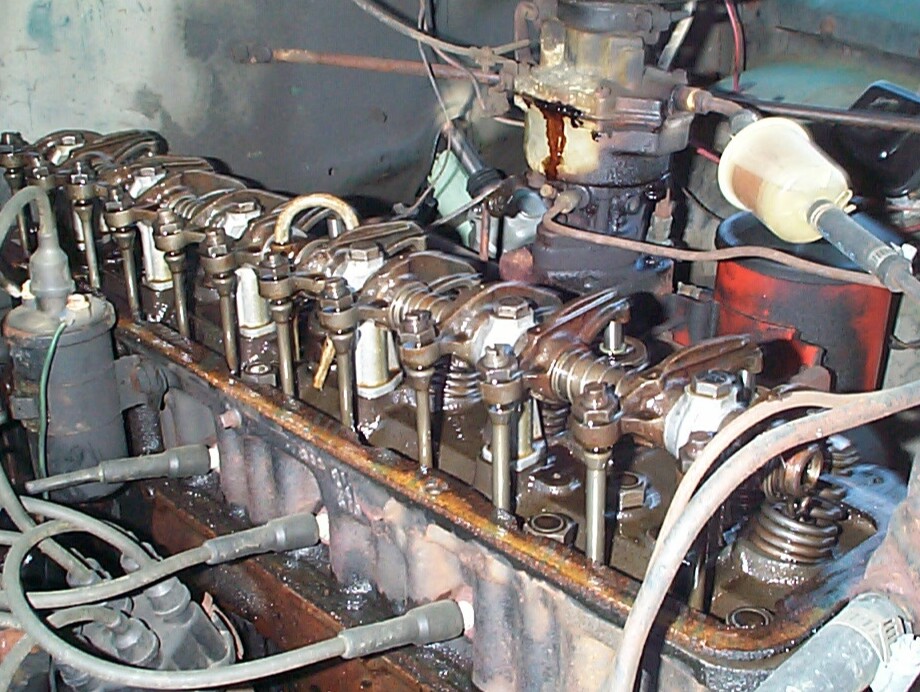
When
I got back to the warehouse last week, I lifted BillyBob's hood to
notice (what seemed to me) a lot of vapor rising from the oil filler
cap. This might be normal but it gave me pause for concern. I decided
to check the state of the valve train oiling this week. I brought a
gawdawful big blade screwdriver with me from Pennslyvania many years
ago but can't seem to find it now. I stopped at the Discount Auto Parts
store and picked up a cheap 8-piece screwdriver set that had a big
blade screwdriver in it for eight dollars. For as cheap as these things
are, at least some of them are magnetized, and have hex-shaped shanks
at the top for putting a wrench on. It remains to be seen if they break
the first time major force is used. I needed a big blade screwdriver
because the valve cover on BillyBob's 235 CI inline six is held on with
four "stovebolts", not hex-heads.
A small screwdriver would have worked. The stovebolts weren't tight. That's why GM used stovebolts for valve covers, oil pans, etc. They are difficult to over-torque. Each of the stovebolts had a flat washer and a lock washer. As a sacrifice to Murphy, I lost one of the lock washers. I found a replacement in a misc. parts can. Murphy must be on vacation already, 'cause that really surprised me. I don't have many spare parts yet . . . 'cept for small springs, that is. I was relieved to find that the whole valve train was receiving oil and looked cleaner than anthing else in the engine bay. I should probably adjust the valves soon, but that's a task for another day.
September 9th 2000 Back from vacation which went fairly smooth, but that's a tale for another place and time. After three weeks of non-activity, BillyBob started up with just a few more seconds of starter cranking than usual. When I got him to the Krash Lab, I made myself a new coffee stirrer alignment gauge for the shift box location on the steering column in preparation for removing the shift box again.
Removed the shift box, prepped with Eastwood's PRE Paint Prep (catalog #10041Z) as best I could and taped off the rubber bellows and mating surfaces. Finished with two light coats of Eastwood's Diamond Clear Gloss Clear for Bare Metal Surfaces (#10200Z). The instructions say to give this product 24 hours drying time, so I may end up in the same state of affairs I was in when I smudged the upper shift rods a few weeks ago. "Nothing for it" as the Brits say . . . I've got to take BillyBob back to the barn at the end of the day.
Next, two more flat washers and cotter pins were given the electro-plating/tumbler polishing treatment for the upper shift rod swivel assembly/shift box lever connections. After removing the masking tape from the shift box, the rubber shift bellows and shift lever bushings were treated with Armor All Protectant applied with a cloth.
 Everything
was reassembled in mid-afternoon. This time when I took the test run
around the block, the shifting was the smoothest to date. The run back
to the warehouse will be a better test, but now I'm almost afraid to
tear into the shift lever mechanism at the top of the steering column
for fear of messing things up again!
Everything
was reassembled in mid-afternoon. This time when I took the test run
around the block, the shifting was the smoothest to date. The run back
to the warehouse will be a better test, but now I'm almost afraid to
tear into the shift lever mechanism at the top of the steering column
for fear of messing things up again!
September 16th 2000 Tropical Storm Gordon is churnin' up the Gulf and there's a pall over the skies here on the East coast. I left BillyBob at the warehouse after disconnecting his gearshift lever assembly and bringing it back to the Krash Lab. I dismantled the assembly and prepped the parts to be re-painted. The lever, support and shaft were brushed, cleaned with Eastwood's PRE, and masked as required. Supports were fabricated from coat-hanger wire and these three items, along with the support screw heads were primed with "Plasti-kote" anti-rust primer that I picked up at Discount Auto Parts a few months ago. The clamp that connects the shaft with the shift box where it comes thru the firewall was pretty ratty looking, so it was dipped in the foul carb cleaner to strip the paint and grease from it. I plan on painting this item in place after re-assembly.
I stopped at Home Depot earlier in the week to pick up a can of Rustoleum "Grass Green", the closest color in the Rustoleum range to match BillyBob's interior (repainted at some point by a previous owner). I was happy to find that they had also restocked "Shell White". Now I can finish the front bumper to match the grille too. The primed parts got two coats of the grass green with no drips, runs or errors. All parts were hung up to dry in the storage shed behind the Krash Lab for the coming week.
 September
23rd 2000 A good day
under the shade tree, a very good day. Murphy must be out-of-town. When
I got to the Krash Lab, I re-assembled the gearshift lever assembly.
When I first dug into this assembly back in June, I had trouble getting
it back together. By the time I'd discovered the proper way to do it,
the new wishbone-shaped spring had been mangled a bit. I decided to
order another one, this time from LMC
(Long Motor Corp). Their's had a few additional parts that
the Jim Carter product did not: a c-shaped retainer that holds the ends
of the wishbone spring in place and a cup-shaped bushing that appears
to perform the same function as the redneck engineered electrical tape
and spring contraption I found when I first took this thing apart (for
the polically-correct readers out there, I can say "redneck" because I
am one below this thin veneer of culture I've absorbed in the big city).
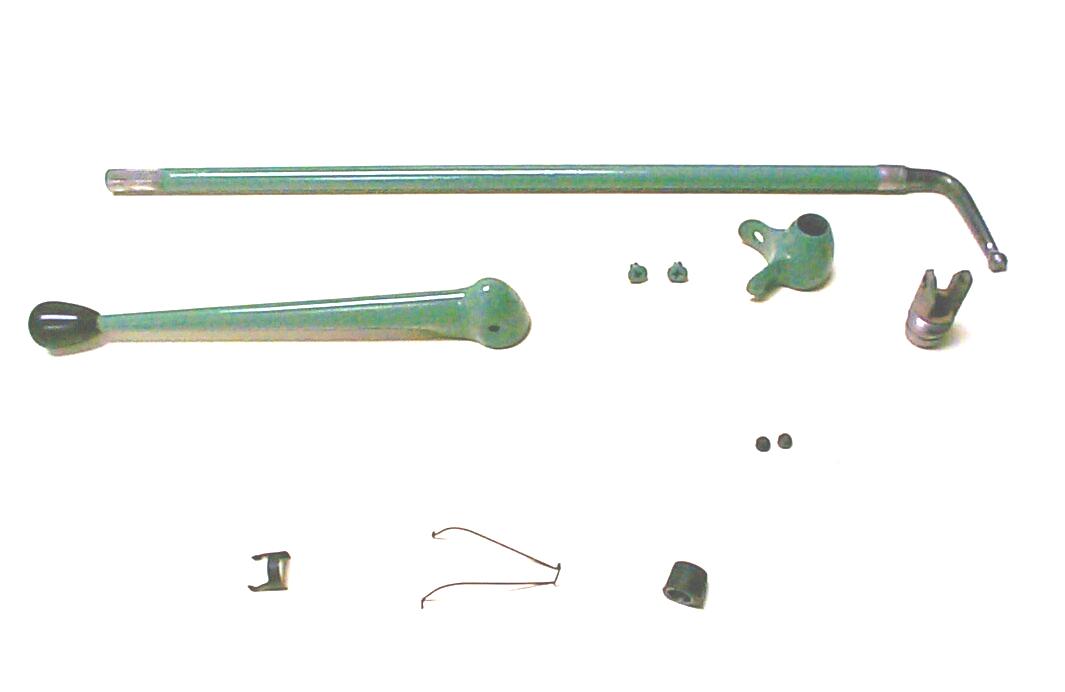
September
23rd 2000 A good day
under the shade tree, a very good day. Murphy must be out-of-town. When
I got to the Krash Lab, I re-assembled the gearshift lever assembly.
When I first dug into this assembly back in June, I had trouble getting
it back together. By the time I'd discovered the proper way to do it,
the new wishbone-shaped spring had been mangled a bit. I decided to
order another one, this time from LMC
(Long Motor Corp). Their's had a few additional parts that
the Jim Carter product did not: a c-shaped retainer that holds the ends
of the wishbone spring in place and a cup-shaped bushing that appears
to perform the same function as the redneck engineered electrical tape
and spring contraption I found when I first took this thing apart (for
the polically-correct readers out there, I can say "redneck" because I
am one below this thin veneer of culture I've absorbed in the big city).
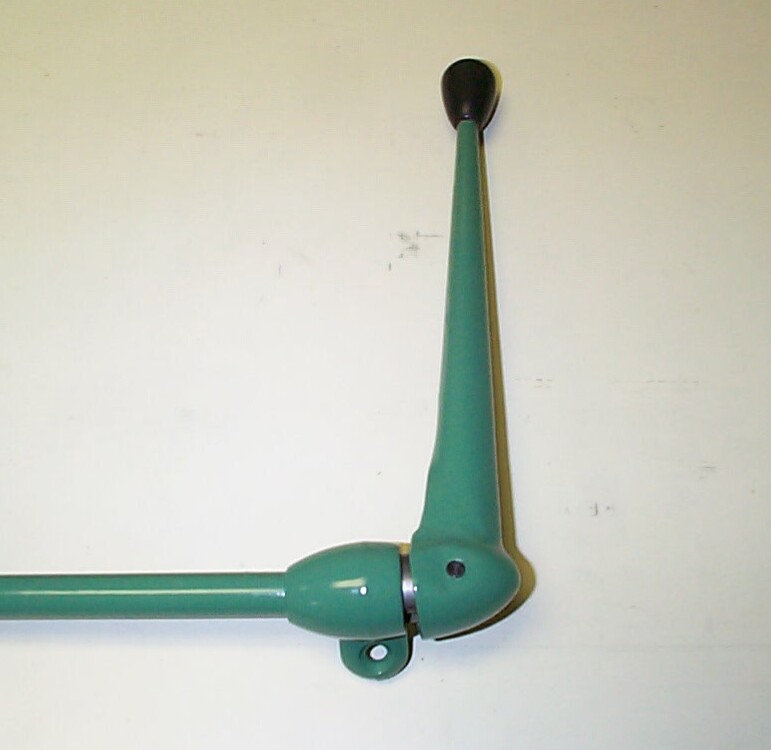
 The
cup-shaped bushing is some kind of soft lead-like metal with a rubber
covering on the outside shaped to fit inside the cross-section of the
shift-lever. I gave the working metal parts a light coating of WD-40
and attempted to re-assemble the gearshift lever. The bushing didn't
quite fit into the lever deeply enuf on the first try. A few light taps
from a punch peppered with a few choice words solved the problem.
The
cup-shaped bushing is some kind of soft lead-like metal with a rubber
covering on the outside shaped to fit inside the cross-section of the
shift-lever. I gave the working metal parts a light coating of WD-40
and attempted to re-assemble the gearshift lever. The bushing didn't
quite fit into the lever deeply enuf on the first try. A few light taps
from a punch peppered with a few choice words solved the problem.
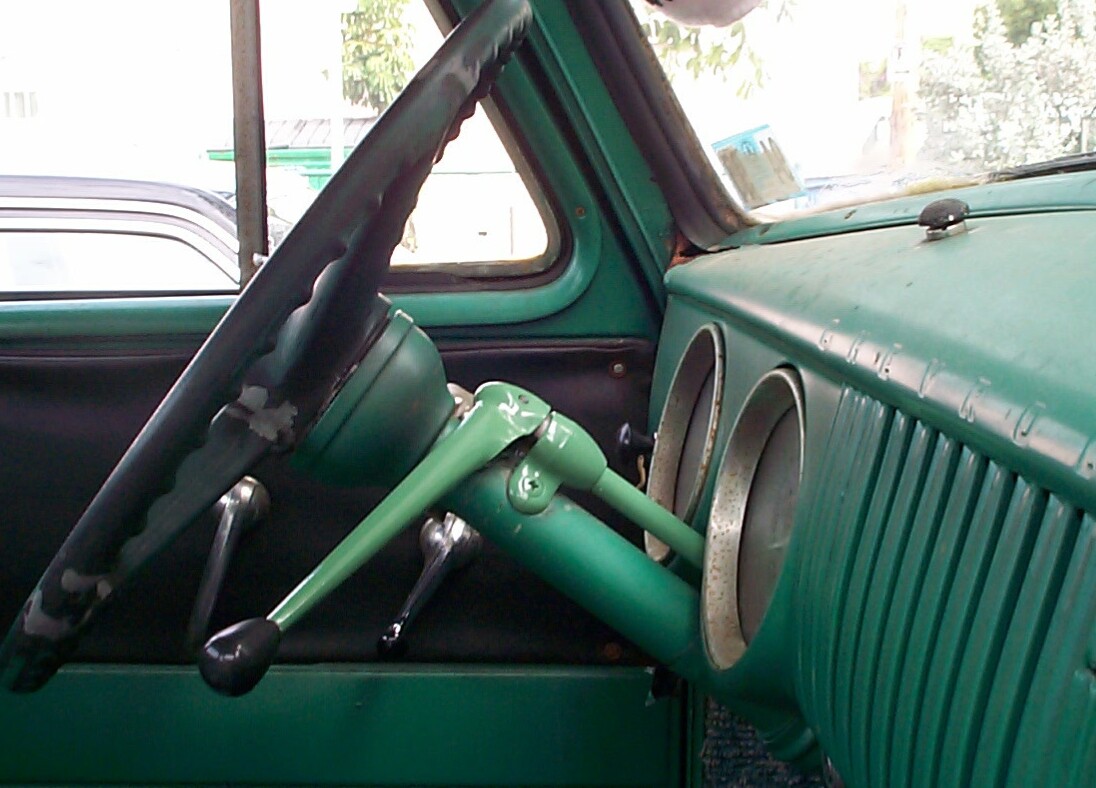
 When
the re-assembly was complete, it felt tighter without the previous
sloppy play. Not too tight, I hoped. Only one way to find out - go up
to the warehouse and install it. Operations at the warehouse went well
too. The gearshift assembly and steering wheel went back together
without conflict. The ride back to the Krash Lab was great! The shift
linkage works well now, about 95% of the kind of performance I'd hoped
for. Shifts are solid without any hangups in the gate (so far). I'm a
happy guy!
When
the re-assembly was complete, it felt tighter without the previous
sloppy play. Not too tight, I hoped. Only one way to find out - go up
to the warehouse and install it. Operations at the warehouse went well
too. The gearshift assembly and steering wheel went back together
without conflict. The ride back to the Krash Lab was great! The shift
linkage works well now, about 95% of the kind of performance I'd hoped
for. Shifts are solid without any hangups in the gate (so far). I'm a
happy guy!
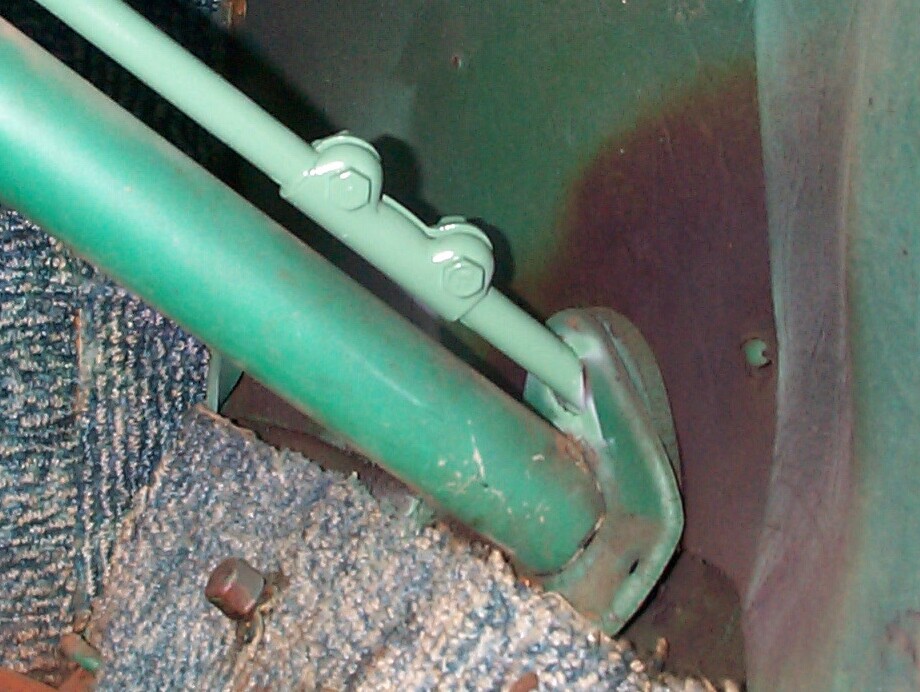 Back at the Krash
Lab, I masked off, prepped with PRE, and painted the clamp connecting
the gearshift assembly to the shift box with a coat of the
"Plasti-kote" anti-rust primer and a coat of the Rustoleum "Grass
Green". I didn't take a great deal of care masking and painting since
I'll be replacing the firewall insulation and "fittings" when I get to
the execution stage of BillyBob's re-wiring job in the next few months.
Back at the Krash
Lab, I masked off, prepped with PRE, and painted the clamp connecting
the gearshift assembly to the shift box with a coat of the
"Plasti-kote" anti-rust primer and a coat of the Rustoleum "Grass
Green". I didn't take a great deal of care masking and painting since
I'll be replacing the firewall insulation and "fittings" when I get to
the execution stage of BillyBob's re-wiring job in the next few months.
 I
started this "Stage I" job back in February and here it is September.
There's been a few deadends and backtrackin' along the way, but the
final results have been worth it from my perspective. Someone said
something to the effect that "It's not the destination, it's the
journey. That's the thing". I hope to save a few of you who have
suffered reading this whole long episode some of the same deadends. I
feel the spirit of my departed Dad over my shoulder today, and I'm
hoisting an imaginary Iron City beer with him since neither one of us
can drink at this point. Now, I'm off to finish my steering wheel and
re-wiring projects.
I
started this "Stage I" job back in February and here it is September.
There's been a few deadends and backtrackin' along the way, but the
final results have been worth it from my perspective. Someone said
something to the effect that "It's not the destination, it's the
journey. That's the thing". I hope to save a few of you who have
suffered reading this whole long episode some of the same deadends. I
feel the spirit of my departed Dad over my shoulder today, and I'm
hoisting an imaginary Iron City beer with him since neither one of us
can drink at this point. Now, I'm off to finish my steering wheel and
re-wiring projects.
| < Back to Intro |
You can email me at ![]() webmaster@laroke.com
webmaster@laroke.com
Issued Saturday September 23, 2000
Updated Monday April 24, 2017
copyright © 1996-2017 Larry Robert Kephart all rights reserved
| | LRK Home | | Bio Info | | Krash Khronicles | | LAROKE | |
| | BettyLou | | BillyBob's Garage | | Rat Patrol | | Deerslayer | | Elvira | |
| | Land of the Free and Home of the Brave | |
| | Keppylou's Art | | WWI Soldier's Diary | |