| | LRK Home | | Bio Info | | Krash Khronicles | | LAROKE | |
| | BettyLou | | BillyBob's Garage | | Rat Patrol | | Deerslayer | | Elvira | |
| | Land of the Free and Home of the Brave | |
| | Keppylou's Art | | WWI Soldier's Diary | |
BillyBob Work-in-Progress Log
![]()
WHAT'S NEW is a chronological listing of updates to the BillyBob site.
![]()
TRUCK LINKS including vendor sites for old parts, custom parts, and tools as well as sites for classic car and truck organizations
STORE Operating in association with Amazon.com, books, recordings and tools can be purchased.
PLANNING for the restoration including project schedule and cost estimates.
![]()
TRAVELS WITH BILLYBOB With apologies to Steinbeck, this area of BillyBob's Garage will be used to log the trips BillyBob and I make together.
WORK-IN-PROGRESS is the restoration of parts of BillyBob that I can accomplish without a garage.
PRE-RESTORATION includes log entries of minor repairs and adventures between time of purchase and the time when I started restoration, a piece at a time.
JR'S KORNER JR's Korner is the history of BillyBob before I got him authored by my brother, Wm. C. Kephart.
![]()
BILLYBOB MAINTENANCE Ever changing detailing, oil change, lube, etc. maintenance routines specifically developed for BillyBob, including required tools, materials and procedures.
PARTS SHOP The Parts Shop is a repository of How-To articles. Things that I have done over and over enough times to have developed a procedure. This gives me a checklist and saves brain cells.
STEALTH SHOP Urban residence design with large integrated shop and separate living quarters for a relative or renter.
![]()
You will need the Adobe Acrobat browser plugin to view these wiring diagrams which are in the PDF file format. This format allows zooming and panning. If you don't have this plugin, it can be downloaded and installed (free) from the Adobe site. The button below will take you there.
![]()
BILLYBOB WIRING DIAGRAM Here's the wiring diagram updated with BillyBob's current state 'cepting the third-party strap-on turn-signal director.
STRAP-ON TURN-SIGNAL DIRECTOR/BRAKE LIGHT CIRCUIT This turn signal and brake light circuit diagram shows the current state of the third-party turn-signal director wiring, which will remain in place until I figure out the problems with the OEM turn-signal director. It also shows the OEM headlight switch.
51. Creature Comforts
February 24th 2007 OK! Gotta get my groove back! I've been lazy the past few weeks and haven't gotten much done other than inventory management. Time to change a few bad habits. It's cold, It's been stormy, Car shows and auctions to attend with the boss, Superbowl and Daytona - I've got any number of lame excuses for not working on BillyBob, Renegade and BettyLou.
 Weather
is perfect this morning and I got to the Krash Lab early. I'm behind on
monthly
and quarterly
maintenance on BillyBob so I did that first. BillyBob sounds
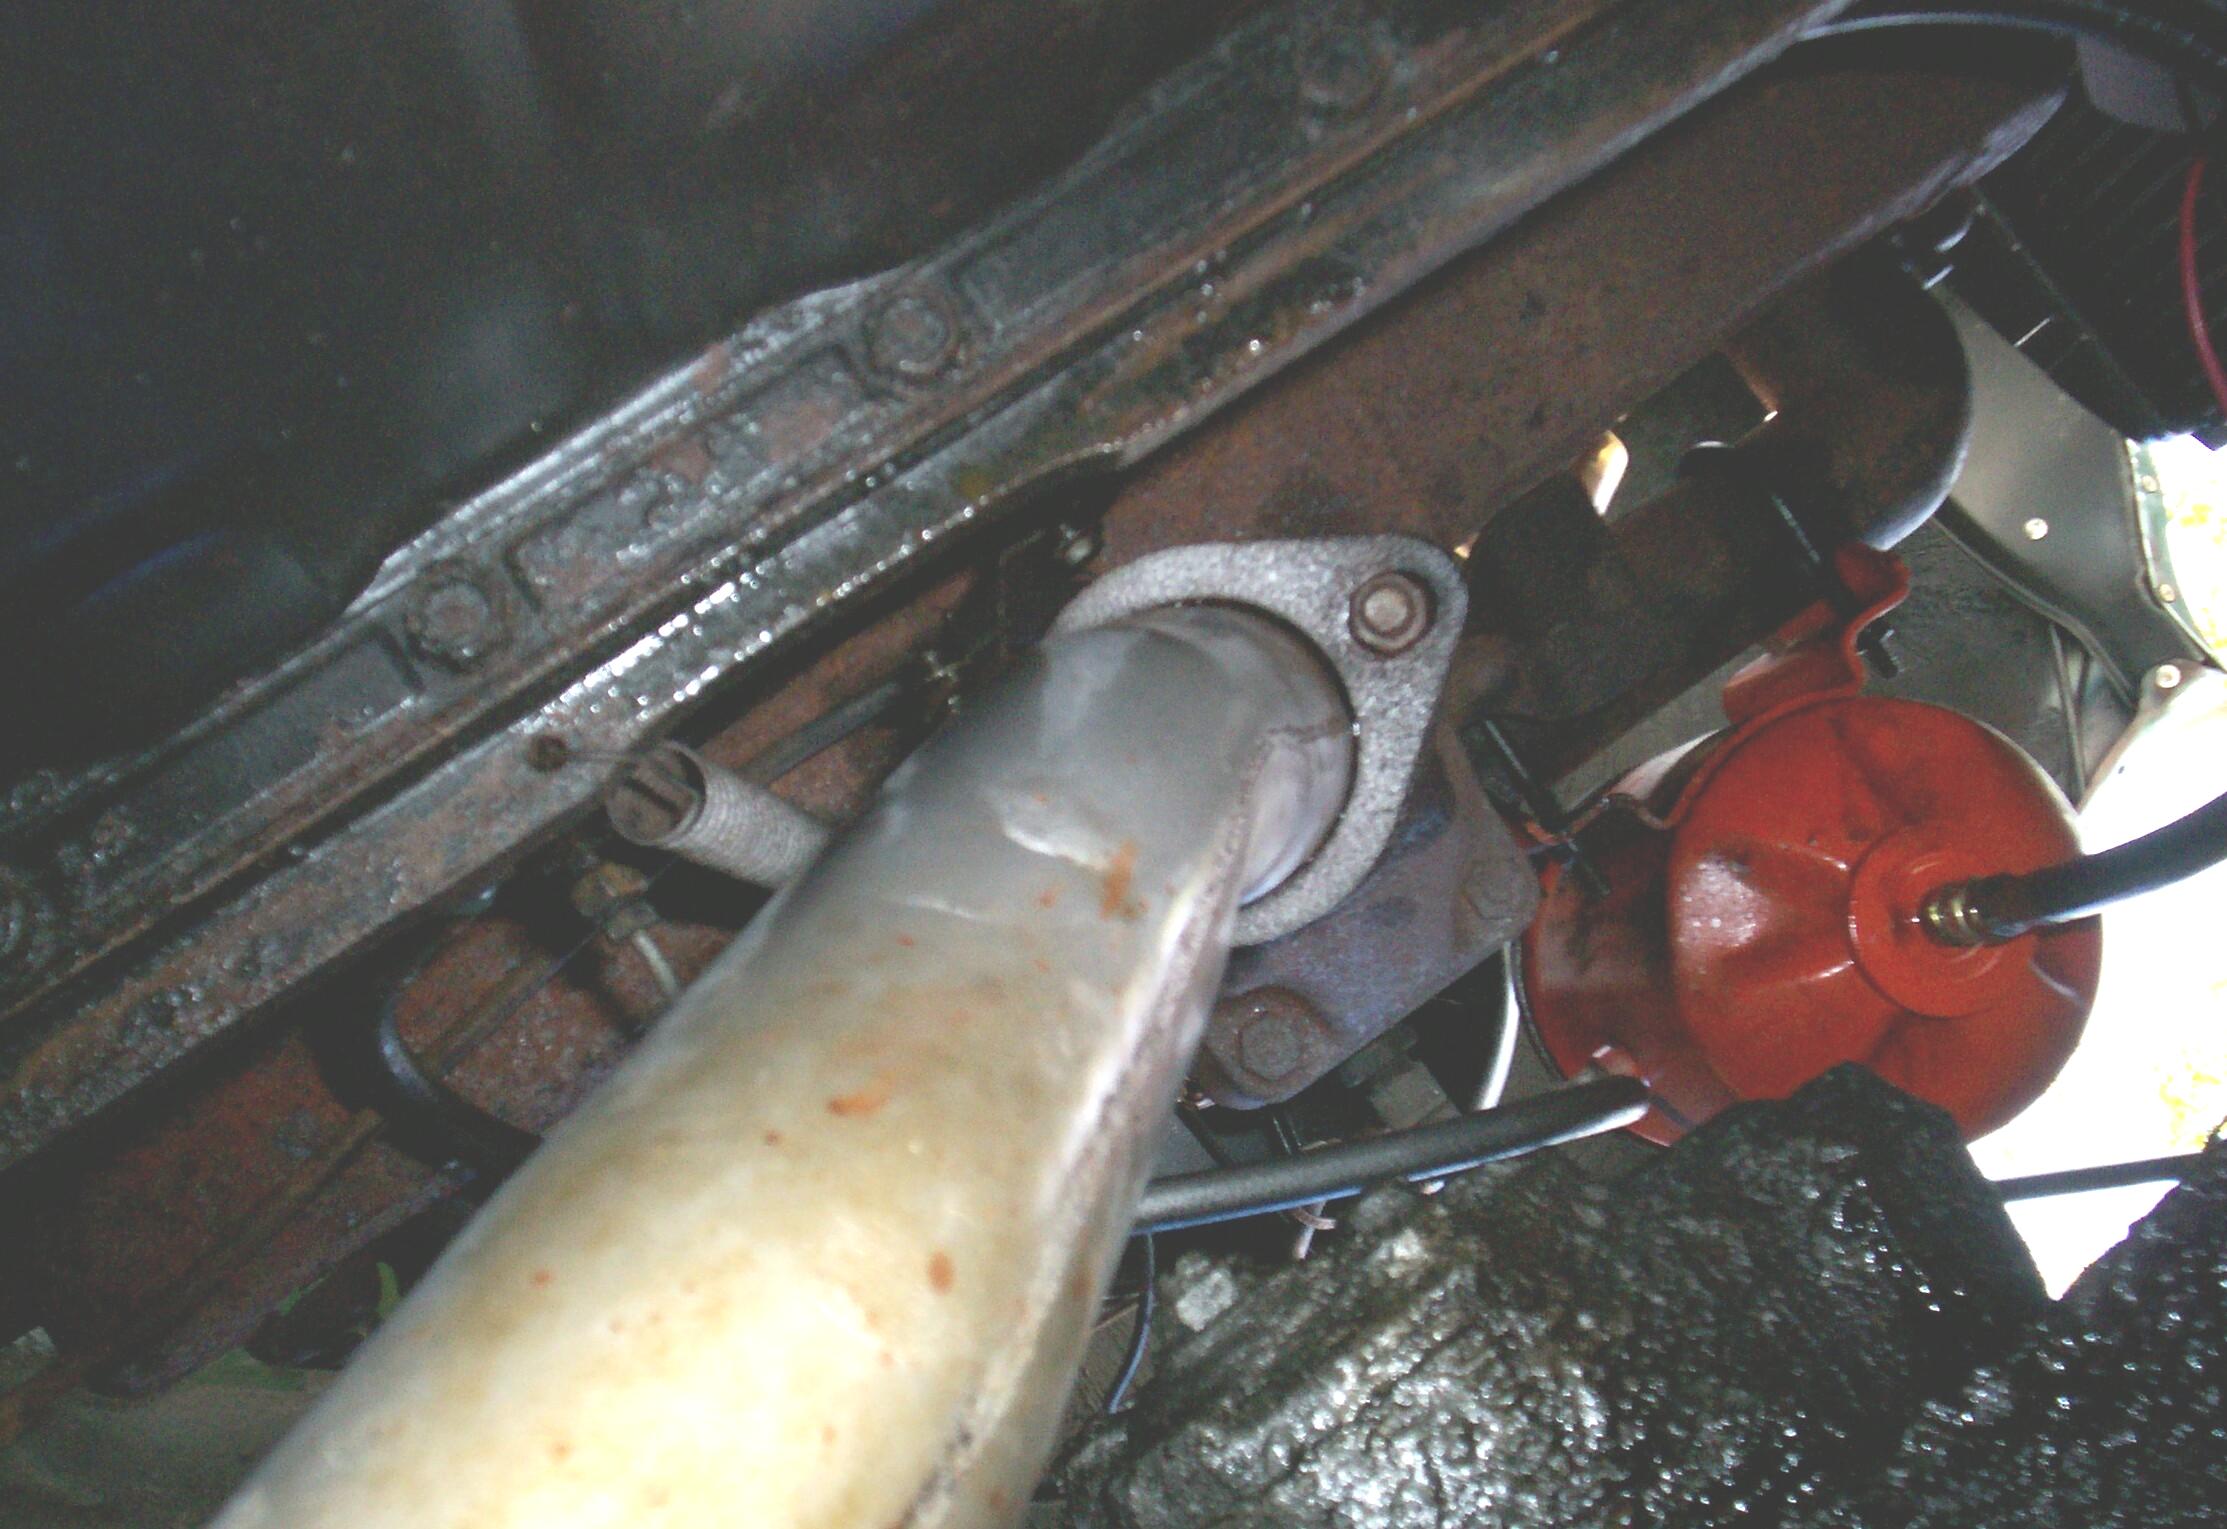
like he has a "chest cold". This has been going on for some time now. I
think it's a leak at the exhaust pipe/manifold junction. While the
truck's front end was still up in the air from lubing the zerk
fittings, I took a look at the exhaust header fasteners. They were
rusted solid and snug. Got a 9/16" 6-pt deep socket on the shorter one
and was able to turn it a bit. Other one was solid tight. Hit them with
Kroil penetrating oil and took a cigar time-out. After that, I cleaned
up the exposed threads as best I could with the Dremal motor tool. I
went after the easy nut again. It turned easy half a turn then hard,
both lefty-loosely and righty-tighty directions. It slowly dawned on my
slow brain that the stud had probably snapped somewhere north of the
flange and that's why I had the new exhaust leak. Damnation! We won't
be dealing with this today. Just have to hope the other stud holds fer
awhile longer.
Weather
is perfect this morning and I got to the Krash Lab early. I'm behind on
monthly
and quarterly
maintenance on BillyBob so I did that first. BillyBob sounds
like he has a "chest cold". This has been going on for some time now. I
think it's a leak at the exhaust pipe/manifold junction. While the
truck's front end was still up in the air from lubing the zerk
fittings, I took a look at the exhaust header fasteners. They were
rusted solid and snug. Got a 9/16" 6-pt deep socket on the shorter one
and was able to turn it a bit. Other one was solid tight. Hit them with
Kroil penetrating oil and took a cigar time-out. After that, I cleaned
up the exposed threads as best I could with the Dremal motor tool. I
went after the easy nut again. It turned easy half a turn then hard,
both lefty-loosely and righty-tighty directions. It slowly dawned on my
slow brain that the stud had probably snapped somewhere north of the
flange and that's why I had the new exhaust leak. Damnation! We won't
be dealing with this today. Just have to hope the other stud holds fer
awhile longer.
February 25th 2007 'Nother good weather day. And things are looking better on the manifold situation too. I stopped at the warehouse on the way in to the Krash Lab in BettyLou to pick up my spare manifolds I got on ebay a few years back. It might be time to restore this thing as a replacement. When I got to the Krash lab and investigated the header fasteners some more, I discovered that the stud I thought had snapped was not a stud at all. At sometime in BillyBob's past, the stud had been replaced with a thru-bolt and that it was not broke. The whole thing was turning with the wrench. I might be able to fix this thing yet with some more applications of penetrating oil and heat.
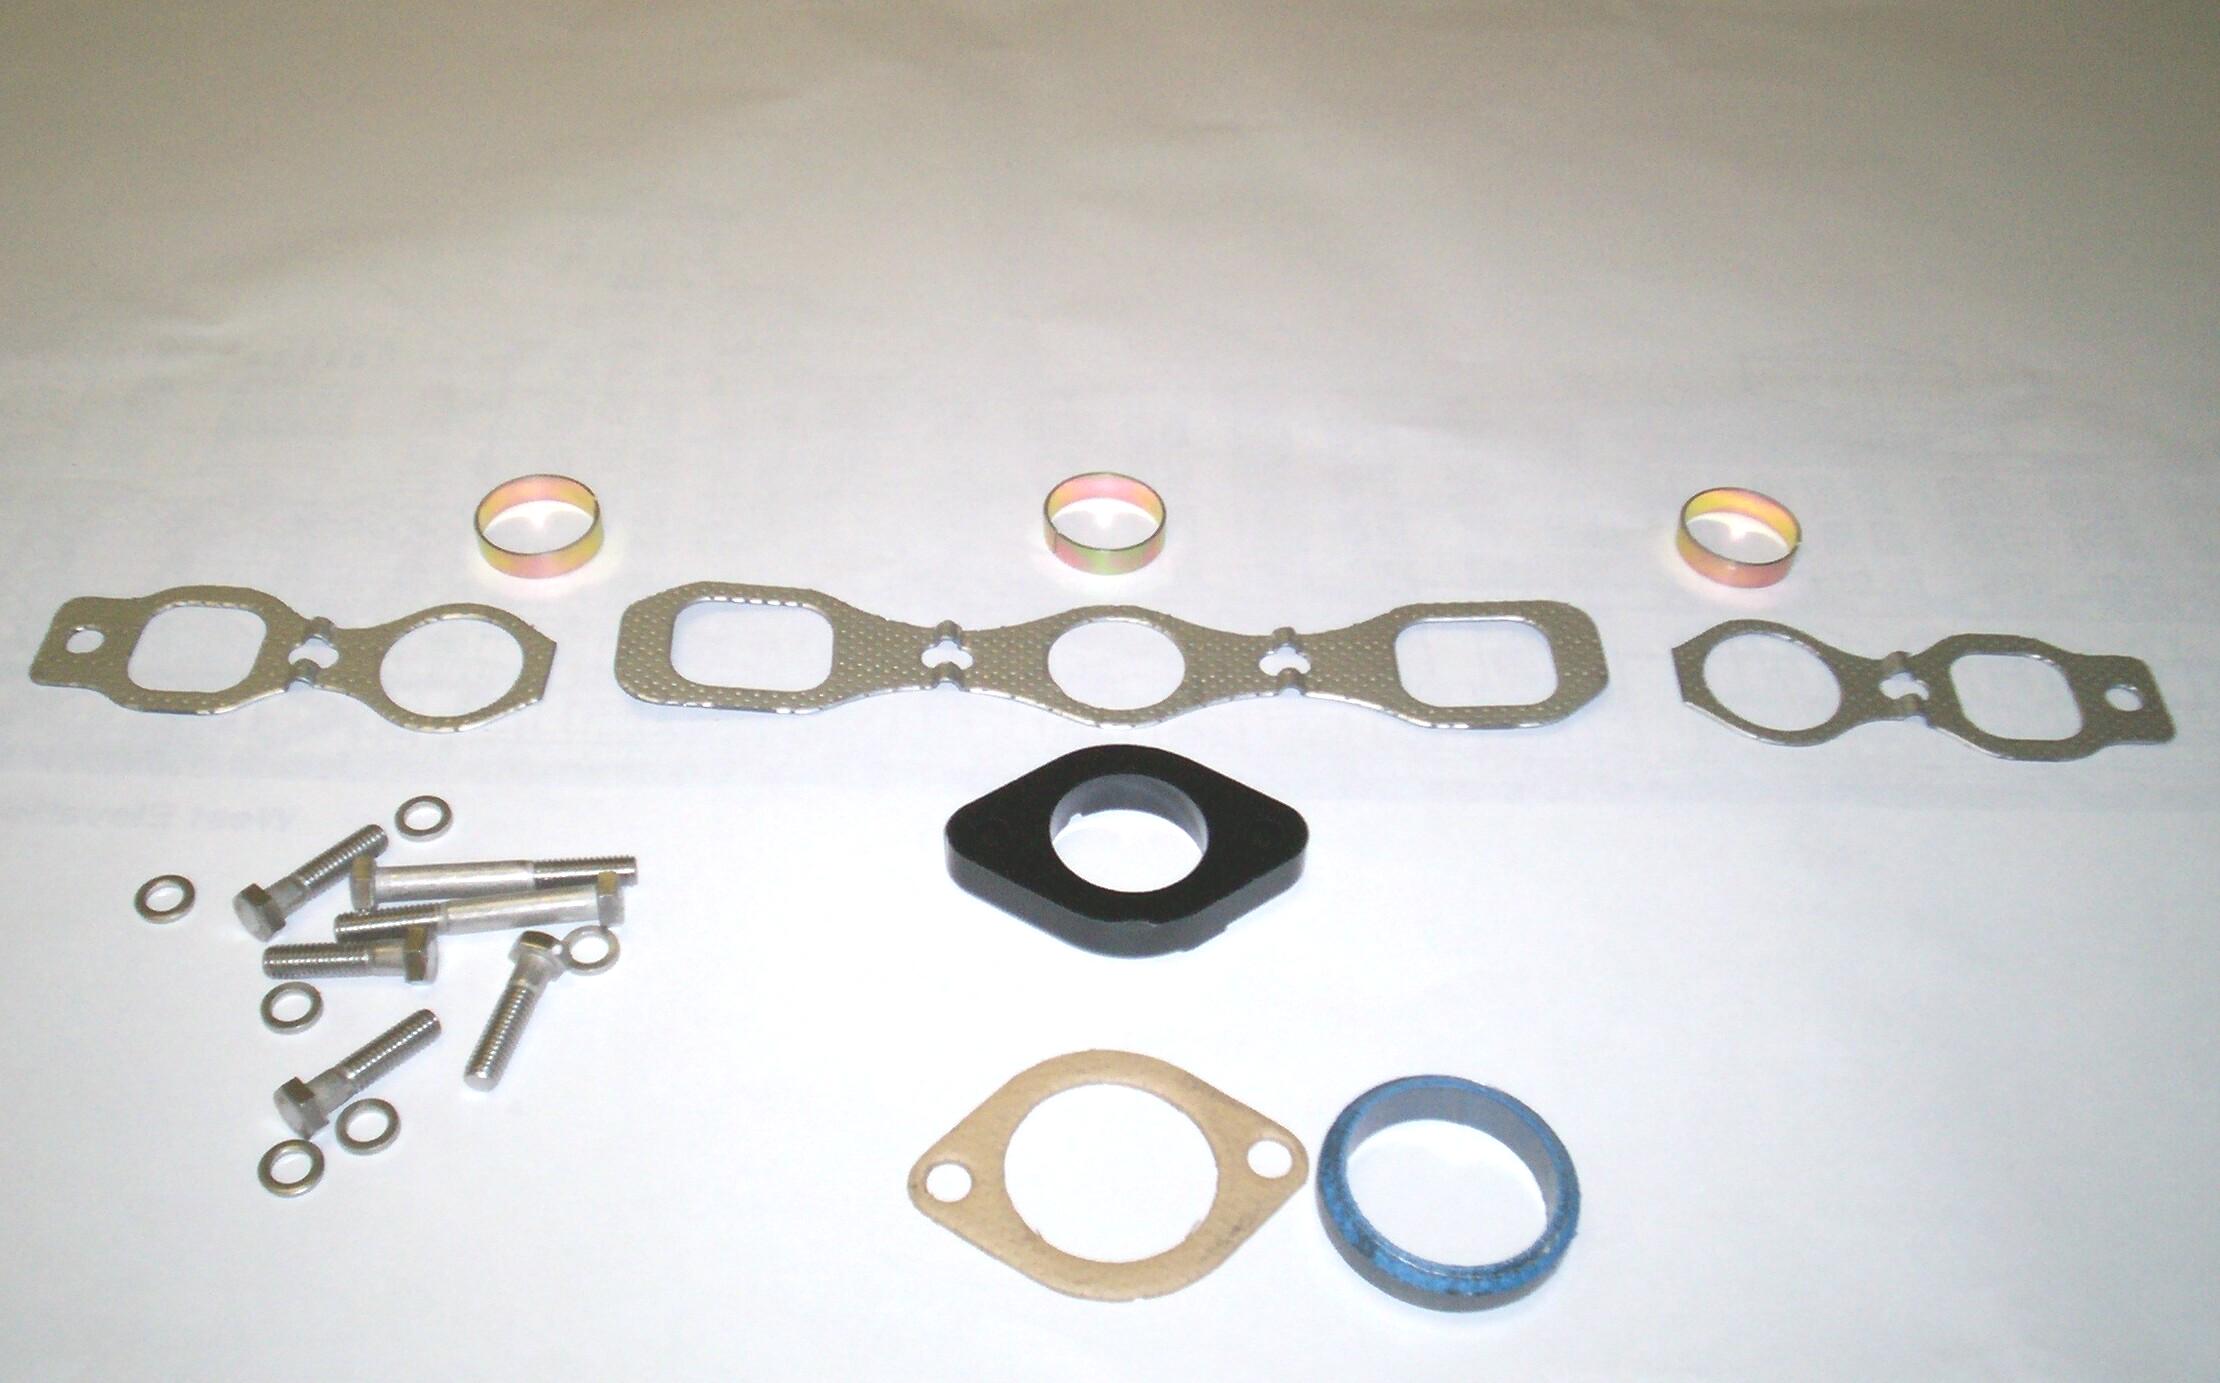 March
3rd 2007 A good weather
day. Having decided to restore the spare manifolds for installation
(hopefully in the fall), I started by locating and ordering some parts.
Placed an order to Classic
American Parts (formerly Chevy-Duty) for a manifold gasket
set, intake alignment rings and a carb spacer. Ordered a stainless
steel engine bolt set from Tom Langdon at Stovebolt Engine Company.
Both orders arrived by week's end. Additional spare parts for the
upcoming roadtrip were also received, organized and stored away. Then,
I turned my attention to Renegade, sadly neglected and off the road for
fourteen months and counting.
March
3rd 2007 A good weather
day. Having decided to restore the spare manifolds for installation
(hopefully in the fall), I started by locating and ordering some parts.
Placed an order to Classic
American Parts (formerly Chevy-Duty) for a manifold gasket
set, intake alignment rings and a carb spacer. Ordered a stainless
steel engine bolt set from Tom Langdon at Stovebolt Engine Company.
Both orders arrived by week's end. Additional spare parts for the
upcoming roadtrip were also received, organized and stored away. Then,
I turned my attention to Renegade, sadly neglected and off the road for
fourteen months and counting.
 March
10th 2007 Didn't get
much done last sunday. BillyBob can be a "Chick Magnet" but that's not
always a good thing. Wuz having my morning java and cigar, sitting on
Renegade's bumper, and down the alley walks a slight figure talking on
her cell phone. As she closes on the truck, I discover she doesn't have
a phone. She looks at BillyBob and guesses '53 Chevy. Comes over and
locates herself on the Jeep bumper with me. Asks for a puff on the
cigar then hacks a coughing fit like advanced TB. Asks to finish off my
coffee. Two hours and four cups of coffee later, I got off the bumper
and washed the truck and she still wouldn't leave. Nothing for it but
to put the tools away and lock her out of the Krash Lab while I tended
to the computers. I'll be watching for her this week so I can duck
inside quickly.
March
10th 2007 Didn't get
much done last sunday. BillyBob can be a "Chick Magnet" but that's not
always a good thing. Wuz having my morning java and cigar, sitting on
Renegade's bumper, and down the alley walks a slight figure talking on
her cell phone. As she closes on the truck, I discover she doesn't have
a phone. She looks at BillyBob and guesses '53 Chevy. Comes over and
locates herself on the Jeep bumper with me. Asks for a puff on the
cigar then hacks a coughing fit like advanced TB. Asks to finish off my
coffee. Two hours and four cups of coffee later, I got off the bumper
and washed the truck and she still wouldn't leave. Nothing for it but
to put the tools away and lock her out of the Krash Lab while I tended
to the computers. I'll be watching for her this week so I can duck
inside quickly.
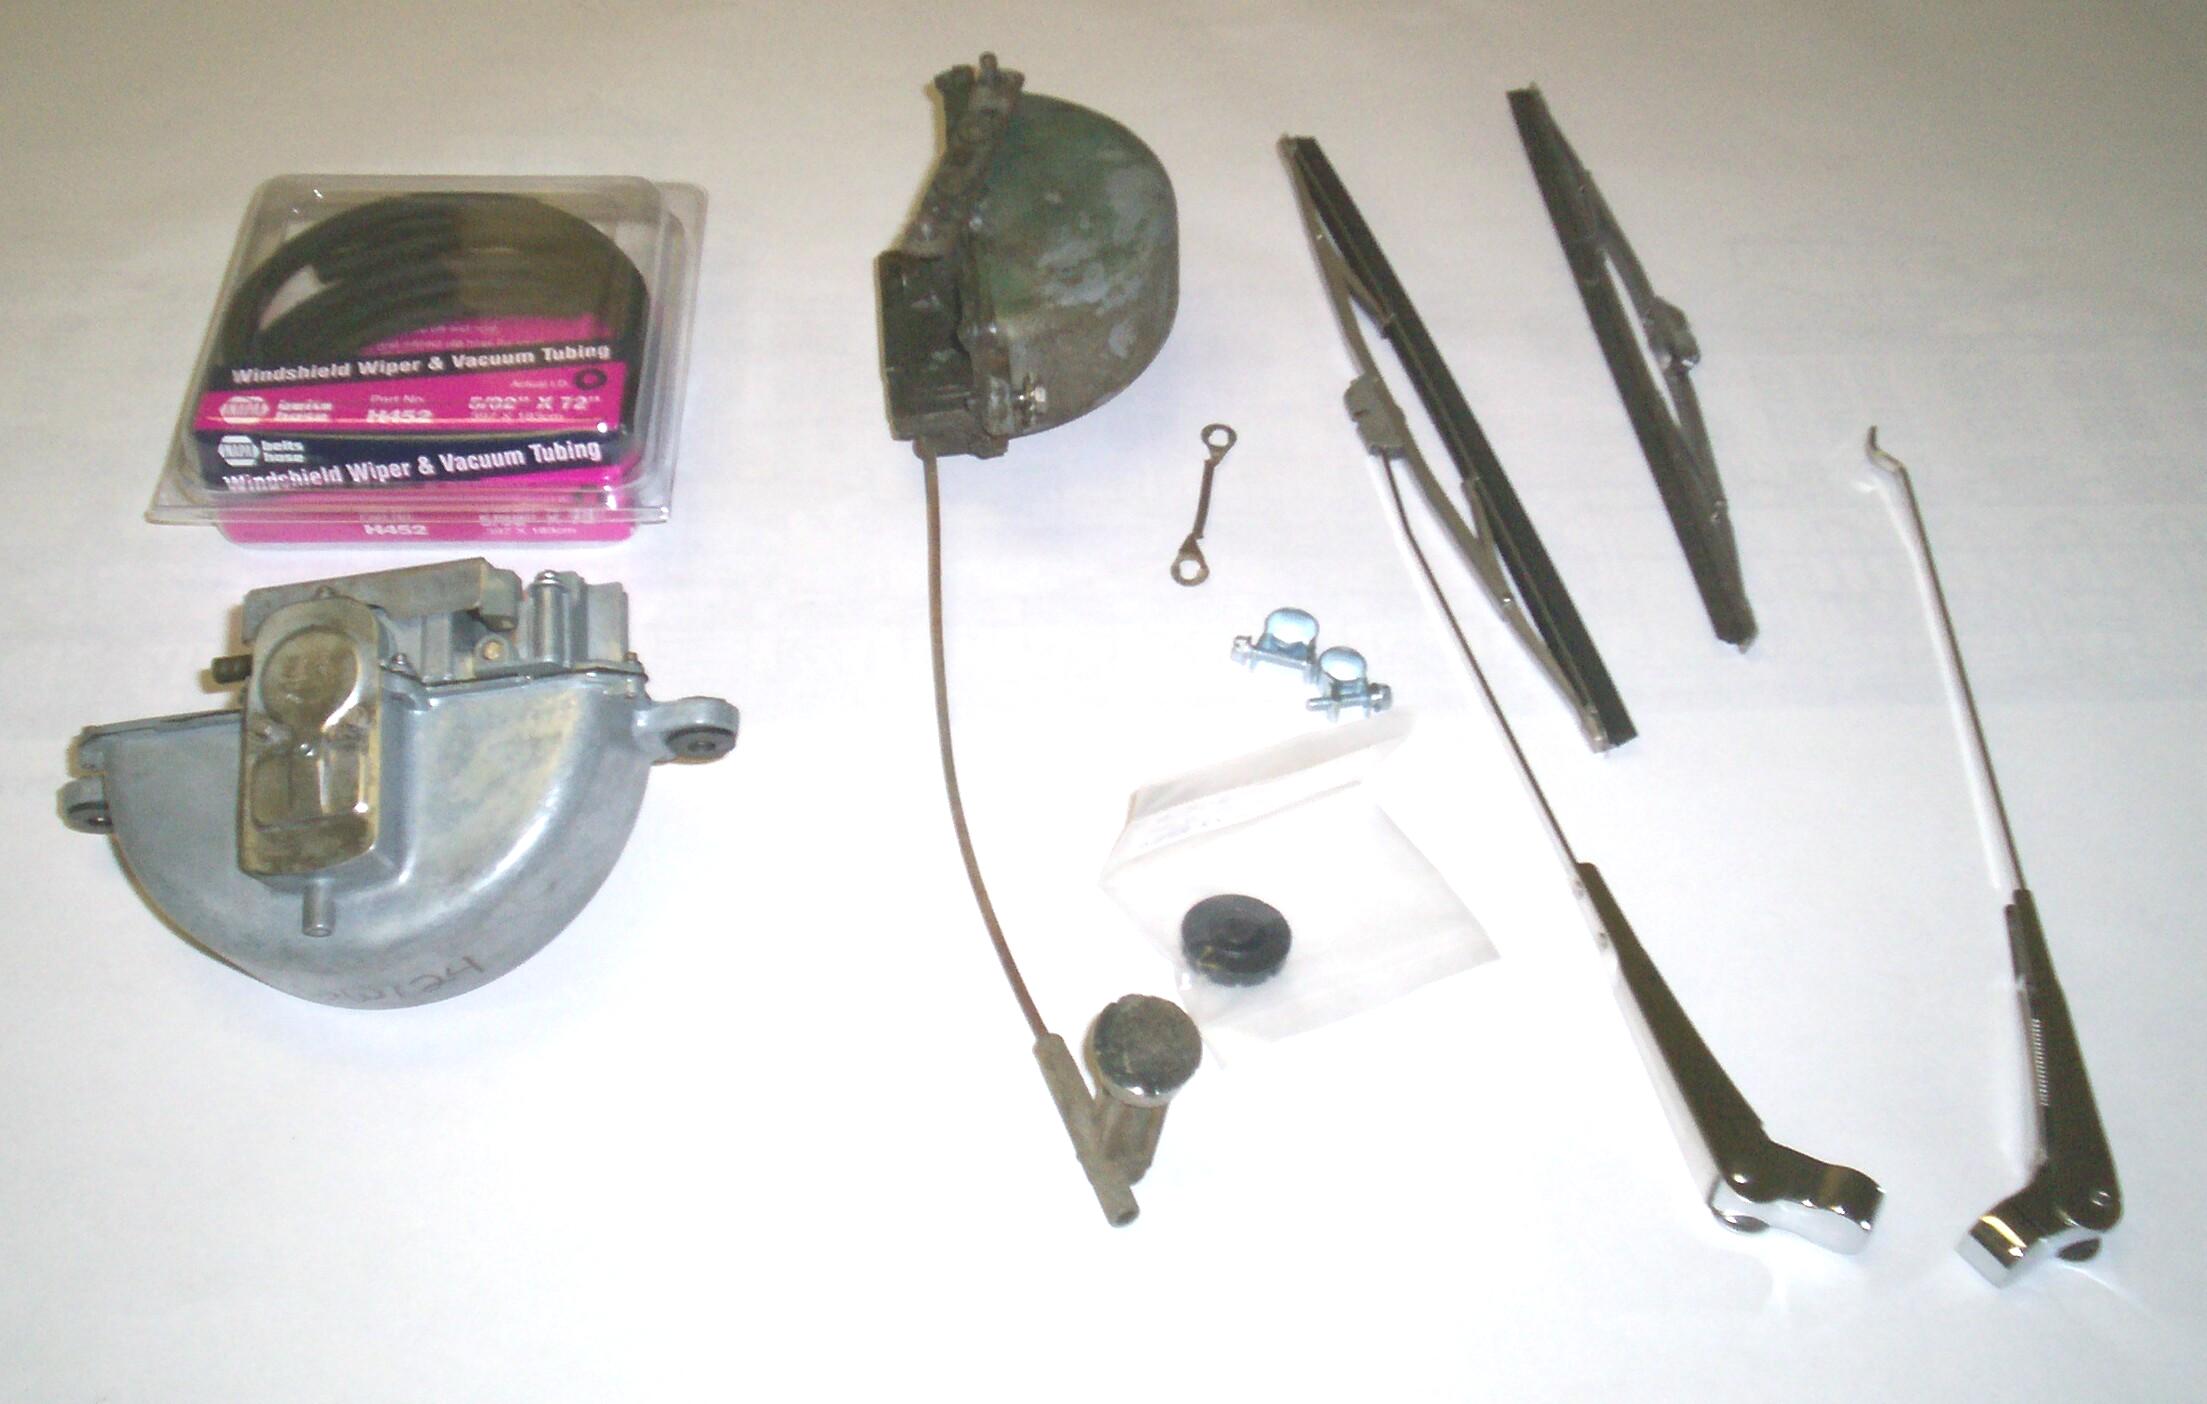 I
don't have all the chassis work done for this detailing cycle yet but
I've assembled all the parts, I think, to get the windshield wipers
going again, so I jumped ahead a bit to the interior phase coming up. A
refurbished vacuum wiper motor arrived from American Classic Truck
Parts this week. Some time back I got new wiper arms, bezels, gaskets,
blade assemblies, dashboard knob, etc. from American Classic and
Chevy-Duty. American Classic even sent me some additional parts they
thought I'd need, free-of-charge. I got vacuum hose from NAPA Online a
few weeks ago and I had some small hose clamps left over from a job on
Renegade. I'm using the control cable and the transmission arm spring
retainer from the original wiper motor. I had installed used
transmission arms I got from American Classic back when I finished the
windshield epic.
I
don't have all the chassis work done for this detailing cycle yet but
I've assembled all the parts, I think, to get the windshield wipers
going again, so I jumped ahead a bit to the interior phase coming up. A
refurbished vacuum wiper motor arrived from American Classic Truck
Parts this week. Some time back I got new wiper arms, bezels, gaskets,
blade assemblies, dashboard knob, etc. from American Classic and
Chevy-Duty. American Classic even sent me some additional parts they
thought I'd need, free-of-charge. I got vacuum hose from NAPA Online a
few weeks ago and I had some small hose clamps left over from a job on
Renegade. I'm using the control cable and the transmission arm spring
retainer from the original wiper motor. I had installed used
transmission arms I got from American Classic back when I finished the
windshield epic.
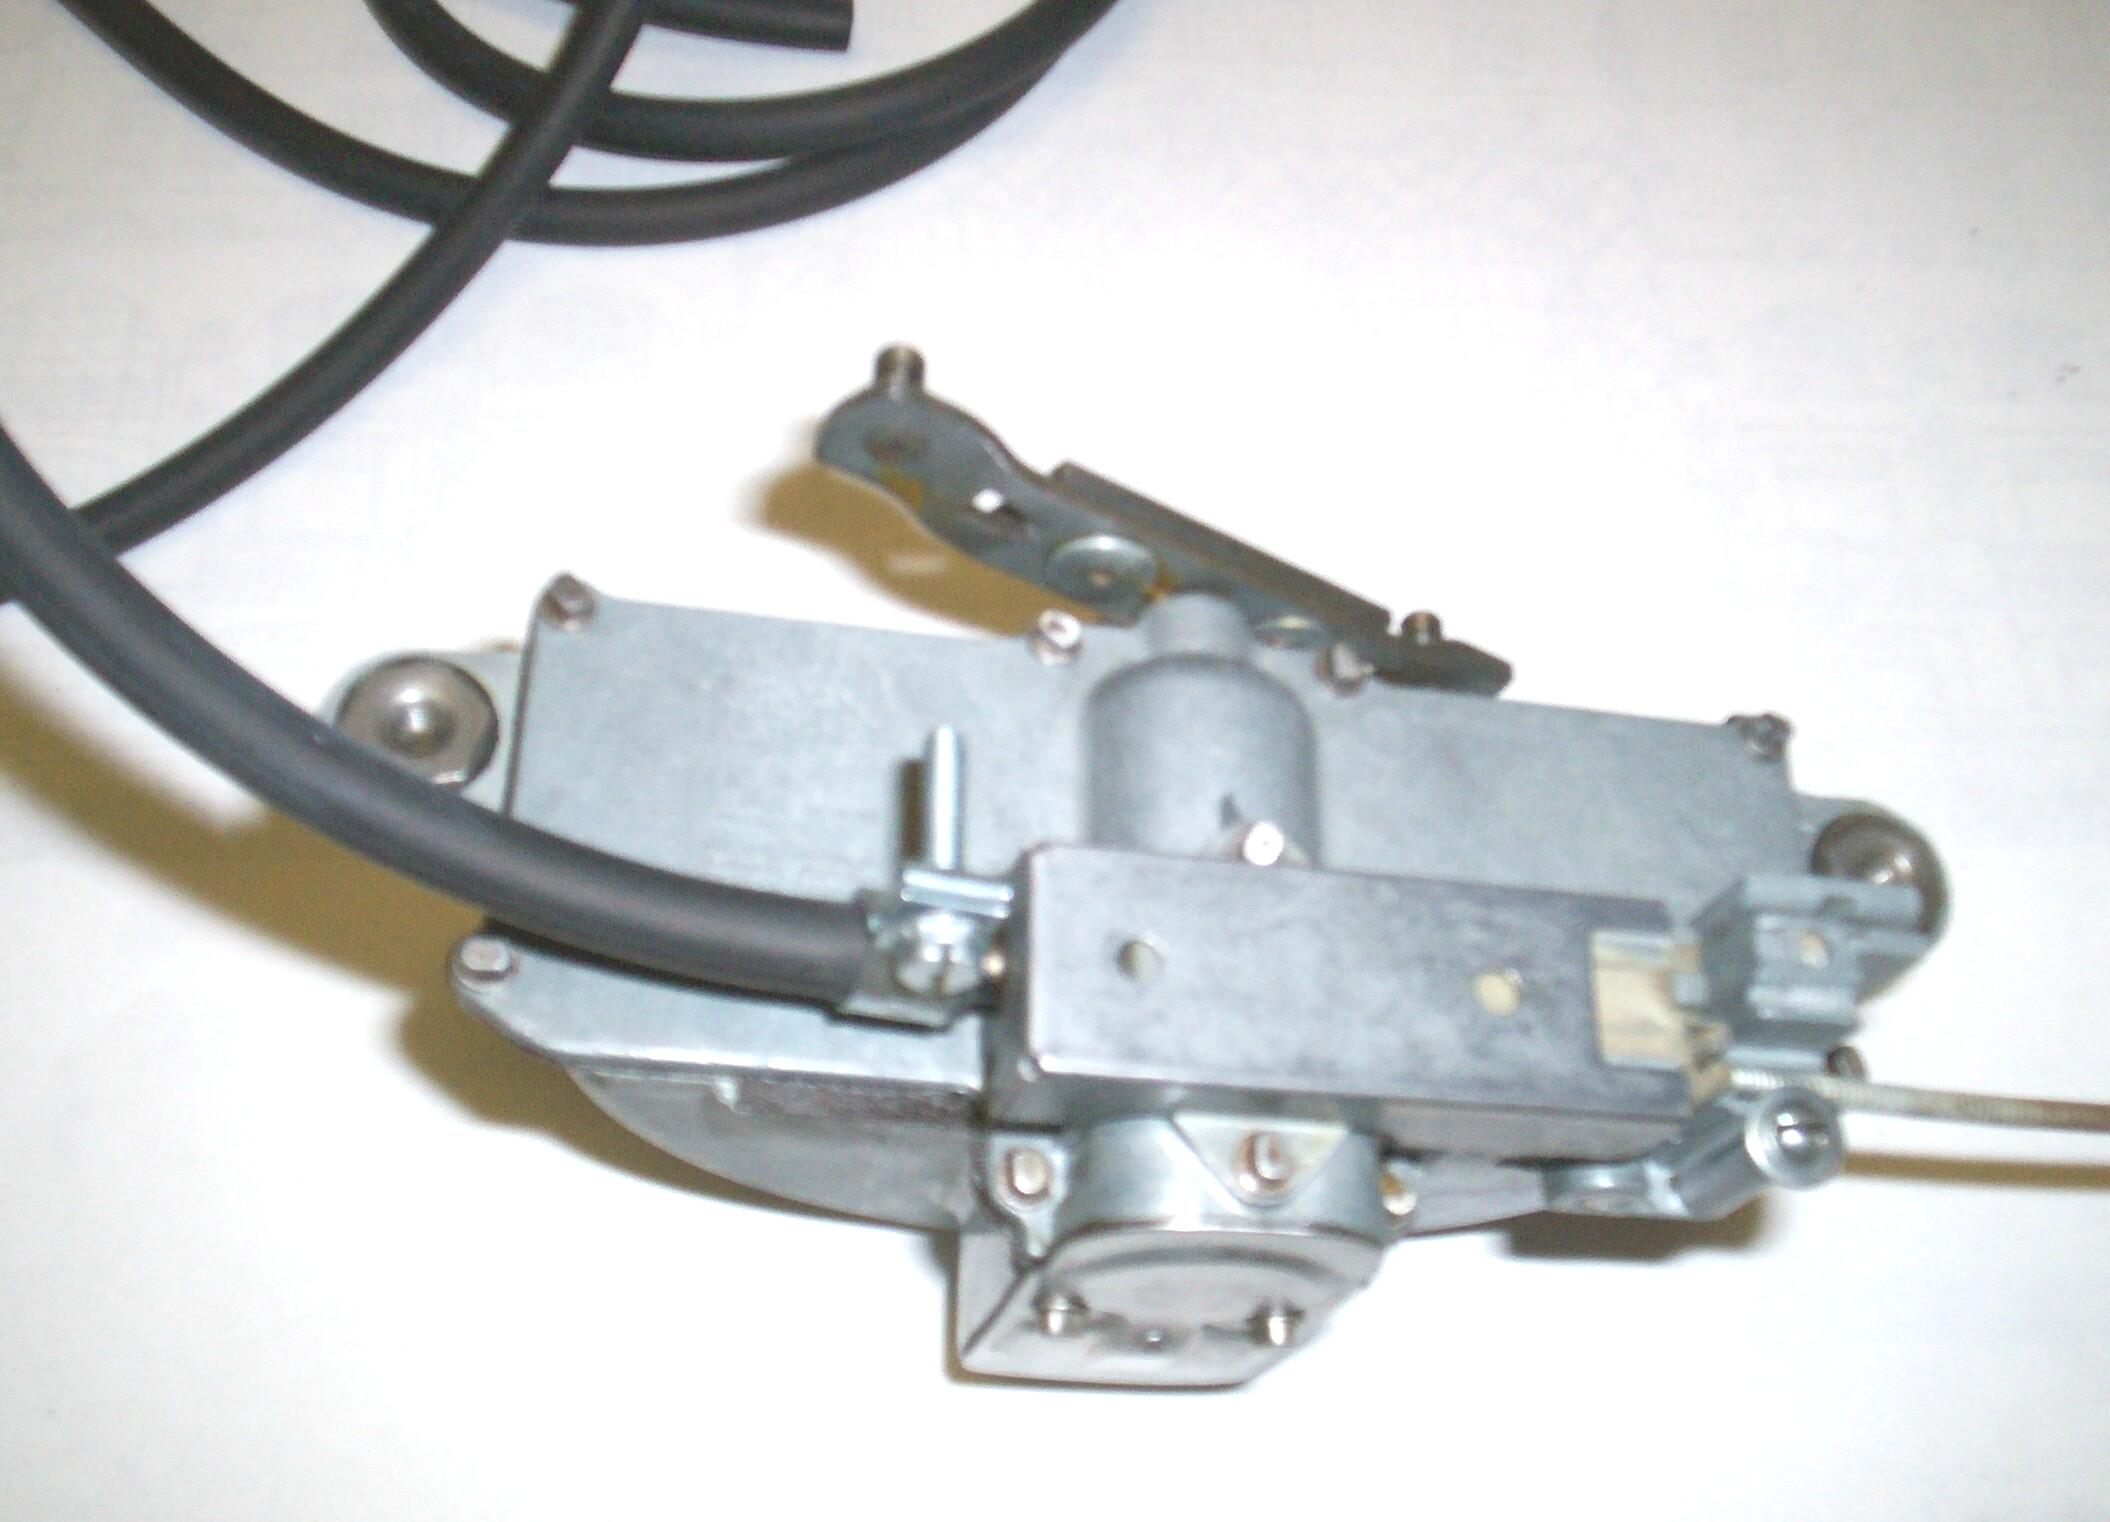 Got
started by attaching the new 6' length of 7/32" vacuum hose to the
outlet on top of the wiper motor with a hose clamp. Removed the control
cable from the old motor and cleaned it up a bit with brake cleaner,
then clamped it in place on the new motor with the supplied screw and
washer. The somewhat cleaner area underneath the old clamp gave me enuf
info for alignment.
Got
started by attaching the new 6' length of 7/32" vacuum hose to the
outlet on top of the wiper motor with a hose clamp. Removed the control
cable from the old motor and cleaned it up a bit with brake cleaner,
then clamped it in place on the new motor with the supplied screw and
washer. The somewhat cleaner area underneath the old clamp gave me enuf
info for alignment.
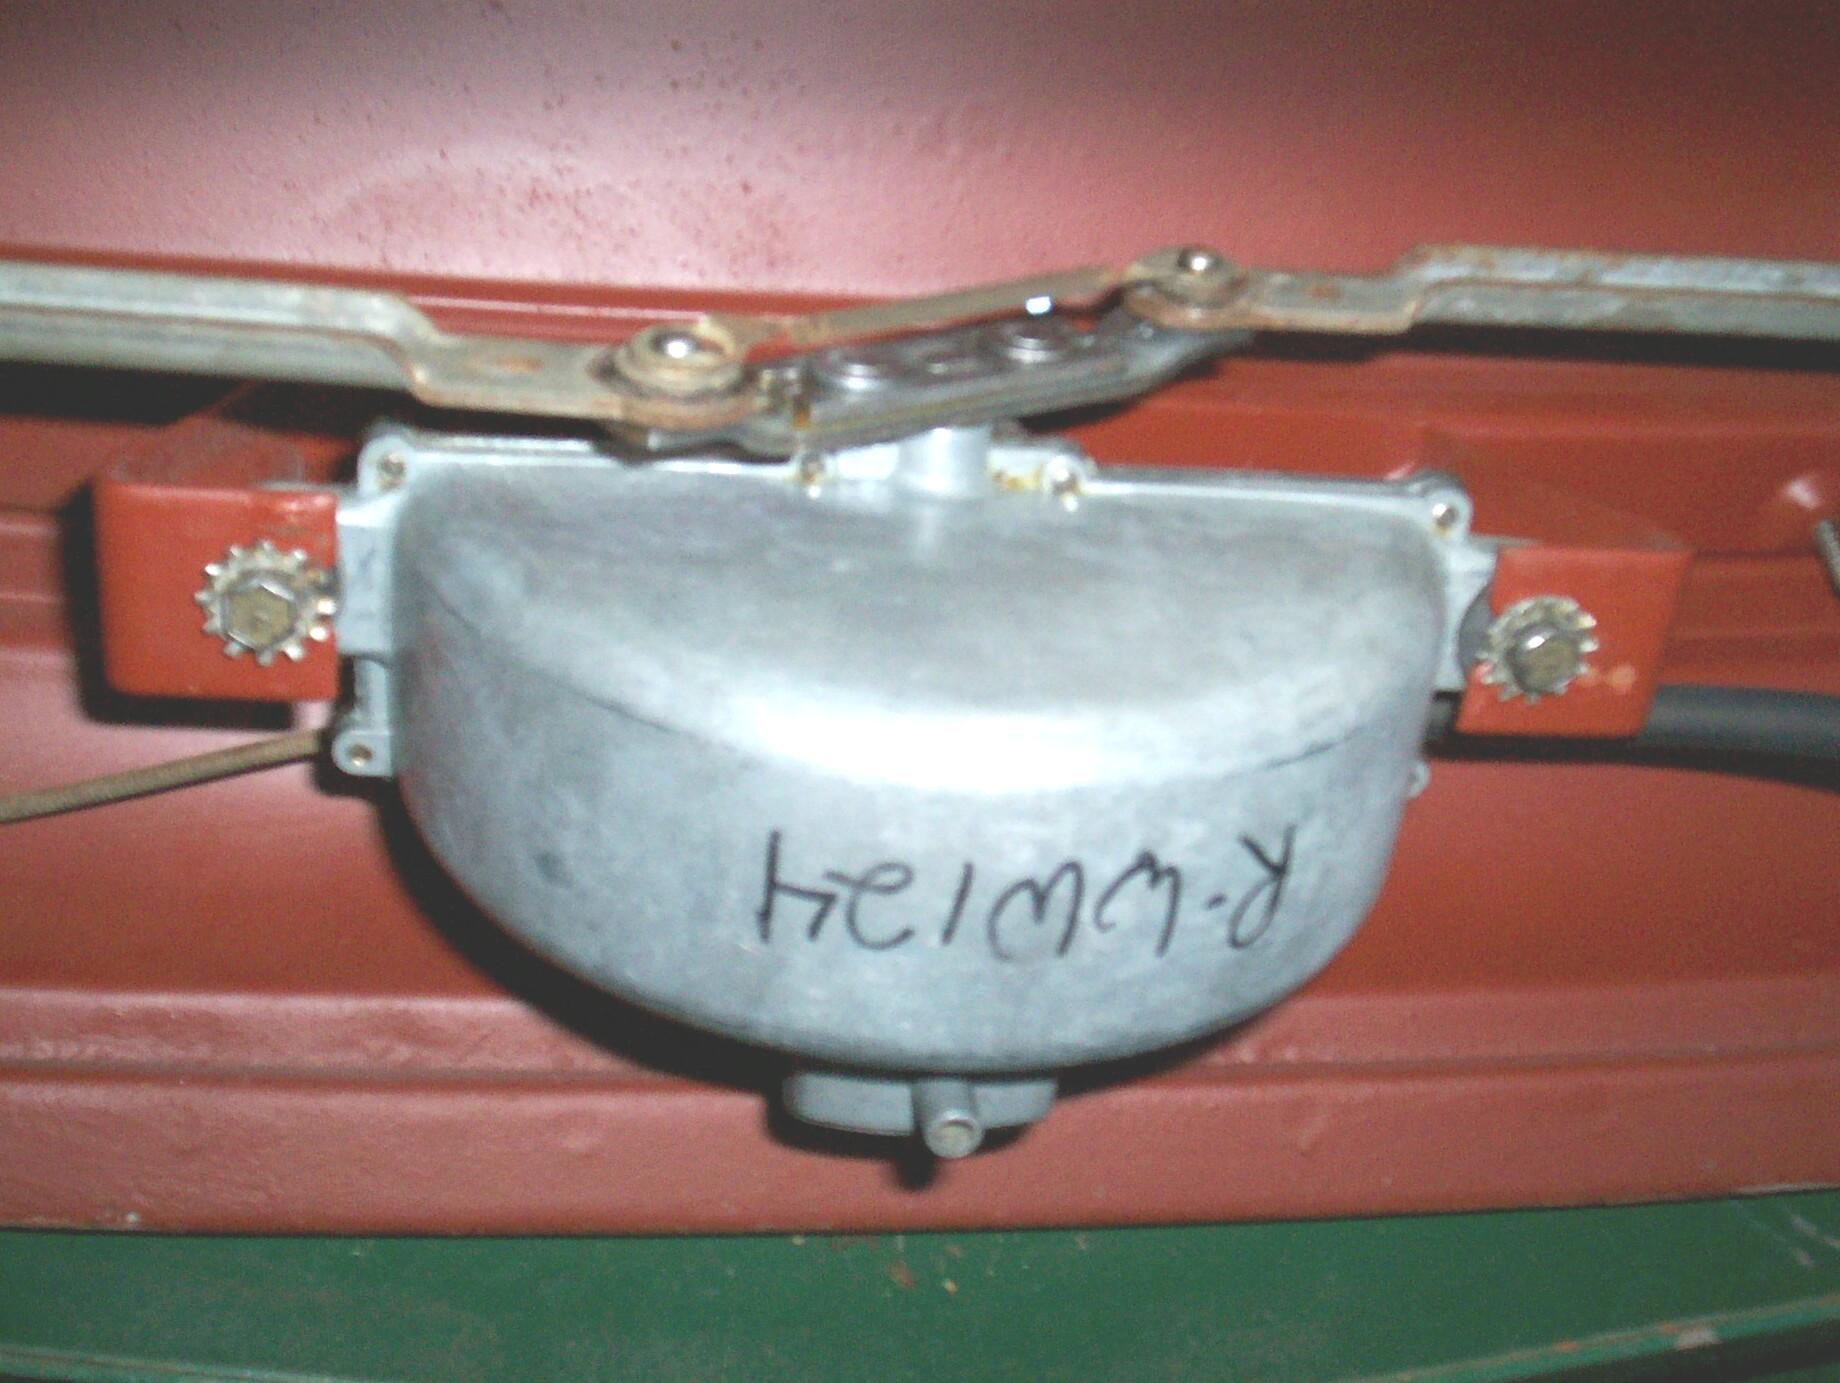 Took
the old mounting capscrews and washers off the original motor too and
bolted the new one in position underneath the dash. I had the
transmission arms secured under the dash with wire ties. These were cut
off and the arms secured to the motor with the old spring retainer. The
old vacuum line was removed from under the dash and the new line was
fed thru the grommet in the firewall. The hose was cut and clamped unto
the existing short tubing element coming out of the brass fitting on
the intake manifold. The control mechanism was fed up thru the dash
hole and secured with the original bezel. A new plastic knob was
pressed on the shaft from above. Time to test it. Idle the engine, turn
the control knob . . . It works!
Took
the old mounting capscrews and washers off the original motor too and
bolted the new one in position underneath the dash. I had the
transmission arms secured under the dash with wire ties. These were cut
off and the arms secured to the motor with the old spring retainer. The
old vacuum line was removed from under the dash and the new line was
fed thru the grommet in the firewall. The hose was cut and clamped unto
the existing short tubing element coming out of the brass fitting on
the intake manifold. The control mechanism was fed up thru the dash
hole and secured with the original bezel. A new plastic knob was
pressed on the shaft from above. Time to test it. Idle the engine, turn
the control knob . . . It works!
Success was short lived, however. The new wiper arms and blade assemblies were mounted on the transmission arm shafts projecting thru the cowl and then the wheels fell off. The eleven inch wiper blade assemblies are too long! The ends of the blades on both sides wedge themselves between gasket and windshield at the top. Damnation! Time to light up a cigar and set my brain wheels to spinnin'.
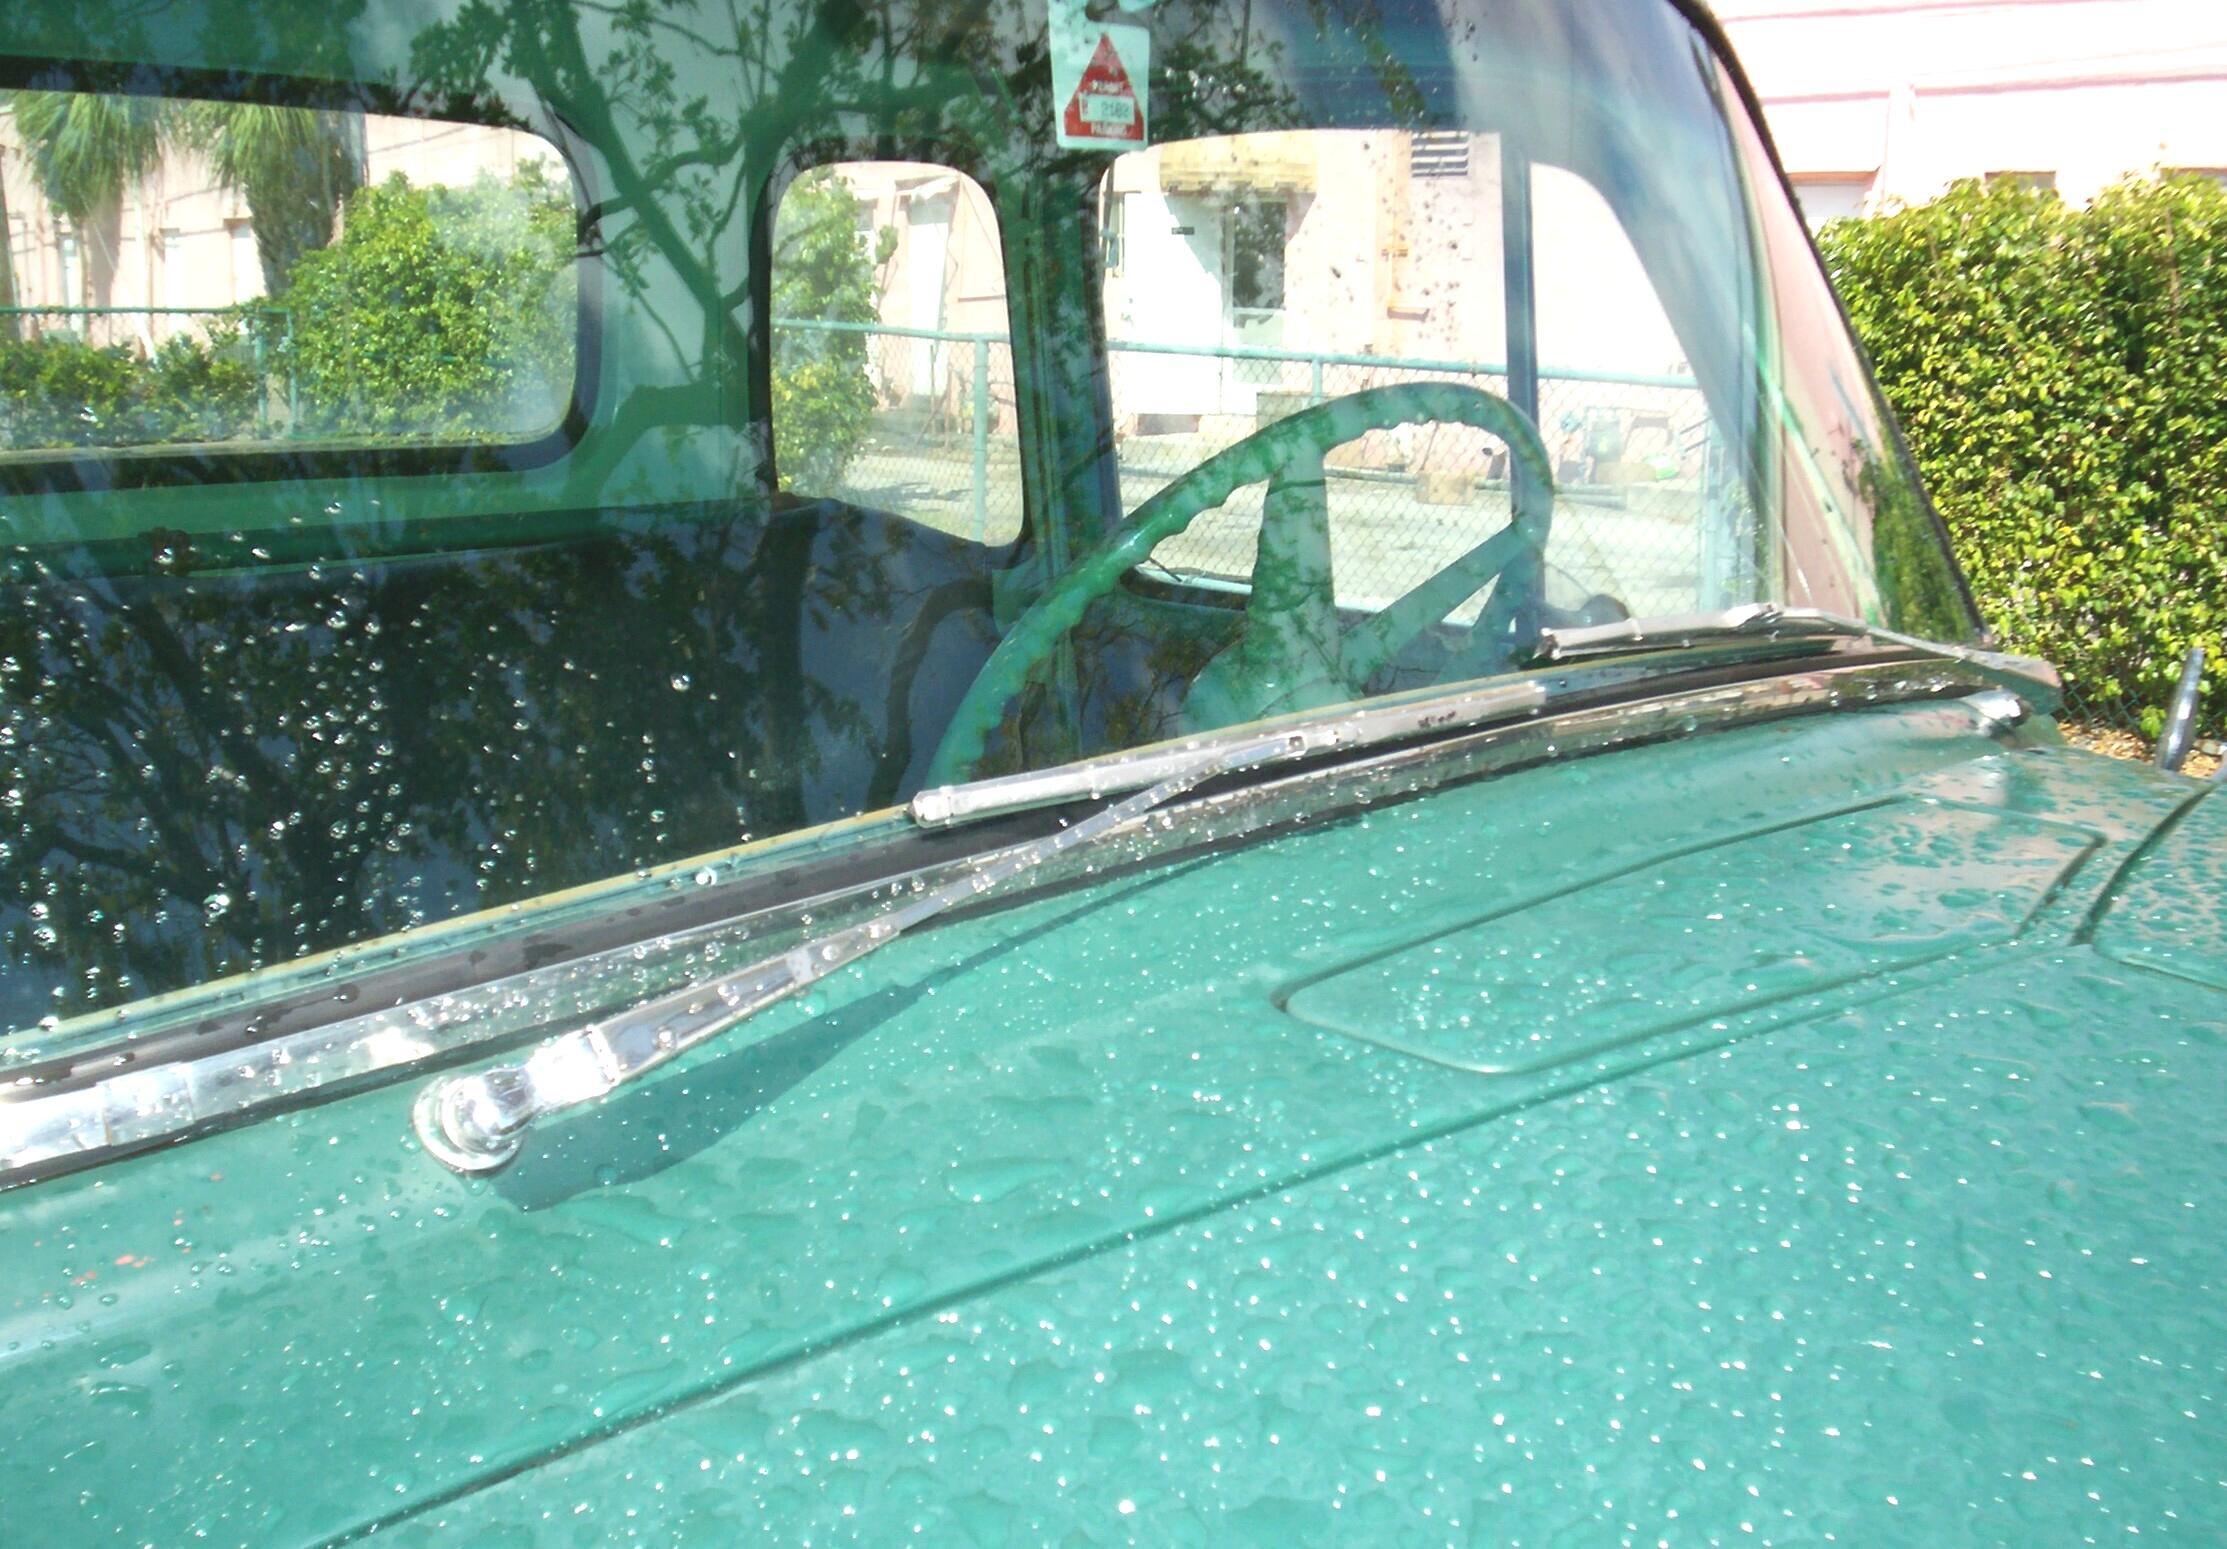 After
the cigar, I got out the air-powered saber saw and lopped a quarter
inch off the wiper blade ends that were hitting the windshield gasket.
Unfortunately, that quarter inch held a retainer mechanism and now the
blade assemblies wanted to fall apart. I solved that by pinching the
mechanism at the other end of the blade with pliers fixing it in place.
The rest of the blade is still free to slide in the assembly to follow
the windshield contours. The wiper arms and blades were re-installed so
that the blades at rest were about an inch from the bottom of the
windshield (so they wouldn't slam below the windshield trim when the
wipers were turned off). I wetted down the windshield and tried again.
Good! It works now, after a fashion. I think that will do until I find
a better blade solution.
After
the cigar, I got out the air-powered saber saw and lopped a quarter
inch off the wiper blade ends that were hitting the windshield gasket.
Unfortunately, that quarter inch held a retainer mechanism and now the
blade assemblies wanted to fall apart. I solved that by pinching the
mechanism at the other end of the blade with pliers fixing it in place.
The rest of the blade is still free to slide in the assembly to follow
the windshield contours. The wiper arms and blades were re-installed so
that the blades at rest were about an inch from the bottom of the
windshield (so they wouldn't slam below the windshield trim when the
wipers were turned off). I wetted down the windshield and tried again.
Good! It works now, after a fashion. I think that will do until I find
a better blade solution.
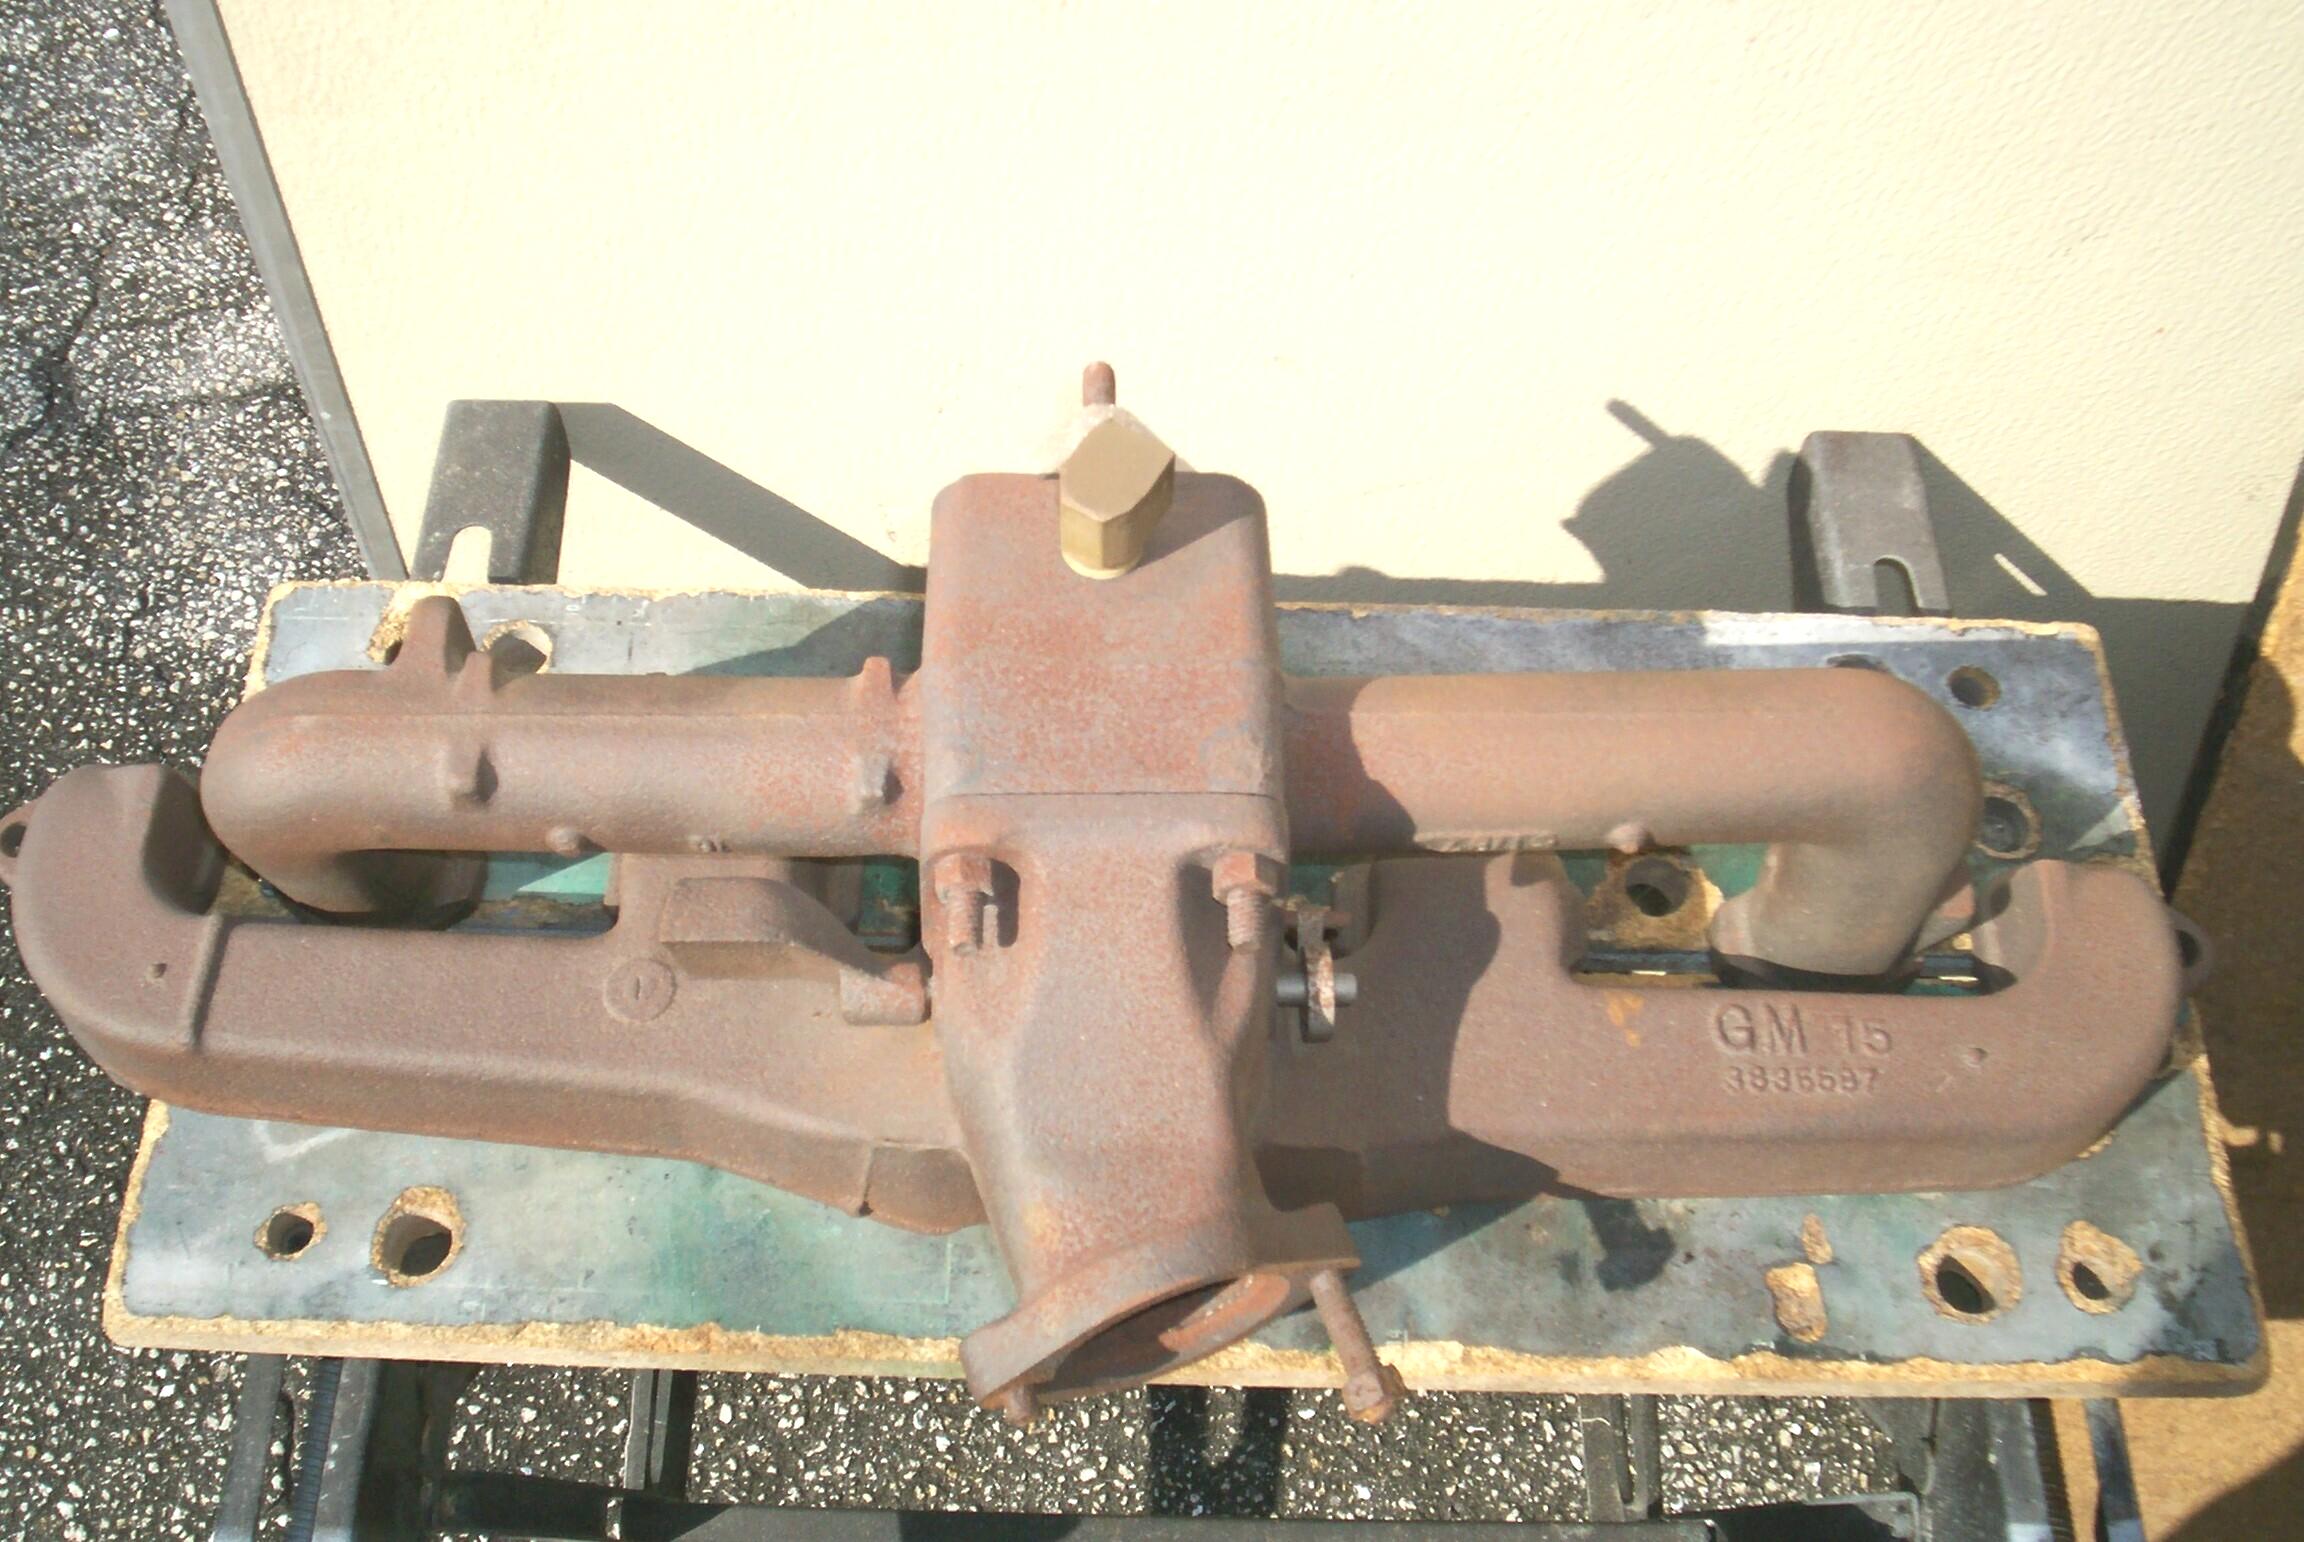 March
11th 2007 The good
weather continues. Birds at the Krash Pad have been partying in the
trees above the cars for the last week and they dumped considerable
guano loads on BillyBob mid-week and BettyLou last night. I hauled the
hose out first thing this morning and washed them both off. Continued
by cleaning BillyBob and giving him an application of Quik Detailer.
Waxed the chrome, dressed the tires and renewed the Rain-X on the
windshield, Vacuumed and wiped down the interior too. Pulled out the
spare intake/exhaust manifold and applied Kroil penetrating oil to all
the studs and bolts. When I got this thru a eBay purchase, it was
freshly sandblasted. The rust is back but I want to get it apart before
I derust it again. Spent the rest of the day organizing BillyBob parts
and painting Jeep chassis parts.
March
11th 2007 The good
weather continues. Birds at the Krash Pad have been partying in the
trees above the cars for the last week and they dumped considerable
guano loads on BillyBob mid-week and BettyLou last night. I hauled the
hose out first thing this morning and washed them both off. Continued
by cleaning BillyBob and giving him an application of Quik Detailer.
Waxed the chrome, dressed the tires and renewed the Rain-X on the
windshield, Vacuumed and wiped down the interior too. Pulled out the
spare intake/exhaust manifold and applied Kroil penetrating oil to all
the studs and bolts. When I got this thru a eBay purchase, it was
freshly sandblasted. The rust is back but I want to get it apart before
I derust it again. Spent the rest of the day organizing BillyBob parts
and painting Jeep chassis parts.
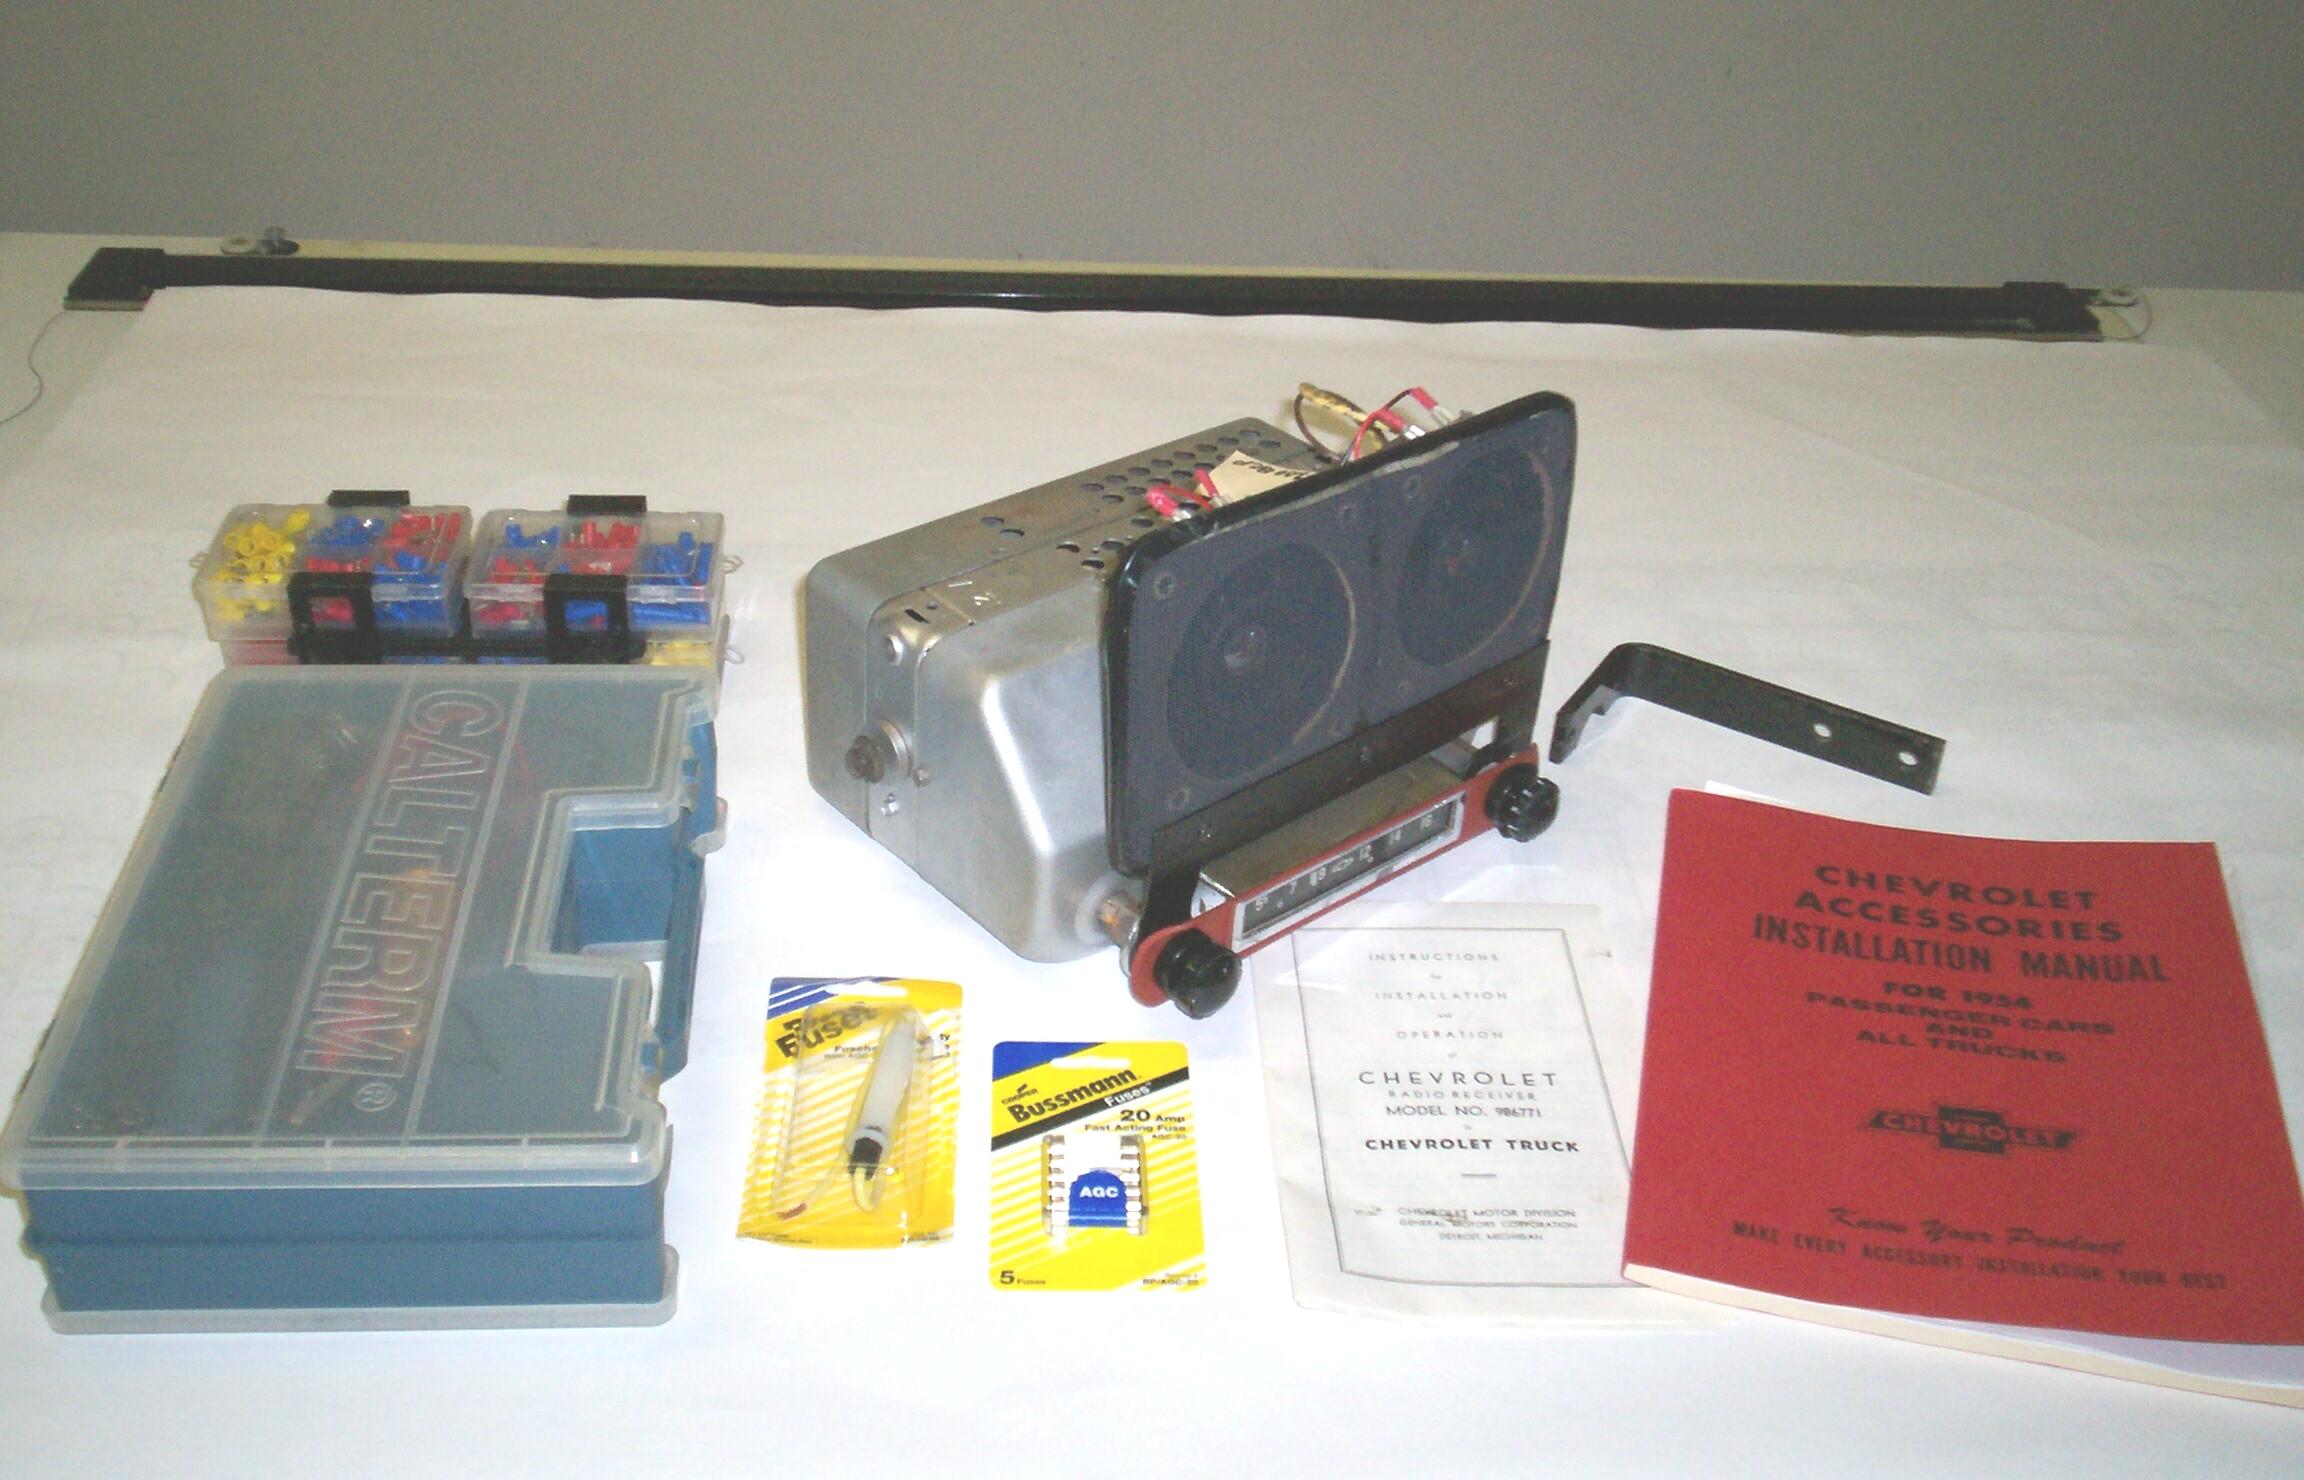 March
17th 2007 It's chilly
today. The Northeast is getting a good dose of global warming in its
white, crystaline form. Dragged the tools out of the shed and continued
with interior improvements on BillyBob. Back in early '03, I picked up
a radio for BillyBob from Bob's Chevy Parts thru an eBay auction. The
'54-'55 1st Series radio had been restored and converted to 12 volts.
Perfect for my purposes. I'm gonna start installing it today. I picked
up an inline fuse holder and some twenty amp fuses (my best guess since
I couldn't locate specific info for this radio) at Advance Auto Parts
earlier in the week.
March
17th 2007 It's chilly
today. The Northeast is getting a good dose of global warming in its
white, crystaline form. Dragged the tools out of the shed and continued
with interior improvements on BillyBob. Back in early '03, I picked up
a radio for BillyBob from Bob's Chevy Parts thru an eBay auction. The
'54-'55 1st Series radio had been restored and converted to 12 volts.
Perfect for my purposes. I'm gonna start installing it today. I picked
up an inline fuse holder and some twenty amp fuses (my best guess since
I couldn't locate specific info for this radio) at Advance Auto Parts
earlier in the week.
Pulled the knobs, jamb nuts and faceplate off the radio and headed out to the truck. A few minutes of grunting and soft cussin' under the dashboard revealed the first snafu of the day. The speakers did not have enuf clearance to get by the ashtray enclosure. Stomped back into the Krash Lab with the radio to study the situation. The original radio had one big speaker. The rebuilder replaced that with two smaller speakers in a fibreboard assembly. This is a common upgrade and can be found in many of the vendor catalogs. Looking at the thing closer, I realized that the speaker bracket (mounted on the knob shafts) was offset to the right. Reversing the bracket would give me the needed clearance and it was probably just assembled backwards in the first place by mistake. I hope that is the only rebuilder mistake I find.
Back out to the truck with the speakers offset to the left and everything fit this time. Goody, goody! After the faceplate, jamb nuts and knobs were re-installed, I turned my attention to the support angle that goes on the left side and bolts to the cowl vent support, I think. This looks like it's gonna fit fine. I just have to scrounge up a bolt, spacer washers and hex nut. OK. Found a 5/16" - 16 capscrew and hex nut and some flat washer spacers and installed the support angle. That works . . . No it don't! The bracket blocks the cowl vent mechanism from working. Damnation! I'm not giving up my crotch cooler! No support angle fer now.
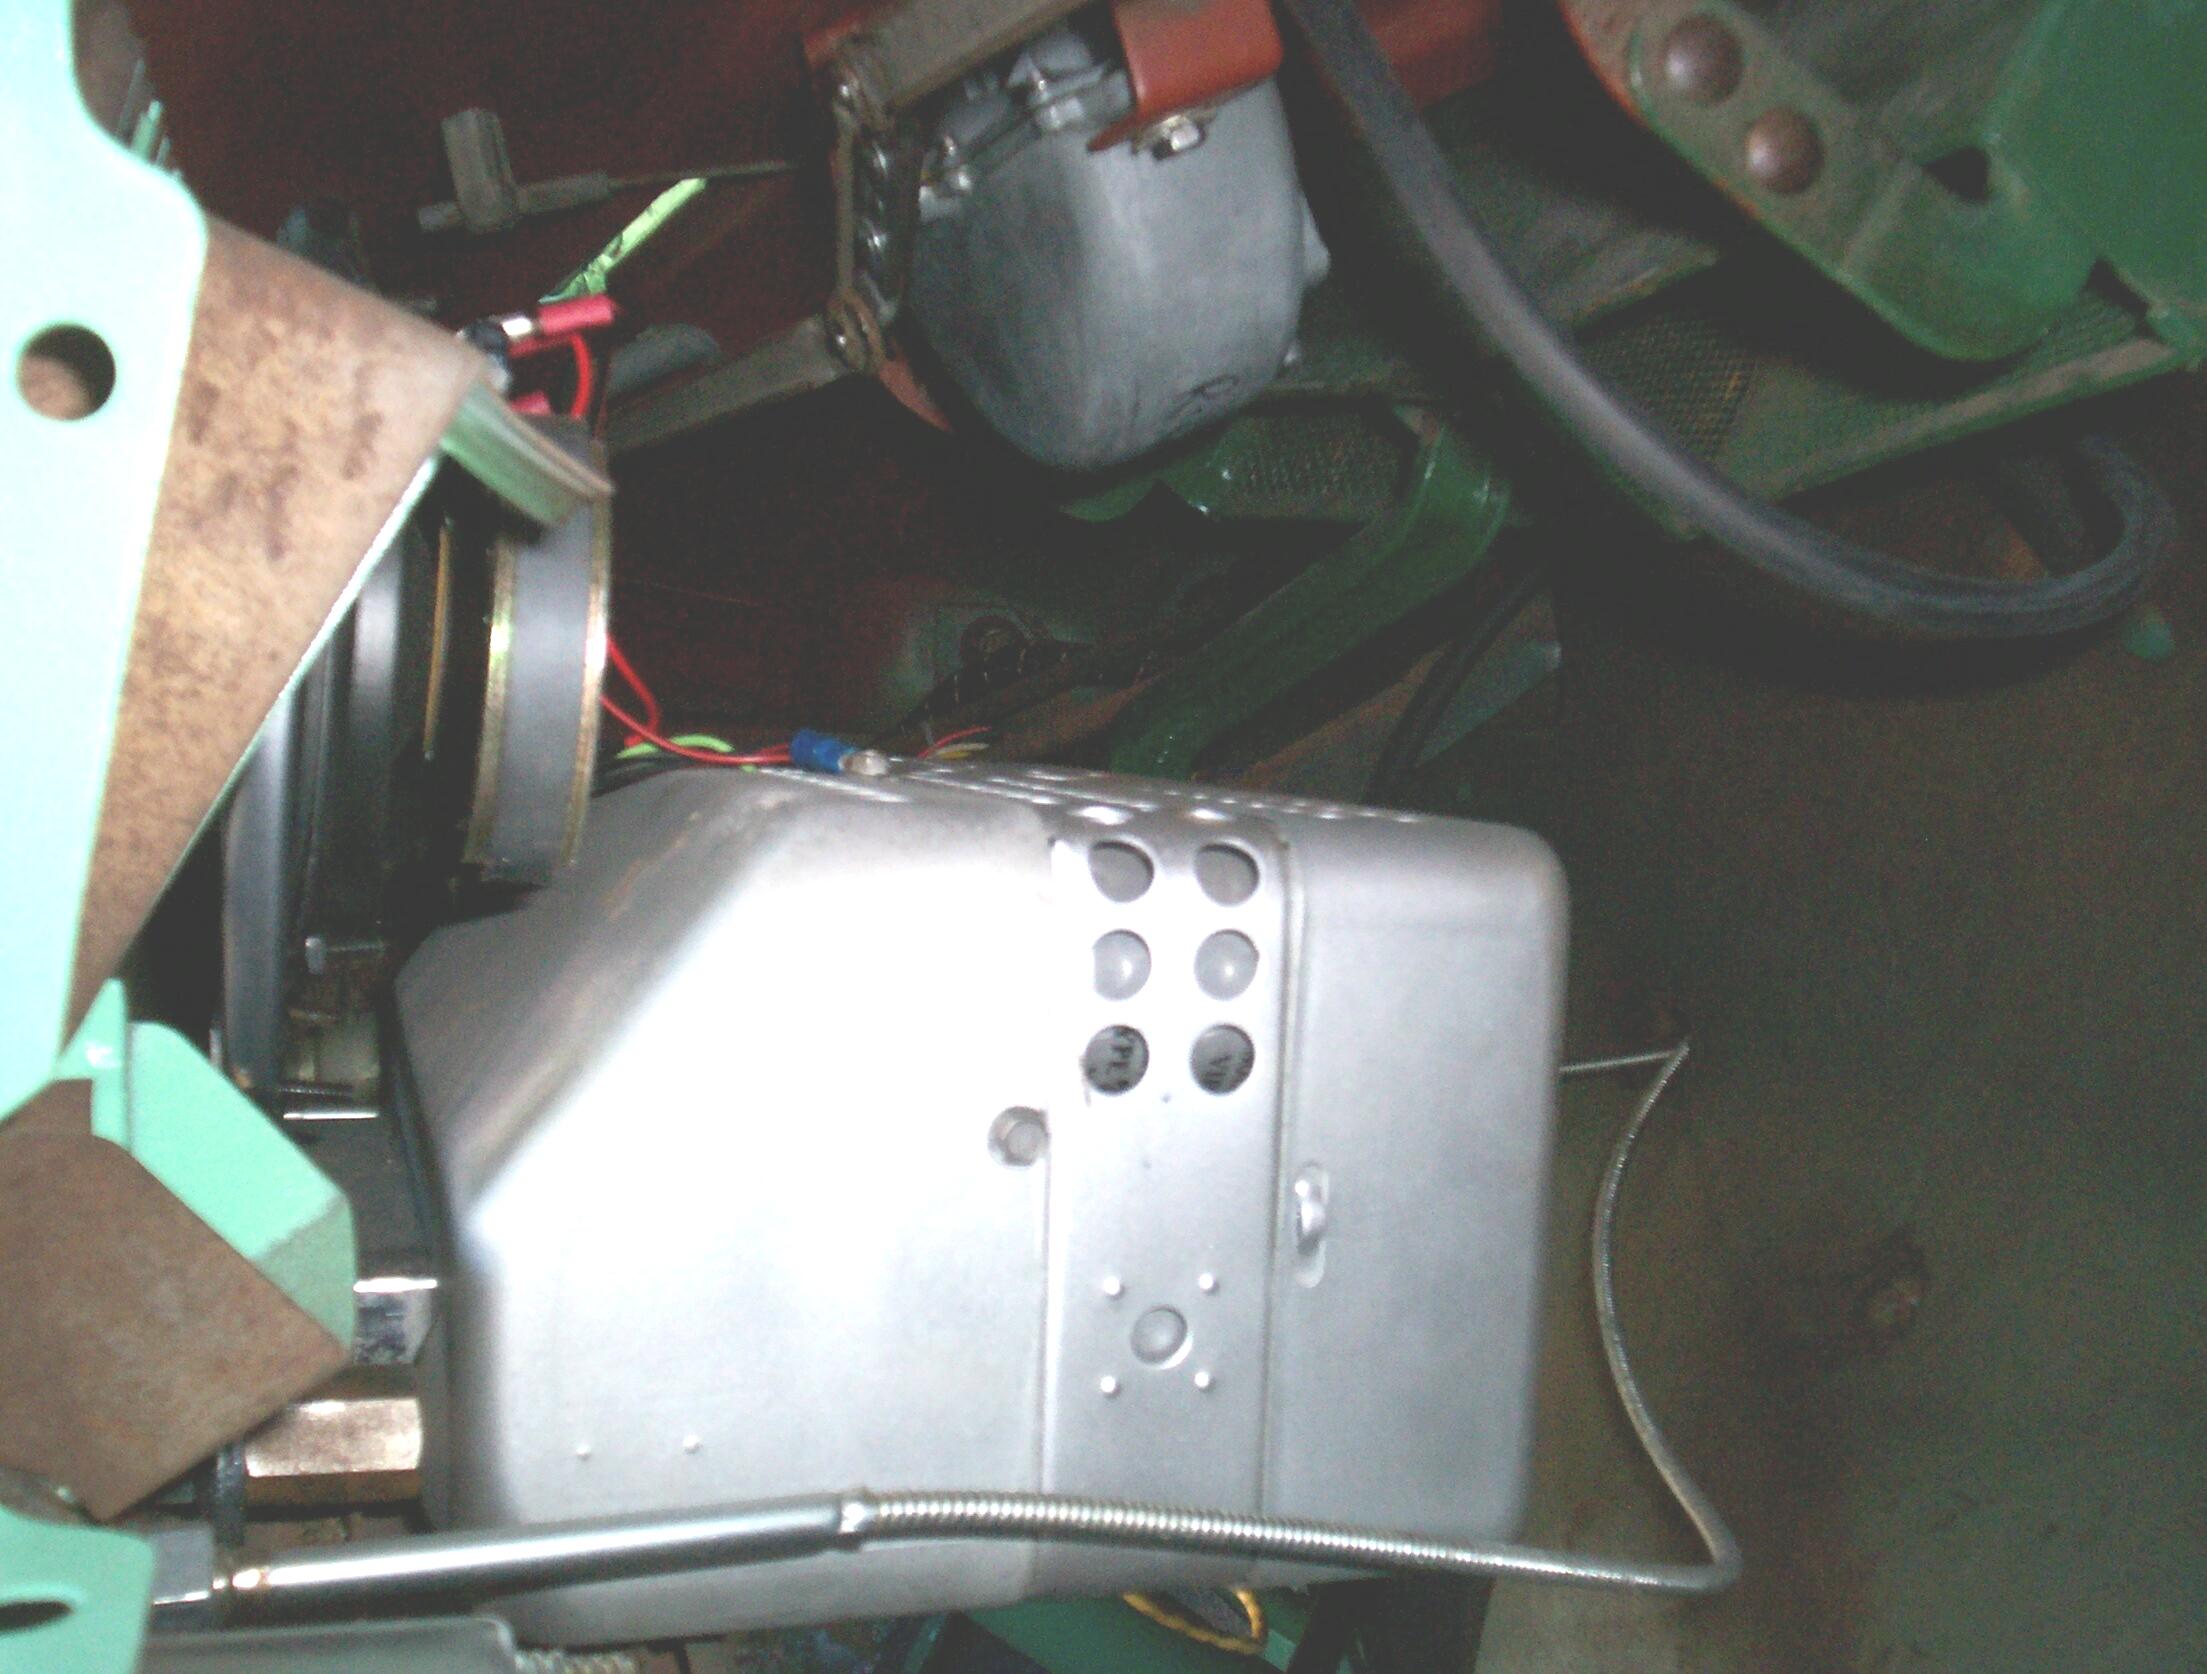 Next
up, wire the thing. There are two wires to connect. One is for radio
power and the other is for the dial light. I connected the power wire
to the inline fuse holder with a crimp connector and put a ring
terminal on the other end of the fuse holder. The ring connector was
then installed on the accessory terminal of the ignition switch. The
wire for the dial light was just a few inches too short to reach the
light switch. I have a empty dash light socket hanging under the dash
from the big re-wiring job a few years ago. It's intended for the
original lighted ignition switch. BillyBob's switch is a generic
aftermarket switch without provision for a light. I decided to cut the
light socket off the wire and crimp on a bullet connector. The dial
light wire from the radio got the other half of the bullet connector
and now the dial light will be on when the other dash lights are on. I
put another bullet connector on the cut-off socket and put it away for
a time down the road when I might snag a original ignition switch.
Next
up, wire the thing. There are two wires to connect. One is for radio
power and the other is for the dial light. I connected the power wire
to the inline fuse holder with a crimp connector and put a ring
terminal on the other end of the fuse holder. The ring connector was
then installed on the accessory terminal of the ignition switch. The
wire for the dial light was just a few inches too short to reach the
light switch. I have a empty dash light socket hanging under the dash
from the big re-wiring job a few years ago. It's intended for the
original lighted ignition switch. BillyBob's switch is a generic
aftermarket switch without provision for a light. I decided to cut the
light socket off the wire and crimp on a bullet connector. The dial
light wire from the radio got the other half of the bullet connector
and now the dial light will be on when the other dash lights are on. I
put another bullet connector on the cut-off socket and put it away for
a time down the road when I might snag a original ignition switch.
Connected the battery and put the ignition switch on accessory . . . Can't tell if anything is happening. No noise or light that I can detect is coming from the radio. I'm assuming the the knob shafts thru the dash are the ground but I've been wrong before. I got the multi-meter out and determined that I have juice up to the inline fuse at least. The antenna is on order from LMC Truck parts and hasn't arrived yet. That may make a difference if it has a ground wire too. Not enuf info right now. We'll wait until I have the antenna in place in the upcoming weeks and in the meantime I'll have a cigar and ponder the situation some.
March 18th 2007 Chilly morning again. Got to the Krash Lab in BettyLou early while it was still dark. Started BillyBob and checked the dial light on the radio now that it was dark enough to see it. That works! Left the radio on for a bit longer than yesterday too and was rewarded with background static. There is life in it after all! It's been a long time since my last contact with tube electronics. I'd forgotten how long it used to take the old Philco to warm up to watch Howdy Doody or my Dad's Heathkit Ham Radio transmitter to "CQ, CQ". That's it fer BillyBob today. Got to do some work on BettyLou and Renegade when it warms up a little. In the meantime, I'll update BillyBob's wiring diagram with the radio wiring and another inline fuse holder I installed in the lighter circuit yesterday.
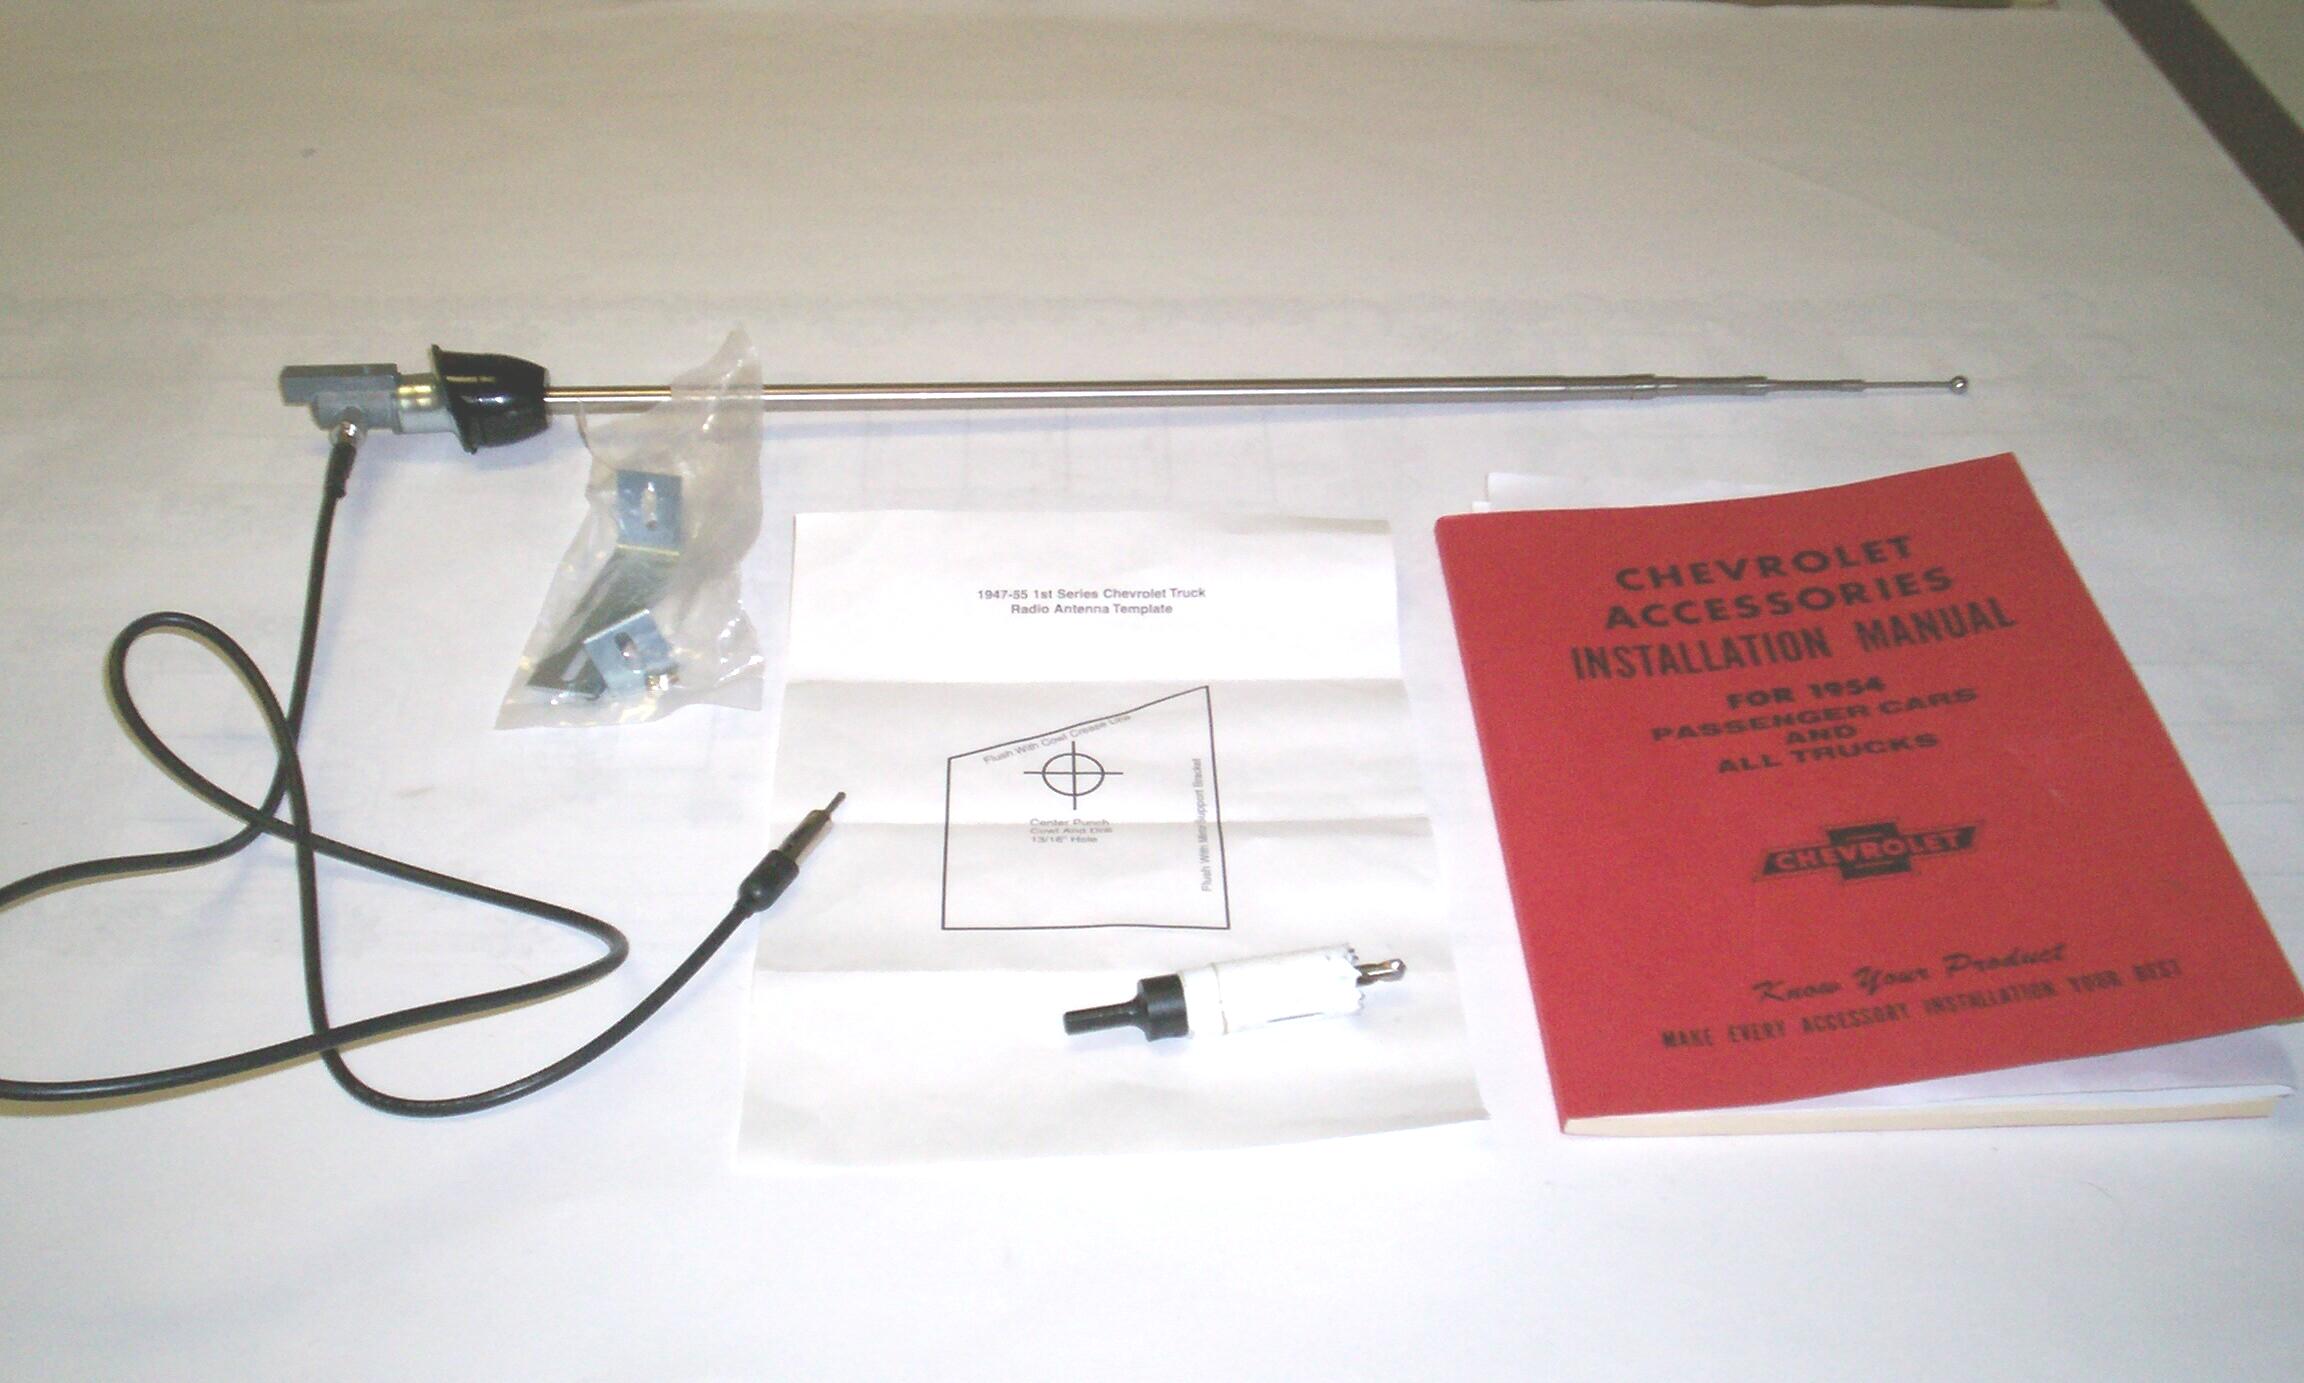 March
24th 2007 Got up to the
Krash Lab and got the stuff out for today's work on BillyBob. An
original type antenna repop for the radio arrived from LMC Truck Parts
this week along with some other stuff. You have to cut a 13/16" hole in
the cowl for the antenna to fit thru. I have two hole saws and I think
the smaller one is 13/16". I don't know because it's been so long since
I've used it that I don't remember what I bought it for. Got the tools
out of the shed and dug thru them until I found it. A good omen! It is
the correct size. I won't have to put this task off another week to buy
a hole saw.
March
24th 2007 Got up to the
Krash Lab and got the stuff out for today's work on BillyBob. An
original type antenna repop for the radio arrived from LMC Truck Parts
this week along with some other stuff. You have to cut a 13/16" hole in
the cowl for the antenna to fit thru. I have two hole saws and I think
the smaller one is 13/16". I don't know because it's been so long since
I've used it that I don't remember what I bought it for. Got the tools
out of the shed and dug thru them until I found it. A good omen! It is
the correct size. I won't have to put this task off another week to buy
a hole saw.
We've been put under water restrictions this week in south Florida due to draught conditions. It rains plenty in the BillyBob garage but the rest of gold coast is not that "lucky". I am allowed to wash a car in the Krash Lab on Saturday morning as long as I do it between seven and eight AM. It's still dark then due to extended "daylight savings" time but I'm adjusting my habits to do detailing procedures first when I get here on saturday. Today, that means cleaning and waxing BettyLou.
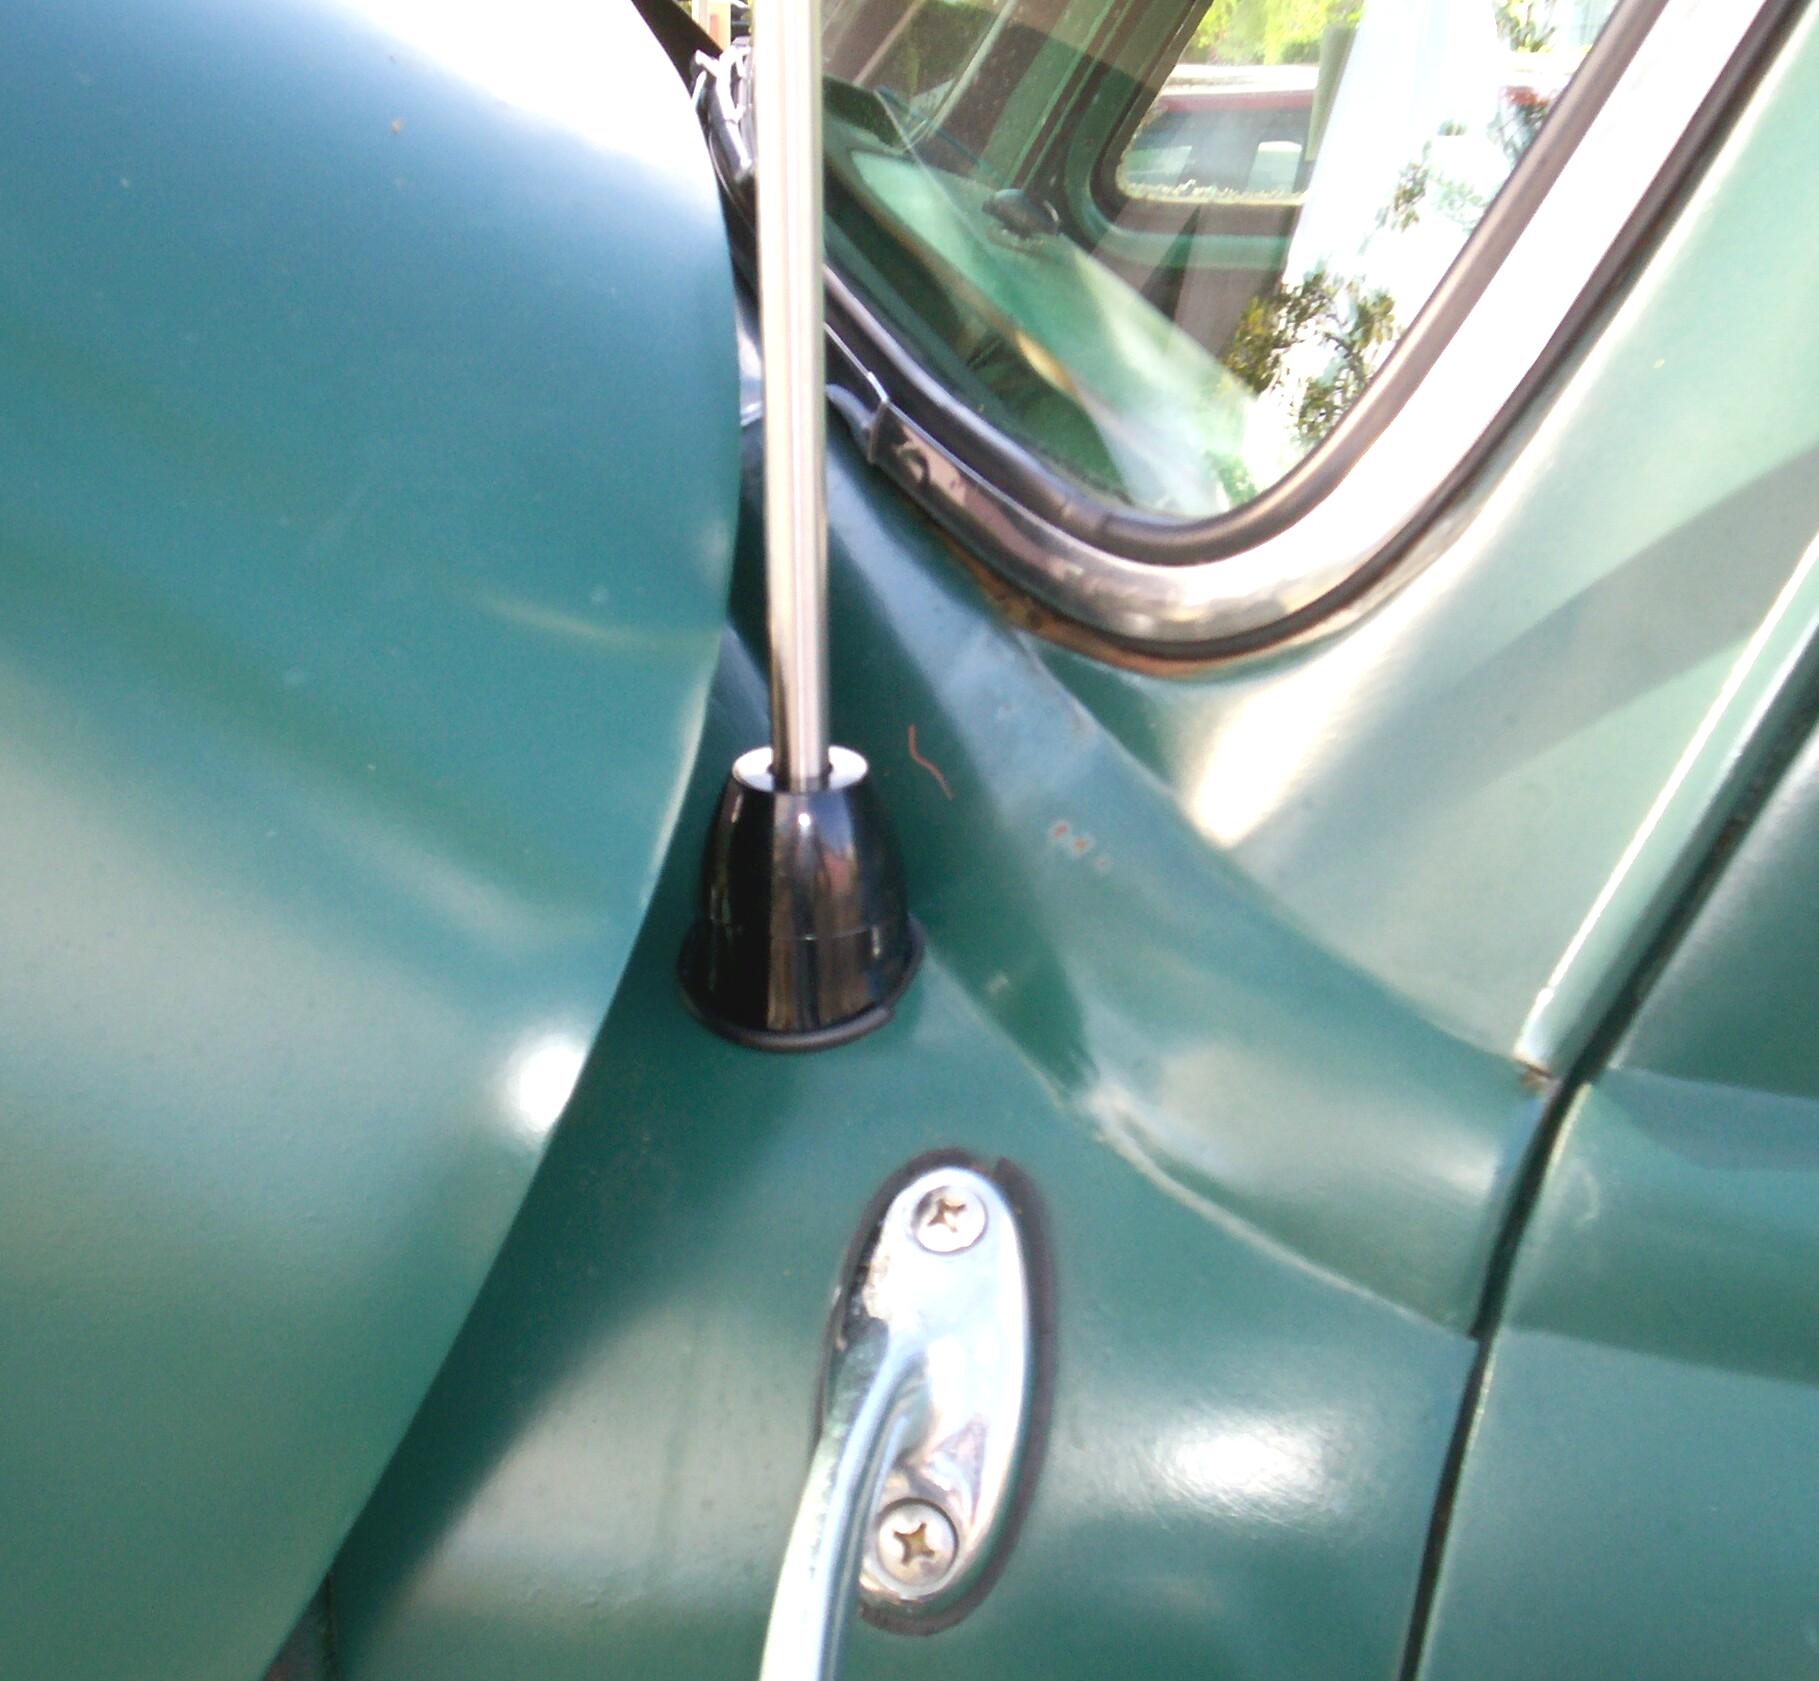
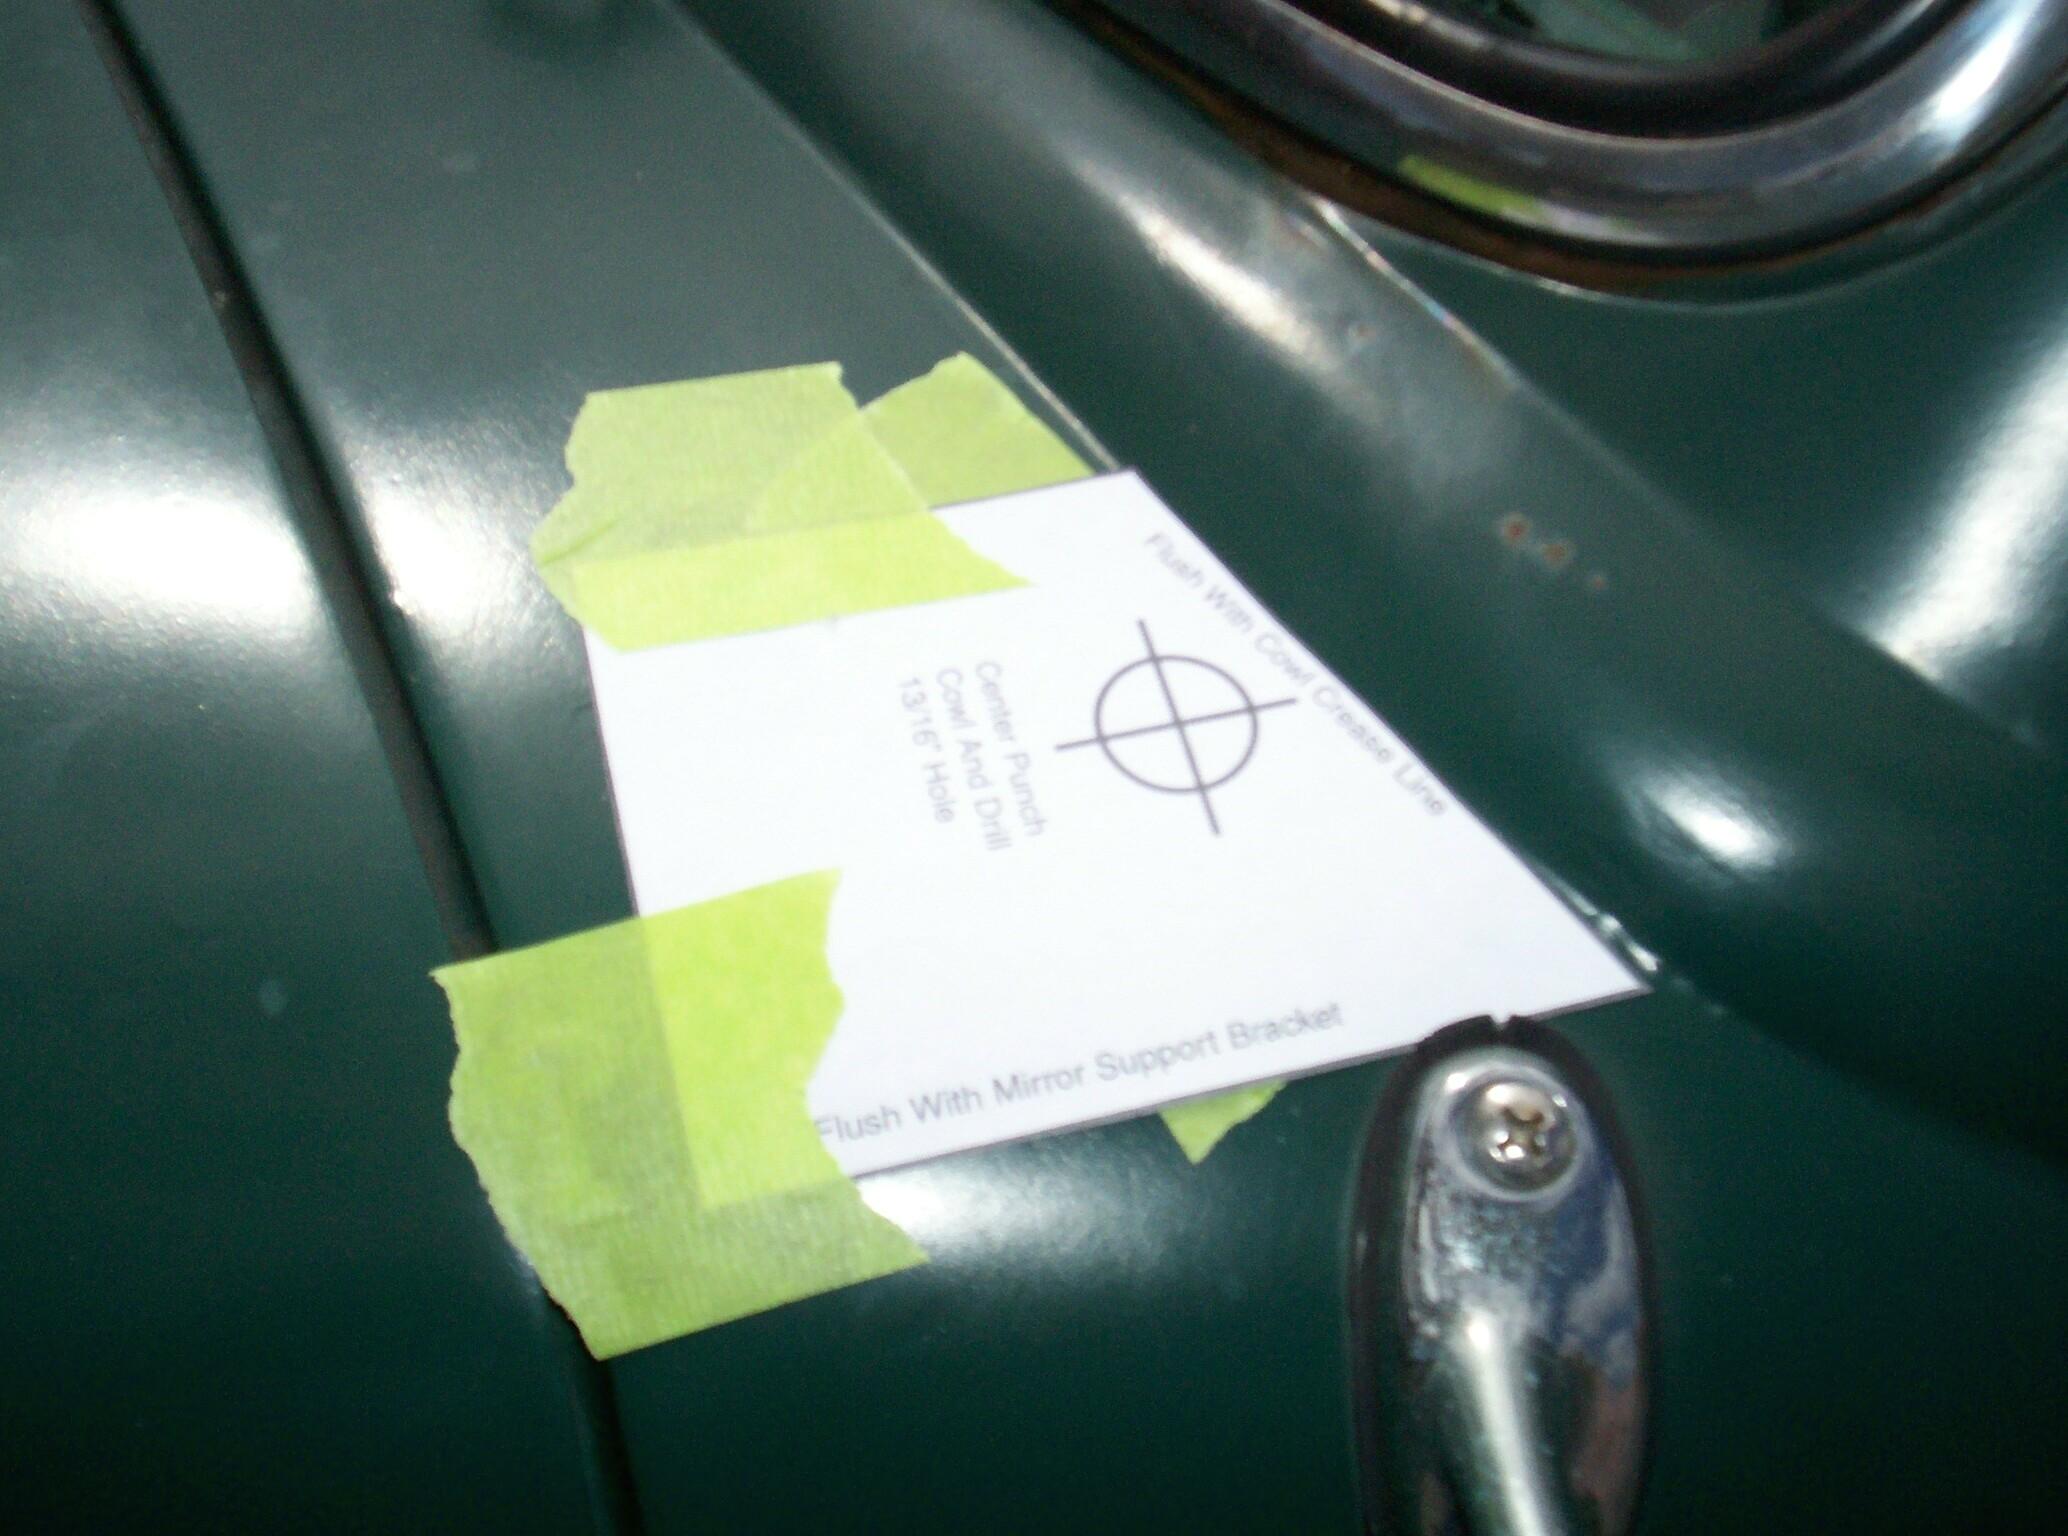 When
I got finished with BettyLou, I turned to the antenna installation. Put
a strip of masking tape on the cowl where the hole is to be drilled and
taped the hole marking template provided with the antenna to the cowl
as directed. Marked the hole with a center punch and drilled the hole.
Cleaned the hole with a half-round file and cleaned the paint off the
underside of the cowl around the hole for a good ground. There is some
sheetmetal bracketry that screws to the bottom of the antenna mount but
it is not an exact fit and not enuf screws were provided with the
brackets. I dipped into my Harbor Freight supply of stainless steel
screws and hex nuts to make up the difference. After some head-bumping
and screwing around (sorry 'bout that) under the dash, I had the
antenna installed.
When
I got finished with BettyLou, I turned to the antenna installation. Put
a strip of masking tape on the cowl where the hole is to be drilled and
taped the hole marking template provided with the antenna to the cowl
as directed. Marked the hole with a center punch and drilled the hole.
Cleaned the hole with a half-round file and cleaned the paint off the
underside of the cowl around the hole for a good ground. There is some
sheetmetal bracketry that screws to the bottom of the antenna mount but
it is not an exact fit and not enuf screws were provided with the
brackets. I dipped into my Harbor Freight supply of stainless steel
screws and hex nuts to make up the difference. After some head-bumping
and screwing around (sorry 'bout that) under the dash, I had the
antenna installed.
 Just
as I sat back in the cab with a cigar and beer to play with the radio a
bit, it started to rain and I had to scramble to get the tools under
cover. Drought, my achin' butt! Reception is good. Now, I'll have to
pick my way between all the sports, haitian, brazilian, cuban,
self-help, and evangelical channels that make up south Florida AM radio
to find something I can listen to. After the rain let up, I went back
out to the truck with a beer and a cigar. I found a Latino station with
music and listened to that fer awhile. I don't know what they're
singing but at least it has a melody. I listened both with the engine
running and off and there was no difference. Doesn't look like I'll be
dealing with a background noise problem that requires various
condensers and suppressors on ignition components. Life is good!
Just
as I sat back in the cab with a cigar and beer to play with the radio a
bit, it started to rain and I had to scramble to get the tools under
cover. Drought, my achin' butt! Reception is good. Now, I'll have to
pick my way between all the sports, haitian, brazilian, cuban,
self-help, and evangelical channels that make up south Florida AM radio
to find something I can listen to. After the rain let up, I went back
out to the truck with a beer and a cigar. I found a Latino station with
music and listened to that fer awhile. I don't know what they're
singing but at least it has a melody. I listened both with the engine
running and off and there was no difference. Doesn't look like I'll be
dealing with a background noise problem that requires various
condensers and suppressors on ignition components. Life is good!
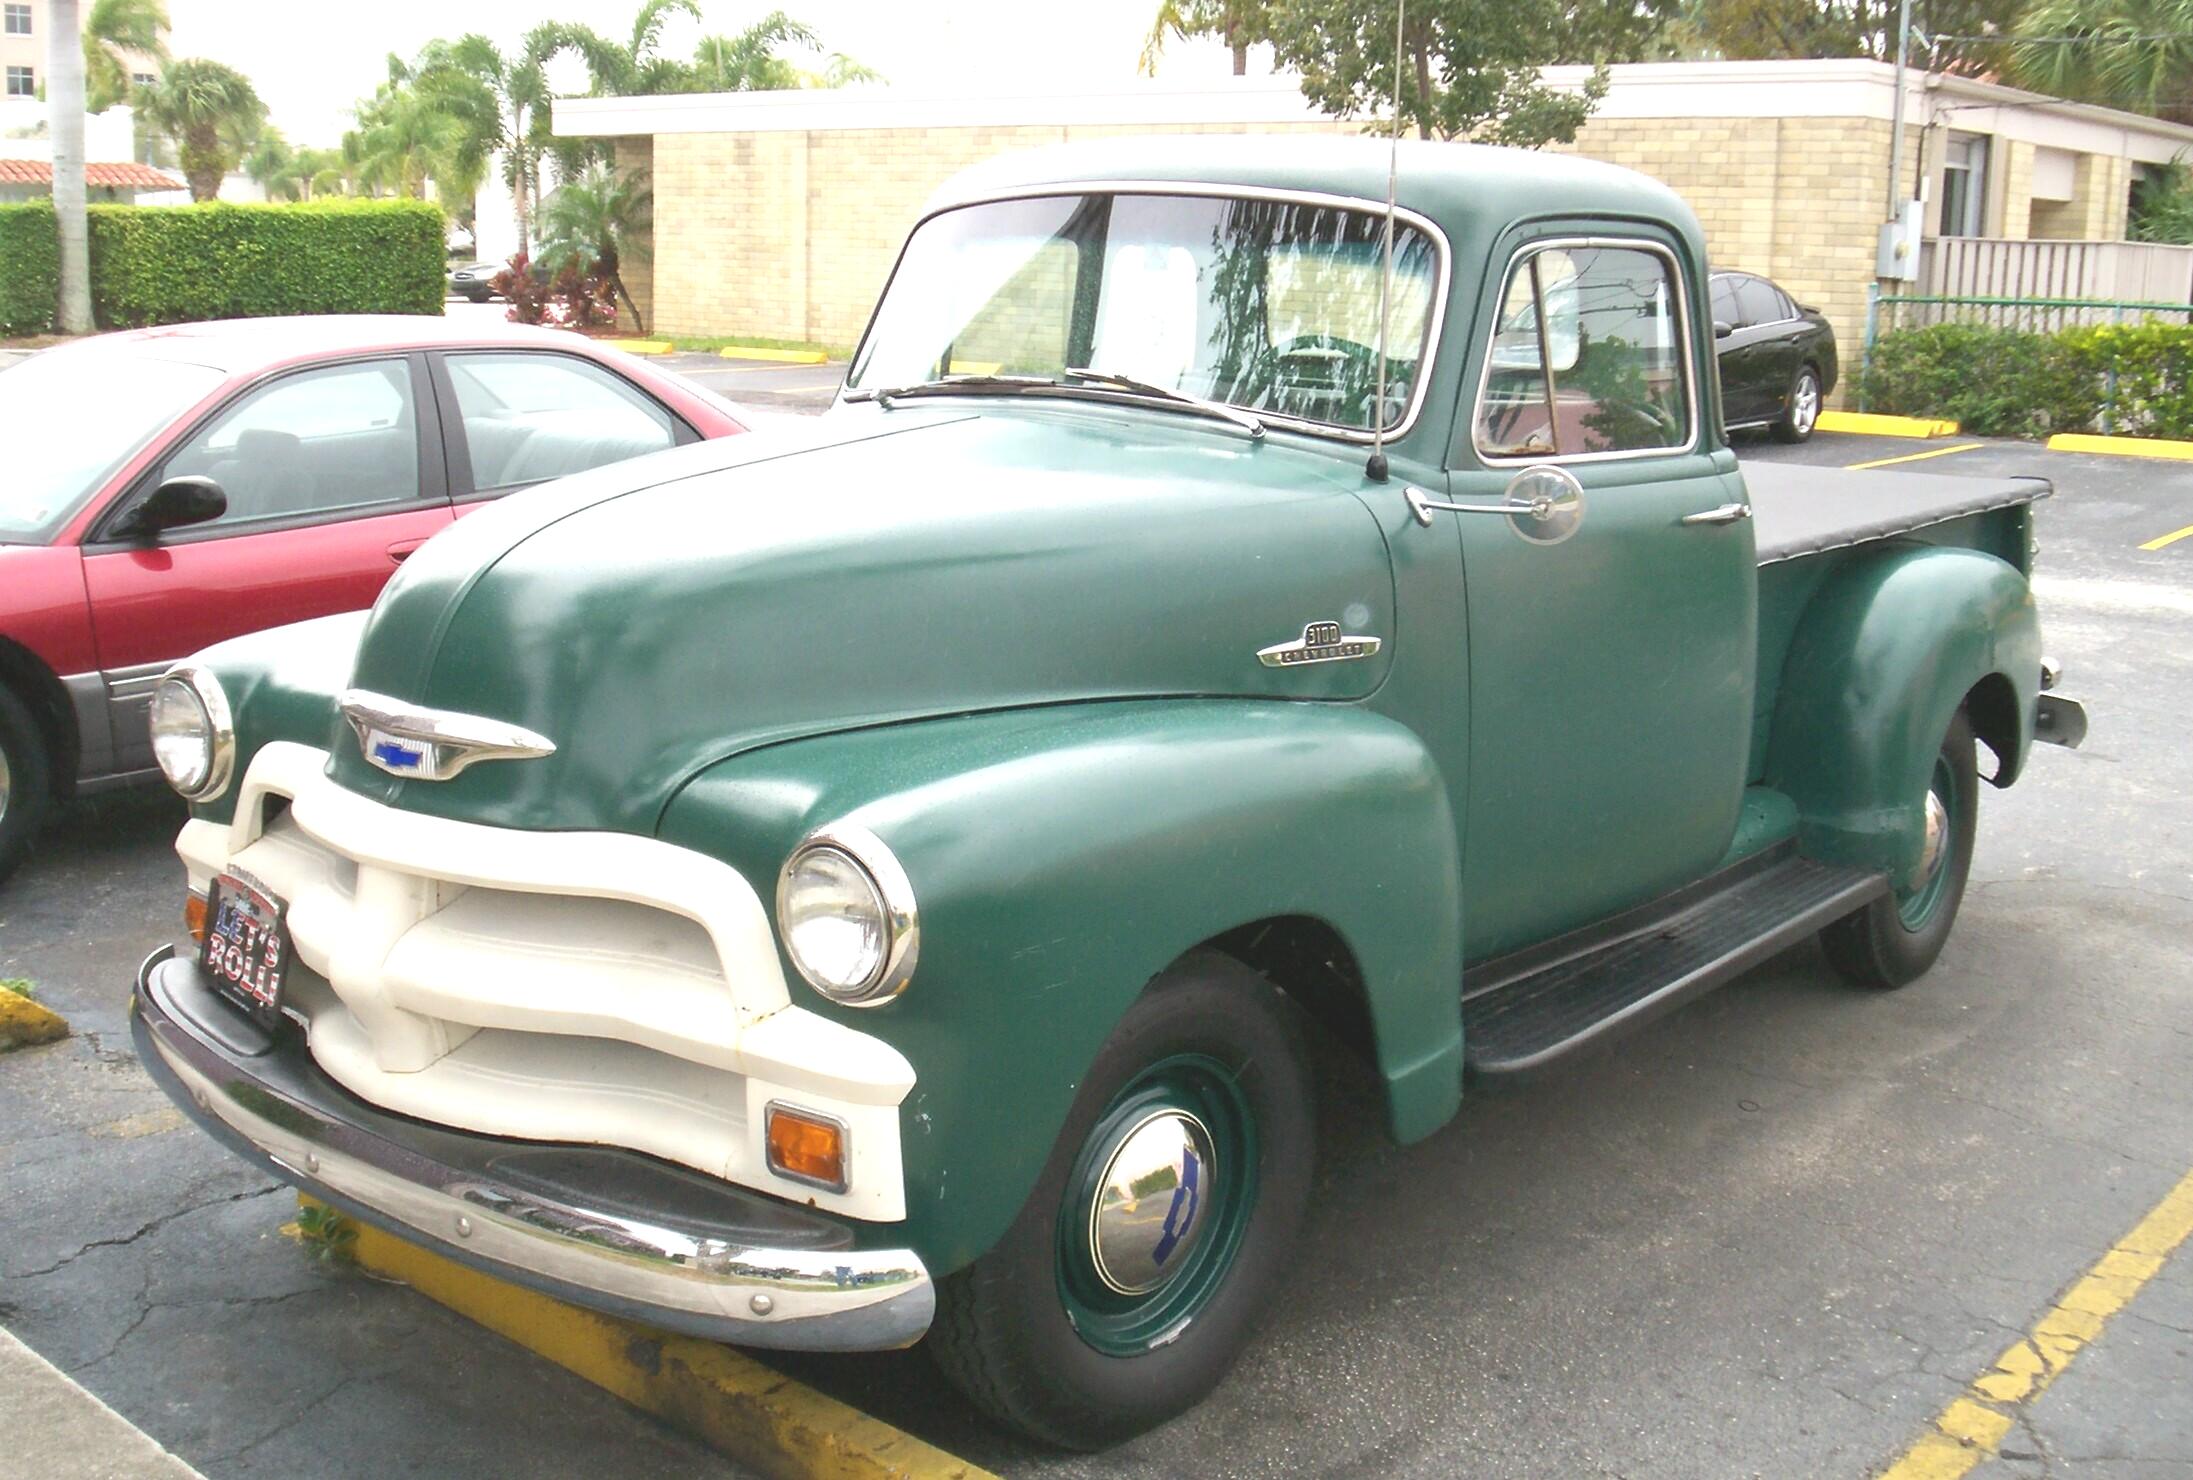
 March
25th 2007 A bit breezy
this morning. It's time for monthly maintenance on BillyBob and
BettyLou so that was performed first. While checking BillyBob's oil, I
noticed how important it is to get the antenna located in the correct
position - only 'bout a quarter inch of hood clearance when the hood is
open. Then I continued cleaning and detailing BettyLou. By
mid-afternoon it was beer and cigar time and I listened to the radio
some more.
March
25th 2007 A bit breezy
this morning. It's time for monthly maintenance on BillyBob and
BettyLou so that was performed first. While checking BillyBob's oil, I
noticed how important it is to get the antenna located in the correct
position - only 'bout a quarter inch of hood clearance when the hood is
open. Then I continued cleaning and detailing BettyLou. By
mid-afternoon it was beer and cigar time and I listened to the radio
some more.
It's been some time since a BillyBob log has been posted. As BillyBob logs go, this one is short because of all the time I wasted goofing off in February. I'm posting it now because next week is the Barrett-Jackson auction in West Palm Beach and I won't get much work done that weekend and delaying a few more weeks won't make the log entry any longer.
| < Back
to Intro |
You can email me at ![]() webmaster@laroke.com
webmaster@laroke.com
Issued Monday March 26, 2007
Updated Tuesday March 27, 2018
copyright © 1996-2018 Larry Robert Kephart all rights reserved
| | LRK Home | | Bio Info | | Krash Khronicles | | LAROKE | |
| | BettyLou | | BillyBob's Garage | | Rat Patrol | | Deerslayer | | Elvira | |
| | Land of the Free and Home of the Brave | |
| | Keppylou's Art | | WWI Soldier's Diary | |