| | LRK Home | | Bio Info | | Krash Khronicles | | LAROKE | |
| | BettyLou | | BillyBob's Garage | | Rat Patrol | | Deerslayer | | Elvira | |
| | Land of the Free and Home of the Brave | |
| | Keppylou's Art | | WWI Soldier's Diary | |
BillyBob Work-in-Progress Log
![]()
WHAT'S NEW is a chronological listing of updates to the BillyBob site.
![]()
TRUCK LINKS including vendor sites for old parts, custom parts, and tools as well as sites for classic car and truck organizations
STORE Operating in association with Amazon.com, books, recordings and tools can be purchased.
PLANNING for the restoration including project schedule and cost estimates.
![]()
TRAVELS WITH BILLYBOB With apologies to Steinbeck, this area of BillyBob's Garage will be used to log the trips BillyBob and I make together.
WORK-IN-PROGRESS is the restoration of parts of BillyBob that I can accomplish without a garage.
PRE-RESTORATION includes log entries of minor repairs and adventures between time of purchase and the time when I started restoration, a piece at a time.
JR'S KORNER JR's Korner is the history of BillyBob before I got him authored by my brother, Wm. C. Kephart.
![]()
BILLYBOB MAINTENANCE Ever changing detailing, oil change, lube, etc. maintenance routines specifically developed for BillyBob, including required tools, materials and procedures.
PARTS SHOP The Parts Shop is a repository of How-To articles. Things that I have done over and over enough times to have developed a procedure. This gives me a checklist and saves brain cells.
STEALTH SHOP Urban residence design with large integrated shop and separate living quarters for a relative or renter.
![]()
You will need the Adobe Acrobat browser plugin to view these wiring diagrams which are in the PDF file format. This format allows zooming and panning. If you don't have this plugin, it can be downloaded and installed (free) from the Adobe site. The button below will take you there.
![]()
BILLYBOB WIRING DIAGRAM Here's the wiring diagram updated with BillyBob's current state 'cepting the third-party strap-on turn-signal director.
STRAP-ON TURN-SIGNAL DIRECTOR/BRAKE LIGHT CIRCUIT This turn signal and brake light circuit diagram shows the current state of the third-party turn-signal director wiring, which will remain in place until I figure out the problems with the OEM turn-signal director. It also shows the OEM headlight switch.
40. All that glitters
 June
26th 2005 It was time
for an oil
change so I used that as an excuse this morning to make a
Fort Lauderdale beach run to warm up BillyBob's engine. After the oil
change, I went back to my charging problem. Installing a new alternator
didn't effect any differences. The ammeter needle is still active all
the time as the engine speeds up and slows down and discharges slightly
at idle when the lights are on. The battery tends to stay between
12.40v and 12.75v Decided to do the same voltage test on the new
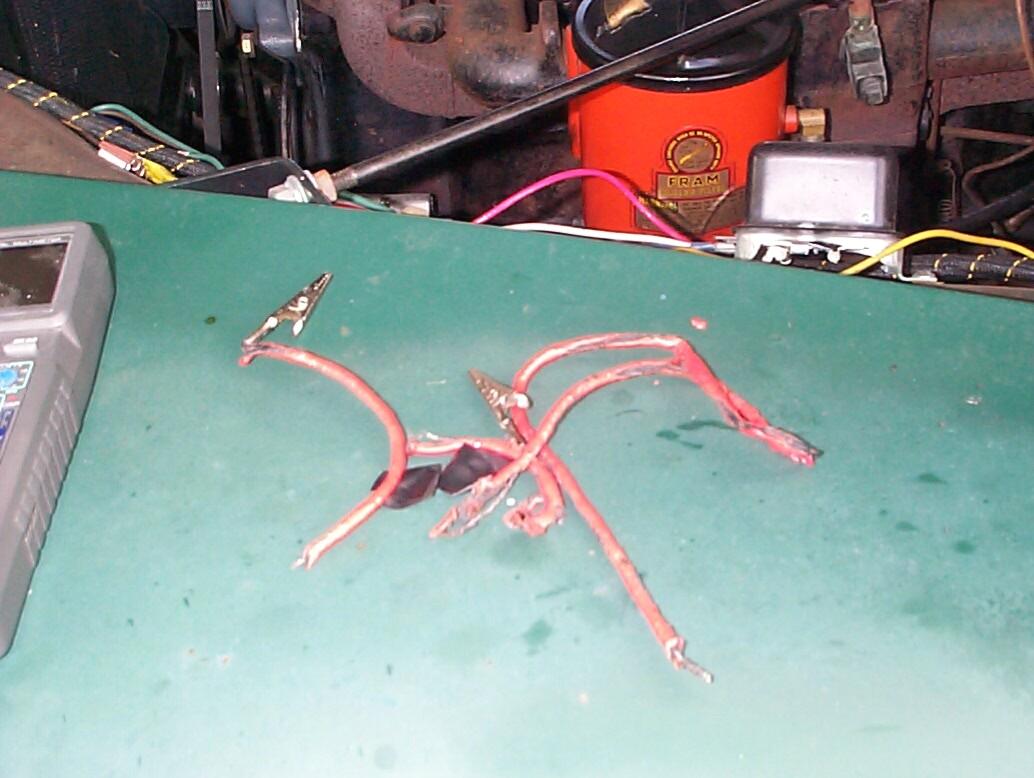
alternator that I did on the old one before I switched them. I removed
and taped the "Field" and "Relay" leads and connected a jumper wire
between the Field terminal and Bat terminal as indicated in the diagram. Got in the
cab and connected the battery in preparation to start the engine. SNAP!
CRACKLE! POP! . . . SMOKE!
Hit the battery kill switch and went to see the damage. My jumper had
lost all its smoke. It was melted. I removed the jumper remains,
re-connected the alternator, crossed my fingers and started the engine.
Appears to be the same as before. I don't know wot happened but I think
that the alligator clip on the Field terminal was grounded to the
alternator case. That's probably why they use plastic plugs in these
sockets in the first place. I wuz sufficently discouraged by this
incident to give up on this problem for now.
June
26th 2005 It was time
for an oil
change so I used that as an excuse this morning to make a
Fort Lauderdale beach run to warm up BillyBob's engine. After the oil
change, I went back to my charging problem. Installing a new alternator
didn't effect any differences. The ammeter needle is still active all
the time as the engine speeds up and slows down and discharges slightly
at idle when the lights are on. The battery tends to stay between
12.40v and 12.75v Decided to do the same voltage test on the new
alternator that I did on the old one before I switched them. I removed
and taped the "Field" and "Relay" leads and connected a jumper wire
between the Field terminal and Bat terminal as indicated in the diagram. Got in the
cab and connected the battery in preparation to start the engine. SNAP!
CRACKLE! POP! . . . SMOKE!
Hit the battery kill switch and went to see the damage. My jumper had
lost all its smoke. It was melted. I removed the jumper remains,
re-connected the alternator, crossed my fingers and started the engine.
Appears to be the same as before. I don't know wot happened but I think
that the alligator clip on the Field terminal was grounded to the
alternator case. That's probably why they use plastic plugs in these
sockets in the first place. I wuz sufficently discouraged by this
incident to give up on this problem for now.
June 27th 2005 While twiddling my thumbs in electrical konfusion, I got two responses from the last log entry regarding disconnecting the battery while the engine is running that I want to put into the record for later recall. The first came from Nate Hall, a real-time mechanic who often helps me with BillyBob.
Good morning Larry ; Great stuff as always . A word about testing alternator by disconnecting the battery cables : It's not the _disconnecting_ that can damage the alternator diodes , it's when you _re-connect_ the cable , that forces the alternator to ' spike ' EG : go to maximum output for an instant and that's what pops the diodes so if you remember to only disconnect the _ground_ cable and then , if the engine continues to run , carefully tuck the ground cable down behind the battery where it cannot touch the battery post (doesn't matter if the ground cable touches the frame etc.) and then go shut off the engine before re-connecting it , or use a helper to shut it off whilst you hold the cable in midair , you can safely test the alternator this way and never damage anything . For those of you who are reading this and grumbling " I've been popping battery cables for 20 years to test alternators and never blew a diode" Yes but the chance is there and often one diode blows in the diode triode and reduces the charging rate even though it'll still charge . Lastly , if you just go to Kragen , Shuck's or wherever , (FLAPS) and ask for an '82 Camaro with V-ate engine alternator , you'll get the nifty internal regulator alternator and it'll bolt right into place and you can then toss out that nasty old regulator and Delcotron , forget about your charging troubles forver , all for a measly $35.00 . -Nate
I may eventually go the alternator with internal regulator route if my growing pile of Delcrotrons and voltage regulators frustrates me enuf to overcome my stubborn streak that makes me want to make this thing work the way it is.
JR responded with an engineering dissertation on the subject but couched in terms even I can follow.
Good entry. You can get a voltage transient disconnecting the battery while running because of the energy trapped in the magnetic field around the battery cable assuming there is current flowing into or out of the battery. Current flow is necessary to generate the magnetic field (a review of electro-magnetics is left to the reader). When you interrupt the current the magnetic field around the conductor collapses causing a voltage transient to appear across the wire. This is controlled by the formula: V=L(di/dt) Where L is the inductance of the wire in henries(no relation to Mr. Ford) and di/dt is the time rate of change of current. In the case of a switch the time is governed by how long it takes for the switch contacts to open (somewhere in the neighborhood of 10 milliseconds the 100 milliseconds). The value of L depends on the wire itself and its environment including its proximity to ferrous metal (acts like a magnetic core). You can use Dad's oscilloscope to see the transient by connecting the probe ground (the short wire with an alligator clip) to the battery terminal and the probe to the battery side of the switch. You'll need the single sweep mode and the trigger should be set for slightly more the, say 14 volts. The hole event will be over in a few milliseconds as set the horizontal for 1ms/div. Opening the switch should cause the sweep to appear. You could install a 0.1uf cap across the switch contacts. This will give a path for the current to flow while the magnetic field collapses and thus reduce the amplitude of the transient to a safe level. Regards, Bill Kephart Application Engineer Powerex, Inc.
Tho' I probably won't be playing around with the cap he mentions, JR's e-mail serves the purpose of giving me something useful to do with Dad's oscilloscope, which I haven't messed with up to this point since I don't know anything about oscilloscopes.
July 2nd 2005 Second month of hurricane season started yesterday. It's hot and muggy with a thirty percent chance of rain. Dragged out the tools and started by putting Renegade's repaired tire back on. Boca Tire had been able to plug it on tuesday.
 After
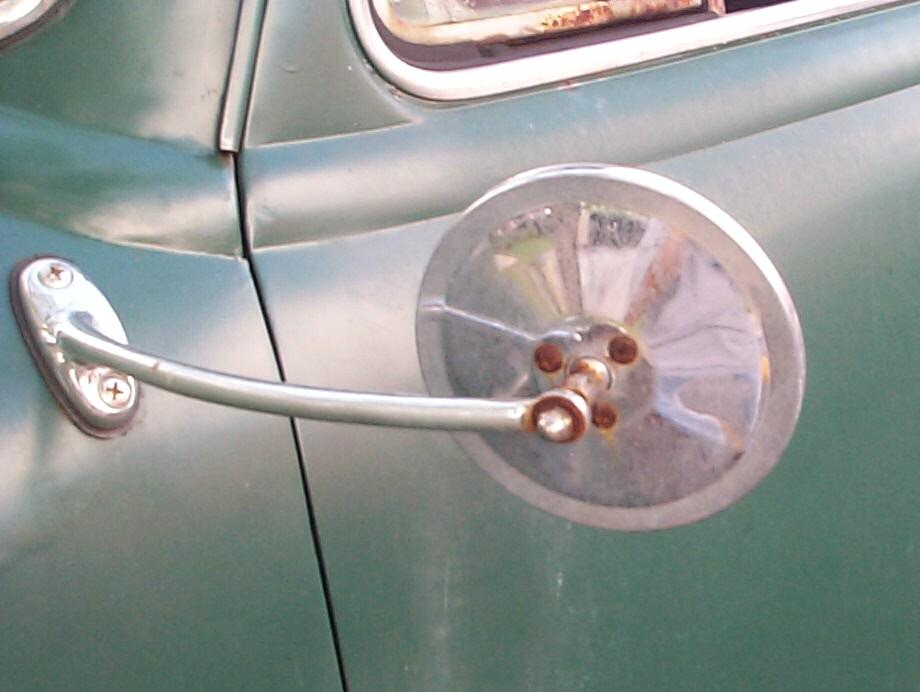
that was out of the way, I turned to trim detailing.
Bought and installed a re-pop driver side exterior mirror back after
the windshield job. Went for the xtra cost stainless steel mounting
fasteners at the time and they're doin' fine. The stock fasteners that
mount the mirror head to the bracket are a different story. The
mounting stud, washers and nuts are rusting away and beginning to stain
the chrome. The adjusting screws have turned into brown nubs, all in
less than a year!
After
that was out of the way, I turned to trim detailing.
Bought and installed a re-pop driver side exterior mirror back after
the windshield job. Went for the xtra cost stainless steel mounting
fasteners at the time and they're doin' fine. The stock fasteners that
mount the mirror head to the bracket are a different story. The
mounting stud, washers and nuts are rusting away and beginning to stain
the chrome. The adjusting screws have turned into brown nubs, all in
less than a year!
Pulled the mirror head off and went after it and the bracket arm with chrome polish. Removed the adjuster screws (one at a time so the adjuster didn't shift down in the mirror head), cleaned and polished under them and replaced them with stainless steel #6 x 1/2" round head slotted screws from a fastener assortment purchased from Harbor Freight some time back. The mounting stud was rusting too and after spinnin' my wheels some trying to figure out how to git rid of the rust, I ended up masking off the rest of the mirror head and using a mini radial bristle brush with embedded 36 grit abrasive in my Dremel motor tool. I got these things from Eastwood a couple of years ago. They are about an inch in diameter and they made short work of the rust on the mounting stud. I couldn't find them in the current catalog so I don't know if they're still offered.
PRE Paint Prepped the mounting stud and applied a coat of Eastwood's Self-Etching Primer. Started documenting a new exterior trim fasteners group while that was setting up. Finished up the mounting stud with a coat of Eastwood's Detail Silver. While the paint was drying, the exposed edge of the rubber mounting gasket between mirror bracket and body was dressed with protectant on a Q-Tip.
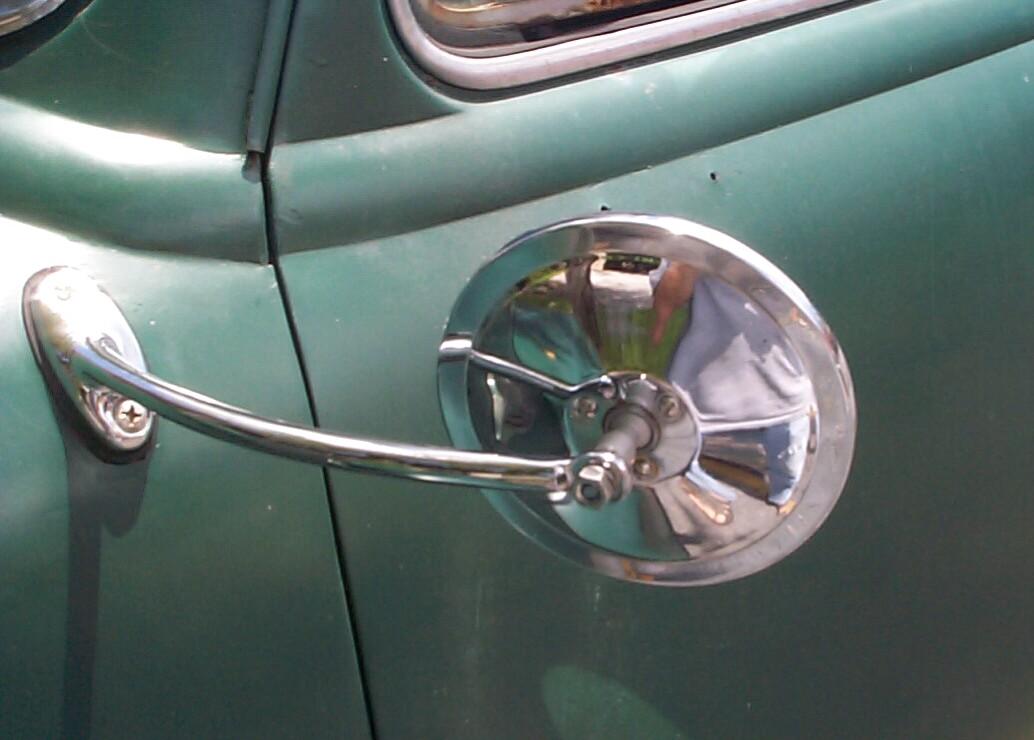 When
the paint was dry, the mirror head was re-mounted. The original rusted
fasteners were replaced with stainless steel 1/4" - 20 hex nuts and
stainless steel 1/4" flat washers from the Harbor Freight assortment
and McMaster-Carr. These
fasteners were installed with Threadlocker Blue and the adjusting
screws were installed with anti-seize compound instead of the
threadlocker since they have to move for adjustment. I don't know how
much better this solution will weather but I think it will be an
improvement over the out-of-the-box re-pop hardware.
When
the paint was dry, the mirror head was re-mounted. The original rusted
fasteners were replaced with stainless steel 1/4" - 20 hex nuts and
stainless steel 1/4" flat washers from the Harbor Freight assortment
and McMaster-Carr. These
fasteners were installed with Threadlocker Blue and the adjusting
screws were installed with anti-seize compound instead of the
threadlocker since they have to move for adjustment. I don't know how
much better this solution will weather but I think it will be an
improvement over the out-of-the-box re-pop hardware.
July 4th 2005 Independence Day #229 Yesterday, BillyBob and I went to the 1st Annual NAPA Auto Parts "Super Summer Show" at Crabby Jacks in Deerfield Beach, Florida. It started rainin' hard at 3:30 PM so BillyBob and I pulled out and went home before the awards ceremony. Started out today with another Fort Lauderdale Beach run, this time to warm up Renegade's engine for an oil and filter change. I took the top down on the Jeep and it's been so long that I fergot how. After the oil change, the rest of the day was spent working on BillyBob's windshield - Dug out more of the bad silicone seal and replaced it with new silicone, this time under the gasket where it belongs.
July 9th 2005 Dawn broke to squall conditions. Hung around the Krash Pad until it slacked off and I could make my way up to the Krash Lab during a lull. We are in the outer bands of Hurricane Dennis as he makes his way into the gulf. Fortified with my first cigar and cuppa joe, I got the tools out.
Then I had to take time out to deal with a network problem in the Krash Lab. A power outage last nite had pushed a nominal UPS over the edge and, as a result, I had a hub out. Thought it was the hub at first. When I figured out it was a UPS, I had to re-route power for the hub and other devices. You've heard of "just-in-time inventory"? I use "out-of-time inventory". I keep very few replacement parts on-site because the technology moves too fast for a small office. If you are blessed with few breakdowns, you are cursed with out-of-date inventory. When something breaks, I make do with scavenged parts from my elephant's graveyard of old equipment until I can get a replacement.
 Back
to BillyBob. Since I'm in the glass and trim detailing cycle, I decided
to restore the hood emblem and replace the side designation plates.
There is some rust corrosion bubbling out from under the emblem and the
driver side designation plate and I want to stop that before it gets
any farther. I grunted around in an awkward position underneath the
hood with a variety of 3/8" wrenches and pliers to wrest the speed-nuts
off the four studs holding on the emblem. A little Kroil penetrating
oil and a few foul words were enuf to get the job done.
Back
to BillyBob. Since I'm in the glass and trim detailing cycle, I decided
to restore the hood emblem and replace the side designation plates.
There is some rust corrosion bubbling out from under the emblem and the
driver side designation plate and I want to stop that before it gets
any farther. I grunted around in an awkward position underneath the
hood with a variety of 3/8" wrenches and pliers to wrest the speed-nuts
off the four studs holding on the emblem. A little Kroil penetrating
oil and a few foul words were enuf to get the job done.
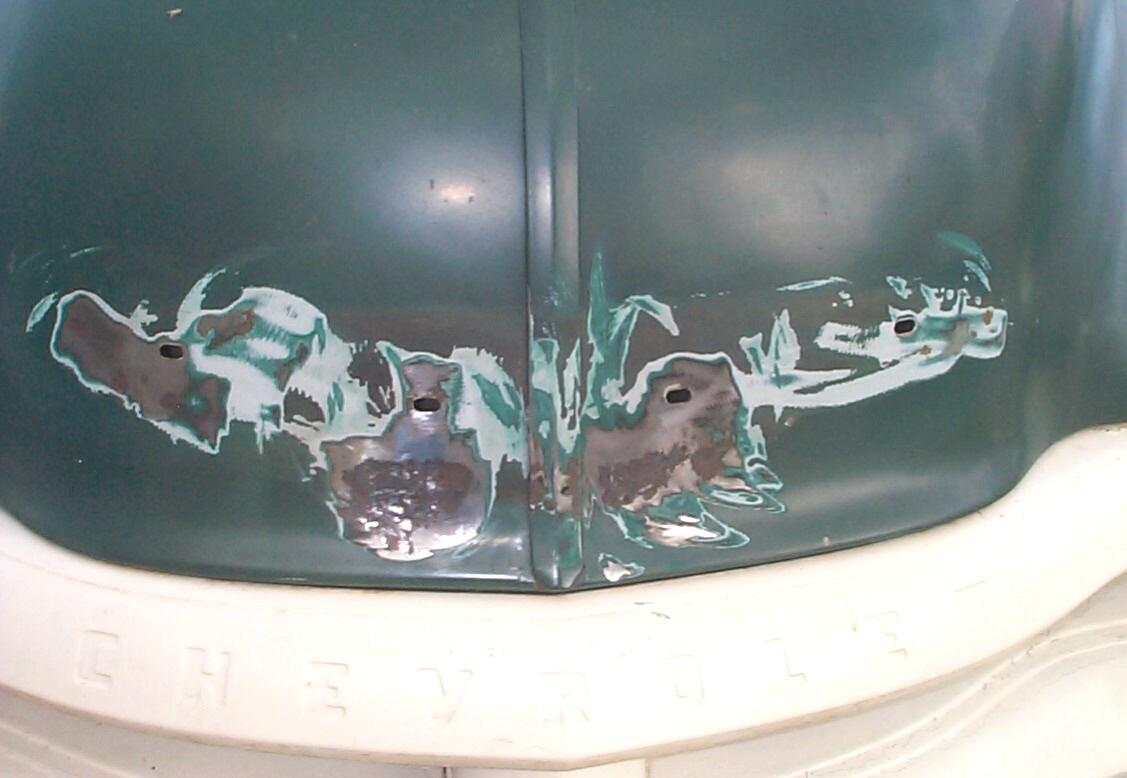
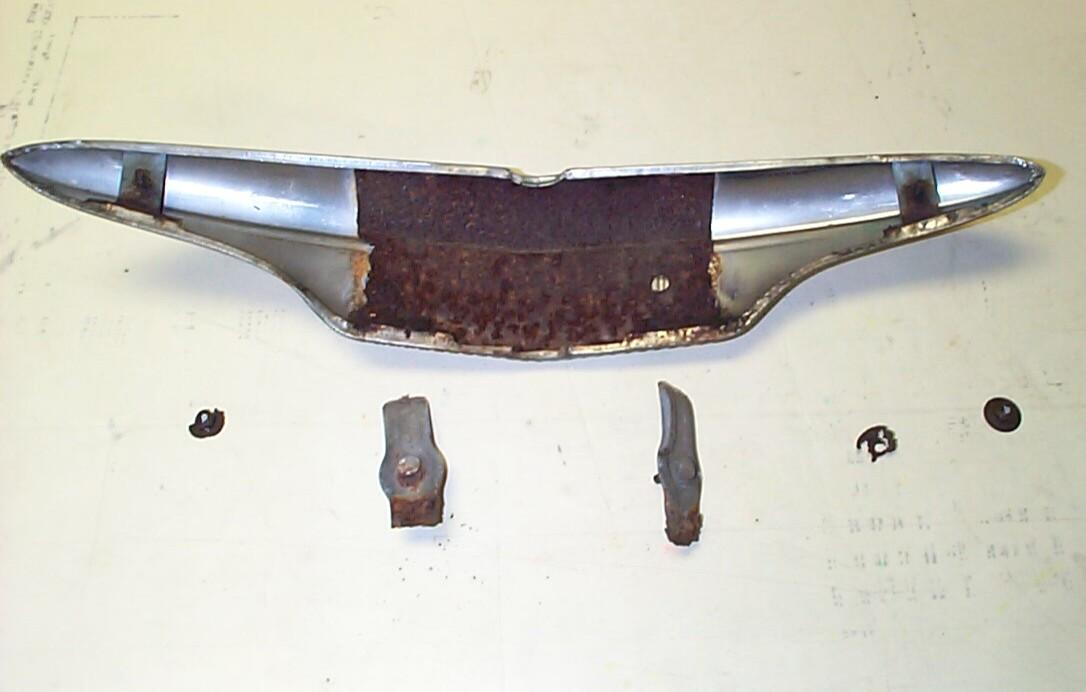 Worst
than I thought or hoped for underneath the emblem - The backing plate
is pretty well gone along with the brackets for the center two mounting
studs. Ran a wire brush over the newly exposed hood areas to get the
loose stuff off. Can't do much more today on the hood due to the
hostile weather.
Worst
than I thought or hoped for underneath the emblem - The backing plate
is pretty well gone along with the brackets for the center two mounting
studs. Ran a wire brush over the newly exposed hood areas to get the
loose stuff off. Can't do much more today on the hood due to the
hostile weather.
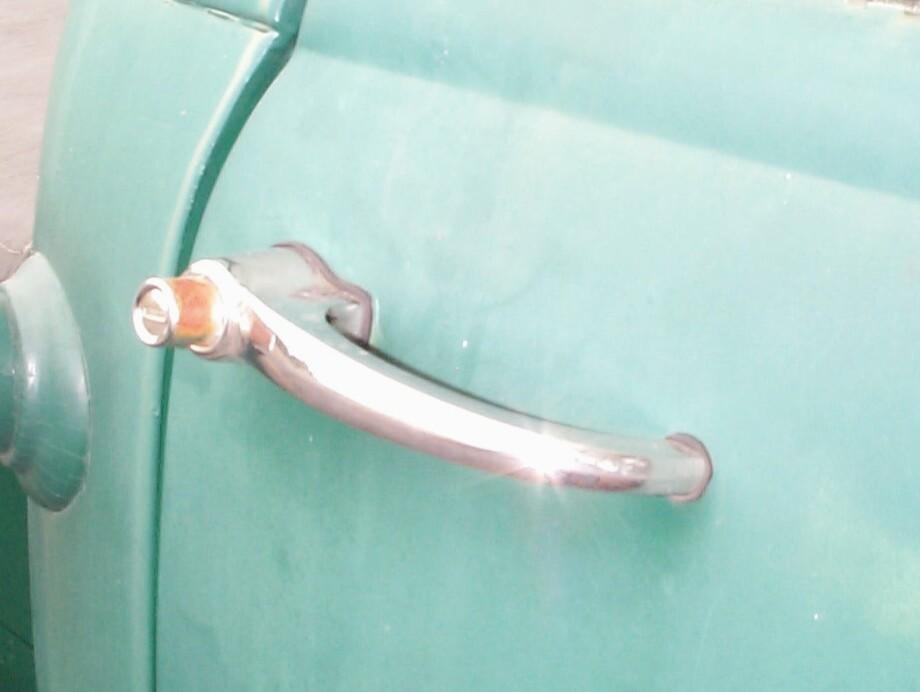 Turned
to the re-pop exterior passenger door handle. This was installed back
in August of 2002. The push button is all rusted now. While stewing
over how to fix this, I thought about the old handle I had taken off.
Went up to the warehouse at lunchtime last week and found it. The push
button on the original handle is not rusted even after forty years of
bad roads. My brainstorm is just to replace the re-pop push button
housing with the original housing. I got the new handle off and both
handles disassembled . . . ~!@#$%^ The
re-pop housing is 1/16" longer and it's mounting latches 1/16" farther
down the lock cylinder than original! The original housing will not fit
over the re-pop lock cylinder because of this difference. In the name
of Murphy, what was the re-pop manufacturer's reasoning behind this
dubious engineering achievement? OK. That's enuf setbacks fer one day.
Turned
to the re-pop exterior passenger door handle. This was installed back
in August of 2002. The push button is all rusted now. While stewing
over how to fix this, I thought about the old handle I had taken off.
Went up to the warehouse at lunchtime last week and found it. The push
button on the original handle is not rusted even after forty years of
bad roads. My brainstorm is just to replace the re-pop push button
housing with the original housing. I got the new handle off and both
handles disassembled . . . ~!@#$%^ The
re-pop housing is 1/16" longer and it's mounting latches 1/16" farther
down the lock cylinder than original! The original housing will not fit
over the re-pop lock cylinder because of this difference. In the name
of Murphy, what was the re-pop manufacturer's reasoning behind this
dubious engineering achievement? OK. That's enuf setbacks fer one day.
July 10th 2005 Still unsavory weather today but not as bad as yesterday and I am really, really glad I don't live in Mobile where Hurricane Dennis is heading. My prayers are with those people in its path. Took another dawn run to Fort Lauderdale Beach, this time in BettyLou to warm her engine up for a oil change.
Then I went back to my rusty door handle push button problem. At the end of yesterday, I put the old door handle back on BillyBob while I dealt with this problem. I can't just put the whole original push button assembly in the re-pop handle because I don't have a key for the original lock. I'm stuck trying to refinish the re-pop pushbutton housing. You know the saying "When you get a new hammer, everything looks like a nail". I went after the push button rust with the 36 grit mini radial bristle brush in my Dremel motor tool again. It did a good job on the mirror mounting stud. It should do a good job here.
Next, the push button housing was submerged in a solution of Eastwood's Metal Wash for a half hour and then dried with a hair dryer. The wind had died down pretty much so I decided on a powdercoating attempt. Gave the button housing a Picklex treatment. Then cooked off the chemicals for about twenty minutes. Applied Columbia Coatings Chrome powder and cured for fifteen minutes. It looks like real chrome again! Decided to dispense with the clear topcoat this time. I'll see how well this weathers by itself. Eastwood is now offering a single coat chrome powder and I'm thinkin' about getting some of that stuff.
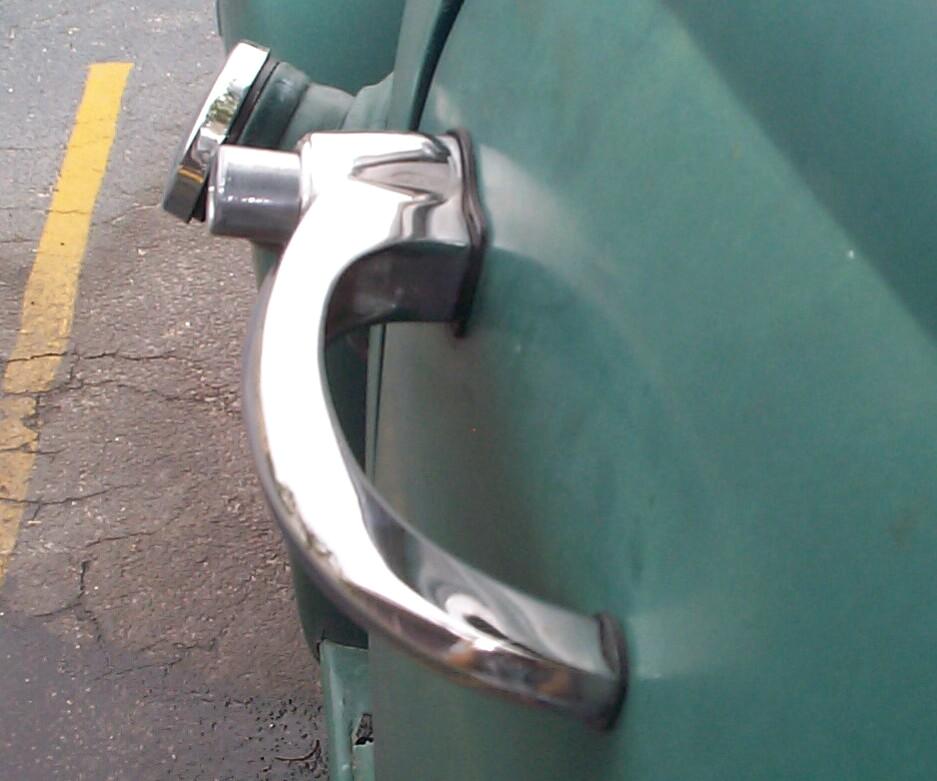 Put
the handle back together, polished the chrome of the handle itself, and
re-installed the handle. The next time thru the detailing cycle, I will
probably break out the doors into their own section. Since the interior
handles and panel have to come off to get to the exterior handle
fasteners, it makes sense to do interior and exterior door maintenance
at the same time.
Put
the handle back together, polished the chrome of the handle itself, and
re-installed the handle. The next time thru the detailing cycle, I will
probably break out the doors into their own section. Since the interior
handles and panel have to come off to get to the exterior handle
fasteners, it makes sense to do interior and exterior door maintenance
at the same time.
Finished up by polishing the gas cap and the stainless steel tailgate chain hooks where they were rust stained by friction with the old tailgate and bed. Stainless steel binding screws and barrels arrived from McMaster-Carr last week so I tied up a loose end by replacing the missing cowl vent pivot with the binding screw (assembled with threadlocker this time).
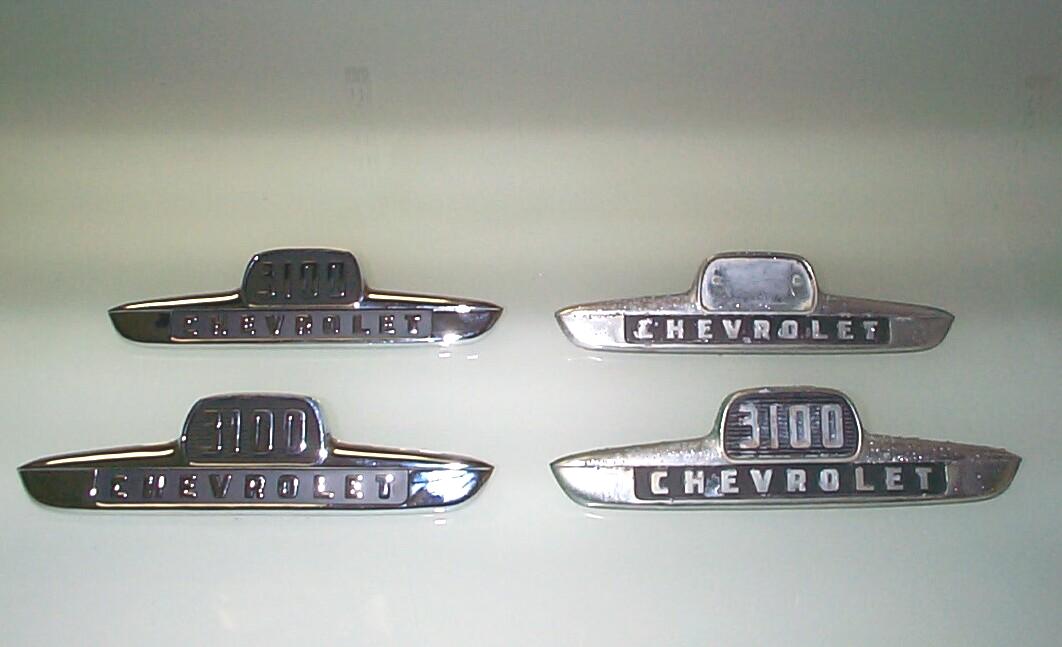 July
16th 2005 Hurricane
Emily is directly to the south of us but too far away to affect South
Florida weather. Here it is a typical July day. Hot and muggy. Received
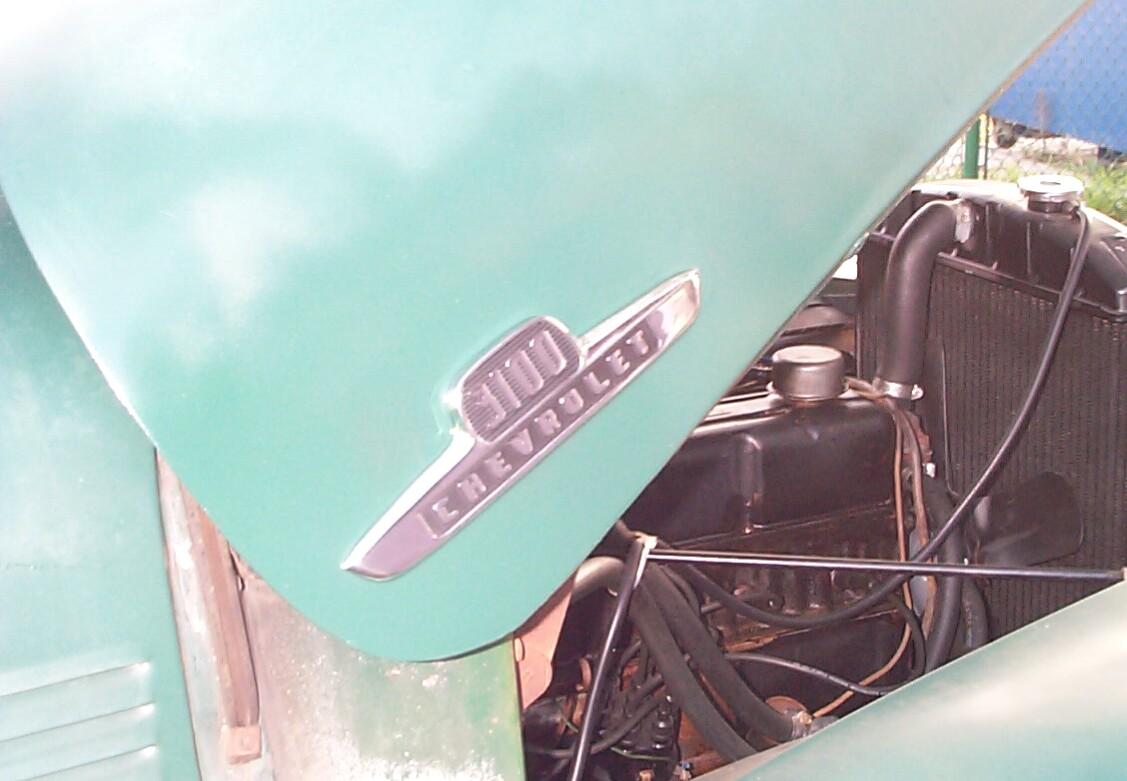
new hood side designation plates earlier in the week from American Classic Truck Parts.
They look pretty good. I hope the chrome is up to snuff. They appear to
be a single casting whereas the originals were two castings. Too bad.
If they had made them like the originals it would be easy to offer the
other designations. As it is, only the "3100" model is available. BTW,
these things are for the '55 1st Series only. The '54's were a
continuation of the '53 side designation plates.
July
16th 2005 Hurricane
Emily is directly to the south of us but too far away to affect South
Florida weather. Here it is a typical July day. Hot and muggy. Received
new hood side designation plates earlier in the week from American Classic Truck Parts.
They look pretty good. I hope the chrome is up to snuff. They appear to
be a single casting whereas the originals were two castings. Too bad.
If they had made them like the originals it would be easy to offer the
other designations. As it is, only the "3100" model is available. BTW,
these things are for the '55 1st Series only. The '54's were a
continuation of the '53 side designation plates.
 Started
cleaning hood emblem areas with wire wheel and flap disks in the
electric angle grinder. Decided that this would be a stage one repair
to the hood, leaving restoration for later. The hood was masked off
with a couple of 1 mil plastic painter drop cloths and the emblem areas
were PRE Paint prepped and given a rattlecan coat of Rust Encapsulator.
Started
cleaning hood emblem areas with wire wheel and flap disks in the
electric angle grinder. Decided that this would be a stage one repair
to the hood, leaving restoration for later. The hood was masked off
with a couple of 1 mil plastic painter drop cloths and the emblem areas
were PRE Paint prepped and given a rattlecan coat of Rust Encapsulator.
While waiting for the Rust Encapsulator to cure, I busied myself with separating the rusted backing plate from the hood emblem. Dug it out, in pieces, with pliers and gasket scraper. At one point, I fired up the air-powered three inch cutoff wheel but soon abandoned that method because I couldn't exercise enough control. I wuz 'fraid of cutting into the stainless steel of the emblem. If I put a hole in that, I'll be up the creek.
Finished off the hood emblem areas with a coat of Rustoleum Dark Hunter Green. That should hold it until I'm ready for stage two work on the hood. Continued then to play around with the hood emblem. Removed what was left of the original blue paint from the "bowtie" recess by rubbing with lacquer thinner. Then I continued to clean up the back of the emblem, first with a brass wire wheel in the angle grinder followed up with the 36 grit mini radial bristle brush in the Dremel motor tool.
 July
17th 2005 A good
weather day under the shadetree this morning. I should have dragged out
the sandblasting equipment but I wuz too lazy. I put the two new
designation plate side emblems on first, having let the Rustoleum dry
overnite. These are secured by sheetmetal push on retainers for a
non-threaded 3/16" shaft. They can only be used one time so I ordered
more from McMaster-Carr for future operations along with new speed nuts
for the front emblem. Then it was on to monthly maintenance.
Renegade and BettyLou monthly maintenance were performed at the same
time. I spent the rest of the day digging the sloppy silicone job out
of the windshield gasket area, this time in the driver side. I tried to
inject new silicone under the gasket but it is tight on this side and I
quit before I made a new mess. The "windshield sealer" silicone you can
buy at the FLAPS is a pain! It comes in a small "toothpaste" tube with
a round nozzle that is too thick for this work. Even if you manage to
get the nozzle under the gasket, the flow is next to impossible to
control. ARRUUGGGH!
July
17th 2005 A good
weather day under the shadetree this morning. I should have dragged out
the sandblasting equipment but I wuz too lazy. I put the two new
designation plate side emblems on first, having let the Rustoleum dry
overnite. These are secured by sheetmetal push on retainers for a
non-threaded 3/16" shaft. They can only be used one time so I ordered
more from McMaster-Carr for future operations along with new speed nuts
for the front emblem. Then it was on to monthly maintenance.
Renegade and BettyLou monthly maintenance were performed at the same
time. I spent the rest of the day digging the sloppy silicone job out
of the windshield gasket area, this time in the driver side. I tried to
inject new silicone under the gasket but it is tight on this side and I
quit before I made a new mess. The "windshield sealer" silicone you can
buy at the FLAPS is a pain! It comes in a small "toothpaste" tube with
a round nozzle that is too thick for this work. Even if you manage to
get the nozzle under the gasket, the flow is next to impossible to
control. ARRUUGGGH!
 July
23rd 2005 Hot and muggy
again but sunny. Tropical storm Franklin is too far to the east to
cause us any problems presently. Brought my buffing gear down from the
warehaouse and set up my rig to polish the hood emblem. like I did with
the windshield trim back in September of last year, I started out with
three passes of "black" compound on the sisal wheel, followed by three
passes each of the "green" compound on spiral sewn wheel, then the
loose wheel. The emblem was cleaned with lacquer thinner at each wheel
change.
July
23rd 2005 Hot and muggy
again but sunny. Tropical storm Franklin is too far to the east to
cause us any problems presently. Brought my buffing gear down from the
warehaouse and set up my rig to polish the hood emblem. like I did with
the windshield trim back in September of last year, I started out with
three passes of "black" compound on the sisal wheel, followed by three
passes each of the "green" compound on spiral sewn wheel, then the
loose wheel. The emblem was cleaned with lacquer thinner at each wheel
change.
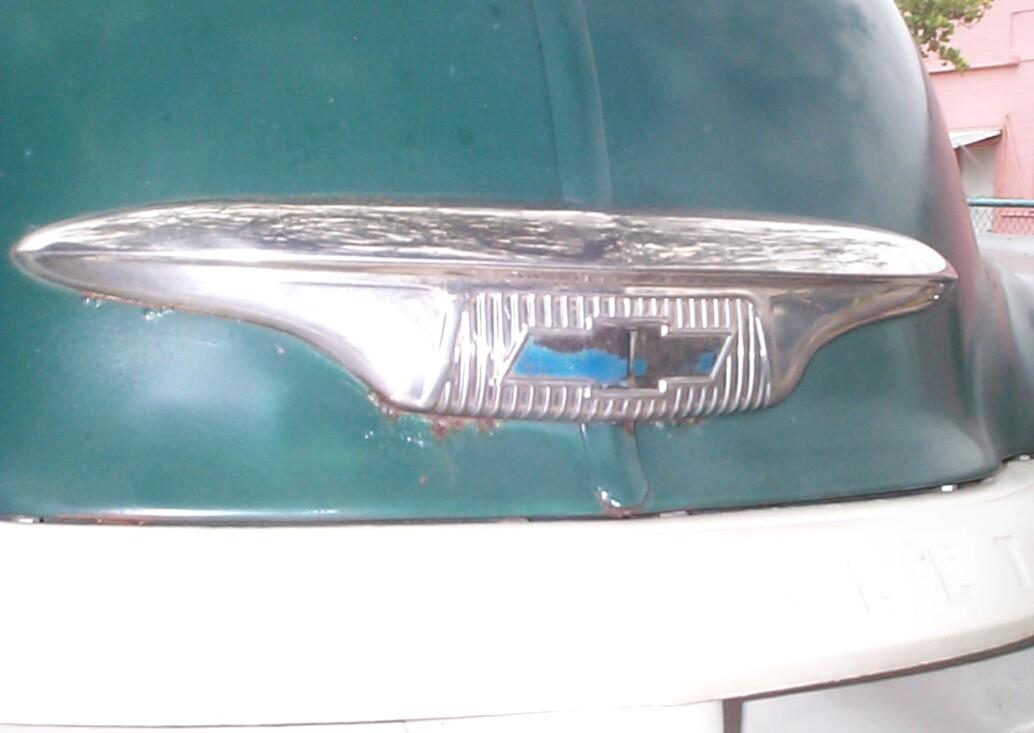
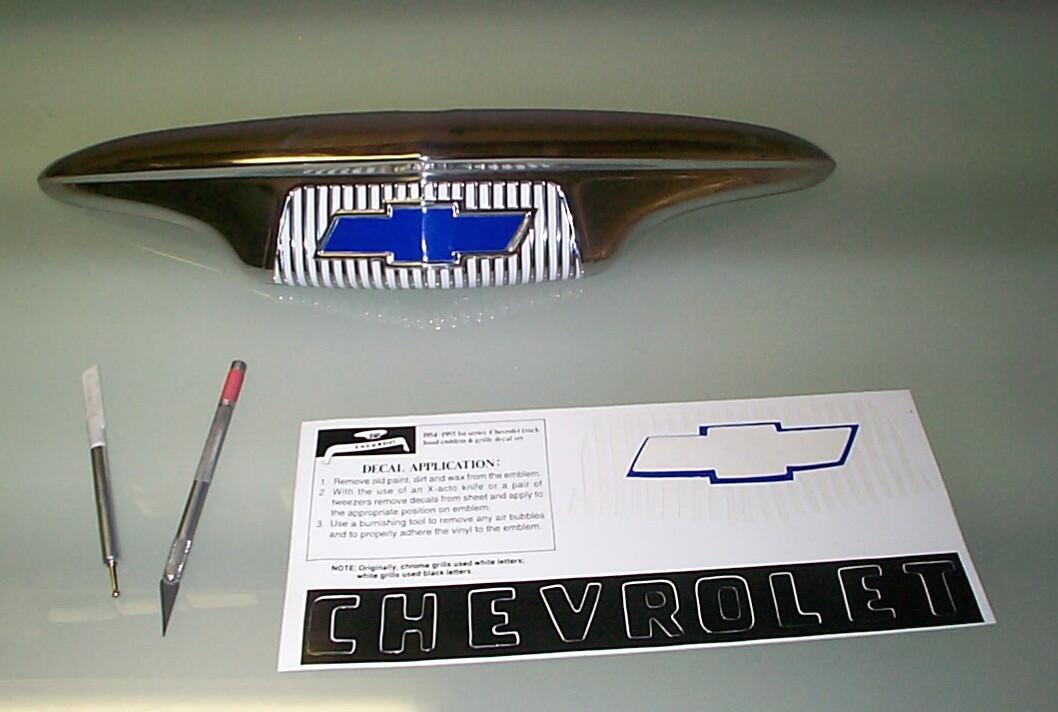 After
the buffing, the emblem was given one more lacquer thinner cleaning.
Then vinyl decals I got from American Classic Truck Parts were applied
in the white striping and blue bowtie areas to substitute for the
original paint. These were pealed off the backing and positioned with
an X-Acto knife. A burnishing tool was used to adhere the decals and
remove air bubbles. A burnishing tool has a flat flexible plastic
spatula on one end and a spring-loaded smooth metal ball tip on the
other. It does a good job and can be bought at any art supply store.
I'm curious to see how these decals hold up over time.
After
the buffing, the emblem was given one more lacquer thinner cleaning.
Then vinyl decals I got from American Classic Truck Parts were applied
in the white striping and blue bowtie areas to substitute for the
original paint. These were pealed off the backing and positioned with
an X-Acto knife. A burnishing tool was used to adhere the decals and
remove air bubbles. A burnishing tool has a flat flexible plastic
spatula on one end and a spring-loaded smooth metal ball tip on the
other. It does a good job and can be bought at any art supply store.
I'm curious to see how these decals hold up over time.
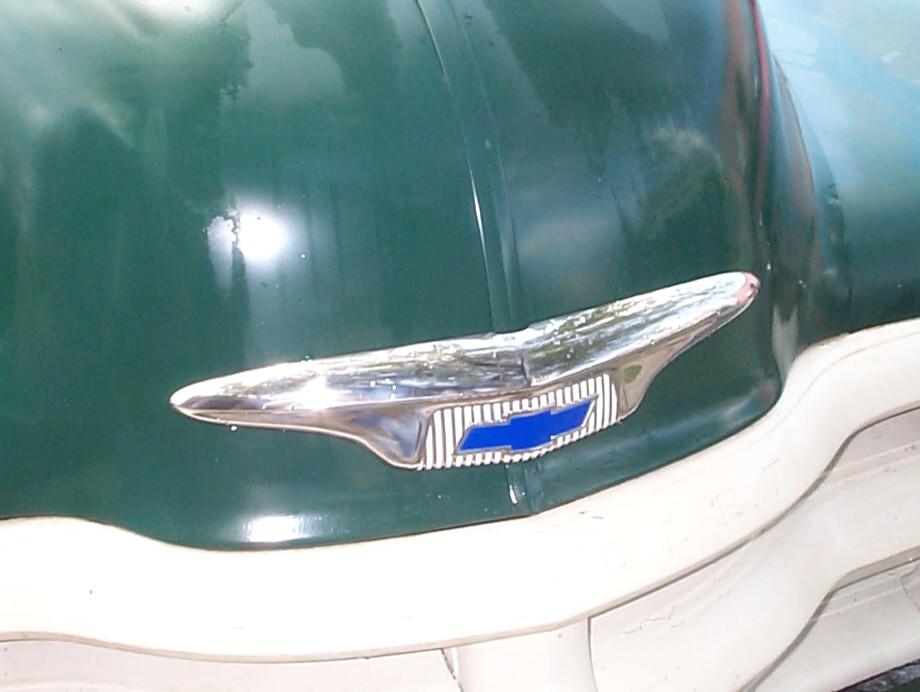 During
the week, I had received a McMaster-Carr shipment with new #10 - 24
flange speed nuts to install the hood emblem along with additional
3/16" push retainers for unthreaded shafts for the side designation
emblems the next time I have them off. Put the hood emblem back on
secured by the end studs only. Sometime down the road, I have to
fabricate something to replace the rusted out center studs and backing
plate. I didn't install the rubber hood emblem gasket because without
the missing center fasteners, I thought it would sag.
During
the week, I had received a McMaster-Carr shipment with new #10 - 24
flange speed nuts to install the hood emblem along with additional
3/16" push retainers for unthreaded shafts for the side designation
emblems the next time I have them off. Put the hood emblem back on
secured by the end studs only. Sometime down the road, I have to
fabricate something to replace the rusted out center studs and backing
plate. I didn't install the rubber hood emblem gasket because without
the missing center fasteners, I thought it would sag.
July 24th 2005 Good weather and low wind this morning. Dragged out the siphon blaster while it was still relatively cool and blasted the headliner bow. PRE Paint Prepped the bow and gave it a coat of Eastwood's Self-Etching Primer. Turned my attention to the passenger side of the windshield gasket again. I think I have a good bead of silicone under the gasket on this side now. The sheetmetal in this area has taken a beating during the old silicone removal. Time to clean that up a bit. Masked off the windshield and gasket, went over the affected areas with a 3M scuff pad and PRE Paint Prepped it. Gave the exposed areas a coat of Eastwood's Rust Encapsulator and let it cure for a couple of hours.
In the meantime, I went on to finish the trim detailing for this cycle. When the Rust Encapsulator was dry, a coat of Dark Hunter Green Rustoleum was applied. Continued with trim work until Murphy interrupted me with the daily rains. After about a hour, the rain got worse - monsoon conditions. That's it for this weekend.
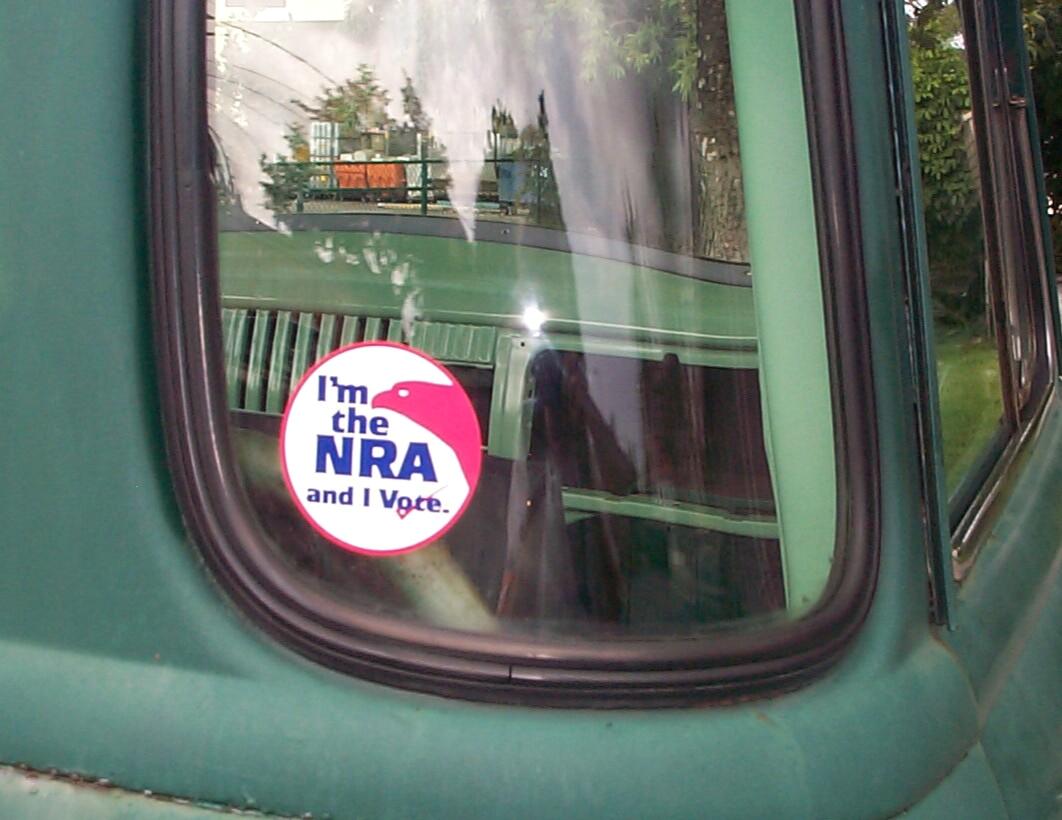 July
30th 2005 Typical
summer day, hot and humid, with a thirty percent chance of rain. Went
about finishing the trim
polishing and glass cleaning ops that last sunday's deluge
had interrupted. A satisfying task of the glass detailing procedure is
replacing faded window decals. The daily rains moved in about three in
the afternoon and we had a power outage which screwed up the Krash Lab
computer network again. We have a commercial grade printing machine
that has a mind of its own. a dedicated Windows NT machine controls it
and a wide format scanner located in another room. all the workstations
are connected to it thru the network and proprietary software. It
sometimes does strange things after a power outage. like a "ghost in
the machine", a long forgotten print job from long past will somehow
migrate to the active queue and start printing at some indeterminate
time after the network powers back up. It doesn't happen every time but
it happened today and it printed thirty sheets on expensive mylar
before I realized what was happening ~!@#$%^
Oh well. It could be worse. If no one had been here, It would have run
until it ran out of media.
July
30th 2005 Typical
summer day, hot and humid, with a thirty percent chance of rain. Went
about finishing the trim
polishing and glass cleaning ops that last sunday's deluge
had interrupted. A satisfying task of the glass detailing procedure is
replacing faded window decals. The daily rains moved in about three in
the afternoon and we had a power outage which screwed up the Krash Lab
computer network again. We have a commercial grade printing machine
that has a mind of its own. a dedicated Windows NT machine controls it
and a wide format scanner located in another room. all the workstations
are connected to it thru the network and proprietary software. It
sometimes does strange things after a power outage. like a "ghost in
the machine", a long forgotten print job from long past will somehow
migrate to the active queue and start printing at some indeterminate
time after the network powers back up. It doesn't happen every time but
it happened today and it printed thirty sheets on expensive mylar
before I realized what was happening ~!@#$%^
Oh well. It could be worse. If no one had been here, It would have run
until it ran out of media.
July 31st 2005 Today marks two months of hurricane season under our belts. Four to go. Today I tackle the next step of the wheel restoration. I've been putting this off 'til I worked up the gumption. It involves putting one coat of epoxy primer on the wheel (which has been sitting in the shed since sandblasting and a light coat of rattlecan self-etching primer was applied several weeks ago).
Brought the HVLP turbine down from the warehouse on friday. First I got out the super stand and ran a 3M scuff pad over the wheel, afterwhich it was PRE Paint Prepped. Then I played with the paint gun fer 'bout an hour. The only time I've used this thing so far was when I sprayed the upper half of the cab interior when I was doin' the windshield job last year. At the time I cleaned the gun by running lacquer thinner thru it. Not a through job. Today I wanted to install a bigger nozzle since I was spraying primer so, I had to take the gun apart. It wasn't long until I was "lost at sea". I took it apart and put it back together several times and still wasn't happy. The needle didn't seem to be seated when it was assembled. I went thru every adjustment in the manual and least once.
Oh well, maybe I do have it together right after all. Set up the turbine and hoses and went on to paint mixing. Wanted the smallest amount since the stuff won't keep and I'm only doing one wheel, one coat. It's a 2:1 mix of Omni MP170 Epoxy Primer to Omni MP175 Hardener. I mixed up three ounces using the mark on the mixing cup. Using Bob Adler's recommendation, I brushed extra primer into the seams between wheel parts before spraying the entire wheel. Then I poured the rest of the mix (thru a strainer) into the paint cup on top of the gun. Small drops began to leak out of the nozzle ~!@#$%^ Curses! There is something amiss.
 No
turning back now. Damn the nozzles, full speed ahead! Went outside and
laid down what looks like a heavy wet coat. Everything looks good and
only one drip that I can see - in the rim area where I can sand it down
easily. Looks like I used about 2/3 of the paint. Two minutes of
painting and several hours of prep and cleanup. Nothing for it. I ether
put BillyBob up on blocks, buy a second set of wheels or do it this
way. I can't tell ya how much I missed drivin' the truck during the
windshield job. I'll keep doing it this way. No mercy today on the
weather front - dark skys, thunder and lightning by 12:30 PM. I had
just gotten tools cleaned and the wheel was dry enuf to handle so I
could get it in outta the weather. Summertime blues.
No
turning back now. Damn the nozzles, full speed ahead! Went outside and
laid down what looks like a heavy wet coat. Everything looks good and
only one drip that I can see - in the rim area where I can sand it down
easily. Looks like I used about 2/3 of the paint. Two minutes of
painting and several hours of prep and cleanup. Nothing for it. I ether
put BillyBob up on blocks, buy a second set of wheels or do it this
way. I can't tell ya how much I missed drivin' the truck during the
windshield job. I'll keep doing it this way. No mercy today on the
weather front - dark skys, thunder and lightning by 12:30 PM. I had
just gotten tools cleaned and the wheel was dry enuf to handle so I
could get it in outta the weather. Summertime blues.
OK. That's a wrap. We're at the end of the detailing cycle and next weekend will be starting back at the beginning again with the engine compartment. I am planning to put more effort into the wheel restoration project too. At the rate I've been goin' at it so far, it'll take years! An' I'm about ready to do combat with the alternator again.
| < Back
to Intro |
You can email me at ![]() webmaster@laroke.com
webmaster@laroke.com
Issued Wednesday August 3, 2005
Updated Thursday March 8, 2018
copyright © 1996-2018 Larry Robert Kephart all rights reserved
| | LRK Home | | Bio Info | | Krash Khronicles | | LAROKE | |
| | BettyLou | | BillyBob's Garage | | Rat Patrol | | Deerslayer | | Elvira | |
| | Land of the Free and Home of the Brave | |
| | Keppylou's Art | | WWI Soldier's Diary | |