| | LRK Home | | Bio Info | | Krash Khronicles | | LAROKE | |
| | BettyLou | | BillyBob's Garage | | Rat Patrol | | Deerslayer | | Elvira | |
| | Land of the Free and Home of the Brave | |
| | Keppylou's Art | | WWI Soldier's Diary | |
BillyBob Parts Shop
![]()
WHAT'S NEW is a chronological listing of updates to the BillyBob site.
![]()
TRUCK LINKS including vendor sites for old parts, custom parts, and tools as well as sites for classic car and truck organizations
STORE Operating in association with Amazon.com, books, recordings and tools can be purchased.
PLANNING for the restoration including project schedule and cost estimates.
![]()
TRAVELS WITH BILLYBOB With apologies to Steinbeck, this area of BillyBob's Garage will be used to log the trips BillyBob and I make together.
WORK-IN-PROGRESS is the restoration of parts of BillyBob that I can accomplish without a garage.
PRE-RESTORATION includes log entries of minor repairs and and adventures between time of purchase and the time when I started restoration, a piece at a time.
JR'S KORNER JR's Korner is the history of BillyBob before I got him authored by my brother, Wm. C. Kephart.
![]()
BILLYBOB MAINTENANCE Ever changing detailing, oil change, lube, etc. maintenance routines specifically developed for BillyBob, including required tools, materials and procedures.
PARTS SHOP The Parts Shop is a repository of How-To articles. Things that I have done over and over enough times to have developed a procedure. This gives me a checklist and saves brain cells.
STEALTH SHOP Urban residence design with large integrated shop and separate living quarters for a relative or renter.
4. Wheel Restoration
When I needed new tires, I decided to do a better job restoring the wheels then I did the first time around since I had acquired more tools, knowledge and skills since that time. The core of that knowledge with regards to this procedure comes from two sources: Bob Adler's article on the subject in the December 2004 issue of Vintage Truck and Brian Martin's (MartinSr) comments on the Stovebolt.com Paint and Body Shop forum. I wanted to do the wheel/tire assemblies one at a time and mount them on BillyBob in pairs so I bought an additional spare wheel, bringing my total to six. Six wheels seemed more than enuf to establish a procedure for. I started with BillyBob's original spare for the basis of this procedure.
Gottchas
Here come de disclaimer. This is not the best way of doing this job. It's just my way, which, by the way, is subject to change. My way is a long, drawn out process because I'm doing one wheel at a time. It is wasteful of time and materials but it matches my limited weekend work hours, the outside environment I have to work in and the main consideration of keeping BillyBob on the road and not on jackstands. I have also mixed PPG primers and generic primers with a DuPont topcoat. This is a big NO-NO! Any paint profesional will tell you to stick with a system. We won't know for some time (I hope) how much harm my violation of this cardinal rule will cause.
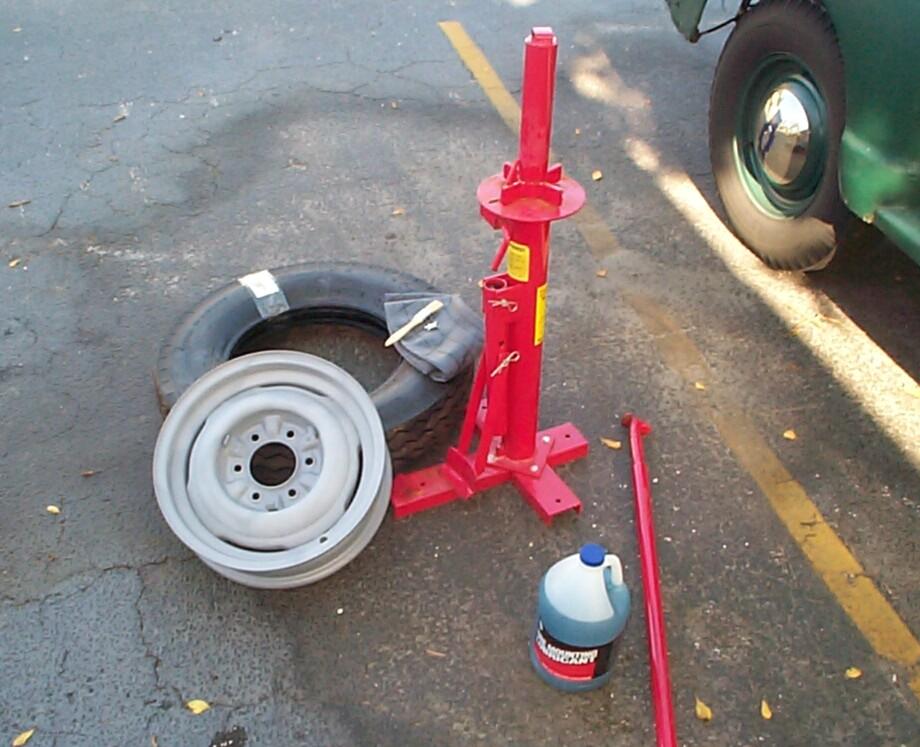
Demount Tire
 Gather
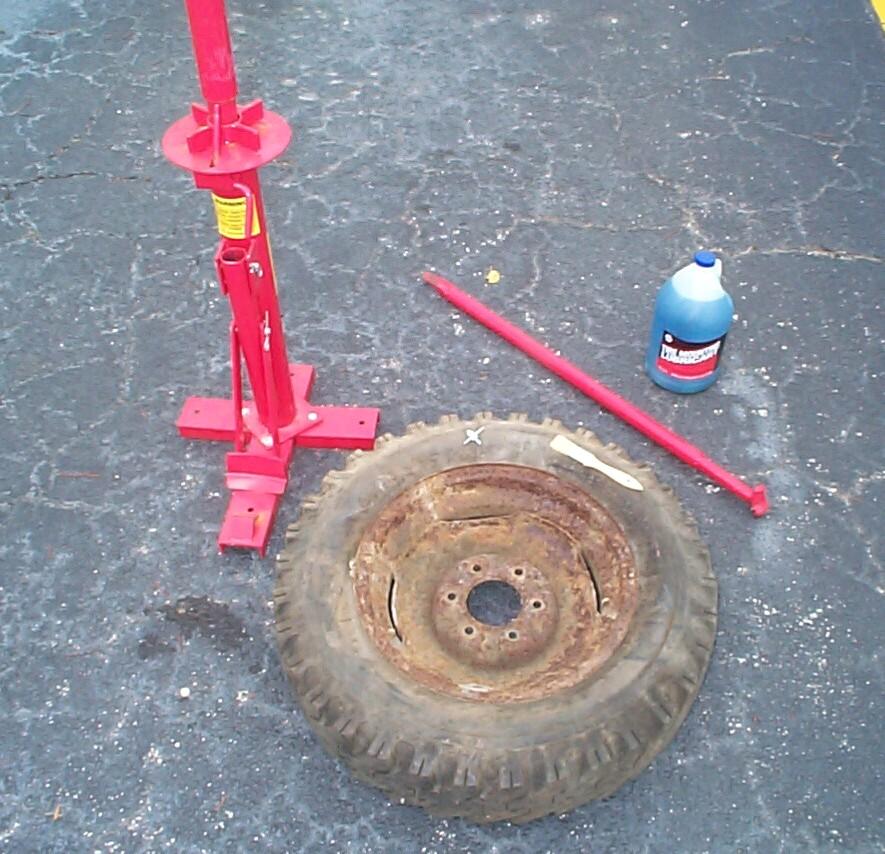
tools: Tire changer, tire valve tool, tire lubricant, 1"
throw-away paint brush. The tire changer and paint brush came from
Harbor Freight, the tire valve tool from a local auto parts store and
the tire lubricant from NAPA. The tire changer is easier to work if you
have a shop where you can bolt it to the floor.
Gather
tools: Tire changer, tire valve tool, tire lubricant, 1"
throw-away paint brush. The tire changer and paint brush came from
Harbor Freight, the tire valve tool from a local auto parts store and
the tire lubricant from NAPA. The tire changer is easier to work if you
have a shop where you can bolt it to the floor.
 Bead
Breaking: Deflate the tire completely and remove the
valve core with the tire valve tool. Spread tire lubricant around edge
of tire at the rim. Use bead breaker shoe with lever to separate tire
from rim. Keep moving around rim with the bead breaker until separation
is complete. After breaking the bead on the front side, turn wheel/tire
assembly over, spread lubricant, and break bead on back side.
Bead
Breaking: Deflate the tire completely and remove the
valve core with the tire valve tool. Spread tire lubricant around edge
of tire at the rim. Use bead breaker shoe with lever to separate tire
from rim. Keep moving around rim with the bead breaker until separation
is complete. After breaking the bead on the front side, turn wheel/tire
assembly over, spread lubricant, and break bead on back side.
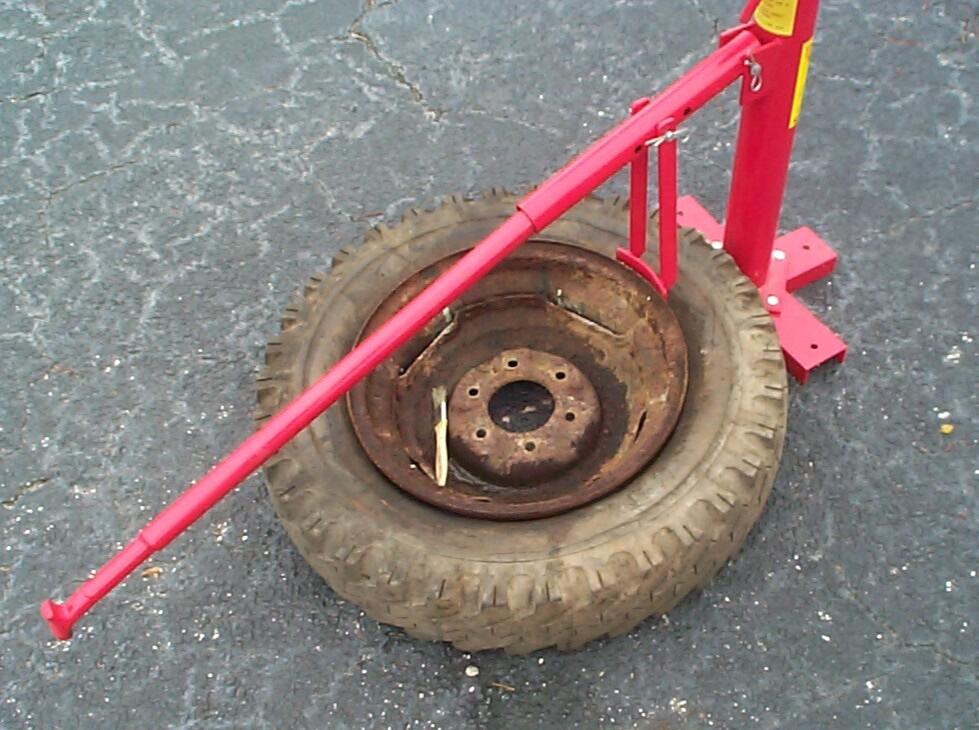
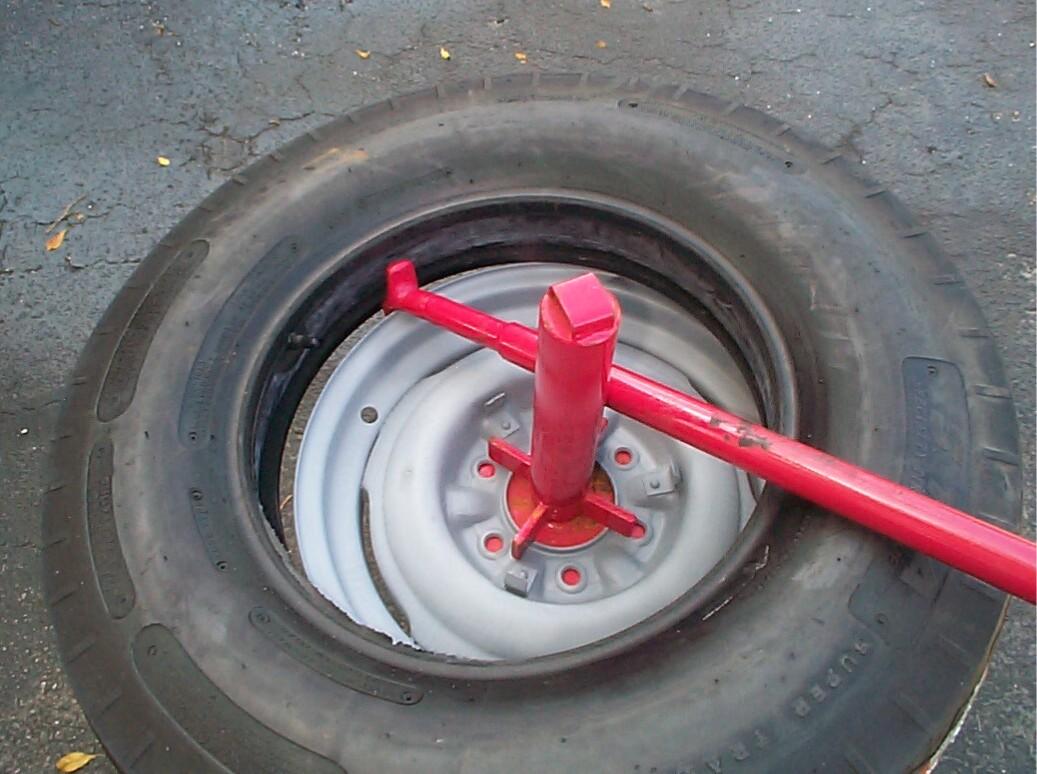
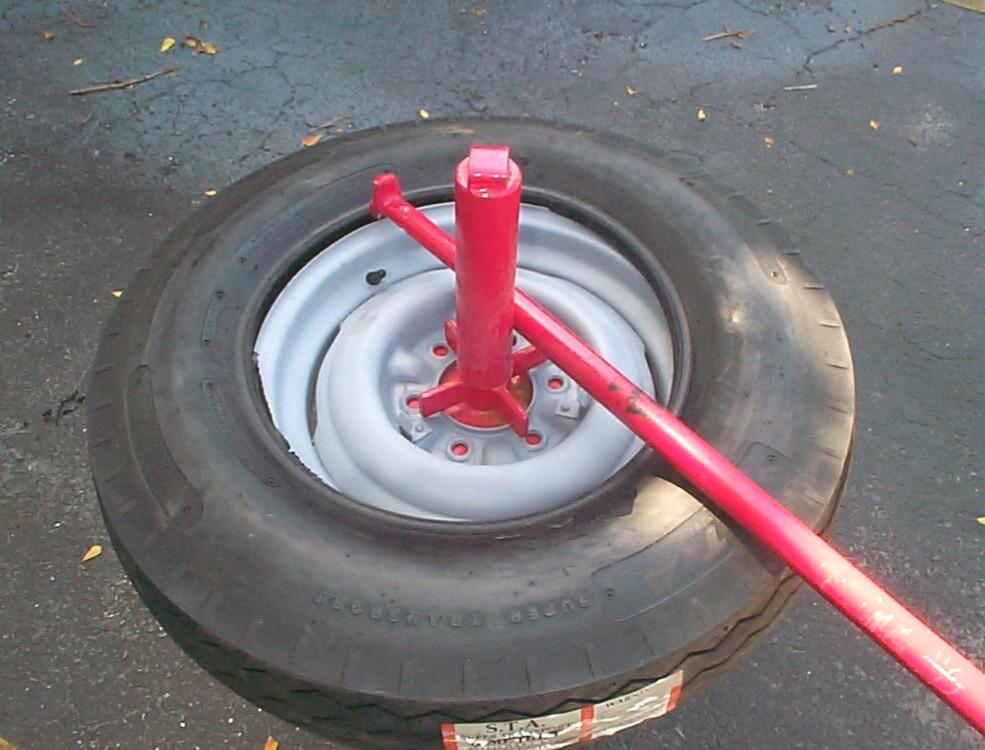
 Front
Bead: Secure tire/wheel assembly, valve side up, on the
tire changer pedestal. Force demount (flat) end of bar between tire and
rim, the flat against the rim. Lever the bar across the tire to force
the edge of the bead over the rim. Apply lubricant and work the bar all
the way around the centerpost to demount the bead completely.
Front
Bead: Secure tire/wheel assembly, valve side up, on the
tire changer pedestal. Force demount (flat) end of bar between tire and
rim, the flat against the rim. Lever the bar across the tire to force
the edge of the bead over the rim. Apply lubricant and work the bar all
the way around the centerpost to demount the bead completely.
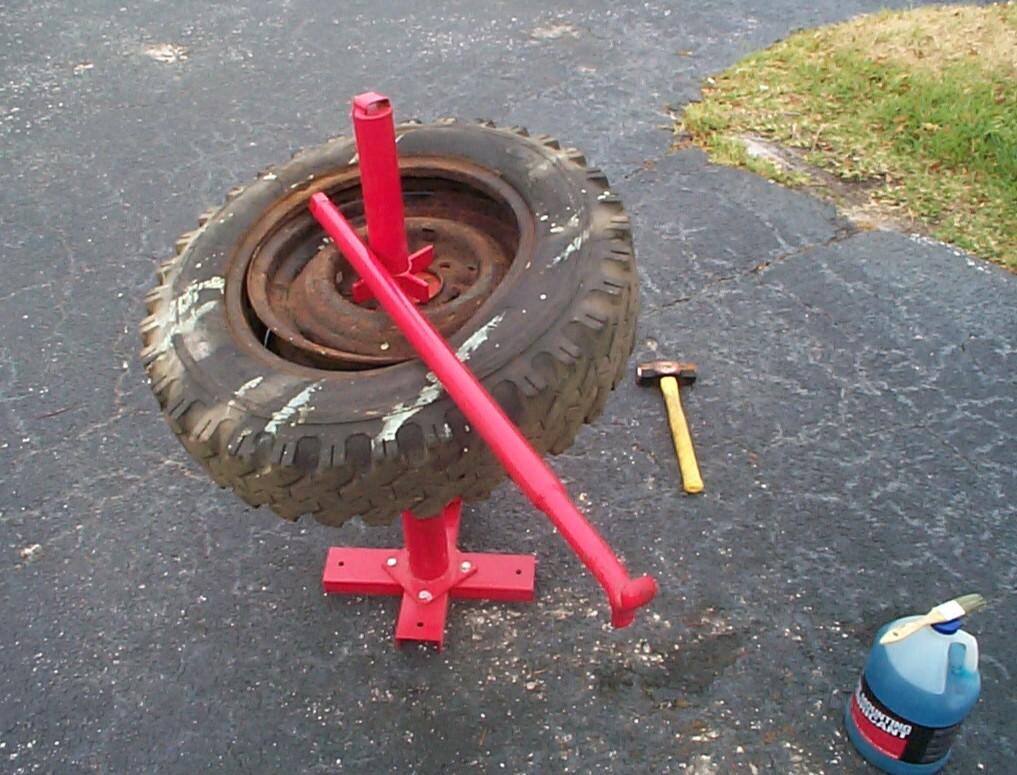
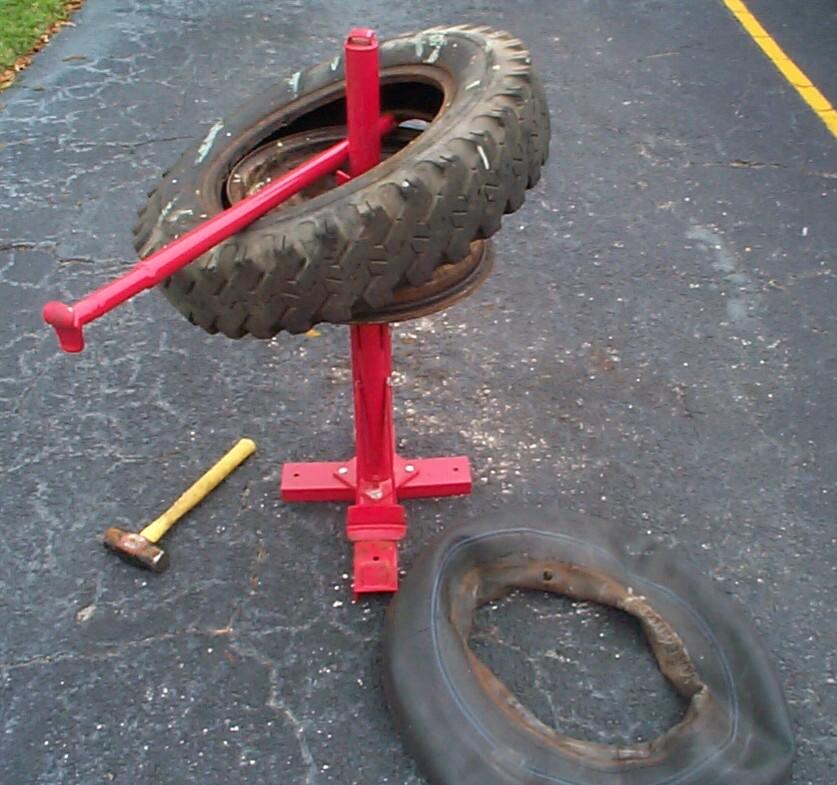 Back
Bead: Remove the inner tube. Pull the tire back bead up
toward the front rim edge and place the flat end of the demounting bar
as before. Apply lubricant and work the bar all the way around the
centerpost to demount the back bead completely.
Back
Bead: Remove the inner tube. Pull the tire back bead up
toward the front rim edge and place the flat end of the demounting bar
as before. Apply lubricant and work the bar all the way around the
centerpost to demount the back bead completely.
Sandblast Wheel
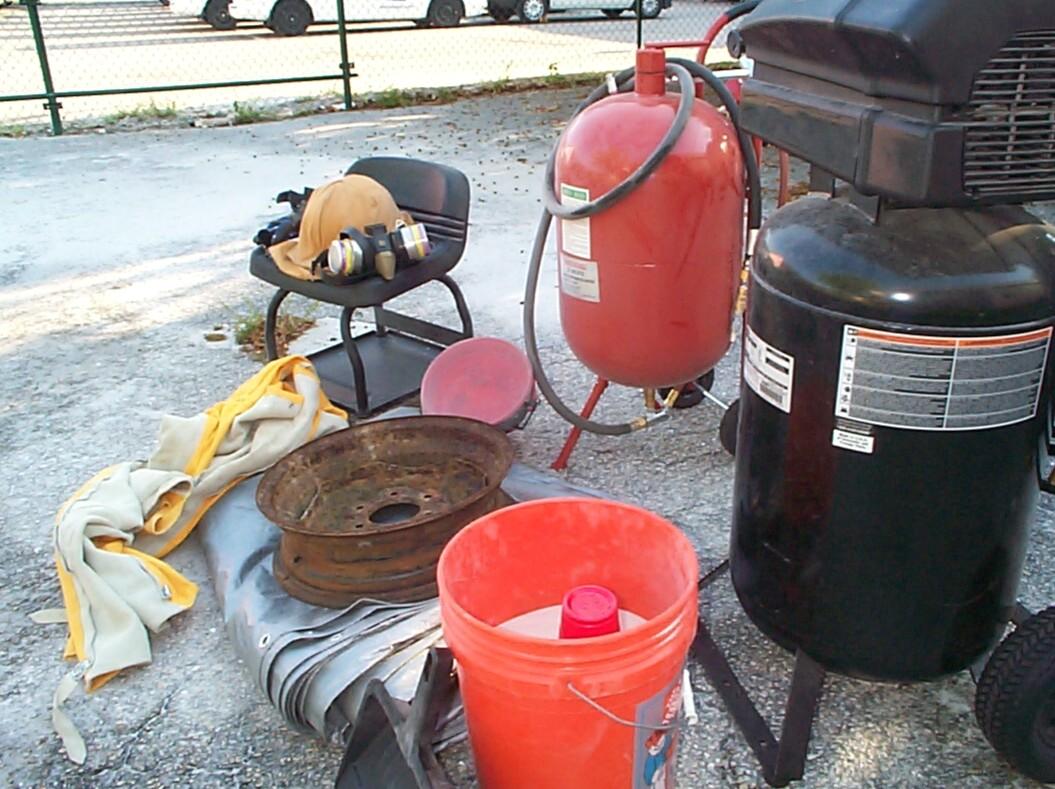 Gather
Tools: Tarp, air compressor, pressure blaster, sand
bucket, dust pan, funnel, stool, blasting coveralls, respirator,
blasting hood, gloves. The tarp is a 20' x 30' Silver Tarp from
Northern Tool. The air compressor is a 3-1/2 hp, 20 gal, 2-stage, 175
psi model from Sears and is light for this kind of task but workable.
The blaster is a 110 lb pressurized abrasive blaster from Harbor
Freight. The funnel came with it and I stretched insect screen secured
with a bungee cord over the funnel mouth to filter the sand. The sand
bucket and dust pan are from Home Depot. The stool is a mechanics
roller seat from Northern Tool. The heavy-duty blasting coveralls came
from Harbor Freight. The respirator is a multi-purpose model from
Sears. The blasting hood is an Eastwood Company deluxe model. The
gloves are mechanix gloves from the Eastwood Company and are light for
blasting work (keep the nozzle away from them).
Gather
Tools: Tarp, air compressor, pressure blaster, sand
bucket, dust pan, funnel, stool, blasting coveralls, respirator,
blasting hood, gloves. The tarp is a 20' x 30' Silver Tarp from
Northern Tool. The air compressor is a 3-1/2 hp, 20 gal, 2-stage, 175
psi model from Sears and is light for this kind of task but workable.
The blaster is a 110 lb pressurized abrasive blaster from Harbor
Freight. The funnel came with it and I stretched insect screen secured
with a bungee cord over the funnel mouth to filter the sand. The sand
bucket and dust pan are from Home Depot. The stool is a mechanics
roller seat from Northern Tool. The heavy-duty blasting coveralls came
from Harbor Freight. The respirator is a multi-purpose model from
Sears. The blasting hood is an Eastwood Company deluxe model. The
gloves are mechanix gloves from the Eastwood Company and are light for
blasting work (keep the nozzle away from them).
Blasting: Spread and anchor the tarp. I use precast concrete paver samples we have laying around the Krash Lab. This works well if the wind is below ten mph. Setup the air compressor and pressure blaster. I fill the pressure blaster with a bucket of sand maximum (about fifty pounds) using the screened funnel to filter it. Replace the filler cap (a drop of oil smeared on the o-ring helps it to seat). Pressurize the blaster (I use about 100 psi), don protective clothing and respirator and get-r-done. There's a lotta waiting on the air compressor but that's where zen meditation enters the picture.
Re-filling: After cycling thru the sand, close off the valve between compressor and blaster and BLEED OFF ALL THE PRESSURE IN THE BLASTER TANK before removing the cap to refill with sand. This is a good time to get a drink of water to re-hydrate yourself. Un-anchor the tarp and pull up the corners to herd the loose sand to the center of the tarp for recovery and recycling. With low wind and the tarp spread to its full 20' x 30', I recover approximately 80% of the sand for each cycle thru the blaster.
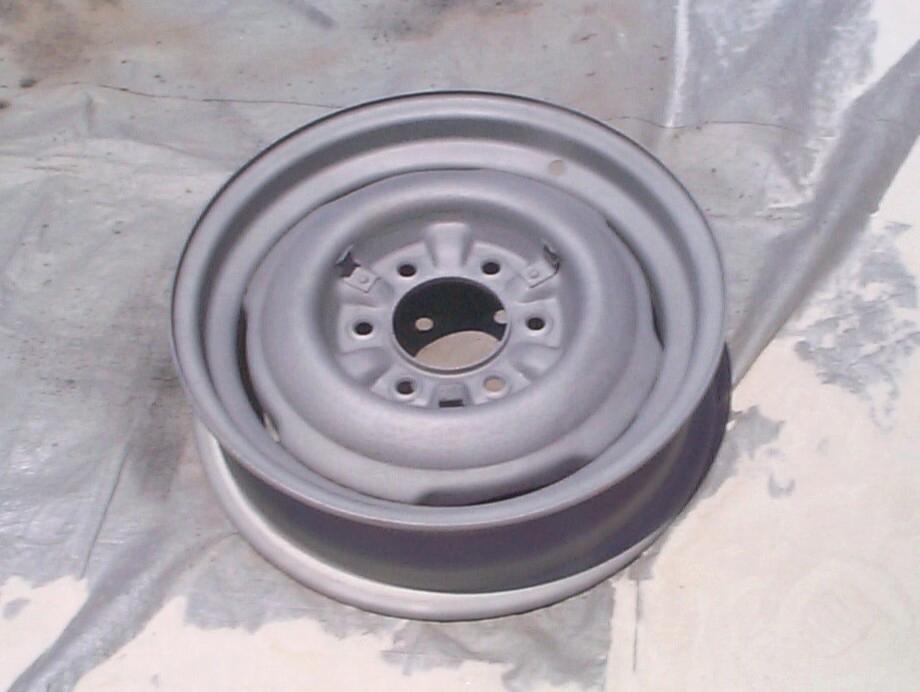 Continue
the above steps until you finish the wheel(s) or grow tired. At the
end, you should have something that looks like this (Yes, it is the
same wheel!). There's almost something religous about clean metal freed
from rust. Too bad you can't take a blaster after a tarnished
character. I try to finish without any sand left in the tank to lessen
the possibility of clogging during storage. Any leftover sand is stored
in the bucket.
Continue
the above steps until you finish the wheel(s) or grow tired. At the
end, you should have something that looks like this (Yes, it is the
same wheel!). There's almost something religous about clean metal freed
from rust. Too bad you can't take a blaster after a tarnished
character. I try to finish without any sand left in the tank to lessen
the possibility of clogging during storage. Any leftover sand is stored
in the bucket.
Self-Etching Primer
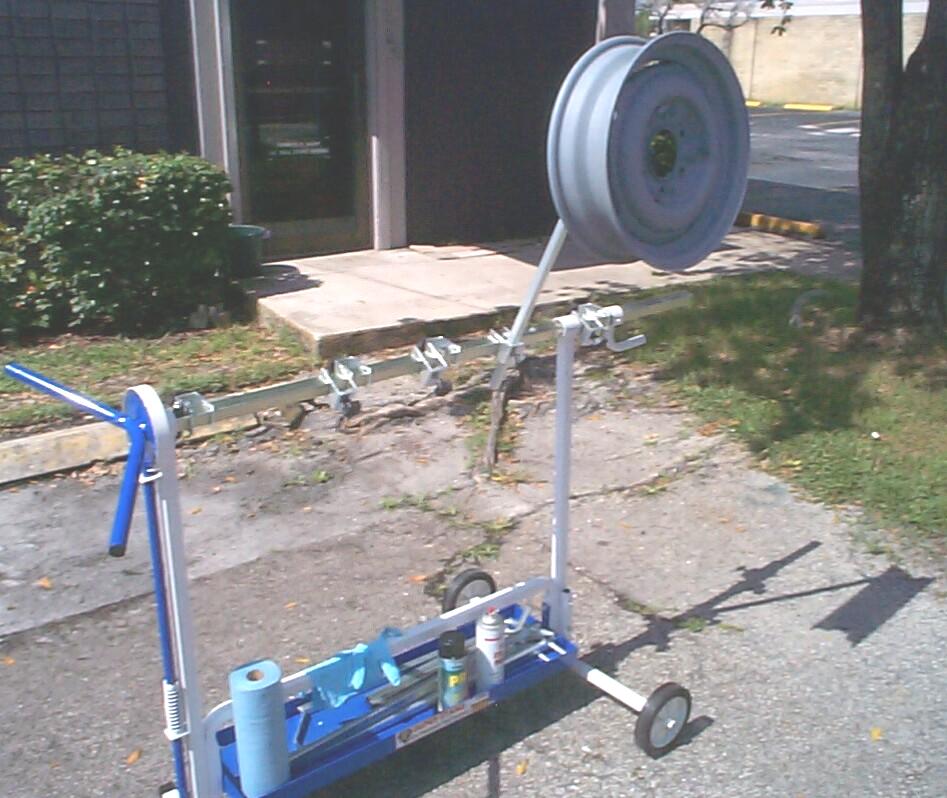 Gather
Tools:Paint stand, nitrile gloves, paint prep,
self-etching primer, shop towels. The shop towels are from a FLAPS
(Friendly Local Auto Parts Store). The nitrile gloves are from Harbor
Freight. The "Super Stand", PRE Paint Prep and Self-Etching Primer are
from the Eastwood Company.
Gather
Tools:Paint stand, nitrile gloves, paint prep,
self-etching primer, shop towels. The shop towels are from a FLAPS
(Friendly Local Auto Parts Store). The nitrile gloves are from Harbor
Freight. The "Super Stand", PRE Paint Prep and Self-Etching Primer are
from the Eastwood Company.
Prime wheel: This step is done immediately after sand-blasting. The wheel is blown off with compressed air and mounted on the paint stand. The nitrile gloves protect the wheel from the oils from your skin. Paint prep is sprayed on and wiped off with clean shop towels. The wheel is given one coat of self-etching primer (a dark color or red is better than gray so you can tell if you've got coverage). The primer's sole purpose is to protect the wheel until I get back to it. If you've got a better shop situation than I have and are set to go with epoxy primer, it is recommended that you skip this step and go straight to the epoxy primer.
Epoxy Primer
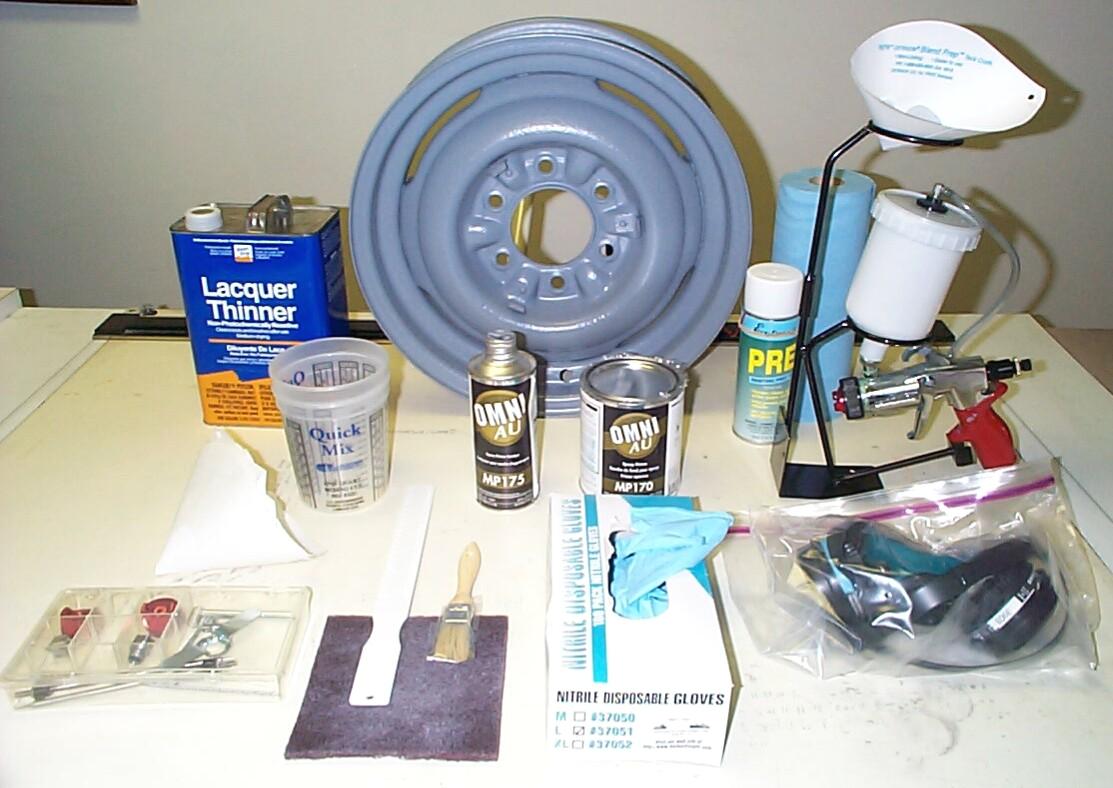 Gather
tools: paint stand, nitrile gloves, paint prep, shop
towels 3M scuff pad, HVLP paint turbine, 1.4 nozzle, Omni MP170 Epoxy
Primer, Omni MP175 Hardener, lacquer thinner, mixing cups, strainers,
paint rated respirator, 1" throw away brush. The HVLP paint turbine,
mixing cups, strainers, and respirator came from TP Tools. The primer
and hardener came from LPL Bodyworks, the scuff pad came from a FLAPS
and the lacquer thinner (for cleanup only, not mixing grade) came from
Home Depot.
Gather
tools: paint stand, nitrile gloves, paint prep, shop
towels 3M scuff pad, HVLP paint turbine, 1.4 nozzle, Omni MP170 Epoxy
Primer, Omni MP175 Hardener, lacquer thinner, mixing cups, strainers,
paint rated respirator, 1" throw away brush. The HVLP paint turbine,
mixing cups, strainers, and respirator came from TP Tools. The primer
and hardener came from LPL Bodyworks, the scuff pad came from a FLAPS
and the lacquer thinner (for cleanup only, not mixing grade) came from
Home Depot.
Prep wheel: Go over wheel with a 3M scuff pad and blow off. Mount wheel on paint stand. Put on nitrile gloves and apply paint prep. Wipe off with clean shop towels. Repeat if necessary. Let wheel dry thoroughly.
Mix paint: Assemble the gun with a 1.4 nozzle assembly. Mix the Omni MP170 Epoxy Primer and Omni MP175 Hardener in a 2:1 ratio in accord with the fact sheet. Use the brush to apply paint in the seams where the wheel center and rim meet and at the hubcap clips. The primer will be drawn in by capillary action. Wipe up any drips. Pour the rest of the primer into the paint gun through a strainer. For one wheel I mixed three ounces.
Apply primer: Put on respirator and apply one wet coat of the epoxy primer to the wheel.
Cleanup: Pour remaining primer into container for proper disposal. Run two ounces reducer through spray gun into a bucket. Disassemble gun and clean parts in lacquer thinner. Re-assemble gun lubricating with petroleum jelly in accord with the manual.
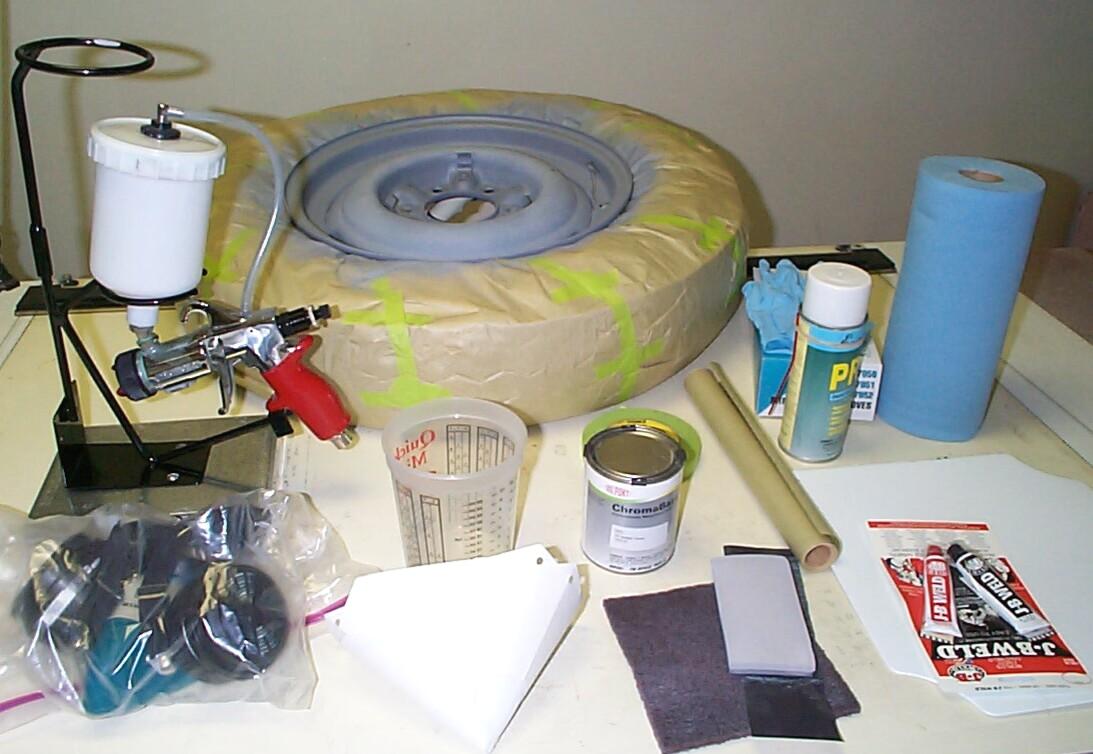
Surfacer
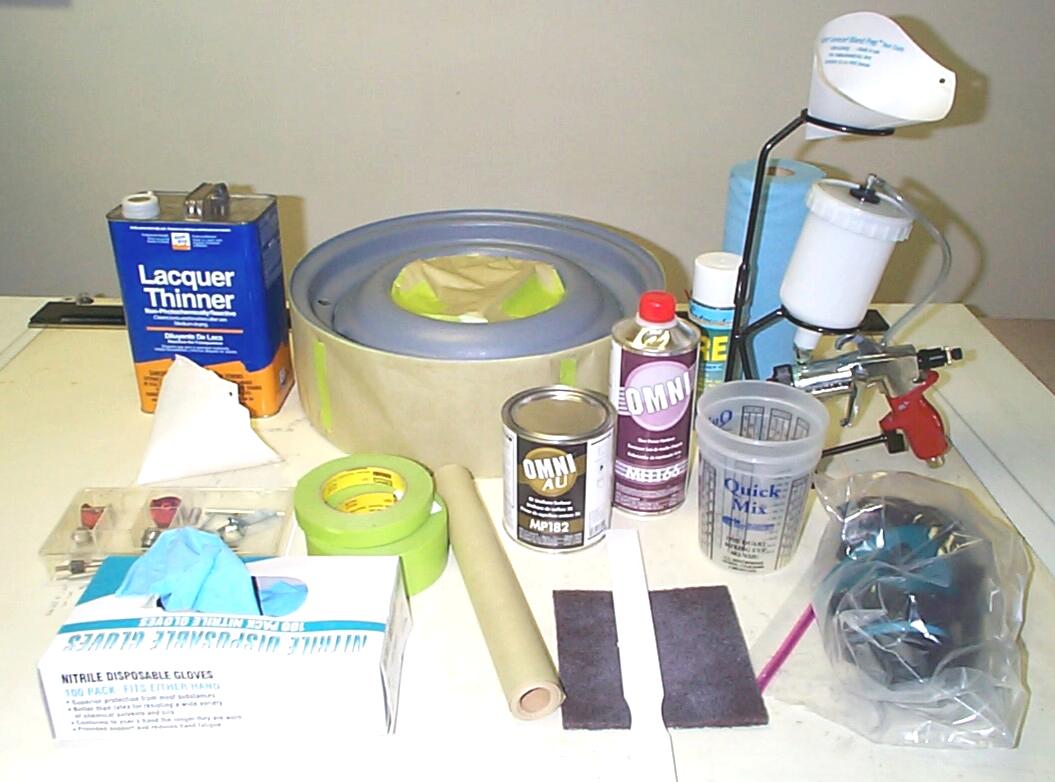 Gather
tools: paint stand, nitrile gloves, paint prep, shop
towels 3M scuff pad, HVLP paint turbine, 1.6 nozzle, Omni MP182
surfacer primer, Omni MH166 slow hardener, lacquer thinner, mixing
cups, strainers, paint rated respirator. The masking paper and masking
tape came from the Eastwood Company.
Gather
tools: paint stand, nitrile gloves, paint prep, shop
towels 3M scuff pad, HVLP paint turbine, 1.6 nozzle, Omni MP182
surfacer primer, Omni MH166 slow hardener, lacquer thinner, mixing
cups, strainers, paint rated respirator. The masking paper and masking
tape came from the Eastwood Company.
Mask wheel: mask off the area under the hub cap and the inner rim area using the back taping method - Tape is placed with centerline at the edge where the masking is to be. The half of the tape farthest from the paint area is pressed down onto the wheel. The other half along the centerline is folded back onto the first half so that the sticky side is up. Masking paper is now pressed down onto this sticky half. This method provides a soft feathered edge where the paint meets the masking tape.
Prep wheel: Go over wheel with a 3M scuff pad and blow off. Mount wheel on paint stand. Put on nitrile gloves and apply paint prep. Wipe off with clean shop towels. Repeat if necessary. Let wheel dry thoroughly.
Mix paint: Assemble the gun with a 1.6 nozzle assembly. Mix the Omni MP182 surfacer primer and Omni MH166 slow hardener in a 5:1 ratio in accord with the fact sheet and pour into the paint gun through a strainer. For one wheel I mixed about five ounces.
Apply surfacer: Put on respirator and apply four coats of the surfacer primer to the wheel. Allow ten to fifteen minutes between coats in accord with the fact sheet. The surfacer has a one hour pot life.
Cleanup: Pour remaining primer into container for proper disposal. Run two ounces reducer through spray gun into a bucket. Disassemble gun and clean parts in lacquer thinner. Re-assemble gun lubricating with petroleum jelly in accord with the manual.
Sanding
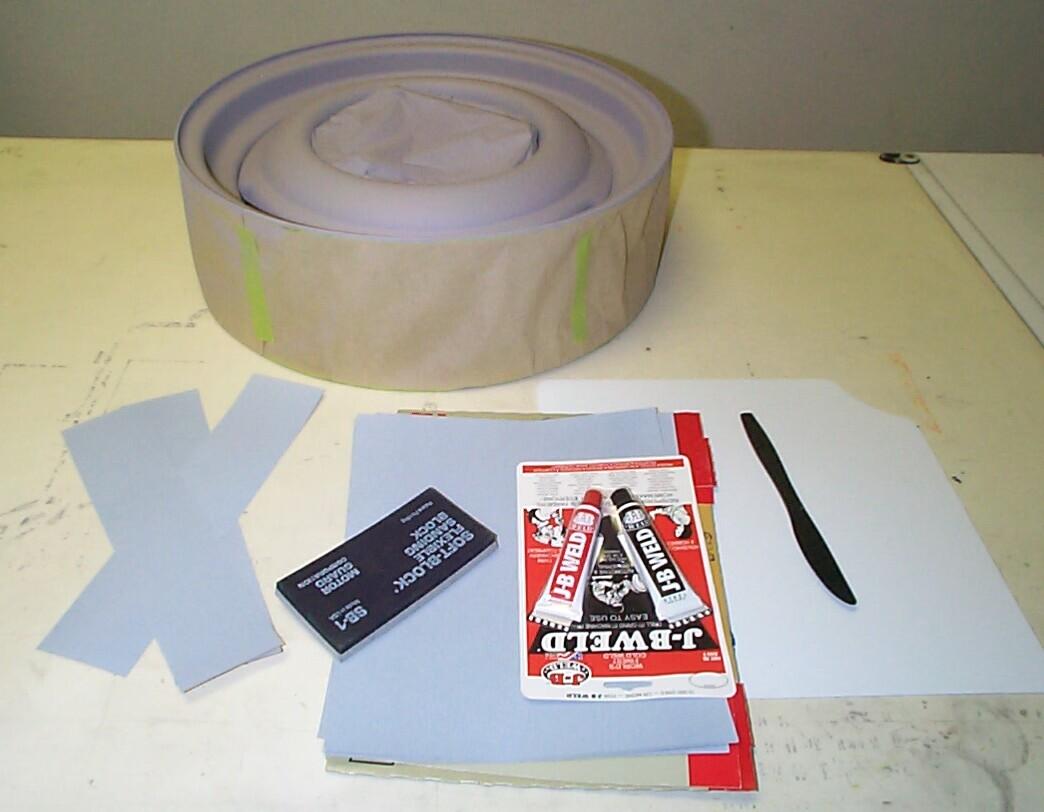 Gather
tools: 80 and 320 grit sandpaper, foam rubber sanding
block, JB Weld, plastic knife, plastic mixing board. The sanding papers
came from various vendors including LPL Bodyworks and
Autobodystore.com. the sanding block and mixing board came from
Eastwood and the JB Weld and plastic knife came from local sources. Not
shown is a electric machine eraser insert that I wrap in sandpaper to
sand the various recesses that are too restrictive for the sanding
block. Eraser inserts can be obtained at an art supplies house.
Gather
tools: 80 and 320 grit sandpaper, foam rubber sanding
block, JB Weld, plastic knife, plastic mixing board. The sanding papers
came from various vendors including LPL Bodyworks and
Autobodystore.com. the sanding block and mixing board came from
Eastwood and the JB Weld and plastic knife came from local sources. Not
shown is a electric machine eraser insert that I wrap in sandpaper to
sand the various recesses that are too restrictive for the sanding
block. Eraser inserts can be obtained at an art supplies house.
320 grit sanding: Sand the surfacer primer coats with 320 grit paper until all the pitting disappears and surface is smooth. I dry sand with strips of paper wrapped around foam block and eraser insert for the recesses. When the paper loads up I use compressed air to clean it for use again.
JB Weld: After the 320 grit sanding is finished, the masking is removed. If the inner rim area is pitted badly (usually around the valve hole), it is filled in with a batch of JB Weld epoxy. The JB Weld is mixed and applied with the plastic knife.
80 grit sanding: Sand the JB Weld smooth with 80 grit paper with strips of paper wrapped around foam block and eraser insert for the recesses.
2nd Epoxy Primer Application
The second epoxy primer coat is applied the same as above except that brush painting the seams is skipped this time.
Mount New Tire and Inner Tube
 Gather
tools and parts: Tire changer, tire valve tool, tire
lubricant, 1" throw-away paint brush, small needle-nose pliers, wire,
new tire and inner tube. The wire is .041" stainless steel wire from
Eastwood (for hanging powder coat parts). The tire and inner tube came
from M.E. Miller Tire Company of Ohio. The tire is a Super Transport
Tire 6.50x16 4-ply light truck tire with a 6-ply rating.
Gather
tools and parts: Tire changer, tire valve tool, tire
lubricant, 1" throw-away paint brush, small needle-nose pliers, wire,
new tire and inner tube. The wire is .041" stainless steel wire from
Eastwood (for hanging powder coat parts). The tire and inner tube came
from M.E. Miller Tire Company of Ohio. The tire is a Super Transport
Tire 6.50x16 4-ply light truck tire with a 6-ply rating.
Prep tire: Inflate the inner tube and wait for awhile to determine if it has any air leaks. Observe the location of the valve stem on the inflated tube to determine if it is on the inner tube centerline or if it is to one side or the other. If it is to one side, that side should be placed to the front of the wheel to match the valve stem opening in the wheel. Deflate the inner tube by removing the valve core with the tire valve tool. Replace the valve core. Blow out the tire casing with compressed air and place the inner tube within. Inflate the tube again just until it begins to take shape.
 Back
Bead: Secure wheel, valve side up, on the tire changer
pedestal. Spread tire lubricant on both sides of the back bead and on
the adjacent surface of the inner tube. Set the tire on top of the rim.
Hook the mount end of the mount/demount bar over the edge of the rim
(my preference is to start it adjacent to the valve stem hole). Push
the tire forward over the rim at the place the mounting bar is.
Position the bead so that it will slide across the flat portion of the
hook. Press down on the tire with one hand against the rim. Pull the
bar clockwise around the centerpost until the bead starts to mount on
the rim. Continue around the rim until the tire mounts over the edge of
the bead. Keep the mounted portion of the bead in the center of the rim
so that the tire has to stretch the least amount to get over the rim
edge.
Back
Bead: Secure wheel, valve side up, on the tire changer
pedestal. Spread tire lubricant on both sides of the back bead and on
the adjacent surface of the inner tube. Set the tire on top of the rim.
Hook the mount end of the mount/demount bar over the edge of the rim
(my preference is to start it adjacent to the valve stem hole). Push
the tire forward over the rim at the place the mounting bar is.
Position the bead so that it will slide across the flat portion of the
hook. Press down on the tire with one hand against the rim. Pull the
bar clockwise around the centerpost until the bead starts to mount on
the rim. Continue around the rim until the tire mounts over the edge of
the bead. Keep the mounted portion of the bead in the center of the rim
so that the tire has to stretch the least amount to get over the rim
edge.
 Front
Bead: Snake the inner tube valve stem through the valve
stem hole. Lubricate the front bead and repeat the above back bead
procedure. Do NOT seat beads. Deflate the inner tube again and fix a
wire around the stem below the valve cap with pliers. Push the valve
stem back into the inner rim area leaving the wire extending thru the
hole to fish it back out after final paint operations.
Front
Bead: Snake the inner tube valve stem through the valve
stem hole. Lubricate the front bead and repeat the above back bead
procedure. Do NOT seat beads. Deflate the inner tube again and fix a
wire around the stem below the valve cap with pliers. Push the valve
stem back into the inner rim area leaving the wire extending thru the
hole to fish it back out after final paint operations.
Single Stage Finish Paint
 Gather
Tools: masking paper and masking tape, 320 grit
sandpaper, foam rubber sanding block, JB Weld, plastic knife, plastic
mixing board, paint stand, nitrile gloves, paint prep, shop towels 3M
scuff pad, HVLP paint turbine, 1.0 nozzle, DuPont ChromaBase "Juniper
Green" Paint, automotive grade lacquer thinner, mixing cups, strainers,
paint rated respirator. The paint was mixed by Paintscratch.com.
Gather
Tools: masking paper and masking tape, 320 grit
sandpaper, foam rubber sanding block, JB Weld, plastic knife, plastic
mixing board, paint stand, nitrile gloves, paint prep, shop towels 3M
scuff pad, HVLP paint turbine, 1.0 nozzle, DuPont ChromaBase "Juniper
Green" Paint, automotive grade lacquer thinner, mixing cups, strainers,
paint rated respirator. The paint was mixed by Paintscratch.com.
Prep Wheel: Mask tire and and valve stem hole. Sand areas of the wheel damaged by the tire bar with 320 grit paper and spot prime bare metal with self-etching primer. Fill dings or chipped areas with a dab of JB Weld. Wait until cured and sand flush. Go over wheel with a 3M scuff pad and blow off. Mount wheel on paint stand. Put on nitrile gloves and apply paint prep. Wipe off with clean shop towels. Repeat if necessary. Let wheel dry thoroughly.
Mix paint: Assemble the gun with a 0.5 nozzle assembly. Mix the DuPont ChromaBase "Juniper Green" Paint and automotive grade lacquer thinner, in a 1:1 ratio in accord with the Paintscratch.com instructions. For one wheel I mixed about six ounces.
Apply paint: Put on respirator and apply two wet coats about twenty minutes apart.
Cleanup: Pour remaining paint, if any, into container for proper disposal. Run two ounces reducer through spray gun into a bucket. Disassemble gun and clean parts in lacquer thinner. Re-assemble gun lubricating with petroleum jelly in accord with the manual.
Pinstripping
 Gather
Tools: shop towels, lacquer thinner, Beugler
pinstripping tool, Sign Painters' 1-shot Lettering Enamel #116-L Ivory.
The pinstripping tool and paint were purchased from the Eastwood
Company.
Gather
Tools: shop towels, lacquer thinner, Beugler
pinstripping tool, Sign Painters' 1-shot Lettering Enamel #116-L Ivory.
The pinstripping tool and paint were purchased from the Eastwood
Company.
Prep Wheel: Put vehicle front end up on jackstands. Mount wheel on vehicle (two lug nuts snugged down will suffice). Put on nitrile gloves and clean paint surface with lacquer thinner. Make custom 1/8" diameter rod guide for pinstripping tool and mount under spindle nut.
Prep Pinstripping Tool: Fill pinstripping tool with Sign Painters' 1-shot Lettering Enamel #116-L Ivory and do a couple of test runs on scrap paper.
Pinstripe Wheel: Clamp Beugler pinstripping tool on guide rod carefully and paint first pinstripe by holding tool against wheel and rotating wheel steady and slow with other hand. Re-position and clamp pinstripping tool and lay down a second concentric stripe.
Cleanup: Remove wheel from vehicle. Re-mount original wheel and put vehicle back on the ground. Clean pinstripping tool with lacquer thinner.
Inflating and Wheel Balancing
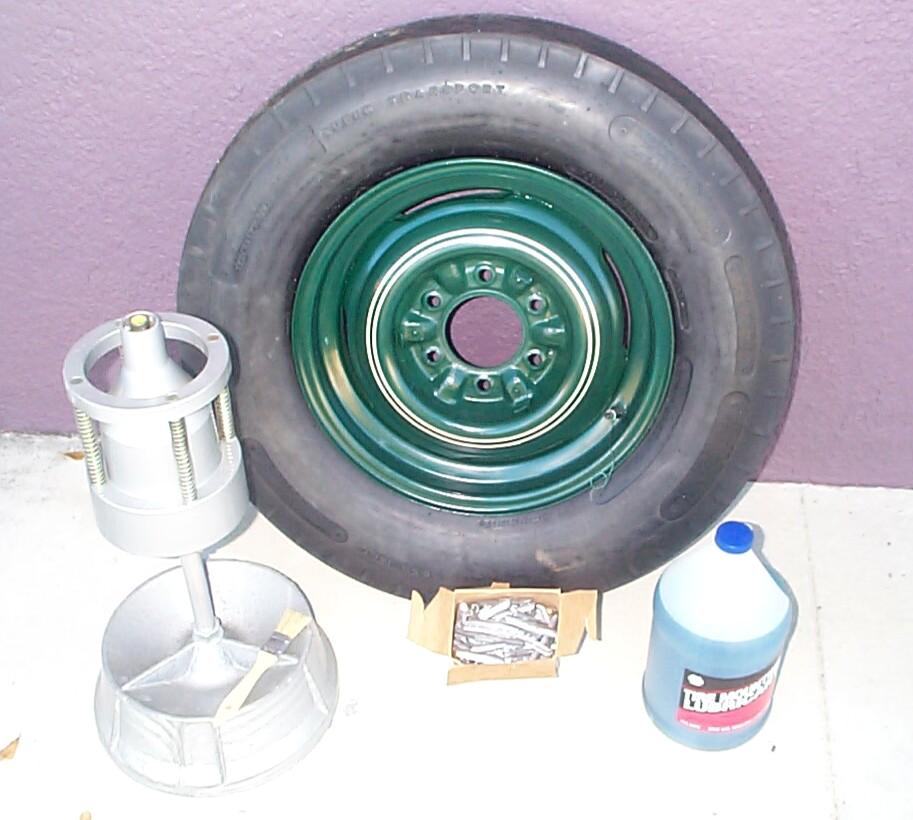 Gather
Tools: air compressor, tire valve tool, tire lubricant,
1" throw away brush, static tire balancer, lead wheel weights. The tire
balancer came from Harbor Freight and the wheel weights from J.C.
Whitney Company.
Gather
Tools: air compressor, tire valve tool, tire lubricant,
1" throw away brush, static tire balancer, lead wheel weights. The tire
balancer came from Harbor Freight and the wheel weights from J.C.
Whitney Company.
Prep and Inflate Tire: Remove masking from tire. Fish valve stem through wheel hole with wire assist. Spread tire lubricant on front and rear tire beads with 1" brush. Inflate tire to 45 psi and observe for leaks. Deflate tire completely and remove valve core. Check to see that beads have seated. Replace valve core and inflate to normal operating pressure.
Balance Tire: Set up static tire balancer on level surface and calibrate if necessary. Center wheel/tire combo, front side up, on static balancer and allow to settle. Rest lead weights on outer wheel rim, incrementally, until balance bubble is centered. Mark weight location and remove wheel from balancer. Put half the required weight on the outer rim and half on the inner rim (e.g. If the required weight is 1-1/2 oz, choose two weights of 3/4" oz and mount at the same place on front and back rims).
You can email me at ![]() webmaster@laroke.com
webmaster@laroke.com
Issued Monday September 19, 2005
Updated Tuesday April 24, 2018
copyright © 1996-2018 Larry Robert Kephart all rights reserved
| | LRK Home | | Bio Info | | Krash Khronicles | | LAROKE | |
| | BettyLou | | BillyBob's Garage | | Rat Patrol | | Deerslayer | | Elvira | |
| | Land of the Free and Home of the Brave | |
| | Keppylou's Art | | WWI Soldier's Diary | |