| | LRK Home | | Bio Info | | Krash Khronicles | | LAROKE | |
| | BettyLou | | BillyBob's Garage | | Rat Patrol | | Deerslayer | | Elvira | |
| | Land of the Free and Home of the Brave | |
| | Keppylou's Art | | WWI Soldier's Diary | |
BillyBob Work-in-Progress Log
![]()
WHAT'S NEW is a chronological listing of updates to the BillyBob site.
![]()
TRUCK LINKS including vendor sites for old parts, custom parts, and tools as well as sites for classic car and truck organizations
STORE Operating in association with Amazon.com, books, recordings and tools can be purchased.
PLANNING for the restoration including project schedule and cost estimates.
![]()
TRAVELS WITH BILLYBOB With apologies to Steinbeck, this area of BillyBob's Garage will be used to log the trips BillyBob and I make together.
WORK-IN-PROGRESS is the restoration of parts of BillyBob that I can accomplish without a garage.
PRE-RESTORATION includes log entries of minor repairs and adventures between time of purchase and the time when I started restoration, a piece at a time.
JR'S KORNER JR's Korner is the history of BillyBob before I got him authored by my brother, Wm. C. Kephart.
![]()
BILLYBOB MAINTENANCE Ever changing detailing, oil change, lube, etc. maintenance routines specifically developed for BillyBob, including required tools, materials and procedures.
STEALTH SHOP Urban residence design with large integrated shop and separate living quarters for a relative or renter.
![]()
You will need the Adobe Acrobat browser plugin to view these wiring diagrams which are in the PDF file format. This format allows zooming and panning. If you don't have this plugin, it can be downloaded and installed (free) from the Adobe site. The button below will take you there.
![]()
BILLYBOB WIRING DIAGRAM Here's the wiring diagram updated with BillyBob's current state 'cepting the third-party strap-on turn-signal director.
STRAP-ON TURN-SIGNAL DIRECTOR/BRAKE LIGHT CIRCUIT This turn signal and brake light circuit diagram shows the current state of the third-party turn-signal director wiring, which will remain in place until I figure out the problems with the OEM turn-signal director. It also shows the OEM headlight switch.
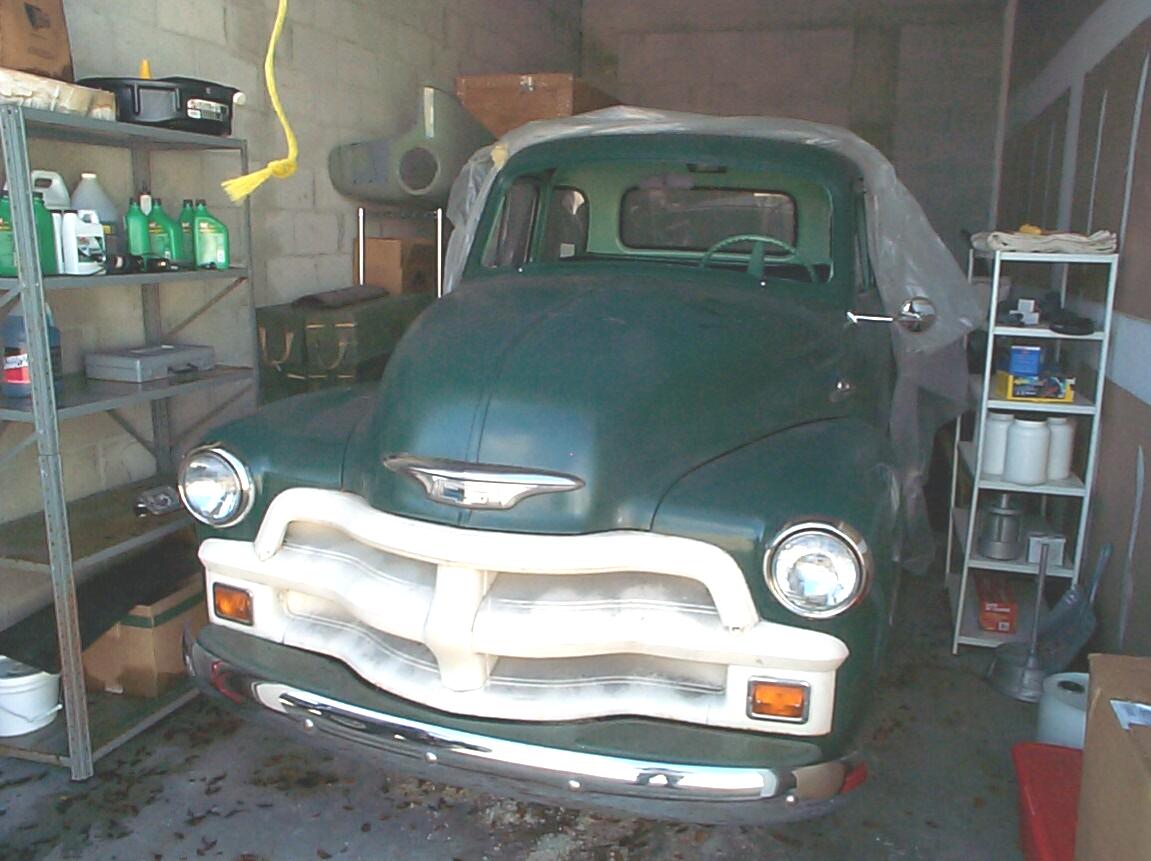
33. Windshield Epic - A gasket too far
 July
3rd 2004 Muggy with a
forty percent chance of rain. Dragged out the tools and started in on
working the Metal-to-Metal filler with the Norton Speedlock System (24
grit disks) and Tight Spot sandpaper cones (80 grit) in the air angle
grinder, along with 36 grit sandpaper by hand wrapped around a flexible
sanding block. Also started working the rest of the windshield opening
pinch weld to get rid of surface rust and the remnants of elephant snot
gasket sealer.
July
3rd 2004 Muggy with a
forty percent chance of rain. Dragged out the tools and started in on
working the Metal-to-Metal filler with the Norton Speedlock System (24
grit disks) and Tight Spot sandpaper cones (80 grit) in the air angle
grinder, along with 36 grit sandpaper by hand wrapped around a flexible
sanding block. Also started working the rest of the windshield opening
pinch weld to get rid of surface rust and the remnants of elephant snot
gasket sealer.
 July
4th 2004 Independence day
Today we celebrate our independence from Great Britain. I think it's
time we draft another declaration to send to the United Nations.
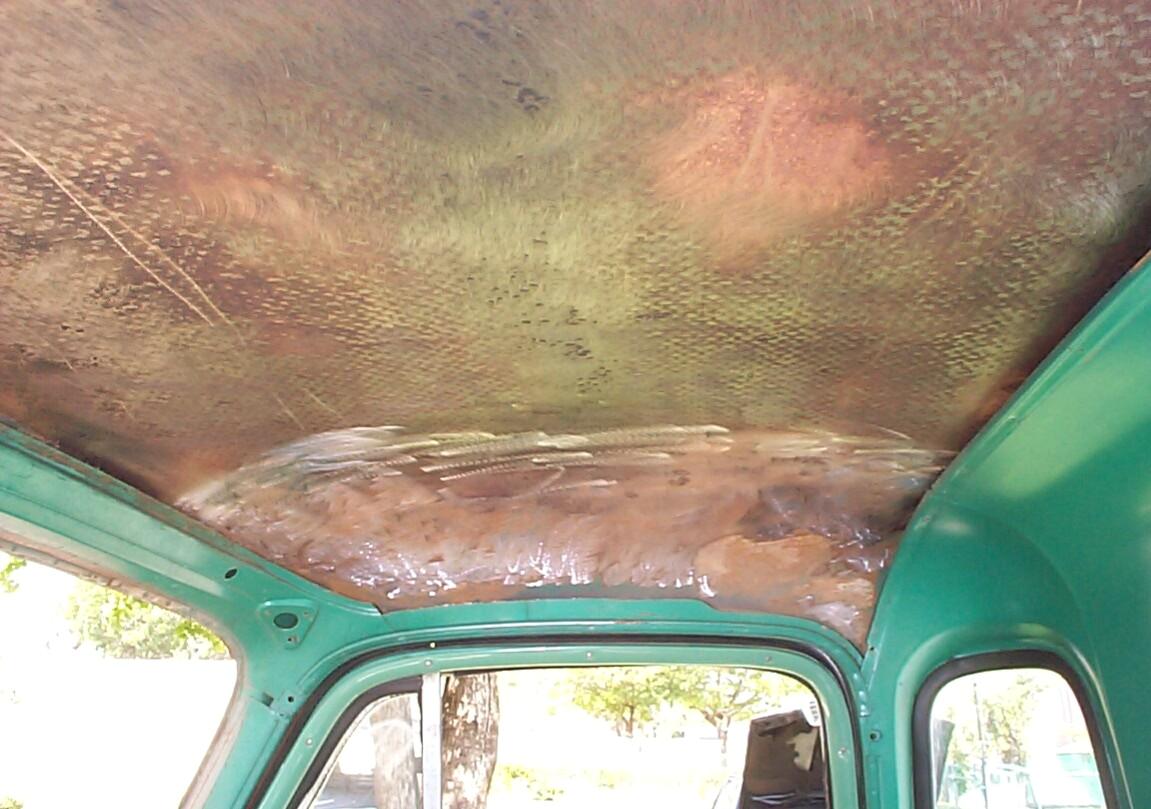
Finished up yesterday by working on the roof headliner area. It still
has remnants of the original tarpaper and great gawdawful globs of
petrified contact cement with tufts of that horrible retro carpet still
embedded in it. I want to take this area down to bare metal and prime
it for painting. I took the high spots off with a 3M Cleaning Disk in
the electric drill. Then continued with the Norton Speedlock 24 grit
disks in the air angle grinder. This is dirty work and I've taken to
wearing goggles and respirator even when hand sanding. Final act of the
day was painting the headliner roof area with two coats of rattlecan
rust encapsulator. I made it just before the thunderclouds started
rolling in.
July
4th 2004 Independence day
Today we celebrate our independence from Great Britain. I think it's
time we draft another declaration to send to the United Nations.
Finished up yesterday by working on the roof headliner area. It still
has remnants of the original tarpaper and great gawdawful globs of
petrified contact cement with tufts of that horrible retro carpet still
embedded in it. I want to take this area down to bare metal and prime
it for painting. I took the high spots off with a 3M Cleaning Disk in
the electric drill. Then continued with the Norton Speedlock 24 grit
disks in the air angle grinder. This is dirty work and I've taken to
wearing goggles and respirator even when hand sanding. Final act of the
day was painting the headliner roof area with two coats of rattlecan
rust encapsulator. I made it just before the thunderclouds started
rolling in.
 July
5th 2004 We had monday
off at the Krash Lab and it was hot and sunny. I spent the day with
Metal-to-Metal filler and sandpaper. By mid-afternoon I was close to
the final shapes of dashboard and cowl. I only have one or two more
applications of filler left before the next step, I think.
July
5th 2004 We had monday
off at the Krash Lab and it was hot and sunny. I spent the day with
Metal-to-Metal filler and sandpaper. By mid-afternoon I was close to
the final shapes of dashboard and cowl. I only have one or two more
applications of filler left before the next step, I think.
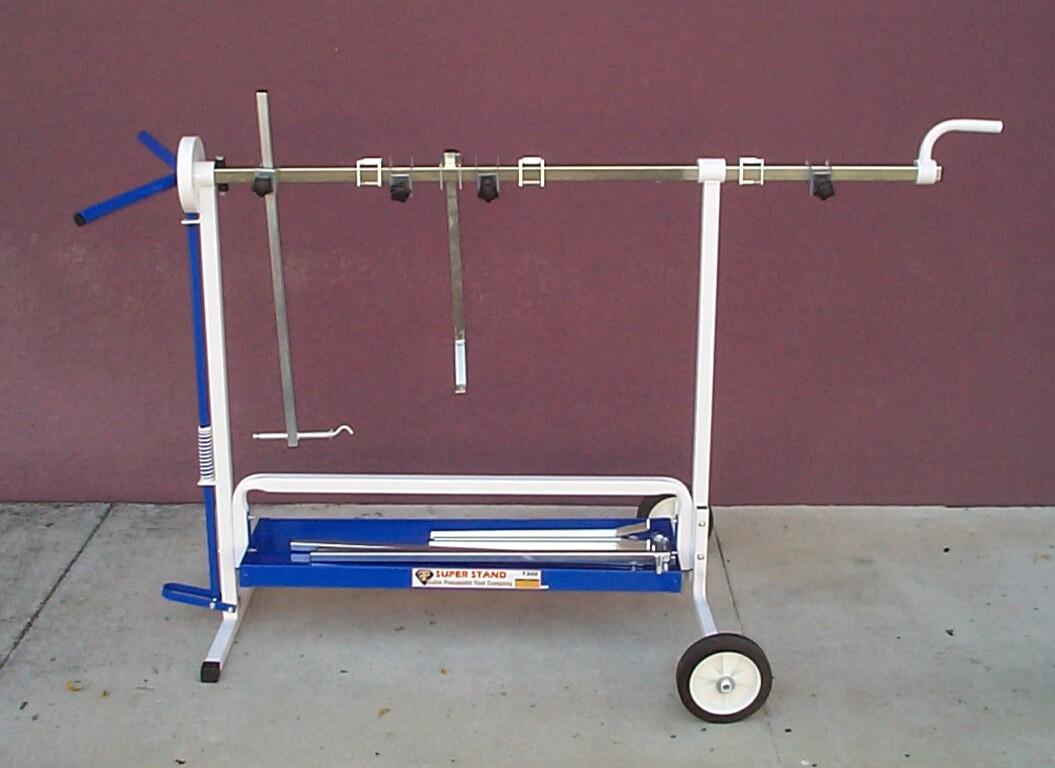 July
10th 2004 Good weather
again, today. Got a delivery from Eastwood
earlier in the week. A "Universal Rotating Parts Work Stand" that has
to be assembled. I did that first. This thing is pretty nifty and will
hold and rotate doors, hood, fenders and smaller items on hooks for
painting, powdercoating, sanding, grinding, whatever. At $169, it was
hard to pass up. It has four "suspension arms" and four "prop arms"
that can be adjusted just about anyway you want. Eastwood lists this
thing as imported but doesn't say from where. Turns out to be red
China. Quality is pretty good considering. As BillyBob garage visitors
have noted, I get a lot of stuff from Eastwood so I finally joined
their buyer's club a couple of months ago. Gives me free shipping on
everything. Now my big problem today is to figure out how to fit this
new toy in the shed with all the other stuff.
July
10th 2004 Good weather
again, today. Got a delivery from Eastwood
earlier in the week. A "Universal Rotating Parts Work Stand" that has
to be assembled. I did that first. This thing is pretty nifty and will
hold and rotate doors, hood, fenders and smaller items on hooks for
painting, powdercoating, sanding, grinding, whatever. At $169, it was
hard to pass up. It has four "suspension arms" and four "prop arms"
that can be adjusted just about anyway you want. Eastwood lists this
thing as imported but doesn't say from where. Turns out to be red
China. Quality is pretty good considering. As BillyBob garage visitors
have noted, I get a lot of stuff from Eastwood so I finally joined
their buyer's club a couple of months ago. Gives me free shipping on
everything. Now my big problem today is to figure out how to fit this
new toy in the shed with all the other stuff.
![]() It won't be long until I'm
ready to paint the upper half of the cab interior so, I ordered a pint
of paint from paintscratch online early in the
week. Took until yesterday for them to execute the order and that
prompted a series of e-mails back 'n forth between a fella named Collin
from Paintscratch and me. Seems their database isn't quite right and
the "Light Green GRN" I'd ordered from the website did not actually
exist. Collin gave me three choices of which "Surf Green 541/555"
(shown above right) seemed close to me. I e-mailed that choice back
with the explanation that I was painting the whole cab interior and not
trying to repair existing paint so color match was not critical. Not
long after, Collin replied saying he was mixing up "SS-Fern Green
GS335" as Surf Green was not a light green. Coulda fooled me but
computer screens, printers and the "real thing" can vary wildly so I
wrote back that that was OK. We'll see how this works out down the
line. As I've said before, we're not going Concours here. I'm shooting
for a "spiritual" restoration and a light green in the fifties spirit
will be good enuf. I visited Paintscratch afterwards and was pleased to
see they corrected the database as a result of this order.
It won't be long until I'm
ready to paint the upper half of the cab interior so, I ordered a pint
of paint from paintscratch online early in the
week. Took until yesterday for them to execute the order and that
prompted a series of e-mails back 'n forth between a fella named Collin
from Paintscratch and me. Seems their database isn't quite right and
the "Light Green GRN" I'd ordered from the website did not actually
exist. Collin gave me three choices of which "Surf Green 541/555"
(shown above right) seemed close to me. I e-mailed that choice back
with the explanation that I was painting the whole cab interior and not
trying to repair existing paint so color match was not critical. Not
long after, Collin replied saying he was mixing up "SS-Fern Green
GS335" as Surf Green was not a light green. Coulda fooled me but
computer screens, printers and the "real thing" can vary wildly so I
wrote back that that was OK. We'll see how this works out down the
line. As I've said before, we're not going Concours here. I'm shooting
for a "spiritual" restoration and a light green in the fifties spirit
will be good enuf. I visited Paintscratch afterwards and was pleased to
see they corrected the database as a result of this order.
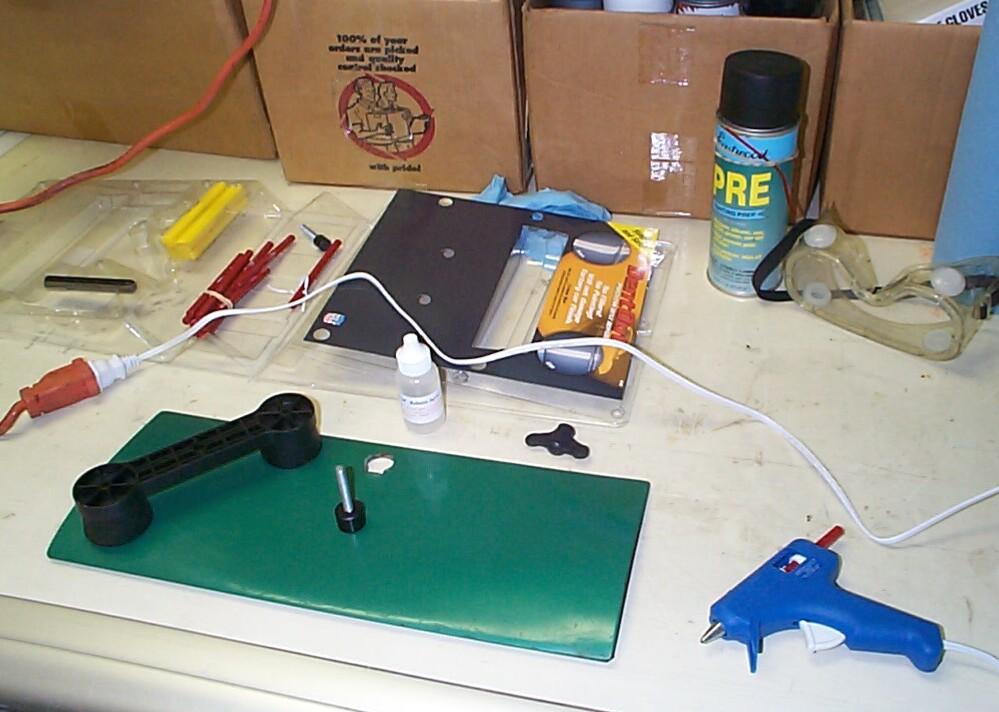
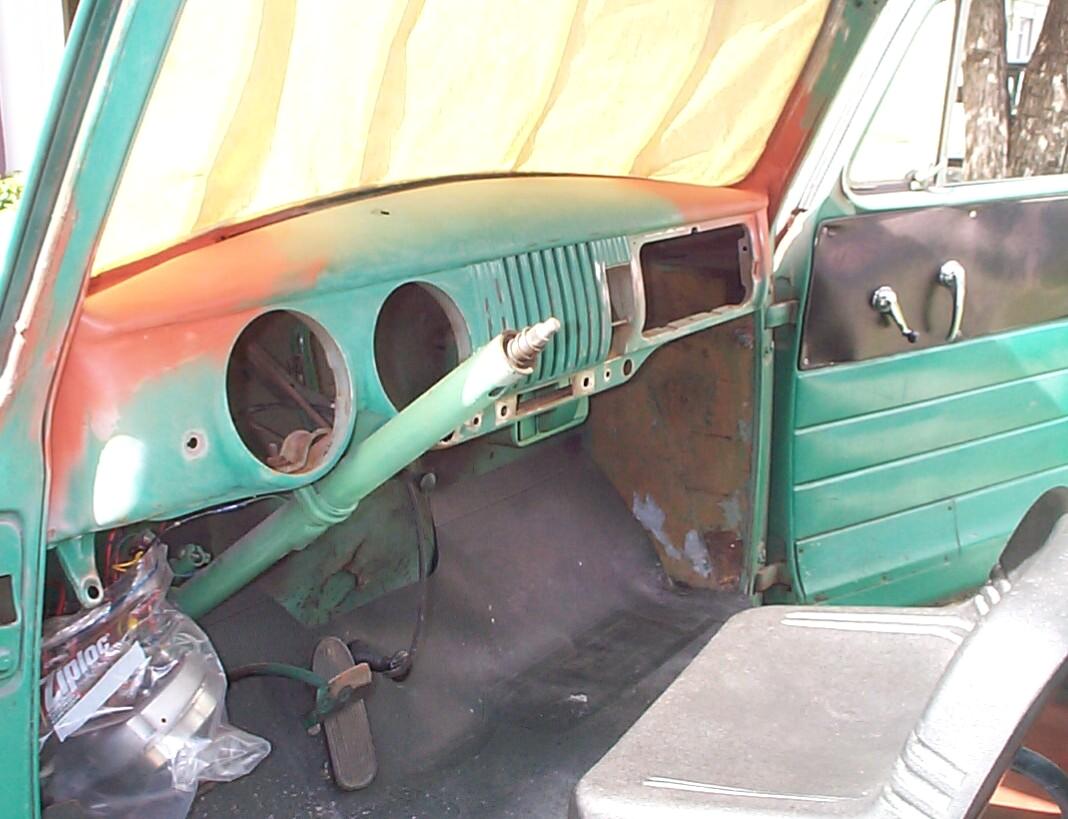
Sanded down last week's Metal-to-Metal filler application, then applied the first Evercoat Polyester Glazing Putty coat . . . ~!@#$%^ I blew off the work area with compressed air but forgot to PRE Paint Prep the area before the glazing putty application. Well, we'll just have to see how well it sticks tomorrow when I sand most of it off again. Going to stop off at the warehouse on my way home to the Krash Pad today and pick up the glove compartment door and ash tray. Plan on painting these items when I paint the cab and they need to be prepared.
 July
11th 2004 Gonna
mediablast the ashtray because of all its nooks and crannies. It also
has substantial surface rust. The front of the glove compartment door
is caved in (looks like a knee did it). I'm still pondering how to
approach the dent repair. The back has a couple of insurance stickers
from a Hollywood, California agency and some handwriting I can't quite
make out - looks like three sets of "Guy & Gal" appletree
carvings. I'm gonna try to preserve as much of this BillyBob history as
possible by gently cleaning the back with detergent and toothbrush.
July
11th 2004 Gonna
mediablast the ashtray because of all its nooks and crannies. It also
has substantial surface rust. The front of the glove compartment door
is caved in (looks like a knee did it). I'm still pondering how to
approach the dent repair. The back has a couple of insurance stickers
from a Hollywood, California agency and some handwriting I can't quite
make out - looks like three sets of "Guy & Gal" appletree
carvings. I'm gonna try to preserve as much of this BillyBob history as
possible by gently cleaning the back with detergent and toothbrush.
Gave the glove box door one cleaning treatment with simple green and water and got it 'bout half way clean. Finished up the day sanding yesterday's glazing putty application by hand with 80 grit paper.
July 17th 2004 Started out today sanding down the glazing putty coat and applying another. Continued sanding that when it set up until two in the afternoon when the sky dumped a bucket of water on the shadetree garage. Managed to get BillyBob and the air compressor covered in the first minute of rain. It rained hard just long enuf to make BillyBob's garage into a swamp.
 Retreated
into the Krash Lab and went to work on the glove box door again. Last
sunday, I ordered a "Glue-on Dent Repair Kit" (#52231) from Eastwood
Company. I wanted to try this "painless" method to pull the dent out of
the glove box door first. At $49, it's much cheaper than a stud welder
too. It arrived by thursday. You start by heating up a glue stick in a
small gun. Next, you clean mating surfaces of the tool and dent area
where the glue will be applied with release agent. Then apply the
melted glue to the dent lifter and apply the lifter to the dent and
hold it in place for ten seconds. Finally, the cross bar is placed over
the dent lifter and the wingnut screwed down to lift the dent.
Afterwards, the glue is removed with more release agent. It worked
pretty good with the glove box door. After several pulls in different
areas, the door was starting to resume it's original shape.
Retreated
into the Krash Lab and went to work on the glove box door again. Last
sunday, I ordered a "Glue-on Dent Repair Kit" (#52231) from Eastwood
Company. I wanted to try this "painless" method to pull the dent out of
the glove box door first. At $49, it's much cheaper than a stud welder
too. It arrived by thursday. You start by heating up a glue stick in a
small gun. Next, you clean mating surfaces of the tool and dent area
where the glue will be applied with release agent. Then apply the
melted glue to the dent lifter and apply the lifter to the dent and
hold it in place for ten seconds. Finally, the cross bar is placed over
the dent lifter and the wingnut screwed down to lift the dent.
Afterwards, the glue is removed with more release agent. It worked
pretty good with the glove box door. After several pulls in different
areas, the door was starting to resume it's original shape.
 July
18th 2004 Continued
hand sanding the glazing putty coat down with 80 grit paper. Got rained
on again late morning but not enuf to flood the shadetree garage and
make it necessary to suspend operations. Early afternoon and I applied
a couple of coats of filler primer to get an idea of where I was at.
Getting close but not enough to hand out the cigars yet. Still a few
spots that will need more glazing putty. and lottsa sanding yet.
July
18th 2004 Continued
hand sanding the glazing putty coat down with 80 grit paper. Got rained
on again late morning but not enuf to flood the shadetree garage and
make it necessary to suspend operations. Early afternoon and I applied
a couple of coats of filler primer to get an idea of where I was at.
Getting close but not enough to hand out the cigars yet. Still a few
spots that will need more glazing putty. and lottsa sanding yet.
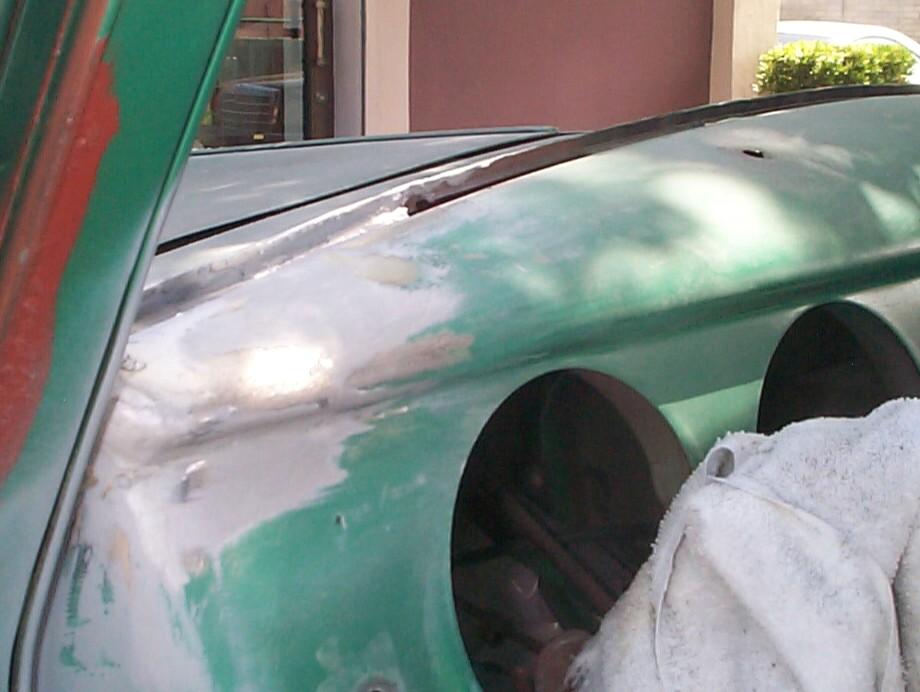
Finished up the day by sanding down the filler primer I had sprayed on the passenger side months ago with 180 grit sandpaper and applying another coat of filler primer . . . Looks good. I'll be ready for paint on this side soon.
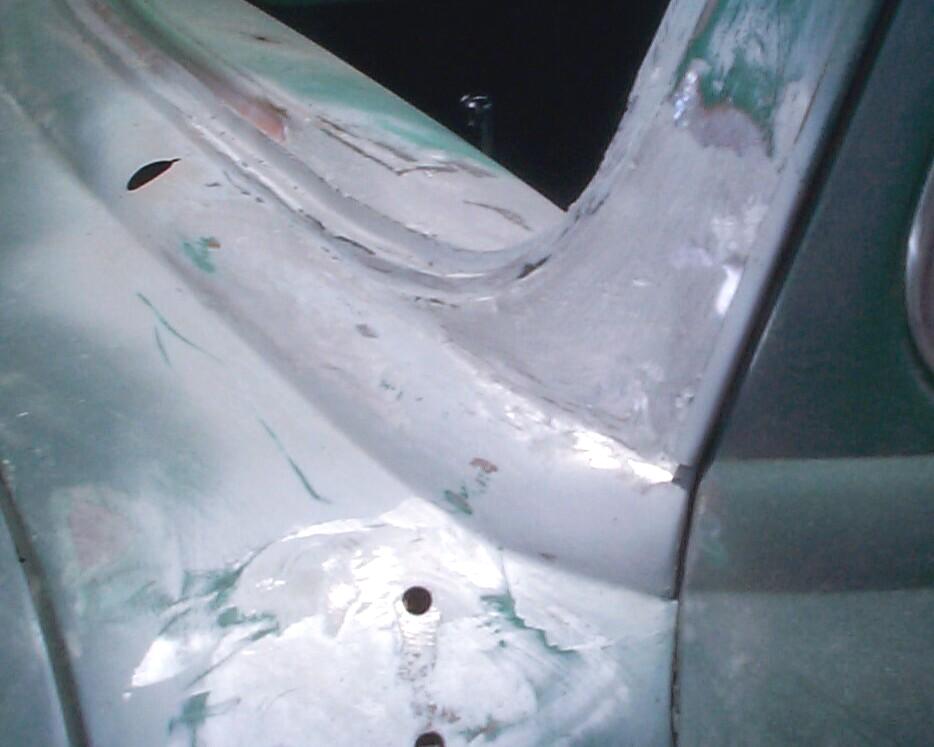
July 25th 2004 Good weather yesterday and I spent it getting the area outside of the pinch weld ready for rattlecan "Dark Hunter Green" Rustoleum. This consisted of several more iterations of glazing putty, filler primer and surfacer and sanding. When I got it up to a stage I "good enough for government work" level, I quit for the day.
This morning, while performing Panzerwagon maintenance, I began prepping the outside cowl, windshield posts, and roof edge for painting. The area was lightly sanded and blown off with compressed air. The whole area was roughed up some more with a 3M Scuff Pad, then washed with soap and water and dried with a towel. Then, the cowl vent was removed to clean the gunk out of the channel and to mask off the gasket.
 I
was half way thru back taping and masking the windshield opening when
first, one big drop, then several, then hundreds, then thousands began
to fall. I got the plastic and cover over BillyBob, then slinked inside
to wait out the rain ~!@#$%^ . . . It's
only ten-thirty, but I won't be doin' anymore paint prep on BillyBob
today. The passing storm is a real gully washer and the shadetree
garage is flooded. The car cover is susceptible to ripping, and trying
to manhandle it back off when it's wet and heavy is just asking for
trouble. Curses!
I
was half way thru back taping and masking the windshield opening when
first, one big drop, then several, then hundreds, then thousands began
to fall. I got the plastic and cover over BillyBob, then slinked inside
to wait out the rain ~!@#$%^ . . . It's
only ten-thirty, but I won't be doin' anymore paint prep on BillyBob
today. The passing storm is a real gully washer and the shadetree
garage is flooded. The car cover is susceptible to ripping, and trying
to manhandle it back off when it's wet and heavy is just asking for
trouble. Curses!
 July
31st 2004 Hot and
muggy. There's a storm system over the Bahamas and it's bumpin' the
coast on its way north to the Carolinas. Chance of rain is forecast at
60%. Looks like the Krash Lab had a power outage last night that ran
down the UPS batteries. I had to spend an hour coaxing the servers back
online. I eventually got around to dragging out the tools and finishing
the windshield opening masking. Then the area was PRE Paint Prepped and
bare metal spots were given a shot of Eastwood's Self-Etching Primer.
July
31st 2004 Hot and
muggy. There's a storm system over the Bahamas and it's bumpin' the
coast on its way north to the Carolinas. Chance of rain is forecast at
60%. Looks like the Krash Lab had a power outage last night that ran
down the UPS batteries. I had to spend an hour coaxing the servers back
online. I eventually got around to dragging out the tools and finishing
the windshield opening masking. Then the area was PRE Paint Prepped and
bare metal spots were given a shot of Eastwood's Self-Etching Primer.
 By
eleven, I was ready for the rattlecan "Dark Hunter Green" Rustoleum.
The weather was still holding so, I went for it. A half hour later, a
second coat was applied to the pinch weld area. I probably got it on a
little heavy 'cause it crinkled a bit in a few places. These areas are
under the gasket so I'm not overly concerned. There are still
imperfections in the cowl area and around the windshield but not as
many as before. This is still Stage I work and won't be addressed until
sometime down the road when the "Juniper Green" automotive paint is
applied. My current goal is to protect the pinch weld area under the
windshield gasket from corrosion. Now, I'm keepin' an eye on the sky
and letting it cure in the open air as long as possible before putting
the drop cloth plastic and car cover back on for today.
By
eleven, I was ready for the rattlecan "Dark Hunter Green" Rustoleum.
The weather was still holding so, I went for it. A half hour later, a
second coat was applied to the pinch weld area. I probably got it on a
little heavy 'cause it crinkled a bit in a few places. These areas are
under the gasket so I'm not overly concerned. There are still
imperfections in the cowl area and around the windshield but not as
many as before. This is still Stage I work and won't be addressed until
sometime down the road when the "Juniper Green" automotive paint is
applied. My current goal is to protect the pinch weld area under the
windshield gasket from corrosion. Now, I'm keepin' an eye on the sky
and letting it cure in the open air as long as possible before putting
the drop cloth plastic and car cover back on for today.
 August
1st 2004 The rains hit
me yesterday 'bout one in the afternoon. Today, I took the seat and
dome light out and started preparing the back of the cab area for
painting by hand-sanding with 80 grit paper. I wasn't quite finished
when my "Trucks"
TV program was just interrupted with a "Severe thunderstorm and tornado
warning" so, I guess it's time to pack it up for today.
August
1st 2004 The rains hit
me yesterday 'bout one in the afternoon. Today, I took the seat and
dome light out and started preparing the back of the cab area for
painting by hand-sanding with 80 grit paper. I wasn't quite finished
when my "Trucks"
TV program was just interrupted with a "Severe thunderstorm and tornado
warning" so, I guess it's time to pack it up for today.
August 6th 2004 A couple of weeks ago, my interior paint from paintscratch.com arrived. It's DuPont! Curses!! The instructions on the can list the same kind of DuPont mixing products that I couldn't obtain the last time I went thru this exercise. I read the instructions from the Paintscratch.com site more closely and they state that I can use the DuPont products or mix the paint in a one-to-one ratio with "automotive lacquer thinner" (not the stuff from Home Depot). OK then. I traveled to a Sherwin Williams automotive paint jobber up the coast in Delray Beach today. Ended up coming back with a five gallon bucket of lacquer thinner. Most of their customers are auto body shops and it was the smallest size container they carry. I am now well supplied with lacquer thinner.
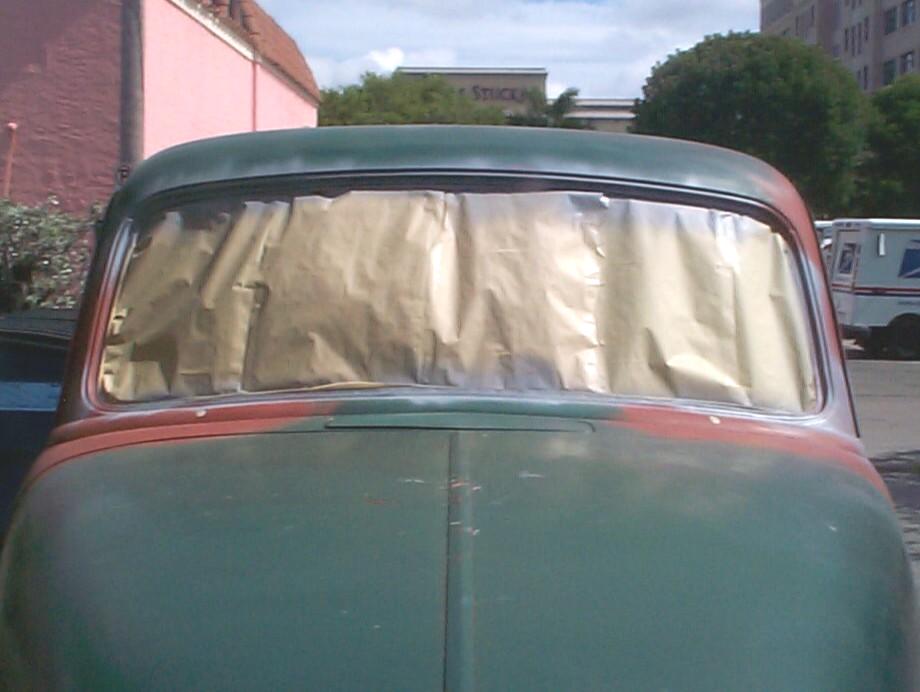
 August
7th 2004 Hot and humid,
dog days of summer. Removed the masking tape and paper from the inside
windshield opening and cowl vent gutter. Re-installed the cowl vent.
Began back taping the windshield opening again, this time from the
outside. Then, interior areas to be painted were treated with the 3M
Paint Stripping Wheel in the electric drill. Stopped long enough to
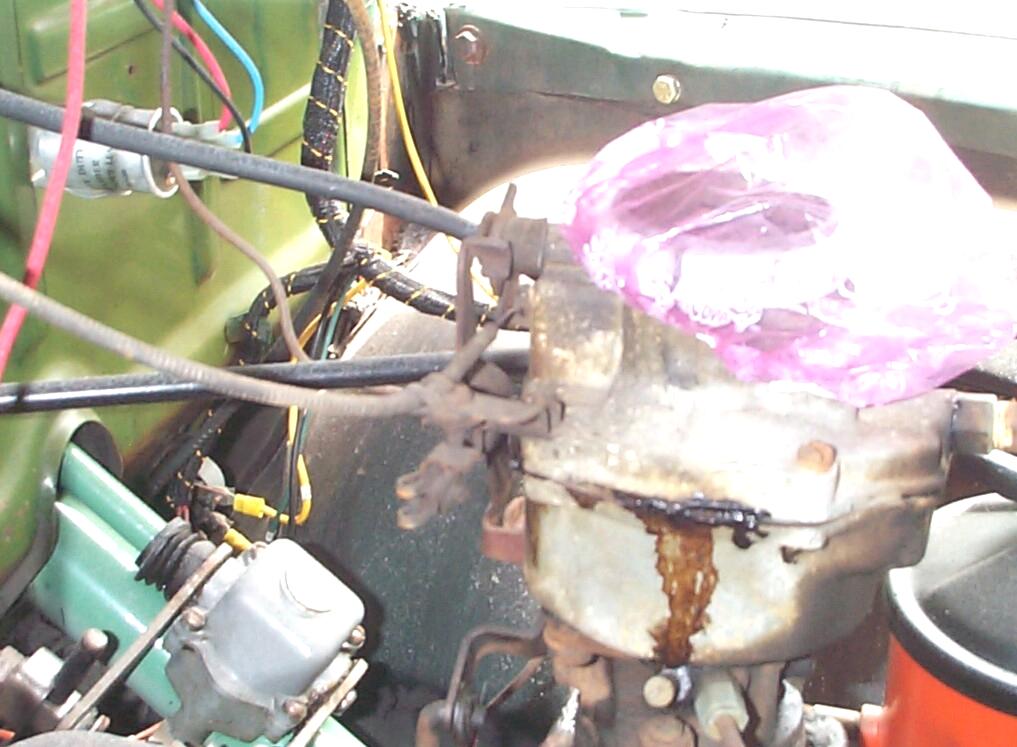
remove the three-on-the-tree lever and the choke cable. Took a pic of
the choke at the carby so I could get it back together again.
Afterwards, I connected the choke cable back up in the engine
compartment. It's hurricane season and I may have to move BillyBob on
short notice. The fewer things I have to put back in place, the better.
A little later on I stopped to remove the emergency brake release rod.
The rain rolled in shortly after two in the afternoon and shut me down
for the day.
August
7th 2004 Hot and humid,
dog days of summer. Removed the masking tape and paper from the inside
windshield opening and cowl vent gutter. Re-installed the cowl vent.
Began back taping the windshield opening again, this time from the
outside. Then, interior areas to be painted were treated with the 3M
Paint Stripping Wheel in the electric drill. Stopped long enough to
remove the three-on-the-tree lever and the choke cable. Took a pic of
the choke at the carby so I could get it back together again.
Afterwards, I connected the choke cable back up in the engine
compartment. It's hurricane season and I may have to move BillyBob on
short notice. The fewer things I have to put back in place, the better.
A little later on I stopped to remove the emergency brake release rod.
The rain rolled in shortly after two in the afternoon and shut me down
for the day.
August 8th 2004 Was optimistically hoping to paint the interior of the cab today but the rain yesterday cut into my prep time. Today, after Renegade and Panzerwagon maintenance, I started going over the inside of the cab again, this time with the 3M Scuff Pad, supplemented with 180 grit sandpaper at rough spots. Then, the ~!@#$%^ rain hit me again shortly after eleven. It rained hard enuf and long enuf that I won't be pulling off the cover again until next week.
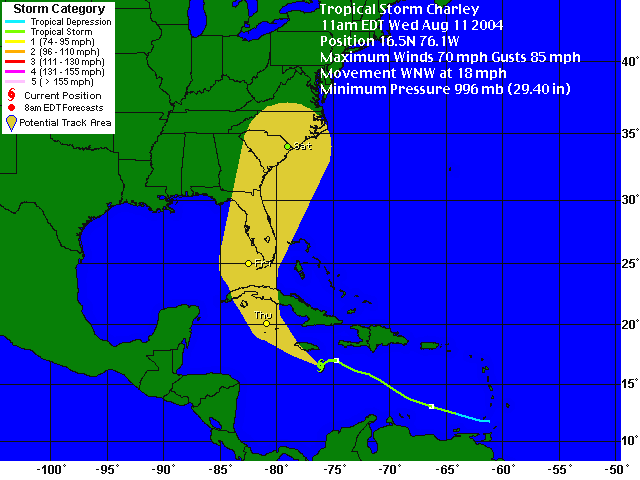 August
11th 2004 Two tropical
storm systems are gonna tag team Florida. Bonnie and Charley will make
landfall in the next couple of days . . . but where exactly? That is
the question. Will Charley track to the east and hit us or will it
track to the west and brush by us? Should I sit tight or should I put
BillyBob back together and get him up to the warehouse? Tomorrow
morning is probably the latest that I can delay the decision. I have a
small appreciation of how Ike felt on the fifth of June, 1944. AAARRRRUUUGH!
August
11th 2004 Two tropical
storm systems are gonna tag team Florida. Bonnie and Charley will make
landfall in the next couple of days . . . but where exactly? That is
the question. Will Charley track to the east and hit us or will it
track to the west and brush by us? Should I sit tight or should I put
BillyBob back together and get him up to the warehouse? Tomorrow
morning is probably the latest that I can delay the decision. I have a
small appreciation of how Ike felt on the fifth of June, 1944. AAARRRRUUUGH!
 August
14th 2004 Breezy and a
bit uneasy but no rain in sight yet. Yesterday, Friday the 13th,
OldCarKook (Rob English) wrote over at the OldGMCTrucks
forum that I dodged a bullet. That bullet's name was
Hurricane Charley. It passed by us here in Boca Raton but cut a wide
swath of destruction thru the middle of the State on it's way to the
Atlantic Seaboard. I had decided on thursday morning not to move
BillyBob up to his barn. My storm gut told me we would not be hit. I
would have lost this weekend of truck work if I had. I continued with
last Sunday's task of working the cab interior with the 3M Scuff Pad
and 180 grit sandpaper.
August
14th 2004 Breezy and a
bit uneasy but no rain in sight yet. Yesterday, Friday the 13th,
OldCarKook (Rob English) wrote over at the OldGMCTrucks
forum that I dodged a bullet. That bullet's name was
Hurricane Charley. It passed by us here in Boca Raton but cut a wide
swath of destruction thru the middle of the State on it's way to the
Atlantic Seaboard. I had decided on thursday morning not to move
BillyBob up to his barn. My storm gut told me we would not be hit. I
would have lost this weekend of truck work if I had. I continued with
last Sunday's task of working the cab interior with the 3M Scuff Pad
and 180 grit sandpaper.
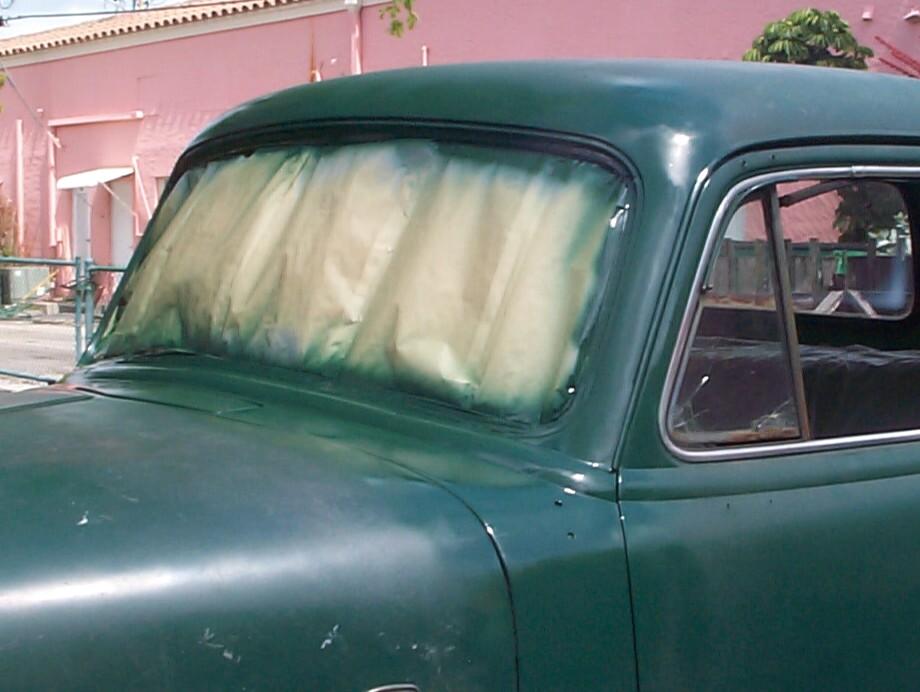
Next, the cab was blown out with compressed air and cleaned with an application of PRE Paint Prep including the rear window gaskets, that had been treated previously with protectant, so that masking tape would stick to them. After that, masking was continued including back taping the glove box opening, defroster vent slots, screw holes, wiper knob hole, ashtray opening, speaker grille, lighter, throttle knob, radio and knob openings, choke knob and ignition switch openings, gauge cluster and headlight switch openings.
 Then
I had to run off to Discount Auto Parts for more masking tape. Next,
the "Nu Vue" rear quarter windows and back window were masked. Tape was
stuffed in the door windlass channels to keep them free of any more
paint. The top of the steering column was taped off. Finally, a two mil
plastic painter's drop coth was taped into the bottom half of the cab
to cover the areas not being painted. The doors were protected with
large plastic trash bags. I didn't mask the door frame area and I'm not
doing that until a later date. I finished up the day by PRE Paint
Prepping and Self-Etch Primering bare spots where the sanding had taken
me down to bare metal.
Then
I had to run off to Discount Auto Parts for more masking tape. Next,
the "Nu Vue" rear quarter windows and back window were masked. Tape was
stuffed in the door windlass channels to keep them free of any more
paint. The top of the steering column was taped off. Finally, a two mil
plastic painter's drop coth was taped into the bottom half of the cab
to cover the areas not being painted. The doors were protected with
large plastic trash bags. I didn't mask the door frame area and I'm not
doing that until a later date. I finished up the day by PRE Paint
Prepping and Self-Etch Primering bare spots where the sanding had taken
me down to bare metal.
 August
15th 2004 Started out
today at the Krash Pad by shaving off my beard so that the respirator
would fit my mug better. This was no sacrifice as I trim it down to a
stubble once a month anyway. I do not have the right conditions for
painting but I'm gonna give it a try. Humidity is supposed to be below
50% but this is South Florida in the summer. I'm less than a mile from
the ocean. I've been checking the humidity daily for two months and
I've never seen it lower than 66%. I don't know if it ever gets down to
50% 'round here. I can't wait until winter to find out.
August
15th 2004 Started out
today at the Krash Pad by shaving off my beard so that the respirator
would fit my mug better. This was no sacrifice as I trim it down to a
stubble once a month anyway. I do not have the right conditions for
painting but I'm gonna give it a try. Humidity is supposed to be below
50% but this is South Florida in the summer. I'm less than a mile from
the ocean. I've been checking the humidity daily for two months and
I've never seen it lower than 66%. I don't know if it ever gets down to
50% 'round here. I can't wait until winter to find out.
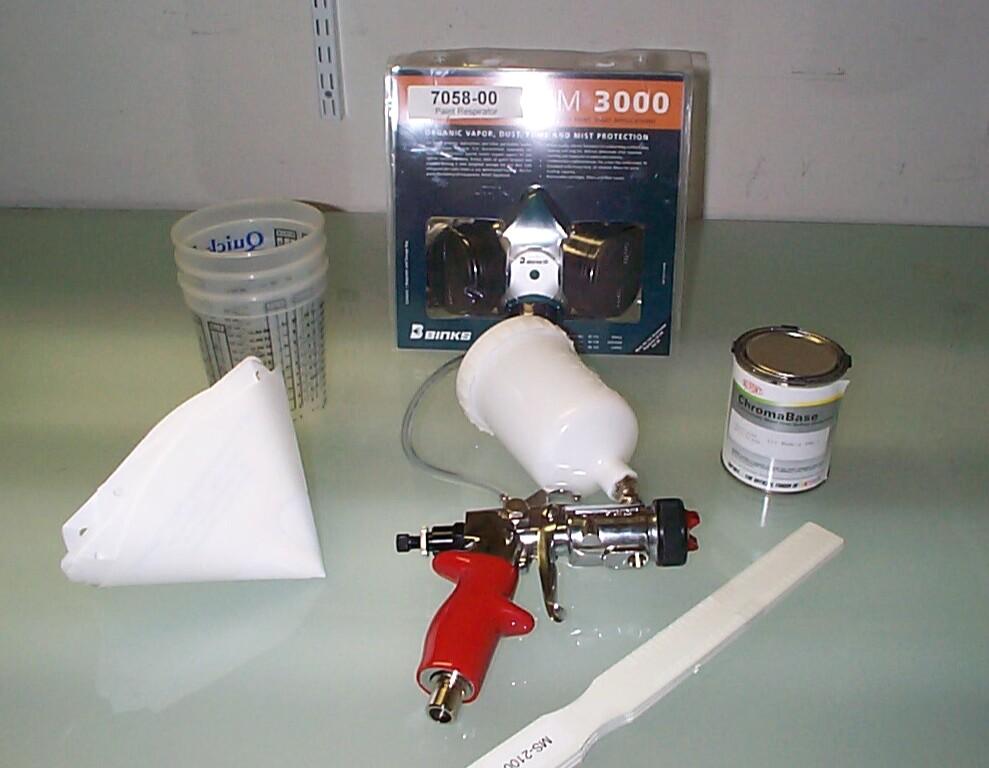
I PRE Paint Prepped the cab interior one more time. By the time I was finished, it was ten. I went into the Krash Lab and hovered over the online doppler radar map, willing away the storm cells in the Boca Raton vicinity. While watching the computer monitor which indicated clear skys in a three mile radius from my position, it began to rain outside, unnoticed by me! We have the technology, my ass! ~!@#$%^ It was hard to get the plastic drop cloth over the truck with the wet roof.
 By
two in the afternoon, weather conditions had improved to marginal. I
went for it. Half the paint container was mixed with lacquer thinner at
a 1:1 ratio. The gun was loaded up and off I went. Of course, I made
mistakes. I don't know anything about spray patterns or spray gun
technique yet. Painting inside the cab is hazardous even with the
respirator on. when my brother, JR, was in naval boot camp in the
Great Lakes, he had fire training. They put him in a fire suit that he
couldn't see out of, handed him a big ass fire hose and pushed him into
a concrete building they had just dosed with gasoline and set fire to.
Jerked around by the fire hose, he just sprayed everything he could
detect as orange thru his fogged face plate. That's about what I was
doin', spraying everything that wasn't light green. I had to move from
one side to the other often to get access to the nooks and cranies. The
first coat was too heavy and resulted in a couple of runs. At fifteen
minute intervals, I gave it additional lighter coats until I was low on
paint. The HVLP turbine works great!
By
two in the afternoon, weather conditions had improved to marginal. I
went for it. Half the paint container was mixed with lacquer thinner at
a 1:1 ratio. The gun was loaded up and off I went. Of course, I made
mistakes. I don't know anything about spray patterns or spray gun
technique yet. Painting inside the cab is hazardous even with the
respirator on. when my brother, JR, was in naval boot camp in the
Great Lakes, he had fire training. They put him in a fire suit that he
couldn't see out of, handed him a big ass fire hose and pushed him into
a concrete building they had just dosed with gasoline and set fire to.
Jerked around by the fire hose, he just sprayed everything he could
detect as orange thru his fogged face plate. That's about what I was
doin', spraying everything that wasn't light green. I had to move from
one side to the other often to get access to the nooks and cranies. The
first coat was too heavy and resulted in a couple of runs. At fifteen
minute intervals, I gave it additional lighter coats until I was low on
paint. The HVLP turbine works great!
After JR read this episode, he e-mailed me back.
Krash: Enjoyed the windshield saga. I'm guessing that you're not taking up windshield installation as a sideline at Laroke Enterprizes. By the way fire fighting school was in Norfolk Va after I reported aboard the Vogelgesang. Being a member of the in port repair party, I was required to attend fire fighting school. All for now. Regards, Bill Kephart Application Engineer Powerex, Inc.
 August
21st 2004 Hot and humid
again today. Got the tools out and uncovered BillyBob. First order of
business was to remove the masking paper, plastic and tape. Some of the
pinch weld Rustoleum lifted with the tape but the primer remained
intact and no bare metal was showing. This area is under the gasket.
Also, I didn't get full paint coverage in the defroster channel but it
will be hidden from view by a moulding and I'm not gonna attend to it
now. The paint job doesn't look quite as good to me in the bright
morning light as it did last sunday but it will have to do. A bit of
color sanding, polish and wax will clean it up in a month or so. As I
said before, I'm not going for the last ten percent of perfection on
this old truck. I'll save refinement for retirement.
August
21st 2004 Hot and humid
again today. Got the tools out and uncovered BillyBob. First order of
business was to remove the masking paper, plastic and tape. Some of the
pinch weld Rustoleum lifted with the tape but the primer remained
intact and no bare metal was showing. This area is under the gasket.
Also, I didn't get full paint coverage in the defroster channel but it
will be hidden from view by a moulding and I'm not gonna attend to it
now. The paint job doesn't look quite as good to me in the bright
morning light as it did last sunday but it will have to do. A bit of
color sanding, polish and wax will clean it up in a month or so. As I
said before, I'm not going for the last ten percent of perfection on
this old truck. I'll save refinement for retirement.
Installed the dome light after pulling a new wire for it. When BillyBob was re-wired a few years ago, I skipped this. Now, with the headliner out, the wire was accessible enuf to replace it. The new driver side mirror went on next with silicone sealant on at the bolt openings. The used wiper transmission Arms from American Classic Truck Parts were installed with new windshield wiper gaskets, bezels, and bezel hold down nuts from The Filling Station. Silicone sealant was used where the shafts passed thru the cowl and threadlocker blue on the bezel nuts. The wiper motor is not going in at this time so, the transmission arms were secured under the dash with wire ties and a golf tee was inserted into the end of the dangling vacuum hose.
Then, the gauge cluster and speedometer were wrestled into place. With some cussin' and head bumps under the dash, I got the headlight and ignition switches back in place and the dash lights back into their sockets. The new choke cable was next. I know I have the two-hole firewall grommet that the choke and throttle cables pass thru somewhere but I couldn't find it. I left the old one in place. I'll find it or get another by the time I'm ready to install the hand throttle. At that time I'll lube the cables as recommended by Nathan Hall (vwnate). Then, the emergency brake release rod was reinstalled in its bracket with a generic grommet I had in one of my spare parts boxes. The gearshift lever went back on the steering column easier than it usually does. I might be on a roll.
 The
aftermarket turn signal director was mounted on the steering column and
connected according to my old wiring diagram. I ended up marring the
new paint at the back of the cab trying to put the seat in
bass-ackwards. I had connected the long coil seat adjustment spring to
the base and seat bottom and was attempting to wrestle the seat frame
unto the bolt studs on top of the tracks. I stopped after awhile and
got over my senior moment. The proper (easy) way to do this is to place
the seat frame over the four studs without the spring and run down the
hex nuts. Then run the seat frame forward on the tracks as far as it
will go so that the spring will go on easily with a pair of vise-grips.
I knew this once. I don't know why I fergot it. Screwed the seat skirts
back on and replaced the seat cushion.
The
aftermarket turn signal director was mounted on the steering column and
connected according to my old wiring diagram. I ended up marring the
new paint at the back of the cab trying to put the seat in
bass-ackwards. I had connected the long coil seat adjustment spring to
the base and seat bottom and was attempting to wrestle the seat frame
unto the bolt studs on top of the tracks. I stopped after awhile and
got over my senior moment. The proper (easy) way to do this is to place
the seat frame over the four studs without the spring and run down the
hex nuts. Then run the seat frame forward on the tracks as far as it
will go so that the spring will go on easily with a pair of vise-grips.
I knew this once. I don't know why I fergot it. Screwed the seat skirts
back on and replaced the seat cushion.
Put the steering wheel on at this point and tried to start BillyBob. The last time BillyBob ran was May 23rd, only two days shy of three months. His battery wasn't up for it this time. The engine turned over a few times and ran out of juice. Ran up to the warehouse in Renegade to retrieve my jumper cables. Billybob started with good cranking (from Renegade) in about twenty seconds. Ran for forty minutes and shut down. That accursed voltage regulator is still charging high, even at idle. If any speed at all is applied, it pegs the ammeter.
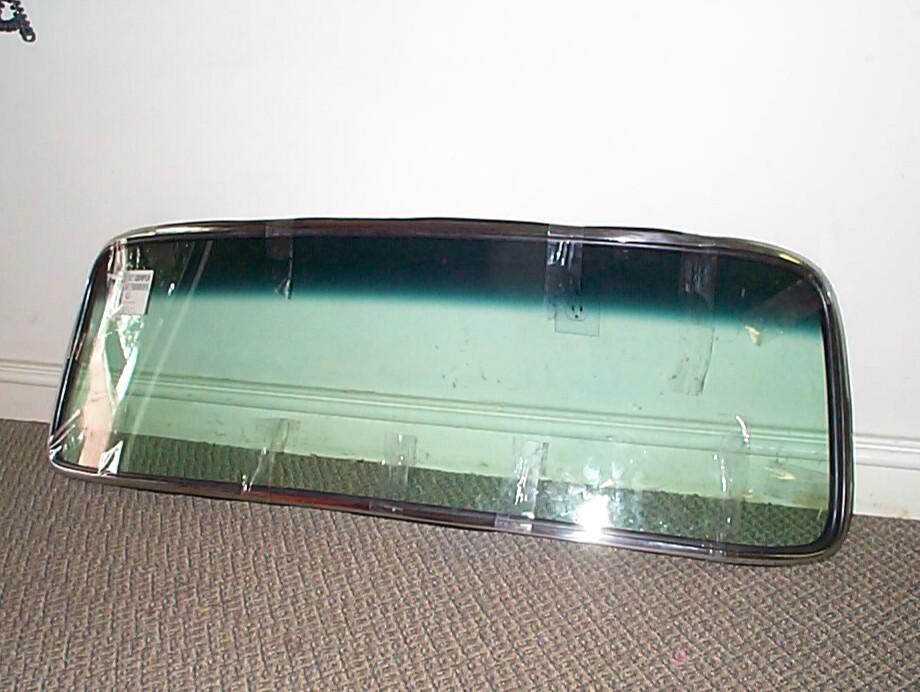
 August
22nd 2004 W-Day
(Windshield Day). Got the new windshield and windshield gasket out of
the cardboard box where it's been hiding lo these many months in
BillyBob's bed box. Then spent 'bout ninety minutes scooping styrofoam
packing peanuts into trash bags and cleaning up so our neighbors don't
come after me with torches, pitchforks and rope (hemp, of course). Half
way thru "Operation Peanut Roundup", I put the windshield gasket to
soak in a bucket of hot dishsoap water to soften it up and clean the
talcum off it. Some of those peanuts tried to make a break for freedom.
I was snagging strays all day.
August
22nd 2004 W-Day
(Windshield Day). Got the new windshield and windshield gasket out of
the cardboard box where it's been hiding lo these many months in
BillyBob's bed box. Then spent 'bout ninety minutes scooping styrofoam
packing peanuts into trash bags and cleaning up so our neighbors don't
come after me with torches, pitchforks and rope (hemp, of course). Half
way thru "Operation Peanut Roundup", I put the windshield gasket to
soak in a bucket of hot dishsoap water to soften it up and clean the
talcum off it. Some of those peanuts tried to make a break for freedom.
I was snagging strays all day.
I spent a couple of hours trying to get the gasket onto the windshield with no luck. The thing seems to be molded with the curves in the wrong direction. You have to twist it (inside out like) to get the glass channel to line up with the glass and this characteristic of the rubber is fighting you constantly. I finally put it in the hot water again as it had stiffened up quite a bit.
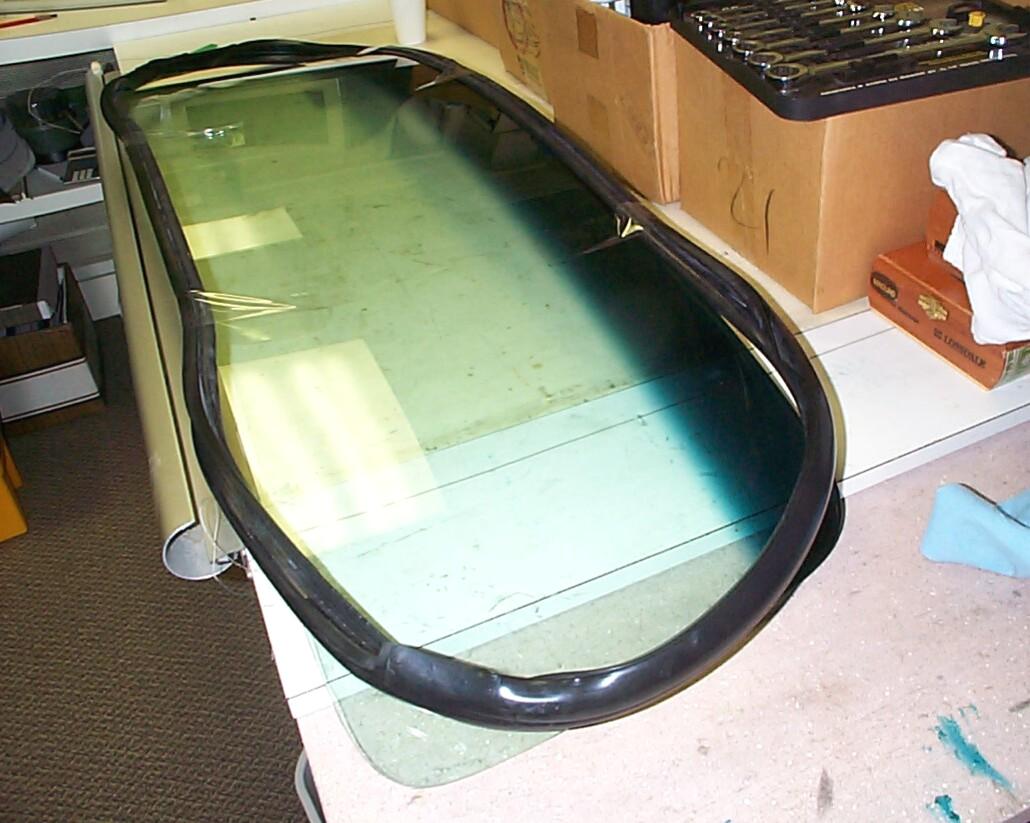 I
had been trying to get the gasket on the ends first (like stringing a
bow), but that wasn't working so I tried something new. I pretty much
knew where the corners were supposed to be by this time so I positioned
the gasket carefully and got it seated on the glass at the top and
bottom center, then secured it with strapping tape. It was two in the
afternoon by now and I realized it wasn't gonna be W-Day after all.
I
had been trying to get the gasket on the ends first (like stringing a
bow), but that wasn't working so I tried something new. I pretty much
knew where the corners were supposed to be by this time so I positioned
the gasket carefully and got it seated on the glass at the top and
bottom center, then secured it with strapping tape. It was two in the
afternoon by now and I realized it wasn't gonna be W-Day after all.
 I
was trying to get the windshield in so I could drive BillyBob a few
days before I go up to Pennslyvania to visit Mom and JR and for the
Labor Day family reunion. I also wanted to get this log entry posted to
the BillyBob site. I was willing to take some shortcuts to meet that
deadline but this ain't "Over-haulin'" and it's not in the
cards. I gave up for the day before frustration turned into a snit. I'm
taking the old windshield up to the warehouse as a spare. As a
historical reference, it has a 1994 PA inspection sticker, the last
visible sign of JR's Service Station Owners Association and State
government conspiracy.
I
was trying to get the windshield in so I could drive BillyBob a few
days before I go up to Pennslyvania to visit Mom and JR and for the
Labor Day family reunion. I also wanted to get this log entry posted to
the BillyBob site. I was willing to take some shortcuts to meet that
deadline but this ain't "Over-haulin'" and it's not in the
cards. I gave up for the day before frustration turned into a snit. I'm
taking the old windshield up to the warehouse as a spare. As a
historical reference, it has a 1994 PA inspection sticker, the last
visible sign of JR's Service Station Owners Association and State
government conspiracy.
 August
25th 2004 After work, I
asked one of my co-workers, Al, to give me a hand with another go at
the windshield gasket to get the ends on the windshield. Before I got
back from the galley with soapy water, there was a crowd gathered
around the windshield. The three guys in the pic - Al Wong, Phil
Plaisted and Luis Lay (from left to right) took the task in hand and
got it done in less than five minutes. All I did was slosh the soapy
water in the glass channel. If I could buy xtra human hands like other
tools, I'd have a half dozen. These guys are the "Vander Ploeg and
Associates Olympic Team for Mah Jong and Windshield Gasket
Installation".
August
25th 2004 After work, I
asked one of my co-workers, Al, to give me a hand with another go at
the windshield gasket to get the ends on the windshield. Before I got
back from the galley with soapy water, there was a crowd gathered
around the windshield. The three guys in the pic - Al Wong, Phil
Plaisted and Luis Lay (from left to right) took the task in hand and
got it done in less than five minutes. All I did was slosh the soapy
water in the glass channel. If I could buy xtra human hands like other
tools, I'd have a half dozen. These guys are the "Vander Ploeg and
Associates Olympic Team for Mah Jong and Windshield Gasket
Installation".
 August
28th 2004 It's a good
weather day. Today's first task was to temporarily reinstall the rear
view mirror and lock down the steering wheel for BillyBob's trip up to
the warehouse on monday morning. I gotta get him undercover in case
Hurricane Frances passes thru here while I'm up in Pennsylvania next
week. My storm gut is a little uneasy about Frances. I do not like the
look of that projected track.
August
28th 2004 It's a good
weather day. Today's first task was to temporarily reinstall the rear
view mirror and lock down the steering wheel for BillyBob's trip up to
the warehouse on monday morning. I gotta get him undercover in case
Hurricane Frances passes thru here while I'm up in Pennsylvania next
week. My storm gut is a little uneasy about Frances. I do not like the
look of that projected track.
Yesterday, Renegade, ruptured a lower radiator hose on the way up to the Krash Lab. I took him to the Mizner Park Citgo for repair since I didn't have time to do it myself. When I went to use the Boss's Mercedes Panzerwagon for some errands, it had a dead battery ~!@#$%^. I put the Panzerwagon on the battery charger next. When I tried to start BillyBob, his battery was dead too! double ~!@#$%^. Some days, the bear gets you.
Since I'm not racin' against time anymore regarding the windshield installation, I went back to touch-up the Rustoleum on the exterior side of the pinch weld where the masking tape had lifted it. Then, yet another new voltage regulator was installed. I noticed one of the blade connectors on the wires to the regulator was loose. Have no idea if this could be contributing to my problems or not so, I crimped new connectors for two of the four wires that seemed suspect. I doubt the problem(s) is that simple but I can dream.
 September
16th 2004 I went home
to Pennsylvania for a family reunion at the end of August. The morning
of my departure, BillyBob was jump-started and driven up to his
warehouse bay to weather Hurricane Frances under cover. Little did I
know at the time that my vacationer status would change to that of
Florida refugee as I waited out Frances and Ivan at the "ancestral
estate" (Mom's house). I finally got back yesterday, driving down I-75
to get ahead of Ivan once I was pretty certain he wouldn't hit South
Florida. My co-workers had been taking care of my parrot, Wingnut, even
going so far as to put a cardboard cutout of me in my chair at the
Krash Lab to keep him company. I'm gonna hafta have a talk with those
boys as I do not daydream about professional wrestlers! When I got back
yesterday, I ran up to check on BillyBob at the warehouse before going
to the Krash Pad to see if I still had a home. One has to keep his
priorities in order!
September
16th 2004 I went home
to Pennsylvania for a family reunion at the end of August. The morning
of my departure, BillyBob was jump-started and driven up to his
warehouse bay to weather Hurricane Frances under cover. Little did I
know at the time that my vacationer status would change to that of
Florida refugee as I waited out Frances and Ivan at the "ancestral
estate" (Mom's house). I finally got back yesterday, driving down I-75
to get ahead of Ivan once I was pretty certain he wouldn't hit South
Florida. My co-workers had been taking care of my parrot, Wingnut, even
going so far as to put a cardboard cutout of me in my chair at the
Krash Lab to keep him company. I'm gonna hafta have a talk with those
boys as I do not daydream about professional wrestlers! When I got back
yesterday, I ran up to check on BillyBob at the warehouse before going
to the Krash Pad to see if I still had a home. One has to keep his
priorities in order!
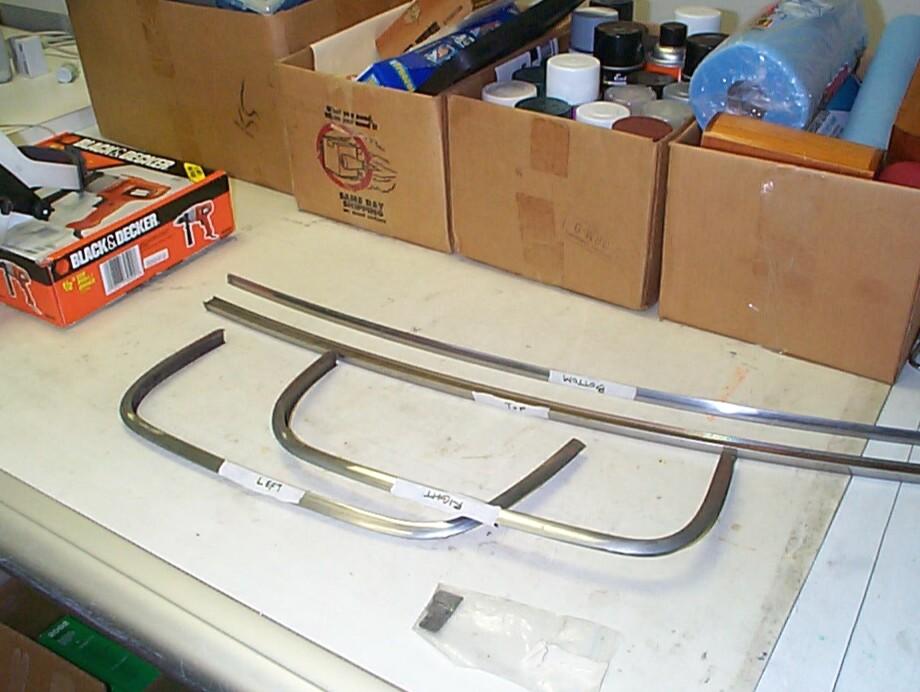 September
18th 2004 Good weather
for a change. BillyBob is secure in his warehouse bay and will probably
remain there until a new battery arrives from Antique
Auto Battery, which I ordered over the phone yesterday.
BillyBob's shadetree survived Hurricane Frances and I started today by
reorganizing the shed and putting back tools my co-workers had brought
inside the main building for better protection from the storm. I'm
going to get my initiation into the world of stainless steel buffing
today with the windshield trim. First, I cleaned up the back side of
the trim pieces with a wire wheel in the electric drill. The drill was
clamped in the Decker WorkMate so I could use both hands to maneuver
the trim pieces.
September
18th 2004 Good weather
for a change. BillyBob is secure in his warehouse bay and will probably
remain there until a new battery arrives from Antique
Auto Battery, which I ordered over the phone yesterday.
BillyBob's shadetree survived Hurricane Frances and I started today by
reorganizing the shed and putting back tools my co-workers had brought
inside the main building for better protection from the storm. I'm
going to get my initiation into the world of stainless steel buffing
today with the windshield trim. First, I cleaned up the back side of
the trim pieces with a wire wheel in the electric drill. The drill was
clamped in the Decker WorkMate so I could use both hands to maneuver
the trim pieces.
 Then
I set up the buffing wheel I got from Caswell,
Inc. (way back it seems now). C-clamped it to the WorkMate
and I was ready to go. I started with "Black" emery compound on a Sisal
wheel. Cycled thru 3 sessions with each piece, wiping the compound off
with a clean cloth between sessions. These sessions were short passes
'cause I didn't want to heat up the thin trim pieces enuf to distort
them or burn them. Next, I went thru 3 sessions again with each piece,
this time with "Green" stainless steel compound on a spiral sewn wheel.
I wore a full face shield and heavy welding gloves during all these
sessions. It's pretty easy for the wheel to grab the piece and rip it
out of your hands if you're not careful, cutting you up in the process.
Then . . . it started raining. That's all I needed to remind me I was
back home in Florida again!
Then
I set up the buffing wheel I got from Caswell,
Inc. (way back it seems now). C-clamped it to the WorkMate
and I was ready to go. I started with "Black" emery compound on a Sisal
wheel. Cycled thru 3 sessions with each piece, wiping the compound off
with a clean cloth between sessions. These sessions were short passes
'cause I didn't want to heat up the thin trim pieces enuf to distort
them or burn them. Next, I went thru 3 sessions again with each piece,
this time with "Green" stainless steel compound on a spiral sewn wheel.
I wore a full face shield and heavy welding gloves during all these
sessions. It's pretty easy for the wheel to grab the piece and rip it
out of your hands if you're not careful, cutting you up in the process.
Then . . . it started raining. That's all I needed to remind me I was
back home in Florida again!
September 19th 2004 Overcast today. Setup the buffing motor again and continued yesterday's operations. Finished with 3 sessions with each piece using the "Green" stainless steel compound on a loose wheel. Next time I will clean the pieces between compound changes with lacquer thinner. Just wiping with a clean cloth didn't quite do the job. I used pliers while buffing to hold the little clips that cover the ends of the trim pieces. Next time I'll wrap the plier jaws with masking tape so they won't bite into the metal and leave marks as they did this time. The windshield trim looks pretty good. It still has a few deep scratches and very small dents but, to me, that's like character lines. Spending a lot of time getting rid of those on a daily driver like BillyBob is like me taking botox injections. BillyBob is not a girly boy truck.
 Wrestled
the trim into place. I did not use soapy water for this operation and
tho' the fit is close, I'm not sure I got it entirely right. Time will
tell. The big day for completion of this project will have to wait
until the new battery arrives and I can bring BillyBob back down from
the warehouse.
Wrestled
the trim into place. I did not use soapy water for this operation and
tho' the fit is close, I'm not sure I got it entirely right. Time will
tell. The big day for completion of this project will have to wait
until the new battery arrives and I can bring BillyBob back down from
the warehouse.
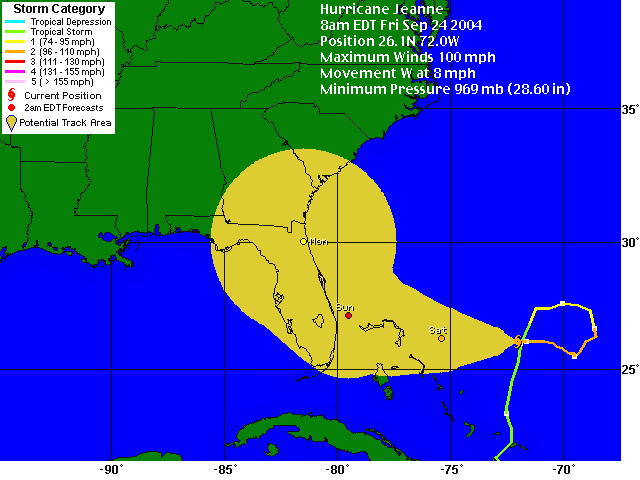 September
24th 2004 Here we go
again! BillyBob's new battery hasn't arrived yet but it wouldn't matter
anyway. The main activity this weekend will be dealing with Hurricane
Jeanne. The dizzie french broad has been playin' spin the bottle out in
the Atlantic for a week now and it looks like we're gonna get the kiss.
I'm gonna hunker down in the Krash Lab bunker an' ride it out with
Wingnut and my Boss, Derek. Even Gov. Jeb Bush is saying he sometimes
feels like Bill Murray in the movie "Groundhog Day" as this fourth
hurricane targets Florida ('an that's not counting Bonnie that passed
thru the panhandle as a tropical storm just before Charley hit!).
September
24th 2004 Here we go
again! BillyBob's new battery hasn't arrived yet but it wouldn't matter
anyway. The main activity this weekend will be dealing with Hurricane
Jeanne. The dizzie french broad has been playin' spin the bottle out in
the Atlantic for a week now and it looks like we're gonna get the kiss.
I'm gonna hunker down in the Krash Lab bunker an' ride it out with
Wingnut and my Boss, Derek. Even Gov. Jeb Bush is saying he sometimes
feels like Bill Murray in the movie "Groundhog Day" as this fourth
hurricane targets Florida ('an that's not counting Bonnie that passed
thru the panhandle as a tropical storm just before Charley hit!).
September 28th 2004 Ended up riding out the storm with my Boss and his family at their house a few miles to the north and a wee bit farther inland. we had power back at the Krash Lab by monday.
The UPS truck managed to get thru the carnage north of here and deliver my battery yesterday. It arrived dry and I went to Discount Auto Parts to pick up six quarts of electrolyte indicated in the instructions to fill it with. I suspect I'll have a lot left over but you don't want to come up short while filling the battery. The instructions said six quarts so that's what I got. I also stopped by the warehouse to see if BillyBob survived the latest hurricane. He's still OK.
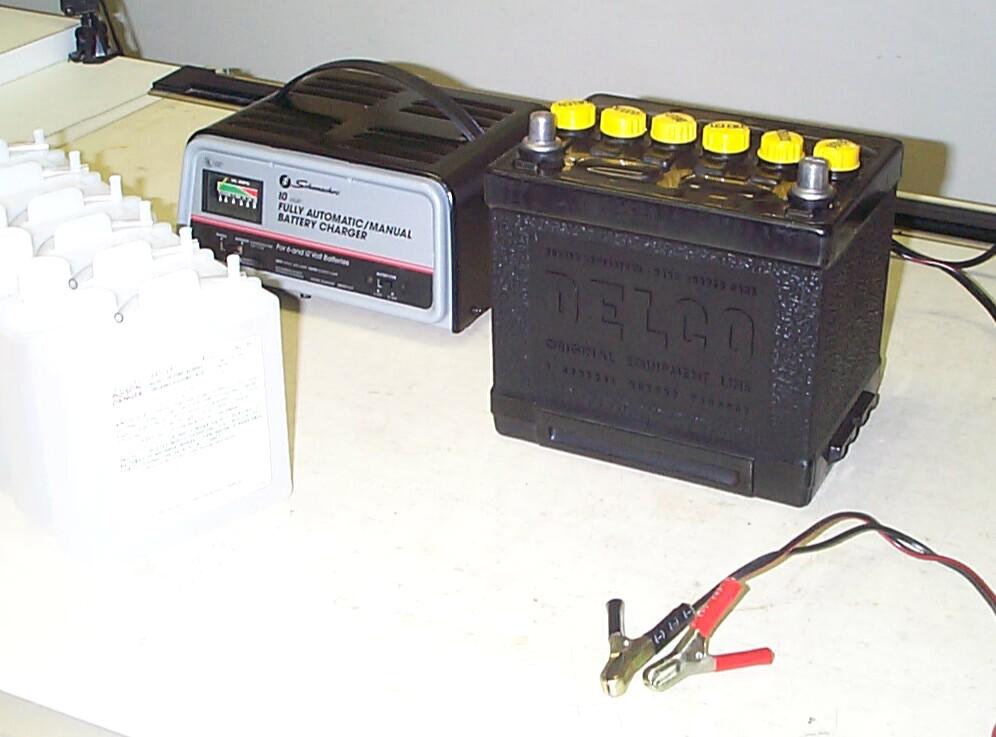 October
2nd 2004 Good weather
today but I don't need it to work on the new battery. First order of
business is to fill the new battery with electrolyte to 1/2" above the
plates in each cell. Then wait two hours for the electrolyte to be
absorbed by the plates. Add more electrolyte after that to bring the
level to 1/2" above the plates again, if necessary, then slow charge
the battery overnite at no greater than ten amps and no less than four.
October
2nd 2004 Good weather
today but I don't need it to work on the new battery. First order of
business is to fill the new battery with electrolyte to 1/2" above the
plates in each cell. Then wait two hours for the electrolyte to be
absorbed by the plates. Add more electrolyte after that to bring the
level to 1/2" above the plates again, if necessary, then slow charge
the battery overnite at no greater than ten amps and no less than four.
 October
3rd 2004 The battery
prep went well yesterday. Used four of the six quarts of electrolyte.
The other two go on the shelf for the future. Went up to the warehouse
first thing this morning and put the new battery in BillyBob. He
cranked good and started after about ninety seconds. The roof in my
warehouse bay leaks so I keep the plastic dropcloth over BillyBob while
he's in here.
October
3rd 2004 The battery
prep went well yesterday. Used four of the six quarts of electrolyte.
The other two go on the shelf for the future. Went up to the warehouse
first thing this morning and put the new battery in BillyBob. He
cranked good and started after about ninety seconds. The roof in my
warehouse bay leaks so I keep the plastic dropcloth over BillyBob while
he's in here.
Went back to the Krash Lab and putzed around fer awhile. My co-worker, Luis, arrived and offered me a ride to the warehouse to pick up BillyBob. We did that and then I got ambitious and began to try to install the windshield. I sweated with it for about ninety minutes and thought I was making some headway. It was going better than I thought it would but not as painless as I would prefer when disaster struck . . . The trim popped out of the upper driver's side corner and while I was trying to fix that, the gasket came off the glass ~!@#$%^ That's it for the day and that's it for this log entry. As much as I wanted to get the windshield in for this episode, it's getting too long. Some people think I'm dead, I haven't posted in so long. I will take up the good fight with the windshield again next time.
| < Back
to Intro |
You can email me at ![]() webmaster@laroke.com
webmaster@laroke.com
Issued Sunday October 3, 2004
Updated Tuesday February 27, 2018
copyright © 1996-2018 Larry Robert Kephart all rights reserved
| | LRK Home | | Bio Info | | Krash Khronicles | | LAROKE | |
| | BettyLou | | BillyBob's Garage | | Rat Patrol | | Deerslayer | | Elvira | |
| | Land of the Free and Home of the Brave | |
| | Keppylou's Art | | WWI Soldier's Diary | |