| | LRK Home | | Bio Info | | Krash Khronicles | | LAROKE | |
| | BettyLou | | BillyBob's Garage | | Rat Patrol | | Deerslayer | | Elvira | |
| | Land of the Free and Home of the Brave | |
| | Keppylou's Art | | WWI Soldier's Diary | |
BillyBob Work-in-Progress Log
![]()
TRUCK LINKS including vendor sites for old parts, custom parts, and tools as well as sites for classic car and truck organizations
STORE Operating in association with Amazon.com, books, recordings and tools can be purchased.
PLANNING for the restoration including project schedule and cost estimates.
![]()
TRAVELS WITH BILLYBOB With apologies to Steinbeck, this area of BillyBob's Garage will be used to log the trips BillyBob and I make together.
WORK-IN-PROGRESS is the restoration of parts of BillyBob that I can accomplish without a garage.
PRE-RESTORATION includes log entries of minor repairs and and adventures between time of purchase and the time when I started restoration, a piece at a time.
JR'S KORNER JR's Korner is the history of BillyBob before I got him authored by my brother, Wm. C. Kephart.
![]()
BILLYBOB MAINTENANCE Ever changing detailing, oil change, lube, etc. maintenance routines specifically developed for BillyBob, including required tools, materials and procedures.
STEALTH SHOP Urban residence design with large integrated shop and separate living quarters for a relative or renter.
31. Windshield Saga - More Ugly
March 6th 2004 Good weather today. The ale drinkin' bum had been back overnite so, the day started with policing the shadetree garage. This time he didn't content himself with just scattering his empty bottles. He broke one under the tree and it looks like he brought a friend. I had to gather fast food remains from the other side of the lot. Today is a downtown festival day and I set up the traffic cones in the driveway to help people who can't read the "No Parking" signs. The activity up the street at the park last nite is probably what drove the bums down to BillyBob's garage.
 Uncovered
BillyBob and used a 3M Scuff Pad to roughen the passenger side
dashboard and cowl area that was self-etching primered two weeks ago.
Set up the air compressor and went over the area lightly with the
Norton SpeedLock System (from autoBodyStore.com) in the
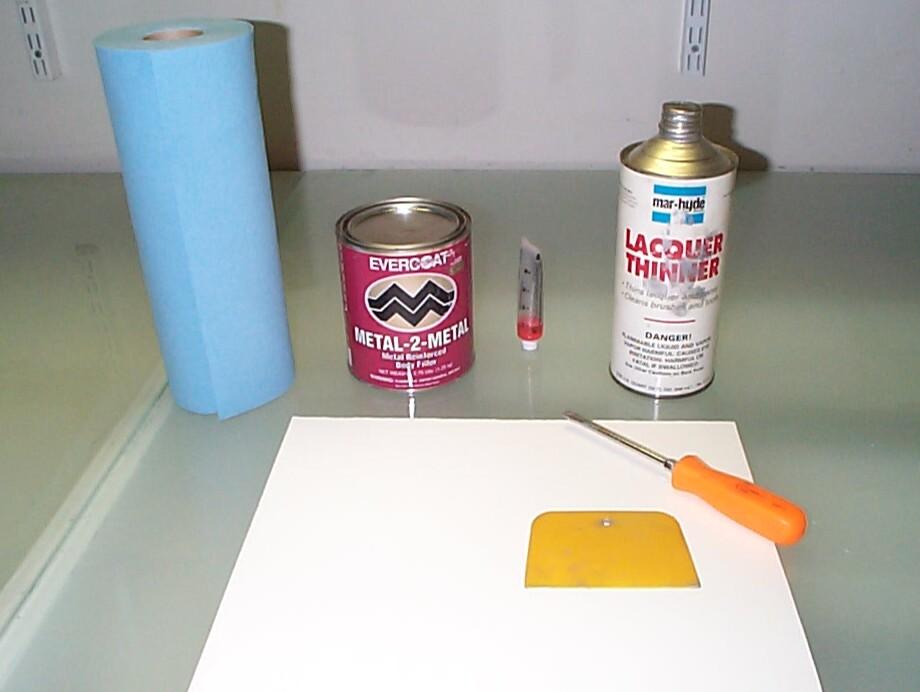
air-powered angle grinder. Mixed up a batch of Evercoat Metal-to-Metal
filler. I got this stuff from Eastwood some time back and it's
getting old so I had troubles with it. The "liquid activator" tube was
ruptured and I lost 3/4 of the stuff before I realized it. Then I had
to throw the first batch I mixed up away because I hadn't mastered
dripping the activator from the ruptured tube and lost half of what was
left into the pile of filler ~!@#$%^.
Uncovered
BillyBob and used a 3M Scuff Pad to roughen the passenger side
dashboard and cowl area that was self-etching primered two weeks ago.
Set up the air compressor and went over the area lightly with the
Norton SpeedLock System (from autoBodyStore.com) in the
air-powered angle grinder. Mixed up a batch of Evercoat Metal-to-Metal
filler. I got this stuff from Eastwood some time back and it's
getting old so I had troubles with it. The "liquid activator" tube was
ruptured and I lost 3/4 of the stuff before I realized it. Then I had
to throw the first batch I mixed up away because I hadn't mastered
dripping the activator from the ruptured tube and lost half of what was
left into the pile of filler ~!@#$%^.
 Also
noticed as I was stirring the can that the filler in the bottom of the
can was beginning to harden. To top it all off, I didn't use gloves and
ended up with filler all over both hands. Had to get it off with
lacquer thinner, followed by GoJo hand cleaner. Well, this stuff isn't
setting up very fast. I won't be able to sand it today. Maybe air
exposure over time weakened the activator. Gonna place an Eastwood
order for fresh filler and activator and get it here by next weekend I
hope.
Also
noticed as I was stirring the can that the filler in the bottom of the
can was beginning to harden. To top it all off, I didn't use gloves and
ended up with filler all over both hands. Had to get it off with
lacquer thinner, followed by GoJo hand cleaner. Well, this stuff isn't
setting up very fast. I won't be able to sand it today. Maybe air
exposure over time weakened the activator. Gonna place an Eastwood
order for fresh filler and activator and get it here by next weekend I
hope.
March 7th 2004 'Nother good weather day. Started out with maintenance chores on BillyBob, Renegade and the Panzerwagon. Been slowly doing a full tune-up on BillyBob as he sits without his windshield (and establishing the procedures for the maintenance page). Compression checks one week (BillyBob tests at 155 psi for no 1 cylinder and 160 psi for the rest. I don't know why this is higher than spec 'cepting maybe the compression is higher from the previous engine rebuild(s). Don't know if BillyBob is .030" or .060" over bored. Maybe the fast cranking of 12 volts thru the 6 volt starter during the compression test is another factor). Then spark plugs on a following weekend, etc. This morning, the points, condenser, rotor and distributor cap were replaced. These things haven't been done since march of '96. There was substantial point, rotor and cap pitting. BillyBob runs pretty good without complainin' but the new parts perked him up a lot. I'm not sure the mechanical advance is working so I'm gonna drag the rebuilt distributor down from the warehouse to examine it in comparison an' sooth my troubled mind. Last weekend I topped off the gas tank and added "sta-bil" gas stabilizer because BillyBob hasn't visited a gas station since November due to the windshield job. It may be my imagination but that seems to have helped too.
Yesterday's filler had hardened overnite. I PRE paint prepped it to get any resins off the surface then worked the filler with the Norton SpeedLock System. Blew off the dust with the air hose and PRE paint prepped again. Mixed up another batch of filler for a second layer and used the last of the activator. I think I got a better batch this time 'tho still a bit slow setting up. Avoided yesterday's cleanup mess by wearing nitrile gloves the whole time.
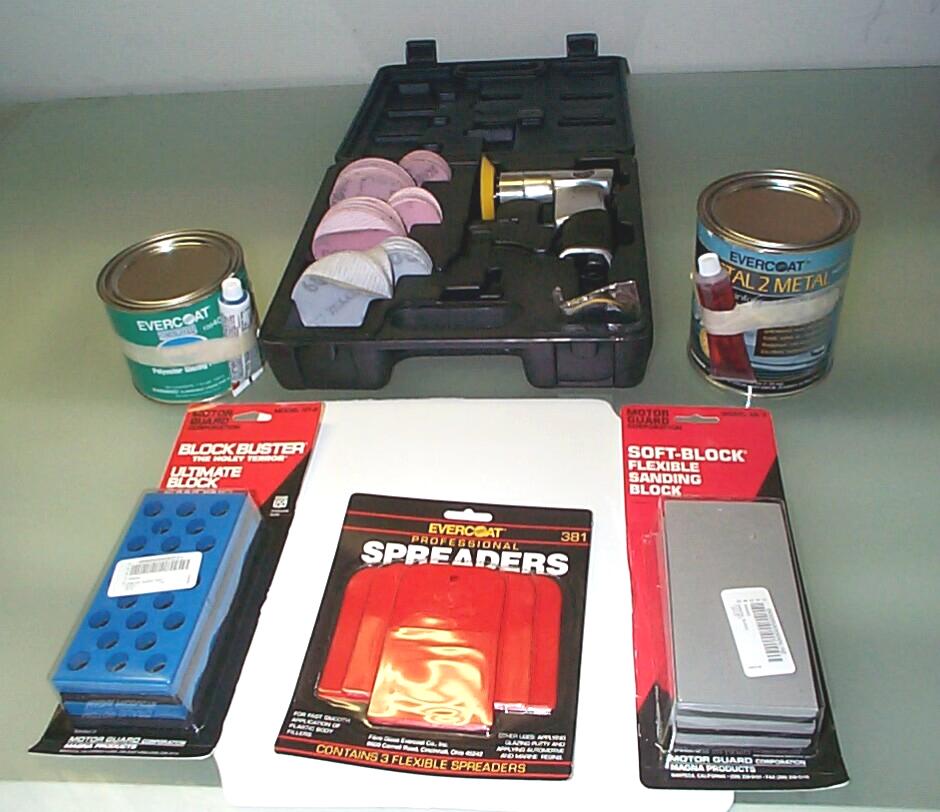 March
13th 2004 Good weather
two weeks in a row! Set up the tools and uncovered BillyBob. Got a
package of goodies from Eastwood on Thursday - A new can of
Metal-to-Metal Filler, a can of Evercoat Polyester Glazing Putty, foam
sanding blocks, filler spreaders, a mixing board and a 3" air-powered
orbital sander. Block sanded down the filler I applied last Sunday with
36 grit paper in a holder I picked up at a FLAPS some months back. Put
the nitrile gloves on and PRE Paint prepped the sanded area again.
Mixed up a small batch of the new filler and got most of it on BillyBob
by the time it started to harden.
March
13th 2004 Good weather
two weeks in a row! Set up the tools and uncovered BillyBob. Got a
package of goodies from Eastwood on Thursday - A new can of
Metal-to-Metal Filler, a can of Evercoat Polyester Glazing Putty, foam
sanding blocks, filler spreaders, a mixing board and a 3" air-powered
orbital sander. Block sanded down the filler I applied last Sunday with
36 grit paper in a holder I picked up at a FLAPS some months back. Put
the nitrile gloves on and PRE Paint prepped the sanded area again.
Mixed up a small batch of the new filler and got most of it on BillyBob
by the time it started to harden.
Waited a half hour and cleaned the resin off the new batch with PRE, then block sanded again. Tight spots were taken care of with the 80 grit sandpaper cones from the tight spot grinding kit. Cleaned, prepped and mixed up another smaller batch of filler. Barely got it applied when a passerby wanted to stop and talk old iron. Some days I get no visitors. Today, I got four, so far. It burns daylight but, hell, that's part of the journey. I'm not workin' on a timeclock here and I enjoy jawing about the truck as much as working on it.
 March
14th 2004 Windy and
overcast today. Limits the tasks I feel comfortable with. Started out
by running BillyBob's engine for a half hour. Yesterday, after five
applications of filler total (including last weekend's) and sanding
down with 36 grit, I felt I was ready for the next step with the
glazing putty. This morning, without the shade and shadow contrasts of
the late afternoon sun, I believe I see a few spots that could still
benefit from one more filler/sanding application.
March
14th 2004 Windy and
overcast today. Limits the tasks I feel comfortable with. Started out
by running BillyBob's engine for a half hour. Yesterday, after five
applications of filler total (including last weekend's) and sanding
down with 36 grit, I felt I was ready for the next step with the
glazing putty. This morning, without the shade and shadow contrasts of
the late afternoon sun, I believe I see a few spots that could still
benefit from one more filler/sanding application.
 After
that, I started with my first polyester glazing putty coat. The
directions say 1/4 tube activator to 1/4 can putty. This is a little
hard to judge in small batches but I think I got the first one right
'cause it started to set up quickly just as described on the can (5 to
6 minutes just like the metal-to-metal filler). I haven't gotten the
hang of applying "thin even coats" yet. My technique at this point can
only be described as "slathering the stuff on before it hardens!"
After
that, I started with my first polyester glazing putty coat. The
directions say 1/4 tube activator to 1/4 can putty. This is a little
hard to judge in small batches but I think I got the first one right
'cause it started to set up quickly just as described on the can (5 to
6 minutes just like the metal-to-metal filler). I haven't gotten the
hang of applying "thin even coats" yet. My technique at this point can
only be described as "slathering the stuff on before it hardens!"
 March
20th 2004 Good day
'cept for 20 mph winds. Pulled the tools out and performed quarterly
maintenance and some wheel balancing before picking up the sandpaper
again. I need to finish up sanding last week's application of glazing
putty with sandpaper cones in the angle grinder for the tight spots
that I had trouble reaching by hand methods. Continued hand sanding too
until everything felt smooth thru the nitrile gloves. I have the Kevin
Tetz Paintucation
video series and he says you can get a better tactile feeling for
smoothness thru the gloves than with bare hands and I think he's right.
I haven't felt a curve this smooth since I went to the submarine races
in my Chevy
van as a young feller.
March
20th 2004 Good day
'cept for 20 mph winds. Pulled the tools out and performed quarterly
maintenance and some wheel balancing before picking up the sandpaper
again. I need to finish up sanding last week's application of glazing
putty with sandpaper cones in the angle grinder for the tight spots
that I had trouble reaching by hand methods. Continued hand sanding too
until everything felt smooth thru the nitrile gloves. I have the Kevin
Tetz Paintucation
video series and he says you can get a better tactile feeling for
smoothness thru the gloves than with bare hands and I think he's right.
I haven't felt a curve this smooth since I went to the submarine races
in my Chevy
van as a young feller.
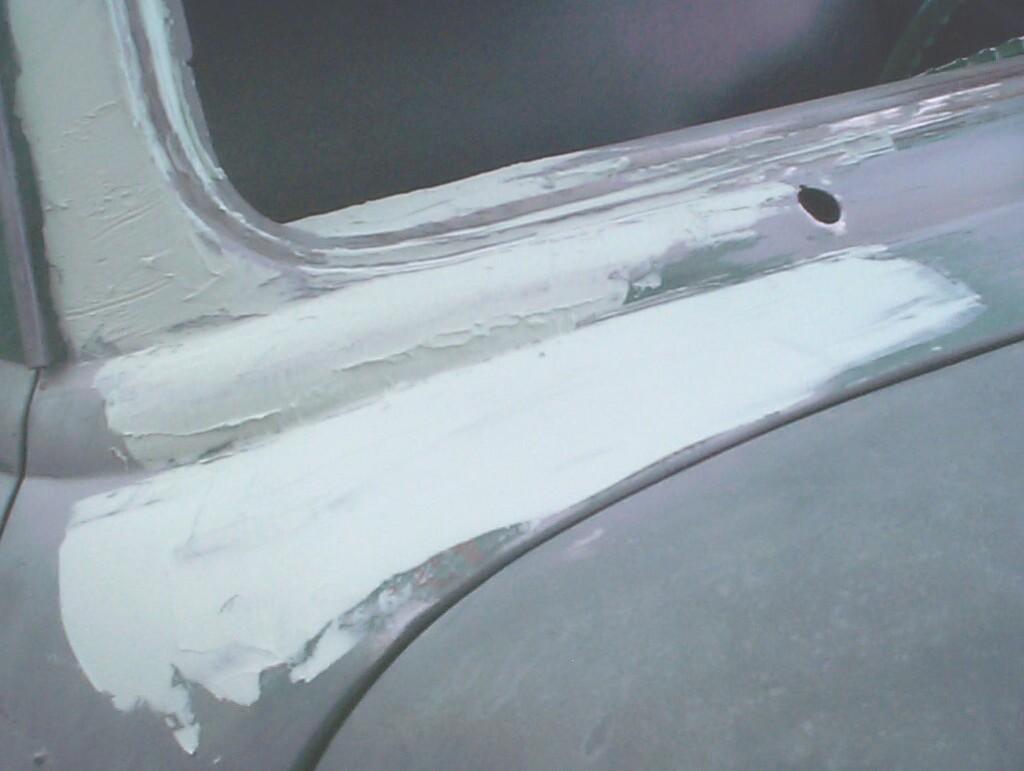
Performed the PRE Paint Prep routine again and sprayed a couple of coats of Plasti-kote Lacquer base Spot Filler & Primer. Tomorrow, I'll start working it with 180 grit block sanding and more coats of the filler primer.
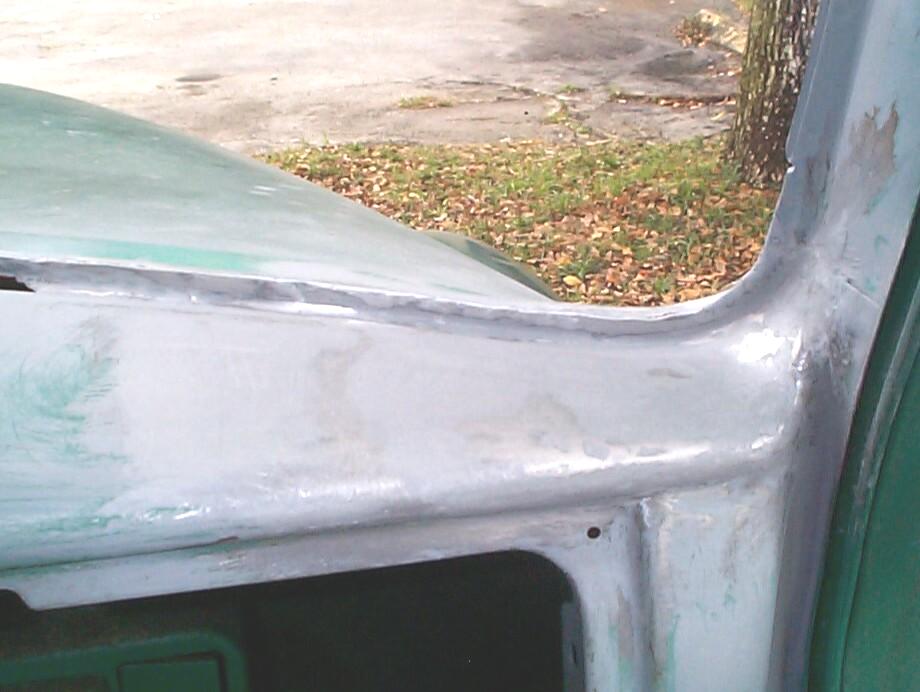
 March
21st 2004 Good weather
day. Performed weekly maintenance and engine run-ups on the
Panzerwagon, Renegade and BillyBob first. BillyBob appears to be
overcharging. I suspect the voltage regulator. I've been getting
familiar with voltage regulators the hard way but that will be covered
in another log entry when I get the windshield saga finished. Gotta
start sanding with 180 grit paper. There are a lot of small
imperfections you can't see in this pic. After the sanding, a second
application of the filler primer was laid on which emptied the
rattlecan. There's only a few imperfections left to sand out before I
apply a sealer coat and move on to the driver's side.
March
21st 2004 Good weather
day. Performed weekly maintenance and engine run-ups on the
Panzerwagon, Renegade and BillyBob first. BillyBob appears to be
overcharging. I suspect the voltage regulator. I've been getting
familiar with voltage regulators the hard way but that will be covered
in another log entry when I get the windshield saga finished. Gotta
start sanding with 180 grit paper. There are a lot of small
imperfections you can't see in this pic. After the sanding, a second
application of the filler primer was laid on which emptied the
rattlecan. There's only a few imperfections left to sand out before I
apply a sealer coat and move on to the driver's side.
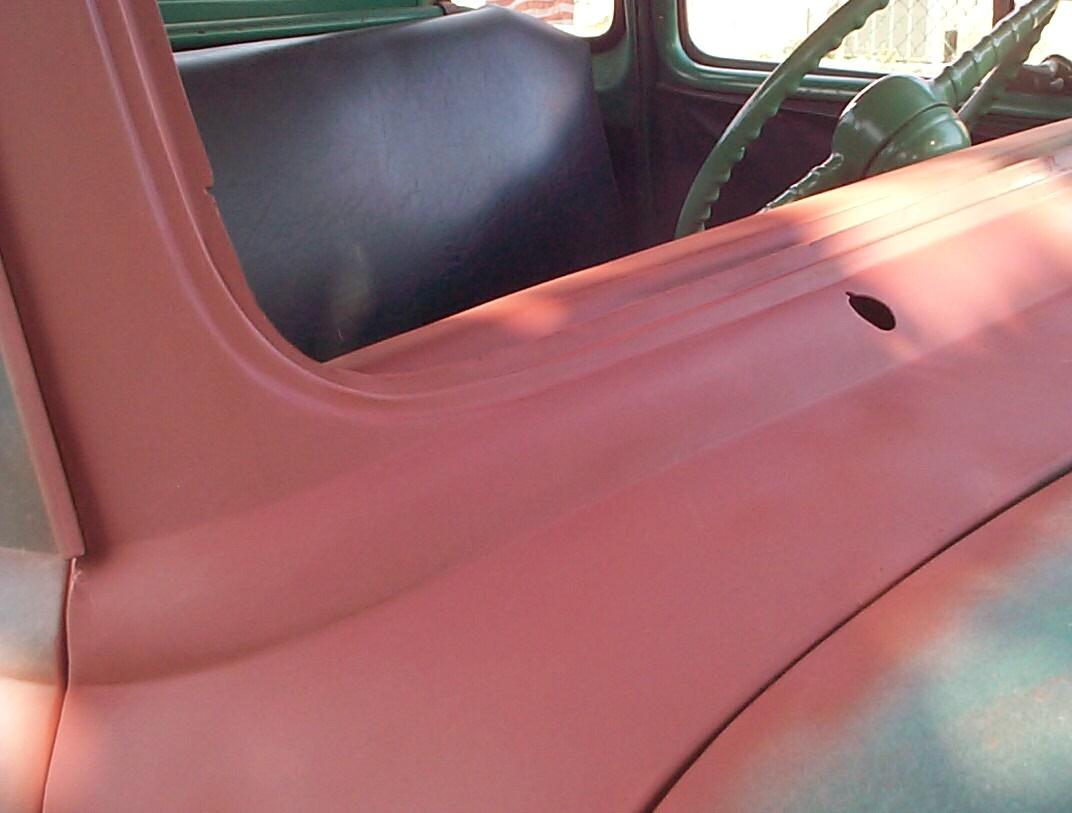
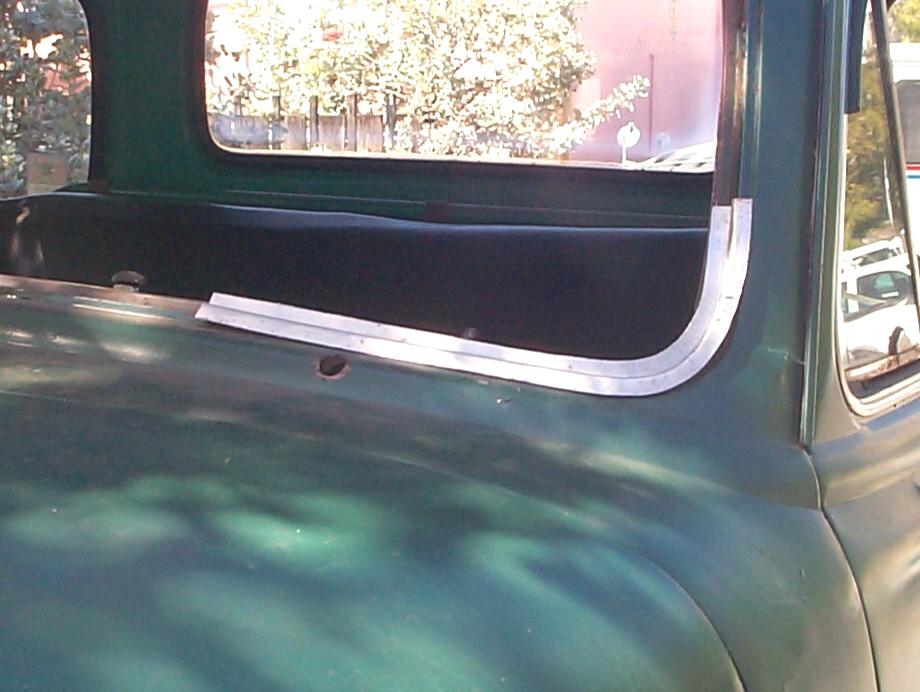
 March
27th 2004 Windy, but a
good day to work otherwise. I've still got fill and finish operations
to complete on the passenger side but it's also time to start forming
patch panels for the driver's side. Smoked a cigar while I pondered
future operations. I've pretty much decided to paint the dashboard and
upper interior of the cab before putting the windshield and headliner
back in. The original paint was a light mint green (discovered in a few
locations - inside the glove compartment, under the windshield gasket
and radio blank out plate). Jim Carter sells this '54-'55 1st
Series Deluxe cab paint but there's a "Catch-22". It's a DuPont paint
and DuPont won't sell the reducer to the general public. Everyone who's
read these log entries knows that I'm a do-it-yerself kinda guy so,
DuPont won't be my paint of choice. I've found a color match for this
light green paint at www.paintscratch.com (1954 Chevy
colors) but I'm not going to order until I'm close to painting time.
March
27th 2004 Windy, but a
good day to work otherwise. I've still got fill and finish operations
to complete on the passenger side but it's also time to start forming
patch panels for the driver's side. Smoked a cigar while I pondered
future operations. I've pretty much decided to paint the dashboard and
upper interior of the cab before putting the windshield and headliner
back in. The original paint was a light mint green (discovered in a few
locations - inside the glove compartment, under the windshield gasket
and radio blank out plate). Jim Carter sells this '54-'55 1st
Series Deluxe cab paint but there's a "Catch-22". It's a DuPont paint
and DuPont won't sell the reducer to the general public. Everyone who's
read these log entries knows that I'm a do-it-yerself kinda guy so,
DuPont won't be my paint of choice. I've found a color match for this
light green paint at www.paintscratch.com (1954 Chevy
colors) but I'm not going to order until I'm close to painting time.
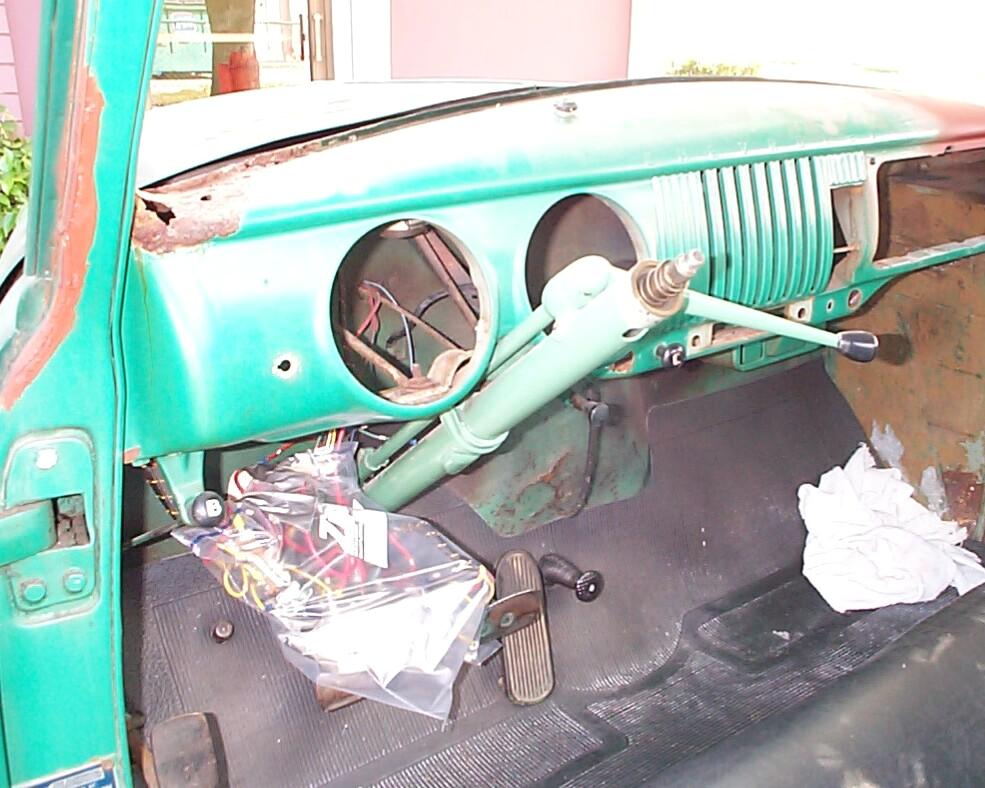 Ran
BillyBob's engine for thirty minutes for the last time before
dismantling the dashboard instruments. It will be a few weeks or more
before I put it back together to run again. I definitely have an
overcharging condition . . . RATS! I
turned the lights on to reduce charging stress on the battery. OK.
Pulled the steering wheel and removed the third-party turn signal
director. Disconnected the third-party ignition switch and removed the
cigarette lighter. Disconnected the third-party headlight switch. The
speedometer cluster was completely removed. The main cluster and the
switches were placed in a 2 gal zip-lock bag and secured with duct
tape. Now I have room to further protect things with a welding blanket
during metalwork and masking paper during painting operations.
Ran
BillyBob's engine for thirty minutes for the last time before
dismantling the dashboard instruments. It will be a few weeks or more
before I put it back together to run again. I definitely have an
overcharging condition . . . RATS! I
turned the lights on to reduce charging stress on the battery. OK.
Pulled the steering wheel and removed the third-party turn signal
director. Disconnected the third-party ignition switch and removed the
cigarette lighter. Disconnected the third-party headlight switch. The
speedometer cluster was completely removed. The main cluster and the
switches were placed in a 2 gal zip-lock bag and secured with duct
tape. Now I have room to further protect things with a welding blanket
during metalwork and masking paper during painting operations.
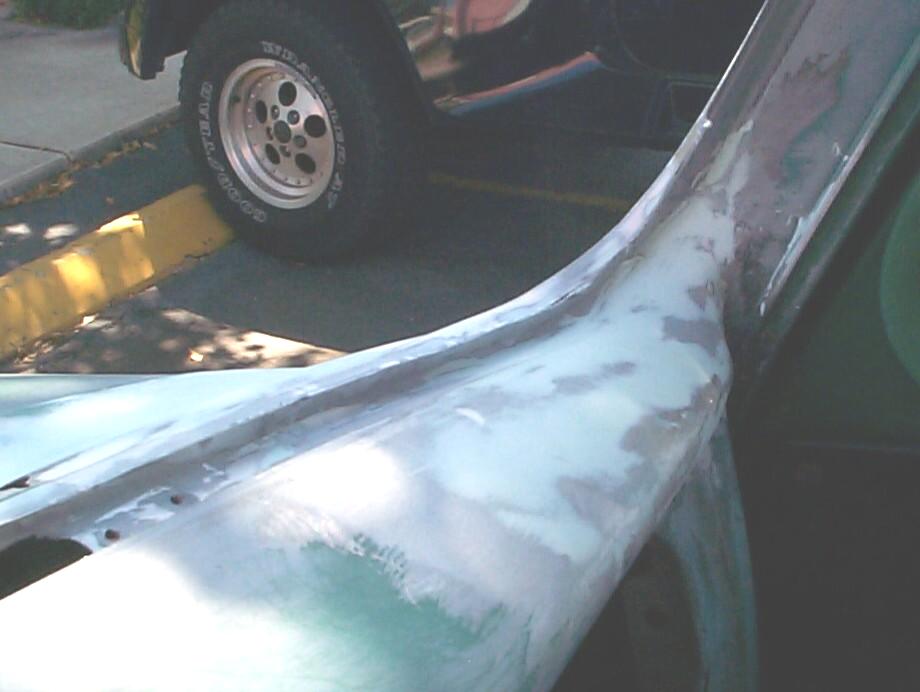
 March
28th 2004 The wind has
died down and it's a perfect day under BillyBob's tree. Smoked a cigar
while I exercised the Panzerwagon engine and performed routine Jeep
maintenance. Cut out a strip of metal for the driver side outer
pinchweld patch panel and formed it into a "Z" shape. Something went
wrong during the shrinking/stretching procedure and I had to start over
with a new strip of sheet metal. Did much better the second time
around. It's a good thing I'm not a surgeon. One casualty for each
survivor isn't a good track record but I feel I'm at least as good as
some of the younger yahoos on American Hotrod. It was two-thirty
by the time I got to this point an' I gotta be at the Krash Pad by
four-forty-five so it's too late to drag out the air compressor and MIG
welder today.
March
28th 2004 The wind has
died down and it's a perfect day under BillyBob's tree. Smoked a cigar
while I exercised the Panzerwagon engine and performed routine Jeep
maintenance. Cut out a strip of metal for the driver side outer
pinchweld patch panel and formed it into a "Z" shape. Something went
wrong during the shrinking/stretching procedure and I had to start over
with a new strip of sheet metal. Did much better the second time
around. It's a good thing I'm not a surgeon. One casualty for each
survivor isn't a good track record but I feel I'm at least as good as
some of the younger yahoos on American Hotrod. It was two-thirty
by the time I got to this point an' I gotta be at the Krash Pad by
four-forty-five so it's too late to drag out the air compressor and MIG
welder today.
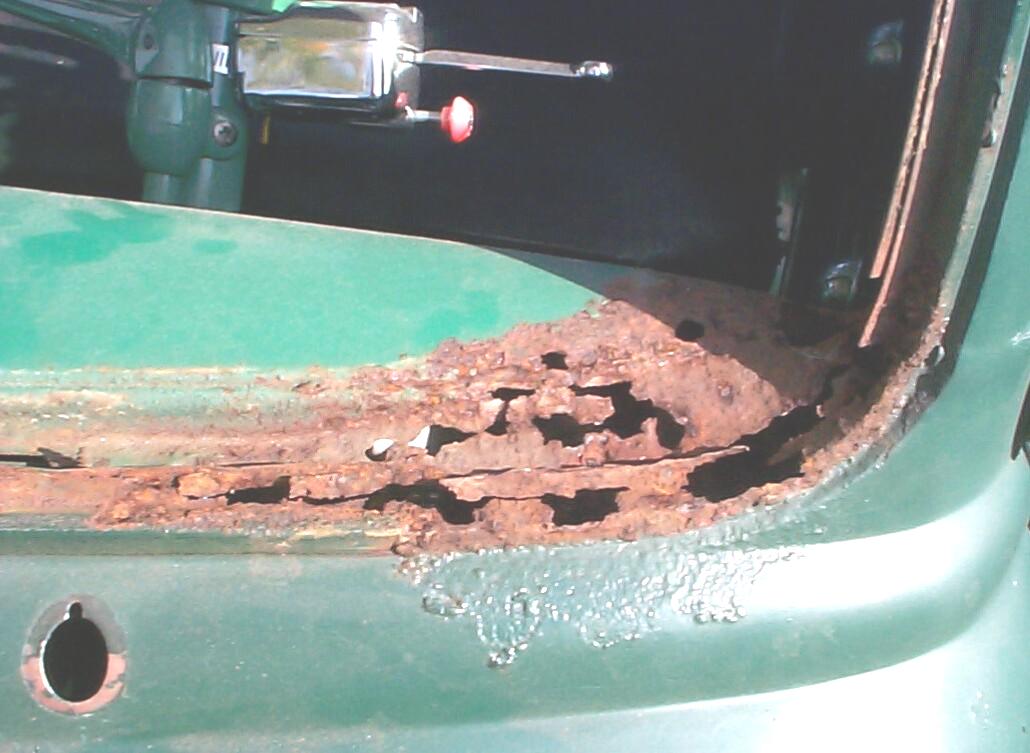
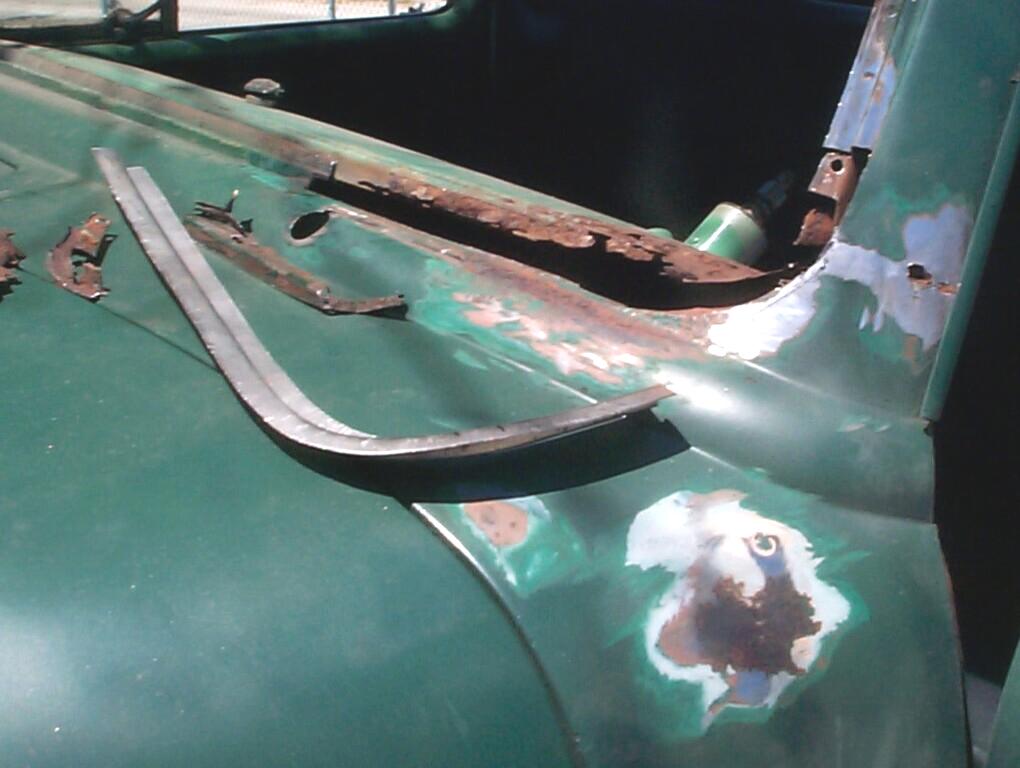 April
3rd 2004 A good weather
day. Got the tools out and placed a welding blanket behind the
dashboard to protect the wiring from cutting, grinding and welding
operations. Started cleaning up around the rusted out driver side area
with a wire wheel in the air-powered angle grinder first, then moved on
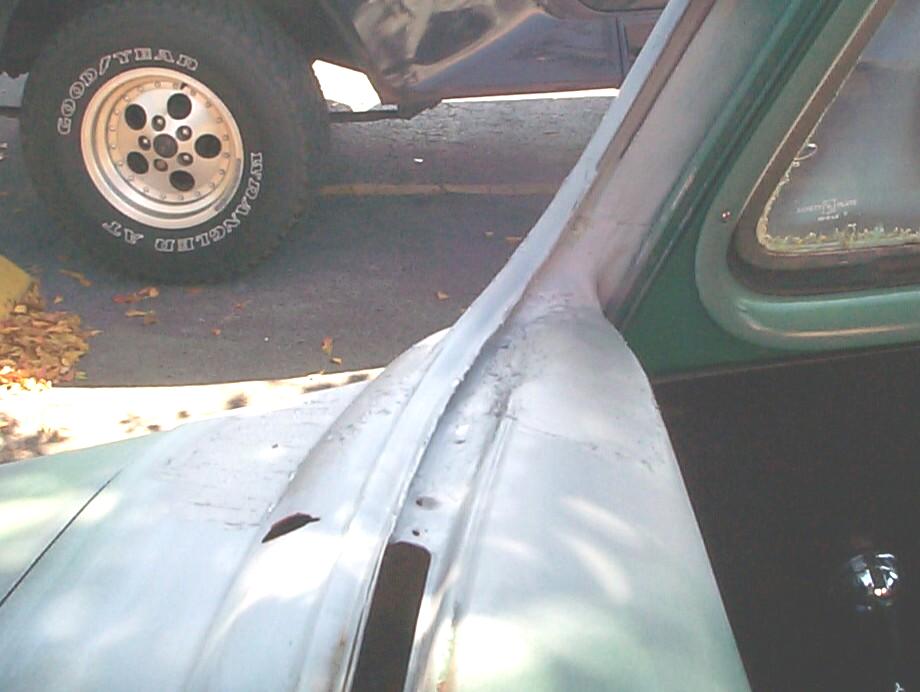
to the 36 grit Norton Speedlock disk. The seam where the door post
meets the cowl got some corrosion behind the lead which expanded it
outward. I ground this down and I'm gonna fill it with JB Weld epoxy.
Also uncovered some holes in the cowl that were filled in with tin-foil
backed bondo. Cut out the rusted exterior pinch weld area to make way
for fitting the first patch panel.
April
3rd 2004 A good weather
day. Got the tools out and placed a welding blanket behind the
dashboard to protect the wiring from cutting, grinding and welding
operations. Started cleaning up around the rusted out driver side area
with a wire wheel in the air-powered angle grinder first, then moved on
to the 36 grit Norton Speedlock disk. The seam where the door post
meets the cowl got some corrosion behind the lead which expanded it
outward. I ground this down and I'm gonna fill it with JB Weld epoxy.
Also uncovered some holes in the cowl that were filled in with tin-foil
backed bondo. Cut out the rusted exterior pinch weld area to make way
for fitting the first patch panel.
April 4th 2004 Good weather day again. Performed my "cigar smoke, Renegade and Panzerwagon routine maintenance ritual". While this was going on, a local church Palm Sunday procession passed down the street with costumes, regalia and police escort. I stopped to watch. Life is good. Yesterday, I decided to hold off welding until I got a roll .023 MIG welding wire to replace the .025 wire I've been using so far. Conventional wisdom sez a lot of people are having better luck on sheet metal with the .023 wire. I put in an order to TP Tools.
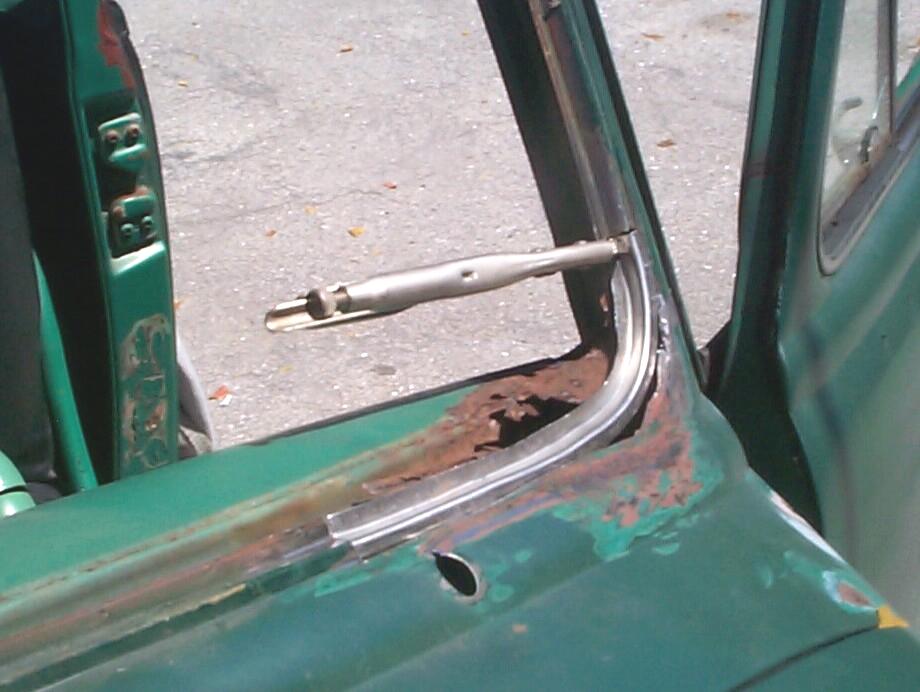 Messed
around for a couple of hours trimmin' bendin' an' fittin' the patch
panel. This side is not going as well as the first time around but I'm
glad things went smoother then. If you hit the bullseye in your first
game of darts, you won't be as discouraged on your subsequent misses.
You at least know that a bullseye is possible. This thing is getting
close. Sometimes, just a couple of wrong moves with the shrinker and
stretcher will distort the shape badly enuf to put you in a panic.
Sometimes you can get the shape back and other times you end up wearing
out the metal and have to start over like last week. This week, I've
recovered from my boo-boos. Just a few more adjustments and we'll tack
it in place.
Messed
around for a couple of hours trimmin' bendin' an' fittin' the patch
panel. This side is not going as well as the first time around but I'm
glad things went smoother then. If you hit the bullseye in your first
game of darts, you won't be as discouraged on your subsequent misses.
You at least know that a bullseye is possible. This thing is getting
close. Sometimes, just a couple of wrong moves with the shrinker and
stretcher will distort the shape badly enuf to put you in a panic.
Sometimes you can get the shape back and other times you end up wearing
out the metal and have to start over like last week. This week, I've
recovered from my boo-boos. Just a few more adjustments and we'll tack
it in place.
April 10th 2004 Darn! I'm gonna hafta burn a good weather day to do inside the Krash Lab organizational crap! Bad plannin' on my part. Office computer maintenance chores have been creepin' up on me. The tax man wants an accounting from me this week too. Thursday is income tax day and "Buy a Gun Day II". I plan to meet both deadlines. I got some new goodies this week from Chevy Duty, Eastwood and TP Tools. Gonna check out those first then post this log entry before diving into the tax return and computer chores.
 From
Chevy Duty are dashboard parts for reassembly after painting and
windshield installation. These consist of another replacement cigarette
lighter assembly to replace the one that melted, a windshield wiper
knob, and choke and throttle cables and knobs. From Eastwood, I picked
up a Paintucation video on color sanding and buffing, and two different
products for heat control during welding, one a putty, the other a gel.
From
Chevy Duty are dashboard parts for reassembly after painting and
windshield installation. These consist of another replacement cigarette
lighter assembly to replace the one that melted, a windshield wiper
knob, and choke and throttle cables and knobs. From Eastwood, I picked
up a Paintucation video on color sanding and buffing, and two different
products for heat control during welding, one a putty, the other a gel.
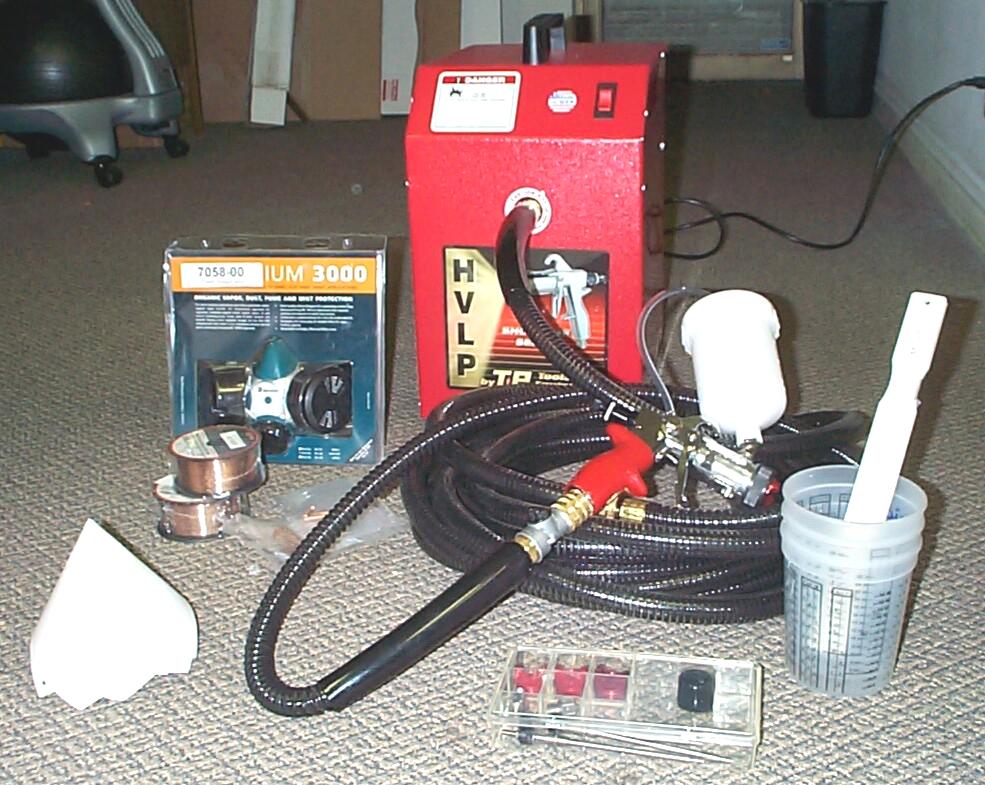 When
I sent for .023 MIG welding wire and tips from TP Tools last week, I
also figured it was time to get a professional paint system. I chose
the Showtime 80 Air Turbine HVLP Paint System with 20 oz Gravity Cup
Paint Gun. Also ordered an Automotive Finish Kit for Showtime 80 and a
Binks Dual Cartridge Paint Respirator. After taking inventory, I found
I was missing one piece for the 1.6 mm nozzle kit that comes with the
Automotive Finish Kit. I'll have to get in touch with TP Tools to
straighten this out, but I've got all I need to get started when the
time comes to paint the upper half of the cab interior.
When
I sent for .023 MIG welding wire and tips from TP Tools last week, I
also figured it was time to get a professional paint system. I chose
the Showtime 80 Air Turbine HVLP Paint System with 20 oz Gravity Cup
Paint Gun. Also ordered an Automotive Finish Kit for Showtime 80 and a
Binks Dual Cartridge Paint Respirator. After taking inventory, I found
I was missing one piece for the 1.6 mm nozzle kit that comes with the
Automotive Finish Kit. I'll have to get in touch with TP Tools to
straighten this out, but I've got all I need to get started when the
time comes to paint the upper half of the cab interior.
OK. Well I gotta get busy on that tax return. The weather outside isn't quite as nice as the experts promised yesterday, so I don't feel as bad about it as I would otherwise. The windshield saga has morphed into the windshield epic with mission creep but I'm over the hump. My new deadline is to be back on the road with BillyBob before it's time to "reason with hurricane season".
| < Back
to Intro |
You can email me at ![]() webmaster@laroke.com
webmaster@laroke.com
Issued Saturday April 10, 2004
Updated Friday February 23, 2018
copyright © 1996-2018 Larry Robert Kephart all rights reserved
| | LRK Home | | Bio Info | | Krash Khronicles | | LAROKE | |
| | BettyLou | | BillyBob's Garage | | Rat Patrol | | Deerslayer | | Elvira | |
| | Land of the Free and Home of the Brave | |
| | Keppylou's Art | | WWI Soldier's Diary | |