| | LRK Home | | Bio Info | | Krash Khronicles | | LAROKE | |
| | BettyLou | | BillyBob's Garage | | Rat Patrol | | Deerslayer | | Elvira | |
| | Land of the Free and Home of the Brave | |
| | Keppylou's Art | | WWI Soldier's Diary | |
BillyBob Work-in-Progress Log
![]()
TRUCK LINKS including vendor sites for old parts, custom parts, and tools as well as sites for classic car and truck organizations
STORE Operating in association with Amazon.com, books, recordings and tools can be purchased.
PLANNING for the restoration including project schedule and cost estimates.
![]()
WORK-IN-PROGRESS is the restoration of parts of BillyBob that I can accomplish without a garage.
PRE-RESTORATION includes log entries of minor repairs and and adventures between time of purchase and the time when I started restoration, a piece at a time.
JR'S KORNER JR's Korner is the history of BillyBob before I got him authored by my brother, Wm. C. Kephart.
![]()
BILLYBOB MAINTENANCE Ever changing detailing, oil change, lube, etc. maintenance routines specifically developed for BillyBob, including required tools, materials and procedures.
STEALTH SHOP Urban residence design with large integrated shop and separate living quarters for a relative or renter.
23. WHOA! Baby: Front Wheel Rebuilds
June 2nd 2002 Drove Renegade last week to keep him limber. Some punk broke in Friday nite at the Krash Pad. Slashed the door skin. Nothing was taken 'cause I leave very little unlocked to be taken to discourage ~!@#holes from slashing the top. That's how I know it was a punk, a stupid one at that. Or, am I being redundant here?
 June
8th 2002 Got back on
the brakes today. Wanted to get the front driver's side backing plate
off to work on it but ran into a snag. The last bolt would not budge
with penetrating oil, MAPP torch heat, breaker bar or impact wrench. I
worked at it 'til ten o'clock. It's hurricane season here in the swamps
an' we're 'sposed to get thunderboomers by mid-afternoon so I gave up
at this point. The small parts I was able to remove were put in the
tumbler for a cleaning. I'll measure the bolts after cleaning and get
some new ones 'cause I might end up breaking a few before I'm finished
with this job. I want to get everything back together by noon to beat
the bad weather.
June
8th 2002 Got back on
the brakes today. Wanted to get the front driver's side backing plate
off to work on it but ran into a snag. The last bolt would not budge
with penetrating oil, MAPP torch heat, breaker bar or impact wrench. I
worked at it 'til ten o'clock. It's hurricane season here in the swamps
an' we're 'sposed to get thunderboomers by mid-afternoon so I gave up
at this point. The small parts I was able to remove were put in the
tumbler for a cleaning. I'll measure the bolts after cleaning and get
some new ones 'cause I might end up breaking a few before I'm finished
with this job. I want to get everything back together by noon to beat
the bad weather.
Well, I didn't get everything back together 'til one-thirty, and I didn't beat the rain. Haste makes waste and I dropped the outermost wheel bearing in the ~!@#$% dirt. Had to stop, clean it and repack it. It was sprinkling by the time I was bleeding the system and raining pretty good by the time I got BillyBob back on the ground and started trying to get the tools back in the shed. Summertime blues.
 July
20th 2002 The upper
bolts turned out to be 7/16-20 x 2-1/2" hex head cap screws and the
lower bolts were 1/2-20 x 4". I ordered and received Grade 8 "armor
coat" bolts from McMaster-Carr and once again
received them in a couple of days time. Only thirty percent chance of
rain today so I went for it. Pulled out all the tools and put
BillyBob's front end up on jackstands. Took the brake drum off and went
after that stubborn bolt right away before taking any of the brake
parts off. This time if came loose pretty easily . . . most likely a
combination of the penetrating oil and applying the wrench
counter-clockwise this time (I think I was twisting it the wrong way
before - boy is my face red).
July
20th 2002 The upper
bolts turned out to be 7/16-20 x 2-1/2" hex head cap screws and the
lower bolts were 1/2-20 x 4". I ordered and received Grade 8 "armor
coat" bolts from McMaster-Carr and once again
received them in a couple of days time. Only thirty percent chance of
rain today so I went for it. Pulled out all the tools and put
BillyBob's front end up on jackstands. Took the brake drum off and went
after that stubborn bolt right away before taking any of the brake
parts off. This time if came loose pretty easily . . . most likely a
combination of the penetrating oil and applying the wrench
counter-clockwise this time (I think I was twisting it the wrong way
before - boy is my face red).
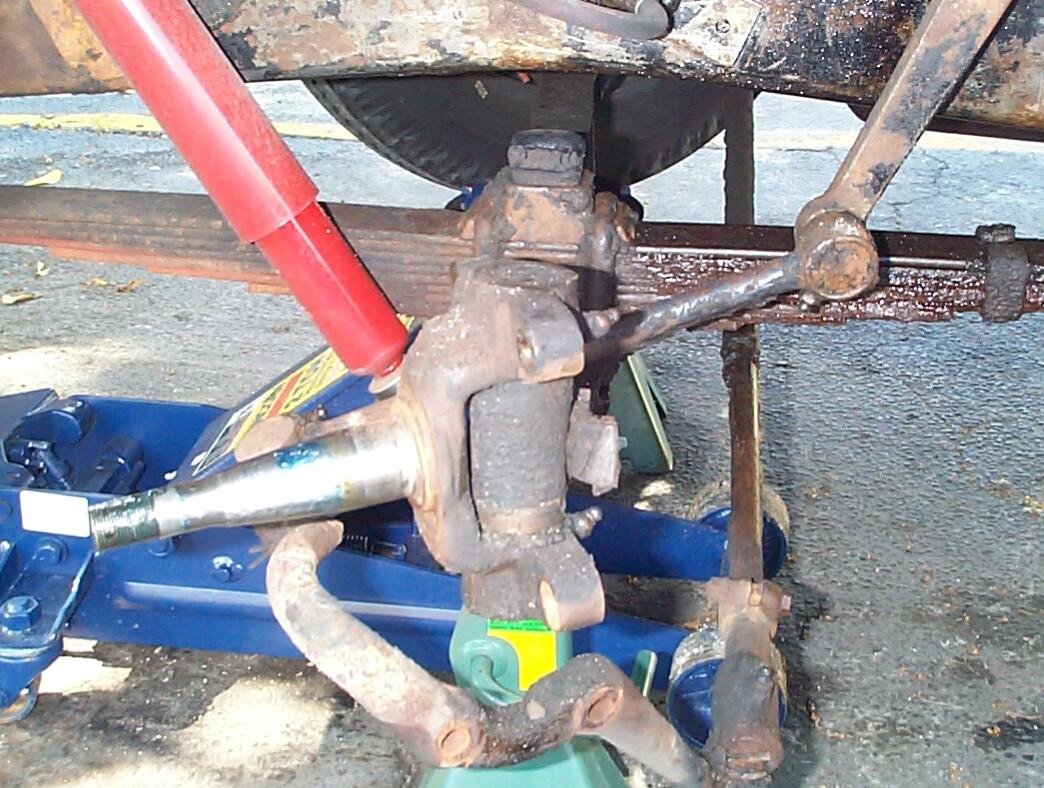
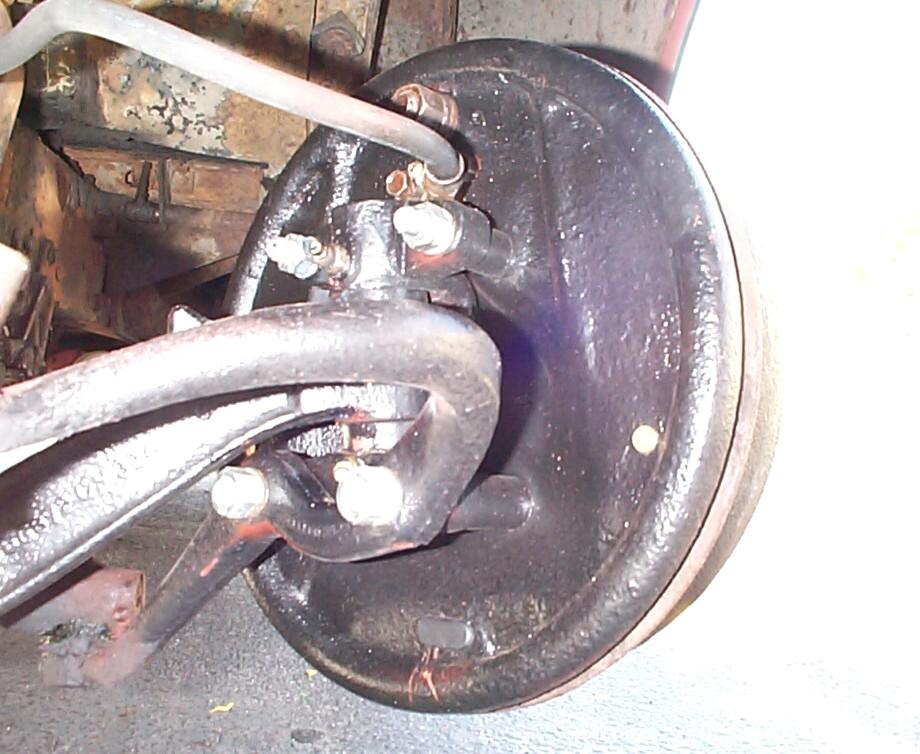
 Took
'bout a half hour to get everything apart. Cleaned up the backing plate
with wire brush and scraper. My drill batteries were both low, so I put
the wire cup in the air-powered angle grinder. This thing runs a little
fast for a wire brush but got the job done (I wore lots of protection
from flying debris including goggles and respirator for dust). Then,
after a PRE Paint Prep treatment, I painted the backing plate, both
sides, with two coats of Eastwood's rattlecan Rust
Encapsulator (Corroless). This was the best access I was gonna get to
the spindle, and axle end so, I cleaned up the area with several
applications of degreaser, wire brush and scraper. After that, it got
the same paint treatment as the backing plate.
Took
'bout a half hour to get everything apart. Cleaned up the backing plate
with wire brush and scraper. My drill batteries were both low, so I put
the wire cup in the air-powered angle grinder. This thing runs a little
fast for a wire brush but got the job done (I wore lots of protection
from flying debris including goggles and respirator for dust). Then,
after a PRE Paint Prep treatment, I painted the backing plate, both
sides, with two coats of Eastwood's rattlecan Rust
Encapsulator (Corroless). This was the best access I was gonna get to
the spindle, and axle end so, I cleaned up the area with several
applications of degreaser, wire brush and scraper. After that, it got
the same paint treatment as the backing plate.
In the mean time, all the small parts were put in the tumbler for a cleaning session. After an hour the back side of the backing plate and the spindle area were finished off with rattlecan Chassis Black. The bolt spacers that go between the backing plate and the spindle were removed from the tumbler and given the same paint treatment.
 By
mid-afternoon I had the backing plate, brake shoes and springs back in
place. At this point all parts are new or rebuilt with the exception of
the shoes which still have plenty of lining. I'd decided I liked the
red lead look of the Rust Encapsulator on the brake shoe side of the
backing plate so I left it exposed. While I was admiring my work,
sounds of approaching thunder reached me from the West. I racheted up
my pace a notch and began to triage the remaining work into tasks that
could be done wet, tasks that would be inconvenient wet and tasks that
should be done dry. It never rained and I was done by four.
By
mid-afternoon I had the backing plate, brake shoes and springs back in
place. At this point all parts are new or rebuilt with the exception of
the shoes which still have plenty of lining. I'd decided I liked the
red lead look of the Rust Encapsulator on the brake shoe side of the
backing plate so I left it exposed. While I was admiring my work,
sounds of approaching thunder reached me from the West. I racheted up
my pace a notch and began to triage the remaining work into tasks that
could be done wet, tasks that would be inconvenient wet and tasks that
should be done dry. It never rained and I was done by four.
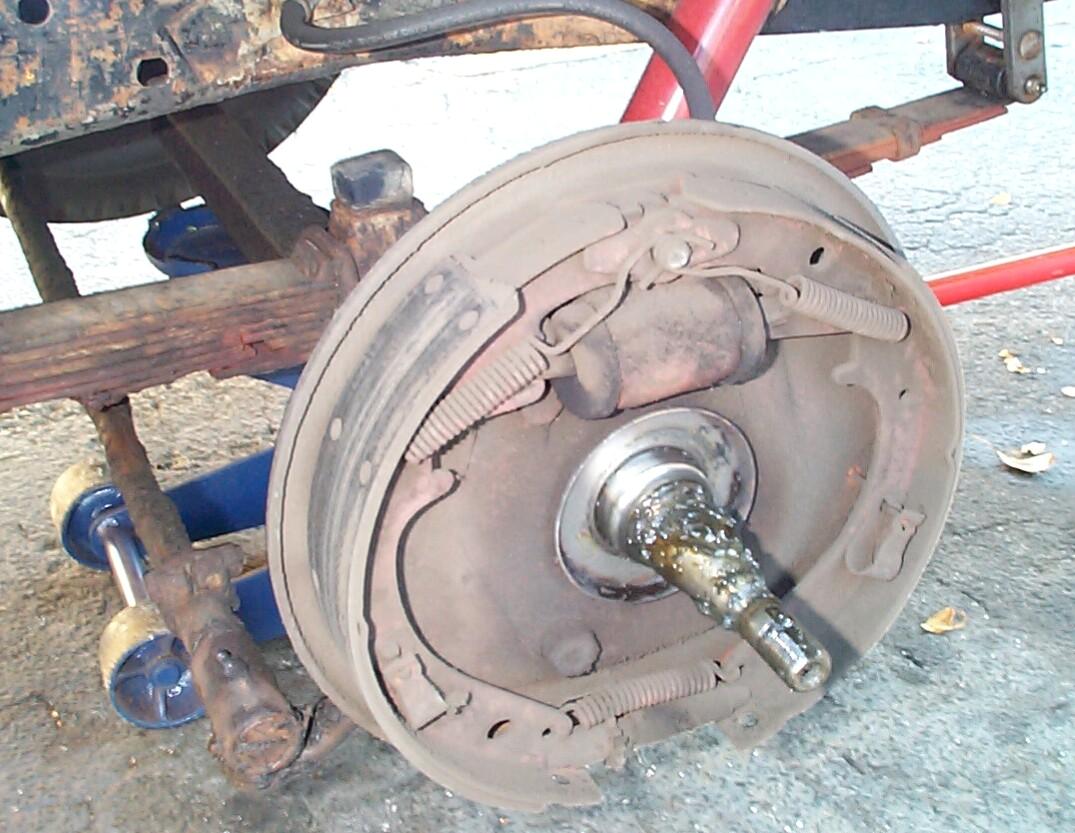
 September
14th 2002 A bit windy
today and tropical storm Hanna is stirrin' things up in the panhandle.
The forecast is 40% chance of rain. I started dragging the tools out of
the shed. Finishing up the driver side front wheel today with wheel
bearing repacking and repainting the brake drum. Also gonna replace a
couple of zerk fittings. Got new bearing seals and an asortment of zerk
fittings from Chevy Duty some time back as well as a bearing packing
tool from Eastwood. Not shown is a seal remover and a bearing race and
seal driver, also from Eastwood. Put Billybob's front end on jack
stands and removed the wheel and brake drum. The seal remover made
short work of the bearing seal. Cleaned grease off of all the bearing
parts and put them in a bucket of carb/parts cleaner to soak. cleaned
off the bearing areas of the drum and decided the better part of valor
was to leave the inner bearing races in place.
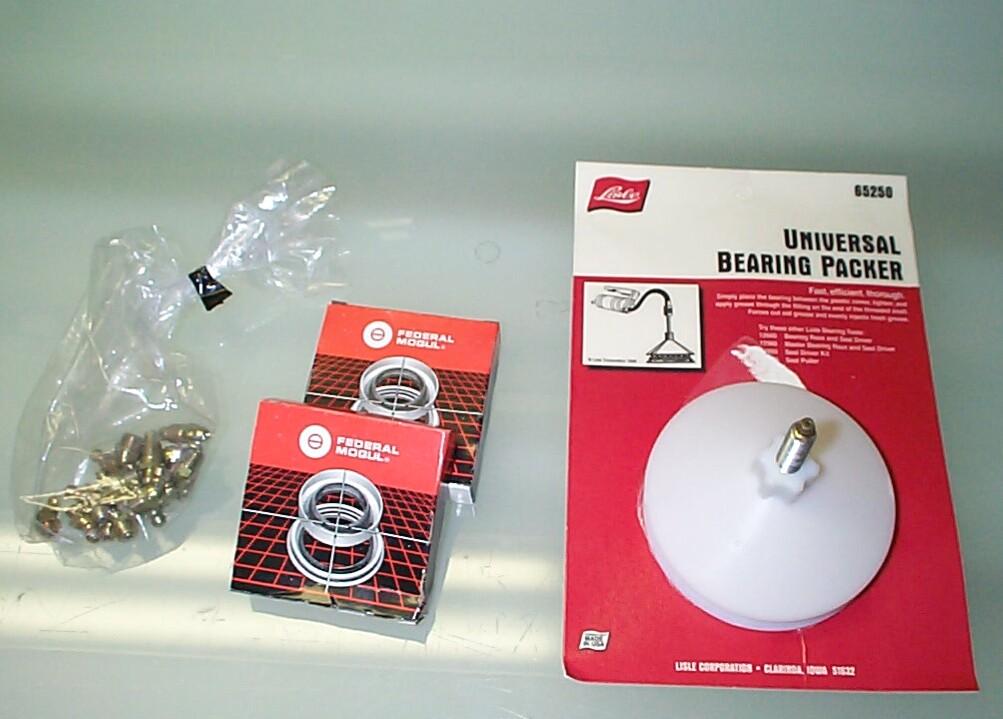
September
14th 2002 A bit windy
today and tropical storm Hanna is stirrin' things up in the panhandle.
The forecast is 40% chance of rain. I started dragging the tools out of
the shed. Finishing up the driver side front wheel today with wheel
bearing repacking and repainting the brake drum. Also gonna replace a
couple of zerk fittings. Got new bearing seals and an asortment of zerk
fittings from Chevy Duty some time back as well as a bearing packing
tool from Eastwood. Not shown is a seal remover and a bearing race and
seal driver, also from Eastwood. Put Billybob's front end on jack
stands and removed the wheel and brake drum. The seal remover made
short work of the bearing seal. Cleaned grease off of all the bearing
parts and put them in a bucket of carb/parts cleaner to soak. cleaned
off the bearing areas of the drum and decided the better part of valor
was to leave the inner bearing races in place.
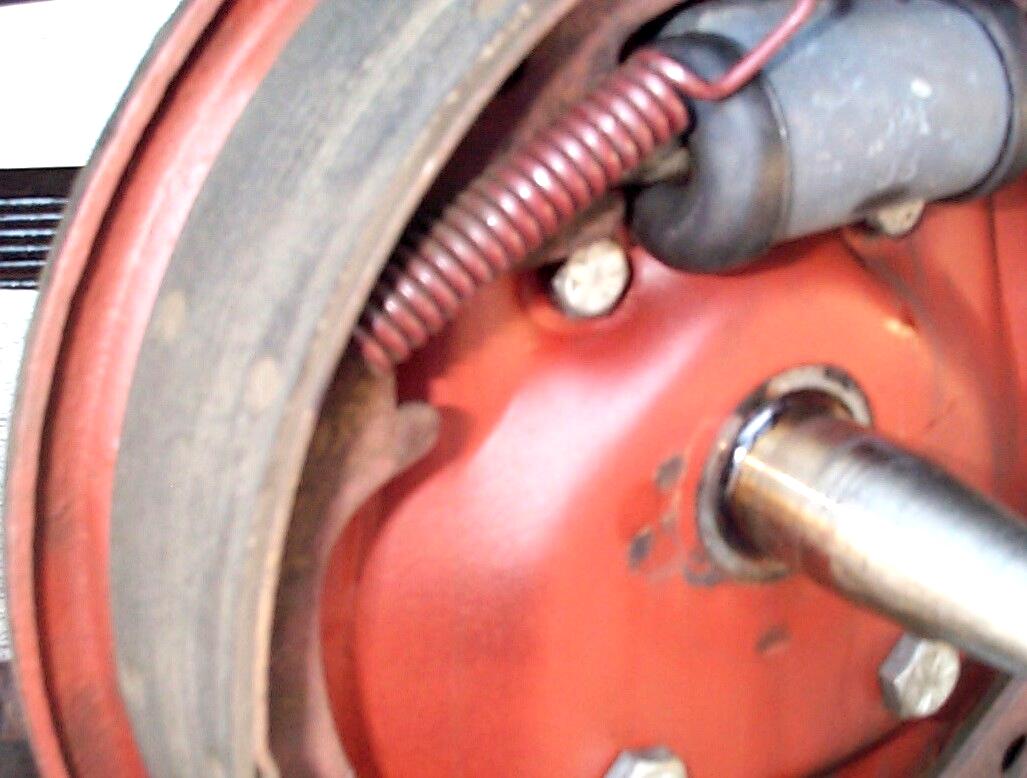
After cleaning, the bearings were packed with the tool from Eastwood. This thing works pretty good tho' I wasn't sure at first and finished up the first (innermost) bearing with the tried 'an true "palm of the hand" packing method. The other, smaller bearing worked fine with the packing tool. Next time, I will do the smaller bearing first. That way a lot of the grease needed for the larger bearing will already be loaded into the tool which consists of two concentric funnels on a hollow, threaded rod with a zerk fitting to introduce the grease. The new oil seal was driven into place with the bearing race and seal driver. All three of these tools are manufactured by Lisle. The drum was placed back on the spindle and the castle nut torqued to thirty-three footpounds while turning the drum, Then backed off to the first slot in the castle nut.
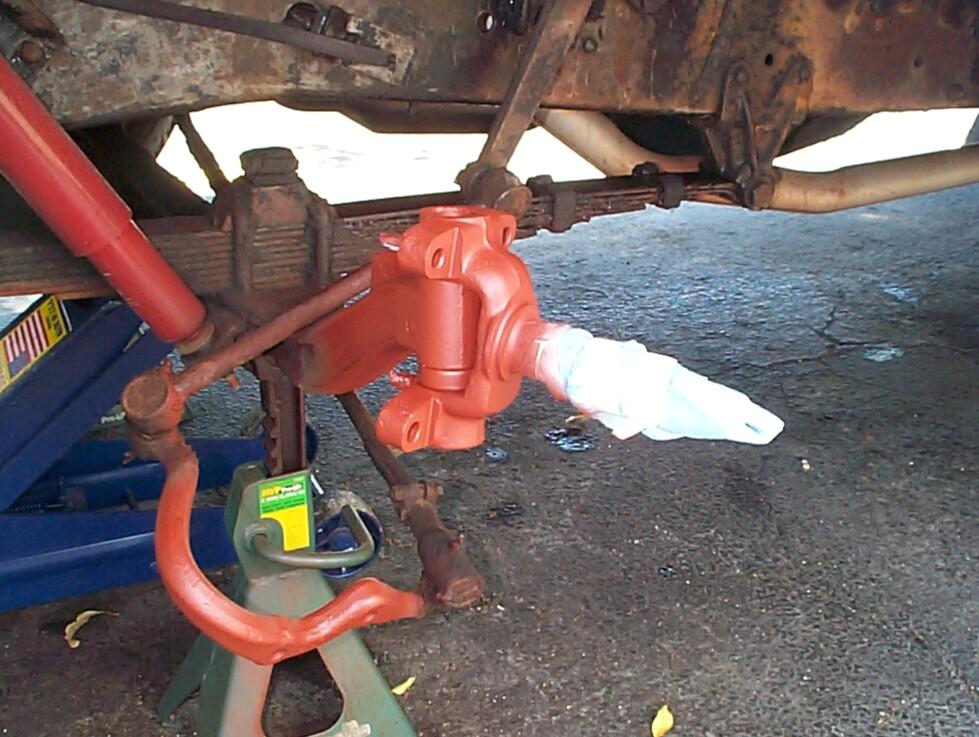
 The
drum was power wire brushed in the areas where brake fluid had eaten
the paint off. The lugs were masked and the drum was treated with PRE
Paint Prep, then Rust Encapsulator. While waiting for the Rust
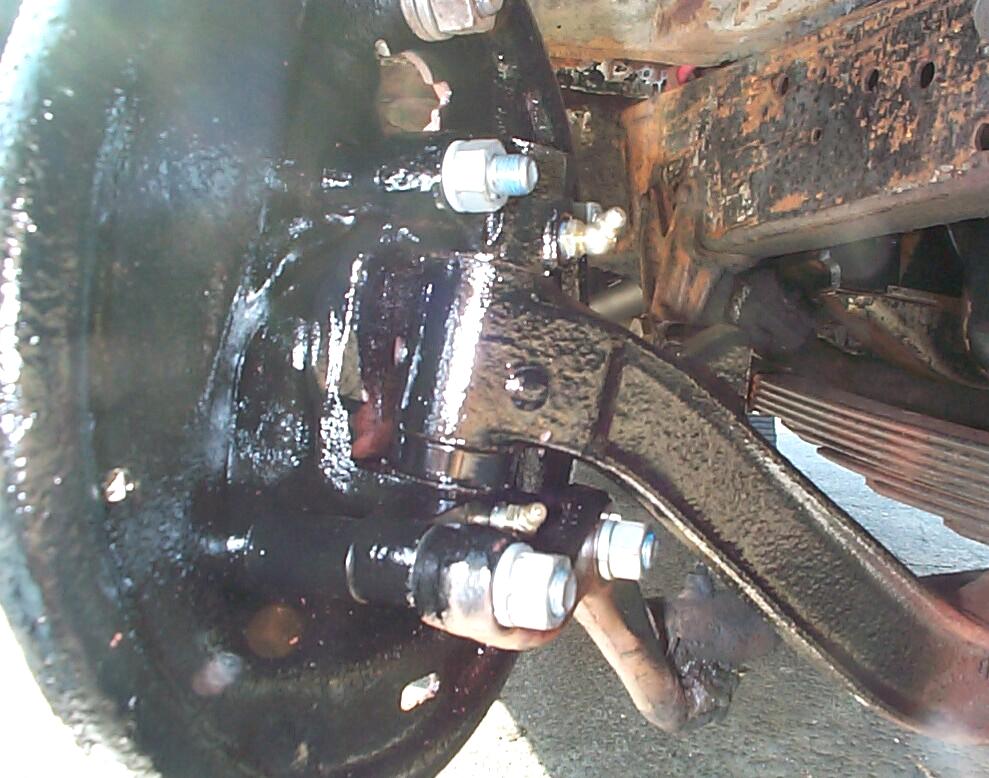
Encapsulator to set up, the lower kingpin zerk fitting was replaced.
The upper zerk fitting was frozen and I couldn't get it out on the
first attempt. It's an elbow zerk fitting so you can't get a six point
socket on it. I quit when the hex nut edges started to round off. I'll
have to work on this another day. It isn't critical for the moment.
Finished up by painting the drum with Eastwood's Chassis Black. Now I
can move on to the passenger side front wheel next time.
The
drum was power wire brushed in the areas where brake fluid had eaten
the paint off. The lugs were masked and the drum was treated with PRE
Paint Prep, then Rust Encapsulator. While waiting for the Rust
Encapsulator to set up, the lower kingpin zerk fitting was replaced.
The upper zerk fitting was frozen and I couldn't get it out on the
first attempt. It's an elbow zerk fitting so you can't get a six point
socket on it. I quit when the hex nut edges started to round off. I'll
have to work on this another day. It isn't critical for the moment.
Finished up by painting the drum with Eastwood's Chassis Black. Now I
can move on to the passenger side front wheel next time.
 October
26th 2002 Beautiful
working weather in the shadetree garage today. Put BillyBob's front end
up on jackstands and removed the passenger side front wheel. Noticed
four broken leaves in the spring right behind the axle for the first
time. Damn! Maybe I've seen this break before but it just didn't
register on me 'til now. OK. Gonna move the spring replacement to the
front of the line in the frame work tasks. Pulled the brake drum and .
. . once again, I dropped the wheel bearing in the dirt! Someone remind
me to put down paper next time since my butterfingers with the bearings
seems to be turning into a ritual. No noticable leaks here and the
linings look OK.
October
26th 2002 Beautiful
working weather in the shadetree garage today. Put BillyBob's front end
up on jackstands and removed the passenger side front wheel. Noticed
four broken leaves in the spring right behind the axle for the first
time. Damn! Maybe I've seen this break before but it just didn't
register on me 'til now. OK. Gonna move the spring replacement to the
front of the line in the frame work tasks. Pulled the brake drum and .
. . once again, I dropped the wheel bearing in the dirt! Someone remind
me to put down paper next time since my butterfingers with the bearings
seems to be turning into a ritual. No noticable leaks here and the
linings look OK.
Put the bearing I dropped in parts cleaner to soak. Left the inside bearing in place since I'm not ready yet to replace the seal today. Removed and replaced the backing plate bolts and hex nuts one at a time. The lower, larger bolts had castle nuts and cotter pins, which the other side didn't. I replaced them with regular hex nuts and bolts secured with threadlocker blue to match the driver's side. I need to get some new 1/2" lock washers before I break this wheel down again too. Also did some preliminary cleaning with Pyroil Brake Parts Cleaner before repacking the bearings and replacing the drum. Today's efforts are to make things go smoother when I revisit this wheel to replace the wheel cylinder, springs and adjuster in a month or so.
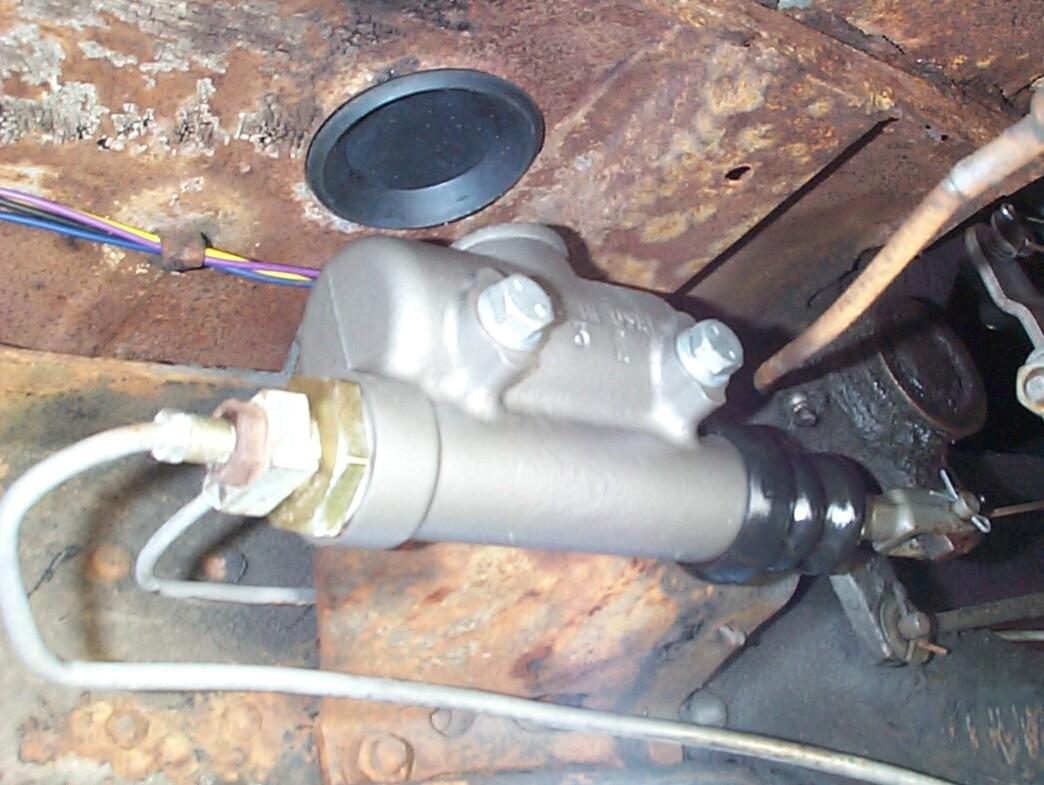 Due
to my sloppiness in topping off the master cylinder, brake fluid has
eaten away the clear coat paint and the master cylinder now has some
rust streaks. I masked off around the master cylinder, applied PRE
paint Prep and then a coat of Eastwood's Spray Gray paint (#1258Z) to
restore the "cast iron" look. Replaced the master cylinder bolts and
lock washers with new ones since I had to purchase more than I needed
when I ordered them from McMaster-Carr originally. I'll clean up the
ones I just removed and place them back in inventory. Cleaned the
rubber boot and treated it with Armorall. I would'uv liked it if the
Spray Gray paint had been a shade darker, but it'll do. I've also
picked up a battery water bulb dropper to use for more precise brake
fluid fill ups.
Due
to my sloppiness in topping off the master cylinder, brake fluid has
eaten away the clear coat paint and the master cylinder now has some
rust streaks. I masked off around the master cylinder, applied PRE
paint Prep and then a coat of Eastwood's Spray Gray paint (#1258Z) to
restore the "cast iron" look. Replaced the master cylinder bolts and
lock washers with new ones since I had to purchase more than I needed
when I ordered them from McMaster-Carr originally. I'll clean up the
ones I just removed and place them back in inventory. Cleaned the
rubber boot and treated it with Armorall. I would'uv liked it if the
Spray Gray paint had been a shade darker, but it'll do. I've also
picked up a battery water bulb dropper to use for more precise brake
fluid fill ups.
December 28th 2002 Another chilly morning here in the shadetree garage. Dragged the tools out of the shed and began trashing the Krash Lab to find the parts needed for the passenger side front wheel rebuild . . . OOPS! Shot myself in the foot again. The replacement wheel cylinder was nowhere to be found. Checking my inventory spreadsheet, discovered it was up at the warehouse. Well, it's already getting too late to do all the work I have scheduled for today so, I'll postpone the work until next week and do something else.
February 1st 2003 The whole month of January had cold weekends. Today, it's finally warm enough to work comfortably outside again. Started draggin' the tools out of the shed. Had everything apart down the the spindle by ten hundred hours. Put the parts I was re-using into the tumbler for a cleaning session. This included the cap screws used to fasten the wheel cylinder to the backing plate as the new wheel cylinder did not come with new cap screws. One of the cap screws (5/16"-18 x 1/2" long) is pretty well butchered an' I'm gonna try to clean it up with a die until I can get new fasteners.
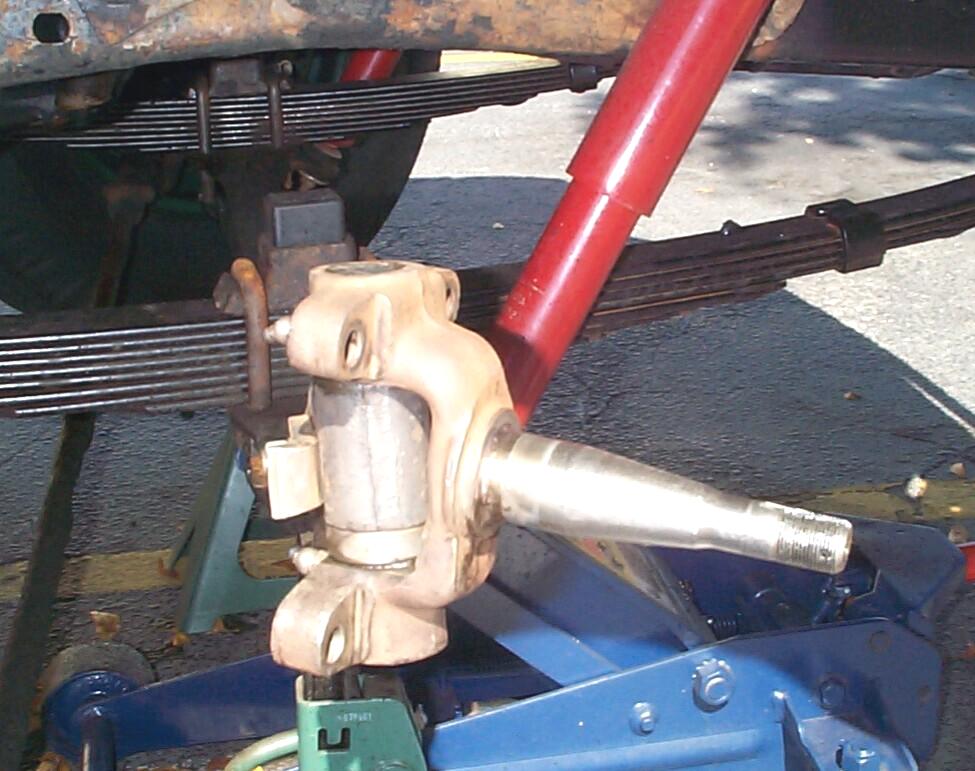 By
11:30, I had the backing plate scraped, wire-brushed, PRE paint prepped
and painted with a coat of Rust Encapsulator. It was about that time
that a co-worker, George, pulled into the parking lot and informed me
of the space shuttle Columbia tragedy. Put a damper on the day's
operations but I continued on. Started degreasing, scraping and
wire-brushing the spindle and axle end. Then the spindle and zerk
fittings were masked off and PRE paint prepped. Finally a coat of Rust
Encapsulator was applied. While that was setting up, the backing plate
bolt spacers were fished out of the tumbler, PRE paint prepped and
given a shot of Rust Encapsulator. After giving the Rust Encapsulator a
bit of time to cure, the spindle/axle end, spacers and back side of the
backing plate were finished off with a coat of rattlecan Chassis Black.
By
11:30, I had the backing plate scraped, wire-brushed, PRE paint prepped
and painted with a coat of Rust Encapsulator. It was about that time
that a co-worker, George, pulled into the parking lot and informed me
of the space shuttle Columbia tragedy. Put a damper on the day's
operations but I continued on. Started degreasing, scraping and
wire-brushing the spindle and axle end. Then the spindle and zerk
fittings were masked off and PRE paint prepped. Finally a coat of Rust
Encapsulator was applied. While that was setting up, the backing plate
bolt spacers were fished out of the tumbler, PRE paint prepped and
given a shot of Rust Encapsulator. After giving the Rust Encapsulator a
bit of time to cure, the spindle/axle end, spacers and back side of the
backing plate were finished off with a coat of rattlecan Chassis Black.
 The
rest of the small parts were taken out of the tumbler and the wheel
cylinder cap screws were cleaned up enuf with a die to use. The paint
wasn't quite dry but time was running out so, I carefully bolted the
backing plate back in place with threadlocker blue on the mounting
bolts and two new angled zerk fittings on the kingpins. It was now
almost 3:30 in the afternoon.
The
rest of the small parts were taken out of the tumbler and the wheel
cylinder cap screws were cleaned up enuf with a die to use. The paint
wasn't quite dry but time was running out so, I carefully bolted the
backing plate back in place with threadlocker blue on the mounting
bolts and two new angled zerk fittings on the kingpins. It was now
almost 3:30 in the afternoon.
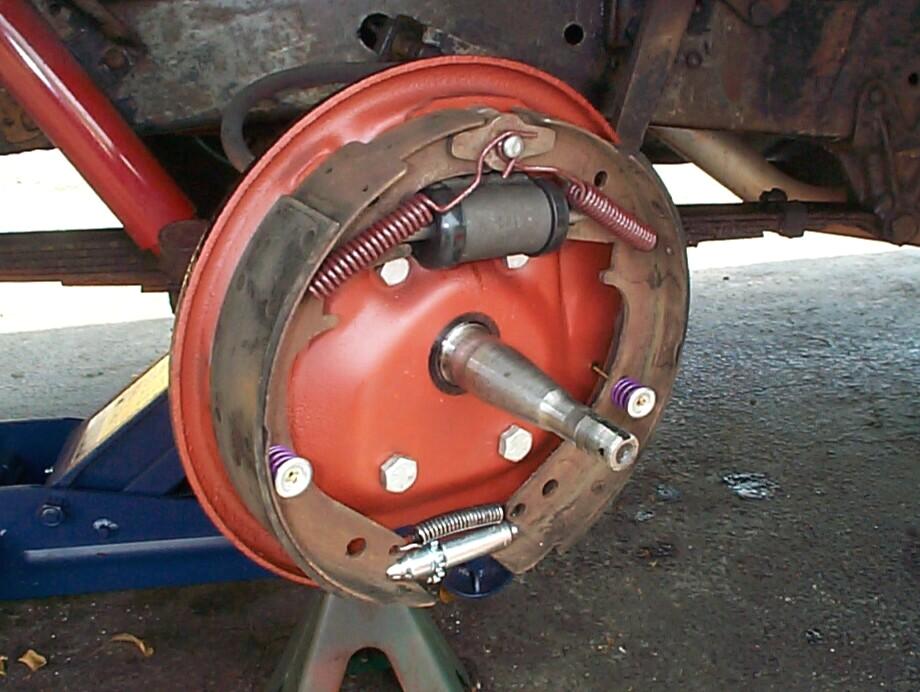
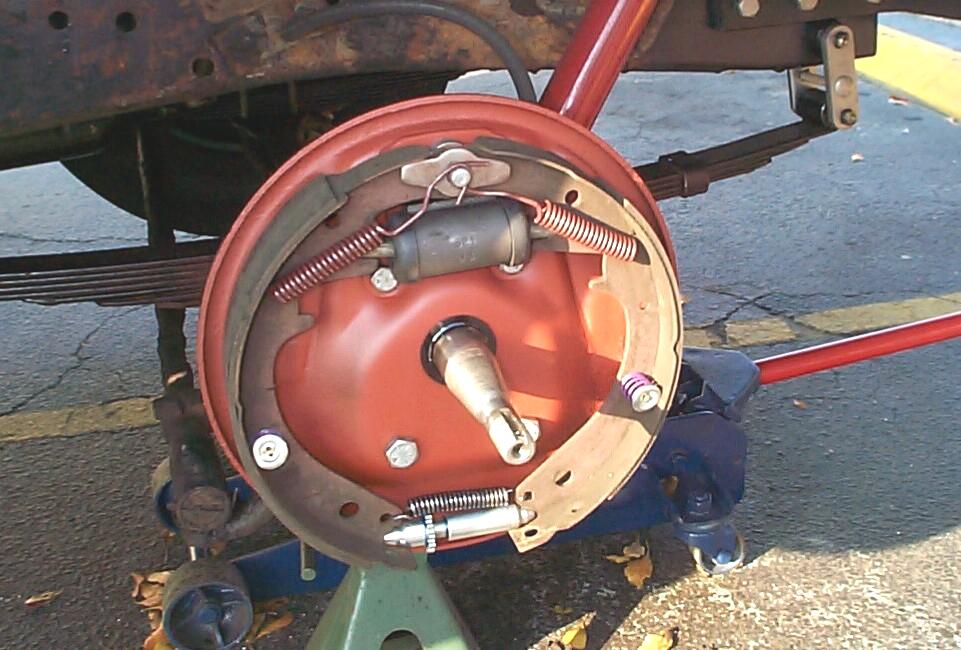 By
4:30 I had the shoes back on with new springs and adjuster. Chassis
grease was used to lube the adjuster threads before assembly.
Specialized brake tools to install the springs are a godsend. I
remember as "a lonely teenage broncin' buck"
struggling with the brake springs of my '59 Ferd with a screwdriver,
vice-grips and channel-lock pliers . . . What a pain that was! It took
me until six o'clock to get the brakes adjusted and bled. No pull, no
noise, no fumes on the way home. It took a heavier foot on the brake
pedal now which I didn't expect. Still got to repack the wheel bearing,
replace the seal, and tie up a few loose ends before this wheel is
finished.
By
4:30 I had the shoes back on with new springs and adjuster. Chassis
grease was used to lube the adjuster threads before assembly.
Specialized brake tools to install the springs are a godsend. I
remember as "a lonely teenage broncin' buck"
struggling with the brake springs of my '59 Ferd with a screwdriver,
vice-grips and channel-lock pliers . . . What a pain that was! It took
me until six o'clock to get the brakes adjusted and bled. No pull, no
noise, no fumes on the way home. It took a heavier foot on the brake
pedal now which I didn't expect. Still got to repack the wheel bearing,
replace the seal, and tie up a few loose ends before this wheel is
finished.
March 1st 2003 Gettin' a hard start this year . . . January was full of cold weekends and February was consumed by re-carpeting operations here at the Krash Lab. Only a couple of weekends of work on BillyBob in the last two months. I'm unhappy with the brakes so far. Stoppin' BillyBob is like piloting a supertanker. Ya gotta think way far ahead of a stop. I've had a couple of close calls. I'm not getting a pull to either side anymore but now I think that's because the front brakes aren't engaging . . . The couple of times I've locked it up, only the rear wheels left skid marks. Also, after a short drive, the rear wheels are slightly warm while the front ones are cold. There's a silver lining to every dark cloud, the oldtimers say, an' I guess this one is that I didn't "fix" all four wheels at the same time 'an screw 'em all up!
First thing this morning, I put BillyBob's front end up on jackstands and depressed the brake pedal with a short length of two-by-four. Good news is that the front brakes engaged . . . Bad news is that I could rotate the wheels if I tried hard enuf 'an I'm no Charlie Atlas. First remedy I'm gonna try is the adjustment spoon. I worked the adjuster on each front wheel until I got the slightest drag and I couldn't move the wheels with the two-by-four "helper" in place. We'll see how that works on the drive home tonite. I spent the next fifteen minutes lookin' for my reading glasses. I had left them in the shop manual at the brake adjustment page. While I wuz outside, Wingnut the parrot had flapped his wings enuf to flip some pages and hide the glasses. Wingnut isn't talking so I don't know if he did it on purpose or not.
March 2nd 2003 On the way home yesterday, I had my brakes back. Wot a relief! I had pull to the passenger side again so I'm gonna make further adjustments by expanding the driver side adjuster three notches at a time while contracting the passenger side adjuster by the same amount.
 May
3rd 2003 Overcast but
otherwise good weather today. Last week I had to do real work
installing seven new computers in the Krash Lab. Saturday was an all
day soaking rain so I didn't feel as bad about it as I would have if
there had been sunshine in the shadetree garage. Today, as I was
getting the tools out of the shed, my makeshift particle board ramp
failed. It is still long enuf to work so I have a month or two to think
about fixin' it.
May
3rd 2003 Overcast but
otherwise good weather today. Last week I had to do real work
installing seven new computers in the Krash Lab. Saturday was an all
day soaking rain so I didn't feel as bad about it as I would have if
there had been sunshine in the shadetree garage. Today, as I was
getting the tools out of the shed, my makeshift particle board ramp
failed. It is still long enuf to work so I have a month or two to think
about fixin' it.
Finishin' up the front brakes today. Back when I found the damaged threads on the old wheel cylinder cap screws, I ordered new 5/16"-18 x 1/2" cap screws and external toothed lock washers from McMaster-Carr. Carroll Smith, in his "Nuts, Bolts, Fasteners and Plumbing Handbook", doesn't think much of lock washers but I still use them to satisfy my sense of superstition. First task today was to replace those cap screws and washers on both front wheel cylinders. No problem with BillyBob jacked up and both front wheels removed. Did the driver's side using a dab of threadlocker blue in a few minutes. Passenger side was another matter. Starting threads of the rear fastener opening in the wheel cylinder were buggered and I didn't have success until I chased the threads with a tap.
That done, the bearings and associated parts were submerged in parts cleaner after the bearing seal was pryed out and thrown away. The drum was cleaned up, again leaving the inner bearing races in place. The bearing parts were fished out of the cleaning soup, one-by-one, dried and installed. Bearings were packed with the tool and then the castle nut was torqued to thirty-three footpounds (while rotating the drum), then backed off a notch to insert the cotter pin. Tires were re-installed and BillyBob put back on the ground.
 That's
it for this log entry. I wanted to write that I am about two-thirds
finished with the brake hydraulics at this point. The brake lines are
only a few years old, having been replaced by my mechanic, Gary Morris,
in 1998 and I have replaced the master cylinder, front wheel cylinders,
springs, adjusters and seals. Wanted to move on to the rear wheels next
episode but I noticed one of the shoe linings is getting thin enuf for
a rivet head to come in contact with the drum soon so, I will be
replacing the front wheel shoes in the next few weeks instead. Still
got minor electrical, doors, continuing frame work, cab, bodywork and
underhood tasks to report on too. Y'all come back now, ya hear?
That's
it for this log entry. I wanted to write that I am about two-thirds
finished with the brake hydraulics at this point. The brake lines are
only a few years old, having been replaced by my mechanic, Gary Morris,
in 1998 and I have replaced the master cylinder, front wheel cylinders,
springs, adjusters and seals. Wanted to move on to the rear wheels next
episode but I noticed one of the shoe linings is getting thin enuf for
a rivet head to come in contact with the drum soon so, I will be
replacing the front wheel shoes in the next few weeks instead. Still
got minor electrical, doors, continuing frame work, cab, bodywork and
underhood tasks to report on too. Y'all come back now, ya hear?
| < Back
to Intro |
You can email me at ![]() webmaster@laroke.com
webmaster@laroke.com
Issued Saturday May 3, 2003
Updated Tuesday February 13, 2018
copyright © 1996-2018 Larry Robert Kephart all rights reserved
| | LRK Home | | Bio Info | | Krash Khronicles | | LAROKE | |
| | BettyLou | | BillyBob's Garage | | Rat Patrol | | Deerslayer | | Elvira | |
| | Land of the Free and Home of the Brave | |
| | Keppylou's Art | | WWI Soldier's Diary | |