| | LRK Home | | Bio Info | | Krash Khronicles | | LAROKE | |
| | BettyLou | | BillyBob's Garage | | Rat Patrol | | Deerslayer | | Elvira | |
| | Land of the Free and Home of the Brave | |
| | Keppylou's Art | | WWI Soldier's Diary | |
BillyBob Work-in-Progress Log
![]()
TRUCK LINKS including vendor sites for old parts, custom parts, and tools as well as sites for classic car and truck organizations
STORE Operating in association with Amazon.com, books, recordings and tools can be purchased.
PLANNING for the restoration including project schedule and cost estimates.
![]()
WORK-IN-PROGRESS is the restoration of parts of BillyBob that I can accomplish without a garage.
PRE-RESTORATION includes log entries of minor repairs and and adventures between time of purchase and the time when I started restoration, a piece at a time.
JR'S KORNER JR's Korner is the history of BillyBob before I got him authored by my brother, Wm. C. Kephart.
![]()
BILLYBOB MAINTENANCE Ever changing detailing, oil change, lube, etc. maintenance routines specifically developed for BillyBob, including required tools, materials and procedures.
15. WHOA! Baby: Wheel and Master Cylinders
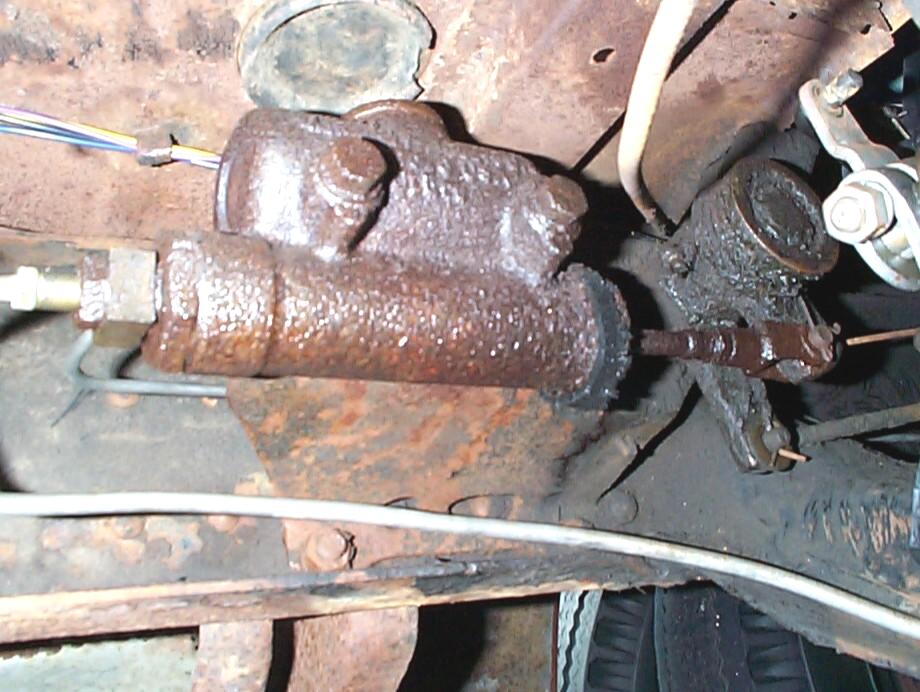
 December
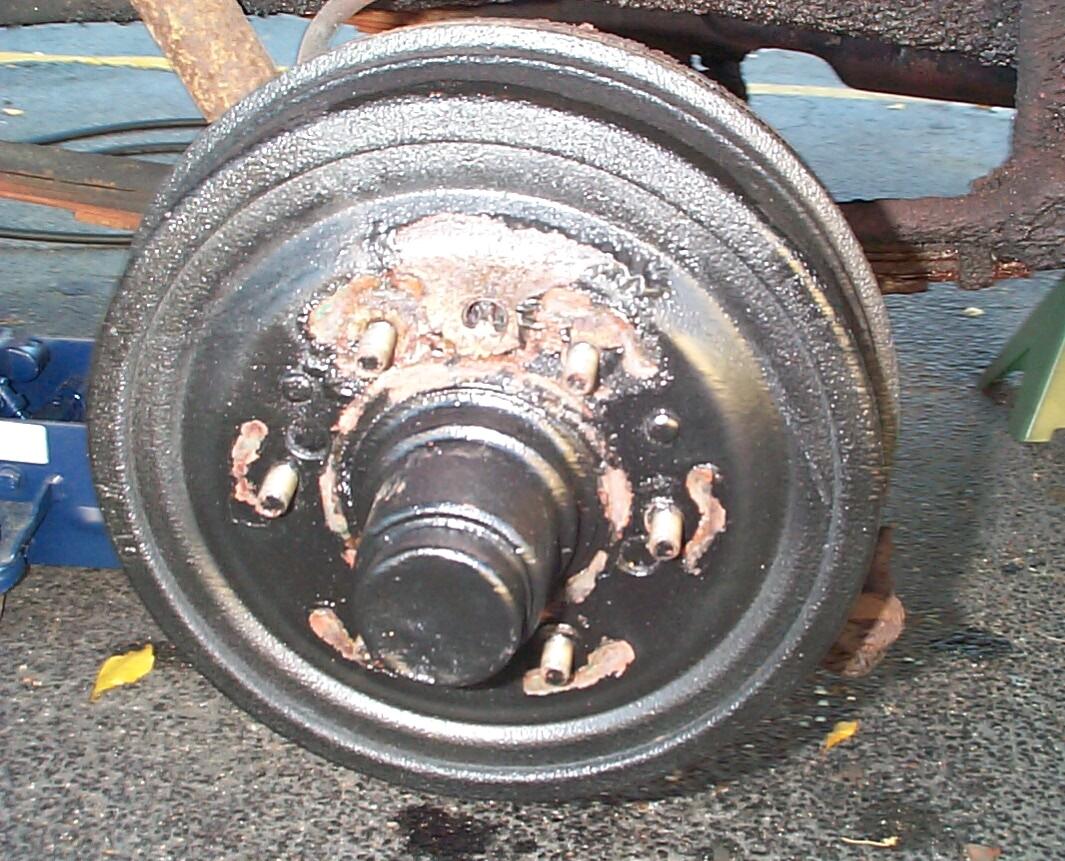
16th 2001 When I took
off the driver side front wheel this morning to replace the front
shocks, I found this mess. Looked like paint remover on the drum which
is just about the effect that brake fluid has on paint. I'd been losing
brake fluid over time. Here was the first indication of where it was
going. Also been experiencing a pull to the passenger side while
braking. A leaking brake cylinder and saturated linings could be
causing most of the front braking to be carried out by the passenger
side wheel. I went inside and ordered brake parts from Chevy-Duty online.
I've got most of the brake tools I need but, just between you and me, I
wouldn't mind if I never had to get them out.
December
16th 2001 When I took
off the driver side front wheel this morning to replace the front
shocks, I found this mess. Looked like paint remover on the drum which
is just about the effect that brake fluid has on paint. I'd been losing
brake fluid over time. Here was the first indication of where it was
going. Also been experiencing a pull to the passenger side while
braking. A leaking brake cylinder and saturated linings could be
causing most of the front braking to be carried out by the passenger
side wheel. I went inside and ordered brake parts from Chevy-Duty online.
I've got most of the brake tools I need but, just between you and me, I
wouldn't mind if I never had to get them out.
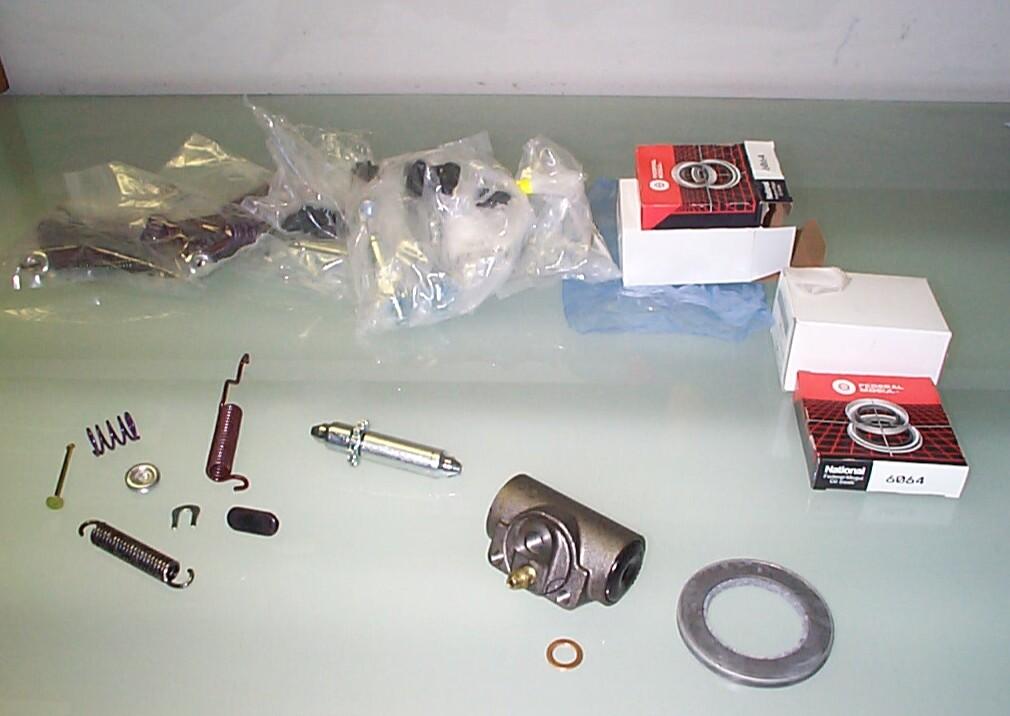
 December
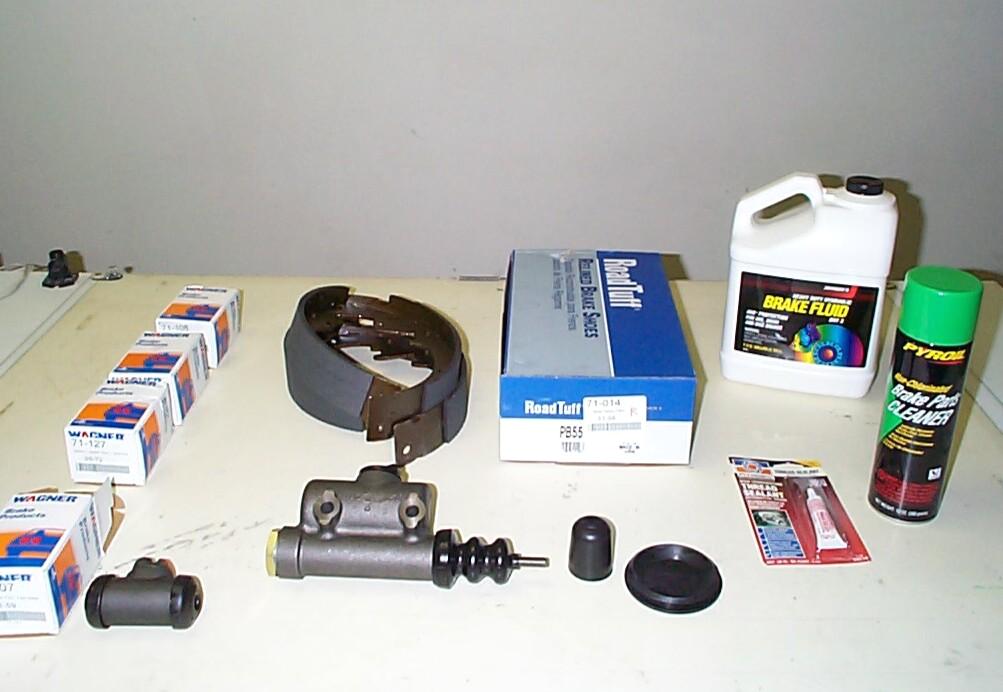
21st 2001 Care package
of brake parts arrived from Chevy Duty today including (#40-325) Master
Cylinder Access Plug 47-59, (#71-012) Left and Right Front Brake Shoes
51-63, (#71-014) left and Right Rear Brake Shoes 51-58, (#71-107) Wheel
Cylinder Frt L 51-59, (#71-108) Wheel Cylinder Frt R 51-59, (#71-127)
Wheel Cylinder Rear L 55-72, (#71-128) Wheel Cylinder Rear R 55-72,
(#71-207) Master Cylinder 52-54, and (#71-285) Master Clyinder Boot
47-72. Sometimes it is hard to determine the correct parts for BillyBob
since he is a 55 1st Series. Most times, you
should order parts made for a '54, but not always. I'm pretty sure
BillyBob's rear axle is the same as later Task Force models, so I
ordered the 55-72 rear wheel cylinders. On the other hand, I went with
the Advance Design Master Cylinder 52-54. Time will tell whether I
flubbed up or not. Also stopped at the FLAPS (Friendly Auto Parts
Store) on the way back from retrieving BillyBob from his warehouse bay
and picked up a gallon of Johnsen's DOT 3 Brake Fluid, Pyroil Brake
Parts Cleaner, and Permatex High Temp Thread Sealant.
December
21st 2001 Care package
of brake parts arrived from Chevy Duty today including (#40-325) Master
Cylinder Access Plug 47-59, (#71-012) Left and Right Front Brake Shoes
51-63, (#71-014) left and Right Rear Brake Shoes 51-58, (#71-107) Wheel
Cylinder Frt L 51-59, (#71-108) Wheel Cylinder Frt R 51-59, (#71-127)
Wheel Cylinder Rear L 55-72, (#71-128) Wheel Cylinder Rear R 55-72,
(#71-207) Master Cylinder 52-54, and (#71-285) Master Clyinder Boot
47-72. Sometimes it is hard to determine the correct parts for BillyBob
since he is a 55 1st Series. Most times, you
should order parts made for a '54, but not always. I'm pretty sure
BillyBob's rear axle is the same as later Task Force models, so I
ordered the 55-72 rear wheel cylinders. On the other hand, I went with
the Advance Design Master Cylinder 52-54. Time will tell whether I
flubbed up or not. Also stopped at the FLAPS (Friendly Auto Parts
Store) on the way back from retrieving BillyBob from his warehouse bay
and picked up a gallon of Johnsen's DOT 3 Brake Fluid, Pyroil Brake
Parts Cleaner, and Permatex High Temp Thread Sealant.
 December
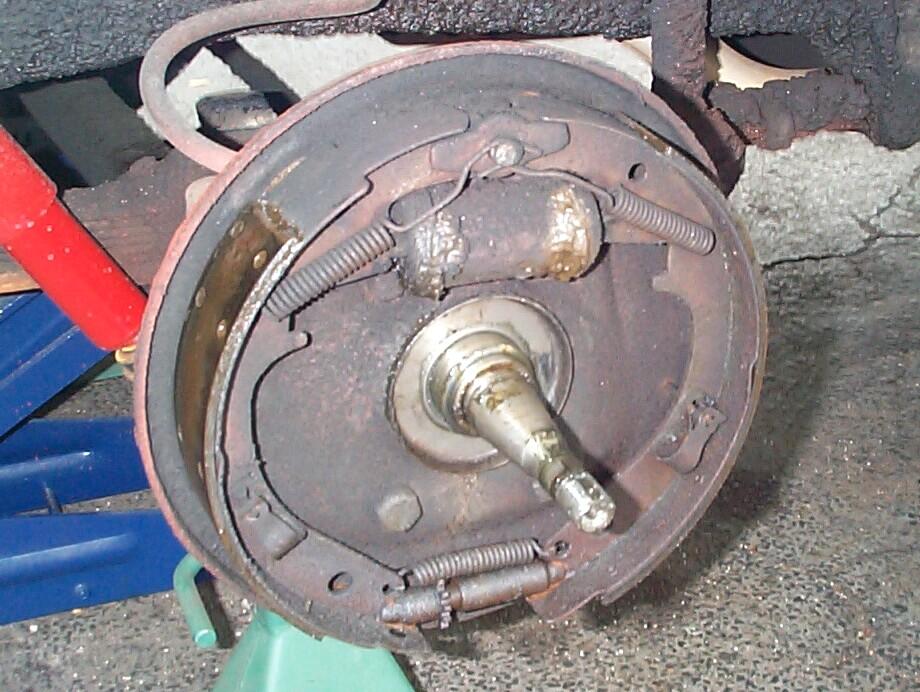
22nd 2001 Jacked up
BillyBob and removed the driver side front wheel and brake drum. The
wheel cylinder was a mess as suspected. There was fluid on the shoe
surfaces and I don't know at this point whether they're salavagable or
not. After some headscratching, I managed to get everything off down to
the backing plate. The adjuster was frozen so I tossed it and the other
small parts in the tumbler for a cleaning session.
December
22nd 2001 Jacked up
BillyBob and removed the driver side front wheel and brake drum. The
wheel cylinder was a mess as suspected. There was fluid on the shoe
surfaces and I don't know at this point whether they're salavagable or
not. After some headscratching, I managed to get everything off down to
the backing plate. The adjuster was frozen so I tossed it and the other
small parts in the tumbler for a cleaning session.
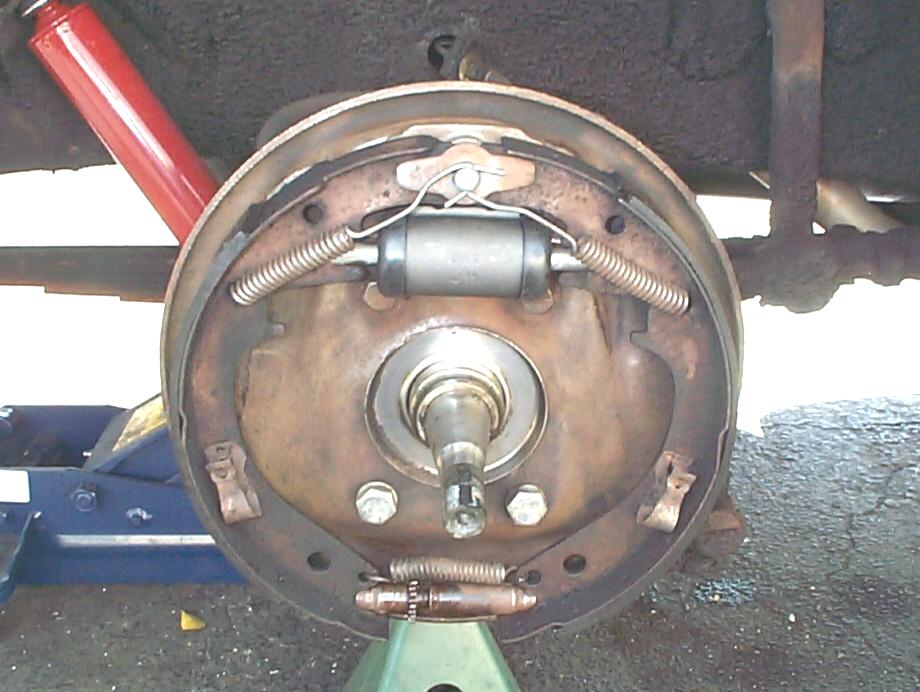 Cleaned
up the backing plate with brake parts cleaner, rags and wire brush
while the tumbler session was running. Next time I'll see about taking
the backing plate off so I can paint it. High noon and time to start
putting things together so I'll be able to drive home later. Removed
the bleeder valve from the new wheel cylinder and gave it a dab of
Permatex Anti-Seize on the threads. Connected the brake hose to the new
wheel clyinder with Permatex High Temp Thread Sealant. Bolted the wheel
cylinder in place using Permatex Threadlocker Blue and put the rest of
the brakes back together. Oh yeah - remembered to put the shoe with the
shorter lining to the front (they are not the same and, therefore, not
interchangeable) Used some Brakes Parts Cleaner on the shoes and drum.
Some penetrating oil got the adjuster working again. Buttoned
everything up and torqued the wheel bearing nut to spec (33 foot
pounds) and backed it off to the first hole I could put the cotter pin
thru.
Cleaned
up the backing plate with brake parts cleaner, rags and wire brush
while the tumbler session was running. Next time I'll see about taking
the backing plate off so I can paint it. High noon and time to start
putting things together so I'll be able to drive home later. Removed
the bleeder valve from the new wheel cylinder and gave it a dab of
Permatex Anti-Seize on the threads. Connected the brake hose to the new
wheel clyinder with Permatex High Temp Thread Sealant. Bolted the wheel
cylinder in place using Permatex Threadlocker Blue and put the rest of
the brakes back together. Oh yeah - remembered to put the shoe with the
shorter lining to the front (they are not the same and, therefore, not
interchangeable) Used some Brakes Parts Cleaner on the shoes and drum.
Some penetrating oil got the adjuster working again. Buttoned
everything up and torqued the wheel bearing nut to spec (33 foot
pounds) and backed it off to the first hole I could put the cotter pin
thru.
Bled this wheel using a Mityvac bleeding system I bought over a year ago. Basically, you connect it to the bleeder valve and use vacuum to "pull" the fluid into the mityvac's reservoir jar until the fluid is free of bubbles. Topped off the master cylinder, put the wheel back on, lowered BillyBob, crossed my fingers and went for a test ride around the block. Hurrah! No pull to the passenger side, no pumping the pedal, no screeching like a randy bull elephant. Life is good.
January 20th 2002 The ride home indicated that things wern't quite as hunky-dory as I first thought. When I stopped at stop lights, I could see slight vapors wafting out of the wheelwell and I could smell something cooking off. I assumed it was the brake cleaner on the shoes. When I got home, that particular wheel was warm to the touch, but not hot. Both vapors and odors disappeared in the next day or two.
 On
Christmas Eve, I placed a Chevy Duty web order for (#71-521) brake
spring kits, (#71-611) adjusters and (#71-691) adjuster access plugs
for all four wheels. I waited a week but didn't get the customary order
confirmation and shipping e-mails. On new Year's Eve, I placed the
order again. Additionally, I ordered (#73-111) front wheel bearing
seals and a pair of (#71-126) 1954 rear wheel cylinders since the 1955
wheel cylinders looked a bit different from the existing ones on
BillyBob.
On
Christmas Eve, I placed a Chevy Duty web order for (#71-521) brake
spring kits, (#71-611) adjusters and (#71-691) adjuster access plugs
for all four wheels. I waited a week but didn't get the customary order
confirmation and shipping e-mails. On new Year's Eve, I placed the
order again. Additionally, I ordered (#73-111) front wheel bearing
seals and a pair of (#71-126) 1954 rear wheel cylinders since the 1955
wheel cylinders looked a bit different from the existing ones on
BillyBob.
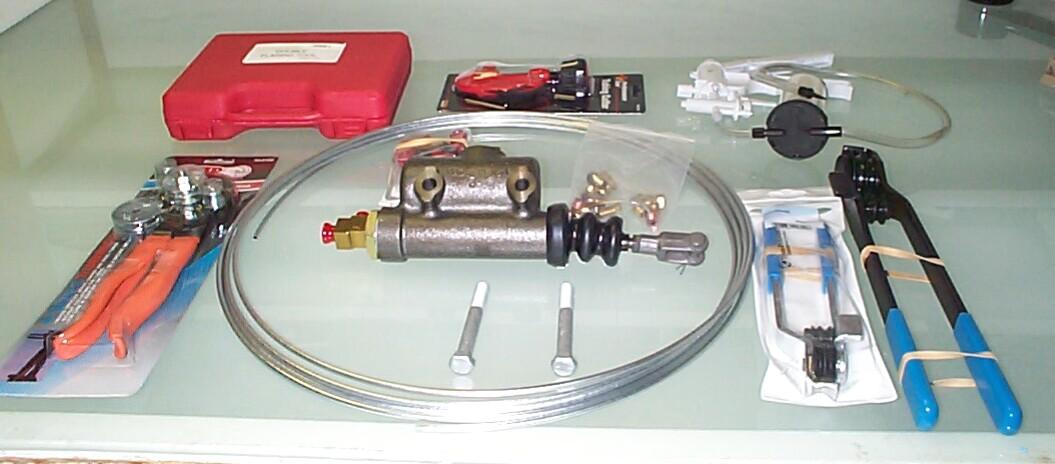
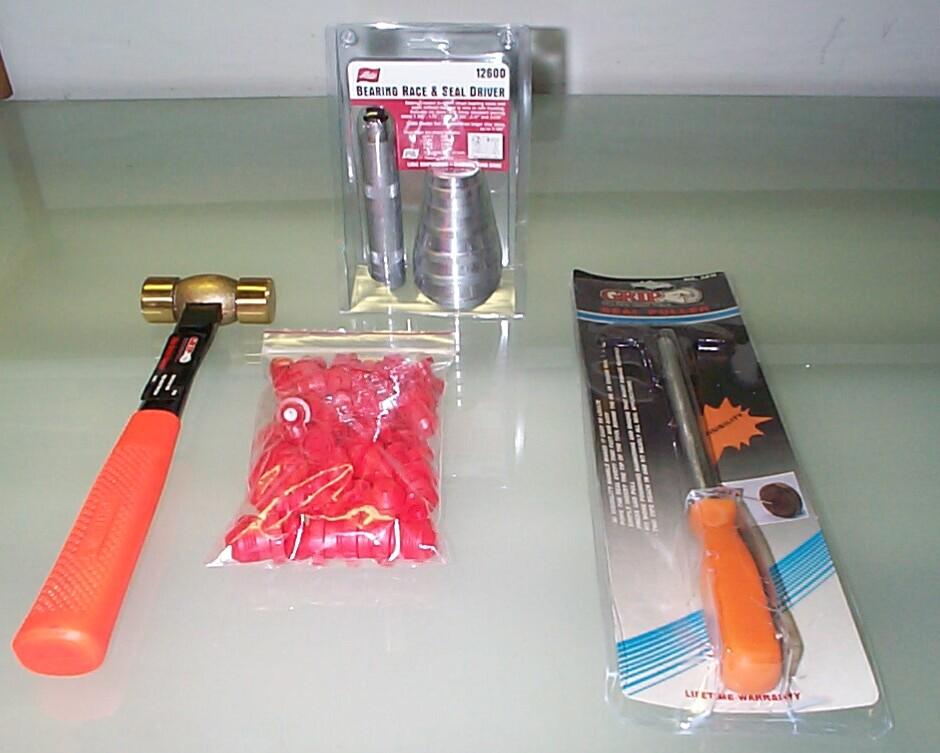 Both
orders arrived the following week. I am now well supplied with brake
parts! Well, the '54 wheel cylinders don't look much like BillyBob's
either. This is going to be interesting. About this time I also ordered
some tools from Eastwood that I thought would help
me with this work - a 24 oz brass hammer (#43215), a seal puller
(#49005), a bearing race and seal driver kit (#49048), and an
assortment of threaded line plugs (#43097).
Both
orders arrived the following week. I am now well supplied with brake
parts! Well, the '54 wheel cylinders don't look much like BillyBob's
either. This is going to be interesting. About this time I also ordered
some tools from Eastwood that I thought would help
me with this work - a 24 oz brass hammer (#43215), a seal puller
(#49005), a bearing race and seal driver kit (#49048), and an
assortment of threaded line plugs (#43097).
After my brother, JR, read this log entry, he sent me the following e-mail:
Krash: The rear wheel cylinders as well as the shoes and seals were replaced after my harrowing run away trip down a steep hill while pulling a backhoe. I was standing on the brake pedal with both feet, hands clenched to the steering wheel and ass off the seat and he wasn't stopping! Pretty much overheated everything in both rear wheels. This adventure will be another chapter if I ever get the writing bug again. Point is, my mechanic at the time was pretty resourceful; those rear brake cylinders could be from anything. Regards, Bill
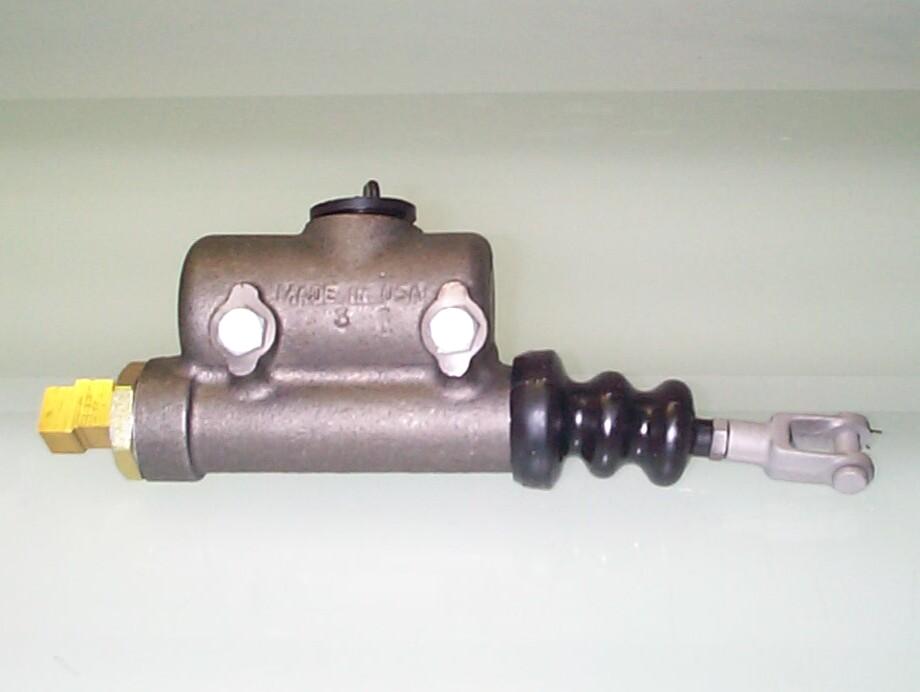
 January
27th 2002 Starting to
contemplate the master cylinder replacement. The old master cylinder
lost its rubber boot sometime in the last century and it's showing
signs of some leakage (or maybe that's just drip down from a reservoir
overfill). I want to purchase new mounting bolts, brake line fittings
and clevis for the piston rod before I tackle this job. Yesterday, I
gave all the connectors in this area a shot of penetrating oil to start
loosening things up.
January
27th 2002 Starting to
contemplate the master cylinder replacement. The old master cylinder
lost its rubber boot sometime in the last century and it's showing
signs of some leakage (or maybe that's just drip down from a reservoir
overfill). I want to purchase new mounting bolts, brake line fittings
and clevis for the piston rod before I tackle this job. Yesterday, I
gave all the connectors in this area a shot of penetrating oil to start
loosening things up.
March 3rd 2002 After weeks of soaking the Master Cylinder bolts with Kroil penetrating oil, I was able to break them loose today with a 5/8" impact wrench socket on an eighteen inch breaker bar. One at a time, I pulled them out and measured them. They are 3-1/2" long (not including hex head) with only 5/8" of the shaft threaded. The threads are 7/16" x 20. I chased the threads with a die, applied a bit of threadlocker blue and replaced them. Now I have enuf info to order new 7/16-20 x 3-1/2 Armor Coat Hex Head Cap Screws, Grade 8 from McMaster-Carr.
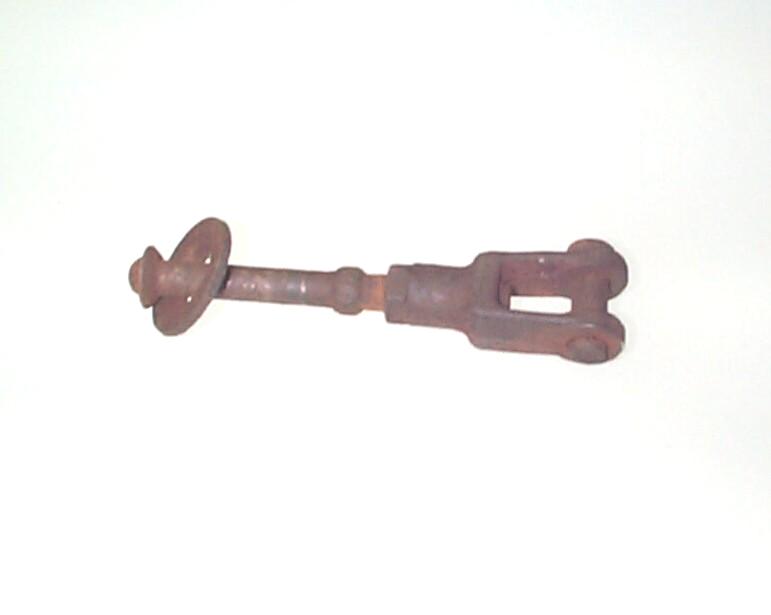 March
23rd 2002 Found a used
clevis for the master brake cylinder rod at American
Classic Truck Parts. The bad news is that it is still rusted
to the push rod. It arrived last week and I'm gonna start soaking it in
Kroil penetrating oil to try and loosen it up some. I got the feeling
I'm gonna be using the MAPP torch before I get these two parts
separated.
March
23rd 2002 Found a used
clevis for the master brake cylinder rod at American
Classic Truck Parts. The bad news is that it is still rusted
to the push rod. It arrived last week and I'm gonna start soaking it in
Kroil penetrating oil to try and loosen it up some. I got the feeling
I'm gonna be using the MAPP torch before I get these two parts
separated.
 April
14th 2002 I eventually
got the clevis and rod separated after applying torch heat to it. I now
have a cheap Harbor Freight blast cabinet and I
cleaned up the clevis, pin and jamb nut as well as the existing master
cylinder filler cap with aluminum oxide media. Last week, I picked up a
new brake line junction block at the local NAPA.
I realized that when I install the new master cylinder, the junction
block may not line up in the same orientation as the existing block and
that the line running to the front driver side wheel may have to be
reformed to fit. Went online and ordered brake tubing, fittings and
flaring and bending tools from Eastwood, just in case.
April
14th 2002 I eventually
got the clevis and rod separated after applying torch heat to it. I now
have a cheap Harbor Freight blast cabinet and I
cleaned up the clevis, pin and jamb nut as well as the existing master
cylinder filler cap with aluminum oxide media. Last week, I picked up a
new brake line junction block at the local NAPA.
I realized that when I install the new master cylinder, the junction
block may not line up in the same orientation as the existing block and
that the line running to the front driver side wheel may have to be
reformed to fit. Went online and ordered brake tubing, fittings and
flaring and bending tools from Eastwood, just in case.
It's a rain day here, despite what the weatherman said it would be. The new master cylinder, clevis, pin, jamb nut and junction block has been prepped and masked for painting with Eastwood's Diamond Clear paint for bare metal and I'll spray it if a hole opens in the rain clouds.
 April
27th 2002 Master
Cylinder D-Day. I've gathered all the tools and parts I can think of to
install a new master cylinder and the sun is shinin'. I have no more
excuses to put this job off. Let's get to it. A couple of weeks ago, I
managed to get three coats of Diamond Clear applied to the master
cylinder. Someone on one of the maillists this week mentioned "bench
bleeding" the master clyinder before installation and this is something
I hadn't thought of. Performed an Internet search on the subject and
found a how-to page on Bob Hewitt's
website. Headed over to the local NAPA store and picked up a generic
master cylinder bleeding kit. Now I'm ready to go.
April
27th 2002 Master
Cylinder D-Day. I've gathered all the tools and parts I can think of to
install a new master cylinder and the sun is shinin'. I have no more
excuses to put this job off. Let's get to it. A couple of weeks ago, I
managed to get three coats of Diamond Clear applied to the master
cylinder. Someone on one of the maillists this week mentioned "bench
bleeding" the master clyinder before installation and this is something
I hadn't thought of. Performed an Internet search on the subject and
found a how-to page on Bob Hewitt's
website. Headed over to the local NAPA store and picked up a generic
master cylinder bleeding kit. Now I'm ready to go.
First things first. Put Billybob's front end on on jackstands. If the wheel cylinder bleeder valves are frozen, I won't be able to finish this job and drive home at the end of the day. It's been several years since my Chevron mechanic, Gary Morris, replaced the brake lines (Pre-Restoration Log entry "What have they done to my garage, Ma?") but, I remember him saying he put anti-seize compound on the bleeder valve threads when he did that job so, I might get lucky. Following the advice of Frank McMullen, a Stovebolt Forums member, I found a good six point socket to use on the bleeder valves. It came from my computer tools kit and the metric socket fit a little more snugly than the 3/8" SAE socket. Kroil penetrating oil and a few tries got all four bleeders loose without breaking anything. We're off to a good start.
Got the old master cylinder out with some problems. If I was still a drinkin' man, I would call it a "three Budweiser degree of difficulty" job. The smaller brake line fitting had been rounded off a bit during installation into the junction block fitting and I had to use some careful heat to loosen it up as well as vice-grips. It's still servicable for this go round but it should be replaced the next time this fitting is disturbed. The clevis pin was blocked by the clutch linkage and I started getting sloppy trying different solutions without thinking 'til Murphy reminded me to slow down with a few cuts and bruises. Finally the light bulb in my head went on and I wedged the clutch pedal down to the floor with a two-by-four against the seat base which gave me enuf clearance to get the clevis pin out. Also discovered that the master cylinder bolts do not screw into the mounting bracket but into a bar behind the bracket which fell out when I got both bolts out.
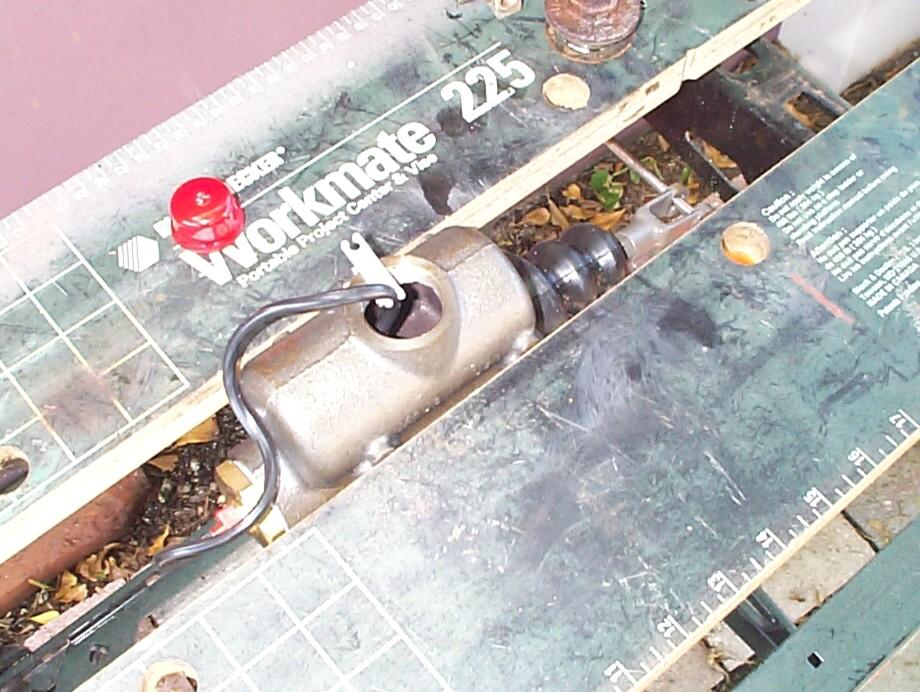 Managed
to get the old junction block off the back of the old master cylinder.
Cleaned it up for reuse with some carb cleaner. This is a better
junction block than the replacement I got at NAPA. That was a solid
machined piece. This is a hollow bolt thru a rectangular block which
allows the side outlet to be placed at any angle when installed . . . I
won't have to fabricate new tubing. Next, the new master cylinder was
bench bled on the Workmate using the NAPA kit. I used a philips
screwdriver thru the clevis as a handle to push the piston in during
the process. Got some fluid overflow and hope I got it wiped up before
too much damage was sustained by the Diamond Clear finish (can't tell
any change by looking at it). When the process was complete, the old
junction block was connected to the master cylinder. Permatex High Temp
Thread Sealant was used. Now, we were ready to install the new master
cylinder. After snugging both anchor bolts up to the bar behind the
bracket, I removed them again, one at a time, and applied Threadlocker
Blue. I forgot to get new lock washers so I'll have to do that another
day. Used the old ones for now.
Managed
to get the old junction block off the back of the old master cylinder.
Cleaned it up for reuse with some carb cleaner. This is a better
junction block than the replacement I got at NAPA. That was a solid
machined piece. This is a hollow bolt thru a rectangular block which
allows the side outlet to be placed at any angle when installed . . . I
won't have to fabricate new tubing. Next, the new master cylinder was
bench bled on the Workmate using the NAPA kit. I used a philips
screwdriver thru the clevis as a handle to push the piston in during
the process. Got some fluid overflow and hope I got it wiped up before
too much damage was sustained by the Diamond Clear finish (can't tell
any change by looking at it). When the process was complete, the old
junction block was connected to the master cylinder. Permatex High Temp
Thread Sealant was used. Now, we were ready to install the new master
cylinder. After snugging both anchor bolts up to the bar behind the
bracket, I removed them again, one at a time, and applied Threadlocker
Blue. I forgot to get new lock washers so I'll have to do that another
day. Used the old ones for now.
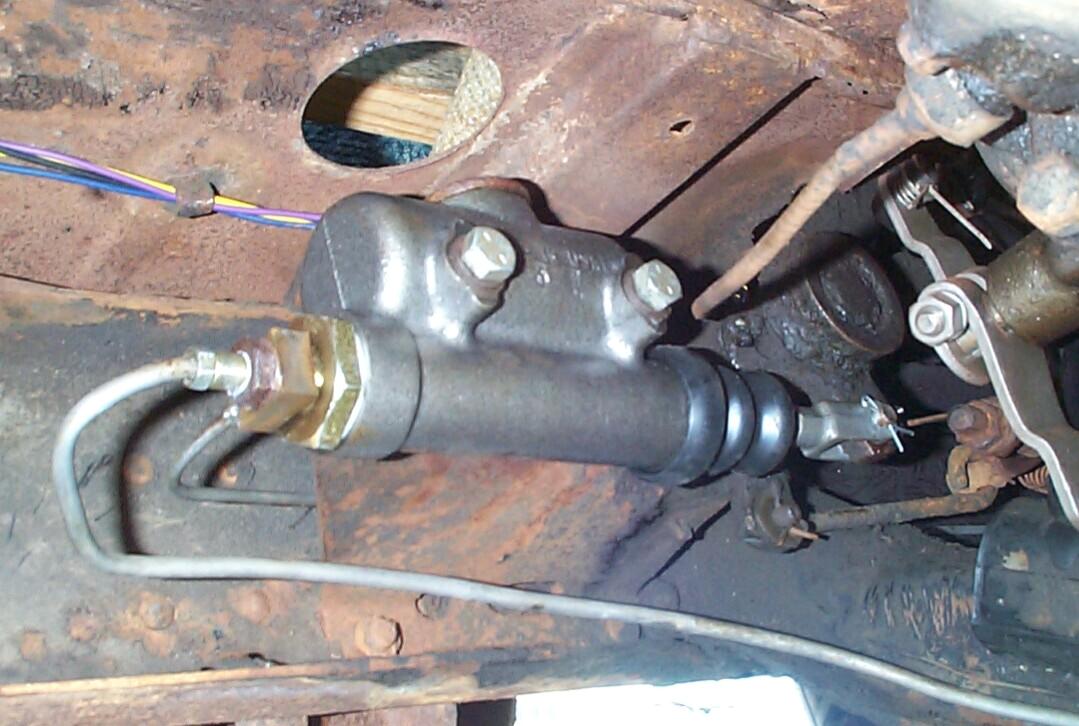 Connected
the new clevis with pin and cotter pin. The smaller diameter brake line
fitting was connected to the side outlet of the junction block with
High Temp Sealant, then the junction block bolt was tightened a little
bit more with a 3/4" socket before connecting the larger diameter brake
line fitting to the end, again with High Temp Thread Sealant. OK. Time
to spin up the Rolling Stones and Let it Bleed! Sorry. I couldn't help
myself.
Connected
the new clevis with pin and cotter pin. The smaller diameter brake line
fitting was connected to the side outlet of the junction block with
High Temp Sealant, then the junction block bolt was tightened a little
bit more with a 3/4" socket before connecting the larger diameter brake
line fitting to the end, again with High Temp Thread Sealant. OK. Time
to spin up the Rolling Stones and Let it Bleed! Sorry. I couldn't help
myself.
April 28th 2002 By the time I was finished bleeding the brakes yesterday, I was spent. Dehydration, mostly. It could have gone easier. The manual states to start with the wheel farthest away from the master cylinder. For BillyBob, the sequence is driver rear, passenger rear, passenger front and driver front. The system should be level, so the truck was put back on the ground. I had trouble at first getting any fluid thru the bleeder valves with the Mityvac pump. I made a decision to replace the bleeder valves with new ones from the new wheel cylinders I had in inventory. All bleeder valves were installed with anti-seize compound on the threads. That improved the flow a bit but I suppose I introduced more air into the system. When I finished all four wheels, I applied the brake and was disheartened to feel the pedal go straight to the floor! Pumped it up a little and checked for leaks . . . Good! No leaks. Re-bled the rear wheels and tried again. This time I got a solid pedal. The pedal stayed firm during the ride home and this morning on the way back to the Krash Lab. Used to get a loud thunk under the floorboards when I took my foot off the brake. Now I get a firm, quiet click. I think I'm home free.
NOTE OF CAUTION: Two visitors to this page cautioned against the use of sealants and compounds coming into contact with the brake fluid. Nate from the old-chevy-truck maillist, a very knowledgable fellow whose advice I respect, had this to say:
don't ever get _any_ penetrant nor sealant or anything else not brake fluid in contact with any part that touches the brake fluid or you'll have a hydraulic brake failure sooner than later . I personally don't use anti-seize on the bleeder screws for just this reason . you could use brake assembly lube instead .
Johnny F. added the following comment in the VCCA forum:
My only hesitation would be the use of "Never Sieze", "penetrating oils", or "thread lockers" on any of the brake parts. I have been very hesitant to use anything that may have a "petroleum base oils" near the DOT 3-4 brake fluids, as I have always been told (especially by aircraft/powerplant mechanics) of the risk of contaminating the brake fluids. I have religiously used "lubriplate" brake products to lube the brake parts. How do you know that the thread locking and lubrication products you use on the brake parts are compatable with the DOT 3 fluids?
I didn't mention it above but, One of the recommended uses for the Permatex High Temp Sealant is brake systems and I was careful not to get it or anti-seize compound on the leading threads of the connections. Threadlocker was not used anywhere near the brake fluid connectors. I probably will cross my fingers at this point and not use penetrating oil or anti-seize on the bleeders or any other hydraulic system connections in the future.
OK. That's it for now. I still have to finish rebuilding the wheels with new springs, adjusters and wheel cylinders but I'm glad to have the master cylinder done. I have several other operations underway to report on also including more frame work, interior work and electrical and underhood odds 'n ends. BillyBob's resurection is going well thirty months into what has turned into a ten year rolling rebuild. BillyBob is reliable enuf now to be a daily driver and this year, for the first time, I've been driving him more than my Jeep.
| < Back
to Intro |
You can email me at ![]() webmaster@laroke.com
webmaster@laroke.com
Issued Wednesday May 1, 2002
Updated Thursday May 25, 2017
copyright © 1996-2017 Larry Robert Kephart all rights reserved
| | LRK Home | | Bio Info | | Krash Khronicles | | LAROKE | |
| | BettyLou | | BillyBob's Garage | | Rat Patrol | | Deerslayer | | Elvira | |
| | Land of the Free and Home of the Brave | |
| | Keppylou's Art | | WWI Soldier's Diary | |