| | LRK Home | | Bio Info | | Krash Khronicles | | LAROKE | |
| | BettyLou | | BillyBob's Garage | | Rat Patrol | | Deerslayer | | Elvira | |
| | Land of the Free and Home of the Brave | |
| | Keppylou's Art | | WWI Soldier's Diary | |
Tinkering with Deerslayer
![]()
DEERSLAYER LINKS including vendor sites for parts and tools as well as sites for old truck and hot rod organizations
![]()
TINKERING WITH DEERSLAYER chronicles the day-by-day maintenance and improvements episodes for Deerslayer, a '37 Chevy farm truck hot rod.
CRUISIN' WITH DEERSLAYER Roadtrips, cruise-in's and truck show stories and tall tales.
TONY'S DUNGEON Tony Pascarella's forum entries at OldGMCtrucks.com and H.A.M.B. regarding Deerslayer, particularly the 302 GMC engine build in his farmhouse basement.
![]()
DEERSLAYER MAINTENANCE Ever changing detailing, oil change, lube, etc. maintenance routines specifically developed for Deerslayer, including required tools, materials and procedures.
PROJECT NAILHEAD Chronicles the rebuild of a 1954 Buick Roadmaster 322 nailhead engine as a future replacement for Deerslayer's Jimmy 302.
6. Cab Comfort Capers
November 30th 2009 Before I ran off to the sunday nite cruise-in yesterday I gapped and installed new spark plugs. Deerslayer has been a bit grumpy of late when cold and I'm performing a slow motion tuneup because this is the first time and I'm establishing procedures as I go. Next week is ignition. I didn't think I'd notice a change but I did. No cold stumble anymore. It was probably #1 plug wire. Seemed a bit loose and I squeezed the terminal with a pliers slightly before re-installing.
At the cruise-in, a young mom with her little girl came up to me. The annoying child wanted to know why Deerslayer had no seatbelts. Tony put seatbelts in but I don't use them and they are behind the seat. I told the little girl (about five or six) that they didn't put seatbelts in cars and trucks when Deerslayer was built. She said "Why?" I endured the series of "Whys" for awhile. I resisted the temptation to point out that school buses are still un-belted. I didn't want a whole new series of "whys". The unsatisfied tyke and her mom eventually departed to find out how many other dangerous hotrodders without seatbelts were in the lot. I'm surprised I didn't catch hell for my hooch and Chesterfields display on the seat.
 I
wanted to put some caps on Deerslayer's rally wheels. I really like the
'41-'46 Chebby car hubcaps but they are a little too flashy for
Deerslayer. They are also 'spensive. I decided on police/taxi plain dog
dish caps. They arrived today from Chevs of the 40's. I rushed out to
install them on a coffee break but they were a tight fit an' I only got
two of 'em on (with bruised palms to boot). "Made in China" was inside
the cap. That's all ya need to know. Those of us who have bought repop
parts know that Chinese manufacturing tolerances can be "NTS". That can
stand for "Not to Scale" or "Not too Sure". Take your pick. I gave up
on putting the other two on until the weekend when I have more tools
available from the warehouse. At least the two I got on are on the same
side.
I
wanted to put some caps on Deerslayer's rally wheels. I really like the
'41-'46 Chebby car hubcaps but they are a little too flashy for
Deerslayer. They are also 'spensive. I decided on police/taxi plain dog
dish caps. They arrived today from Chevs of the 40's. I rushed out to
install them on a coffee break but they were a tight fit an' I only got
two of 'em on (with bruised palms to boot). "Made in China" was inside
the cap. That's all ya need to know. Those of us who have bought repop
parts know that Chinese manufacturing tolerances can be "NTS". That can
stand for "Not to Scale" or "Not too Sure". Take your pick. I gave up
on putting the other two on until the weekend when I have more tools
available from the warehouse. At least the two I got on are on the same
side.
December 4th 2009 Lotsa show and cruise activity planned for this weekend but stormy weather may change all that. Got Renegade out of the warehouse bay and exercised this morning while I reorganized some more. I'll soon have enuf cleared away to fit BillyBob in there again. We've got a storm front passing thru and my friend, Lou Lupino, called this afternoon to say that he and Anthony weren't going to the Tower Shoppes cruise-in today. We made plans to meet sunday morning for a Boca Raton event. Another friend, Paul O'Keefe, called to say if he was going to ABACOA at all, it would be late in the day tomorrow. The weather looks too iffy (sixty percent rain chance) for a 120 mile round trip so I decided not to go to that one either. Plan B is another restaurant cruise at brunch time tomorrow with the Classic Diamonds followed by a solo run in Deerslayer to a new car show debut at Boomers in Boca.
I think I brought all the tools down from the warehouse this time for what little I'll be able to get done this weekend. I got a head start by putting the two remaining hub caps on Deerslayer with the help of a pair of channellocks to relieve the inner rim enuf to squeeze over the wheel nub and snap into place.
 December
5th 2009 Wet and
threatening rain when I arrived at the Krash Lab this morning. Went to
work on the floor pan insulation first. Staying true to the spirit in
which the Deerslayer was built and in compliance with my level 2
austerity measures, I started looking around the warehouse yesterday to
see what scraps I had at hand that I could fashion a master cylinder
cover and shifter and hand brake boot flanges out of . . . I found some
old license plates.
December
5th 2009 Wet and
threatening rain when I arrived at the Krash Lab this morning. Went to
work on the floor pan insulation first. Staying true to the spirit in
which the Deerslayer was built and in compliance with my level 2
austerity measures, I started looking around the warehouse yesterday to
see what scraps I had at hand that I could fashion a master cylinder
cover and shifter and hand brake boot flanges out of . . . I found some
old license plates.
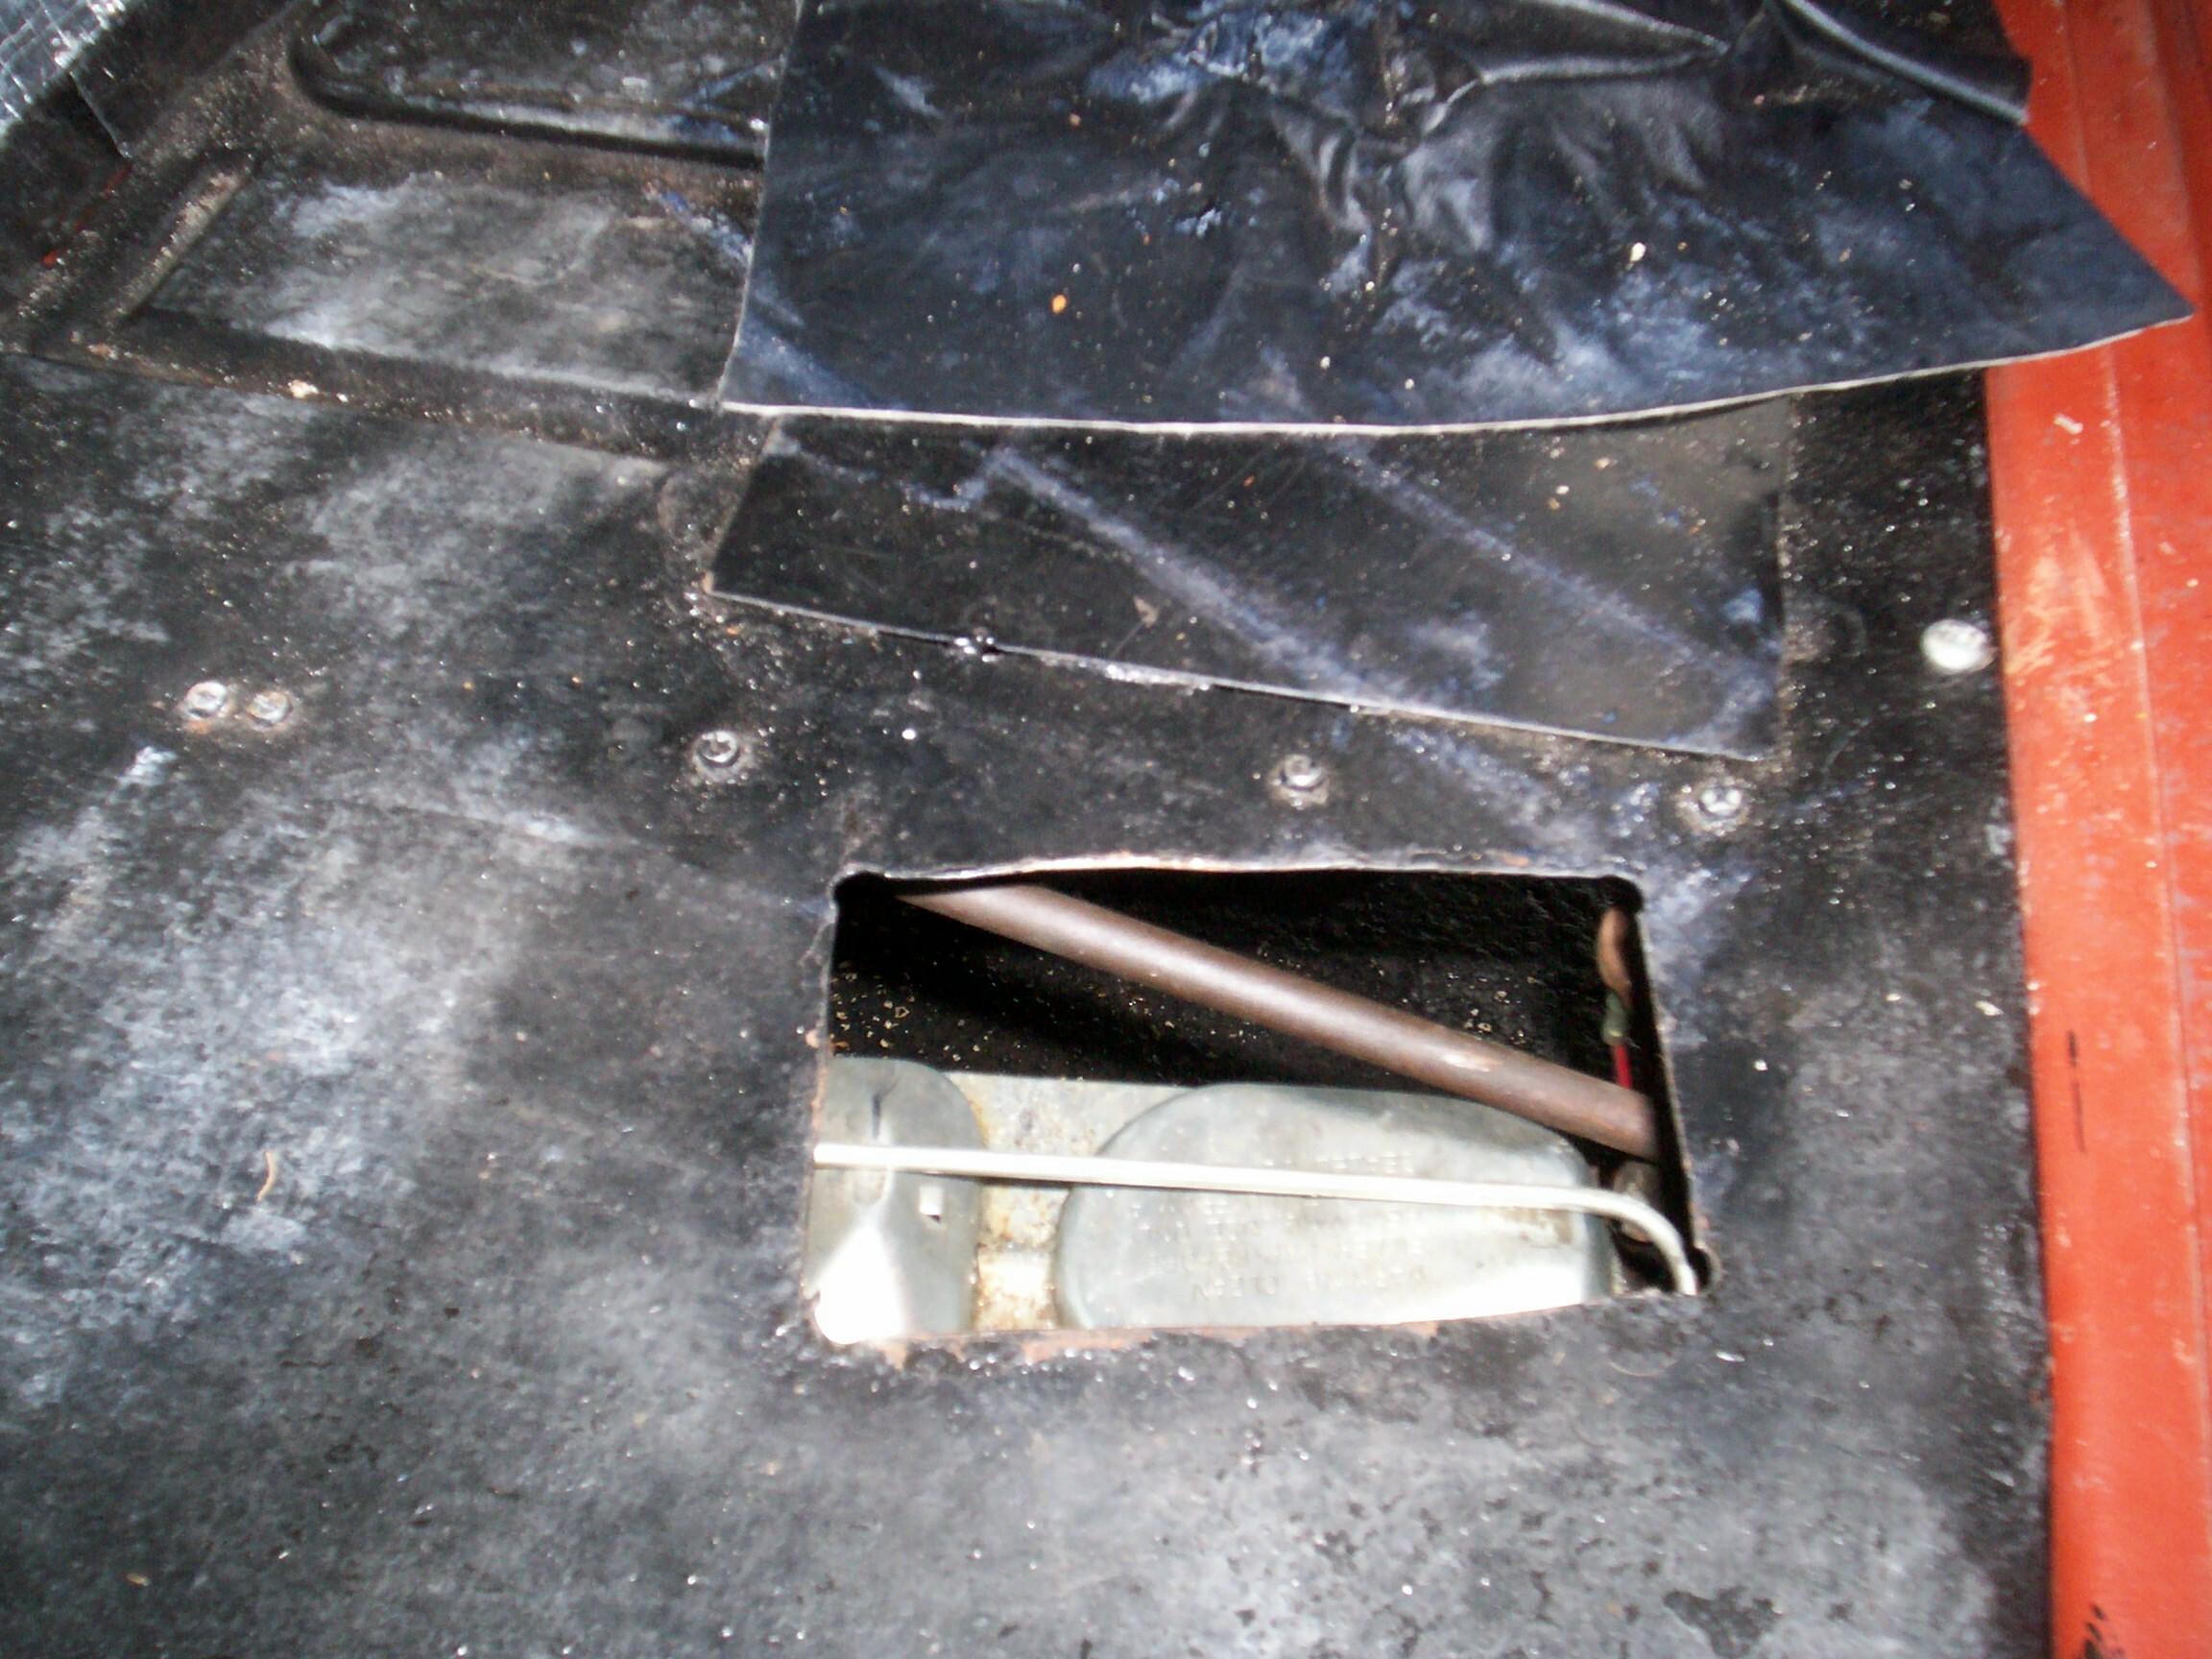
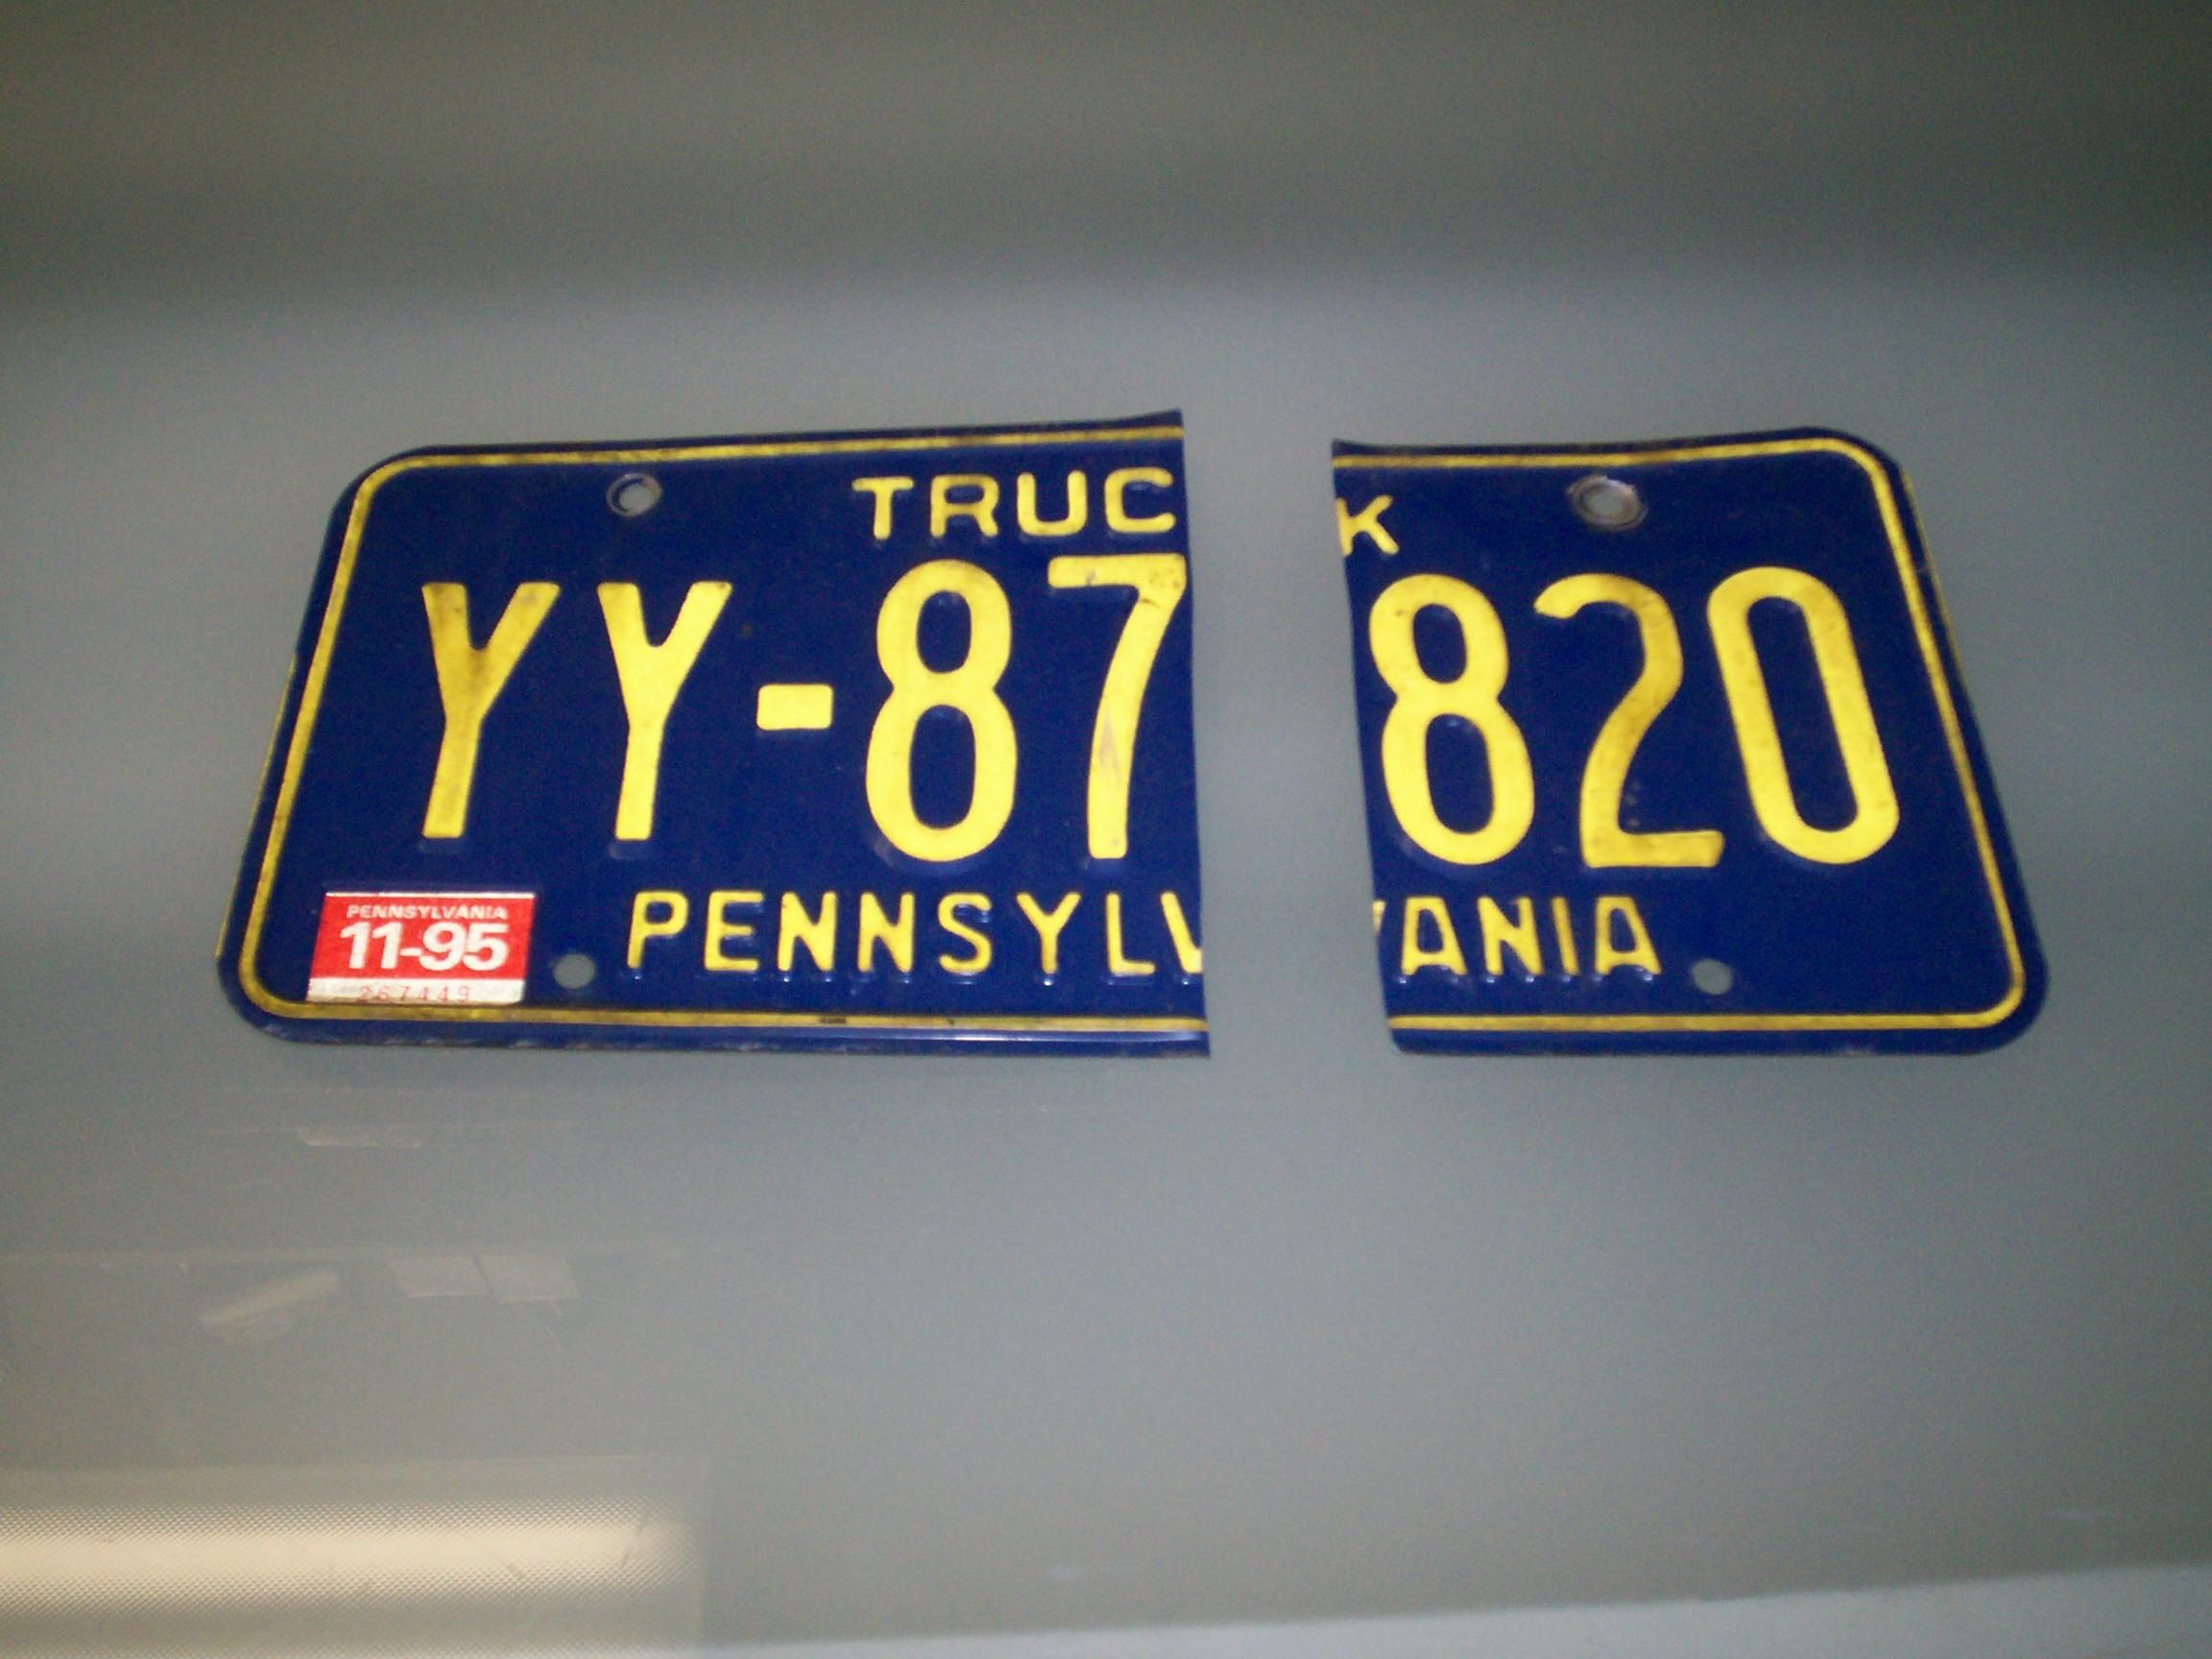 The
cover for the 3-1/2" x 5-1/4" master cylinder access opening is first.
I grabbed the first plate, BillyBob's last Pennsylvania plate from '95
when JR owned him, and
cut five inches off the right side with my sheet metal nibbler. Then,
measurements were made and two slots were cut in each end with the
nibbler to form two tabs which could be bent down to "snap" into each
end of the opening. Well, license plate metal isn't spring metal and
the tabs don't 'xactly "snap" in place. The idea worked but was just a
bit loose.
The
cover for the 3-1/2" x 5-1/4" master cylinder access opening is first.
I grabbed the first plate, BillyBob's last Pennsylvania plate from '95
when JR owned him, and
cut five inches off the right side with my sheet metal nibbler. Then,
measurements were made and two slots were cut in each end with the
nibbler to form two tabs which could be bent down to "snap" into each
end of the opening. Well, license plate metal isn't spring metal and
the tabs don't 'xactly "snap" in place. The idea worked but was just a
bit loose.
 I
discovered, quite by accident, that by rotating my new cover to line it
up with the longitudinal axis of the truck once it was in place (the
access hole is at an angle), would wedge the tabs in the opposite
diagonal corners of the opening for a snug fit. I had unknowingly
dimensioned the tabs just right. Hot damn! I wish I could say I planned
it this way from the git-go but sometimes It's better to be lucky than
smart.
I
discovered, quite by accident, that by rotating my new cover to line it
up with the longitudinal axis of the truck once it was in place (the
access hole is at an angle), would wedge the tabs in the opposite
diagonal corners of the opening for a snug fit. I had unknowingly
dimensioned the tabs just right. Hot damn! I wish I could say I planned
it this way from the git-go but sometimes It's better to be lucky than
smart.
With one little victory under my belt, I tackled the shifter and parking brake lever openings next. I've nebber examined these boots closely before and now I find that they are made out of the same felt-backed leatherette material as the homemade firewall cover I removed a few weeks back and stored up at the warehouse. They are finely sewn with red thread and have elastic to gather them at the top openings. I see Joy Pascarella's handiwork here unless Tony is as good with a sewing machine as he is with a pair of side cutters. They are nice items like the deerskin steering wheel cover she made.
Measured the shifter hole in the floorboard and cut up one of my old generic Florida plates in the shape of a flange with a round center hole and a rectangular perimeter. Used the nibbler and aviation snips. I haven't got the aviation left-hand, right-hand, straight procedures down pat but, in this case, the red-handled ones seemed the best choice for this job. Then, I got my drill out and ran into a snag. My drill bits weren't in the toolbox they were 'sposed to be in. Damnation! Now, I actually 'member seein' 'em at the warehouse yesterday but my mind tricked me into dismissing the sighting since they weren't supposed to be there! I needed a 1/8" drill bit. I got lucky and found a stray one after fifteen minutes of cursin' and rootin' around.
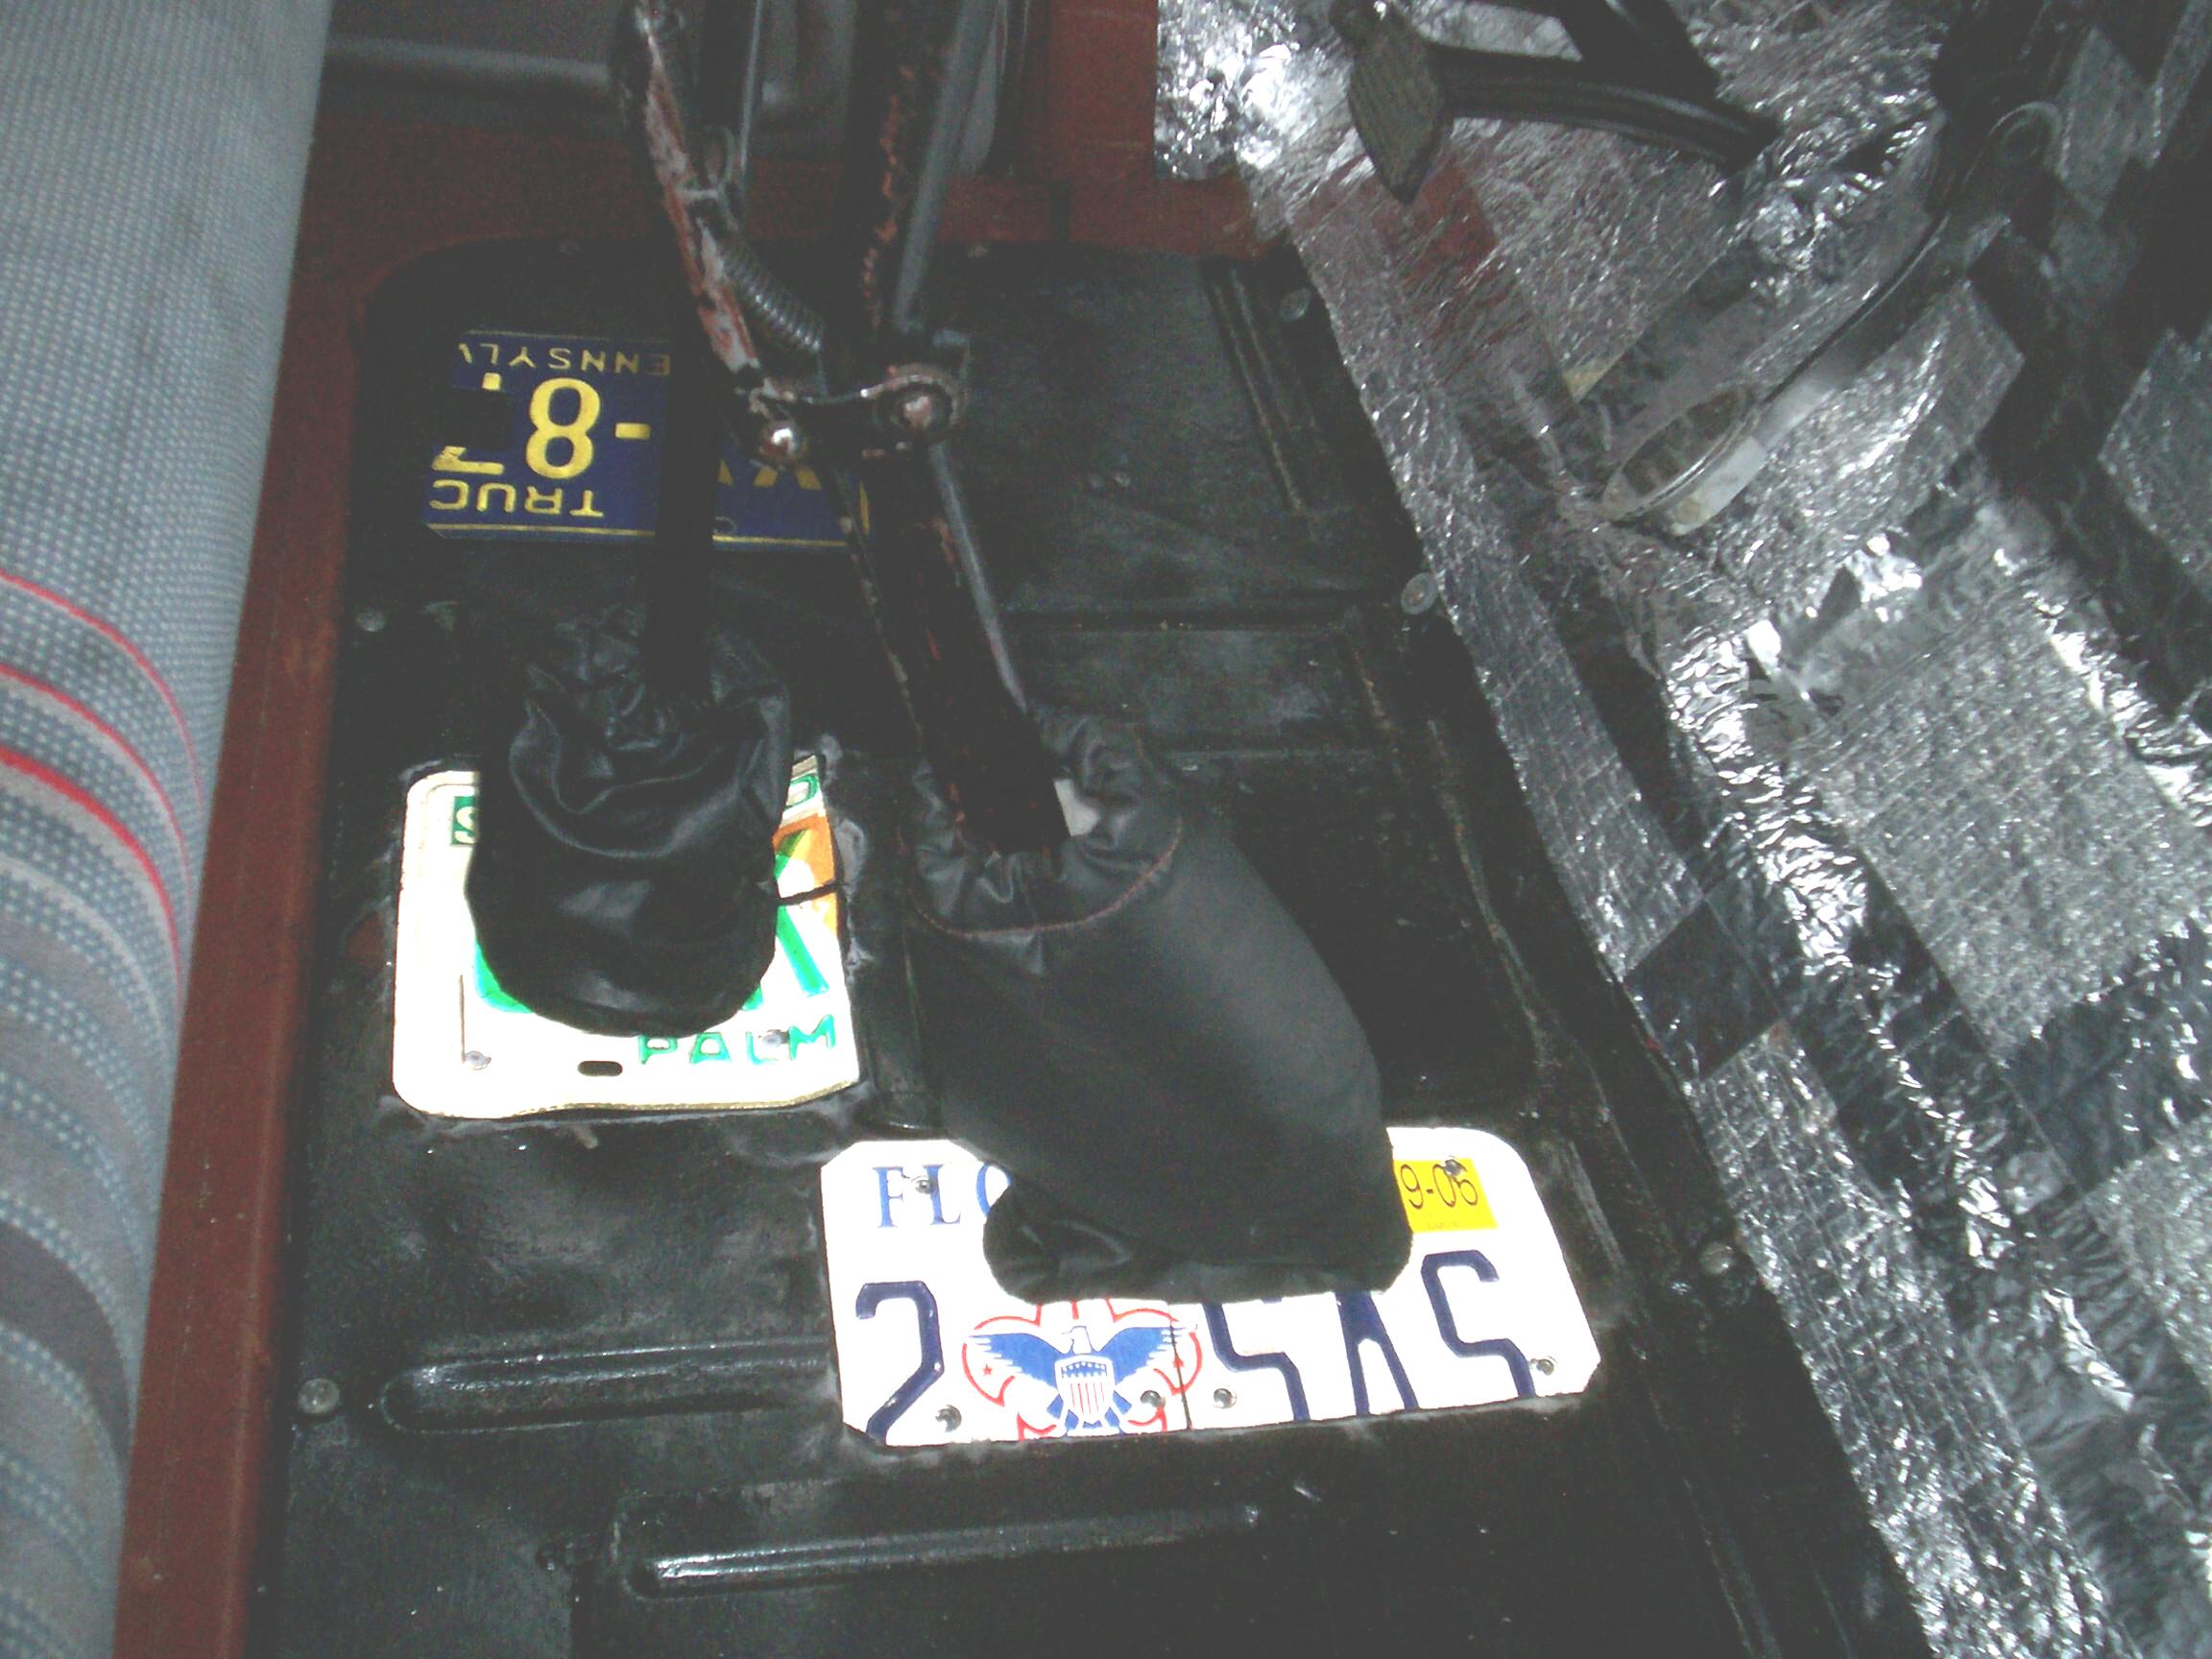 Placed
the shifter boot and flange and started drilling 1/8" holes, one at a
time, thru the sandwich of license plate, boot material, and
floorboard. Then, poping a 1/8" x medium length aluminium pop rivet
thru the three materials. Then on to the next hole until the flange was
solidly anchored.
Placed
the shifter boot and flange and started drilling 1/8" holes, one at a
time, thru the sandwich of license plate, boot material, and
floorboard. Then, poping a 1/8" x medium length aluminium pop rivet
thru the three materials. Then on to the next hole until the flange was
solidly anchored.
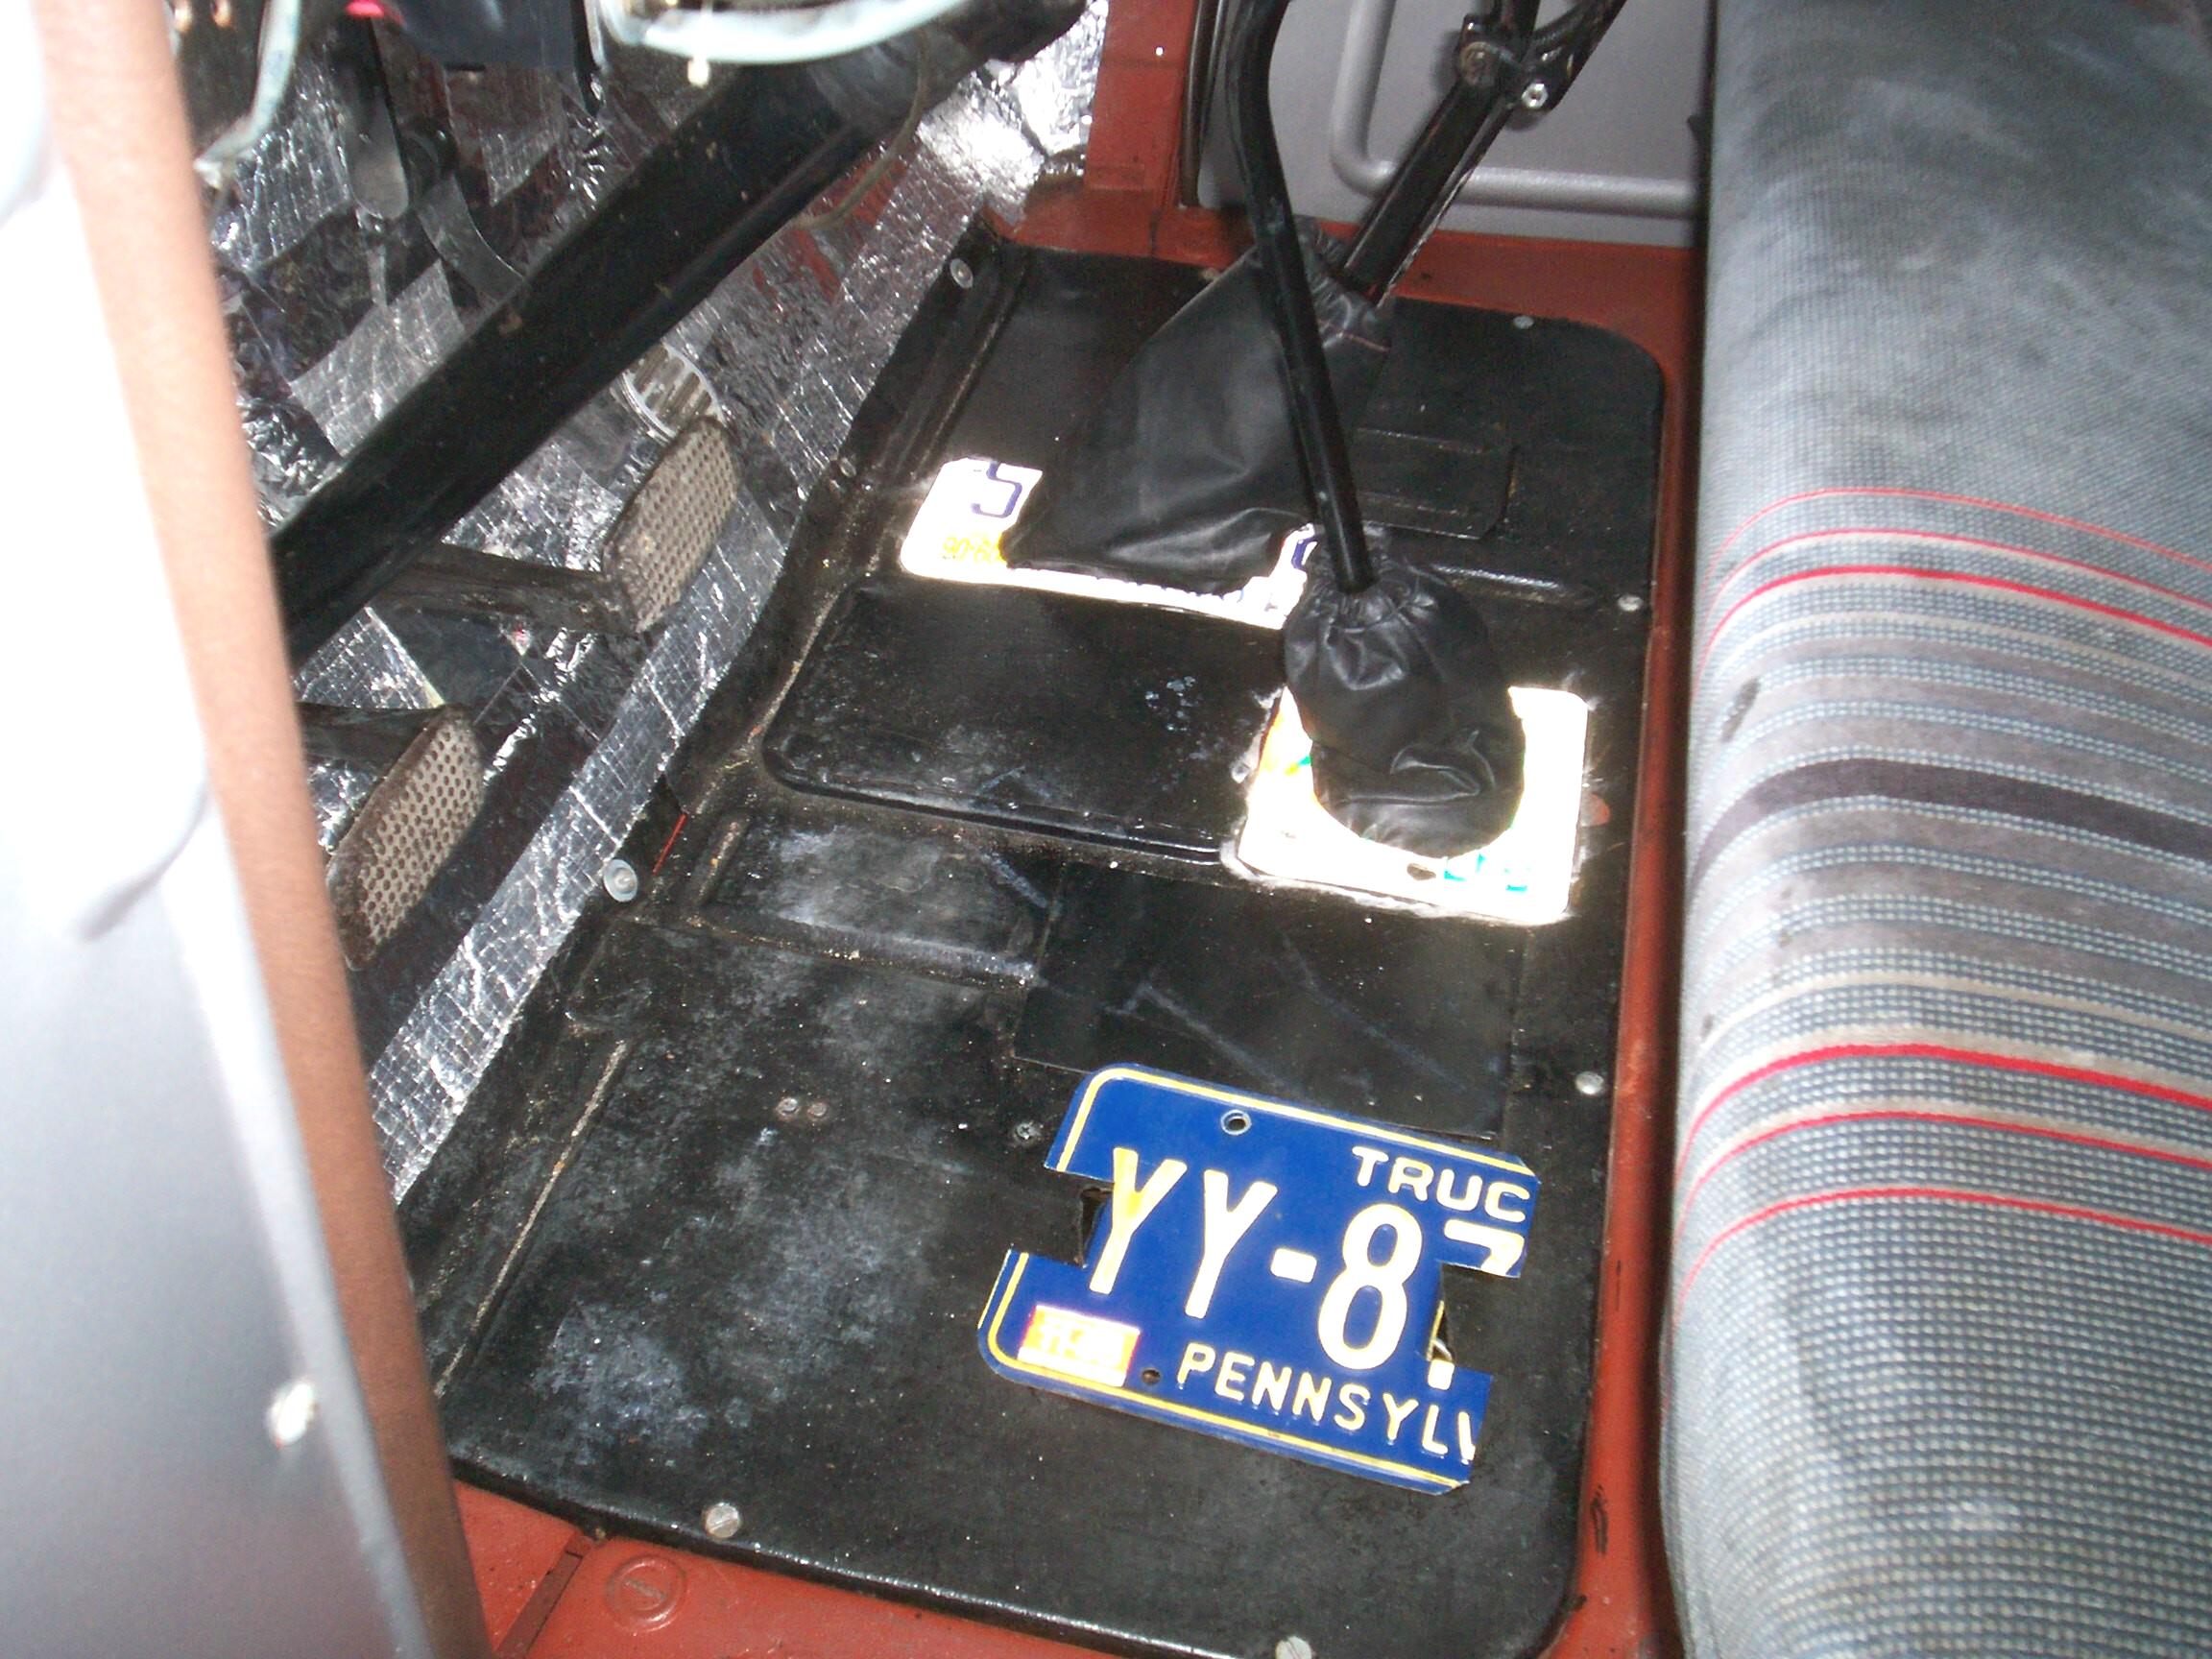 The
parking brake lever boot and flange was handled in the same manner with
one of my old Renegade "Support Scouting" Florida plates. This time the
opening was a longitudinal slot instead of a hole. With the flanges
securely pop-riveted, the excess boot material was trimmed with a
utility knife. It will be a little more difficult to remove the
floorboard now but I think the change will go a long way in keeping
engine air out of the cab at speed.
The
parking brake lever boot and flange was handled in the same manner with
one of my old Renegade "Support Scouting" Florida plates. This time the
opening was a longitudinal slot instead of a hole. With the flanges
securely pop-riveted, the excess boot material was trimmed with a
utility knife. It will be a little more difficult to remove the
floorboard now but I think the change will go a long way in keeping
engine air out of the cab at speed.
It's time to head off the the saturday brunch cruise with the Classic Diamonds club so I start to load up Deerslayer for that and the Boomer's show afterwards. The sky looks nasty so I dialed up the Miami radar loop on the Intarweb. Spit! There is a nasty wall of rain rolling across the everglades from Lake Okeechobee to the Keys and it should be here in a hour of so. I started unloading the truck again and cracked the first beer of the day, Florida Beer Company's Key West Sunset Ale.
 December
7th 2009 Pearl Harbor Day
The worst of the rain passed on saturday by 1 pm. I loaded up the truck
again and went to the first Boomer's cruise-in in Boca. The rain had
done it's damage. Only myself and a NASCAR tribute car showed. I sat
there with the promotors for a few hours anyway. Yesterday dawned
bright and cool and I met my friends, Anthony and Lou early for a "by
invitation only" car show. Everybody lined up in a restaurant parking
lot to caravan to the event site.
December
7th 2009 Pearl Harbor Day
The worst of the rain passed on saturday by 1 pm. I loaded up the truck
again and went to the first Boomer's cruise-in in Boca. The rain had
done it's damage. Only myself and a NASCAR tribute car showed. I sat
there with the promotors for a few hours anyway. Yesterday dawned
bright and cool and I met my friends, Anthony and Lou early for a "by
invitation only" car show. Everybody lined up in a restaurant parking
lot to caravan to the event site.
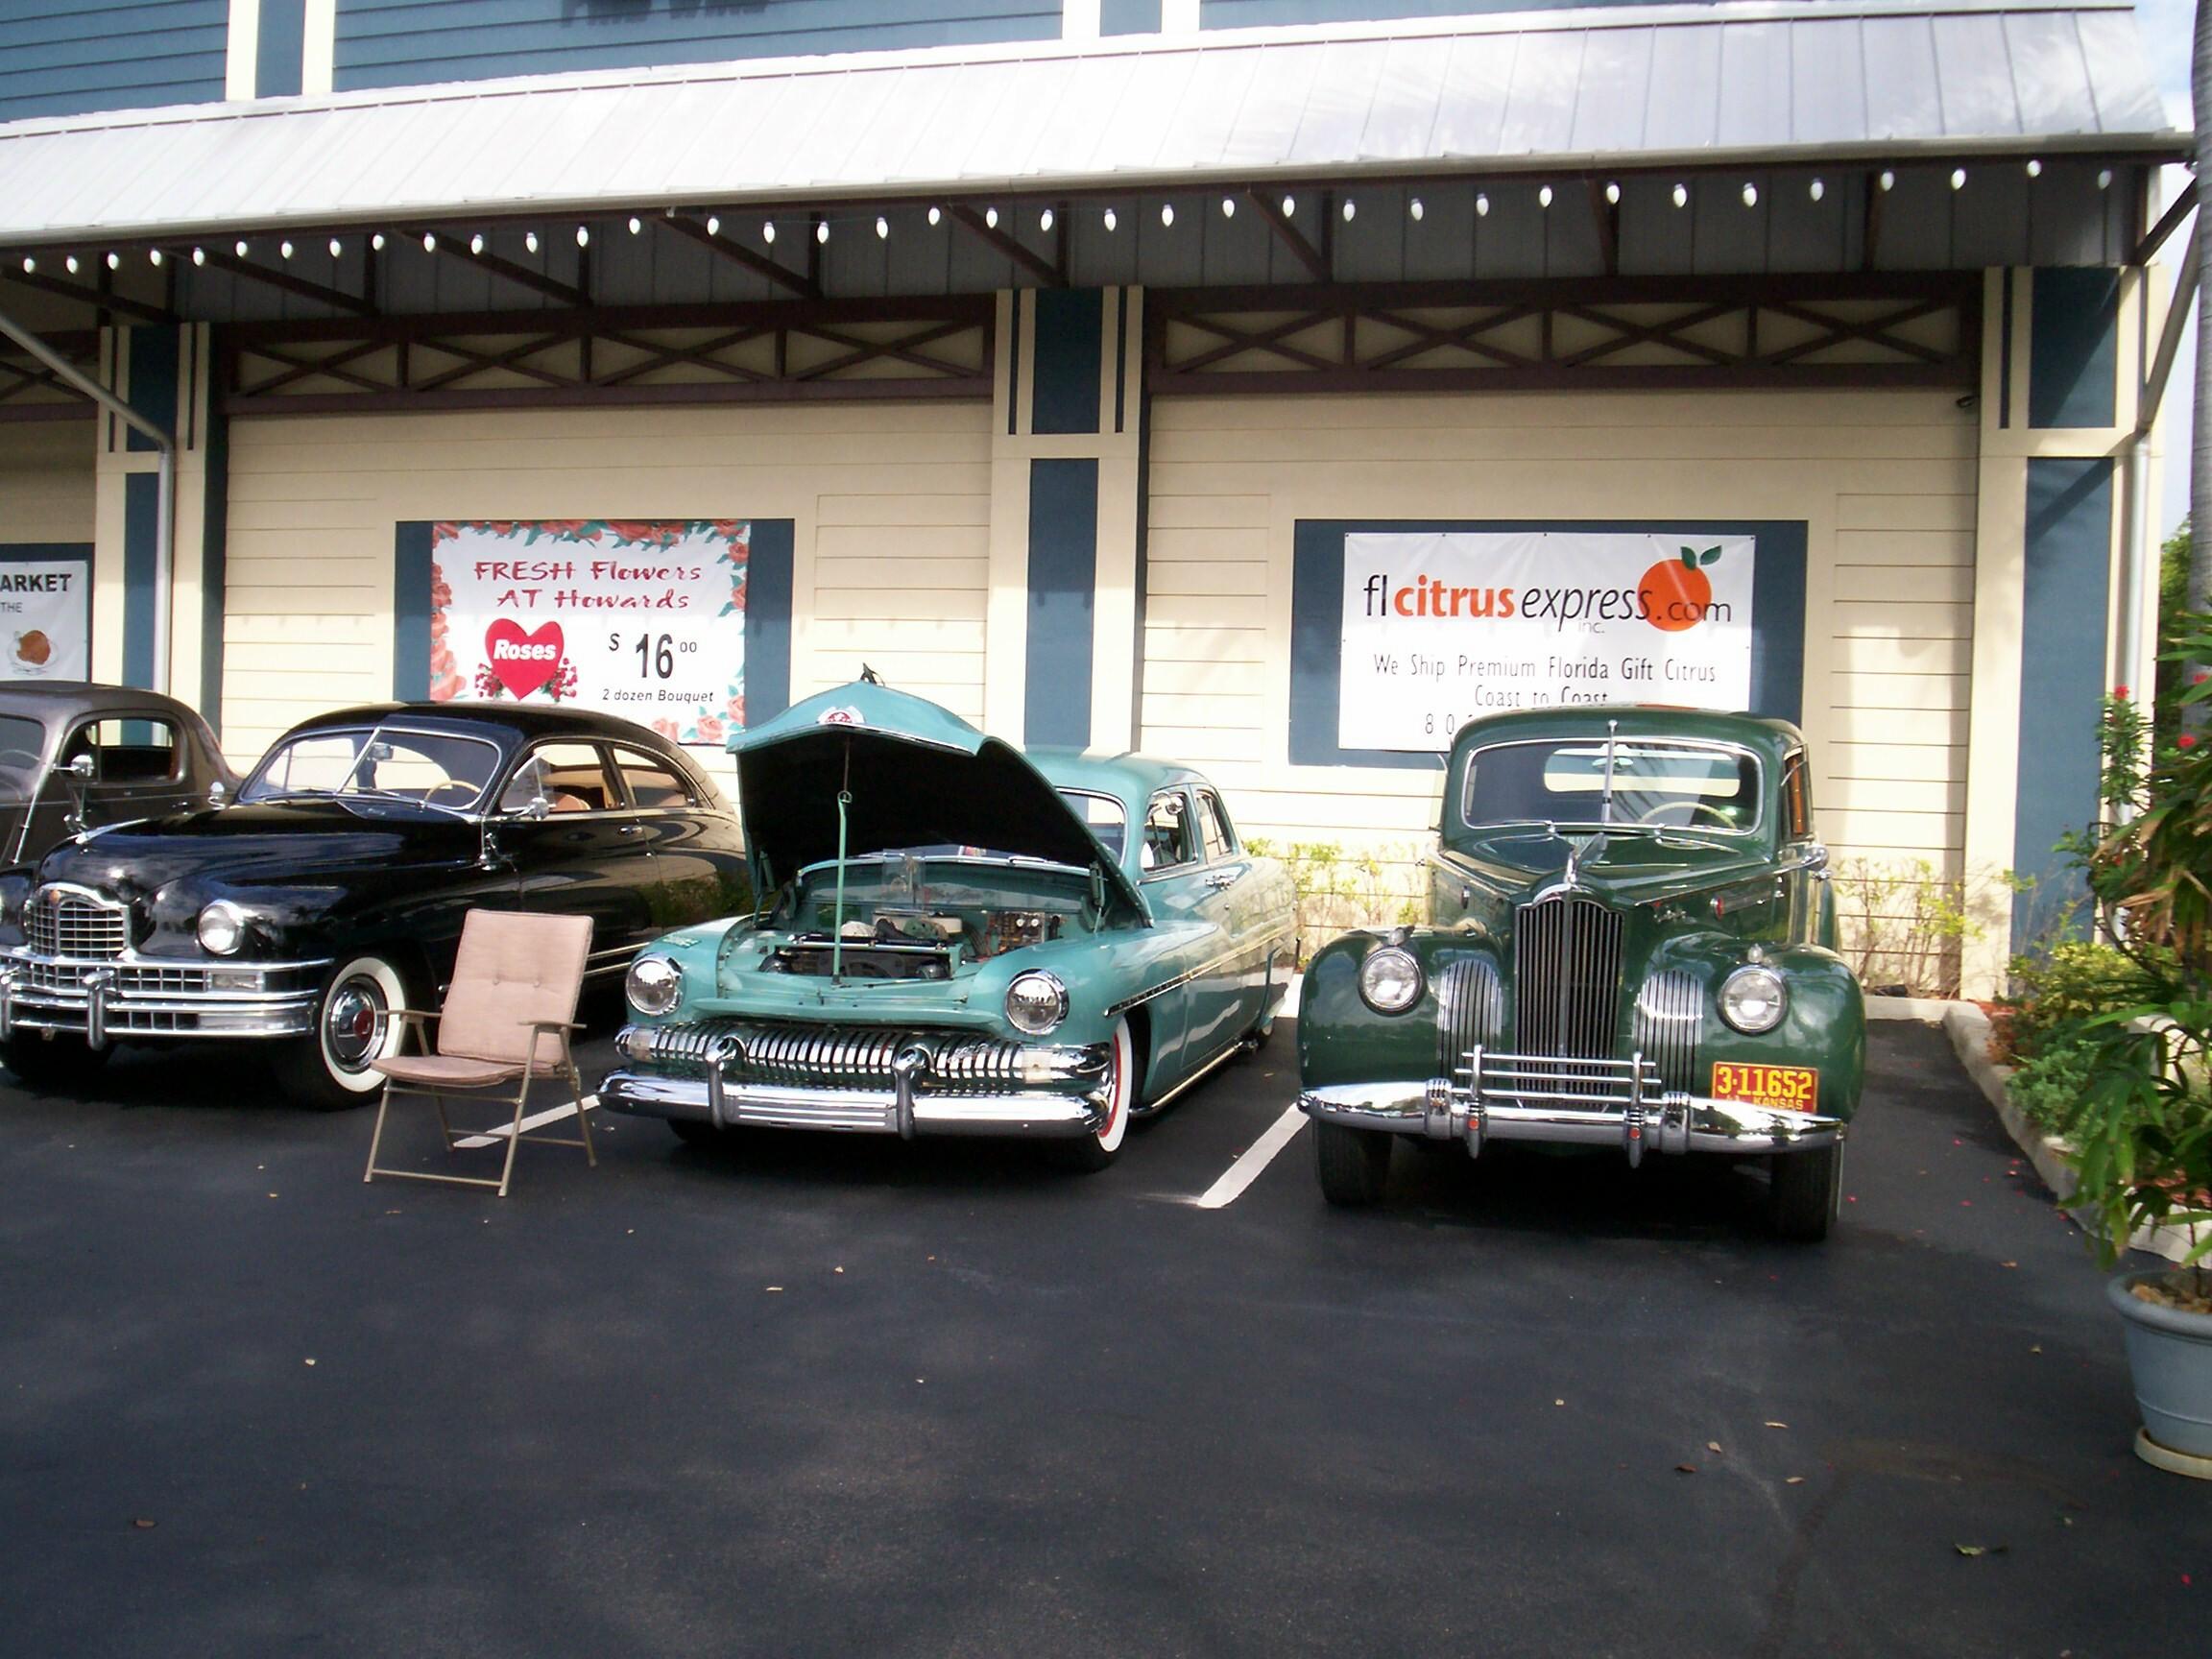 The
reason it was a closed event was that there was no registration fee and
all the entrants were served a nice free BBQ lunch at mid-day. This was
sponsored by Howard's Market, a specialty food market, and the grub was
first rate. They had a band belting out hard rock classics too. Lots of
AACA iron here and the promotors directed everybody where they wanted
them to park so Anthony and Lou and I were split up. There were only
two trucks, Deerslayer and a '29 Model A roadster pickup. Anthony was
put in Packard row. I was across from him and Lou was further up my row
with the later model entries.
The
reason it was a closed event was that there was no registration fee and
all the entrants were served a nice free BBQ lunch at mid-day. This was
sponsored by Howard's Market, a specialty food market, and the grub was
first rate. They had a band belting out hard rock classics too. Lots of
AACA iron here and the promotors directed everybody where they wanted
them to park so Anthony and Lou and I were split up. There were only
two trucks, Deerslayer and a '29 Model A roadster pickup. Anthony was
put in Packard row. I was across from him and Lou was further up my row
with the later model entries.
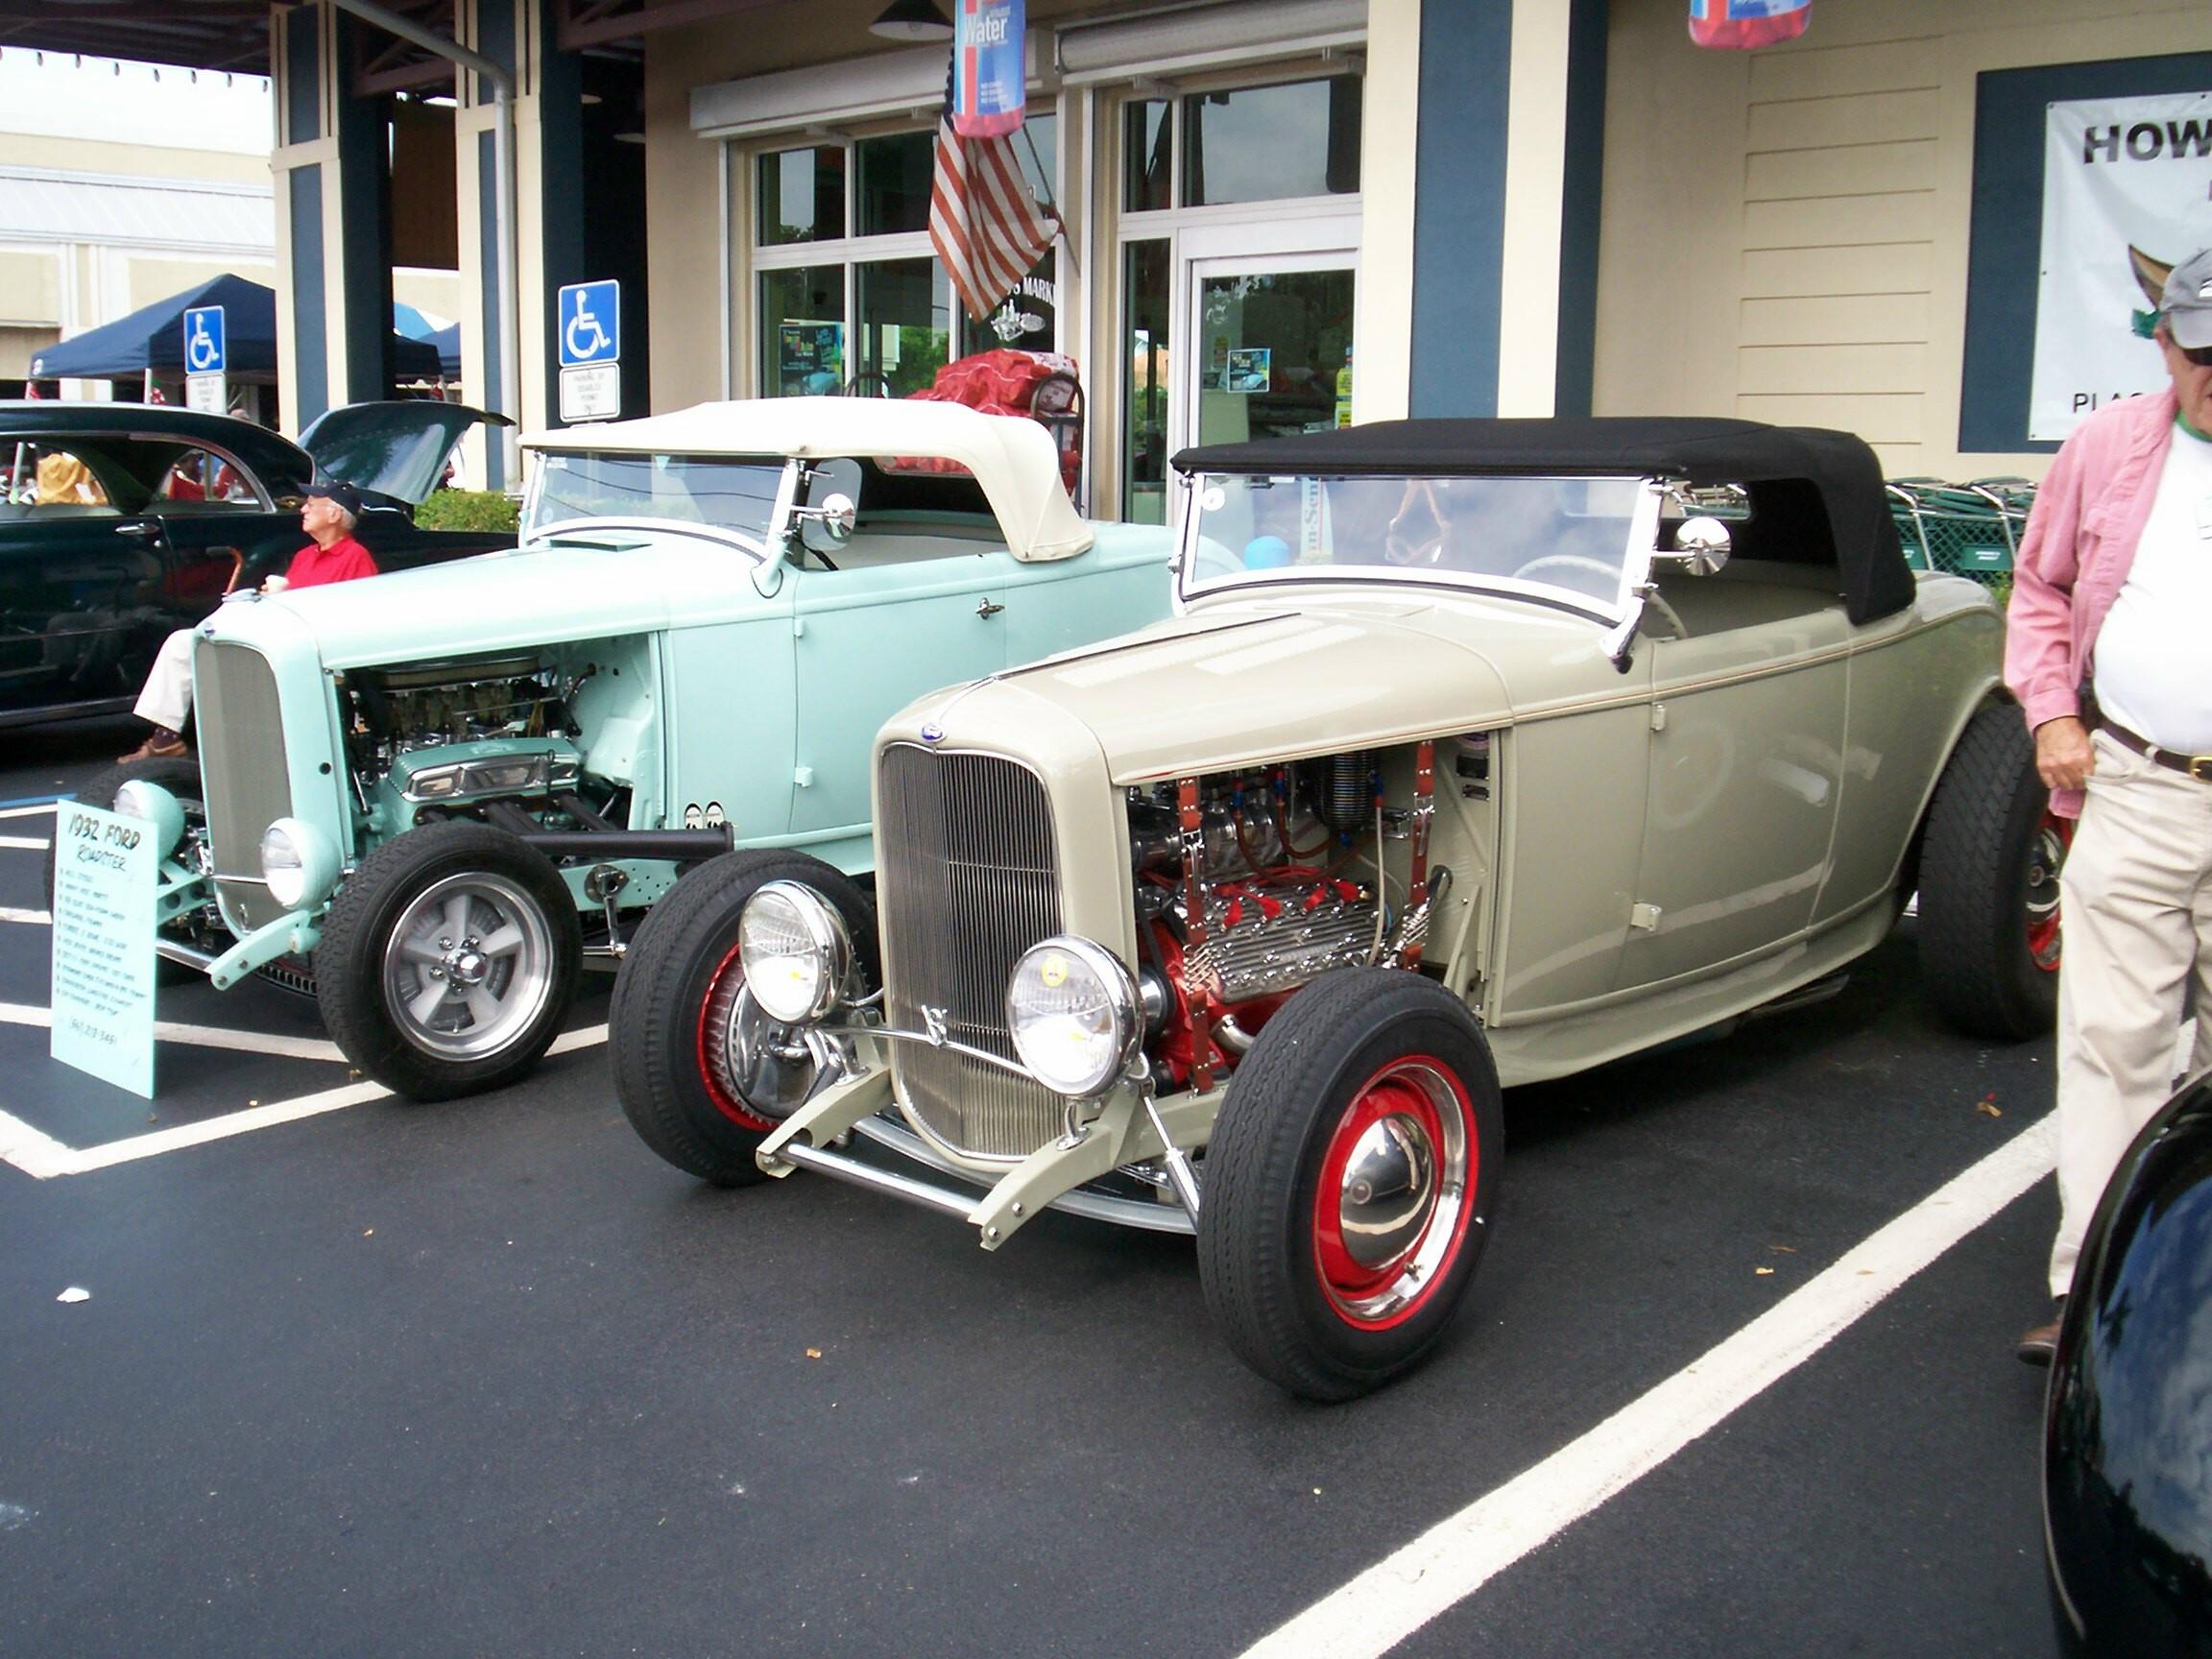 These
two '32 highboys had all the right styling cues. There were many cars
that you don't see at the other shows around here. Scuttlebutt is that
the AACA fellas just don't show their cars if they have to pay a fee to
enter them. It was a very nice show and afterwards, the three of us
hightailed it down to the sunday nite cruise-in to finish the day off.
These
two '32 highboys had all the right styling cues. There were many cars
that you don't see at the other shows around here. Scuttlebutt is that
the AACA fellas just don't show their cars if they have to pay a fee to
enter them. It was a very nice show and afterwards, the three of us
hightailed it down to the sunday nite cruise-in to finish the day off.
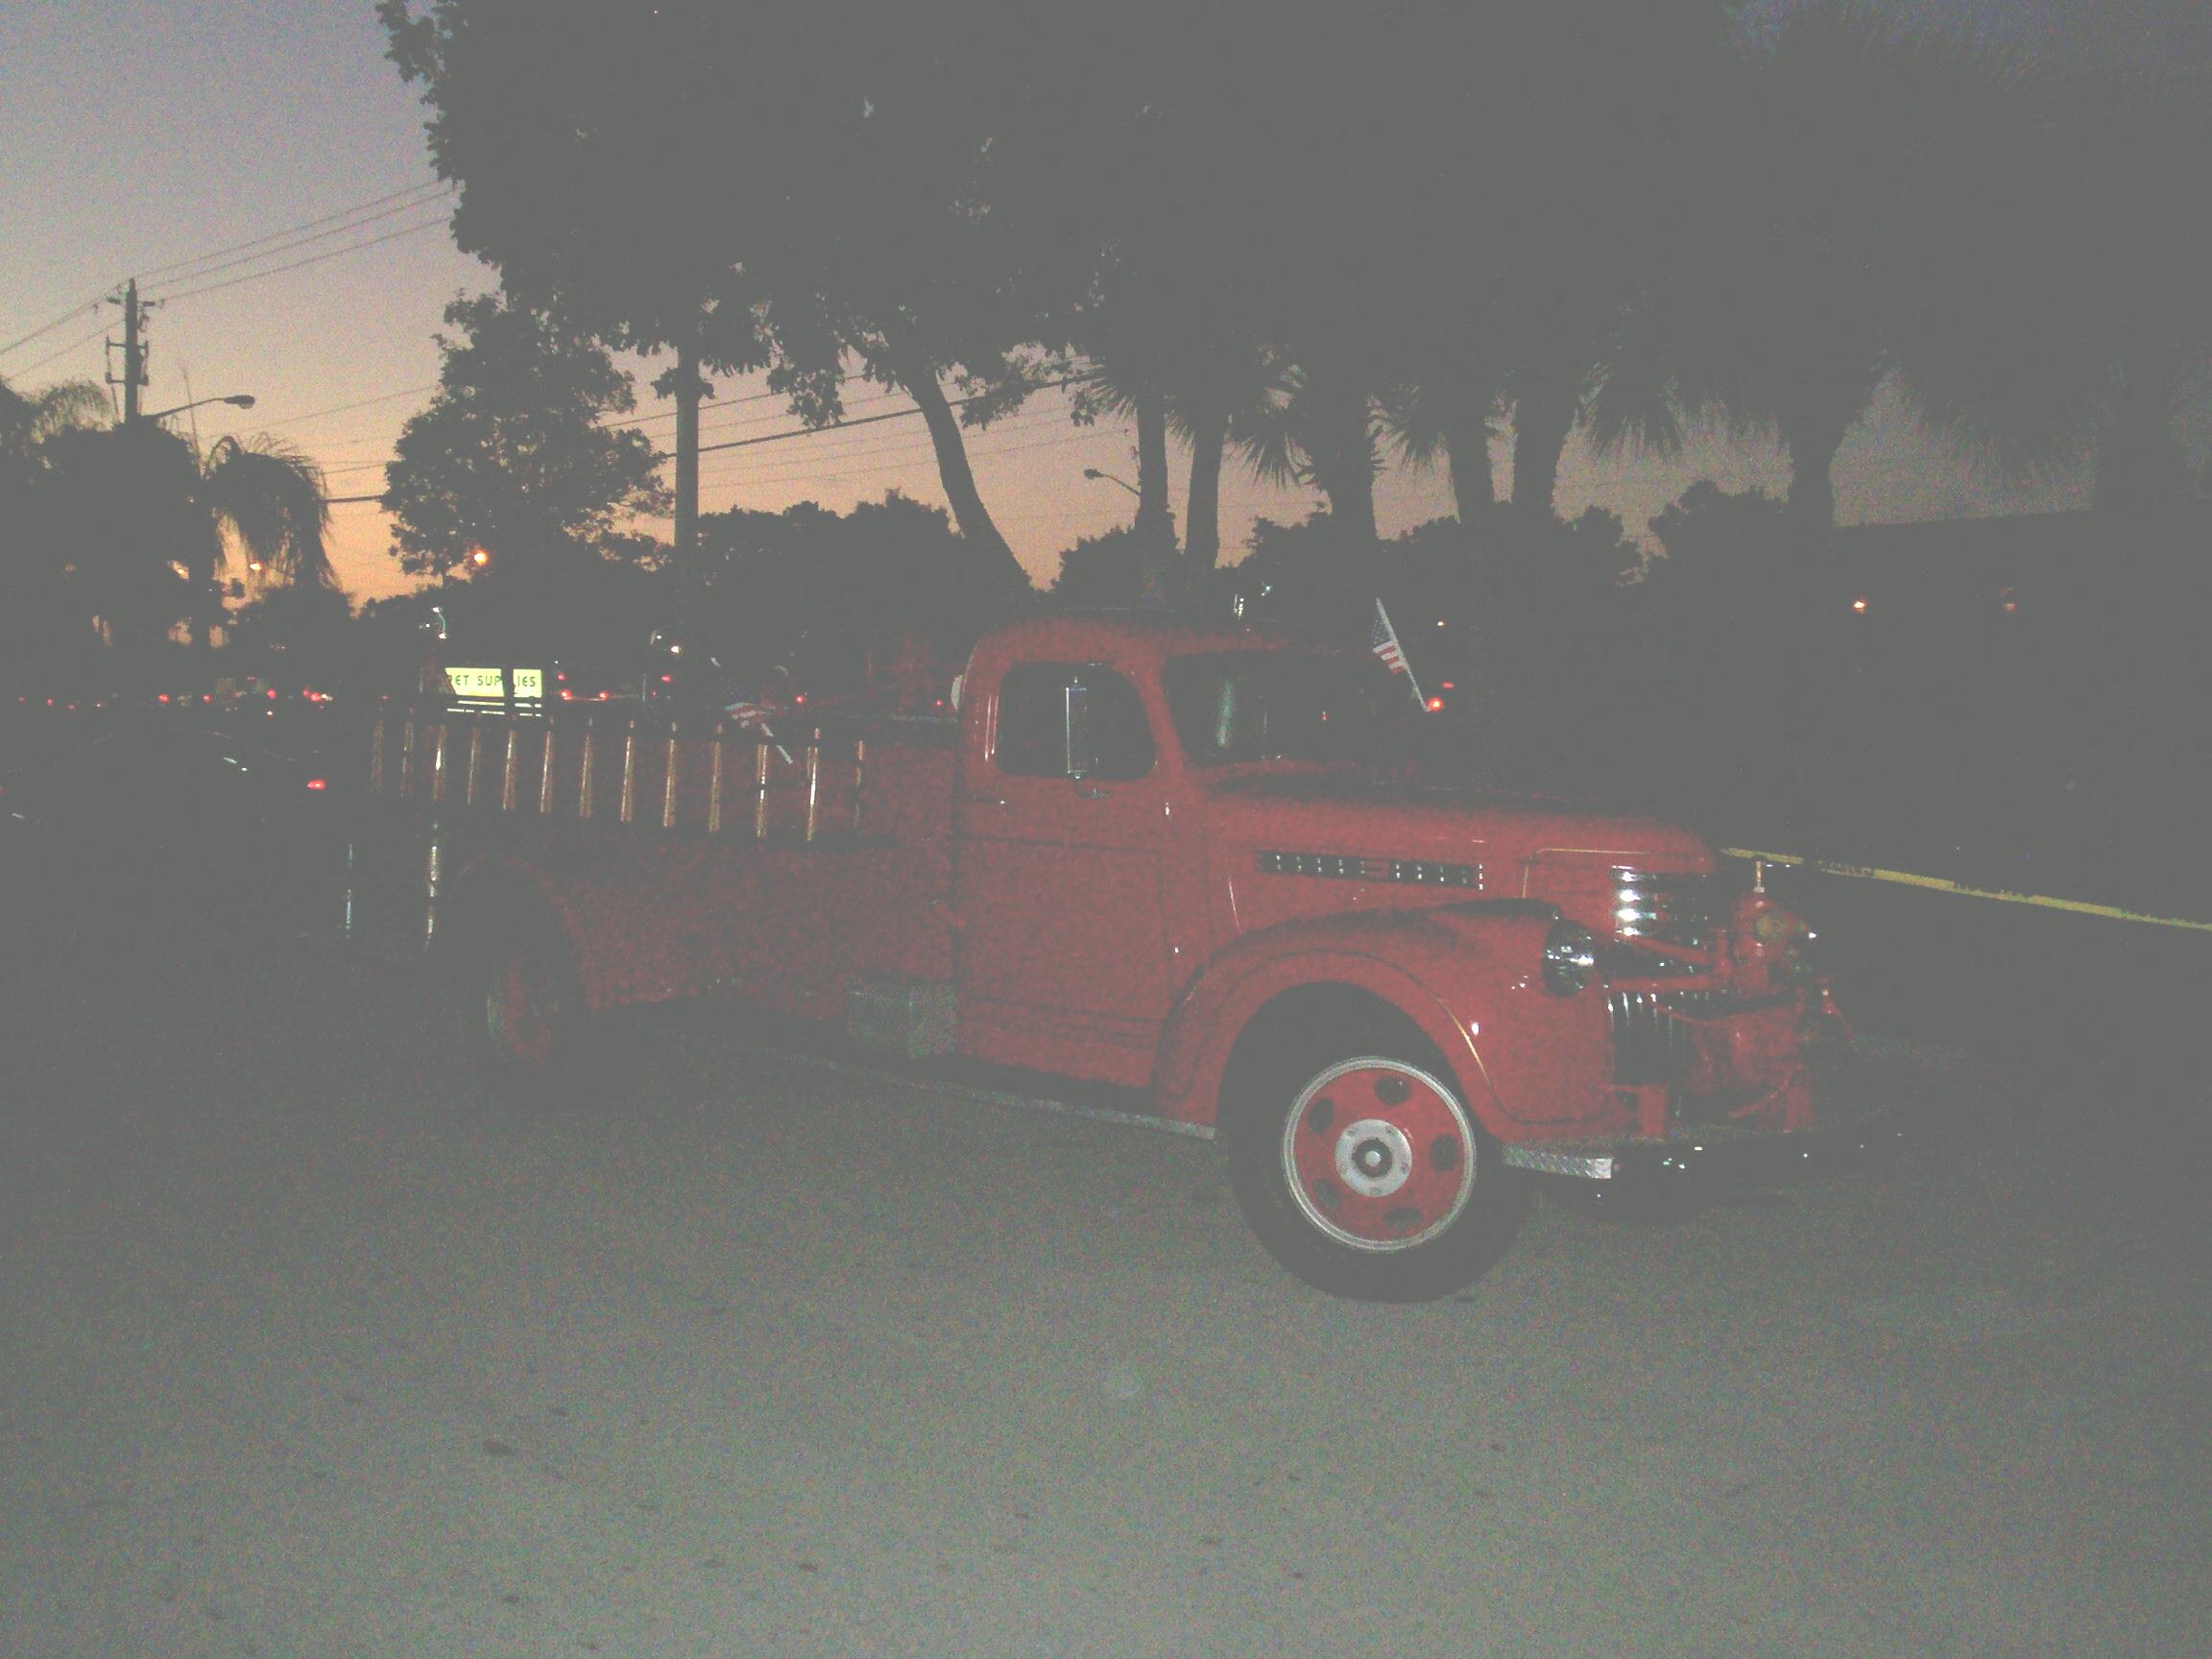 December
9th 2009 Last nite,
Classic Diamonds held their Toys for Tots cruise-in. We collected more
for the Marines than last year which is sayin' something in these
trying times of Obamanomics. Some pretty classy rides showed up
including this old Chebby fire truck. I'm not equipped to take night
time pics so I soon gave up on that and made merry.
December
9th 2009 Last nite,
Classic Diamonds held their Toys for Tots cruise-in. We collected more
for the Marines than last year which is sayin' something in these
trying times of Obamanomics. Some pretty classy rides showed up
including this old Chebby fire truck. I'm not equipped to take night
time pics so I soon gave up on that and made merry.
December 14th 2009 Shows and cruise-ins filled up the weekend and I didn't get any maintenance done on any of the rides. On saturday, the Diamond Classics club was committed to showing the cars at a Boynton Beach green market. Deerslayer and I were the first there. The sky was threatening rain but it held off and we finished the show at two pm and caravaned off to a pizza joint. On the way back to the Krash Lab, the sky opened up and I kept on going home to the Krash Pad instead.
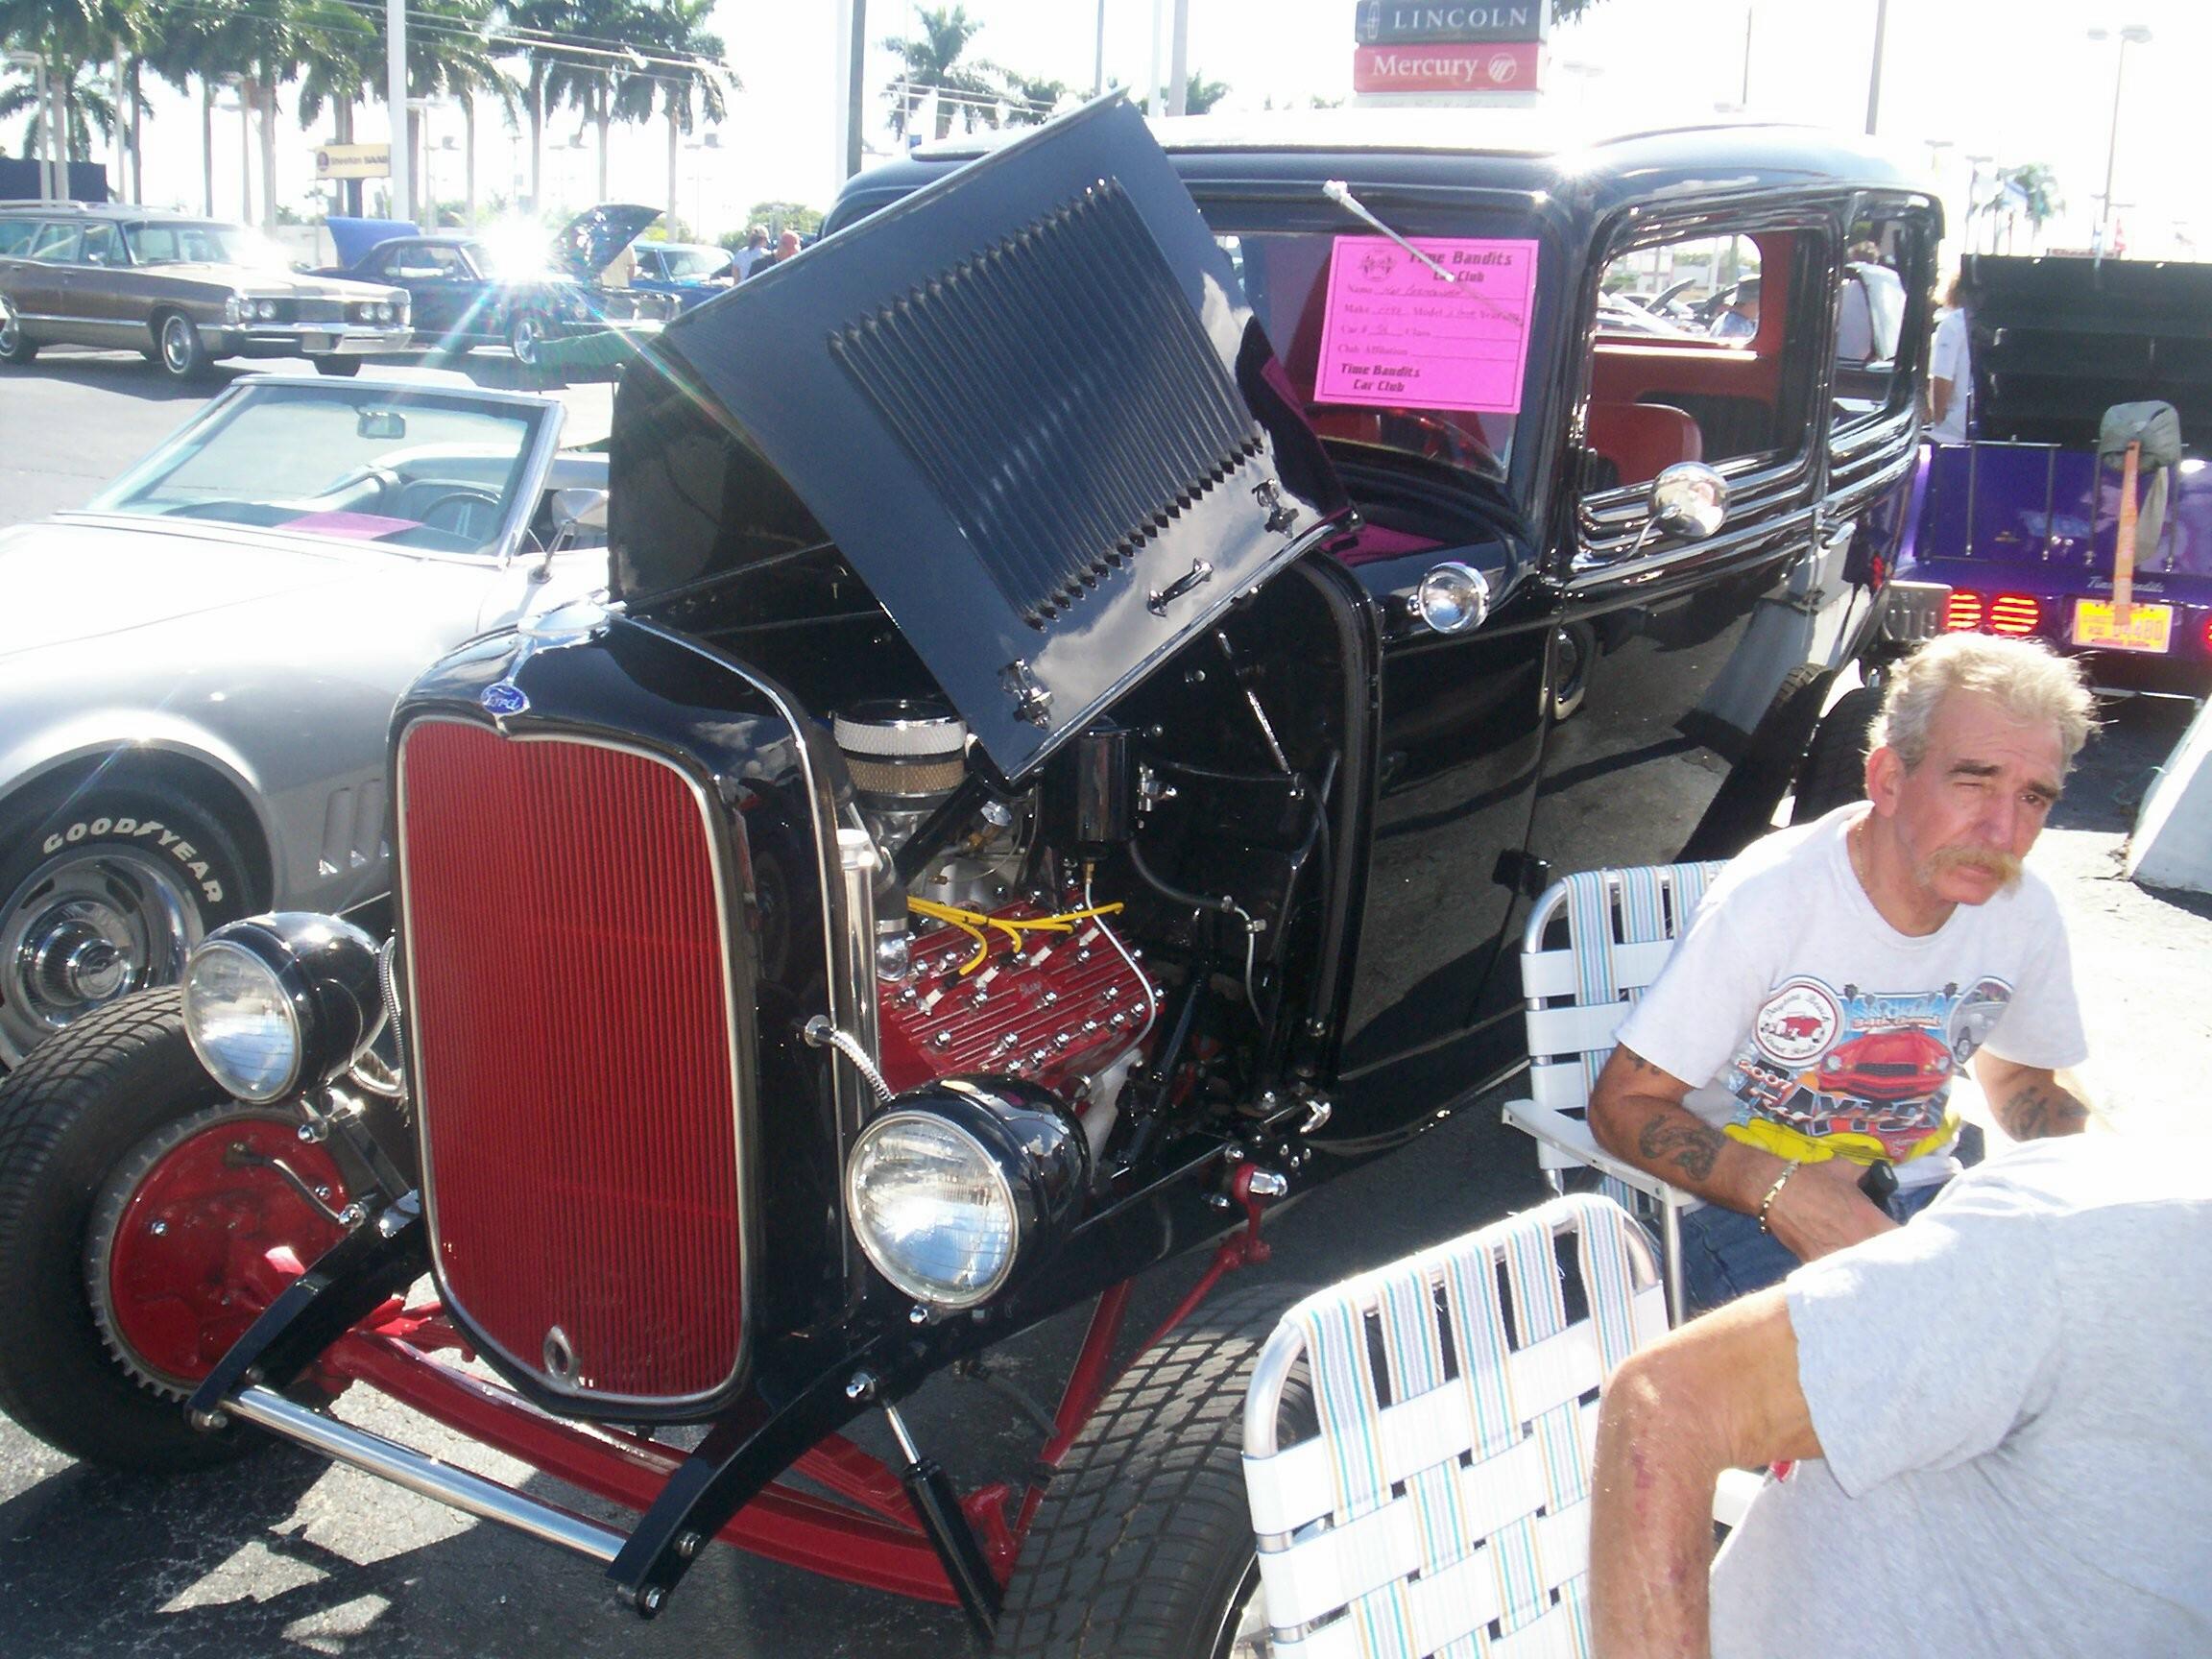 Yesterday
was better. There was an open show by a group called the Time Bandits
at a Ford-Lincoln-Mercury dealership in Pompano Beach. My friends, Lou
and Anthony got there three hours early to stake out spots in the shade
of the main building. I had to park some distance from them by the time
Deerslayer and I arrived. I left Deerslayer to fend for himself in the
sun and I dragged my folding chair over to the shade with my friends.
Despite staying in the shade most of the time, I ended up with December
sunburn. The mid-day temp was eighty-six. After the show, we finished
out the day at the sunday nite cruise-in.
Yesterday
was better. There was an open show by a group called the Time Bandits
at a Ford-Lincoln-Mercury dealership in Pompano Beach. My friends, Lou
and Anthony got there three hours early to stake out spots in the shade
of the main building. I had to park some distance from them by the time
Deerslayer and I arrived. I left Deerslayer to fend for himself in the
sun and I dragged my folding chair over to the shade with my friends.
Despite staying in the shade most of the time, I ended up with December
sunburn. The mid-day temp was eighty-six. After the show, we finished
out the day at the sunday nite cruise-in.
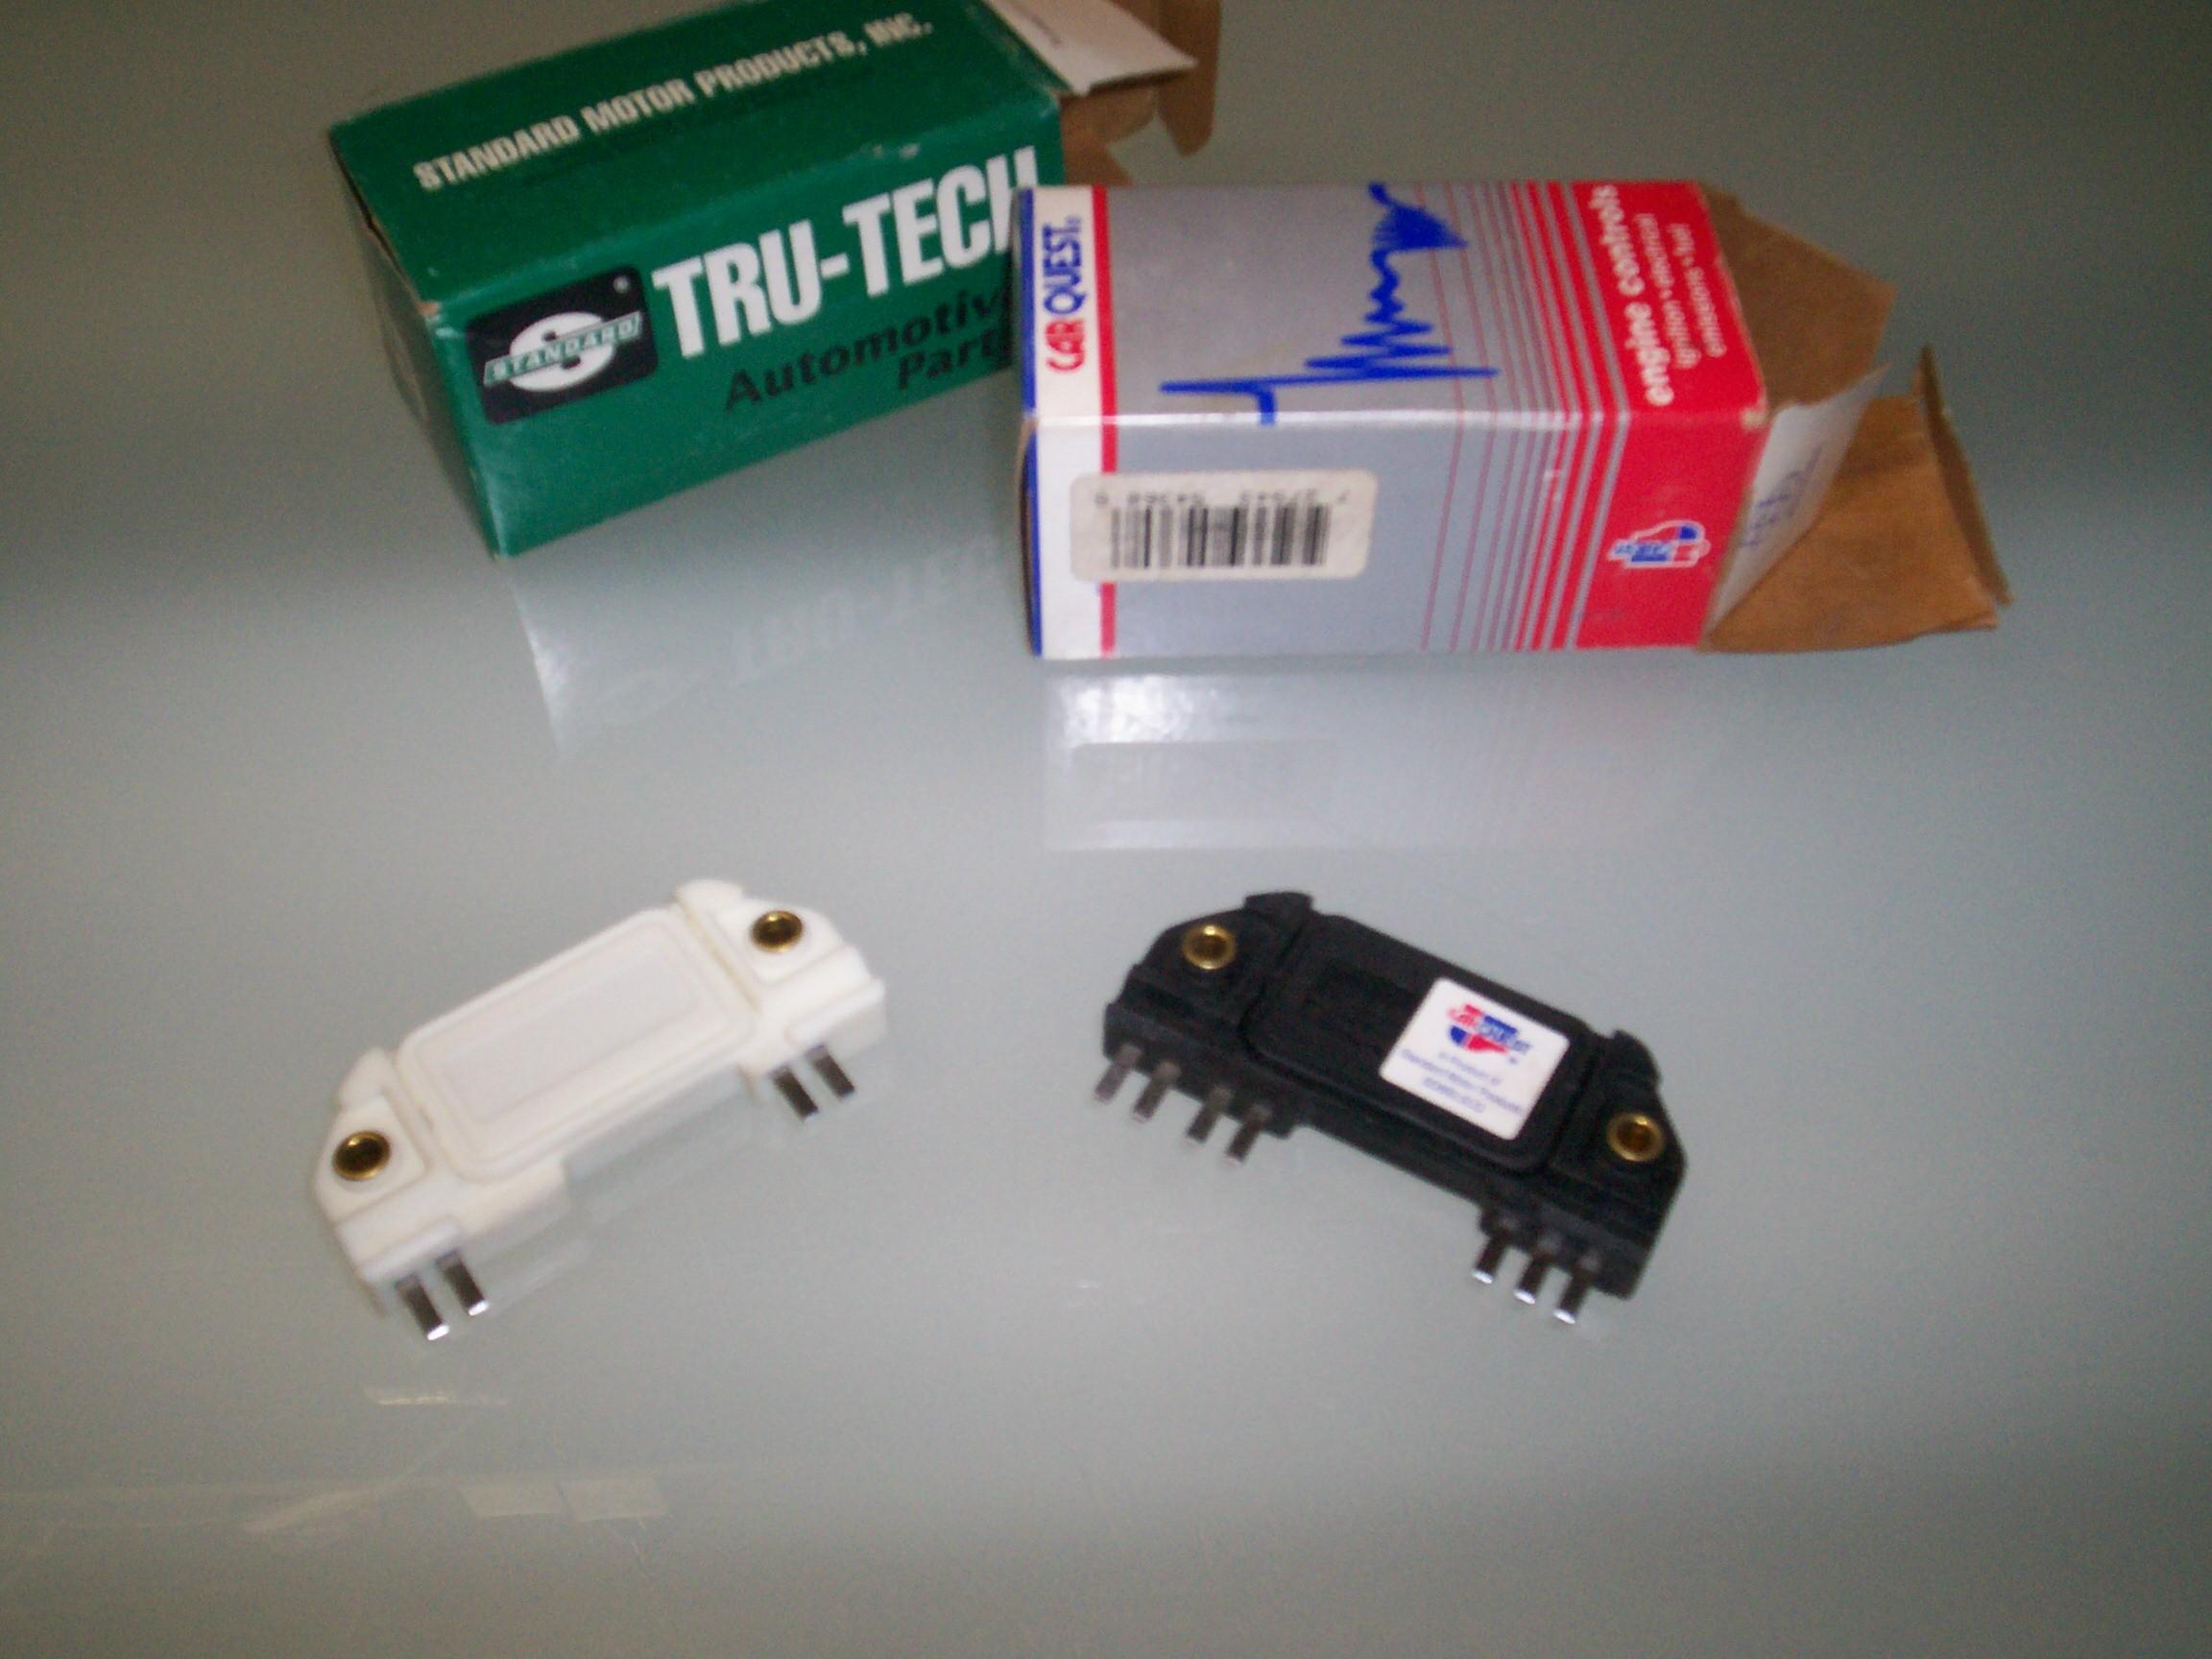 When
I bought tuneup parts for Deerslayer sometime back, I guessed at a '82
Chebby S10 2.8L V6 engine for the dizzy parts based on what Tony had
told me about the HEI he modified for the Jimmy 302. I wanted a spare
module but they had a 4-prong and 7-prong listed and I didn't know
which one the Deerslayer dizzy has. I'm a real pussy when it comes to
taking apart something that is working and that I don't know much about
so, I let it pass at the time and didn't order a module. Last week, RockAuto sent me an
e-mail regarding clearance sales on the various vehicles they have down
for me in their database. Both modules were available for less than
half their list prices so, I ordered both and got by for less than
forty bucks. These items will go into Deerslayer's travel supplies. One
had instructions but was missing the mentioned heat sink silicone. The
other had the heat sink silicon but was missing the instructions. They
are both from Hong Kong.
When
I bought tuneup parts for Deerslayer sometime back, I guessed at a '82
Chebby S10 2.8L V6 engine for the dizzy parts based on what Tony had
told me about the HEI he modified for the Jimmy 302. I wanted a spare
module but they had a 4-prong and 7-prong listed and I didn't know
which one the Deerslayer dizzy has. I'm a real pussy when it comes to
taking apart something that is working and that I don't know much about
so, I let it pass at the time and didn't order a module. Last week, RockAuto sent me an
e-mail regarding clearance sales on the various vehicles they have down
for me in their database. Both modules were available for less than
half their list prices so, I ordered both and got by for less than
forty bucks. These items will go into Deerslayer's travel supplies. One
had instructions but was missing the mentioned heat sink silicone. The
other had the heat sink silicon but was missing the instructions. They
are both from Hong Kong.
I might have gotten more insight into this by going back to OldGMCtrucks.com and searchin' the HEI posts by Tony (Truckedup) and Andy (SlimSix) and, I did eventually. It's no secret that I often do the dumb thing before I do the smart thing. Hell, sometimes, I never even get to the smart thing.
December 15th 2009 I was wasting a bit of the Boss's time yesterday over on the H.A.M.B (Hokey Ass Message Board) when I ran across this thread by Carbking:
Carter AFB pump link installation. This is the little "S" shaped link that connects the accelerator pump rocker arm to the accelerator pump. The link is constructed with a bend in the middle. When properly installed, the link will resemble the letter "S" if viewed from the front, NOT a reverse "S". If viewed from the throttle side of the carburetor, when the lower portion of the link is vertical, the upper portion will be leaning toward the rear of the carburetor. I know a picture is better, but my digital camera works best outside, and the temperature is less than optimal. Installing the link backwards will result in the necessity of much greater pressure to depress the footfeed, and also premature failure of the accelerator pump. I thought everyone by now knew about this issue, but of the six AFB's I disassembled this morning, four had the link backwards. Jon. __________________ Good carburetion is fuelish hot air! The Carburetor Shop of Missouri
I ran out and took a look at Deerslayer's 400 CFM AFB. It had the link on backwards. Carbking has been very helpful over the years and I respect his expertise. He also has the same foul opinion of ethanol that I do. I googled a bit more for a pic and found a good Carter AFB reference in a PDF file by David Kovac that should come in handy down the road.
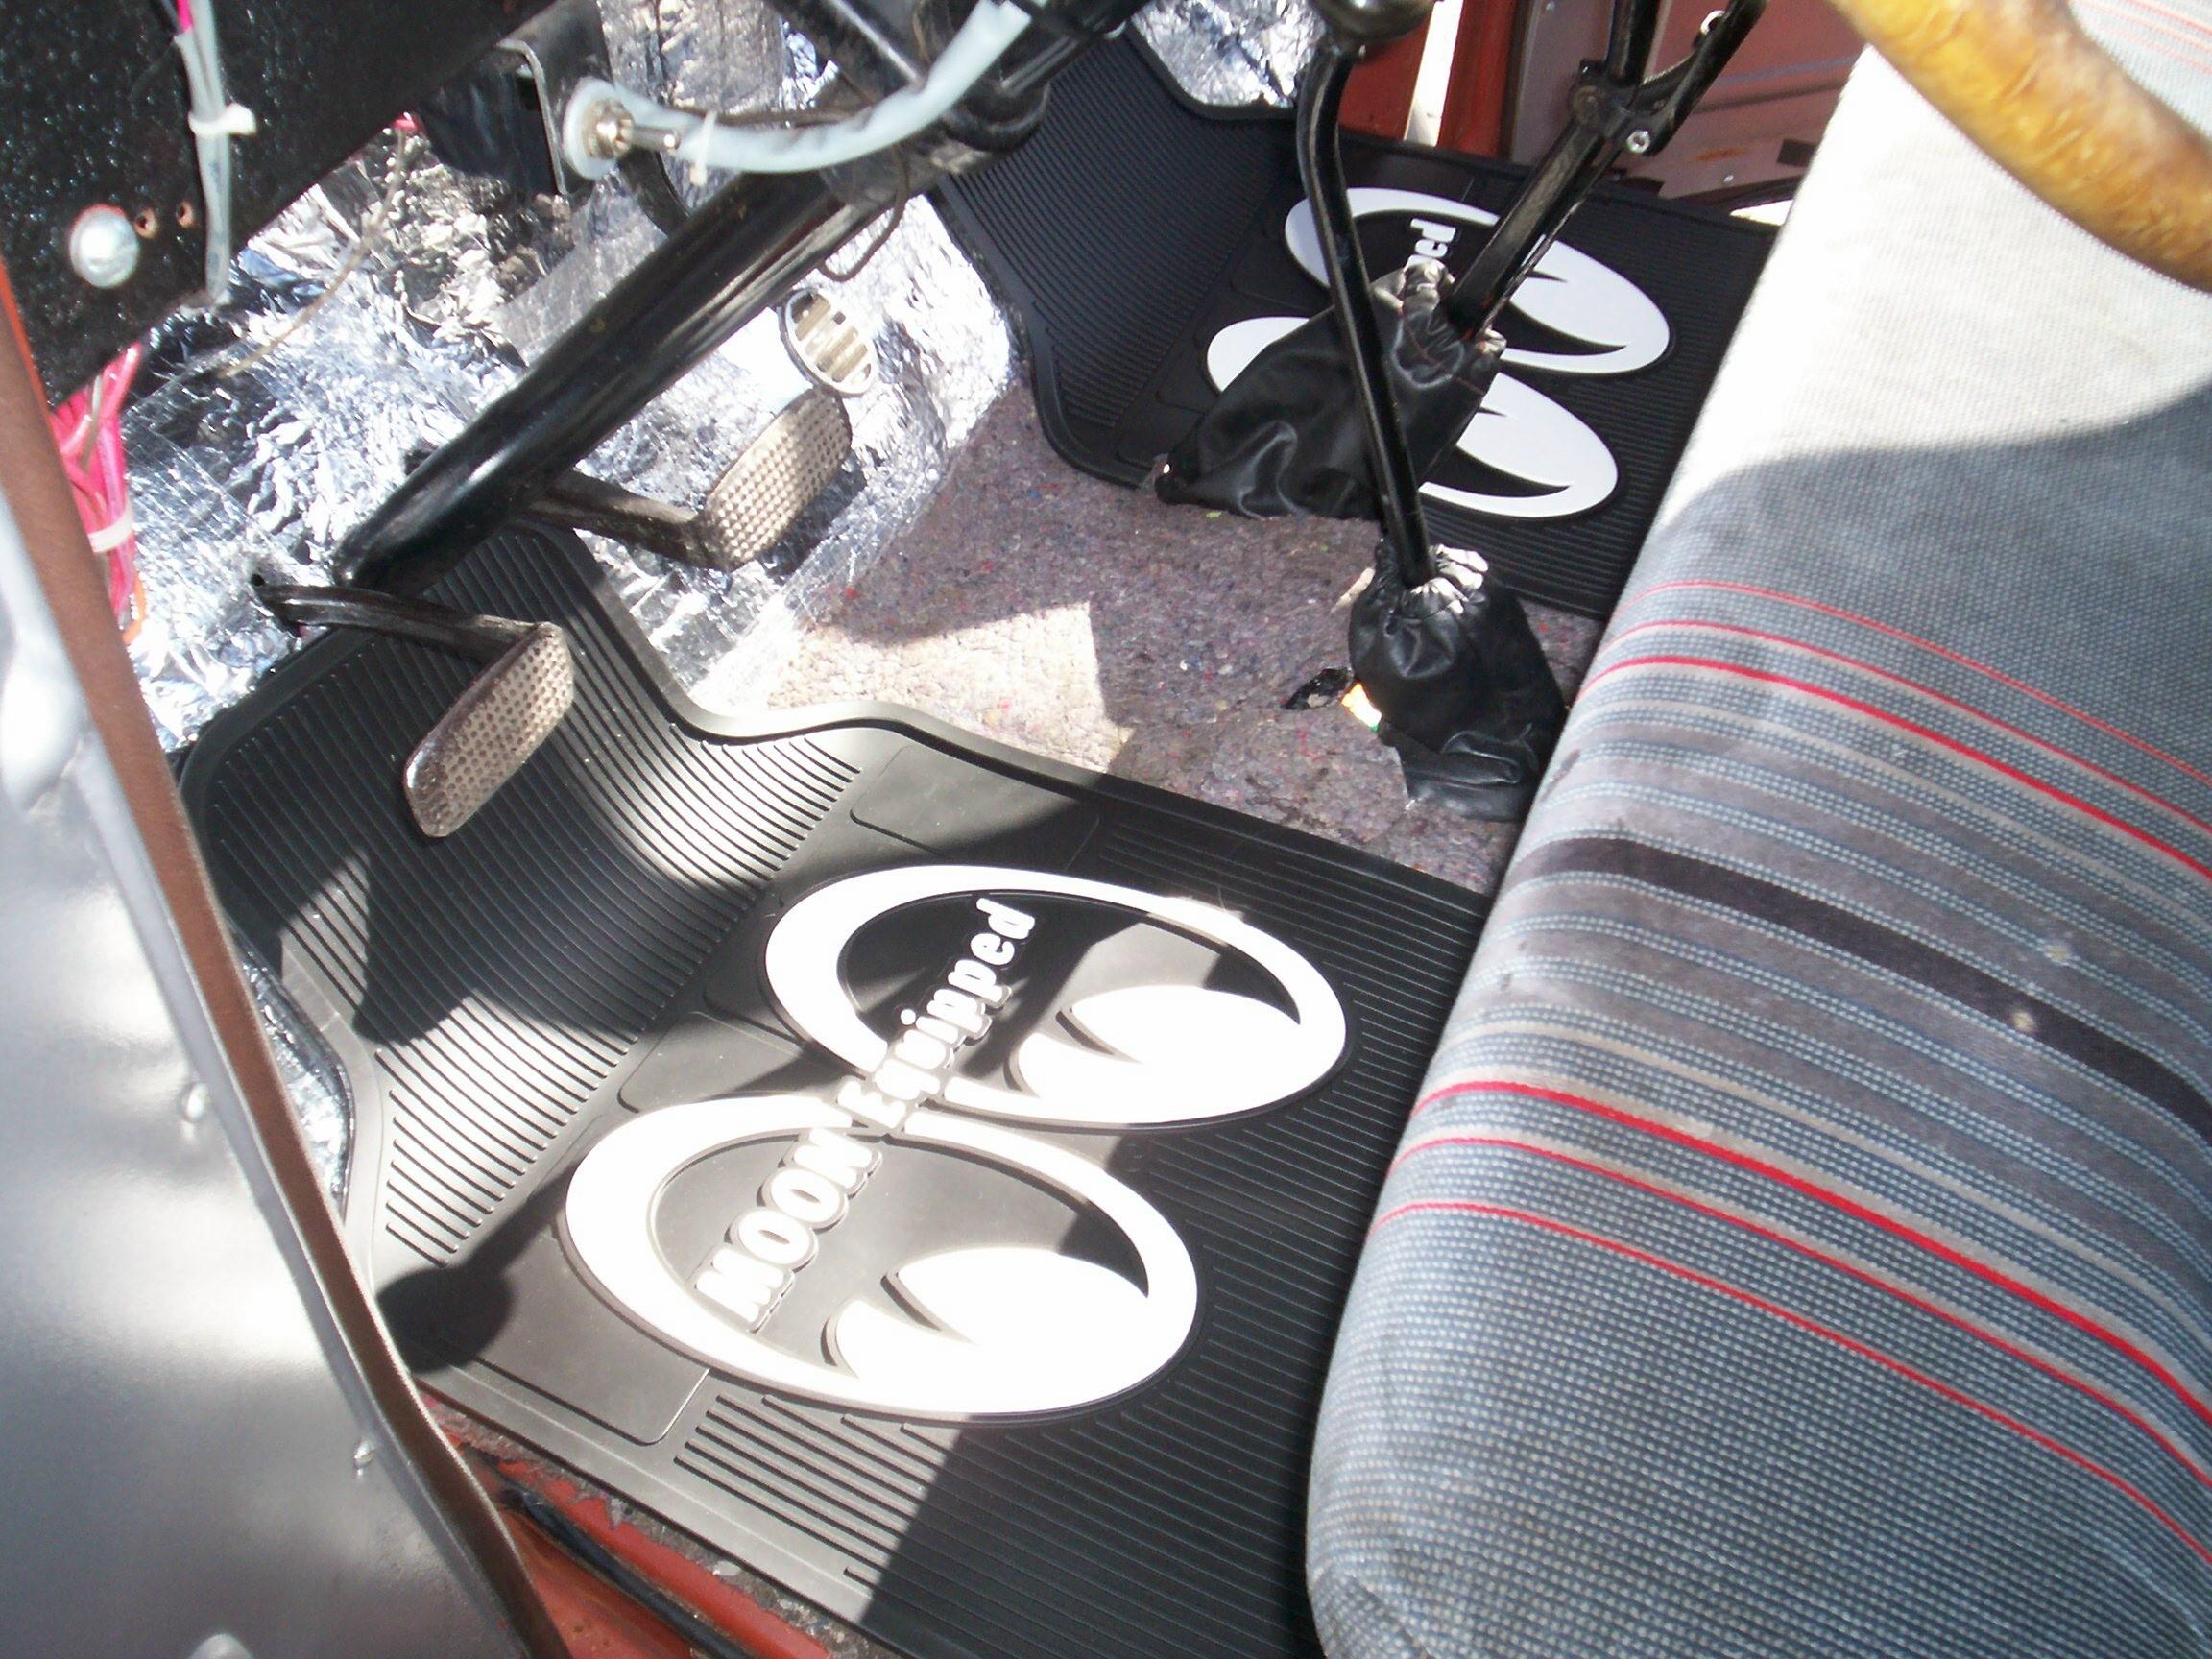 The
MoonEyes floor mats arrived today and with a bit of trimming, look just
fine. I may still be able to use the three pieces of old brittle floor
mat for something so I will find a place for them up at the warehouse.
I'll get back to the remainder of the cab insulation job soon and
finish that task.
The
MoonEyes floor mats arrived today and with a bit of trimming, look just
fine. I may still be able to use the three pieces of old brittle floor
mat for something so I will find a place for them up at the warehouse.
I'll get back to the remainder of the cab insulation job soon and
finish that task.
December 16th 2009 Last nite was the last Delray cruise-in for the Diamond Classics until after New Year's. It also turned out to be the last cruise-in at this location. The restuarant was closed and out-of-business. We didn't know it at the time but they delayed closing until after our Toys for Tots cruise-in. Nice people and more victims of Obamanomics. When we start up again, we will be meeting farther up the road at a restuarant in Boynton Beach. A longer ride and a little hard on the stock stovebolts of Morgan Brown and John Ray. I hope they don't drift away from the group.
December 19th 2009 We've had a two-day deluge of rain, including flooding, and I didn't get up to the warehouse yesterday or to the friday nite cruise-in. Today is cooler and rain is not in the forecast but some wind is. I'm gonna start with the stuff I have at hand and make a warehouse run if I still have time afterwards. First up is a wash wax all session with the red primer portion of Deerslayer's body. Then I gave the fenders a quik-n-durty application of Mequiar's Cleaner wax.
Made the run to the warehouse and stopped at a FLAPS along the way to pick up some Lexol Leather Cleaner. It was finally starting to warm up a bit under the shadetree by the time I got back to the Krash Lab. Deerslayer was due for monthly maintenance again so that was next. Brake fluid needed topping off and everything else was in the green.
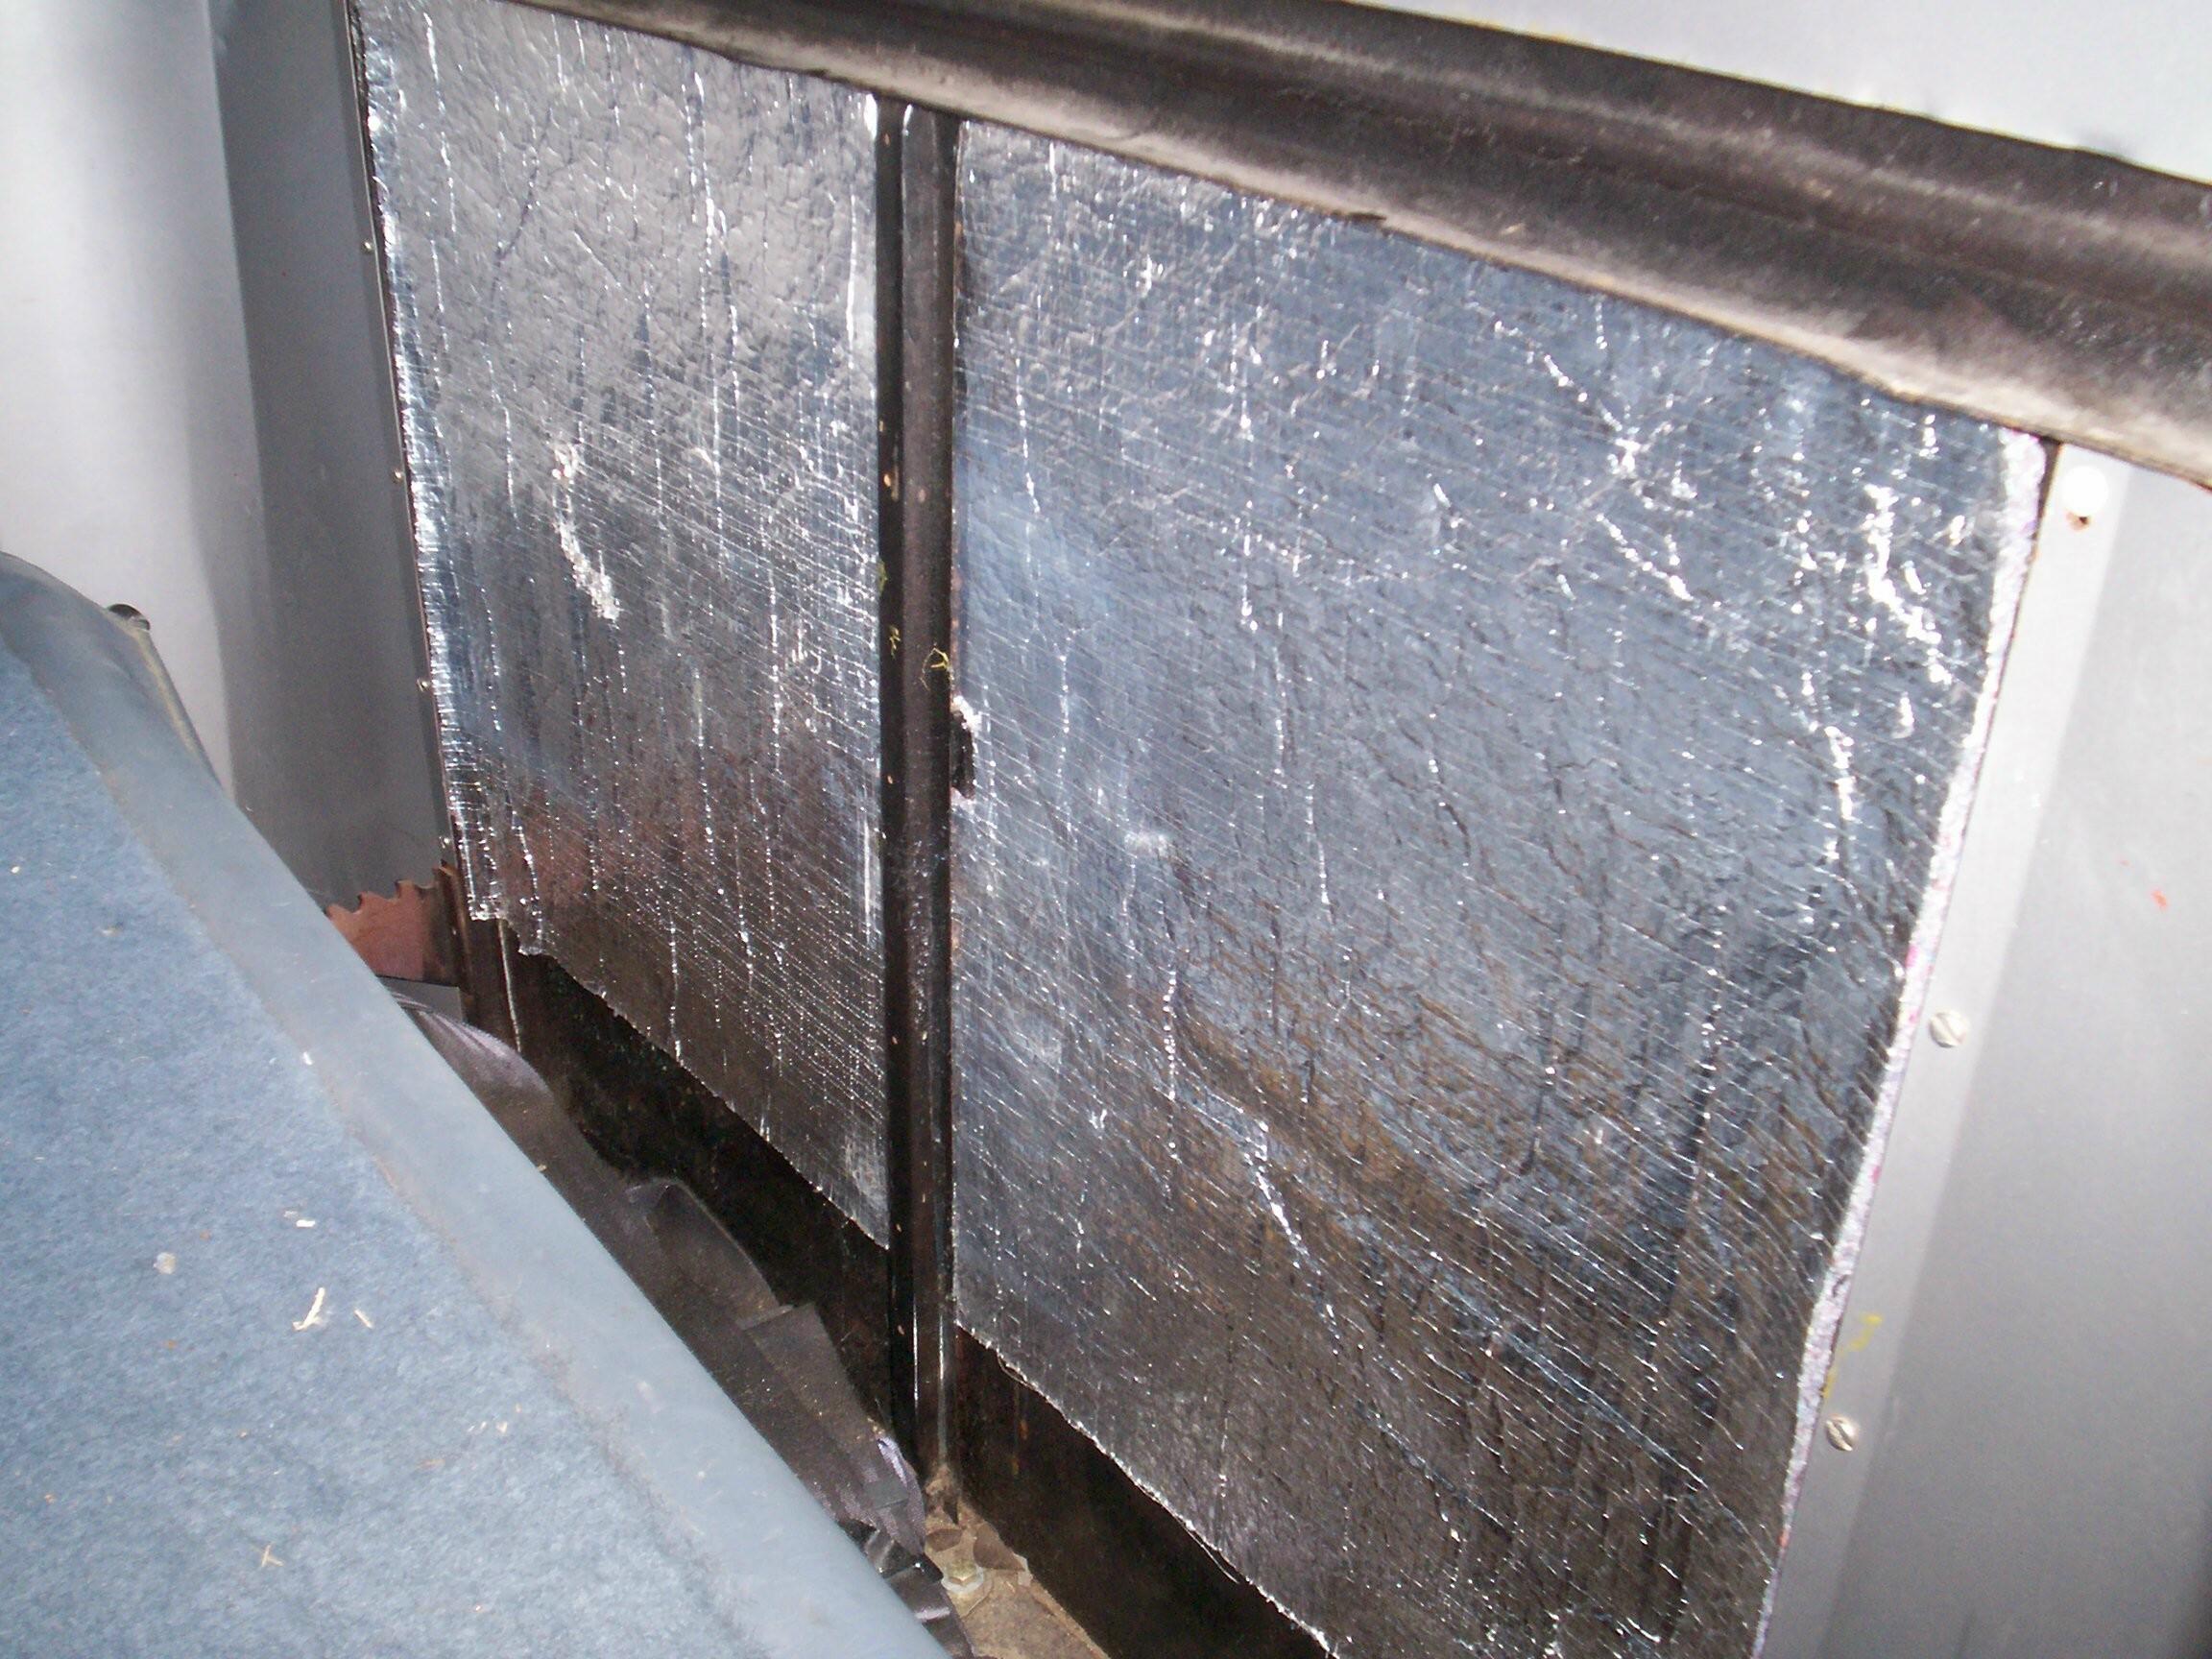
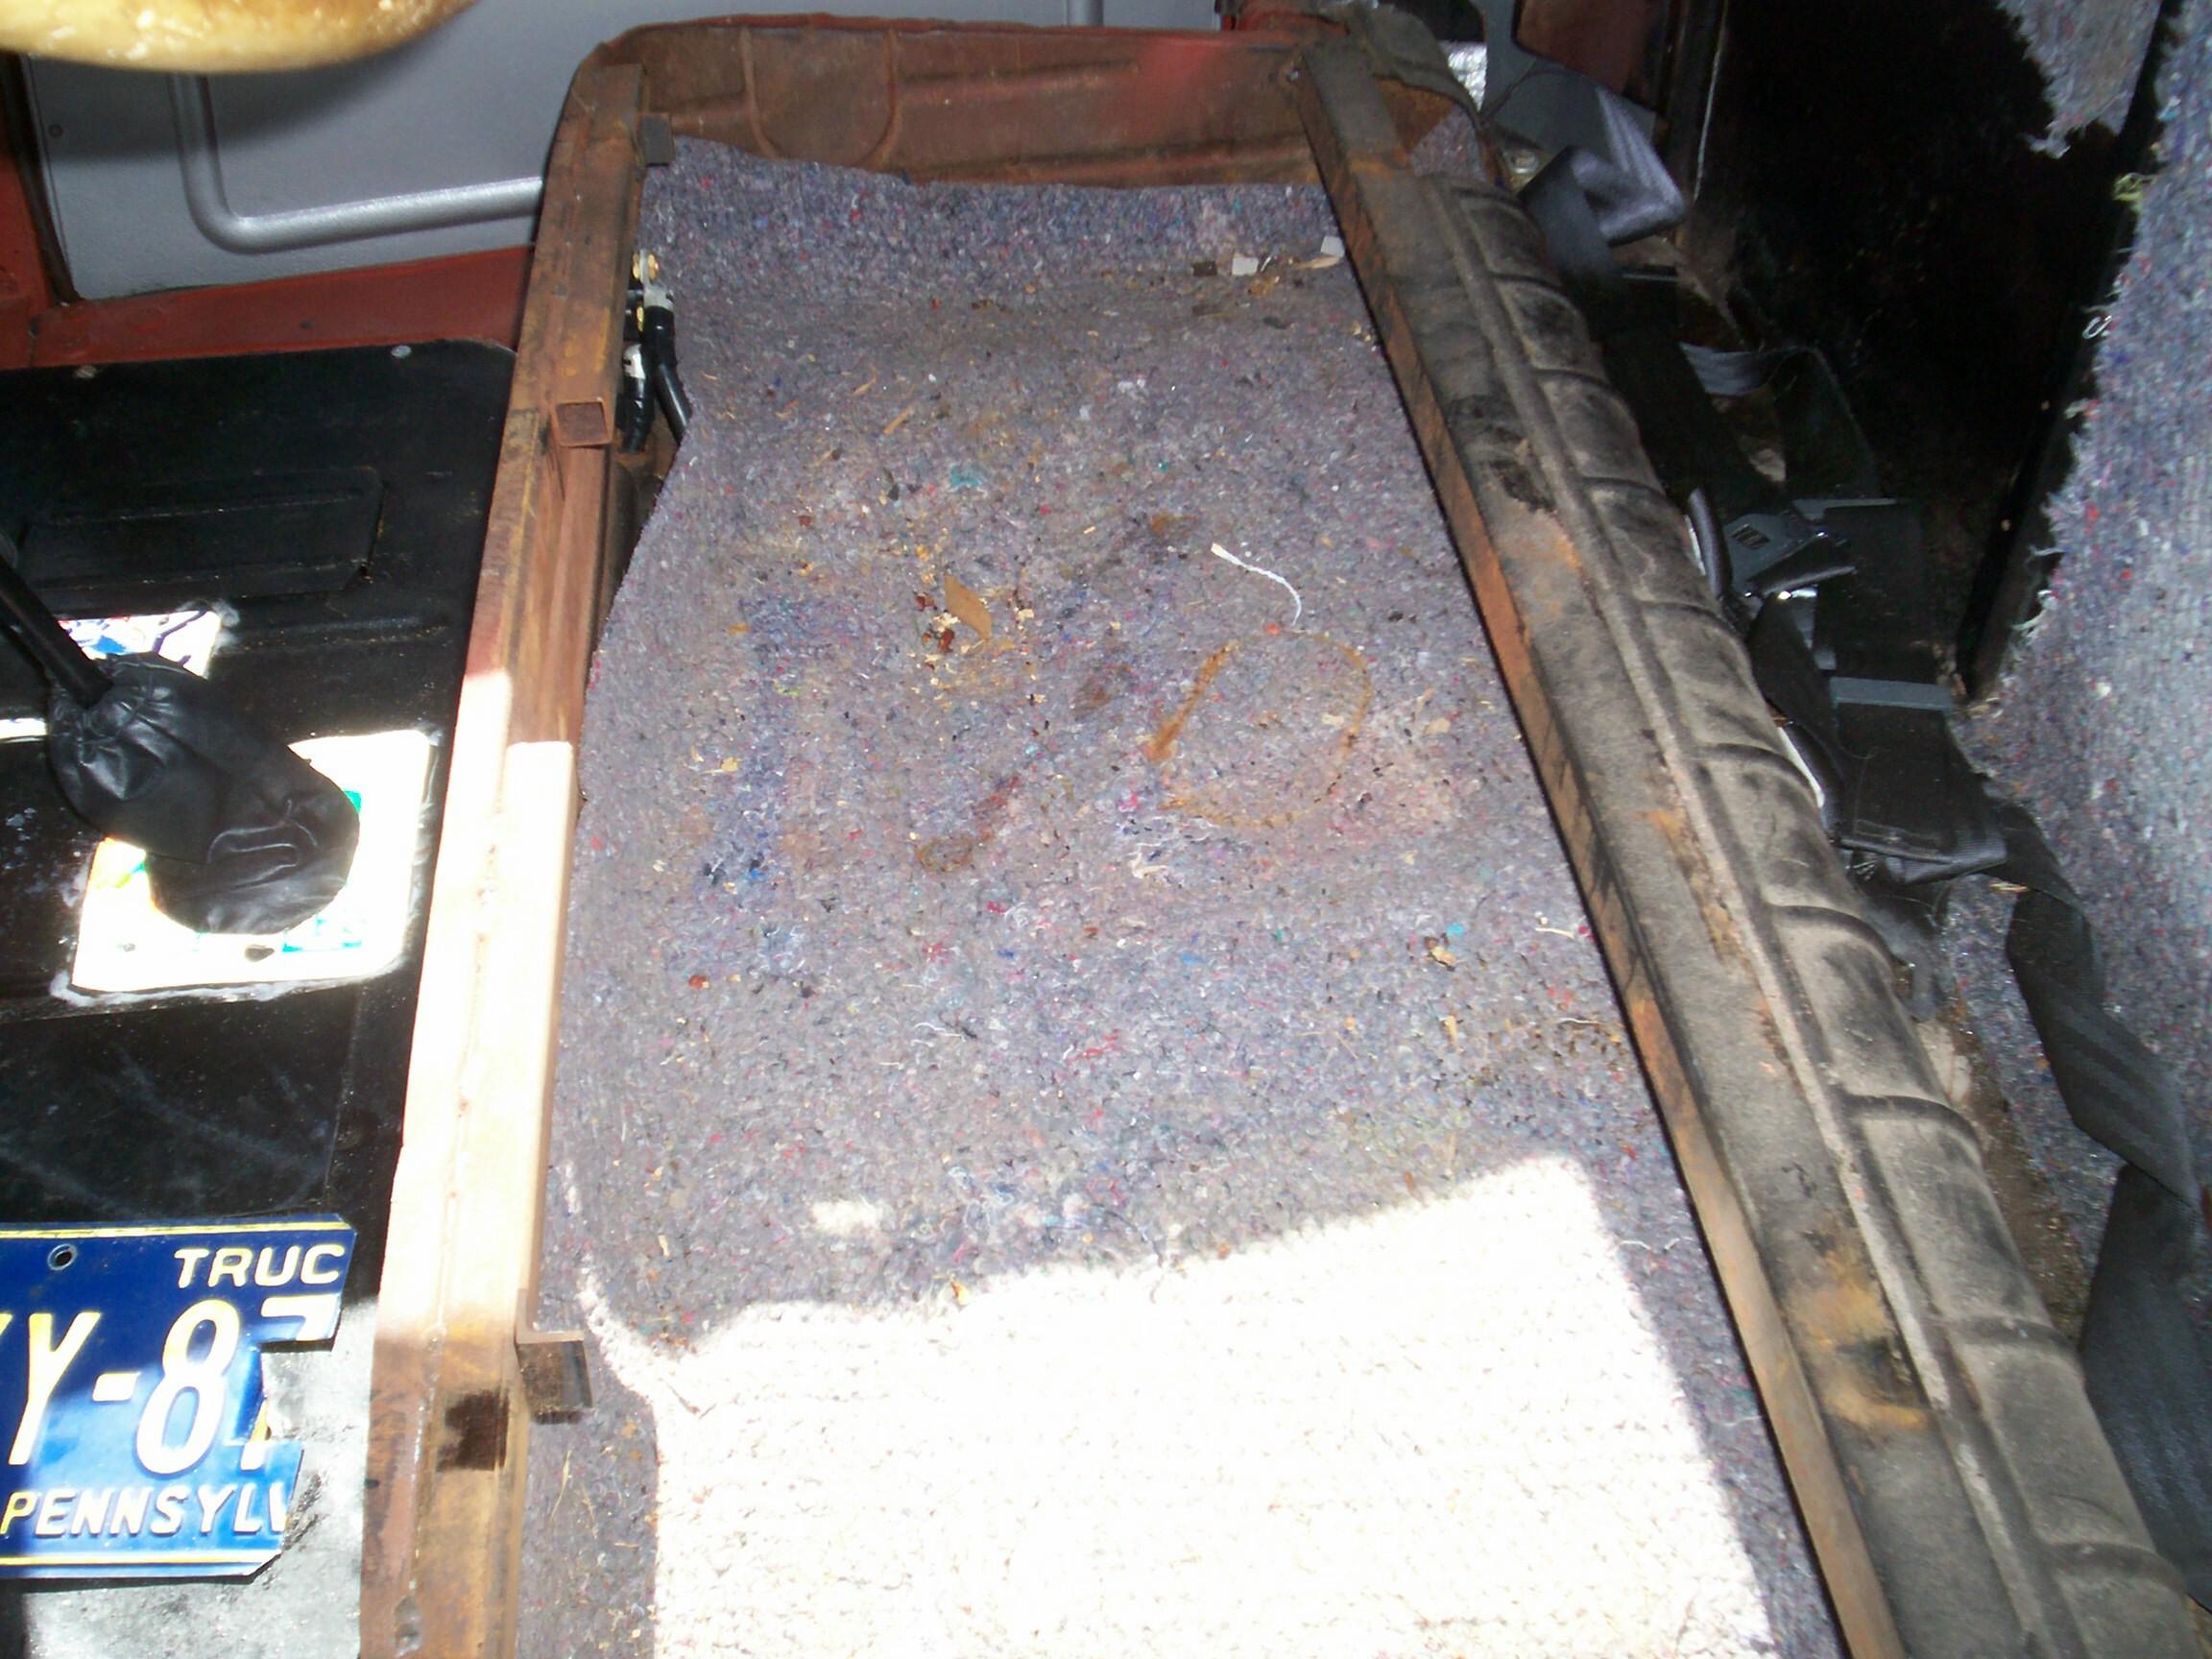 Detailed
the cab interior next with an eye to doin' some more of the cab
insulation redo while I was at it. I wrestled the minivan seat out of
the cab and it seems heavier than the last time! Heavier than a dead
Baptist preacher, the spirit of my maternal, Methodist Grandfather is
whispering in my ear. There's another big sheet of the foil-backed
fibrous insulation here that I can glue on the back of the cab.
Detailed
the cab interior next with an eye to doin' some more of the cab
insulation redo while I was at it. I wrestled the minivan seat out of
the cab and it seems heavier than the last time! Heavier than a dead
Baptist preacher, the spirit of my maternal, Methodist Grandfather is
whispering in my ear. There's another big sheet of the foil-backed
fibrous insulation here that I can glue on the back of the cab.
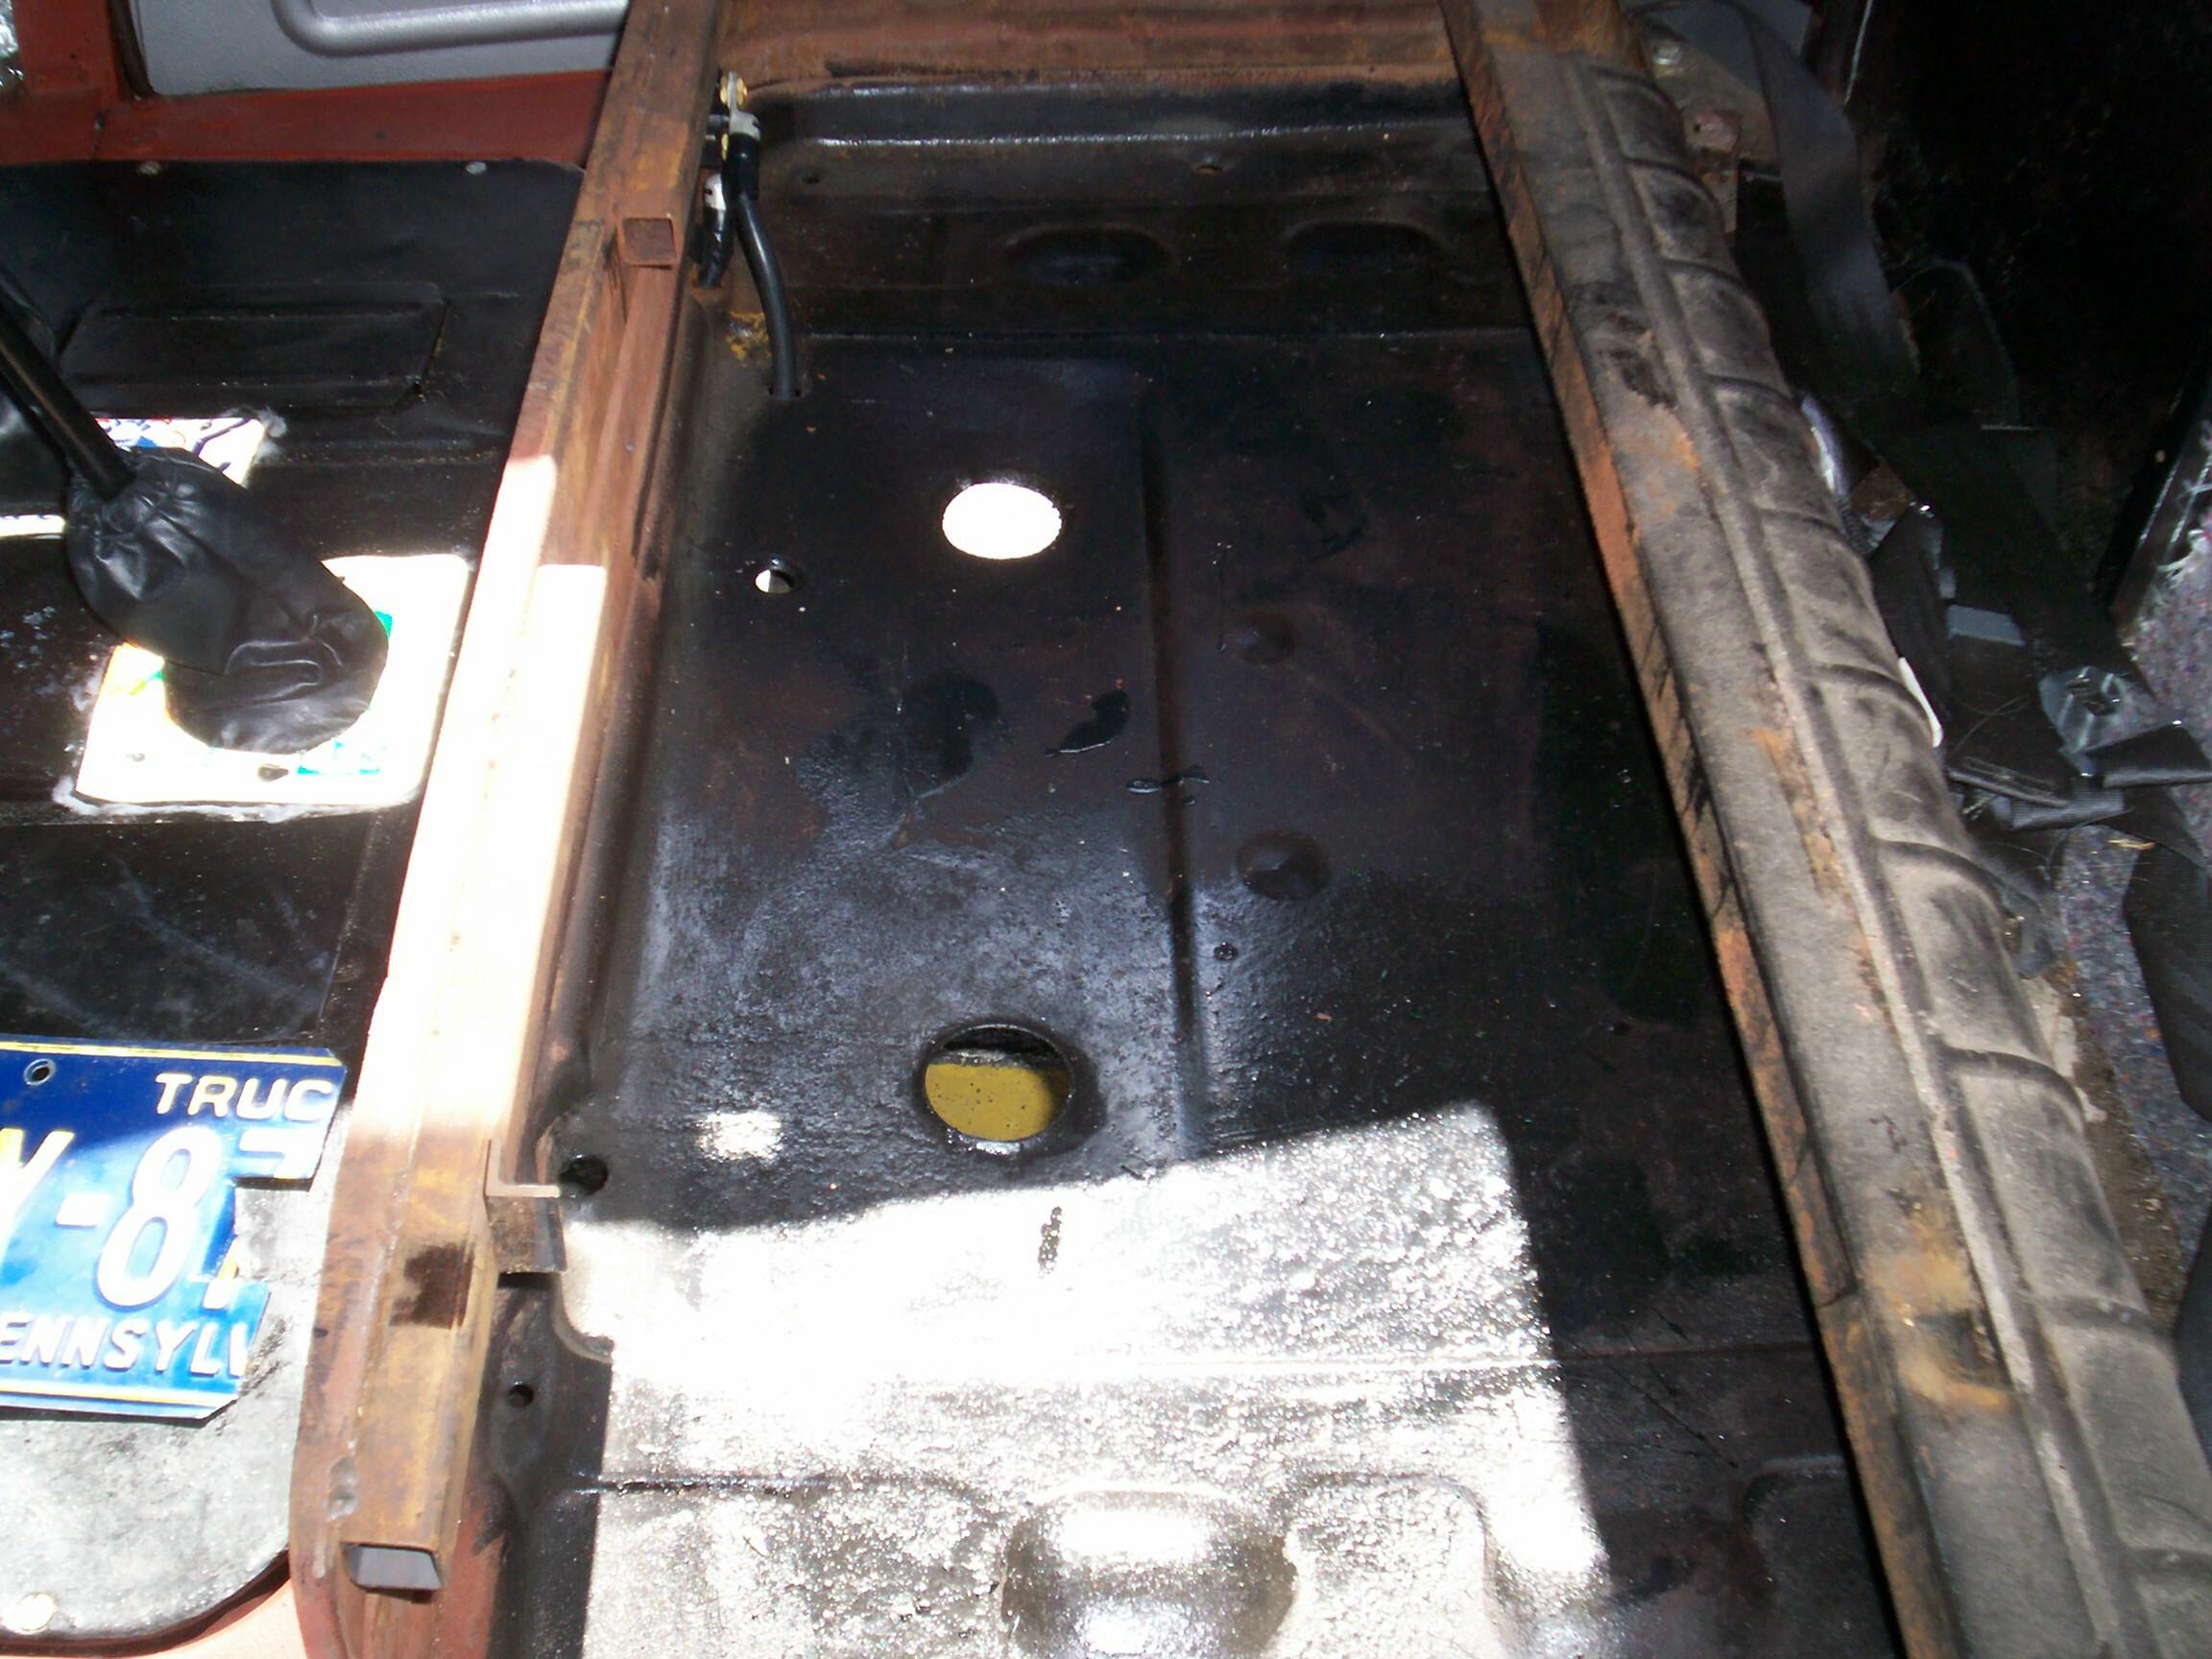 Underneath
that, Tony had a CarQuest fender cover over the big holes in the floor
pan. I think I'll tape the holes for now and see how they hold up to
that treatment . . . I got four of the smaller holes taped when I ran
into a problem with the tape not gaining adhesion. My grease and wax
remover is up at the warehouse along with my scotchbrite pads. Rather
than waste the tape, I stopped to take on the rest of this task at a
later date.
Underneath
that, Tony had a CarQuest fender cover over the big holes in the floor
pan. I think I'll tape the holes for now and see how they hold up to
that treatment . . . I got four of the smaller holes taped when I ran
into a problem with the tape not gaining adhesion. My grease and wax
remover is up at the warehouse along with my scotchbrite pads. Rather
than waste the tape, I stopped to take on the rest of this task at a
later date.
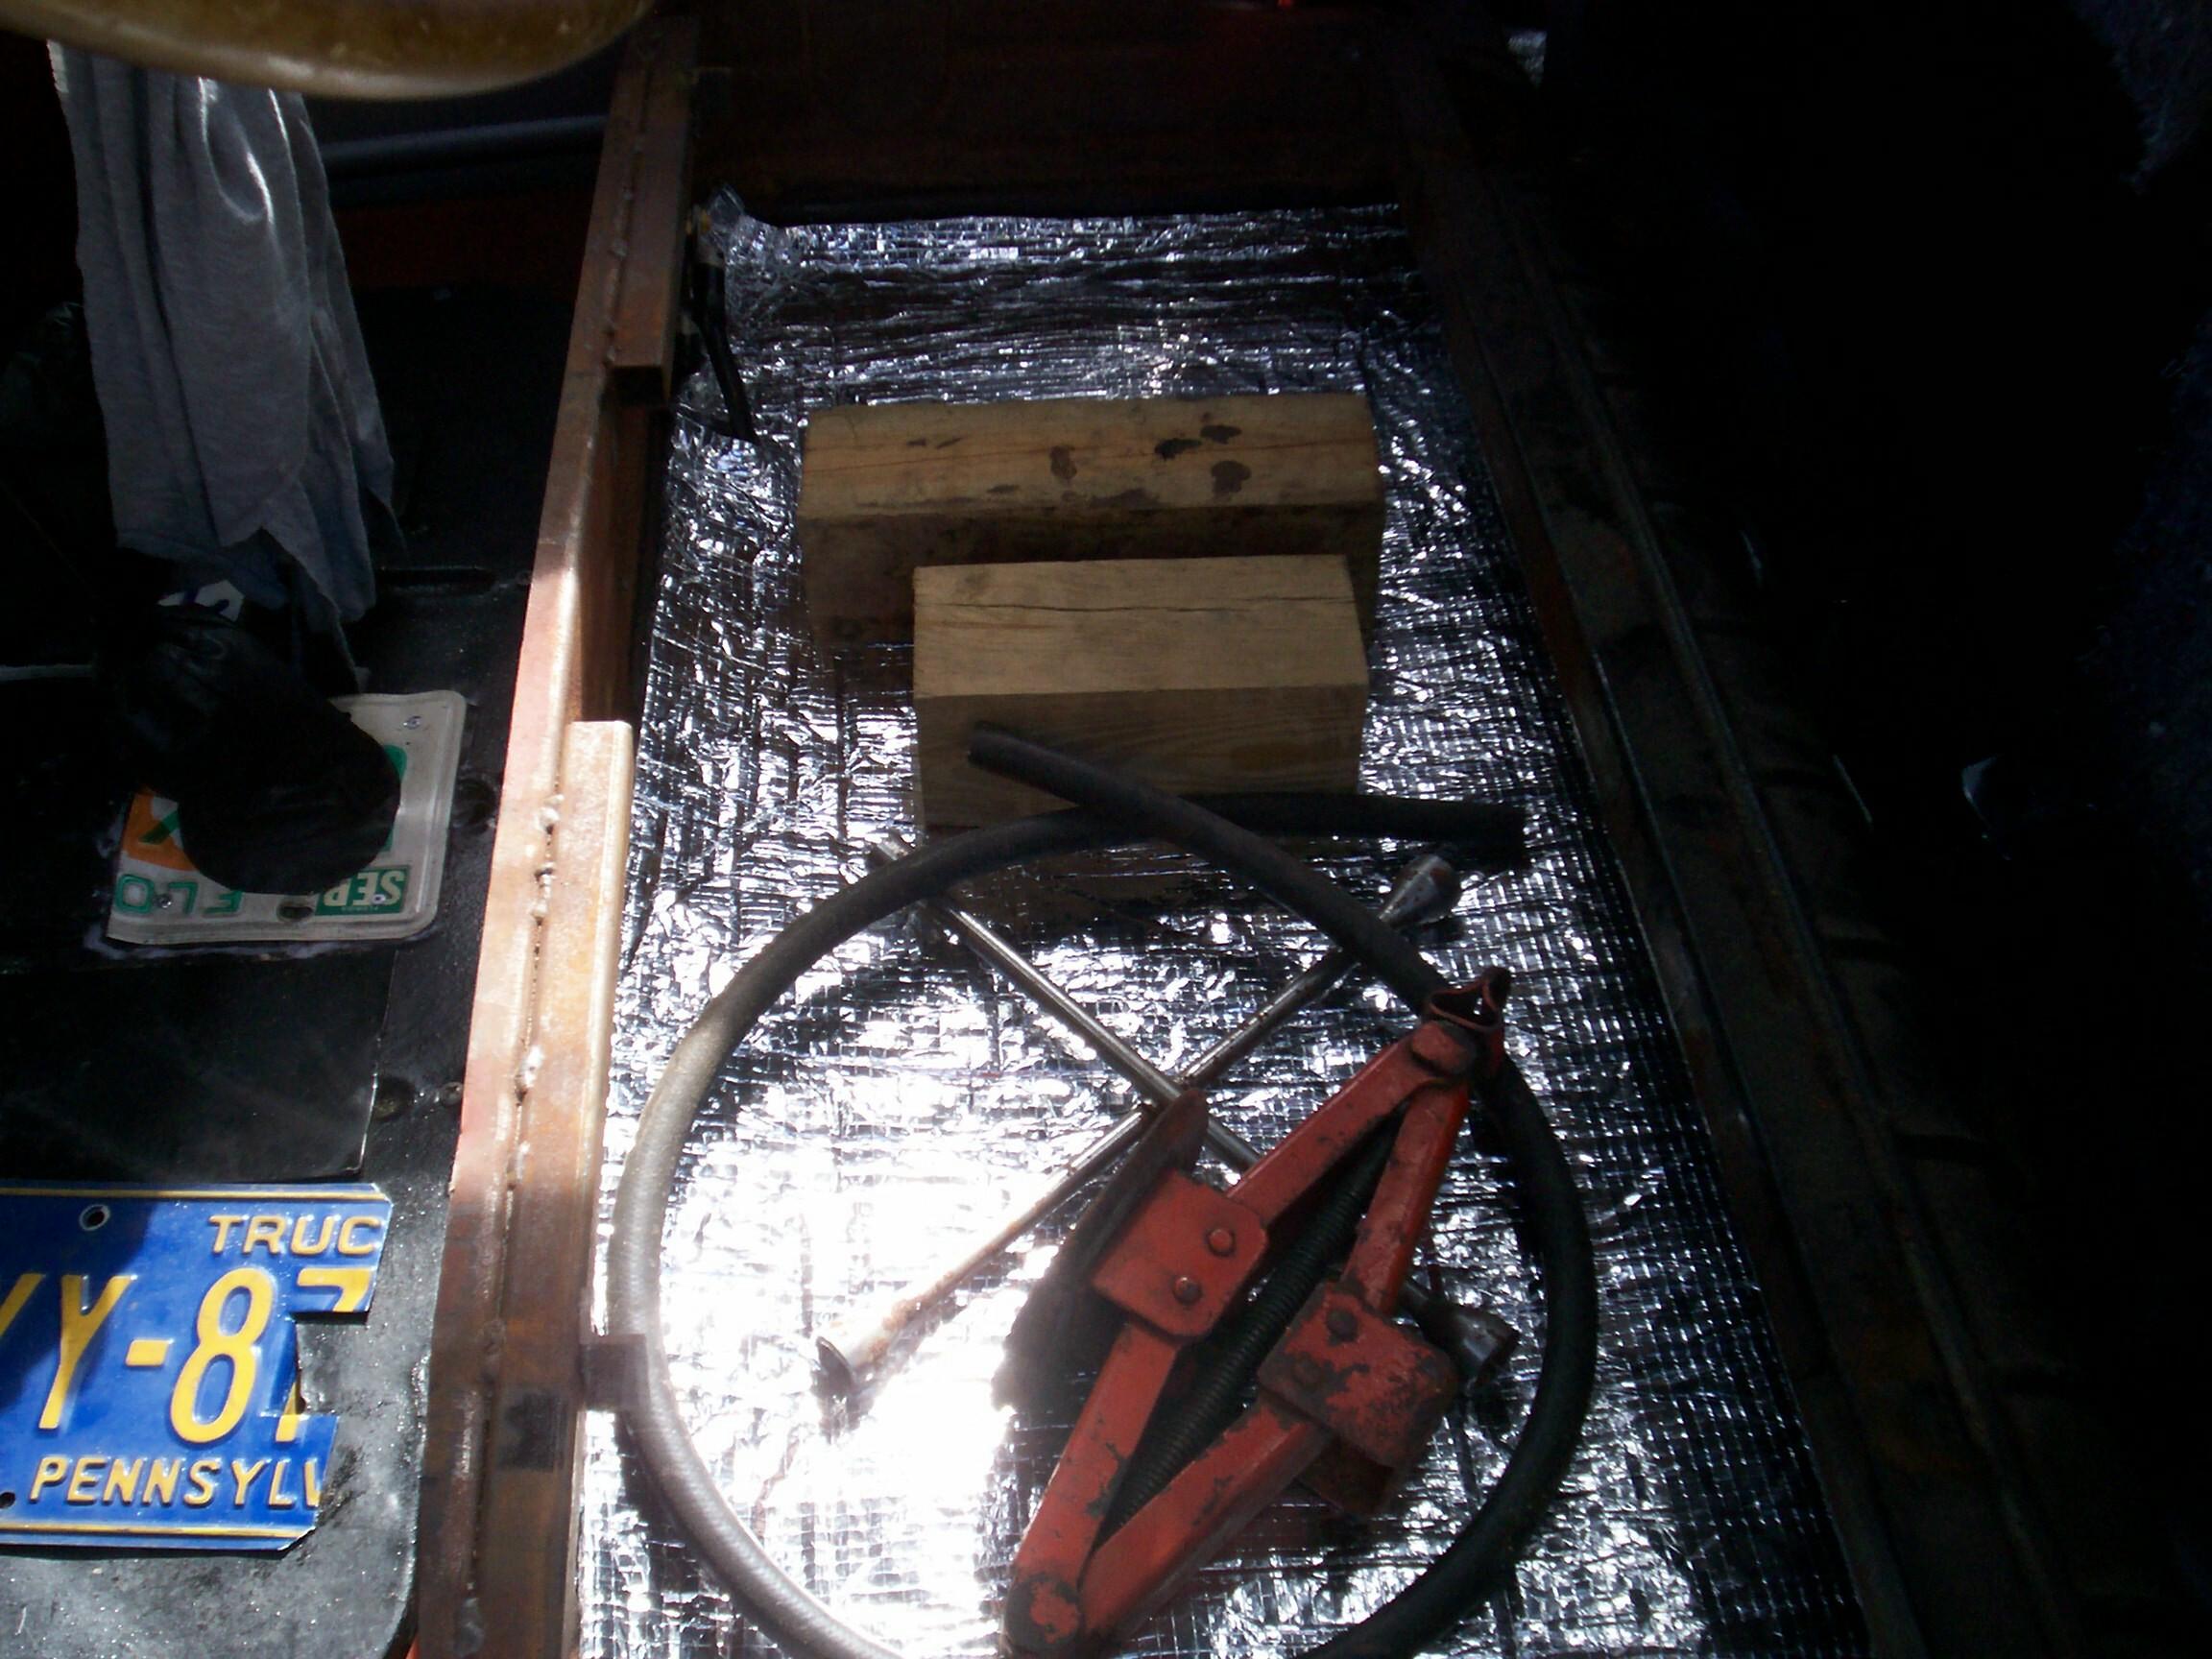 I
put the fender cover back in and replaced the insulation with a slab of
3/8" fibrous insulation with foil backing on both sides. This was left
over when I put a new headliner in BillyBob sometime back and I found
it up at the warehouse a few weeks ago. Certain areas of the cab are
wet from the two day soaking and I'm not gonna attempt to glue and tape
any more insulation until things dry out again.
I
put the fender cover back in and replaced the insulation with a slab of
3/8" fibrous insulation with foil backing on both sides. This was left
over when I put a new headliner in BillyBob sometime back and I found
it up at the warehouse a few weeks ago. Certain areas of the cab are
wet from the two day soaking and I'm not gonna attempt to glue and tape
any more insulation until things dry out again.
December 20th 2009 Went to Champs "Happy Days" cruise-in in Pompano last nite by myself. It was "Chevy/GM" nite and about 25 cars showed. Mostly vettes and pro-street camaros and chevelles. A custom '48 chebby truck parked next to me. The car that made my day was a flat black '55 chevy 2-door sedan that pulled in with open pipes. It was a rat rod gasser with straight front axle, fiberglas tilt hood, plexi side windows. roll cage, halibrand wheels all around with small tires in front, slicks in back. I waited for the guy to tilt the hood but he went inside Champs to eat. Several of the pro street guys hovered around it and got on their cell phones. I expected Dennis Wilson and James Taylor to show up as it looked pretty much like the car in Two Lane Blacktop. Even had a rollcage with the spare slick where the rear seat should be.
When the guy came out of the restuarant, he walked over to have a look at Deerslayer and after a minute said that I had the best ride at the show. Jawboned with him for awhile. His name is Tom and he also has a '40 Jimmy truck that he's working on. I told him about OldGMCtrucks.com and hope he signs in there. He sez he's not much of a Intarweb guy. I went over to the '55 when he tilted the hood. Old school early 350 chevy with double hump heads, three deuces and magneto ignition. Steel headers dumping into open bucket collectors behind the front wheels. While some of the pro street guys standing around trailered their rides to the cruise-in, Tom and his wife drove this beast down from West Palm Beach. Hope to run into him again down the road.
 Chilly
today but the wind has died down. Gonna wait for it to warm up before I
go out and fiddle around with the trucks . . . By noon, it wasn't much
warmer but as good as it is going to get, I think. I started messing
around with the HEI dizzy first. As part of Deerslayers's first tuneup,
I got a new rotor and cap. I put the new rotor on with the old cap and
started it up because I wasn't sure if I guessed correctly when I
purchased a rotor and cap for a '82 S10 2.8L V6.
Chilly
today but the wind has died down. Gonna wait for it to warm up before I
go out and fiddle around with the trucks . . . By noon, it wasn't much
warmer but as good as it is going to get, I think. I started messing
around with the HEI dizzy first. As part of Deerslayers's first tuneup,
I got a new rotor and cap. I put the new rotor on with the old cap and
started it up because I wasn't sure if I guessed correctly when I
purchased a rotor and cap for a '82 S10 2.8L V6.
Okay, that worked so, the new cap was put on next. That worked too so, I got the timing light out, pulled the vacuum line off the dizzy and checked Tony's marks on the damper to see that total advance wuz still at 34 degrees. Looks good.
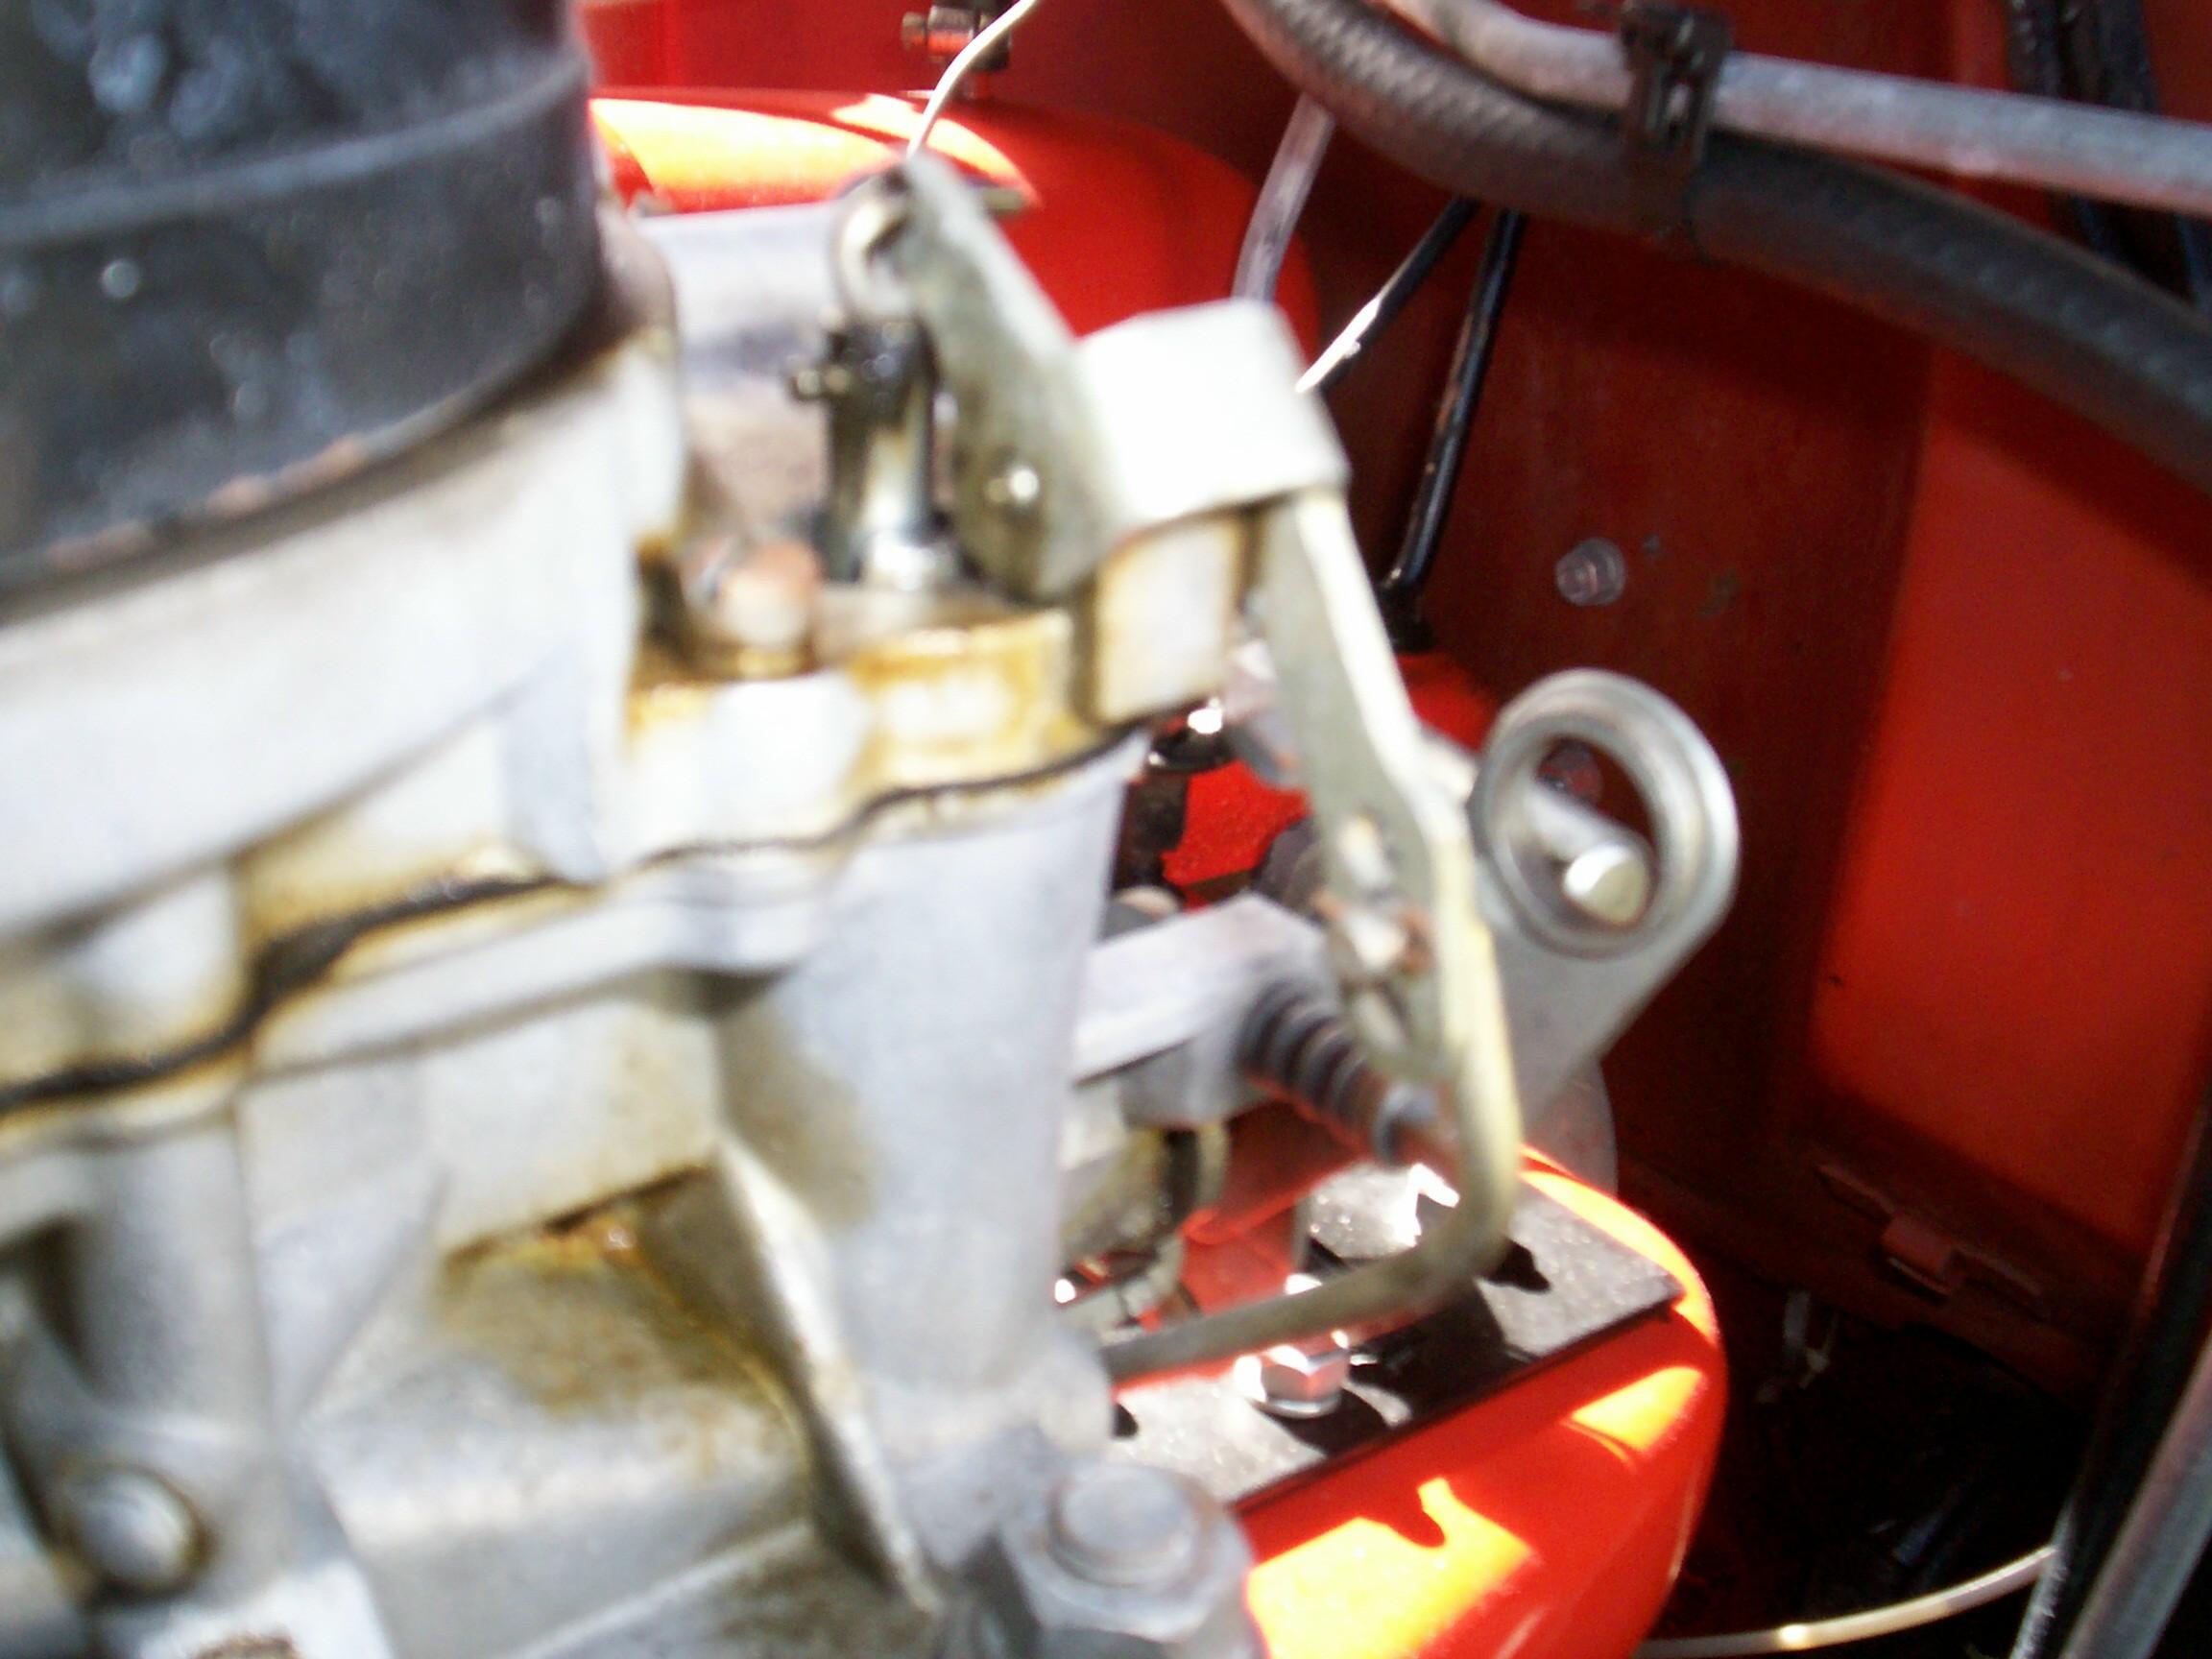 Messed
with the carby next and installed the "S" link on the acel pump as
directed by the CarbKing thread on the HAMB forum. I didn't note which
of the three holes in the lower rocker arm the other rod link was in
when I took it off to remove the rocker arm. Damnation! Okay, put it in
the middle hole and see it there's a problem . . . Seems okay. We'll
let it there for now.
Messed
with the carby next and installed the "S" link on the acel pump as
directed by the CarbKing thread on the HAMB forum. I didn't note which
of the three holes in the lower rocker arm the other rod link was in
when I took it off to remove the rocker arm. Damnation! Okay, put it in
the middle hole and see it there's a problem . . . Seems okay. We'll
let it there for now.
Good! I'm gonna grab a ceegar and sit in BillyBob's cab for a half hour while I exercise the stovebolt. This dizzy and carby messin' around is simple stuff but a real sense of accomplishment for a hotrod nancy boy like me. The only carb I've ever rebuilt was the Carter AFB on my '69 Javelin SST but that's when I was a kid and knew everything. I got it back together and was trying to dial it in when my Dad came home from work. It would start but wouldn't run below 2,000 RPM and even then the air sucking thru the carb sounded like a F-86 jet. Dad messed with it for a half hour and finally said "Something isn't right. You have to tear it apart again." Turned out to be a main body gasket that had a hole in the wrong place because I had bought a generic Carter rebuild kit. Even back then, it was hard to get the correct parts for AMC iron.
December 21st 2009 Went to the sunday nite cruise and chilled out in the parking lot . . . literally! The temperature went down by the minute while we were there. Most cars cleared out before the music stopped. My friend, Fred, was asking me about the HEI dizzy modules and he thinks the difference between the two (4 prong vs 7 prong) might be due to the fact that some of these distributors came with vacuum advance and some did not. Which is which tho' is still open for puzzlement because I couldn't get a good look at the connection when I had the cap off and I didn't want to mess up the silicon heatsink seal by yanking it out to see how many terminals it has.
December 26th 2009 Saturday morning again and I made it thru the Christmas festivities intact, more or less. Chilly this morning but good working weather under the shadetree otherwise. I went back to the cab insulation now that it has dried up in there.
 Moved
the seat out of the way and took out the two slabs of insulation that
Tony had cemented on the back of the cab, foil side down. Cut a
replacement piece of fibrous insulation to size for the passenger side
from the loose piece that had been under the seat and placed it foil
side up.
Moved
the seat out of the way and took out the two slabs of insulation that
Tony had cemented on the back of the cab, foil side down. Cut a
replacement piece of fibrous insulation to size for the passenger side
from the loose piece that had been under the seat and placed it foil
side up.
 Cut
another piece for the driver's side and glued it in. The White
Lightning contact cement was on the verge of not working because the
surfaces were too cold but I think these pieces are gonna stay put.
Pretty much finished with the insulation job for now 'cept for some
tweaks here n there. The areas of the cab that get wet are going to
require more thought.
Cut
another piece for the driver's side and glued it in. The White
Lightning contact cement was on the verge of not working because the
surfaces were too cold but I think these pieces are gonna stay put.
Pretty much finished with the insulation job for now 'cept for some
tweaks here n there. The areas of the cab that get wet are going to
require more thought.
I want to check the valve lash. I seem to have misplaced my remote starter to turn the engine over with. I went up to the warehouse to look for it but was unsuccessful. At least I got the Jeep exercised and I stopped at a FLAPS on the way back to pick up a K & N Filter Recharging Kit. I also found my drill bits again and brought them back to the Krash Lab to reside in the toolbox that my mind expects them to be in. After thrashing around in the Krash Lab looking for the remote starter switch some more, I finally gave in and ordered one online. Now that I've ordered another, I'll probably stub my toe on the one I'm looking for in the next day or so.
December 27th 2009 Chilly by Gold Coast standards again today. I started out by cleaning Deerslayer's air filters. There are three of 'em on the Jimmy 302 (2 crankcase vents and a carby) and this ritual will become part of the tuneup procedure. Pulled the crankcase vents first and knocked the worst of the built-up crud off before spraying down with K & N Air Filter Cleaner. Rinsed them with tap water after ten minutes and re-installed them to dry out. Then I did the same with the carby air cleaner. I will recharge them with K & N Air Cleaner Oil next week when I'm shure they're dry.
 Tony
installed a PCV valve in a hose that runs from the back of the valve
cover to the base of the Carter AFB carby. I decided to make a new PCV
valve a part of the tuneup routine. When I bought a replacement valve,
sometime back, with the rest of the tuneup parts, I made a WAG and
ordered one that "looked close". The Wild Ass Guess turned out to be
slightly off this time as the outlet turned out to be a bigger diameter
than the one Tony used.
Tony
installed a PCV valve in a hose that runs from the back of the valve
cover to the base of the Carter AFB carby. I decided to make a new PCV
valve a part of the tuneup routine. When I bought a replacement valve,
sometime back, with the rest of the tuneup parts, I made a WAG and
ordered one that "looked close". The Wild Ass Guess turned out to be
slightly off this time as the outlet turned out to be a bigger diameter
than the one Tony used.
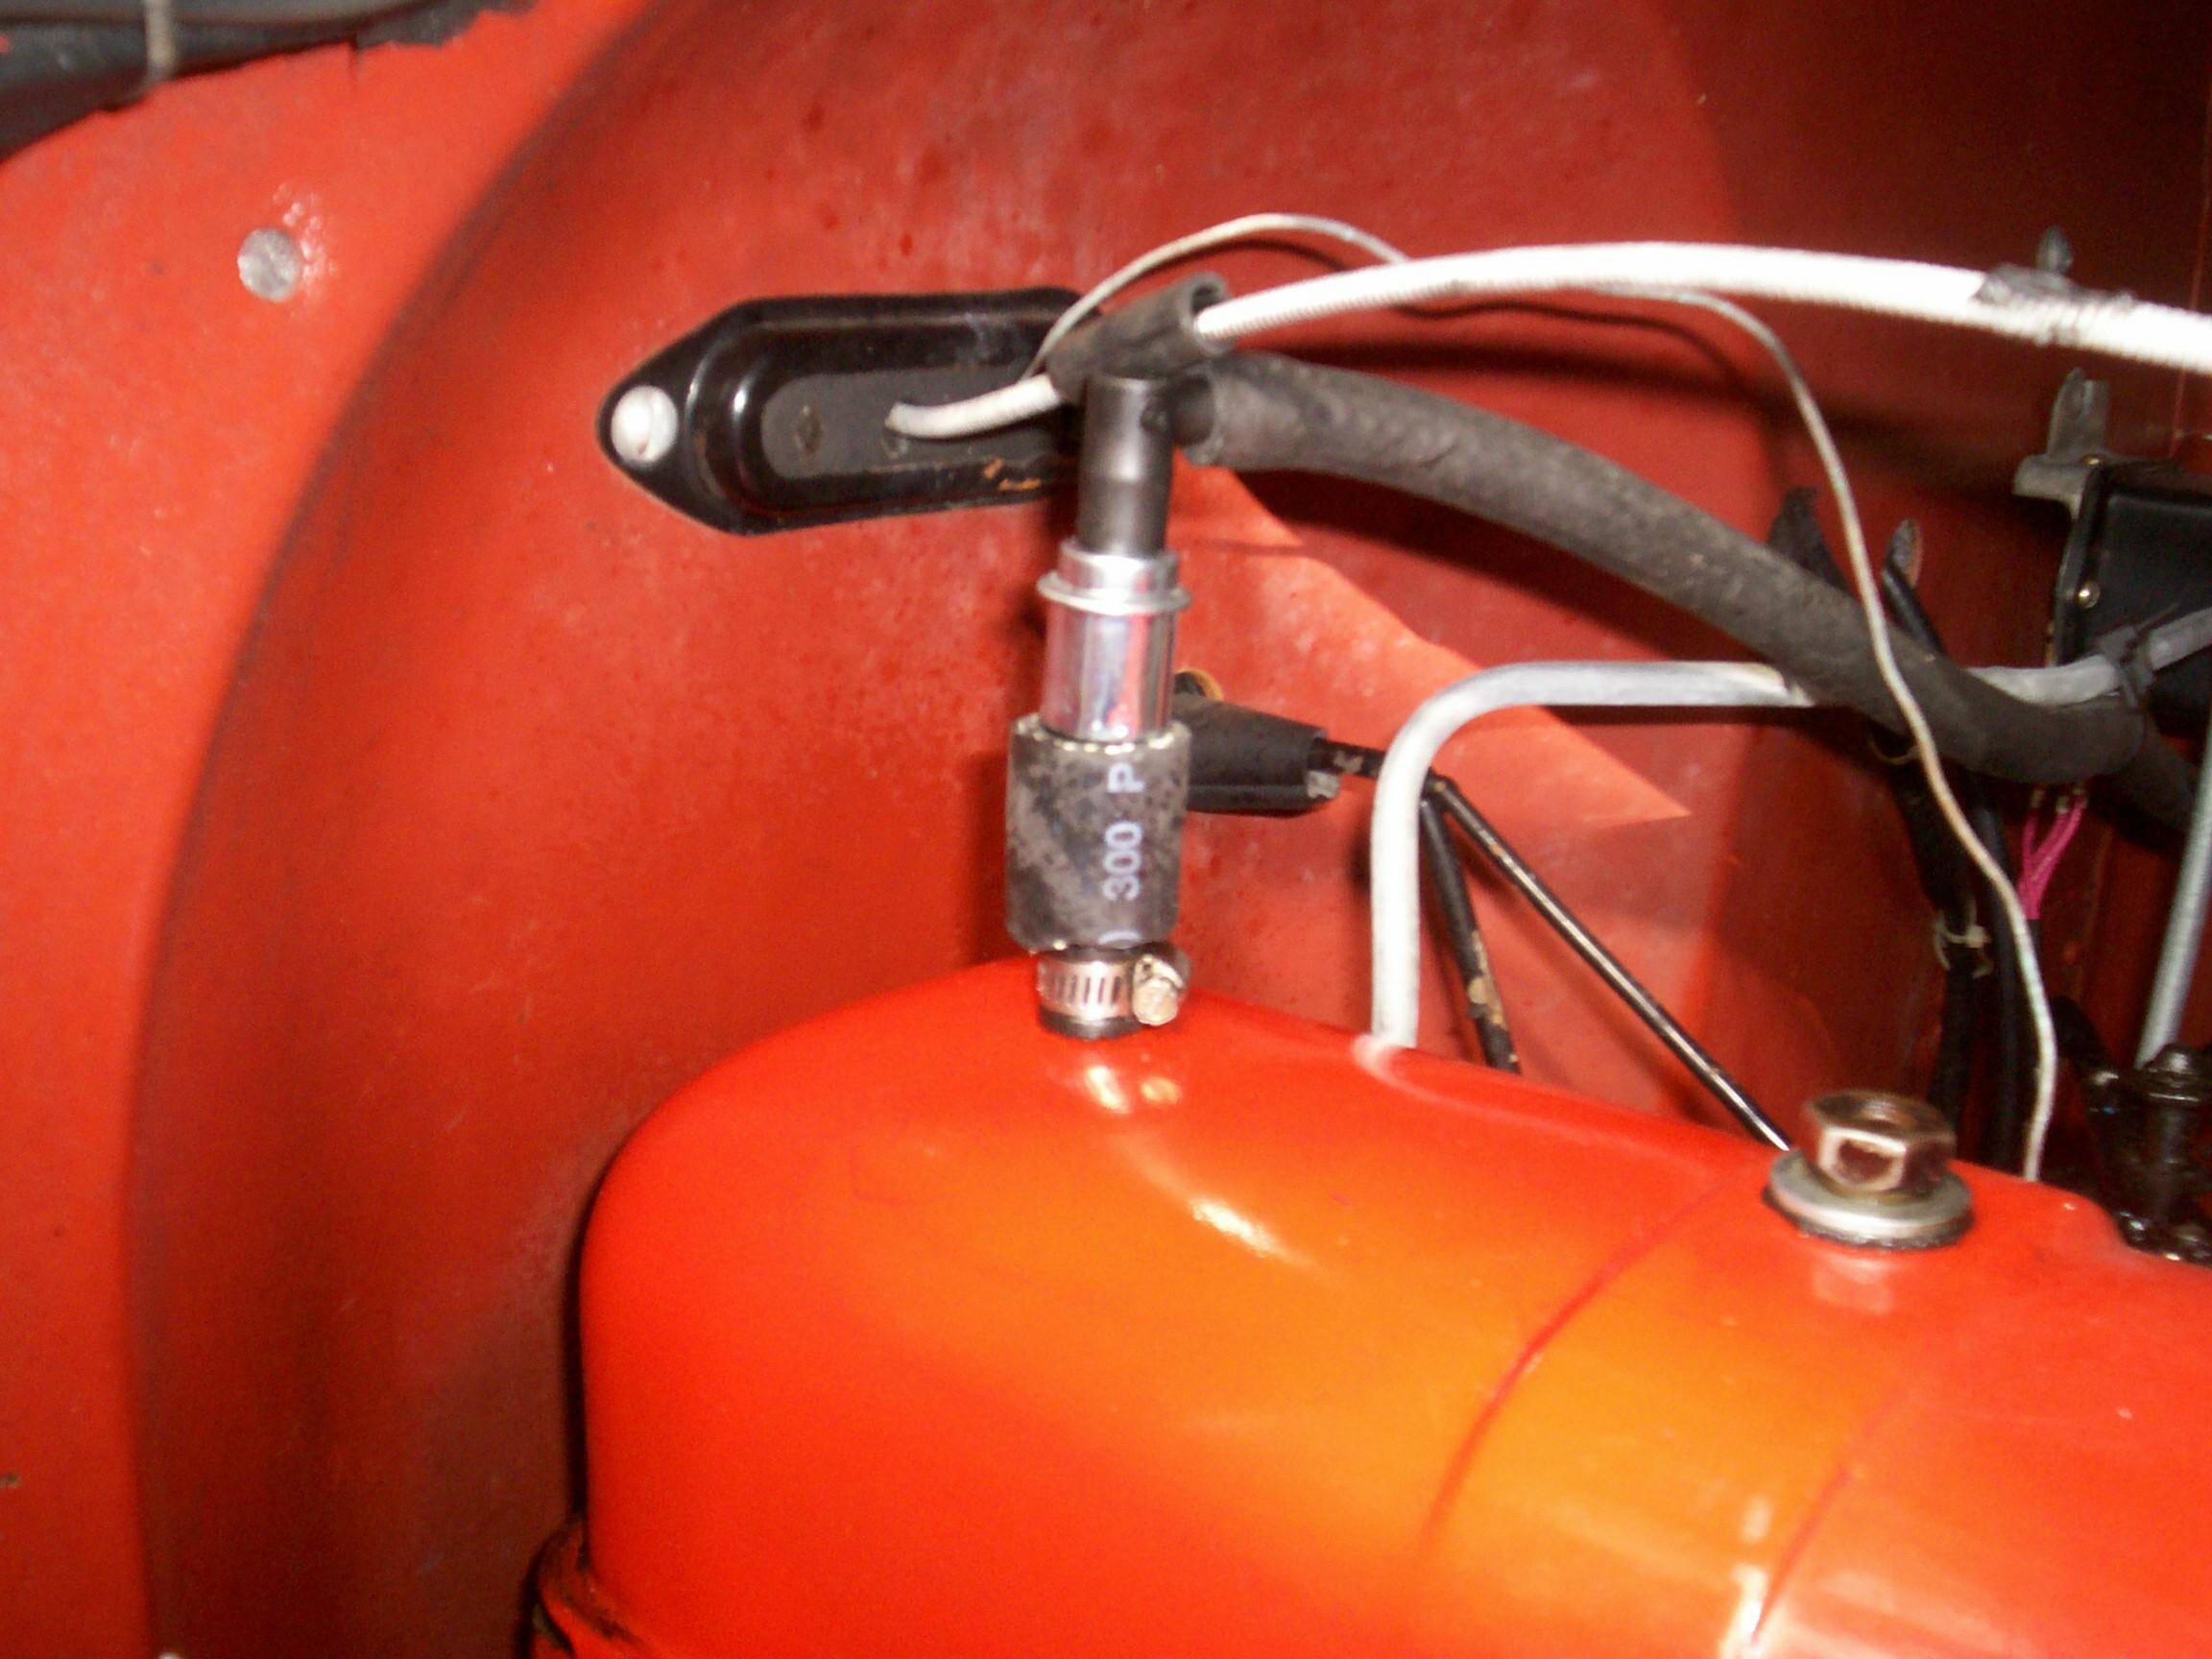 The
3/8" hose stub that went between the valve cover and the PCV valve was
not going to work with the new valve. I don't have much stuff here at
the Krash Lab but I did find 5/8" heater hose in BillyBob's long
distance supplies. I cut off a 1" length to fashion a "union" out of. I
knew that all my spare hose clamps were up at the warehouse but I
rampaged around the Krash Lab searchin' for some anyway. I didn't look
too hard. I knew that too many hose clamps were going to look like
hell. I found that the heater hose was a snug fit over the old hose
stub and a loose fit on the PCV valve. I wrapped the PCV valve
connection tightly with electrical tape (often Truckedup's weapon of
choice) until it too was a snug fit in the heater hose. I think this is
gonna work fine.
The
3/8" hose stub that went between the valve cover and the PCV valve was
not going to work with the new valve. I don't have much stuff here at
the Krash Lab but I did find 5/8" heater hose in BillyBob's long
distance supplies. I cut off a 1" length to fashion a "union" out of. I
knew that all my spare hose clamps were up at the warehouse but I
rampaged around the Krash Lab searchin' for some anyway. I didn't look
too hard. I knew that too many hose clamps were going to look like
hell. I found that the heater hose was a snug fit over the old hose
stub and a loose fit on the PCV valve. I wrapped the PCV valve
connection tightly with electrical tape (often Truckedup's weapon of
choice) until it too was a snug fit in the heater hose. I think this is
gonna work fine.
Okay, it's almost year end. I got more done this month or, at least I wrote more than I have in a long time. I've got a few hours before it's time to head for the sunday nite cruise-in and it's a good time to post this episode. Beer of the day is Sam Adam's Winter Lager. Happy New Year everybody!
| < Back
to Intro |
You can email me at ![]() webmaster@laroke.com
webmaster@laroke.com
Issued Sunday December 27, 2009
Updated Monday May 7, 2018
copyright © 2008-2018 Larry R. Kephart all rights reserved
| | LRK Home | | Bio Info | | Krash Khronicles | | LAROKE | |
| | BettyLou | | BillyBob's Garage | | Rat Patrol | | Deerslayer | | Elvira | |
| | Land of the Free and Home of the Brave | |
| | Keppylou's Art | | WWI Soldier's Diary | |